KONICA MINOLTA 5600HS D SERIES
Wireless Flash for the Common Man
 By MIKE PASINI
Editor
The Imaging Resource Digital Photography Newsletter
Fortunately, the age of dSLRs for the Common Man has dawned. The Canon Digital Rebel lightened the sky, the Nikon D70 evaporated the dew and a whole new slew of products are making it a gorgeous morning. We can hardly wait to break for lunch.
But it isn't only the dSLR that has become affordable. Some rather exotic complementary technologies are also tempting the old credit card. Take, for example, wireless flash.
Dave has written enthusiastically about Nikon's wireless flash system, both in Nikon dSLR reviews and PMA show coverage. "The SB-800 and SB-600 strobes look like standard on-camera flash units, but their capabilities go way beyond anything most of us would expect from such compact light heads. They have two amazing capabilities that combine to make for a portable lighting system of unparalleled flexibility. The first amazing trick is that they offer true TTL (through the lens) metering for wireless flash exposures, regardless of how many strobes you have slaved together for any given shot. The second, really amazing feature is that you can control the exposure and operating mode of up to three separate groups of flashes independently from the 'master' SB-800 attached to your camera."
See his video demonstrating the use of an SB-800 and three SB-600 units and a folding, portable light box to shoot cameras and other products at PMA (http://www.imaging-resource.com/EVENTS/PMAS05/PMAS05VIDEO.HTML).
Canon, too, has a wireless flash system, but the granddaddy of them all is Konica Minolta's, which was developed nine years before Canon introduced their system.
Recently, we got our hands on a Konica Minolta wireless flash designed for Maxxum, Dynax and DiMAGE cameras. We'll explain (http://www.imaging-resource.com/ACCS/56H/56H.HTM) how it works, how to set it up and what to watch out for. Note, however, that each camera works differently with this flash. See your camera manual for the specifics.
A LITTLE BACKGROUND MUSIC | Back to Contents
After shutter lag, the big disappointment in digital photography has been red-eye. Those cute little digicams never seem to have their on-camera flash far enough away from the lens to avoid red-eye. We're delighted to see Kodak and Nikon implement in-camera red-eye removal, but the prize-winning trick is to avoid the problem in the first place.
 |
| Basic Bounce Position. Fire the light at the ceiling. We prefer to use a white card (some ceilings aren't white). |
Changing the angle of the flash, so it can not bounce off the back of the inside of the eye is the solution. And there are two ways to do this:
- Bounce the flash (preferably off a known reflector)
- Move the flash off the camera
When you expose for flash, the strobe itself becomes the shutter, illuminating the subject for a fraction of the time the shutter is open. Controlling the duration of the flash, rather than the shutter speed, is the first key to successful flash exposure.
When you move the flash off the camera, this gets tricky. If the flash takes the sensor with it, proper exposure is monitored at the flash position, not the camera position. Often this isn't a big deal, but it's a loss of precision that can cause inaccurate exposure.
Some flash units use a detachable sensor you can mount on the camera and cable to the flash. But cables tie you down. A better approach is to use the camera to control the flash with through-the-lens flash metering. The sensor is behind the lens at the sensor plane and monitors the light where it matters most.
The second key then is to establish communication between the external flash and the camera. A slave flash, for example, will fire when prompted by a main flash or a filtered main flash for a set duration that isn't monitored. Ideally, you'd like the camera to set up, trigger and control the remote flash. Wireless communication lets you do that.
Consequently, you have to get your wireless flash from the guys who manufactured your camera. If you have a Nikon dSLR, you'll want a Nikon SB-800 or SB-600. And, in this case, for a Konica Minolta 7D, we had a Maxxum 5600HS D Series.
At $299.99, The 5600HS isn't inexpensive for a compact strobe, but reasonable for a powerful wireless flash. In addition to providing off-camera wireless flash capability, the unit boasts significantly increased range over the built-in flash and five-flash-per second continuous flash performance.
The 7D's on-camera flash ranges 39 feet at ISO 100 with coverage equal to a 24mm 35mm lens. At ISO 100 and full power with a coverage setting of 24mm, the 5600HS reaches 82 feet in wireless mode and 98 in normal mode. At ISO 100, the unit has a guide number of 100 or 184 feet.
Flash coverage can be set from 17-85mm. Coverage is automatically set from 24-85 using the Auto Zoom function. A built-in wide angle adapter flips over the flash lens to provde 17mm coverage. You can also set coverage manually to 24mm, 28mm, 35mm, 50mm, 70mm and 85mm equivalents.
You can throttle the power level down from 1/1 to 1/2, 1/4, 1/8, 1/16 or 1/32 settings. That's handy for manual mode.
The flash head rotates up to 45, 60, 70 and 90 degrees; down to 10 degrees for close-up photography; to the right at 30, 45, 60, 75 and 90 degrees and to the left at those same settings plus 120, 150 and 180 degrees.
The five-flash per second continuous flash performance is calculated on a 1/32 power level with Ni-MH batteries. You can get 40 flashes at that clip.
At 3x5.2x3.75 inches at 13 ounces (without batteries), the 5600HS fits the standard compact flash profile.
AA batteries power the 5600HS. While you can pop alkalines, lithiums or Ni-MHs into it, performance varies depending on the power source.
Konica Minolta manufacturers a number of accessories for this unit, including an off-camera cable, off-camera shoe (to match the proprietary connector to standard hot shoes), extension cable and a cable CD and triple connector for multiple flash units. An external battery pack holding six AA batteries reduces the charging time by half and doubles the number of flashes possible. And a bounce reflector set (V) includes an adapter and a large fabric reflector that folds up for transport.
Sto-fen (http://www.stofen.com) offers a version their Omni Bounce for the 5600HS, too.
Along with the flash unit itself, Konica Minolta includes an attractive leather-like case and a small stand that adds not only feet but a tripod mount to the 5600HS.
The unit also ships with a comprehensive instruction manual.
A SHORT TOUR | Back to Contents
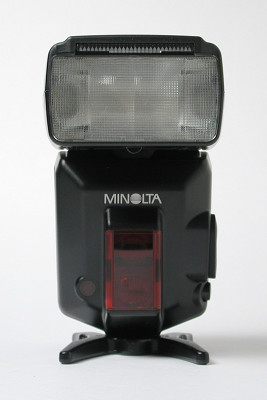 |
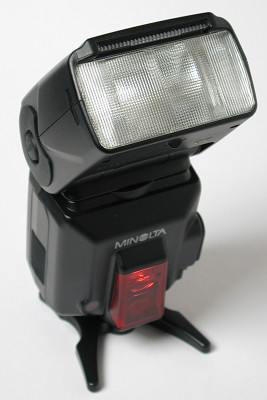
The front of the 5600HS is dominated by the flash head's lens and flash tube at the top. On the main body, the wireless/remote control signal receiver sits to the left of the autofocus illuminator.
 |
On the left side of the unit (looking at it from behind), the terminal cap with its accessory terminal and external power terminal sits above the mounting foot release button.
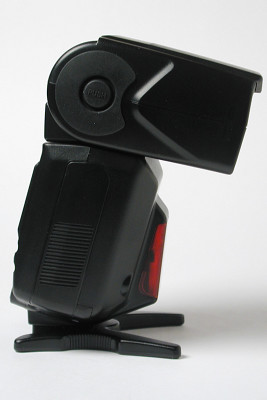 |
| Head is dropped into macro position. |
On the right side, the head contains the bounce lock release button while the body features the battery chamber door.
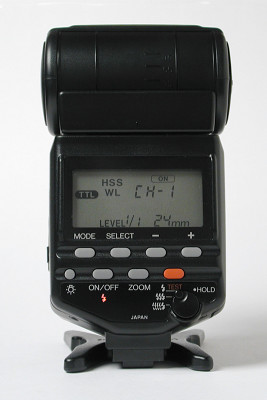 |
On the back, the head has an engraved bounce angle scale. The body is dominated by a large black and white LCD data panel below which is a control panel of a number of buttons.
The control panel's first row of buttons consists of the Mode button, Select button, Minus button and Plus button. The second row holds the data panel Illuminator button, Flash on/off button, Zoom button and the Test button. Below the Test button is the Test mode switch, offering four options.
THE KM WIRELESS SCHEME | Back to Contents
Getting a grip on wireless flash is something of a goose chase. There's the flash manual, which often defers to the camera manual. And the camera manual, which can't speak for the flash. We found Gary Friedman's article (http://www.samys.com/articles/gary_friedman/flash.html) helpful in divining what neither told us -- but he was working with a film camera. To understand how the 7D digital Maxxum works with the 5600HS we asked Konica Minolta's Phil Braden. Phil had helped us find a few accessories.
It turns out that the 5600HS behaves quite differently with the 7D than it does with a Maxxum film camera. All exposure computing is done before the shot is taken.
When you press the shutter button on the 7D, Phil explained, a series of 14 preflashes are fired, one for each of the 7D's 14 metering segments. The 14-segment exposure sensor reads the reflected light and the exposure computer factors that information in with the Subject Focus distance and position reported in the viewfinder, the ambient light brightness and the Distance if a D lens is attached. The calculation also considers how much of the flash's capacitor is required for the right exposure.
Then the shutter release sequence starts, raising the mirror, closing down the aperture, opening the shutter and firing the flash at the calculated percent of its power.
"For example," Phil said, "say 76 percent of the flash's power is needed for a group shot at 18 feet. The release sequence starts, mirror lifts, aperture closes, shutter opens and the flash fires 76 percent of its power."
WIRELESS SETUP | Back to Contents
Bright scenes can make it impossible for the 5600HS to detect the signal from the built-in flash. Consequently, Konica Minolta recommends using wireless for interior or dark scenes rather than outdoor fill shots in bright sun. You can, however, get nice fill shots in shade outdoors.
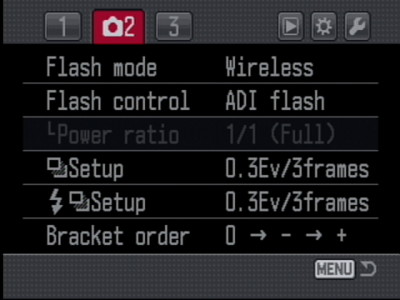 |
| The 7D Flash Setup |
Konica Minolta makes it pretty simple to get the 7D and flash into wireless mode. Just attach the flash to the camera's hot shoe, turn them both on and set the camera's flash to wireless. That will also set the flash to wireless mode and set the camera to the flash's wireless channel. Change the channel (there are four available) if you run into another 5600HS user and don't want to fire their flash for them <g>. You can then remove the flash from the camera and activate the built-in flash by raising it up so it can communicate with the 5600HS.
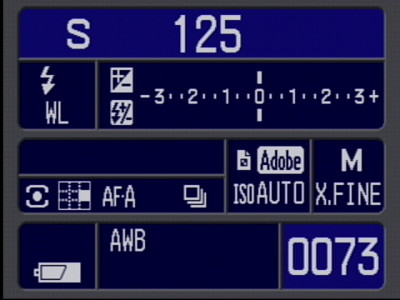 |
| Wireless Flash Active First box in second row shows status when built-in flash is raised. |
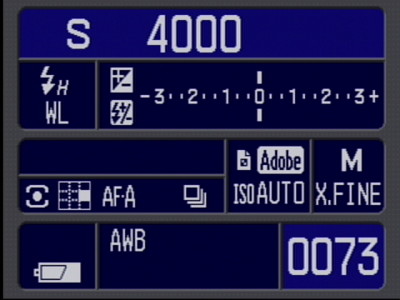 |
| With HSS Note the 1/4000 shutter speed at top |
Without a cord to tether you within range of the flash, you can move freely around the subject. But you do have to keep one angle in mind. "The camera signal burst must reflect off the subject and into the flash receiver," Phil explained. "If the distance is too great and/or reflection of the subject is too little, the signal gets lost and nothing happens." You can twist the 5600HSD body around to face the camera to improve the working distance.
Setting the shutter speed is something of a puzzle. Buckle up. With Anti-Shake on (which is built into the camera body of the 7D), flash sync speeds up to 1/125 second are available. With it off, you use speeds only up to 1/160. Since the strobe is making the exposure, not the shutter, there isn't any advantage to Anti-Shake unless you're using the flash for fill.
But this is all moot if you enable HSS -- high speed sync -- on the flash. You can then use any shutter speed up to 1/4000 second to sync with the 5600HS as long as the flash head is in the direct, not bounce, position.
HSS uses a preflash, Phil explained, to determine the brightness of the set of strobe bursts to keep up with the shutter when it's moving at speed above flash sync speed. Rather than fire an intense burst of light for a very short time, the 5600HS sends a series of smaller bursts in HSS mode.
"Press the shutter button and the preflash bursts fire for exposure computing, the computer determines the brightness of each of the short exposure bursts, the exposure burst sequence starts, the shutter passes through the multi-burst sequence and is exposed as if it were daylight," Phil said. "This is how it works for any speed above 1/160 up to 1/4000. However, the working distance for HSS is reduced as the shutter speed goes up and/or the aperture is made smaller."
You can also set the ratio of the 5600HS on the unit itself to be either half or twice the power of a second external unit. But this is option if off when using just the built-in flash (which is used exclusively to communicate with the 5600HS).
WORKING WITHOUT WIRES | Back to Contents
We tried a number of studio shots using the built-in flash to trigger the 5600HS remotely in both direct and bounce positions. We found ourselves spending a lot less time on adjusting settings than on modeling the light -- a nice change. You can see some samples shots in our illustrated review.
 |
| Macro We did pop a diffuser on the flash. It still figured out the exposure. |
With the flash out of arm's reach, how can you tell if it's charged and ready to fire? The Autofocus illuminator on the 5600HS blinks. Being able to turn the 5600HS body toward you helps here, too.
 |
|
 |
|
 |
 |
| Bounced Flash. We set the flash to bounce through a Sto-fen diffuser and moved the model (hey, he can hold a position) and the camera. |
|
A test shot is all you really need to evaluate your setup on a digital camera, but the 5600HS does have a modeling feature with several options to fire the flash without making the exposure. Just press the 7D's AEL button to fire a test flash. Firing once at the set light level can help calculate flash with a flash meter (which is otherwise confused by the preflash and wireless flash communications). You can also fire the flash three times at the rate of two flashes a second to evaluate shadows. Or you can fire it four seconds at a rate of 40 flashes a second, which helps evaluate shadows in macro setups.
We proved to ourselves that a dumb slave will be fooled into responding to the preflash. A smart slave might be set to ignore the preflash but the added light won't be part of the exposure calculation. So it will inevitably overexpose. When you go wireless, every flash has to be wireless. Alternately, you can use the 5600HS in manual mode.
The highest reading on our Quibble Meter was recorded by Konica Minolta's non-standard hot shoe. We wanted to mount the 5600HS on a standard pistol grip, but that requires the hard-to-find $40 OS-1100 adapter to do that.
And that's our second quibble. Konica Minolta accessories are hard to find. We had no luck with the local photo shops. But we did finally find that $40 OS-1100 adapter as well as a T-ring to do some scope shots with the 7D at B&H Photo (http://www.bhphotovideo.com).
And finally, we would have liked to have seen a built-in bounce card like the Nikon SB-800. The 5600HS already has a built-in 17mm wide angle adapter, so adding a bounce card wouldn't be too difficult. And it would get a lot more use than the 17mm adapter.
These complaints aren't quite deal breakers, though. Which is why we call them quibbles.
We've been pretty old school when it comes to strobe lighting. We use bounce flash, set the camera's f-stop and shutter speed manually and locate our guns where they'll flatter the subject.
But we've been charmed by wireless flash. Losing the cord makes a big difference both in setting up the lighting and composing the shot. You can put the flash where the light will most flatter the subject. And you can change position without worrying about affecting the exposure. That's nearly as good as shooting in sunlight!