PASINI REPORTS
Apple TV -- An Idea Whose Time Has Come
Editor
The Imaging Resource Digital Photography Newsletter
Late Thursday, Apple stores began selling Apple TV, Apple's latest innovation. We tied our shoes, erased our memory card and stuffed our pipe with pipe dreams to set out in search of the mythological creature.
It was just as easy to find as we had heard. The store window was decorated with a silhouette of an appreciative audience watching an ad for the new box. "If it's on iTunes, it's on TV," the text above them read.
But finding the box inside the store took connections. We asked an idle fellow in a black mock turtleneck where the HD it was. "Oh, right here," he said, pointing behind the counter to the sales credenza with a small group of highly prized small packages. It was right to the left of the iPods.

Apple Store. Not quite everything in iTunes plays, though.
We took a few pictures to prove we aren't making this up before a security guard informed us that photos were somehow frowned upon. Odd, we thought, considering this particular box attracted us simply because it promises to display our images on an HDTV. Still, we apologized gracefully and went on our way.
Not before, however, we had managed to acquire one of the boxes by quite unusual means (for a reviewer). But considering Apple's liberal return policy (minus a 10 percent restocking fee if we don't have a clue how to break the thing), how could we lose?
BACK AT THE RANCH | Back to Contents
We had done a little research before setting off. All we really needed was the box and an HDMI cable. Our HDTV has two HDMI ports, one of which was unoccupied. Radio Shack recently advertised a six-foot HDMI cable for under $50, a miracle where these things easily go for $99 (unless you buy online from some place like monoprice.com).
More Photos? Sure, we've
got an installation gallery and
an in-action gallery.
But we were delighted to see the Apple store had XtremeMac HDMI cables for $20. Apple has this way of removing impediments to closing the sale, we've noticed. You know going in that you can't get this cheaper anywhere and that it's available. If you need a cable, here's one at a good price. You can, we hasten to point out, also connect to a TV using component cables.

The Boxes. The MAC addresses are printed on the box, BTW. The $20 HDMI cable comes with a free Audible.com download.
So when we got back to the ranch (or bunker, as we more accurately call it), we had everything we needed.
HARDWARE INSTALLATION | Back to Contents
The box is really a slipcase. You know, like the Library of America ships its classics of American lit in. Slide out the black enclosure with "Designed by Apple in California" foil stamped on the cover, untap the closed end and you have the box on one side above its power cable and software and the remote on the other. Two pieces. Simple.
Well, not entirely simple. Extracting the remote seemed tricky until we noticed the small flap designed to help us. Pull on the flap and the remote pops out.
The box itself is surprisingly slim, about as high as an external hard drive case (an inch, say). The front panel has a small power status light next to a larger IR receiver and the back panel has all the connections: power, USB, Ethernet, HDMI, composite video, analog audio and optical audio. WiFi is built in.
Inside is a 40-GB hard drive with about 33-GB free (a good chunk used by the stripped down OS X operating system) and a motherboard.

Setup. Pick a language you understand.
The black 5x5-inch User Guide is where we started.
You can connect the box to an HDTV with an HDMI port (for both video and audio), component video with separate audio (that's five connectors) or a DVI port using an HDMI-to-DVI cable for video plus a separate audio cable. You can also connect the box to a home theater receiver instead of an HDTV.
Our setup was just to plug into the free HDMI port on our HDTV. That's a very simple connection (if, uh, you can reach). Both audio and video come through the HDMI cable. HDMI cable connectors are generally a joke, flimsy and limp handed, shall we say, but the convenience is undeniable. The connection the XtremeMac HDMI made, however, was surprisingly secure.

WiFi. It finds all the local networks. WEP and WPA are both supported.
The next step is to connect to your network. There are two approaches here. If you have a lot of data to sync, the smart thing to do is connect via the Ethernet port. That's faster than WiFi. In our case, concerned most of all with photos, either would work fine. If you're making a WiFi connection to your network, you don't really have anything to do. Apple warns about blocking the top of the box, which can cause interference with the wireless signal.
Then you connect the power cable to the back of the box (shove hard and wiggle) and to a power outlet (both prongs are normal size). Make sure the box is securely seated before you do that, though, because you're turning it on. It has a very nice soft, clinging bottom that won't slide around.
It's finally time to turn on the TV and select the box as the input.

Connections. All we needed was power (left) and HDMI.
You go through an initial setup routine that prompts for language, a network, network configuration and connecting to iTunes. As with any TV box, you just follow the instructions with the remote in one hand and your fingers crossed on the other.
SOFTWARE INSTALLATION | Back to Contents
The minute you plug in the box, of course, the hard disk spins up (quite silently) and the status light flashes yellow. It turns solid green when the box is booted.
By then, we had turned on the HDTV and selected the input for our second HDMI port.

Stacked. Apple TV installed.
At this point, you're really configuring the software to display content.
Using the remote, you answer the prompts on the screen, scrolling with the arrow keys to the right option and pressing the center button to select.
It's actually pretty quick and painless (and even fun). First, you pick a language. Then a display resolution. Then you select a wireless network (imagine our surprise to find the nuns up the street have a network). Next, you select the security protocol for that network and a surprisingly efficient screen keyboard appears to enter your password. Kudos to the guys who designed that screen. We hate those things in general, but our password and the arrow keys made it a breeze.
When the box finds the network, you're treated to a little video eye candy that's a thrill to watch (considering the nuns up the street are our neighbors). Then the box tells you to launch iTunes and enter a secret pass code. We took a picture.
Syncing your box with iTunes (v7.1.1) is how you put content on it. We went back down to the bunker to launch iTunes.
In the left hand panel where your playlists are, you'll find a Devices list. Your Apple TV should show up there. Click on it and you'll be prompted for the pass code. Once you type it in, you can name your box and register it. Then you can start syncing your content.
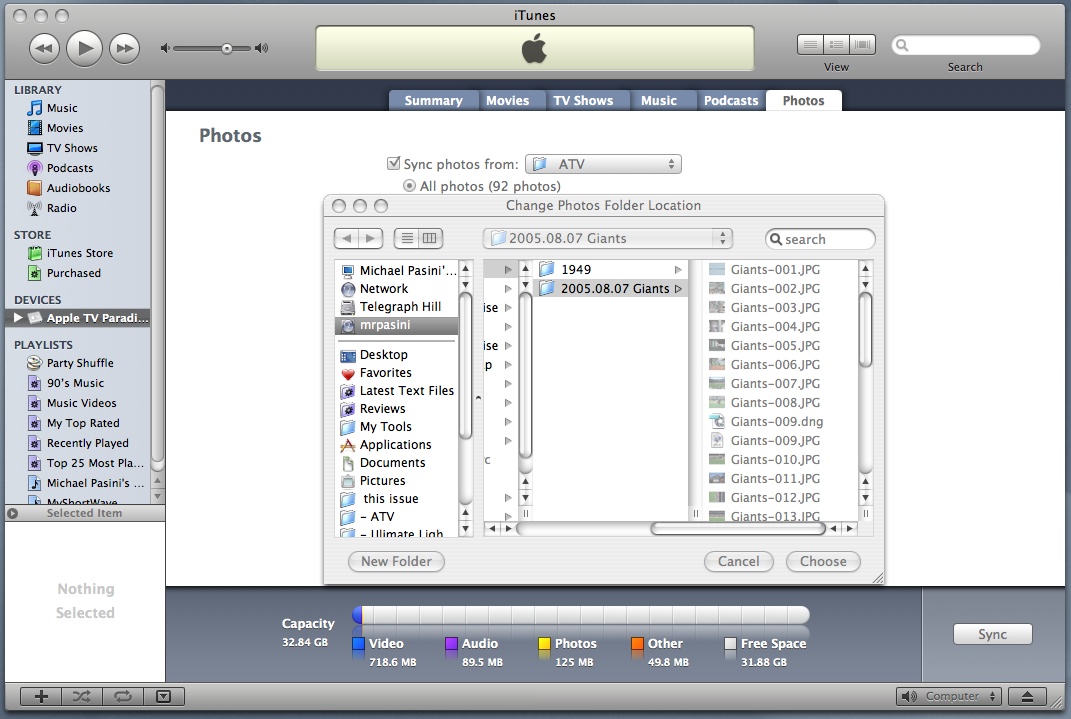
iTunes. We're syncing a networked computer's images.
The easy way to do this, it seems to us, is to select the Apple TV in the Devices menu and pick the content tab you want to sync. These include Movies, TV Shows, Music, Podcasts and Photos. In that order, too. So photos -- what we were interested in -- can get ignored.
Our music is on CDs so we can copy it freely. Our movies are on DVDs so we can play them on any device. But our pictures are trapped in our computers.
You do not, hurray, have to import your images into iPhoto for iTunes to synch them to your box. You can simply enable the "Sync photos from" option and use the pulldown menu to select a folder on your drive. You can then sync all of them or selected folders or images. You can also drag the folders around to change the order.
So we were able to sync from our current stash of images. That was about 840 images.
You can also stream content, which is tempting, although the content isn't recorded. Sort of Internet radio for TV. And we do plan to sync some Fotomagico slide shows with sound (those would be QuickTime movies), too.
Synching wirelessly does take some time. We might have disconnected the box at this point and plugged it into an Ethernet connection on our network to speed things up. But this is really how we'll use it, we told ourselves, and by then it was happy hour anyway.
And time to reflect on 1) the easy purchase with no deal breakers, 2) the elegant packaging, 3) the simple hardware installation and 4) the nearly fun configuration routine. All of which went flawlessly over a Wireless-G network with an Asante router, a Linksys router and an Airport Express router.
In fact, the box strikes us as the video equivalent of that Airport Express router. We really weren't sure what we could do with it when we first got it, but were intrigued by the possibility of streaming Internet radio throughout the house. It did that fine but it also gave us better coverage outside the walls of the bunker. We could look out over the ocean and pretend to work. It was just gravy that we could take the thing to hotel rooms to work wirelessly from the wired Ethernet connections provided.
So we're starting with a humble but seriously neglected desire to see our images in high definition on the big screen, which may just be the best digital frame in your house.

Sync. A progress bar (lower left) shows we're almost done.
It took a while to move over 800 images varying in size from 3-Mp to 11-Mp through our Wireless-G network. iTunes was on a box that has a wired connection to our router, so the only segment of the trip that was wireless was from the router to Apple TV. The slightly over 1-GB sync took about an hour. If it had involved just a day's event, we suspect it would have been reasonably prompt.
To test that theory, we set up a folder with 92 images copied from our collection, including Canon, Fujifilm and Nikon Raw images, totaling 402 megabytes. That's about what we'd shoot on the average outing. It took approximately three minutes to sync all that, well within range of everybody coming home, hanging up their coats, visiting the facilities and getting something to drink before sitting down to see the pictures.
We couldn't look at the box's disk to see what was on there, but iTunes does display a graph showing capacity with color keys for the various types of media. We did notice that our movie files were not included but our Raw format files were.
We weren't very selective about what we copied. Just all our recent images. Which was silly. You can't really pick and choose what to import from iTunes or what to display from the box's interface. We tried to sync from a folder of aliases, but that didn't fly. Next we'll try to sync from a folder set up with copied files we want to see on the big screen. A playlist for photos would have been nice, though.
Deleting content from the box is just a matter of deselecting it in iTunes and resyncing.
As an appliance intended to be left on, the box runs hot. Our Panasonic HDD/DVD/VCR with a 40-GB hard drive does not. It goes to sleep and is cool to the touch. But Apple TV is quite warm on top (not to remind you avoid blocking the WiFi signal but because it functions as a heat sink), about as warm as our heater vent when the heater is on. It won't burn you, but it's not comfortable.
For its part, Apple recommends using the box in a place where temperatures are always between 32 and 104 degrees F.

Remote. All you need (except Volume).
There's a lot of whining about the size of the hard disk in this box. We've never been one to think of these things -- whether it's an iPod or the HDD in our TV recorder -- as a permanent or complete storage device.
Do you need your entire music collection on your iPod? No, just create a playlist and sync for that session or day or week.
Same with your video and photo collections. And particularly TV shows. Sync them when you want to see them and forget about it after. Or just stream them.
So 40-GB seems about right to us for that usage pattern. Our images were nowhere near choking the thing. But ask us in about six months, after a couple of updates, if we still feel that way.
One more note about the $20 cable from XtremeMac. Included in the box is a coupon for a free download of one digital audiobook from Audible. There's a small but varied selection of books on disc to selected from. But that was a nice touch.
THE INTERFACE | Back to Contents
And, once again, we have to rave about the remote and the user interface. How many times have we had to scour a megabutton remote to find the right key and then been confused by a couple of options, picked the wrong one and gone down a road we didn't want to travel? Lots.

Apple TV Menu. A simple list.
But the interface for this box is almost clairvoyant. Hold down the Up or Down key on a list, for example, and it flies faster over the entries, stopping the moment you release the key. In fact, we didn't even have to look at the remote. The ring of arrows, the center key and a Menu button below were easily distinguishable by their location.
And everything you might want to look for can be found, too. How do you update the box? It was just a click away from the main list. Our box reported it was up to date.
It's simply the best interface and remote for any television product we've ever seen (TiVo is second and nothing is in third place).
BACK TO THE SHOW | Back to Contents
You can't select which images to show, but you can change a number of slide show settings.

Slide Show Settings. Another simple list.
Those options include: Timer Per Slide, Music, Repeat (On/Off), Shuffle Photos (On/Off), Shuffle Music (On/Off), Ken Burns Effect (On/Off) and Transitions (which offers a selection).
Transitions. We went with the default.
Ken Burns Effect is on by default and makes a very pleasant experience, zooming and panning (but not rotating) your images. But it's not particularly intelligent, of course, so it can inadvertently crop out important parts of your images. Cropping is how it works (or there's nowhere to pan), so if it's important to see the whole image, just turn it off.

Photo Menu. Two options in our case.
BTW, once you have images on the box, it uses them as a screen saver and even as a theme for the Photos option. That's a nice touch.
OK, so now that our images are on the box and our options have been explored, we're ready to see our images on the big screen.
Wow. Just gorgeous. Really sweet. OMG.

Slide Show. Good enough to eat.
Our Panasonic recorder has an SD slot where we entice visitors to insert their digicam cards. We copy their images to the Panasonic HD and play them on the big screen -- which is always a hit. So we know what a high res display of a still photo looks like on this screen.
And Apple TV doesn't improve on that, of course. It just extends that from what we can get from the SD card reader to what we have on our computer. Which was what attracted us to this box when we saw it at Macworld Expo in January.
The slide show, enhanced with the special effects, is superior to what the Panasonic does. And the remote again seemed to read our mind. Pressing the Pause button did indeed hold the image if someone had to leave the room for a minute. Pressing the Right button didn't skip ahead, but that's probably a because the Ken Burns effect was on.
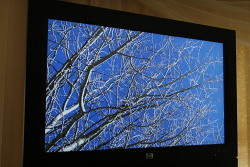
Slide Show. Detail was great. Tone and color tweaked by our monitor settings were also excellent.
We have a bright 8-inch digital photo frame here for review and that's a big hit among our visitors. They like being able to see some photos (theirs or ours) without having to utter any special incantations over a keyboard. But it's a small screen and it displays only a subset of a photo's colors. It does a nice job, but we wonder what's the point of having a blank framed screen staring at us. You can, but we don't, leave it on all the time.
How you use a digital frame is a conundrum, consequently. But how you use a TV isn't. And a large screen HDTV just seems to make the most of your digicam's images, the way a 13x19-inch print flatters those images you flip through when they're just 4x6 prints. An HDTV may be the best digital frame you ever own.
We tried to sync a video podcast of Meet the Press to the box and it did copy it over but wouldn't play. The box is particular about what formats it will play and apparently this one didn't qualify. So it isn't quite true, as it says on the Apple Store window, that if it's on iTunes, it's on TV.

iPod Movie. Letterboxed but really not enough resolution for the big screen.
Digicam movies didn't make it either, as we noted above. No doubt there's a few ways to convert them to the right format. Leading candidates are QuickTime Pro's Export to Apple TV and VisualHub (can Roxio be far behind?). Just one more task for our virtual intern here.
Movie trailers were available but we found it a bit frustrating to watch them. The first few minutes would download in the blink of an eye, but our connection (the fastest DSL you can buy) apparently couldn't keep up with the box. Right in the middle of the trailer, it would freeze and the download would try to catch up -- but never did. We just got into the habit of watching half a trailer and then hitting the Menu button to revisit the list.
The next night, however, performance improved dramatically. We were able to watch quite a few trailers all the way through with no interruption. Just as we were about to cheer, though, the interruptions came back. It seems as if the trailer server just gets overloaded, but we didn't do any formal testing to nail down the culprit.
We built a short slide show in Fotomagico Pro 2.0, exporting it as a 720p movie. That wouldn't sync. So we exported it for iPod and that did sync, although it wasn't the resolution we wanted. Fotomagico has a lot of presets, but it also lets you customize how it exports a movie. So we tried a DVD export at 720 with H.264 compression. That wasn't quite it either, but VisualHub knew what to do with it. It took over half an hour to create a 44.4-MB file but it looked good on HDTV.
iTunes will report what problems your content has. The Device menu listing for your box will have a caution icon to the right of it. Clicking on the icon will display a list of the problems.
Which is very nicely displayed using Quarz graphics, apparently. Posters are shown alongside the list and then zoom down to postage stamps above the text description of the movie.
There's a music library on another Mac in the house that feeds an iPod and we'll try to sync to that for sound. But our machines are rather pressed for free space with lots of large images, so content like movies and audio are better left on portable media like discs.
Sometimes you don't need a home run to win the game. A walk can force in the winning run. That's pretty much how we feel about Apple TV after one day with it.
Apple has leveraged its investment in OS X (both the graphics engine and image format parsing), its investment in iTunes (both the software and the store) and its investment in wireless networking to load the bases. While the rest of the industry tries to find a way to wedge image display into the home theater with one or another incomprehensible scheme, Apple has avoided swinging for the fences and brought home the winning run. We can see our images on our HDTV now -- and, yes, we're up on our feet cheering.
We still have a few experiments to try with this set up and we'll report back here when we sift through the results. So stay tuned!