FRIDAY AT PHOTOKINA
Offroad Interviewing
 By MIKE PASINI
Editor
The Imaging Resource Digital Photography Newsletter
COLOGNE, Germany -- Our plan to follow the imaging workflow layout of the exhibition halls took a turn off road today. After briefly covering cameras, software and printing on successive days, we felt the need to sit down and talk to a few people. Or buy new shoes.
|
Off-the-Wall Lomographers |
Fortunately we found a couple of very interesting guys. And some interesting things on our way to chat with them.
OFF-THE-WALL LOMOGRAPHERS | Back to Contents
We were attracted to a long wall covered by colorful 4x6 pictures. As we investigated, we realized we'd come upon something unusual. The hundreds of images were not taken by one person but by a group of people. They called themselves Lomographers. And, yes, they have a Web site (http://www.lomography.com).

The Wall. At 29 cents a print....
And that wall has a name, too. It's a LomoWall. They "encompass thousands of lomographs" provided by Lomographers. The photo mosaic is "a phantasmagorical visual flow where each single photo is as important as the ensemble." And they've been exhibited all over.
So what's a Lomographer?
"The entirety of Lomographers is known as the Lomographic Society: A wild, independent bunch of astonishing people -- individuals who thirst for excitement and hunger for pictures. Lomographers share a common goal -- to look at the world through the eye of the Lomographic lens-TOOLs; weaving their individual Pictures into the growing fabric of the Lomogrpahic Picture Universe."

How to be a Lomo. No user guide or quick reference but you get the idea.
Not making this up. We copied it right off the signs at their stand.
Of course there's an explanation for any fanaticism, and Lomographers have theirs. "In the early 1990s we, at that time students in Vienna, Austria, discovered a small enigmatic Russian camera, the Lomo Kampakt Automat, and started a new style of artistic experimental photography. Our approach: taking as many photographs as possible in the most impossible of situations, from the most unusual positions."
OK, we've done that. Sort of. But they go on, "The result was a flood of authentic, colorful, crazy, off-the-wall and unfamiliar snapshots, shot by many people -- the Lomographers -- mounted on LomoWalls encompassing up to 100,000 images at a time, and presented in major shows at various public and private locations, always accompanied by events with photo competitions, visual and music performances."
Which is where we, personally, draw the line.
But just when we thought photokina was about big glass, bodies that cost more than a Smart car, software that can swallow a paycheck whole and printers that can bankrupt the Soviet Union, here come a bunch of guys who know how to have a good time.
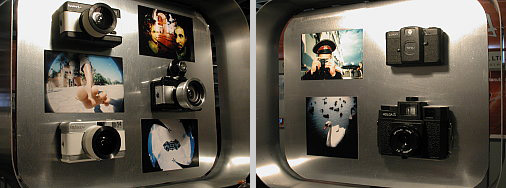
Lomocams. Sort of a hall of fame.
Not that Nurizen's Sebastian Schroder doesn't know how to have a good time. In fact, he seems to be having a ball with Acolens (http://www.acolens.com), his software tool to correct optical distortion, vignetting and corner softness.
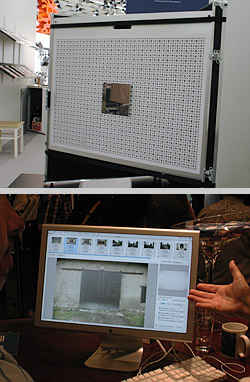
Acolens. The target with mirror attached and a corrected image.
He originally developed something like this for a large format camera manufacturer who, subsequently, quit the business and left him with all this interesting code. He released it on the Mac platform in July for $750 with very modest system requirements (10.3.9 and just 256MB RAM, although at least 512MB is recommended). You can also purchase a calibration target mounted on a polymer and aluminum base to keep it perfectly flat for another $800. The target comes with a magnet mirror you slap on the target to align your camera to the target.
But the company has already profiled a large number of popular Canon and Nikon lenses and plans to do more, offering new ones for free on their Web site. But, Sebastian told us, you don't really need to create your own lens profiles unless you are using custom or old lenses.
Each profile is a set of corrections at every aperture and focal length of the lens. Zoom lenses are profiled at the major focal lengths and you can use either the short or long one for images in between. The Acolens software actually includes the profiling software in it. "We use the same software as our customers," Sebastian explained with a smile.
Then he showed us how simple it is to create a profile by pulling up a target, entering the database information for the lens, clicking the center of the target and clicking a button to analyze the target. In just seconds, the target was overlaid with green marks to indicate it had calculated the deviations and created the profile.
To correct an image, you apply the right lens profile to it. The program displays the image after applying conservative adjustments to avoid loss of detail. Sliders for optical distortion, vignetting and corner softness can then be adjusted to your satisfaction. That's the part, Sebastian said, that takes a trained eye, not a smart algorithm.
The program does not do Raw conversion, but reads JPEGs and TIFFs. It also doesn't save Exif header data, which Sebastian finds unreliable. But if the image is 16-bit it remains 16-bit and if only 8-bit, it remains 8-bit. It can also apply ICC profiles to the images.
Because the profiles are lens-based, it doesn't matter what camera body you used to shoot the picture, he pointed out.
We asked about correcting chromatic aberration. It really isn't possible, he said. He could remove the colored fringe, but that's just color correction.
At first glance we liked the program well enough that we'll take a closer look at this new approach to optical correction in the months ahead.
INNOVA PAPERS | Back to Contents
Whether you're a fan of swellable or porous inkjet papers, one thing you probably miss from the old darkroom days is the rich texture of fiber printing papers. Innova (http://www.innovaart.com) has developed FibaPrintGloss, a digital equivalent using a titanium dioxide coating.

FibaPrintGloss. Framed and raring to go.
The coating is used in preference to barite coatings of the past to provide a perfectly flat, regular ink-receptive surface. Titanium oxide has the optimum cover strength of all white pigments to hold high contrast. The coating can be made with either a warm or cool cast and lasts for decades on an acid-free base.
Compared to Agfa's MultiContrast Fibre Classic paper's D-Max of 2.3, Innova's FibaPrint Gloss touts a D-Max of 2.7 with a consistently smooth surface that doesn't crack. Intended for pigment-based inks, it's available in sheets or rolls in four types including White Matte 280 gsm, White Gloss 300 gsm, Warm Tone Gloss 300 gsm, and White Semi Matte 300 gsm.
The science sounds good but the experience of seeing these papers and images printed on them was a thrill. This is one aspect of the good old days we can still enjoy!
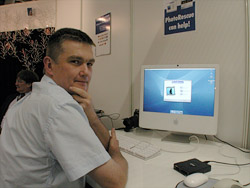
Pierre. Rare shot of Pierre not scouring his screen.
PHOTORESCUE'S NEW CLOTHES | Back to Contents
On the subject of thrills, one we hoped to have was meeting Pierre Vandevenne of DataRescue. We reviewed his indominable image rescue program PhotoRescue (http://www.datarescue.com/photorescue) some time ago, but we're still impressed with the kinds of deletions it knew how to handle that killed other utilities. When you accidentally erase the images on your card (and it happens to the best of us), this is the program to have.

PhotoRescue 3. New interface of signon screen (top) and Advanced recovery screen (bottom).
Just before we left for Germany, Pierre released version 3.0 of PhotoRescue. The new version has a completely new interface. And while it uses the same algorithms as the previous version, the recovery engine has been rewritten in C++ so both Windows and Mac versions can be updated quickly and simultaneously.
And with 4GB and 8GB flash memory cards proliferating, updates are going to be required. Incidentally, Pierre warned, make sure if you buy one of these larger cards that 1) they're compatible with your camera and 2) your reader can handle them, too. It seems we need a whole new generation of card readers to recognize the new capacities. The symptom is that you plug the large card in the reader and your operating system offers to initialize it for you. Don't go there.
This version of PhotoRescue has one more thing going for it besides the attractive user interface that leads you step-by-step through data recovery. It incorporates both the Expert and Wizard versions of the previous product.
You can try a Quick Recovery that shows you what it found and each image as it retrieves it. Or you can use the Advanced mode option to try a few tricks that may recover more images.
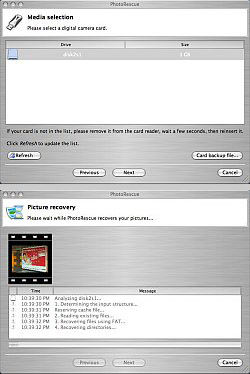
Quick Recover. Finding the card (top) and recovering an image (bottom).
Pierre explained some of the Advanced mode options to us, too. Turning off Thumbnail Rendering isn't just faster, it's more reliable on the Mac (which relies on QuickTime routines to render the thumbnails, unlike the PC version which uses PhotoRescue code to do it). Turning on the Ignore directories and FAT, tells PhotoRescue not to rely on that possibly bogus information and, instead, try to reconstruct the disk structure by reading and trying to reassemble the data sectors themselves. It's remarkably good at figuring that out, BTW, but we can't divulge why <grin>. Finally, turning off Fast Read won't stress the card as much and may make recovery more reliable.
Pierre reminded us his seven person staff provides same day support to emailed questions. And he acknowledged that, if you know what you're doing, you can recover more than flash media with PhotoRescue. But if you have to ask....
We chatted quite a while about the inner workings of flash media and it was great fun. But since it revealed proprietary information, we can't pass it along. Rest assured, however, Pierre knows his stuff and if PhotoRescue can't help you, nothing can.
OF APERTURE & LIGHTROOM | Back to Contents
Apple tried to steal the show Monday with its pre-opening event to announce Aperture 1.5, but Adobe held its own little seance yesterday to highlight some new features in Lightroom beta 4.
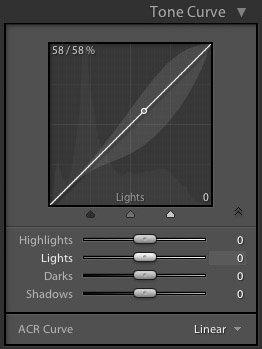
Tone Curve. The bubble on the curve represents the credible changes you can make with the sliders below.
While Apple was confessing its sins (unbundling our images from their database), Adobe was reinventing the Curve. You may have heard about curves and even dared to try to use them, only to find they are so powerful, they can send you over the cliff from a seated position on your couch. Well, Lightroom's curves have very nice training wheels on them that don't get in the way if you know what you're doing.
We took a screenshot of a curve displayed on one of our Angels of Cologne images (http://www.imaging-resource.com/EVENTS/PKNA06mrp/angels/). We put the cursor over a lighter area of the image, but not a highlight and this is what Lightroom's Tone Curve showed. Notice first that the value of the tone at the cursor position is indicated on the curve with a circle. Slightly above middle gray, see that? Then notice the balloon bulging around it. That balloon represents the credible change you can make to the image. It's the training wheels.
How you make a change to the curve is also very slick. You use those sliders below to change the part of the image you want to affect. It really doesn't get simpler than that. Bravo, Adobe!
Tomorrow, we've heard, is another day. We'll be back on the floor to follow a few tips we've gotten and post our final photokina 2006 report. Meanwhile, the feedback link below has been activated, so if you have questions or suggestions, please don't hesitate.