NO COMPUTER NEEDED
HP Photosmart 7960 -- More
Than Enough Inks
 By MIKE PASINI
Editor
The Imaging Resource Digital Photography Newsletter
Review Date: October 2003
INTRODUCTION | Back to Contents
Hewlett-Packard invented the thermal inkjet printer (Canon the bubble and Epson the piezo, according to the rock painting on the wall behind us). But with the Photosmart 7960, HP has focused its expertise on creating the Ideal Home Photo Printing Experience. Make it easy, Carly said, to print digital images without resorting to Windows.
|
C O N T E N T S |
We've applauded this approach in the Hi-Touch 4x6 dye subs (which can make 40 cent 4x6 prints). But we've also pointed out that it doesn't address the storage problem. You have to copy your images to some sort of long-term storage (like CDs), so a computer inevitable enters the equation (stop the presses: MicroSolution's RoadStor may solve that problem -- stay tuned). But you don't have to resort to the computer to make excellent prints.
The 7960 goes a bit further than the Hi-Touch by providing larger prints of similar quality. Borderless 8.5x11 prints, in fact. Seeing your images large used to be a thrill reserved for professionals or amateurs with infrequently used bathrooms. But since the advent of photo quality inkjets, anyone can enjoy them.
For $299, HP's engineers put together a fast 4800-dpi printer using three cartridges with up to eight inks. It includes an LCD monitor, a card reader that can handle 10 formats, a scanner and some intelligent firmware. That firmware can calibrate the printer automatically when you change cartridges, plus print and read a proof sheet to automatically print images from your storage card, among other things.
While it's a Photosmart printer, you can certainly print plain black text if you want. In fact, HP sells a black ink cartridge optimized just for that.
TECH SPECS | Back to Contents
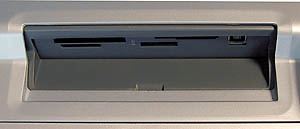
The 7960 features drop-on-demand thermal inkjet printing up to 4800-dpi (1200-dpi black) using two USB ports and four memory card slots. The slots can read CompactFlash, SmartMedia, Memory Sticks, Secure Digital/Multi Digital/Multi Media and xD-Picture cards. Next to them the second USB port handles direct printing from a compatible HP digicam.
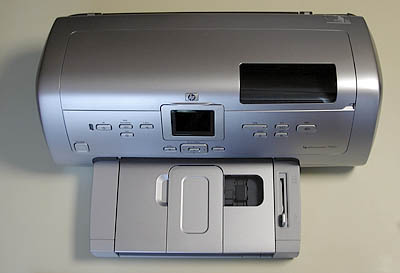 |
| Aerial View Note card reader (big window top right), LCD (middle), 4x6 tray (window on tray)( |
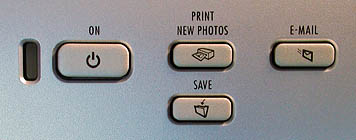
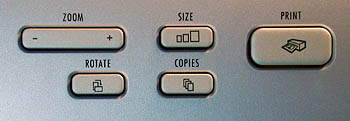
A 2.5-inch swivel LCD provides feedback from an array of buttons on the front of the printer. There are buttons to Print New Photos, Save photos from the card to your computer, Email a photo, Zoom in or out on the LCD, set the paper Size, Print tagged photos (using Digital Print Order Form fields), set the number of Copies, Rotate a photo and Select photos for printing.
Internal memory is 16-MB, facilitating black-and-white print speeds of 21 ppm in Fast Draft mode (0.9 ppm in Best mode) and color in 35 seconds (Fast Draft) or 97 seconds in Best mode.
It uses HP's PCL Level 3 Enhanced printer language. The 100-sheet input tray includes a 20-sheet built-in 4x6 tray. Printable media includes plain, inkjet, photo and glossy paper; transparencies; labels; cards; iron-on transfers and banner paper -- all of which have HP-brand products.
The unit is built to handle 3,000 pages a month, consuming 10 watts when printing and four when idle (and even two when off). Dimensions are 20.9x15.1x7.6 inches and 16.8 pounds. Operating environment is 59 to 95 degrees with a recommended humidity range of 20-80 percent RH.
HP warranties the printer for one year.
OUT OF THE BOX | Back to Contents
We didn't get a retail version of the printer, but one that's been packaged for lowly reviewers. A few things were missing (like a power cord and the cartridge cover to keep a partially used cartridge from drying out) that should be included in the retail version.
One thing missing that is _always_ missing with an HP printer is the cable to connect the printer to the computer. In this case, a USB cable. HP has been doing this for years. And it stinks. HP, include a cable.
In contrast, the printer was swaddled in adhesive wraps and tape and foam to protect it from scratches and more serious damage. It took quite a while to "unwrap" it. Make sure you remove all the protective tape, plastic and foam before you power it up.
At 17 pounds, it's surprisingly heavy. We like that in a printer. It won't walk across the table. We also like how whisper quiet it is when printing. And there's no banging from side to side.
But we really don't like the high-pitched whine from the power supply. You hear it whether the printer is on or off. As long as it's plugged into the wall, the printer whines. The only thing we like to hear whining around here is our little brother when we hide his power adapter.
THE HP WAY | Back to Contents
All HP inkjets share some features.
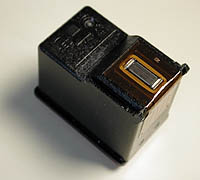 |
| Three-Ink Cartridge Business end only |
The ink cartridges, for example, contain more than one color ink, for example. And they also include print heads. Every time you change a cartridge you get new print heads. And you toss some ink.
The U-turn paper path is another HP feature. The advantage is that it saves table space. The disadvantage is possible paper jams. We didn't have any paper jams (the printer adjusts itself for different weights of paper). We did save table space.
If you can live with that, you may be an HP kind of person.
CARTRIDGE INSTALLATION | Back to Contents
Task number one is to install the cartridges.
This is a wide printer, so opening the hood flexes the plastic in what we would call disturbing ways. If we'd paid for this thing, we would have broken a sweat.
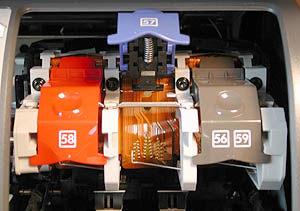 |
| Installing the Cartridges |
Of course, that's what manuals are for. But the HP manual skips a lot of little things like that. We recommended playing with one of these at some SuperStore to get comfortable.
Same problem with the cartridges. They're delicate little things, but you practically have to cram them into the printer and then seat them with very flexible caps that require too much force to lock into position. Twenty-four hour protection won't cut it.
Once you've done it to a couple of cartridges, it's no problem. But the first time is disconcerting. Try it in the store.
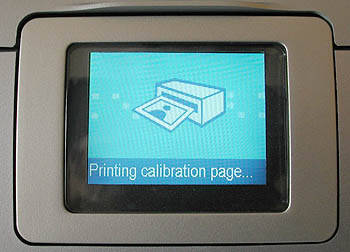
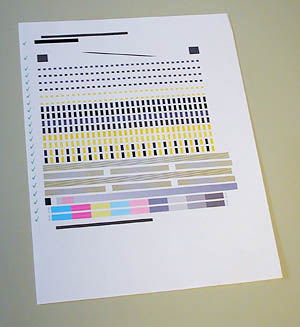 |
| The Calibration Sheet |
Calibration is automatic when you turn on the printer after installing the cartridges. A test sheet is printed and read as it comes out of the printer. That's very nice.
In fact the scanner built into the printer comes in handy for other tasks as well. Like ordering prints from a proof sheet.
USING A PROOF SHEET | Back to Contents
The simplest way to use the printer is just to plug a storage card into the built-in reader. You can use the LCD to scan through, print or mark to print the images on your card. Or you can print an index or a proof sheet on plain paper to see what's on the card.
 |
| Built-in Card Reader And second USB port (right) |
The proof sheet lets you identify individual images to be print, print up to three sets of prints and indicate the size (4x6 and some ganged layouts on 8.5x11). Once you've marked your choices, you feed the proof sheet back into the printer by putting it back in the paper tray and pressing the OK button when prompted. The printer scans the proof sheet and starts printing after confirming paper size.
This worked fine for us and we found it pretty convenient, too. Especially if you want to repeat the run later or don't like working from the LCD. Not that you wouldn't, but if you make a mistake on the proof sheet, you just print another one.
USING THE LCD | Back to Contents
We didn't have any trouble at all using the swivel LCD. The type was large and the menus clear. You navigate with a four-way controller button just below the LCD that has an OK button in the middle. We had to press firmly to navigate, but you get used to the touch.
 |
| The LCD |
The firmware behind the LCD is fairly well thought out. And the system recovered gracefully from all the bonehead mistakes we made. But it does more than just recover gracefully. You can enhance images and even remove red-eye. In no time at all we were ready to print.
PAPER FEED | Back to Contents
The printer comes with the paper tray installed. It looks like a removable tray, but we never actually removed it. We tried but it resisted. More deodorant didn't help, so we can't say if it's removable. We can say it seemed a bit shallow for our use, especially for loading photo paper. But on second thought, maybe you don't want to leave 75 sheets of expensive paper out _en plein aire_.
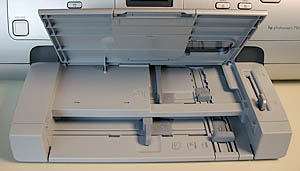 |
| The Paper Tray Bottom tray holds 8.5x11 sheets, top holds 4x6 |
But it is very easy to use. You flip the deck up, turn your 8.5x11 stack of sheets upside down and slide it up to the front of the tray, adjusting a side guide and a back guide to hold the stack snugly in place. A smaller tray to the right fits 4x6 media. It's engaged by sliding forward a large rubbery tab on the top right side of the deck. We expected the tab to be hard plastic. While the flex doesn't make it easy to move the tab, it doesn't prevent it.
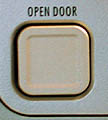 |
| Open Button To mechanically release the hood |
 |
| On Button Power down to keep protect the cartridges |
 |
| Menu, Controller, Cancel To communicate with the LCD |
 |
| Print, Etc. |
HP doesn't use a straight-through paper path. The sheet is fed upside down via small rubber rollers that contact the printable surface and small pinwheels that grab the back side. Then it makes a U-turn, righting itself as it comes under the print heads.
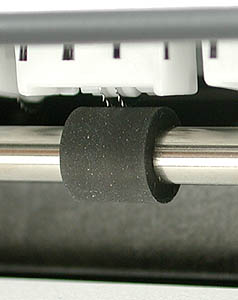 |
| Feed Wheels Note the small metal pinwheels |
If you make borderless prints, you'll notice the printer slow down as it finishes the print. It drops borderless 4x6 prints neatly on the paper tray deck. But larger prints get spit out rather quickly. We installed the printer at the edge of a table and had to routinely dive for prints sailing toward the floor. Not a pretty sight.
The whole point of the U-turn paper path is to take up less desk space. You can back this baby up to the wall, in fact. Just leave room for the power cord and the USB cable. But it would be wise to plan on a little desk space in front. The prints that made it to the floor all landed upside down.
PRINT MEDIA | Back to Contents
HP makes much of their combination of ink and paper. Sometimes this is a lot of hooey (buy our products or void your warranty). But sometimes there's some science behind it. Well, a _lot_ of science (http://www.hp.com/oeminkjet/learn/techreparchive.html). Let's take a look.
The premium photo paper alone is built with more layers than Nonna's lasagna. Below the imaging layer is a thick undercoat on top of a resin coating that rests on a photo base paper (the same as silver halide photo paper). Under that is another resin coating on top of a back coat that rests on a unique stacking layer. The stacking layer is composed of very small plastic beads that prevent ink on the previously printed photo from offsetting onto the back of the newer print. You can actually feel the little beads. Quite a thrill.
HP said they spend about two years to develop a new paper like this. Here's just a few things they test for: curl, surface finish, caliper, stiffness, flatness, dry time, cockle (waviness), permeability (especially for duplex printing), opacity, brightness and color, dot gain, additives and treatment, gloss.
Inks, we learned from HP's Dr. Ross Allen, are not just colored water, even if they are _mostly_ water. The trick is to keep them soluble in the cartridge but quick-drying on the print. Without resorting to alchemy.
Pigments and dyes take different approaches to that problem. The 7960 uses dyes. Dyes are brighter and more colorful than pigments (which sometimes wrap themselves in a dye for just that reason). But dyes can fade. So the media-dye chemical interaction greatly affects light- and water-fastness.
When an inkjet droplet hits photo paper, the surface of the paper swells, encapsulating the dye before it shrinks back to its normal size as the ink vehicle (everything but the dye) evaporates. That's why the print is at first sticky or wet. Indeed some combinations of ink and paper may never dry.
Together, according the Whilhelm tests from June 2003, prints made using this media on this printer will last 73 years. HP compared that to the Canon i950 score of 27 years, the Epson 2200 score of 56 years or even a silver halide print with 23 years. We weren't able to confirm those numbers.
LET'S TEST IT | Back to Contents
We ran a batch of prints using HP's premium photo paper. And the stuff was indeed gorgeous. We left one in the sun and weeks later it still compares exactly to the copy we kept in the dark.
Moreover, try as we might, we couldn't detect a dot pattern. We did only once, in a highlight of our very first print. But subsequent prints -- even under 10x magnification --- showed no such pattern, so we suspect it was just a break-in issue. Although the rest of the print was spectacular.
It's hard to convey that. We were awed by the quality. It was like looking at sharp 8x10 dye subs. Vibrant colors. We weren't sure they were our photos, the prints looked so good. We had to take a little walk to calm down and remind ourselves how pedestrian we are.
When we came back to earth, we tried a test print of a sailboat with colorful sails on the blue-green bay under a blue sky with the Golden Gate bridge in the background. We used three other papers. One was an Epson photo paper, another was made by Champion (an old favorite) and a third was a new paper made by Tapemaker designed to be compatible on any inkjet (more about that later).
The only disappointment was the Epson. There was a noticeable color shift toward blue. The others reproduced the color accurately, although the Champion, a lighter sheet, exhibited some track marks across the surface of the sheet, probably from the small pinwheels the 7960 uses to advance the paper.
The Tapemaker sheet did very well. Standing alone, you'd be delighted with the detail and color. But the HP sheet did even better. It seemed to exhibit more tones with a brighter image. Ever so slightly, but noticeable.
Print times were respectable. About five-and-a-half minutes for a Best quality 8x10.
Total materials cost for an 8x10 is $2.50, HP told us. That's about 65 cents for a 4x6.
DRY TIME | Back to Contents
We learned long ago not to touch inkjet prints fresh out of the printer. They have to dry. Or, we might better say, the ink vehicle has to evaporate and the swellable coating shrink.
Anyway, these prints don't much like to be touched either, fresh from the printer, but they were hardier than we're used to. Pretty minimal drying time, after which you can handle them (carefully).
Of course, with borderless prints it's pretty hard not to get a fingerprint somewhere. And we did, especially at the beginning, before we remembered to levitate the prints using our magic powers. But we were also able to "erase" the finger print by gently polishing it away.
USB TRAVAILS | Back to Contents
Because the printer emits a high pitched whine when the power cord is attached, we routinely turned it off and unplugged it.
That gave a little grief to the computer to which it was attached. Suddenly a USB device lost power and disappeared. We got error messages to that effect from the HP driver, but it was also sometimes disruptive to other USB devices (mice, for example) on that port.
On the other hand, we were pleased to notice that with the USB connection, when we put a card in the reader, we could transfer the images to our computer as well as use the printer to navigate the card.
DRIVER QUIRKS | Back to Contents
We've yet to see a printer driver that should be emulated by anyone. And HP is no exception. Kudos for delivering cross-platform drivers, but my, what confusion.
Say, for example, you have a grayscale image. You want a black and white print. You will look all day in Page Setup for a setting to use the photo gray inks. So you think it's automatic. Nope. You actually have to give the Print command, _then_ look under the options to set the popup option for Grayscale on the right tab. Nuts.
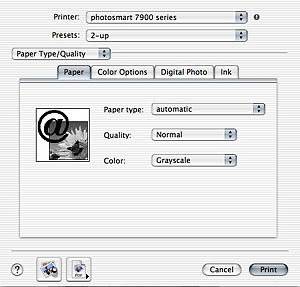 |
| Printing Grayscale |
Less aggravating but still confusing is the Page Size menu. That's where you determine whether you're printing borderless or not. In fact, for any particular size, there are several options. The driver indicates that with the word "Index," as in "4x6 Index." Which is unfortunate because the printer does print indices, thumbnails of all the pictures on your card. The menu option should just use an ellipse in place of the word "Index" to indicate there are more options for that category. Ellipses aren't confusing. They're standard.
There are also a number of (optionally automatic) image optimizations (like sharpening) available in the driver (after you give the Print command). We generally don't like the printer to perform any magic we can't see on screen when we're editing an image. But sharpening is something tailored for the print, so we tried that with nice results.
INK USAGE | Back to Contents
HP includes a utility program to tell you how much ink is left in each of the cartridges. We found that helpful in monitoring our ink usage.
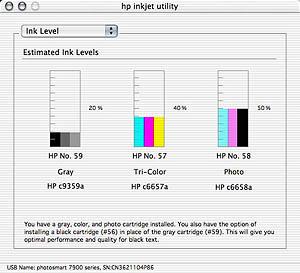 |
| Ink Usage Utility |
One of the quibbles with HP's cartridge system is that the cartridges contain more than one ink. So a color cartidge with cyan, magenta and yellow might still have cyan and magenta when it runs out of yellow, wasting ink.
We like to work with matching sets of inks. It's easier to profile the printer that way. But the truth is, inkjet inks are pretty stable from batch to batch. Matching sets are theoretically superior, but may not be so in practice.
But being able to see the approximate usage was a revelation. We're not sure how HP monitors the cartridges. Canon actually has a sensor that sees how much ink is left in each individual color cartridge. Epson calculates ink usage by paper usage (sort of like using your odometer when your gas gauge fails). But HP's utility showed us we were using the cartridges at different rates (black mostly, as we printed a number of black and white images). The inks within the cartridges aren't individually monitored by the program, unfortunately.
HP told us their design requires a much smaller service bay for the print heads so more of the ink ends up on the paper. Every so often, even during printing, an inkjet nozzle will clog. The printer routinely flushes ink through all the nozzles at the service bay to clear the nozzle. Piezo print heads require this service much more frequently, according to HP.
PHOTO GRAY OR QUADTONE | Back to Contents
HP is making a lot of noise about the three gray inks in the black cartridge. Superior black and white photo printing, they say.
If you print black and white on an inkjet using just black ink, they're right. The number of tones you can get with one ink just isn't going to equal using three tones (a light gray, a mediuim gray and a photo black). You salvage detail in the shadows and pick up detail in the highlights.
But who does that? For years we've recommended printing black and white images in color. In the printing industry it's called a quadtone (neutral printed with cyan, magenta, yellow and black inks). And the reason you do it is to enjoy a greater density range.
Because we didn't know about the Print dialog option to print Grayscale, we actually printed a few black and whites as quadtones (although, we suppose they're properly six inks, considering the light versions of cyanb, magenta and yellow). When we compared an identical image printed both ways, we found a slightly magenta cast to the quadtone. But we also noted the Grayscale image printed with a warm tone.
Whether you like your monocolor images warm or cool, you can manipulate a quadtone to do what you want. Not so with the photo grays.
So, on the whole, we weren't impressed with this capability. But we used it.
CONCLUSION | Back to Contents
For some time now, we've pointed out you really can't lose whichever inkjet printer you buy. The photo quality results are outstanding across the board.
So which printer do you buy?
For formats larger than 8.5x11, Epson's 2200 (and forthcoming 4000) offer eight-ink pigment printing on multiple paper surfaces, while Canon's i9000 does a quick and quality job with an ingenious individual-tank ink system whose levels are actually monitored.
Epson and Canon make excellent choices in the 8.5x11-inch market, too. So HP had its work cut out for it to capture any interest. Epson had routinely delivered more dots per inch and Canon had routinely printed faster. Both gloriously.
But the 7960 holds its own in that august company. It does it by providing multi-ink (glorious) printing in borderless sizes with unassailable quality and unparalleled print longevity using HP media. And then it takes it a step further by providing the home drugstore print service we lauded Hi-Touch for delivering. Finally, it delivers all that for under $300.
How to decide? Enjoy the agony. You can't go wrong. But with the HP Photosmart 7960, you can go very, very right no matter what level of expertise you have.
Images and text copyright © 2003 by The Imaging Resource unless otherwise noted