LARGER DYE SUB PRINTS
HiTi 730PS -- The 4:3 Revolution
Editor
The Imaging Resource Digital Photography Newsletter
Review Date: February 2004
If you're going to start a revolution, there's no sense straightening your tie. We've reviewed two dye sub printers from Hi-Touch Imaging Technologies (http://www.imaging-resource.com/cgi-bin/nl/pl.cgi?hti) already because we were impressed with their revolutionary approach (http://www.imaging-resource.com/IRNEWS/index-arch.html). Not only are they high-quality dye subs rather than finicky inkjets -- but they don't need no stinkin' computer neither.
| C O N T E N T S |
But with the 730PS, Hi-Touch has revolutionized paper size, too. The standard 4x6, 5x7 and 8x10 sizes were as tired as double Windsor knots to them. So they built the 730PS to make 6x8 prints.
It kind of reminds us of the days when all the labs were printing 3.5x5-inch prints and some wise guy thought of making Jumbo 4x6 prints. They were a lot easier on the eyes and pretty soon everybody was buying double Jumbos.
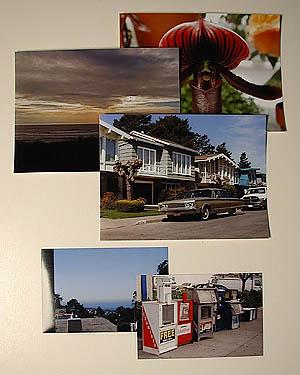 |
| The New Jumbo Print? 4:3-ratio 6x8s above 3:2-ratio 4x6s |
Why didn't Hi-Touch go all the way to 8x10? Well, for one thing, they might. But pausing at 6x8 has a number of advantages. For one thing, the 4:3 aspect ratio is more common among digicams than the standard 3:2 of the 35mm world. And it matches the aspect ratio of standard monitors, where most of the viewing gets done.
But regardless of the politics behind this revolution, we've gotten ridiculously fond of these 6x8s. You only have to buy an 8x10 frame, for one thing. And, boy, are they easy on the eyes. Which you can't say about most revolutions.
ABOUT HI-TOUCH | Back to Contents
Hi-Touch Imaging Technologies (http://www.hitouchimaging.com) was established in Feb. 2001 in Taiwan. With 450 employees, their focus is in hardware ASIC design, moving mechanisms, firmware/driver/application development and color science. And every one of those talents is evident in the 730PS.
Since the introduction of the 630PS, we've seen HiTi printers showing up all over the place from our local photo dealer to major online retailers. The company has its own production team and manufacturing plant just outside Shanghai in Suzhou, China. The high performance production facility gives them the ability to manufacture large numbers of printers quickly and efficiently to meet demand worldwide.
"Our goal," the company said, "is to be the leader of the digital imaging revolution. After all, our digital prints are not the closest thing to photo lab prints, they are better."
FEATURES | Back to Contents
The $399 (street $368) 730PS, which looks like a larger 640PS, sports five main features:
- It make prints in three sizes: 6x8 5x7 and 4x6. You have to swap out ribbons and paper for the different sizes, though, so it isn't as if you can print two 6x8s and five 4x6s unattended.
- A "new generation" ribbon provides "extra durability and superior color performance."
- High-speed printing. We clocked our 6x8s in 90 seconds (1:36, actually). Hi-Touch clocks them in 70 seconds (and just 45 seconds to do a 4x6 and 60 seconds for a 5x7). We started our clock the moment we hit the Print button, so just think of our time as real world and theirs as technically precise.
- Computer-free printing with the LCD controller -- or drive it from your computer via the USB interface.
- Built-in support for seven types of memory card: Smartmedia, CompactFlash Type I & II, Memory Stick, Secure Digital, Multimedia Card and MicroDrive. Unfortunately not xD Picture Cards.
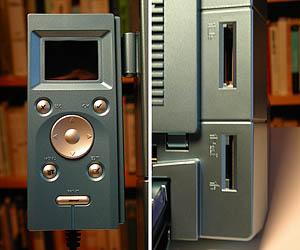 |
| The Controller & Card Slots Everything but xD Picture Cards |
- 301 dpi resolution (equivalent to a 4800-dpi inkjet, Hi-Touch said, and what the original 630PS produces)
- 30 sheet cassette for unattended printing
- 13.4x11x8.7 inches and 18.8 lbs. gross weight and 13.7 lbs. net
- Accessories include the Controller, Quick Guide, Paper Cassette, USB Cable, AC Power Cord, CD (with Printer Driver, Bundle Software and Electronic User Manual).
THE DYE SUB DIFFERENCE | Back to Contents
Apologies for repeating ourselves every time we review a Hi-Touch printer, but dye sub printing remains an exotic technology. It's actually continuous tone printing (like real prints), not screened printing (as on an inkjet). It uses a heating element to heat dye impregnated in a ribbon to over 350 degrees, at which point it turns into a gas and migrates into the surface of the specially coated photo paper. Temperature controls how much dye transfers at any point on the paper.
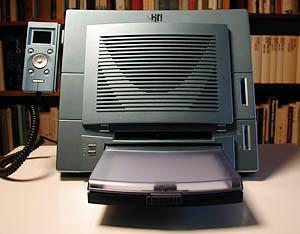 |
| The Front |
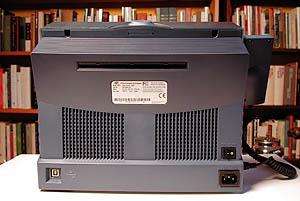 |
| The Back |
 |
| The Side |
In addition to yellow, cyan and magenta dyes, the ribbon contains a clear coating. Hi-Touch's Magic Coating Technology protects the dyes from UV light and waterproofs them, sealing the dyes into the paper.
With no messy inks, dye sub printing is very clean. Once in a while, you'll want to clean paper dust off the feed transport rollers inside the printer, but that's it. The 4x6 Hi-Touch dye subs use a $9.99 cleaning kit to do that (http://www.hitishop.com/accessory.html) after every 100 prints. The 730PS also uses an air filter behind the front grill, which can be replaced. The 730PS cleaning kit will be available in June, the company said.
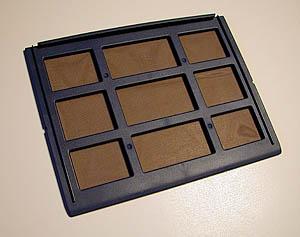 |
| The Filter |
The manual suggests covering the printer when not in use to prevent dust from entering it. Good advice. Our first few prints were marred by dust spots.
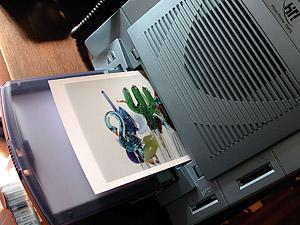 |
| In Action Hit Print and 90 seconds later ... |
Any way you cut it, this is as clean and simple -- and beautiful -- as photo printing gets.
SYSTEM REQUIREMENTS | Back to Contents
If you do attach the 730PS to an optional computer <g>, it connects to a USB port (and supports USB 1.1 and USB 2.0).
Drivers are provided on CD for Windows 98/ME/2000/XP. A Macintosh OS X driver, for all Hi-Touch printers, is available for download from the site but we needed a Windows computer to download it. The Mac download using various browsers hung waiting for a response from the Hi-Touch server.
We received our review unit just after Hi-Touch's 640PS won the DIMA Digital Printer Shoot-Out for Small Format Printers at the 2004 Photo Marketing Association trade show held in Las Vegas. Not content to rest on its laurels, Hi-Touch had just released a firmware update for the 730PS.
Unfortunately, we needed a Windows machine to run the firmware update. It took our Vaio about five minutes to update the 730PS from 0.91.07 to 0.92, fixing a paper mismatch error when using cleaning paper and another problem running the cleaning paper in standalone mode. We've updated the firmware on several Hi-Touch printers in the past without ever encountering a problem. And the 730PS is apparently able to update firmware from its memory card slot, like the other Hi-Touch printers.
You'll need 64-MB RAM, 150-MB hard disk space and a Pentium PC to run HiTi's PhotoDesiree image editing software, included on the CD, which enhances and modifies images and can adjust individual color preferences for all prints.
The printer manual is written in HTML so Mac users won't have to do without, but the printed Quick Installation Guide is really all anyone needs.
RESOLUTION | Back to Contents
Of course, the big system requirement is actually your image. Just how much resolution do you need to print a 6x8 dye sub
Hi-Touch says the 730PS prints at 301 dpi. So 8 times 301 is 2408 and 6 times 301 is 1806. And 2408x1806 is 4,348,848 pixels. But do you really need a 4-Mp digicam to print 6x8s?
No. We tossed a lot of 3.1-Mp images (2048x1536 pixels for 3,145,728 pixels) at the 730PS and never saw any resolution issues. We printed directly from our card and from our computers.
Of course, on the computer, we resized our images (between 118 and 150 percent) and ran an unsharp mask filter to optimize them for the printer -- something you aren't likely to do printing directly from a card. But the direct prints were fine, too.
Nevertheless, Hi-Touch recommends you stick to 4x6 prints with a 2-Mp digicam, 5x7 prints for a 3-Mp digicam and 6x8 prints for 4-Mp or greater digicams. That's a safe mapping of image pixels to the 730PS's resolution, but our experience showed 3-Mp images can print very well at 6x8 sizes, too. Don't worry, be happy.
INSTALLATION | Back to Contents
You also need an electrical outlet. Actually assembling the printer and plugging it into the wall are often more difficult than one might think. Installing inkjet cartridges can take nerves of titanium.
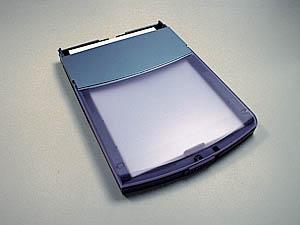 |
| The Paper Cassette |
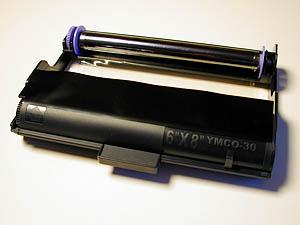 |
| The Ribbon Cartridge |
Like other Hi-Touch dye sub printers, you simply place the printer, attach the controller and open a small door to load the paper cassette. Connect the power cord and optionally <g> the USB cable. Drop the ribbon in when you load the paper in the cassette and that's it.
 |
| Innards Exposed Find the cassette and filter |
Both paper loading and ribbon insertion are very simple. The ribbon is especially noteworthy because it isn't delivered on a spool that has to be threaded but in a cartridge that simply pops into place. Very nice.
ON PAPER SIZE | Back to Contents
So what's with the 6x8 paper size? You know what to do with a 4x6, a 5x7 and an 8x10. But what can you do with a 6x8 and its 3:4 aspect ratio?
Actually, the trouble with most framed prints is that the frame is the same size as the print. A 4x6 print gets framed in a 4x6 frame and an 8x10 print in an 8x10 frame.
That may be economical but it suffers from a couple of drawbacks.
First, the point of a frame is to stake out a little real estate on the wall apart from the room itself. So some sort of border makes a very big difference in framing.
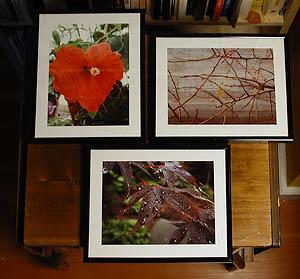 |
| Waiting for a Wall Three 6x8 images in 8x10 frames |
Second, putting a print in contact with glass isn't generally recommended. The paper and glass don't expand and contract at the same rate. And you'll no doubt get Newton rings where contact is under pressure.
So we applaud the 6x8 size precisely because there is no 6x8 frame. Buy an 8x10 frame with a 5x7 mat or cut your own 6x8 mat for an 8x10 frame. That leaves you a one-inch margin all around. We found that tidy format delightful for groups of three images.
CONSUMABLES | Back to Contents
Hi-Touch (http://www.hitouchimaging.com/consumable3.asp?lid=350) currently sells three paper kits for the 730PS:
- A pack of 30 6x8 sheets with a ribbon for $29.99
- A pack of 30 5x7 sheets with a ribbon for $23.99
- A pack of 60 4x6 sheets with a ribbon for $23.99
But other kits are on their way:
- 30 6x8 1x1 sticker sheets (i.e., one 6x8-inch sticker per sheet)
- 30 5x7 1x1 sticker sheets
- 30 5x7 CD labels
- 60 4x6 4x4 stickers
- 60 4x6 4/2/4 stickers
- 60 1x1 stickers
We noticed the 4x6 format has a few new consumables since we last looked, including bulk paper kits. A 12-pack of 600 prints for $230 and a 300-print pack for $109.99. There's also a black and white 75-sheet pack for $26.99. Hi-Touch told us they weren't planning to offer a black and white kit for the 730PS but the jury was still out on multi-pack paper kits.
BTW, we recently had to run out to buy some paper for our 630PS. The nearby photo shop that sells the printer still doesn't sell the paper, believe it or not. The faraway shop sells it, but at a substantial markup. Plan ahead and buy online.
UNTETHERED MODE | Back to Contents
The six-button controller with a 1.6-inch color LCD provides the same computer-free interface to the printer's functions as the other printers in the line.
The Main Page displays a set of eight icons. On the top row are Photo, ID Photo, Index and Sticker. Along the bottom are Quick Photo, DPOF, Print All and Setup. A four-arrowed toggle button navigates the options and an OK button confirms your choice.
Setup has a Printout Setting option to make persistent changes to the brightness, contrast and color cast in the printer. After you correct a representative image from your storage card, the changes are saved in the printer, making it possible to calibrate the device to your environment. There's also a Matte Effect option to simulate a matte rather than glossy finish and a Date Print option to overlay the date the image was captured on the print.
Select Photo to scroll through the thumbnails of the JPEG images on your storage card one at a time. When you see one you want to print, press OK. Use the Up or Down arrow key to set the number of copies to print and press OK again. Continue through the card. When you've finished, press Print to batch print the set.
While previewing your images, you can press the Edit button. Functions available include Move, Rotate (not really necessary), Resize and Copies.
You can also Enhance the image, changing its Brightness, Contrast, Color R/G (hue shift from red to green) and Color B/Y (blue/yellow hue shift).
ID Photo is a pair of special ID photo formats that use matching die-cut photo paper. You can print 12 one-inch ID photos or 9 two-inch ID photos on a 4x6 sheet. An Index print can be formatted into 6x5, 8x7 or 5x4 columns/rows, providing a handy contact sheet of your card contents. There are also two Sticker formats, 4x4 and 4/2/4.
Quick Photo simplifies printing a single image. Just select the photo and press OK to send it to the printer.
Press Print after selecting DPOF to confirm and print the DPOF order.
Similarly, press Print after selecting Print All to confirm and start printing.
CONCLUSION | Back to Contents
The 730PS isn't just a good idea. It's a well-executed concept that performs at a consistently high level (which is why it's little brother, the 640PS, won the DIMA Shoot-Out). You won't find an inkjet printer built as solidly, a company as dedicated to perfecting its products -- or a cheaper way to get the best print from your images. But most importantly, you'll be thrilled every time you click on Print. And that's a revolutionary thought.