Back
to Full Kodak DCS Pro 14n Digital SLR Review
Back
to Full Kodak DCS Pro 14n Digital SLR ReviewGo to Kodak DCS Pro 14n Digital SLR Data Sheet
Go to Kodak DCS Pro 14n Digital SLR Pictures Page
Up to Imaging Resource Cameras Page
Use your browser's "Back" button to return to the previous page, or the links at the top and bottom of this page to navigate to related information. If you have difficulty fitting the text on this page onto your printer output, simply resize your browser window to a narrower width and print again.
Remember us when it's time to buy!
Dave here: Have our reviews been helpful to you? (Is this article you're reading right now useful?) Preparing this level of information on as many products as we do is incredibly hard work, not to mention expensive. Things on the Internet may look like they're free, but they're not. (As a lot of big dot.com companies are finding out these days.) Somewhere, somebody has to pay to produce worthwhile content. YOU can help us though, by remembering us when it comes time to make your purchase. Would you consider coming back to our site and clicking-through to one of our advertisers to make your purchase? Every dollar you spend with one of our advertisers helps us directly (in affiliate fees) or indirectly (the advertiser will keep renewing their ad contract with us). To make it easy for you to support us, here's a URL you can visit, to see all our current advertisers, with links to click on that will register your visit to them as having come from our site. It's up to you where you buy, but Mike, Mike, Kim, Yazmin, Marti and I would be really grateful if you'd help us out by choosing one of our advertisers to purchase from.
Thank you for your support!
Dave Etchells, Founder & Publisher
Visit our "Buy Now" Page:
https://www.imaging-resource.com/buynow.htm
Back
to Full Kodak DCS Pro 14n Digital SLR Review
Go to Kodak DCS Pro 14n Digital SLR
Data Sheet
Go to Kodak DCS Pro 14n Digital SLR
Pictures Page
Up to Imaging Resource Cameras
Page
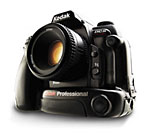
Kodak DCS Pro 14n Digital SLRKodak's latest digital SLR brings full-frame, 13.7 megapixel resolution to market for under 5,000. Review First Posted: 03/23/2003 |
|
 |
|
13.7 megapixel (effective) RGB-filtered CMOS sensor, delivering 4,500 x 3,000 pixel images. |
|
|
Full-frame sensor gives focal-length multiplier of 1.0 | |
|
|
ISO of 100, 200, 400 (ISO 800 at reduced resolution) | |
|
|
Rugged, magnesium-alloy chassis pares weight, but provides rigid frame. | |
| * | Compatible with most current Nikon F-mount lenses and accessories. | |
|
|
Excellent dynamic headroom in Kodak's DCR "raw" file format, excellent ability to recover highlight detail post-exposure. |
Manufacturer Overview
Kodak of course needs no introduction in the field of photography,
their name being almost synonymous with photography for much of this century.
They were one of the first digital camera makers in the US, and for a long while
were the only game in town when it came to digital SLRs. Recently, as
camera giants like Canon and Nikon have entered the digital fray themselves,
many people (myself among them) have wondered whether Kodak would be able to
continue to compete in the d-SLR marketplace.
Kodak emphatically addressed the industry doubters though, when they announced
the DCS Pro 14n at last year's Photokina, in September 2002. While it's taken
quite a while to make it to market, as of this writing in mid-March, 2003, the
first demo units have just now been shipped to dealers across the US. While
still not cheap at $5,000, it does set something of a new benchmark for the
price of a full-frame digital SLR, and its astonishing 13.7 megapixel resolution
has had many prospective users salivating for months now.
So how does it do? Read on for all the details, including some comparison photos
snapped alongside a Canon EOS-1Ds, its most obvious competitor.
High Points
Executive Overview
Just as many industry observers (myself included) were wondering whether Kodak could continue to compete in the professional SLR market, the company dropped a figurative bombshell on the photographic world at Photokina 2002 in the form of the DSC Pro 14n. The new camera is built upon a body built by Nikon, but incorporates an astounding 13.7-megapixel full-frame CMOS sensor. Most amazing was the $4,995 US list price, undercutting Canon's recently announced EOS-1Ds full-frame SLR by fully $3,000. Some of the excitement of the announcement was dissipated in the ensuing months, as Kodak was forced to push back the ship date of the new model. Now, in mid-March 2003, the megapixel heavyweight is finally making its way onto dealer's shelves, and I've managed to get hands on a late-model prototype to put through at least a preliminary set of tests. (I'm holding off on shooting my full set of test images until such time as Kodak can get me a full-production unit to put through the wringer.)
The 14n's substantial body is similar to Nikon's high-end 35mm SLR cameras, with a hefty size and very solid feel, thanks to its magnesium-alloy body. The sensor covers the same area as a 35mm film frame (36 x 24 mm), and produces a maximum 4,500 x 3,000-pixel resolution image without interpolation. This clearly sets a new record for 35mm-format portable digital SLR cameras.
A Nikon "F" lens mount accommodates most Nikkor F-series lenses, a boon to anyone who already owns a Nikon 35mm camera setup. With a Nikon-built chassis and camera electronics, the control layout will be immediately familiar to Nikon shooters. Beginning on the front of the camera, a switch next to the lens mount, sets the focus mode to Manual, Single Servo, or Continuous Servo. The 14n also offers an adjustable AF area, via a setting on the Exposure Mode dial. Single Area AF bases focus on one of five AF areas in the frame, selectable via the Four-Way Arrow rocker pad. Alternatively, Dynamic Area AF uses all five AF areas at once, "tracking" a moving subject as it passes in front of each area. Also on the 14n is an AF assist light, which helps the camera focus in dark shooting conditions. The 14n's digital SLR design includes an accurate optical viewfinder that incorporates a detailed information display reporting exposure settings, memory card information, and a handful of mode settings. A set of brackets on the viewfinder screen highlights the selected AF area, and a Custom menu setting enables an alignment grid for more accurate framing. (A feature I'm personally very fond of.) The 14n also features a 2.0-inch color LCD monitor, for image review and menu display only. - Like most digital SLRs, the LCD screen cannot be used as a "live" viewfinder. In addition to the standard image playback display, the 14n offers a histogram option, showing the tonal distribution of the captured image, and an overexposure indicator option "blinks" blown-out highlights to show where highlight detail has been lost. Unique to the 14n though, is an extended range on the histogram display, showing information that can be recovered from the file via Kodak's "ERI" (Extended Range Imaging) JPEG file format.
Exposure control on the 14n is quite extensive, as the camera offers a wide range of features and Custom menu settings. An Exposure Mode dial offers the usual Program AE, Manual, Aperture Priority, and Shutter Priority modes. In Program AE mode, although the camera controls both aperture and shutter speed, you can rotate the Main Command dial to access a range of equivalent exposure settings to place emphasis on a faster shutter speed or larger depth of field. Shutter speeds range from 1/4,000 to two seconds, and a Bulb setting allows much longer exposures. In aperture or shutter priority modes, the camera will display "Hi" or "Lo" in the viewfinder and on the top data readout panel if the camera can't achieve a proper exposure with the settings you've chosen. In manual mode, the camera's metering system evaluates the exposure you've chosen, and reports the amount of over- or underexposure it thinks you've specified in the viewfinder. A Depth of Field Preview button on the front of the camera stops down the lens to the selected aperture, previewing the depth of field before you take the shot.
By default, the 14n employs a Matrix / 3D Matrix metering system to determine exposure, depending on the lens in use. In Matrix mode, the camera divides the image area into 10 segments and meters each one individually. 3D Matrix metering applies to Nikkor D-type lenses (with a built-in CPU chip, allowing the lens to report focusing distance to the camera), and the camera not only reads brightness, but also scene contrast and subject distance to provide a more accurate exposure. Center-Weighted and Spot metering modes are also available. An exposure compensation adjustment increases or decreases exposure in one-half-step increments from -3 to +3. (A feature I'd change: Half-EV exposure adjustments are really a bit too coarse for digicams - I'd really like to see one-third EV steps.) If you're uncertain of an exposure, the 14n's Auto Exposure Bracketing mode takes a series of either two or three images at different exposures, bracketed around the metered setting. The camera also offers an AE Lock button, which locks exposure and/or focus independent of the Shutter button.
An interesting feature on the 14n is the Digital Exposure Correction option, by which the camera automatically assesses the image and makes adjustments to its tone and contrast to optimize the images. This feature only affects data in the JPEG files though, not the camera's RAW-format images. Note too, that Digital Exposure Correction doesn't correct for improper shutter speed, aperture, or ISO selections. Another option, called "Look" in the settings menu, applies a tone scale and color-management adjustment as the images are captured. Options for Look are Portrait (less saturated colors) and Product (more saturated colors). Yet another adjustment lets you tweak the 14n's in-camera sharpening.
Sensitivity settings range from 80 to 800 ISO equivalents, depending on the resolution. (Maximum ISO is 640 at the 13.5-megapixel resolution.) A Noise Reduction feature reduces the level of image noise from longer exposures and higher sensitivity settings, helping reduce image noise in low-light shooting conditions. White balance options on the 14n include Auto, Daylight, Tungsten, Fluorescent, and Flash presets, and a Click Balance (manual) setting. Within each of the presets, you have a handful of options. For example, the Daylight setting offers Standard, Warm, and Cool settings, and the Flash preset offers Standard, Warm, Cool, and Studio options. The Click Balance option analyzes the RGB values from the most recently captured image (such as a gray card), or a saved image, and applies them to the next image captured. Once selected, Click Balance provides an eyedropper over the image, letting you sample a specific part of the frame and determine the correct color balance.
The 14n's pop-up flash unit is rated at a guide number of 12 meters at ISO 100, translating to a maximum range of 4.2 meters (13.7 feet) at f/2.8. Depending on the lens being used, the internal flash offers D-TTL metering control in either 3D Multi-Sensor Balanced Fill-Flash for Digital SLR, Multi-Sensor Balanced Fill-Flash for Digital SLR, or Standard TTL Flash for Digital SLR modes. Flash operating modes include Front-Curtain Sync, Slow Sync, Rear-Curtain Sync, Red-Eye Reduction, and Red-Eye Reduction with Slow Sync modes. A Flash Exposure Compensation setting adjusts flash power from -3 to +1 EV in one-half-step increments. The 14n also features an external flash hot-shoe with standard Nikon proprietary contacts, and a PC sync terminal for connecting more powerful flash units. Maximum flash sync speed is 1/125 second.
A Continuous Shooting mode captures a series of images as fast as 2.5 frames per second as long as the Shutter button is held down, until the 14n's buffer memory fills. Actual frame rates will vary somewhat, depending on the JPEG compression and image resolution settings, and the number of images in the series will depend on the amount of available buffer and card memory. (Maximum run lengths range from 4 high resolution/best quality JPEG files to 6 low resolution/low quality JPEG shots before you have to wait for the buffer memory to clear. Shooting in RAW mode, the maximum run length is 6-8 shots, depending on the image size chosen.) There's also a 10-second Self-Timer mode, and the ability to record short sound clips to accompany images.
The 14n stores images on either CompactFlash (Type I or II) or SD/MMC cards, and is compatible with the IBM MicroDrive. You can specify which card the camera saves images to, with the option of saving duplicate images on both cards. (An option that struck me as handy was to save RAW files to the CF card, while simultaneously saving JPEGs on the SD card.) A Job Tracker function lets you mark all images associated with a certain event, date, etc, using IPTC-standard file tags. Available resolutions are 4,500 x 3,000; 3,000 x 2,000; 2,250 x 1,500; or 1,125 x 750 pixels, with JPEG compression levels of Good, Better, and Best, and a RAW setting. To mimic common film sizes, the 14n features a Crop Aspect adjustment with options for 2 x 3, 4 x 5, or 2 x 2 aspect ratios.
The 14n connects to a computer via an IEEE-1394 FireWire cable (not included with the camera). A video cable accompanies the camera for connection to a television set, which is only useful for image playback. For power, the 14n uses a Kodak Professional DCS Pro battery pack, or an AC adapter.
Design
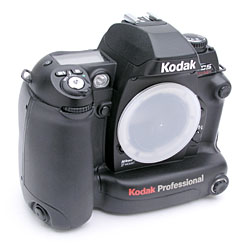
Featuring a camera body custom-built for Kodak by Nikon, the DCS Pro 14n looks a lot like Nikon's high-end 35mm cameras. Measuring 5.16 x 6.22 x 3.50 inches (131 x 158 x 89 millimeters), the 14n is about the same size as most high-end 35mm cameras. It's noticeably larger than prosumer cameras like the Nikon D100 and Canon D60/10D, but quite a bit smaller than high-end professional models from Nikon or Canon. (See the shots below comparing the 14n's size to that of the Canon EOS-10D and Canon EOS-1Ds.) The 14n has enough heft to give it a solid feel, at two pounds five ounces (1042 grams) with memory card and battery, a good bit lighter than I'd expected. (For comparison, the Canon EOS-10D comes in just 6 ounces (170 grams) lighter.)

The front of the 14n features the large lens mount, which accommodates Nikon's "F" lenses. Directly to the right of the lens (as viewed from the front) is the lens release button, which unlocks the lens from the mount. Just below is the Focus selector switch, and below that is the 10-pin accessory socket (which hosts Nikon's remote control accessory), protected by a small (and easily lost) cap. In the top right corner is the PC sync terminal, protected by another tiny cap. On the opposite side of the lens is the camera's Depth of Field Preview button, nestled between the lens and hand grip. Directly above it is the AF assist lamp, which also lights when the Self-Timer is active and serves as the Red-Eye Reduction lamp as well. The camera's Sub-Command dial appears at the top of the hand grip, changing camera settings when it's turned.
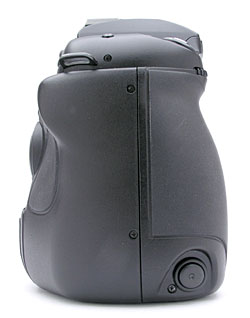
The right side of the 14n (as viewed from the rear) shows only the secondary Shutter button, used when the camera is held vertically. - The bulge of the battery compartment that projects in front of the camera along its bottom serves as a vertical-format handgrip, but I found it rather awkward to use. It's certainly workable, but far from comfortable, with the bulge of the main handgrip forcing your middle finger lower on the body than I'd like, and making it rather a stretch for your index finger to reach the secondary shutter button.

On the opposite side of the camera are the Video and IEEE 1394 connection ports. Above these is a small battery compartment, which houses the coin cell battery used for clock/date chip backup power. The main battery slot is just below the connection jacks, and features a small latch that releases the battery from the slot.
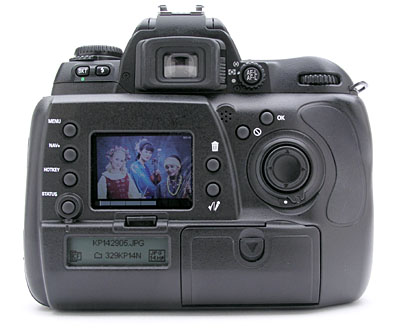
The majority of the 14n's controls are the rear panel, along with the optical viewfinder eyepiece and 2.0-inch LCD monitor. A sliding diopter adjustment on the left side of the viewfinder eyepiece adjusts the optics for eyeglass wearers. Directly adjacent on the right is the Metering selector and AF/AE Lock button. The Main Command dial in the top right corner controls lens aperture and/or shutter speed when shooting, and a variety of camera settings when used in conjunction with the LCD menus system. In the center of the right side of the rear panel is a Four-Way controller, surrounded by a locking ring useful for preventing any accidental settings changes. Just above the Four-Way controller are the OK and Cancel buttons, with the Delete and Tag/Record buttons to its left. Lining the left side of the LCD monitor are the Menu, Nav+, Hotkey, and Digital Status buttons. Just above these are the Flash Mode and Auto-Exposure Bracketing buttons, in the top left corner. A monochrome status LCD just below the large LCD monitor reports specific camera information, such as white balance, JPEG quality, ISO, etc. Finally, the media compartment is in the lower right corner, protected by a hinged door that snaps firmly shut. A thumb pad on the right side makes a comfortable thumb rest when holding the camera, counterbalancing the support from the handgrip. There's also a tiny microphone just below the viewfinder eyepiece.
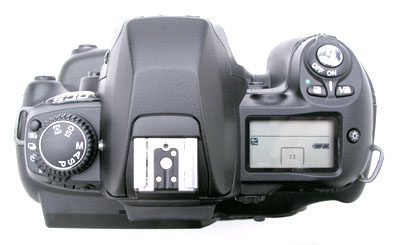
On top of the 14n is the pop-up flash compartment, just in front of the external flash hot shoe. A button on the side of the flash compartment releases the flash, letting it spring open. On the left side of the top panel is the Exposure Mode dial, which sits on top of the Drive Mode selector. A small button beside the dials locks the Drive Mode selector in place, preventing it from slipping out of position inadvertently. Angling down towards the front of the camera, the Shutter button and Power switch are on the far right side. Just behind the Shutter button are the Flash Exposure Compensation and Exposure Compensation buttons. On the righthand side of the camera, another status display panel reports basic exposure information, with a switch for the backlight illuminator lamp directly to its right. Also visible from the top of the camera are two eyelets for attaching a neck strap. (A minor point: The neckstrap eyelets are positioned such that the camera body by itself will hang straight. With a lens of any sort attached though, the camera will tilt downward at an awkward angle. While it's obviously impossible for the camera to hang straight with larger lenses attached, regardless of the eyelet positions, I'd like to see the eyelets moved as far forward as possible, to result in better balance when relatively lightweight lenses are attached.)
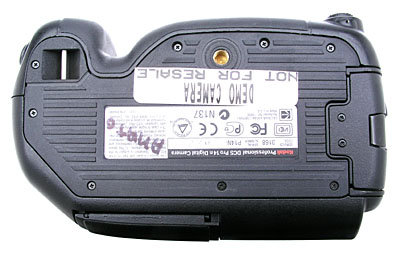
The bottom of the 14n is pretty plain, featuring only a metal, threaded tripod mount and the bottom lip of the battery slot. A third neck strap attachment eyelet is also on the bottom panel, for use when holding the camera vertically. Thanks to the large battery compartment, the 14n has a very broad, flat bottom, great for secure mounting on a tripod.
Viewfinder
 The
14n is a digital SLR, meaning that it has a true, TTL (through the lens) optical
viewfinder. A digital display at the bottom of the viewfinder's image display
reports the basic exposure settings, such as aperture and shutter speed, and
any exposure compensation dialed in. Additionally, a variety of icons in the
information display indicate various other camera settings, from metering mode
to exposure mode. A set of focus brackets in the central portion of the display
show the available autofocus sensors, and indicate the currently-selected AF
area by glowing a dull red when the AF is active. Through the camera's Custom
menu, you can turn on an alignment grid, which displays a light grey grid pattern
over the subject area. The 14n's optical viewfinder also has a diopter adjustment
switch, which adjusts the view for eyeglass wearers, although its range doesn't
seem to be as wide as that of many cameras on the market, covering value from
-0.8 to +1.8 diopter
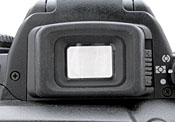
The
14n is a digital SLR, meaning that it has a true, TTL (through the lens) optical
viewfinder. A digital display at the bottom of the viewfinder's image display
reports the basic exposure settings, such as aperture and shutter speed, and
any exposure compensation dialed in. Additionally, a variety of icons in the
information display indicate various other camera settings, from metering mode
to exposure mode. A set of focus brackets in the central portion of the display
show the available autofocus sensors, and indicate the currently-selected AF
area by glowing a dull red when the AF is active. Through the camera's Custom
menu, you can turn on an alignment grid, which displays a light grey grid pattern
over the subject area. The 14n's optical viewfinder also has a diopter adjustment
switch, which adjusts the view for eyeglass wearers, although its range doesn't
seem to be as wide as that of many cameras on the market, covering value from
-0.8 to +1.8 diopter
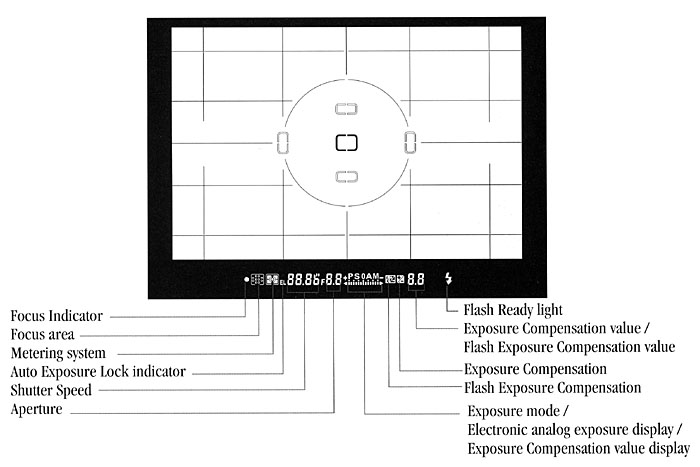
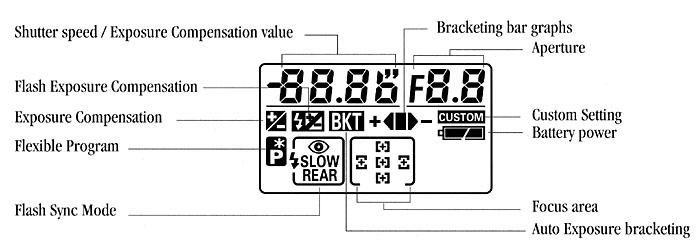
The illustration above shows the exposure and other information that's reported in the viewfinder display.
The 14n's viewfinder presents a very wide field of view, no doubt thanks in part to the full-frame sensor and the wider frame that it calls for. One side effect though, seems to be that the eyepoint is a bit lower than I've become accustomed to on other SLRs, forcing me to press my eyeglass lenses right against the eyepiece bezel to see the full frame. - People with unusually thick eyeglass lenses my have trouble seeing all of the frame at one time.
 Though
not available for use as a viewfinder, the 14n does have a two-inch, 130,000-dot,
low temperature polysilicon TFT LCD display. The LCD monitor display images
while in review mode, and also provides access to the camera's settings menus.
During image review, the LCD monitor offers one of four display modes, changed
via a small sub-menu that appears on-screen momentarily during image review.
Review modes are Single Image, Histogram, Zoom Image, and Multiple Image. Single
Image mode displays only the captured image, without an information overlay.
In Histogram mode, a thumbnail of the image is displayed, along with a small
histogram of the image and the exposure information. Zoom Image mode lets you
enlarge the current image, using the arrow keys to pan around within the expanded
view. Finally, Multiple Image mode displays four thumbnails on the screen at
one time.
Though
not available for use as a viewfinder, the 14n does have a two-inch, 130,000-dot,
low temperature polysilicon TFT LCD display. The LCD monitor display images
while in review mode, and also provides access to the camera's settings menus.
During image review, the LCD monitor offers one of four display modes, changed
via a small sub-menu that appears on-screen momentarily during image review.
Review modes are Single Image, Histogram, Zoom Image, and Multiple Image. Single
Image mode displays only the captured image, without an information overlay.
In Histogram mode, a thumbnail of the image is displayed, along with a small
histogram of the image and the exposure information. Zoom Image mode lets you
enlarge the current image, using the arrow keys to pan around within the expanded
view. Finally, Multiple Image mode displays four thumbnails on the screen at
one time.
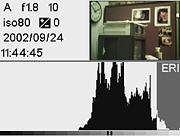 The
14n's Histogram display is unusual, in that it reports extended-range exposure
information, as preserved in Kodak's "ERI JPEG" (Extended Range Imaging
JPEG) format. A full discussion of ERI JPEG technology is beyond the scope of
this article, but it's basically a (very) clever way of recording all the information
that would normally be preserved in a RAW-format image, but lost from a JPEG
file. The really clever part is that ERI JPEGS can still be read just fine as
normal JPEGs (minus the ERI data) by standard imaging software. The extended-range
information won't be available in such programs, but they'll at least be able
to read all the basic JPEG information in these files. In the 14n's histogram,
the extended-range information appears in a grey-tinted area to the right of
the standard histogram plot. (Think of this data as corresponding to "super
highlights," brighter than the 100% level of the basic JPEG data, but with
valid tonal data recorded in the ERI file.) Information represented by this
part of the graph won't be visible in standard JPEG images, but can be recovered
by using Kodak's ERI JPEG plug-in for Photoshop(tm). The screen shot above right
shows an image with some highlight information that pushes up into the "ERI"
range of the histogram.
The
14n's Histogram display is unusual, in that it reports extended-range exposure
information, as preserved in Kodak's "ERI JPEG" (Extended Range Imaging
JPEG) format. A full discussion of ERI JPEG technology is beyond the scope of
this article, but it's basically a (very) clever way of recording all the information
that would normally be preserved in a RAW-format image, but lost from a JPEG
file. The really clever part is that ERI JPEGS can still be read just fine as
normal JPEGs (minus the ERI data) by standard imaging software. The extended-range
information won't be available in such programs, but they'll at least be able
to read all the basic JPEG information in these files. In the 14n's histogram,
the extended-range information appears in a grey-tinted area to the right of
the standard histogram plot. (Think of this data as corresponding to "super
highlights," brighter than the 100% level of the basic JPEG data, but with
valid tonal data recorded in the ERI file.) Information represented by this
part of the graph won't be visible in standard JPEG images, but can be recovered
by using Kodak's ERI JPEG plug-in for Photoshop(tm). The screen shot above right
shows an image with some highlight information that pushes up into the "ERI"
range of the histogram.
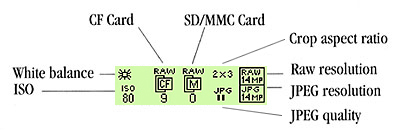
Two smaller status LCDs are also on the 14n, one on top for a quick view of basic camera settings, and a second one on the back panel that reports on the camera's digital functions. The smaller digital status LCD on the back panel has a dynamic display that reports either capture-related information, review-related information, or helpful messages. Capture-related information includes explanations of the digital buttons and their shortcuts, the number of captured images on either the CF or SD/MMC card, the current aspect ratio, RAW and JPEG resolutions, white balance, and ISO. In Review mode, the display reports basic image information such as the file name and image number, as well as the folder, file format, and resolution. During camera operation, either in a menu or not, this smaller LCD also shows descriptions for menu selections or shortcut keys. (For example, it may indicate to press the right and left buttons to change one setting, and the up and down arrows for another.)
The slightly larger LCD data readout on the camera's top panel displays information about more conventional camera settings, such as shutter speed and aperture, metering modes, exposure compensation, etc. Most of the external camera controls for frequently-used functional settings work in conjunction with this display to show you the setting value you've selected.
Optics
Learn how to use lens aperture to control depth of field - Visit our free Photo Lessons area!
Free Photo Lessons
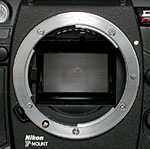 Designed
for Kodak by Nikon, the Pro 14n features the standard Nikon F lens mount, which
accommodates a wide range of Nikon and compatible third-party lenses. The mount
features a mechanical AF coupling for older lenses, and AF electrical contacts
for the latest AF-IF or AF-S Nikkor lenses with internal focus motors. You can
thus use the 14n with more than 90% of all F Mount Nikkor lenses ever made.
(See the camera's manual for a list of specific lenses that aren't compatible
with the 14n.)
Designed
for Kodak by Nikon, the Pro 14n features the standard Nikon F lens mount, which
accommodates a wide range of Nikon and compatible third-party lenses. The mount
features a mechanical AF coupling for older lenses, and AF electrical contacts
for the latest AF-IF or AF-S Nikkor lenses with internal focus motors. You can
thus use the 14n with more than 90% of all F Mount Nikkor lenses ever made.
(See the camera's manual for a list of specific lenses that aren't compatible
with the 14n.)
Functions and exposure modes available with a given lens will vary with the type of lens in use. Most recent Nikkor lenses include a microchip CPU (central processing unit) that communicates focal-distance information to the camera. This suggests that non-CPU lenses wouldn't permit the "3D matrix metering" exposure mode, since that mode relies on distance information from the lens. The loss of functionality with non-CPU lenses goes quite a bit beyond that though: Non-CPU lenses apparently provide no aperture information to the camera either. This means that you can only shoot in full manual exposure mode, the exposure meter will be disabled, and you'll also have to set the aperture manually. (Bummer.) While you therefore can indeed take pictures with most Nikkor lenses made, using older non-D lenses would be a figurative step back to the stone age. Unless you really like fully manual cameras with no internal exposure meter, plan on using D- or G-type lenses with the 14n.
All the above said, I can't understand why Nikon and Kodak couldn't have come up with a way for the 14n's exposure meter to at least remain active with non-D lenses. While the metering system is set up to meter with the lens wide open, calculating what the exposure will be when the aperture closes for the actual exposure, I can't see why it wouldn't be possible to have a metering mode that tells the camera to ignore the missing aperture information, and simply report the exposure based on the amount of light currently falling on the AE sensors. How about it Kodak/Nikon? Perhaps a feature for the next version?
Compatible
Lens / Accessories |
|||||||||
| Lens / Accessories | Focus
Mode |
Exposure Mode |
Metering
System |
||||||
Autofocus |
Manual
with electronic rangefinder |
Manual |
Any mode but M |
M |
Matrix |
Center Weighted Spot1 |
|||
3D
10- segment |
10- segment |
||||||||
CPU
NIKKOR2 |
G-type or D-type AF NIKKOR3,
AF-S, AF-1 NIKKOR |
yes |
yes |
yes |
yes |
yes |
yes |
- |
yes |
AF-I Teleconverter6 |
yes7 |
yes7 |
yes |
yes |
yes |
yes |
- |
yes |
|
Non-D-type AF NIKKOR, (except AF NIKKOR for F3AF |
yes |
yes |
yes |
yes |
yes |
- |
yes |
yes |
|
AI-P NIKKOR |
- |
yes8 |
yes |
yes |
yes |
- |
yes |
yes |
|
Non-CPU
NIKKOR9 |
AI-S or AI type NIKKOR, Series E, AI-modified NIKKOR |
- |
yes |
yes |
- |
yes |
- |
- |
- |
Medical-NIKKOR 120 mm f/4 |
- |
yes |
yes |
- |
yes11 |
- |
- |
- |
|
Reflex-NIKKOR |
- |
- |
yes |
- |
yes10 |
- |
- |
- |
|
PC-NIKKOR |
- |
yes5 |
yes |
- |
yes10 |
- |
- |
- |
|
AI-S or AI type Teleconverters |
- |
yes7 |
yes |
- |
yes10 |
- |
- |
- |
|
Bellows Focusing Attachment PB-612 |
- |
yes7 |
yes |
- |
yes10 |
- |
- |
- |
|
Auto Extension Rings (PK-11A, PK-12, PK-13 and PN-11) |
- |
yes7 |
yes |
- |
yes10 |
- |
- |
- |
|
| Legend | |
| 1 | Spot Metering area can be shifted with focus area selector with CPU NIKKOR lens |
| 2 | IX-NIKKOR lenses cannot be attached |
| 3 | Camera is compatible with the Vibration Reduction function of the VR NIKKOR lens |
| 4 | Camera’s exposure metering and flash control do not work properly when shifting and/or tilting the lens or when using an aperture other than maximum aperture |
| 5 | Without shifting and/or tilting lens |
| 6 | Compatible with AF-S and AF-1 NIKKOR except AF-S 17-35 mm f/2.8 IF-ED and AF-S 28-70 mm f/2.8 D IF-ED |
| 7 | With maximum effective aperture of f/5.6 or faster |
| 8 | With maximum aperture of f/5.6 or faster |
| 9 | Some lenses/accessories cannot be attached |
| 10 | With Exposure mode set to Manual. The exposure meter cannot be used |
| 11 | With Exposure mode set to Manual and shutter speed set to 1/125 second or slower. The exposure meter cannot be used. |
| 12 | Attach the PB-6 vertically. PB-6 can be set to horizontal position after attaching |
| - | AS-15 must be attached in combination with Medical NIKKOR 200 mm f/5.6 for the lens to fire flash |
| - | Reprocopy Outfit PF-4 can be attached in combination with Camera Holder PA-4 |
| - | Do not attach the following accessories to the lens as they might damage parts such as the lens CPU contacts (Auto Extension Ring PK-1, PK-11, Auto Ring BR-4 and K1 Ring) |
| Incompatible Lenses and Lens Accessories | |
| - | TC-16A Teleconverter |
| - | Non-AI lenses |
| - | 400 mm f/4.5, 600 mm f/5.6, 800 mm f/8, and 1200 mm f/11 with Focusing Unit AU-1 |
| - | Fisheye 6 mm f/5.6, 8 mm f/8, and OP 10 mm f/5.6 |
| - | Old type 21 mm f/4 |
| - | K2 ring |
| - | ED 180-600 mm f/8 (No. 174041 - 174180) |
| - | ED 360-1200 f/11 (No. 174031 - 174127) |
| - | 200-600 mm f/9.5 (No. 280001 - 300490) |
| - | 80 mm f/2.8, 200 mm f/3.5, and TC-16 Teleconverter for F3AF |
| - | PC 28 mm f/4 (No. 180900 or smaller) |
| - | PC 35 mm f/2.8 (No. 851001 - 906200) |
| - | Old type PC 35 mm f/3.5 |
| - | Old type Reflex 1000 mm f/6.3 |
| - | Reflex 1000 mm f/11 (No. 142361 - 143000) |
| - | Reflex 2000 mm f/11 (No. 200111 - 200310) |
| - | PC Micro-NIKKOR 85 mm f/2.8 |
The 14n allows you to take advantage of either auto or manual focus via a small rotating control on the front of the camera, right next to the lens. Setting the switch to "M" puts the camera into manual focus mode, "S" places it in Single Servo AF (focus priority), and "C" puts it into Continuous Servo AF (release priority). Single Servo simply means that the camera sets focus only once, when the Shutter button is first pressed halfway, and is best for still objects. Continuous Servo means that the camera continuously adjusts the focus, as long as the Shutter button is halfway pressed, and is best for moving objects.
The AF Area Mode setting on the Exposure Mode dial lets you select between Single Area and Dynamic Area, both of which offer a Closest Subject Priority option. Single Area AF simply means that the camera judges focus based on one part of the subject. Dynamic AF employs all five of the autofocus brackets, or areas. The camera first focuses on the subject in the central focus area. Whenever the subject moves to a different AF area, the camera also shifts the focus to "follow" the subject. This is great for erratically moving subjects. The Closest Subject Priority option (enabled through the Custom Settings menu) means that the camera first focuses on the closest object that falls into one of the five focus areas and then tracks it as it moves. In Single Area AF mode, you can change the main focus area by unlocking the focus area selector (the four-way Arrow Rocker pad on the back panel) and then shifting the focus area using the up, down, right, or left arrow keys. Then, simply lock the focus area selection by sliding the switch back into place. By default, the 14n does not "wrap" the focus area selector as you scroll between focus areas. Through the Custom Settings menu, you can opt for a "Wrap" function, which hunts for the next area from top to bottom or left to right. What this means is that if you continue to press the right arrow key when the right focus area is selected, the selection will wrap around the display, jumping next to the left focus area.
There are two methods for using the AF Lock function. The first is to place the central subject in the selected focus area, halfway press the Shutter button, then realign the composition and fire the shutter. Alternatively, when using Single Servo AF, you can press the AF-L/AE-L button to lock focus (and exposure, unless set for focus only in the Custom Settings menu). Keeping this button pressed will lock focus and/or exposure, even if the Shutter button is not held down. This allows you to recompose the photograph without keeping your finger on the Shutter button, but on the AE-L/AF-L button instead. (Thereby resulting in less chance that you'll accidentally fire the shutter when you don't intend to.)
Exposure
| Free Photo Lessons | |
|
In any of the camera's exposure modes, except Manual, the exposure compensation adjustment lets you increase or decrease exposure in one-half-step increments from -3 to +3. (For the record, I greatly prefer having the option of a one-third step size on digital cameras, as a full half-stop adjustment is really too coarse, leaving too large a step between one exposure setting and the next.) The 14n offers three metering systems: Matrix / 3D Matrix, Center-Weighted, and Spot. In Matrix mode, the camera divides the image area into 10 segments and meters each one individually. The camera then examines overall brightness and the differences between the various segment readings to determine the best overall exposure for the scene. If a Nikkor D-type lens is in use, 3D Matrix metering is available. Also dividing the image into 10 segments, 3D Matrix mode not only reads brightness, but also takes into consideration scene contrast and subject distance to provide a more accurate exposure. Center-Weighted metering reads the exposure from a fairly large area around the center of the frame, while Spot metering looks at only a small point in the very center. If you're uncertain of an exposure, the 14n's Auto Exposure Bracketing mode captures a series of images at different exposures, bracketed around the main metered setting. Through the settings menu, you can specify a series of either two or three frames, as well as the order of capture. (For example, under/over/normal vs under/normal/over.) Exposure can vary as much as +/- 2 EV between subsequent shots.
The camera's AE/AF Lock button lets you lock exposure and/or focus without half-pressing the Shutter button. In the settings menu, you can configure the AE/AF button to lock either exposure, focus, or both.
The 14n features a Digital Exposure Correction (DEC for short) option through its record menu, a very unusual feature for a professional-level camera. This automatic adjustment examines the image post-exposure, and makes minor adjustments to the tone curve and color balance to produce what it thinks is a more correct overall exposure. Note though, that this doesn't correct for improper shutter speed, aperture, or ISO selections, it merely tinkers with the image data after it's acquired. For JPEG files, the change appears directly in the files themselves. Data in RAW files is not adjusted directly, although an adjustment setting is saved for optional application later, in Canon's Mac- or Windows-based image processing software. This could be a handy option when used in conjunction with the 14n's simultaneous dual-format RAW/JPEG file capability. The JPEG files would reflect the camera's adjustments, while the RAW files would preserve the original image data.
I didn't experiment a great deal with the 14n's DEC option, after having a somewhat negative experience with it in my initial night shooting at PMA in Las Vegas. Reading about the option, I decided to turn it on, but also have the camera save RAW files as I shot. I figured this would be the best of both worlds, as I'd have the benefit of DEC in the JPEGs, but still be able to revert to the RAW files if I needed to. As it turned out, it was very fortunate that I chose to also save the RAW files, as the DEC pretty much made a hash of the night-scene JPEGs. The problem was that DEC kept thinking that the shadow areas were too dark, tweaking the tone curves to boost the brightness there. Unfortunately, in the process of doing this it horribly amplified the image noise, producing incredibly blotchy shadows. I suspect this feature may work much better under daylight shooting conditions, but once bitten, I was twice shy, and so ended up leaving it turned off the rest of the time I had the camera. (See my notes below about the JPEG format files from the 14n though. - They're really suboptimal at this stage of the firmware development, so I ended up shooting almost exclusively in RAW mode anyway.)
Another option, called "Look" in the settings menu, applies a tone scale/color saturation adjustment to captured images. Two adjustments are available: Portrait and Product. The Portrait setting lowers contrast to improve detail in the highlights and shadows, while Product mode increases contrast and color saturation. Just as with Digital Exposure Correction, the Look adjustment applies immediately to JPEG files. RAW files are tagged according to the Look they were captured with, and the adjustment is applied when they're viewed with Kodak's Photo Desk software.
Depending on the image resolution that's selected, the 14n offers an ISO range from 80 to 800. The maximum for full-resolution 13.5-megapixel files is 400. While very long shutter times (including bulb exposures) are supported by the camera body itself, sensor noise effectively limits maximum exposure times to a second or less. While it's possible that full-production cameras will do better in this regard, I sincerely doubt it. The noise appears to be a consequence of the sensor technology Kodak is using, and as far as I can tell, the only changes being made at this point involve firmware, not the camera's hardware. The 14n does offer quite a bit of control over noise-reduction processing (particularly in the Photo Desk software), but in my experience with it, it was difficult to significantly reduce image noise without also losing some subject detail as well.
White balance options on the 14n include Auto, Daylight, Tungsten, Fluorescent, and Flash presets, and a Click Balance (manual) setting. Within each of the presets, you have a handful of options. For example, the Daylight setting offers Standard, Warm, and Cool settings, and the Flash preset offers Standard, Warm, Cool, and Studio options. The Click Balance option analyzes the RGB values from the most recently captured image, or a saved image, and applies them to the next image captured. Thus, you can snap an image of a gray card under specific lighting, and then apply that color balance to each subsequent image. Once you've selected Click Balance, an eyedropper appears over the image, letting you pick the specific area you want to use as your white balance reference.
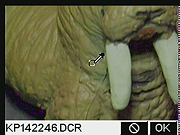 A
particularly nice touch on the 14n is the degree of precision with which you
can select white- or gray-point references for determining color balance. You
can zoom in on the image on the LCD screen and move the selection eyedropper
with the arrow keys to sample a specific part of the frame. (See the illustration
at right for an example, with an image zoomed way in on the LCD screen.) This
is a great feature, making it easy to zoom in on just a part of the subject
to select your white/gray reference point.
A
particularly nice touch on the 14n is the degree of precision with which you
can select white- or gray-point references for determining color balance. You
can zoom in on the image on the LCD screen and move the selection eyedropper
with the arrow keys to sample a specific part of the frame. (See the illustration
at right for an example, with an image zoomed way in on the LCD screen.) This
is a great feature, making it easy to zoom in on just a part of the subject
to select your white/gray reference point.
The 14n also features a Sharpness adjustment, with settings of None, Low, Medium, and High available on the camera. These settings are applied directly to JPEG image files, but once again are simply saved as tags on RAW-format (DCR) files. Tagged DCR files are automatically processed using the selected sharpening setting whenever JPEG or TIFF files are extracted from them with Kodak's Photo Desk software. The sharpening tool in Photo Desk offers good control, although it lacks an effective on-screen preview of the results of your settings, making it awkward to work with interactively. - See the subsequent software section of this review for more detail on Photo Desk's options and control panels.
A Self-Timer mode provides a 10-second delay once the Shutter button is pressed, giving you time to run around in front of the camera before the exposure.
File Format Issues
While the Pro 14n can write either DCR (RAW) and JPEG files (or even both simultaneously),
the two file formats are definitely not equal partners in the camera's design
and workflow. Kodak itself readily admits that their in-camera JPEG generation
leaves something to be desired. For critical work, you'll really want to save
your images in the DCR format in the camera, and then extract the final JPEGs
from the DCR files with Photo Desk when you're back at the computer. This is
a bit of a hassle, but it's pretty safe to assume that some future firmware
update will improve the camera's JPEG code. (This is one area where Kodak deserves
enormous credit: They've consistently done an excellent job of supporting their
camera products with field-installable firmware upgrades, a good hedge against
both new-product birthing pangs and early obsolescence.)
Flash
The 14n features a built-in, pop-up flash unit with a guide number of 12 meters (39 feet) at ISO 100. For a standard f/2.8 lens, this would translate into a flash range of roughly 14 feet (4.3 meters). Depending on the lens in use, the flash unit offers D-TTL metering control in three modes: 3D Multi-Sensor Balanced Fill-Flash for Digital SLR, Multi-Sensor Balanced Fill-Flash for Digital SLR, and Standard TTL Flash for Digital SLR. With 3D Multi-Sensor Balanced Fill-Flash metering (Type G or D CPU lenses), the flash balances the exposure based on readings from the 3D Matrix Metering system. The built-in flash operates in either Front-Curtain Sync, Slow Sync, Rear-Curtain Sync, Red-Eye Reduction, or Red-Eye Reduction with Slow Sync modes. A Flash Exposure Compensation adjustment controls flash intensity, adjusting it from -3 to +1 EV in one-half-step increments.
For connecting more powerful flash units, the 14n also features an external flash hot-shoe as well as a PC sync terminal. The same D-TTL flash metering modes are available, depending on the type of lens and speedlight connected to the camera, and the full range of flash sync modes are available as well.
Continuous Shooting
Through the camera's Drive setting, the 14n features a Continuous Shooting mode that captures a series of images for as long as the Shutter button is held down. The manual claimed a frame rate of 2.5 frames/second, but my tests showed a maximum rate of only 1.72 fps. Actual frame rates will vary, depending on the JPEG compression and image resolution settings, and the number of images in the series will depend on the amount of available memory space.
Sound
The 14n also lets you record short clips of sound to accompany captured images. The manual doesn't specify how long you can record sound, and I didn't test this function while I had the prototype unit on hand.
Variable Cropping Ratios
An unusual feature of the 14n is it's provision for a variety of different cropping
aspect ratios. "Aspect ratio" is simply the ratio between the length
and width of the image. Common examples are the 2x3 ratio of conventional 35mm
film (making 4x6 prints a perfect fit), the 4x3 ratio of computer screens and
most consumer digicams, etc. The Pro 14n offers aspect ratios of 2x3, 4x5, and
2x2. Like many other exposure parameters, the crop aspect ratio setting applies
directly to JPEG images created in the camera, but only exists as a "tag"
on RAW-format DCR files. With DCR files, the full sensor information is saved
in the file, regardless of the crop ratio selected, but the chosen crop ratio
is recorded in the file header. The crop is applied when the images are opened
in the Photo Desk application, and the crop can also be changed at that point
as well.
NOTE: My qualitative characterizations of camera performance below (that is, "reasonably fast," "about average," etc.) are meant to be relative to other cameras of similar price and general capabilities. Thus, the same shutter lag that's "very fast" for a low-end consumer camera might be characterized as "quite slow" if I encountered it on a professional model. The comments are also intended as only a quick reference: If performance specs are critical for you, rely on the absolute numbers to compare cameras, rather than my purely qualitative comments.
|
|
||
|
|
Normal Card |
|
| Power On -> First shot | 12.4 | Camera takes a very long time to start up, due to internal dark-frame noise calibration. Production units may start up faster. |
| Shutdown |
|
No lens to retract, times shown are for buffer clearing. (Max clearing time with a fast memory card is ~29 seconds, but slow cards can result in very long buffer clearing times. |
| Play to Record, first shot | 0.2-0.3 | Camera obeys shutter priority, it can always shoot, even when in playback mode. Times shown are approximate shutter lag times, will vary with lens being used. |
| Record to play (max/min res) | 1.6 | Time for most recently shot image to appear on-screen after hitting "OK" button. Fairly typical. |
| Shutter lag, full autofocus | 0.234 | Time will vary greatly with lens in use and how far lens mechanism must traverse to acquire focus. Time shown is for 104mm f/2.8 macro lens with lens already focused on subject from prior exposure. (Eg, best-case.) There was some variation, with most shots showing a shutter lag of ~0.195 secs, but as many as 30% coming in at higher values, up to 0.347 secs. (Most but not all of these occurred after the camera had been resting for 10-30 seconds between shots.) 0.234 was the average across 20 or so shots, but best performance averaged 0.195 seconds. |
| Shutter lag, manual focus | 0.128 | This time should be independent of the lens in use, since AF speed isn't an issue. |
| Shutter lag, prefocus | 0.119 | This is the lag time when the shutter is half-pressed and held prior to the shot. Very slightly faster than the manual focus time. |
| Cycle time, JPEG large/fine
files (CF card) |
0.61 | Four-shot buffer for large/fine JPEGS. After this is full, there's an 11-30 second delay, depending on card speed, then subsequent shots occur at intervals of 6-14 seconds, again depending on card speed. (You definitely want to use fast cards with the 14n.) (Time is for saving to CF card slot - Prototype firmware didn't support SD/MMC card slot.) |
| Cycle time, JPEG small/basic
files (CF card) |
0.60 | Seven-shot buffer for small/basic JPEGS. After this is full, there's an 8-20 second delay, depending on card speed, then subsequent shots occur at intervals of 4-12 seconds, again depending on card speed. |
| Cycle time,
Large RAW files (CF card) |
0.58 | Seven-shot buffer for large RAW files. After this is full, there's an 10-30 second delay, depending on card speed, then subsequent shots occur at intervals of 4-25 seconds, again depending on card speed. |
| Cycle Time,
Large RAW+JPEG files (CF card) |
0.61 | Shooting in combined RAW + JPEG mode drops buffer capacity back to four frames, and results in very long buffer-empty times. (30 seconds with the fastest cards I tested, up to 162 seconds with the slowest.) |
| Continuous Mode,
JPEG Large/Fine (CF card) |
0.58 | Four-shot buffer, then wait 30 seconds (with a fast card) for buffer to clear, can then shoot another four shots rapidly. |
| Continuous Mode, RAW Files (CF card) |
0.58 | Six- to seven-shot buffer, then wait 30 seconds (with a fast card) for buffer to clear, can then shoot another 6-7 shots rapidly. (Only impact I saw from write-accelerated cards was here, where WA cards gave 7 shots before buffer fill, normal cards gave 6.) |
Overall, the Pro 14n was a mix of great speed and noticeable sluggishness. Shooting in either JPEG or RAW mode (but not both simultaneously), it is pretty fast (~1.7 frames/second in either single-shot or continuous mode) while writing to its buffer, but you then need to wait quite a while for the buffer to empty. The buffer capacity is on the small side for a professional camera, only ~four large/fine JPEGs, or 7 RAW images. There's no question that very fast memory cards are a solid investment with the Pro 14n: Buffer-clear times with even the fastest Lexar cards I tested were on the order of 30 seconds, but stretched to as long as 162 seconds(!) when working with my "standard slow card," a 256 MB Mr. Flash unit.
I had on hand a pair of Lexar 24x memory cards, identical except that one of them was one of the new "Write Accelerated" (WA) cards. While the 14n is supposed to be able to take advantage of WA technology, that function must not have been enabled in the version firmware that my prototype unit was using, because I saw virtually no difference between the two cards. The relatively fast 24x card themselves did produce markedly better buffer clearing times than did lesser cards though.
A really neat feature of the 14n was also the source of some of my greatest frustration with it: It has the ability to write both RAW and JPEG files to its memory cards simultaneously. - That is, it can save both RAW and JPEG copies of each image shot. I could see this having a lot of advantages, with the RAW files serving as "digital negatives" in the event post-exposure manipulation was required, while preserving the speed and ease of use of a JPEG-based workflow. The problem with this is that shooting slowed to a crawl on my prototype unit when operating in this mode. The original prototype was particularly bad in this regard, with buffer capacity being reduced to only 2 shots when I was saving both RAW and JPEG files simultaneously. A subsequent firmware upgrade raised this limit to 4 shots, but the camera still required a great deal of time for its buffer to clear when operating in this mode, and a four-shot buffer can be pretty limiting if you're shooting a quickly changing subject and bracketing exposure as well.
While the 14n will support simultaneous use of both CF and SD/MMC memory cards, the firmware on my prototype unit did not have the SD/MMC slot enabled.
Operation and User Interface
Anyone already familiar with Nikon 35mm SLRs should feel at home with the 14n's user interface, which is very similar. The dials and control buttons that affect basic camera operation are very similar to those of many 35mm models, with only the portions relating to digital operation presenting a learning curve to be climbed. The 14n's combination of external dials and controls make it quick and easy to change most of the camera's primary exposure settings without delving into the LCD menu. The LCD menu itself is quite large, but is divided into four subject tabs for simpler navigation. I personally wasn't too keen on the layout of the 14n's LCD menu system, feeling it to be somewhat cumbersome to navigate. On a positive note though, you can select up to five functions for rapid access via the "hotkey" on the 14n, providing shortcuts to LCD menu functions, as well as to functions shown on the smaller status display on the camera's rear panel. I didn't shoot with the 14n long enough for the menu system to become completely intuitive, but did find that the hotkey function made a big difference in how easy it was to use.

Depth of Field Preview Button: Nestled between the hand grip and lens
on the camera's front panel, this button stops down the lens aperture to the
value you've selected, so you can preview the depth of field through the camera's
viewfinder.

Lens Release Button: On the opposite side of the lens, this button
unlocks the lens, allowing it to be rotated and removed from its mount.
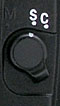
Focus Selector: Directly below the Lens Release button, this selector
dial controls the main focus mode. Positions are Manual, Single, and Continuous.
![]()
Sub-Command Dial: Located at the top of the hand grip, on the front
of the camera, this dial controls a variety of camera settings when turned while
pressing a control button.

Shutter Button: Angling down from the camera's top panel, just over
the hand grip, this button sets focus and/or exposure when halfway pressed.
It releases the shutter when fully pressed.

Power Switch: Surrounding the Shutter button on the top panel, this
switch turns the camera on or off.
![]()
Exposure Compensation Button: Behind the Shutter button on the top
panel, this button adjusts the exposure from -3 to +3 exposure equivalents (EV)
in one-half-step increments when pressed while turning the Main Command dial.
Pressing this button together with the Auto-Exposure Bracketing button resets
all of the camera settings to their factory defaults.
![]()
Flash Exposure Compensation Button: To the right of the Exposure Compensation
button, this button adjusts the flash exposure compensation from -3 to +1 EV
in one-half-step increments when held down while turning the Main Command dial.
![]()
LCD Illuminator Button: On the right side of the top status display
panel, this button illuminates the LCD status displays briefly when pressed.

Flash Head Release Button: On the left side of the pop-up flash compartment
(as viewed from the rear), this button releases the flash from its compartment.
![]()
Drive Mode Selector Lock Button: Located in the far left corner of
the top panel, this button locks or unlocks the Drive Mode Selector.

Drive Mode Selector: On the left side of the camera's top panel, this
dial selects the camera's drive mode. Options are Single, Continuous, Self-Timer,
or Lock Exposure (this last locks the exposure settings so that they cannot
be changed).
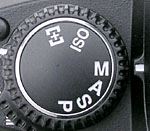
Exposure Mode Dial: Sitting directly on top of the Drive Mode Selector,
this dial sets the camera's exposure mode. Choices are Program (P), Shutter
Priority (S), Aperture Priority (A), or Manual (M). The dial also accesses the
camera's ISO and AF Area Mode settings.
![]()
Auto-Exposure Bracketing Button: In the top left corner of the camera's
rear panel, just below the Exposure Mode dial and Drive Mode Selector, this
button activates the camera's Auto-Exposure Bracketing mode when pressed while
turning the Main Command dial. Pressing this button while turning the Sub-Command
dial changes the bracket step size, the number of frames in the series, and
the order that shots are taken in, cycling through a series of configurations
involving various combinations of those parameters. Pressing this button in
conjunction with the Exposure Compensation button resets the camera's settings.
![]()
Flash Sync Mode Button: Adjacent on the right to the Auto Exposure
Bracketing button, this button controls the operating mode of the built-in flash.
Pressing the button while rotating the Sub-Command dial cycles through Front-Curtain
Sync, Slow Sync, Rear-Curtain Sync, Red-Eye Reduction, and Red-Eye Reduction
with Slow Sync modes.

Menu Button: The topmost button in a series lining the left side of
the LCD monitor, this button displays the settings menus and activates the LCD
display. This button also cancels the menu display.

Nav+ Button: Beneath the Menu button, this button activates the LCD
and displays the last-accessed image, with a small Image Mode menu overlay that
lets you choose the type of playback display you want. (Normal, index, histogram,
or zoomed.) During image review, this button changes the action of the arrow
keys. With this button held down, the up/down arrow keys jump between image
folders, while the left/right arrow keys jump 10 images forward or backward
on the memory card.
![]()
Hotkey Button: Just below the Nav+ button, this button can be customized
as a shortcut key to menu functions. When pressed, it activates the LCD display
with a highlight over the shortcut function, so you can quickly change a setting.
Pressing the left or right arrow keys while this button is held down cycles
through the programmed hotkey shortcuts. (The manual says the top or bottom
keys, but on my prototype unit, it was the left/right keys that cycled through
the shortcuts.)

Digital Status Button: The final button in the series lining the left
side of the LCD monitor, this button highlights the last-used function on the
digital status LCD screen, as well as its associated menu option on the larger
LCD monitor. Holding down the button while pressing the right or left arrow
keys cycles through the different functions shown on the digital status display
beneath the main LCD monitor.

Delete Button: Adjacent to the right side of the LCD monitor, this
button displays the image erase menu, allowing you to delete images from the
memory card.

Tag/Record Button: Below the Delete button, this button displays the
Tag menu when pressed quickly and released. (The Tag menu lets you tag recorded
images for printing or a number of other post-capture operations within the
Kodak DCS Photo Desk software. Pressing and holding this button for more than
one second enables an audio record mode, which records short sound clips to
accompany captured images.
![]()
OK Button: Just above the Four-Way controller on the back panel, this
button confirms menu selections. Pressing this button while the LCD monitor
is inactive turns it on and displays the most recently captured image, with
a small Image Mode menu overlay that lets you choose the type of playback display
you want. (Normal, index, histogram, or zoomed.)

Cancel Button: Below the OK button, this button cancels menu selections
and backs out of menu screens. It's also generally how you turn off the main
LCD display when you're finished using it.
Four-Way Controller: Dominating the right side of the camera's back
panel, this rocker-toggle button features four arrow keys. In any settings menu,
these buttons navigate through menu selections. In image review mode, the right
and left arrows scroll through captured images on the memory card. When the
LCD monitor is powered off, the arrow keys let you select the AF area.
Four-Way Controller Lock Switch: Surrounding the Four-Way controller, this rotating ring locks the controller and prevents it from making any adjustments.
![]()
Main Command Dial: Located in the top right corner of the rear panel,
this dial adjusts a variety of camera settings, when turned while holding down
various control buttons. In Aperture Priority and Shutter Speed Priority modes,
this dial sets either the aperture or shutter speed settings. In Manual exposure
mode, the dial sets the shutter speed.

Metering System Selector: To the right of the viewfinder eyepiece on
the rear panel, this dial sets the camera's metering mode to 3D Matrix, Center-Weighted,
or Spot modes.
AE/AF Lock Button: In the center of the Metering System Selector, this button locks focus or exposure for one shot.

Vertical Shutter Release Button: Located on the bottom of the right side
of the camera (when looking at the back panel), this Shutter button can be used
when shooting vertically. It's indented slightly to prevent it from being accidentally
pressed during normal use. NOTE that the vertical release is also disabled by
default. It can be enabled via the camera's setup menu.
Camera Modes and Menus
Shooting Mode: Turning the on camera automatically places it into Shooting mode. The Exposure Mode dial lets you select Program AE, Shutter Priority, Aperture Priority, or Manual exposure modes. (A Flexible Program mode is accessed by turning the Sub-Command dial in Program AE mode. Flexible Program mode lets you choose different combinations of aperture and shutter speed, to control depth of field or motion blur, while still maintaining the convenience of automatic exposure control.) Depending on the exposure mode selected, the user has as much or as little control over exposure as needed.
Image Review Mode:
Accessed by selecting an image folder and then an image review mode through
the menu, this mode lets you review captured images on the memory card. Images
can be erased or displayed with a variety of information screens. When the LCD
monitor is disabled, pressing the OK or Nav+ buttons activates the display,
along with a short menu. (Pressing the up or down arrow key will cycle through
these modes. If the menu isn't displayed, pressing the up or down keys in playback
mode recalls it.):
Basic-Mode Menu:
Camera Menu:
 ISO:
Sets the camera sensitivity from 80 to 800 ISO equivalents, in one-third-step
increments. The actual adjustment range varies with the image resolution,
restricted to lower values at maximum resolution. (My prototype eval unit
limited ISO to 400 at the full 13.5 megapixel resolution. Production models
may or may not have a higher limit.)
ISO:
Sets the camera sensitivity from 80 to 800 ISO equivalents, in one-third-step
increments. The actual adjustment range varies with the image resolution,
restricted to lower values at maximum resolution. (My prototype eval unit
limited ISO to 400 at the full 13.5 megapixel resolution. Production models
may or may not have a higher limit.)
Review Menu:
 Folder:
Selects a folder for image review, either from SD/MMC Card or CF Card. A sub-menu
lets you choose which memory card you want to look at. Once a card is selected,
the available folders are displayed.
Folder:
Selects a folder for image review, either from SD/MMC Card or CF Card. A sub-menu
lets you choose which memory card you want to look at. Once a card is selected,
the available folders are displayed.
Image Menu:
 JPEG
Quality: Sets the JPEG compression to Good, Better, or Best.
JPEG
Quality: Sets the JPEG compression to Good, Better, or Best.
Setup Menu:
 User
Mode: Offers Basic and Advanced modes. Basic provides access to just
a handful of digital controls, displayed on a single-screen menu, while Advanced
mode permits access to all camera functions.
User
Mode: Offers Basic and Advanced modes. Basic provides access to just
a handful of digital controls, displayed on a single-screen menu, while Advanced
mode permits access to all camera functions.
 Default
Reset: Restores either the digital settings, camera settings, or
both to the factory defaults.
Default
Reset: Restores either the digital settings, camera settings, or
both to the factory defaults.
Custom Menu:
 Soft
Press AE-L: Determines whether or not exposure is locked with a half-press
of the Shutter button. (Default is not.)
Soft
Press AE-L: Determines whether or not exposure is locked with a half-press
of the Shutter button. (Default is not.)
 Bracketing
Order: Determines the order that images are captured in a bracketing
sequence, either underexposed, normal exposure, overexposed; or normal exposure,
underexposed, overexposed (default setting).
Bracketing
Order: Determines the order that images are captured in a bracketing
sequence, either underexposed, normal exposure, overexposed; or normal exposure,
underexposed, overexposed (default setting).
Image Storage and Interface
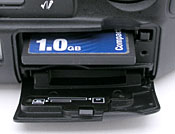 The 14n stores images on either
CompactFlash (Type I or II) or SD/MMC cards, and is compatible with the IBM
MicroDrive, and offers an unusual degree of flexibility in its use of the two
card slots. Through the settings menu, you can choose to store either RAW or
JPEG files, or both, to either the CF or SD/MMC cards, or both. For instance,
you can save a RAW file plus a JPEG copy of the image, both to the CF card.
Or, you can save only the RAW file to the CF card, and the JPEG copy to the
SC/MMC slot. Or both RAW and JPEG to both CF and SD/MMC for complete redundancy
between the cards.
The 14n stores images on either
CompactFlash (Type I or II) or SD/MMC cards, and is compatible with the IBM
MicroDrive, and offers an unusual degree of flexibility in its use of the two
card slots. Through the settings menu, you can choose to store either RAW or
JPEG files, or both, to either the CF or SD/MMC cards, or both. For instance,
you can save a RAW file plus a JPEG copy of the image, both to the CF card.
Or, you can save only the RAW file to the CF card, and the JPEG copy to the
SC/MMC slot. Or both RAW and JPEG to both CF and SD/MMC for complete redundancy
between the cards.
For each memory card, the 14n gives you the ability to manage image folders and assign specific names. You can even track a series of images with the Job Tracker function, which lets you mark all images associated with a certain event, date, etc, writing IPTC-compatible data into the files' header blocks. Individual images can be write-protected through the Image Review menu, which prevents them from being accidentally erased (except by card formatting), and can also be "tagged" to mark them for subsequent processing in Kodak's Photo Desk Pro software. The camera's Card Format option offers a Quick and Full Format, as well as a Recovery option to get back accidentally deleted files.
Four image resolutions are available: 4,500 x 3,000; 3,000 x 2,000; 2,250 x 1,500; or 1,125 x 750 pixels, with JPEG compression levels of Good, Better, and Best. RAW images can be saved at 4,500 x 3,000; 3,000 x 2,000; or 2,250 x 1,500-pixel resolutions. To mimic common film sizes, the 14n features a Crop Aspect adjustment for 2 x 3, 4 x 5, or 2 x 2 aspect ratios.
The Pro 14n doesn't ship with a memory card, but you're going to want a *really* big card to use with it: Its RAW and JPEG files are both enormous. (The 14n's JPEG files carry the Extended Range Imaging (ERI) data, which makes them about 30% larger than ordinary JPEG files of the same resolution and compression ratio.) Personally, I'd recommend that you not consider cards any smaller than 512MB for use with the 14n, and even larger cards would definitely be welcome. The table below shows image sizes and compression ratios, as well as the number of images of each size/quality/format setting that can fit on a 512MB card.
|
Resolution/Quality 32MB Memory Card |
|
|
Better |
|
|
| 4,500 x 3,000 | Images (Avg size) |
14 18.6 MB |
34 7.6 MB |
46 6.7 MB |
72 3.6 MB |
| Approx. Compression |
2:1 | 5:1 | 7:1 | 11:1 | |
| 3,000 x 2,000 | Images (Avg size) |
25 10.4 MB |
76 3.4 MB |
89 2.9 MB |
133 9.2 MB |
| Approx. Compression |
2:1 | 5:1 | 6:1 | 9:1 | |
| 2,250 x 1,125 | Images (Avg size) |
50 5.2 MB |
160 1.6 MB |
491 533 K |
577 454 K |
| Approx. Compression |
2:1 | 6:1 | 19:1 | 22:1 | |
| 1,125 x 750 | Images (Avg size) |
N/A | 286 915 K |
383 683K |
418 626K |
| Approx. Compression |
- | 3:1 | 4:1 | 4:1 | |
(The prototype unit I tested may not have had the JPEG parameters set properly
for the smallest image size, given that the "better" and "good"
settings for that resolution produced almost identical final file sizes.)
My prototype unit didn't ship with a FireWire cable, so I couldn't check its
download speed. I'll try to make this measurement whenever Kodak can get me
a production model to test.
Lost Images? - Download this image-recovery program so you'll have it when
you need it...
Since we're talking about memory and image storage, this would be a good time
to mention the following: I get a ton of email from readers who've lost photos
due to a corrupted memory card. It's tragic when it happens, there are few things
more precious than photo memories. Corrupted memory cards can happen with any
card type and any camera manufacturer, nobody's immune. "Stuff happens,"
as they say. A surprising number of "lost" images can be recovered
with an inexpensive, easy to use piece of software though. Given the amount
of email I've gotten on the topic, I now include this paragraph in all my digicam
reviews. The program you need is called PhotoRescue, by DataRescue SA. Read
our review of it if you'd like, but download the program now,
so you'll have it. It doesn't cost a penny until you need it, and even then
it's only $29, with a money back guarantee. So download PhotoRescue for
Windows or PhotoRescue for
Mac while you're thinking of it. (While you're at it, download the PDF
manual and quickstart
guide as well.) Stash the file in a safe place and it'll be there when you need
it. Trust me, needing this is not a matter of if, but when... PhotoRescue
is about the best and easiest tool for recovering digital photos I've seen.
(Disclosure: IR gets a small commission from sales of the product, but I'd highly
recommend the program even if we didn't.) OK, now back to our regularly
scheduled review...
Video Out
 The
14n is equipped with a Video Out terminal, and comes with a video cable for
connection to a television set or VCR. This allows images to be played back
on the TV screen and recorded to video tape, with all the menu options available
on the video screen. A setting in the Setup menu sets the video timing to either
NTSC or PAL.
The
14n is equipped with a Video Out terminal, and comes with a video cable for
connection to a television set or VCR. This allows images to be played back
on the TV screen and recorded to video tape, with all the menu options available
on the video screen. A setting in the Setup menu sets the video timing to either
NTSC or PAL.
Power
 The
14n uses either a custom LiIon battery pack or the AC adapter for power. The
packs I received with the prototype unit didn't show any capacity listing on
them in mAh, only a voltage (7.4v). I had a good bit of difficulty measuring
the power drain of the camera with my usual test setup, as the camera seems
to draw rather large spikes of current, and it is also very finicky about noise
on its power supply line. I finally managed to jerry-rig an external power connection
that I could monitor but that was also well-filtered. The results were surprising
on a couple of fronts, which I'll explain in a minute. But first, here are the
power-consumption numbers I came up with:
The
14n uses either a custom LiIon battery pack or the AC adapter for power. The
packs I received with the prototype unit didn't show any capacity listing on
them in mAh, only a voltage (7.4v). I had a good bit of difficulty measuring
the power drain of the camera with my usual test setup, as the camera seems
to draw rather large spikes of current, and it is also very finicky about noise
on its power supply line. I finally managed to jerry-rig an external power connection
that I could monitor but that was also well-filtered. The results were surprising
on a couple of fronts, which I'll explain in a minute. But first, here are the
power-consumption numbers I came up with:
|
|
(@7.4 volts on the external power terminal) |
(?? mAh Li-Ion battery pack) |
| Capture Mode, quiescent state |
|
|
| Capture Mode, shutter fires (peak current) |
|
|
| Processing images (starts high, then drops) |
|
|
| Image playback (starts high, then drops) |
|
|
| Capture mode, AF assist light active |
|
|
| Capture menu displayed (menu navigation) |
|
|
| Scroll around zoomed image view in playback mode |
|
|
Overall, this is a very power-hungry digital camera! Peak (transient) currents were as high as 1.4 amps at 7.4 volts, when the shutter fired, and operating current while it was processing images would go as high as 780 mA for extended periods. This is a lot of power for a digital camera, more than most others I've tested in the past. When you read the specs for the 14n's electronics though, the reason becomes obvious: The 14n packs a tremendous amount of processing horsepower to manipulate its huge files, and that carries a price in terms of power consumption. This is to be expected, and most high-end digicams gobble a fair bit of power while they're actively processing images. What's different in the 14n's design though, is that it continues to consume a fair bit of power the entire time it's powered up, whether it's processing files or not. Kodak had told me that the 14n's quiescent power drain is fully half what it is when it's processing images. I didn't find this to be the case though, as I measured quiescent drain at only 130 mA, actually a pretty low figure.
There's been some speculation on the internet that the 14n draws battery power even when its power switch is turned off, but I only learned of this after I'd had to ship the prototype unit back to Kodak, so can't either confirm or deny the truth of this speculation. In my own use of the camera though, I was constantly struck by how short the battery life was, seemingly only an hour or so in my typical usage. - This contrasts greatly with many other pro SLRs I've tested, which have battery packs capable of sustaining the camera for many hours.
Bottom line - DEFINITELY plan on purchasing one (or two) extra battery packs along with the 14n, and/or a hefty external, belt-mounted power pack. If you plan to shoot for more than about an hour at a time, you're going to need extra batteries.
Included Software
| |
|
|
The 14n ships with Kodak Professional DSC Camera Manager software, which provides minor image editing and management capabilities. Also included is Kodak Professional DSC Photo Desk, for processing RAW files, and the Kodak Professional Extended Range Imaging File Format Module, for opening ERI JPEG files. An IEEE-1394 connector jack provides high-speed connection to a computer for downloading files.
The Photo Desk software is a pretty key component of the overall Pro 14n package, so I hope to come back to this review shortly to add a complete description of its operation. It makes it pretty easy to quickly review and batch-process RAW image files, a key focus of Kodak's camera development. - Kodak's RAW files consistently capture more data in extreme highlight regions, that can be brought back by adjusting the tonal rendition after the fact in Photo Desk. Many camera makers offer RAW-format output files from their cameras, but few if any do as good a job at preserving dynamic range as do those from Kodak.
In the Box
Retail-boxed versions of the Pro 14n ship in the US with the following accessories included:
Test Results
Given that the particular Pro 14n unit that I tested for this review wasn't
a final production model, I didn't run it through all my usual standardized
tests. While I did shoot some of my standard test targets, I focused more on
shooting some side by side comparisons with the Canon EOS-1Ds, its most natural
competitor. (Both are full-frame digital SLRs, with resolutions considerably
higher than the now-standard six megapixels, although the 1Ds is a much higher-priced
camera.)
I've assembled a number of analysis pages that present the shots I snapped with the Pro 14n and EOS-1Ds, as well as fairly detailed comments on what I saw in them. If you're seriously considering one or the other of these cameras, you'll want to examine these photos and read the commentary on them in detail. To jump to these pages, see the temporary picture-index page, or follow the links below:
Following is a summary of my comments on the analysis pages, as well as some
general observations about the two cameras:
Resolution
There's no question about it, the 14n shows the highest resolution I've yet
found in a digicam. Besides its very high pixel count though, some of its exceptional
sharpness derives from Kodak's decision to leave out the antialiasing (lowpass)
filter. This had the (not unexpected) effect of producing artifacts such as
jaggies and color aliasing in areas of very high detail. These effects were
quite evident in the shots I snapped using my Nikkor 105mm f/2.8 Micro (Nikon
parlance form"macro") lens. Given the tiny dimensions of the pixels
relative to conventional film grain structures, it's very likely that the use
of less-sharp lenses could avoid these artifacts. - But resolution is one of
the primary reasons a photographer would purchase a 14n in the first place.
Kodak does offer special anti-moire processing in its Photo Desk software, but I found it only partially successful at removing color "twinkles" around fine, high-contrast detail. (See the "Silos" shot analysis page.) I personally would much prefer to have an an antialias filter and give up some of the cutting edge of sharpness, if it would mean losing the camera's tendency to produce color artifacts. Others may well choose differently though: I'm reminded of the response of many of my readers to the Sigma SD-9 SLR, which also lacked an antialias filter. I personally found that camera's jaggies and tendency toward luminance moire unacceptable, but many people don't seem to be bothered by it, instead exclaiming over the unusual sharpness of its images. I strongly suspect that the 14n will find a similar response among prospective owners.
In contrast to the 14n, the 1Ds pretty much never produced a moire or other aliasing, but at the cost of somewhat softer images with slightly lower absolute resolution. Not to overemphasize the point, but this is going to be an area of personal preference: Examine the test photos closely and make up your own mind.
My comparison of the 14n and 1Ds did emphatically underscore the multidimensional
nature of "resolution" though. While the 14n would consistently out-resolve
the 1Ds when dealing with high contrast subject matter (res target elements,
tree limbs against the sky, etc.), the 1Ds just as consistently blew it away
when dealing with low contrast subjects (interior detail in the clumps of pine
needles of the Silo shot, detail in Marti's hair in the studio shot, etc.).
This is a result of the 14n's sensor noise issue, and the software legerdemain
used to cope with it. - See my comments on image noise below.
Color
Very good to excellent, although I felt it sometimes was more "pleasing"
than accurate. Looking at the results from the 14n and 1Ds side by side, I felt
that neither camera really nailed the color on all (or even most) of the shots,
but found the 14n's color bobbles less objectionable. The 1Ds tended to produce
images with a slightly greenish color cast under most circumstances, while the
14n tended toward slight oversaturation, and blues that were a bit deeper than
the original subject. (A good example of this is the sky in the Silos shot -
The actual sky color that day was somewhere about halfway in between the ways
that the two cameras rendered it. The 14n's sky blue was too deep and had too
much magenta in it, while that of the 1Ds was too pale and had too much green.
If you literally averaged the two colors, you'd end up with the sky as it actually
appeared that day.
For a professional camera like the 14n and 1Ds, color rendition is possibly
less important than it is in consumer-level cameras, simply because pros
are much more likely to employ some sort of a color-managed workflow. Both cameras
seemed very well-behaved (that is, consistent) in their color handling, and
both support color spaces with wide gamuts that are well suited to use in color-managed
environments.
Exposure and Tonality
I didn't challenge the 14n with any especially difficult subjects, in terms
of tonal range and contrast. (This is the function of my standardized, horribly-lit
"outdoor portrait" shot, which deliberately uses terribly harsh direct
sunlight to evaluate how well cameras manage to hold onto detail in very strong
highlights.) That said, I've observed that Kodak's RAW file format (and the
associated ERI JPEG format) preserves noticeably more highlight detail in overexposed
areas than any does any other RAW format I've seen. The 14n did seem to offer
a really unusual ability to retrieve data from overexposed highlights, via the
Photo Desk software.
Tonality on the 14n generally seemed to be quite good. Its native contrast level struck me as about right for general shooting, and its "Portrait Look" setting further reduces contrast to preserve more subtle tonal gradations. In comparison, I felt that the default tone curve of the 1Ds was somewhat harsh, particularly as evidenced in the studio portrait test. Before you write off the 1Ds for portraiture though, it must be pointed out that Canon's host software for it gives you an unprecedented ability to create your own tone curve, embodying whatever characteristics you choose. (Albeit via an excessively tedious user interface. Still, most users would only need to create one or two custom tone curves to meet their shooting needs with the 1Ds, and the software/camera combination really does give you complete control.)
Exposure metering on the 14n was generally pretty accurate in the limited tests
I performed, although none of the subjects I shot (apart from the Las
Vegas night scenes) presented much of a metering challenge. I really didn't
like the limitation to 1/2 EV exposure steps though. Half-EV steps are really
too coarse for digicams, IMHO. (The too-large exposure steps are somewhat mitigated
by the fact that the combination of the DCR format's excellent highlight headroom
and Photo Desk's post-shot exposure correction capability make it easy to bring
back "lost" highlights. I'd much rather have the control on the camera
to avoid losing the highlights in the first place though.)
Image Noise
Image noise in the 14n is a little hard to discuss in objective, quantifiable
terms, simply because so much of the camera's performance in this area is a
function of how the images are post-processed in the Photo Desk software application.
Furthermore, it's very much up to the photographer to choose how he/she wants
to make the tradeoff between image noise and detail in areas of low subject
contrast.
The issue has to do with how short-exposure noise reduction algorithms work in general, and how those employed by Kodak work in particular. The approach involved is to look at the contrast between picture elements in a given area, and make an assessment as to whether the inter-pixel variations are due to noise or subject detail. The general idea is that variations below a certain magnitude, and involving areas smaller than a certain minimum are considered to be noise. If the camera thinks its seeing noise in an area where it believes there isn't any significant subject detail, it "flattens" the image, reducing the inter-pixel variations.
If the scene at that point consisted of a flat patch of color or tone (a blank wall, MacBeth(tm) target swatch, etc.), this approach works very well: It reduces the image noise without any apparent deleterious effects. On the other hand, of there's a lot going on in the subject at that point (res target patterns, lots of fine, contrasty subject detail), chances are the noise won't be noticeable anyway, so leaving the image alone lets the viewer see the subject detail without them being aware of the image noise overlaid on it.
The problem comes when you have significant subject detail with relatively low contrast between scene elements. In such situations, depending on where the thresholds are set for discriminating noise, the noise-reduction processing can turn into detail-reducing processing. This is what happened with the 14n in dealing with the detail in Marti's hair in the studio portrait shot and with the inner detail in the clumps of pine needles on the Silos shot.
You can also see the 14n's noise processing "backing off" as it gets to an area of strong subject contrast, by looking around the edges of the color swatches on the MacBeth chart in the Davebox shots. There, you can see "fuzz" around the edges of the color swatches, which is the underlying sensor noise showing through. What happened is that the high-contrast edge with the black surround of the color swatch told the camera that there was strong subject detail in the area, so it needed to back off on the noise processing to preserve the subject information.
Properly setting the parameters for this sort of noise reduction processing is a ticklish and time-consuming business, as it's a matter of constant tradeoffs and experimentation. This is evidently what Kodak has been doing leading up to their shipping announcement for the 14n, and the process is apparently still continuing, based on what I've heard from other reviewers about more recent firmware releases.
The problem is, once there's noise in an image, there really isn't any way to get it out, other than having some a priori knowledge about the structure of the scene that's being photographed. (A bit of the old purse-from-a-sow's-ear story.)
While the image noise levels in flat-tinted areas are quite similar between the 14n and the 1Ds, it's obvious that the sensor in the 1Ds has much better noise characteristics than that in the 14n, reducing the need for this sort of tricky trading off of subject detail and image noise.
Having focused so much on the noise characteristics of the 14n so much though, I feel that I'd better not let the 1Ds off the hook totally, or I'll have readers emailing me crying foul, etc. So I'll comment briefly on a frequently observed but (to my knowledge anyway) never explained noise characteristic in images from the 1Ds. I refer to the little single-pixel flecks of black or white that appear in res target images shot with the 1Ds. If the camera is locked down and multiple shots taken, these tiny imperfections will stay put, but the least movement of the camera between exposures will cause them to disappear and others appear in different places. What's going on?
The answer is that this is Canon's bad-pixel substitution algorithm at work, swapping in data from adjacent pixels to take the place of that from pixels which are bad. This sort of thing happens all the time in digicams, it's just that we usually don't get to see it. (And we can only see it on res target shots snapped with the 1Ds because artificial targets like that represent something of a worst-case scenario for basic bad-pixel substitution scheme.
There's nothing too remarkable about there being a significant number of bad pixels on the 1Ds' sensor array: The economics of manufacturing image sensors mean that it'd be prohibitively expensive (and how) to require 100% pixel yield from the sensor manufacturing process. The solution is to come up with clever ways of substituting data from the surrounding area to take the place of missing data from dead sensor elements. A complete discussion of approaches for doing this is way beyond the scope of a simple camera review like this one, but most methods use some variant of a "median" filter (for those interested in looking it up in image-processing texts) to sort through the data and automatically swap-in relevant data for the bad pixel. Where Canon gets caught out on the 1Ds (and other recent cameras of theirs but not, apparently, the 10D) is when a bad pixel happens to be in either a light or dark area, with a highly contrasting region immediately adjacent to it. When this occurs, the algorithm sometimes chooses the wrong data value to substitute, so you end up seeing a light speck in a dark area, or a dark one in a light region. (Look closely at res target images from the 1Ds, and you'll see that you never find these wrong-colored specks in the middle of large areas of similar tone.)
All this just to make the point that, as good as it is, the 1Ds isn't perfect:
It shows these bad-pixel-swapping errors, while the 14n doesn't seem to. (Note
too though, that while this problem shows up in res target shots, you'll be
very hard-pressed to find it in natural scenes, where the subject tone generally
varies more gradually.)
Night/ High ISO Shots
Not to put too fine a point on it, "fuggeddabouddit." ("Forget
about it," for those not indoctrinated by American TV shows.) While more
recent firmware updates apparently help its long-exposure image noise quite
a bit, the Pro 14n just doesn't look like a good choice for low-light or high-ISO
photography. In normal lighting, its ISO stops at 400 for full-res photos (increasing
to 800 for lower-res ones), and exposures at any ISO in light levels of a foot-candle
(11 lux, representative of average city street lighting) or so are either very
noisy or show very poor tonal gradation, depending on how the noise-reduction
parameters are set.
Shutter lag and cycle time/general responsiveness
The 14n doesn't do too bad in the shutter lag department, with a manual-focus
lag time of only 128 msec (0.128 seconds). This is much faster than most consumer
cameras, but isn't as fast as the best D-SLRs (I've seen lag times as low as
58-59 msec) and the equivalent lag time on the 1Ds is 83 msec. Experienced photographers
would probably describe it as "a little sluggish," but I doubt anyone
would miss a critical shot as a result of it.
I do have some complaints over the 14n's buffer memory though: It just doesn't feel big enough, and takes way too long to empty. Depending on the shooting mode, the 14n's buffer can hold either 4 or 7 shots before having to wait for the memory card to catch up. Once full, the buffer takes a minimum of 30 seconds to fully clear, even with the fastest memory cards I tested (including Lexar "Write Accelerated" ones), and slower cards can take more than two minutes.
By contrast, the 1Ds can fire off 10 shots without stopping, and even after that point is reached, can continue to snap an additional 7 shots at 2-second intervals before really slowing down.
I'm told that the 14n has a 256 megabyte buffer memory, but based on my experience
with the prototype camera, it still felt too small. (NOTE though, that this
is an area in which the production models could do much better, as the firmware
is tweaked further.)
AF Performance/Flexibility
Another win for the 1Ds I'm afraid, although perhaps to be expected, given
the $3K price difference. I don't have any way of measuring AF system performance
quantitatively, so I generally refrain from making comments about it unless
there's a glaring deficiency or a dramatically better than average "feel"
to the camera. The 14n really doesn't fall into either camp, at least based
on my relatively limited testing with it. I didn't experience any significant
focusing problems with it, and it was overall pretty workmanlike in its operation.
Comparatively speaking though, the AF system in the 1Ds is in another category
entirely, with 45 AF sensors vs 5, and much faster, more fluid operation. Probably
a non-issue for studio use, but if you're thinking in terms of fast-breaking
action, you'll probably need a faster and more capable AF system than what's
in the 14n.
Battery Life
Battery life on the 14n was oddly short. I say "oddly," because
the power consumption I measured at the external AC adapter terminal really
wasn't all that high. (At least in the camera's quiescent capture mode.) The
current really spiked whenever I fired the shutter, and the AF system drew a
lot of power with certain lenses, but even given those factors, I really expected
to see the batteries last longer than they did. - In heavy use, I could drain
a battery in a bit over an hour, and even in light use, two hours of run time
was unusual. I've since heard from some reviewers that the camera appears to
draw current from the batteries even when its power switch is off, so it's possible
that I was using partially drained batteries when I thought they were full.
Whatever the case, definitely plan on buying an extra battery pack or two along
with the camera, if you plan any extended shooting sessions.
Summary
Phew! That came out *way* longer than I'd intended, but somehow there just
kept on being more to say. Apologies for the length, but on reviewing it, I
really didn't feel I could leave anything out without missing important information.
Here's what I see a the pros and cons of this camera:
Pro:
- Fantastic resolution
- Full-frame sensor permits true wide angle D-SLR photography
- Excellent color
- Very good tonality
- Excellent highlight headroom in DCR RAW files
- ERI (Extend Range Imaging) JPEG format combines power of RAW files with compatibility of JPEG
- Dual-card (CF and SD) supports flexible workflows
- Simultaneous dual-mode (RAW/JPEG) file recording is a nice touch
- Compatibility with Nikon lenses is a plus
- Fully field-upgradeable firmware is a big plus
- Much lower cost than the competition (Canon EOS-1Ds)
- All-magnesium alloy frame should be very rugged
Con:
- Noisy sensor forces tradeoff of low-contrast subject detail
- Lack of antialiasing filter results in artifacts and color aliasing
- Poor high-ISO performance
- Poor long-exposure performance
- Too-short buffer length (max 7 frames, only 4 in JPEG mode)
- Slow buffer-empty times
- Short battery life
- 0.5 EV exposure steps are too coarse
- Unsophisticated AF system
- Despite magnesium frame, camera feels more prosumer than pro.
Conclusion
| Free Photo Lessons | |
|
I think the 14n will find a lot of application in studio photography environments,
where there's plenty of light available (strobes), and where its relatively
sort buffer length may not be seen as a limitation. It's sad though, that it'll
probably miss a lot of applications that it could have found if its sensor performance
had been more on a par with that of its competition. If you need full-frame
imaging, high resolution and very nice-looking color but have to stay within
a budget, the 14n could be just the camera for you. If cost isn't an object,
the Canon EOS-1Ds is a lot more camera (with a little less resolution) for a
lot more money.
|
Your purchases help support this site! NOTE: Neither Ritz Camera nor State Street Direct charges a fee to get on their waiting list for these cameras, so there's no reason not to get on both waiting lists to increase your chances of getting a camera sooner. |
|
| Kodak DCS Pro 14n | |
| Canon EOS-1Ds | |
<<Pro 14n Sample Images | Additional Resources and Other Links>>
Reader Comments!
Questions, comments or controversy on this product? Click
this link to see what other Imaging Resource readers have had to say about
the Kodak DCS Pro 14n Digital SLR, or add comments of your own!