 Back
to Full Minolta DiMAGE A1 Review
Back
to Full Minolta DiMAGE A1 ReviewGo to Minolta DiMAGE A1 Data Sheet
Go to Minolta DiMAGE A1 Pictures Page
Up to Imaging Resource Cameras Page
Use your browser's "Back" button to return to the previous page, or the links at the top and bottom of this page to navigate to related information. If you have difficulty fitting the text on this page onto your printer output, simply resize your browser window to a narrower width and print again.
Remember us when it's time to buy!
Dave here: Have our reviews been helpful to you? (Is this article you're reading right now useful?) Preparing this level of information on as many products as we do is incredibly hard work, not to mention expensive. Things on the Internet may look like they're free, but they're not. (As a lot of big dot.com companies are finding out these days.) Somewhere, somebody has to pay to produce worthwhile content. YOU can help us though, by remembering us when it comes time to make your purchase. Would you consider coming back to our site and clicking-through to one of our advertisers to make your purchase? Every dollar you spend with one of our advertisers helps us directly (in affiliate fees) or indirectly (the advertiser will keep renewing their ad contract with us). To make it easy for you to support us, here's a URL you can visit, to see all our current advertisers, with links to click on that will register your visit to them as having come from our site. It's up to you where you buy, but Mike, Mike, Kim, Yazmin, Marti and I would be really grateful if you'd help us out by choosing one of our advertisers to purchase from.
Thank you for your support!
Dave Etchells, Founder & Publisher
Visit our "Buy Now" Page:
https://www.imaging-resource.com/buynow.htm
Back
to Full Minolta DiMAGE A1 Review
Go to Minolta DiMAGE A1
Data Sheet
Go to Minolta DiMAGE A1
Pictures Page
Up to Imaging Resource Cameras
Page
Minolta DiMAGE A1Minolta updates their revolutionary five-megapixel electronic SLR with faster shutter speeds, an Anti-Shake mode, 14-bit A/D, and a tilting LCD monitor, among other improvements. Review First Posted: 08/08/2003, Updated: 11/10/03 |
|
 |
|
5.0-megapixel CCD delivers uninterpolated
images as large as 2,568 x 1,928 pixels. |
| |
Tack sharp 7x optical zoom lens covers a 28-200mm
equivalent focus range. |
|
| |
TFT LCD viewfinder is surprisingly
usable under low light conditions. |
|
| |
Enhancements over the D7Hi include Anti-Shake
mode, 14-bit A/D, tilting LCD monitor, and faster maximum shutter speed
of 1/16,000. |
Manufacturer Overview
The Minolta DiMAGE A1 is the latest in a family of DiMAGE electronic
SLR models that stretches back to the original DiMAGE 7, the first five-megapixel
prosumer camera, introduced over two years ago (early 2001). As you'll read
below, the new DiMAGE A1 carries on the proud tradition of the line, with a
host of innovations and improvements over the previous DiMAGE 7Hi flagship model.
In 2001, Minolta shook up the high end of the prosumer market, by beating everyone
else to the punch with the first five-megapixel prosumer digital camera. And
it wasn't just "any" five-megapixel model either, but the Dimage 7,
an electronic SLR design with a remarkably high quality 7x optical zoom lens,
a host of advanced image-control functions, and an all-new electronic viewfinder
using ferroelectric LCD technology for impressive low light performance.
In 2002, Minolta upped the ante again first with the Dimage 7i, which added
numerous features, and offered dramatically improved focusing speed and shutter
response. They also announced the Dimage 7Hi, which added an external flash
sync socket, higher-speed continuous shooting for full-resolution files, and
an extra-fine JPEG image-quality setting. The Dimage 7 was an impressive camera
when it was introduced, and Minolta's improvements implemented in the 7i version
were well-considered, intelligent, and bountiful. With the 7Hi, they brought
the camera fully into the photo studio, with the external flash sync connector,
in addition to increasing continuous-mode speed, and offering an extra-fine
JPEG mode as an alternative to TIFF or RAW files. Finally, the Dimage 7Hi offered
several options for color space, including both normal and "vivid"
sRGB options, and Adobe RGB.
Now, Minolta improves on an already great camera model with the Dimage A1,
which boasts the same 7x lens, five-megapixel sensor, and finely-tuned exposure
control. In addition to all of the great features from the 7Hi model, the Dimage
A1 also offers 14-bit A/D conversion, a tilting LCD monitor, blazingly fast
1/16,000 second maximum shutter speed, tracking autofocus, and a grip sensor
that actually senses when you have the camera in-hand, to save power in the
continuous autofocus mode. It's a nice update on an already great camera. Read
on for more details.
Highlights
Many of our readers will be familiar with the recent Dimage 7Hi, so I put together the following major feature comparison between the Dimage 7Hi and the Dimage A1.
| Feature | Dimage A1 | Dimage 7Hi |
| Improved A/D converter | 14-bit. | 12-bit. |
| Electronic Viewfinder | High resolution TFT LCD | Ferroelectric reflective imager |
| Faster maximum shutter speed. | | |
| New grip sensor controls Full-time AF | | |
| One less Digital Subject Program | Text mode dropped. | Portrait, Sports, Sunset, Night Portrait, and Text. |
| Different Continuous Shooting options | Normal and High Speed only. | Normal, High Speed, and Ultra High Speed |
| Larger "mid-size" resolutions | 2,080 x 1,560 and 1,600 x 1,200 | 1,600 x 1,200 and 1,280 x 960 |
| Tilting LCD monitor | LCD panel lifts out from camera body and tilts upward 90 degrees or downward about 15 degrees. | Fixed LCD monitor. |
| New Anti-Shake Mode | Anti-Shake prevents blurring from slight camera movement at full telephoto. | - |
| Optional Noise Reduction mode | Reduces image noise from longer exposures. | - |
| New Tracking AF option | Tracking AF "tracks" a subject as it moves across the AF area points. | - |
| Remote capture capability | Supports a remote-capture mode over the USB connection, using Minolta Remote Capture software. | - |
| Upgraded power source | Single high-power Li-Ion rechargeable cell (More compact, 11.1 watt-hour capacity) | Four AA batteries (Current max power ~10.5 watt-hours, and bulky) |
Executive Overview
Minolta's previous Dimage 7, 7i, and 7Hi digicams have proved so successful
among consumers, that the company apparently decided to keep a good thing going.
The new Dimage A1 offers the same exceptional features found on the previous
models, with a few updates that further extend its capabilities. The A1 continues
with the 5.0-megapixel CCD, ultra-sharp 7x optical zoom lens, and host of fine-grained
user controls that contributed to the earlier models' popularity, but adds a
number of subtle but significant enhancements like 14-bit A/D conversion and
a new Anti-Shake system. The camera also boasts a higher maximum shutter speed
at 1/16,000 second, a grip sensor that controls the Fulltime AF option, and
a tilting LCD monitor. As with the Dimage 7Hi, the Dimage A1 features extensive
creative controls (including an option to use the Adobe RGB color space), sophisticated
camera functions, and a user-friendly interface that make it appealing to advanced
users, while its simple to use full "auto" mode lets you hand it to
a novice with confidence. The camera's ergonomic design looks and feels a lot
like a conventional 35mm SLR, with an elongated lens barrel and a lightweight
magnesium alloy body with plastic outer panels hosting the numerous dials, switches,
and buttons. Although the profusion of controls makes the camera appear complex,
they're all logically arranged and actually fairly easy to learn. Minolta has
packed a lot of functions into a very workable layout, with a range of features
normally found only on more expensive professional-level digital cameras.
A 2/3-inch progressive-scan primary-color CCD with 5.3 million pixels (5.0 million
effective), provides a maximum resolution of 2,560 x 1,920 pixels, among the
highest available in a consumer digital camera as of this writing in early August,
2003. The 14-bit A/D converter and relatively large pixel size provide a wide
dynamic range (detailed highlights and shadows) and fine tonal gradation, with
as many as 16,384 levels captured in each RGB channel. The CCD's light sensitivity
ranges from ISO 100 to 800, and may be automatically controlled by the camera
or manually selected by the user. The Dimage A1's updated color space flexibility
includes two sRGB options (Natural and Vivid color), in addition to standard
and embedded-profile Adobe RGB options for professional use in a color-managed
environment.
All that sensor resolution would be useless, however, if the lens couldn't resolve
fine detail. The Dimage A1 appears to feature the same advanced apochromat 7x
zoom GT Lens that was so impressive on previous models in the line, one of the
sharpest and lowest-distortion digicam lenses I've tested to date. Comprised
of 16 glass elements in 13 groups, the GT lens has two anomalous dispersion
(AD) and two aspheric glass elements for sharp, detailed images with minimal
distortion and glare. The 7.2-50.8mm focal range (equivalent to a 28-200mm zoom
in 35mm format) provides the flexibility for wide-angle interior and landscape
shots, as well as close-up portraits and distant action in sports photography.
The manual zoom ring is a pleasure to use, with a wide rubberized grip and smooth,
mechanically-coupled lens action. A maximum aperture that ranges from f/2.8-f/3.5
(depending on the focal length setting) is fairly "fast," helpful
for low-light and action photography. The Macro capability lets you capture
subjects as close as 9.8 inches from the lens, which translates to a very small
1.5 x 2.0-inch minimum capture area. A host of focus controls provide a lot
of flexibility, and on-demand manual focus lets you tweak the autofocus setting
without switching from auto to manual focus mode.
One area of significant departure for the A1 though, is its use of a conventional
TFT LCD for its electronic viewfinder (EVF), rather than the unique reflective
ferroelectric LCD that was used on the previous models. The ferroelectric LCD
was the source of much comment and rather polarized feelings amongst the user
community, with some lauding it for its very smooth appearance and excellent
low-light capability, while others were put off by the "crackled glass"
effect caused by either camera or subject motion. The new TFT-based design seems
to have very high resolution (Minolta hasn't published a spec for its pixel
count) and does an excellent job in low light as well, while not showing the
"crackled glass" artifacts seen in the earlier design. (I predict
that the new EVF will be a big hit with users, eliminating what was a negative
point for many prospective users. Like those of its predecessors, the A1's EVF
offers unique flexibility, with a variable position eyepiece that tilts up as
much as 90 degrees. The camera's 1.8-inch LCD monitor also tilts downward about
15 degrees or upward 90 degrees, making it more convenient when shooting at
high or low angles.
The Dimage A1's exposure system offers three metering options: 300-segment Multi-Segment,
Center-Weighted, and Spot. The default Multi-Segment option divides the image
into 300 separate areas, placing emphasis on the main subject, but integrating
luminance values, color, and autofocus information from across the image to
accurately calculate exposure. Like similar AE metering systems on other cameras,
the Center-Weighted and Spot metering options place most of the exposure emphasis
on the central portion of the frame, or a small spot at the very center of the
frame, respectively. Exposure modes include Auto, Programmed AE, Aperture Priority,
Shutter Priority, and Manual, plus four Digital Subject Programs specifically
set up for Portrait, Sports, Night Portrait, and Sunset exposures. These presets
use not only aperture and shutter speed settings to best capture the subjects,
but also Minolta's exclusive CxProcess image processing to optimize color balance
and skin tones.
On top of all these features, the Dimage A1 also provides a Digital Effects
Control that can be used to adjust Color Saturation, Contrast, and Filter (hue).
The Digital Effects adjustments are particularly notable for their fine gradations
and wide range, allowing you to customize the camera's color and tonal response
to precisely match your personal preferences. A Color Mode option offers special
color effects and a black and white shooting mode, which can be adjusted via
the Filter Effects setting. Exposure Compensation is adjustable from -2 to +2
EV in one-third-step increments. A Digital Enhanced Bracketing option for taking
three bracketed exposures of an image, features two different values adjustable
to either 1/3 or 1/2-stop increments (the one-stop option available in earlier
high-end DiMAGE models has been dropped in the A1. In addition to exposure,
this feature can also bracket any of the Effects options, including contrast
and saturation. A customizable AE Lock button can be set to lock only exposure,
or both exposure and focus. White Balance is adjustable to one of four preset
options (Daylight, Fluorescent, Tungsten, Cloudy, and Shade settings), along
with Auto and Manual options. Shutter speeds range from 1/16,000 to 30 seconds,
with a Bulb setting that permits manual control of exposures as long as 30 seconds.
Maximum lens apertures are f/2.8 at the wide-angle end and f/3.5 at telephoto.
A real-time histogram display mode helps verify exposure before capturing the
image. (There's a histogram display option in Playback mode as well.)
Autofocus performance is a key area where the Dimage A1 shines. Autofocus is
powered by a Large Scale Integration (LSI) chip that rapidly processes image
data through a high-speed 32-bit RISC processor. A lot of jargon that simply
explains why the A1's AF system is noticeably faster than average among high-end
"prosumer" digicams. The autofocus system can determine focus in one
of three ways: Wide Focus Area averages readings from a large area across the
middle of the frame (indicated on the LCD by a set of widely spaced brackets);
Spot Focus Point reads information from the very center of the LCD (indicated
by a target cross-hair), and Flex Focus Point lets you move a target cross-hair
to virtually any position within the viewfinder, so you can focus on off-center
subjects without having to aim, lock focus, and then recompose the shot.
The built-in, pop-up flash offers two methods of flash metering. Advanced Distance
Integration (ADI) bases its exposure on the lens aperture, feedback from the
autofocus system (how far the subject is from the camera), as well as on a separate
metering flash. Pre-Flash TTL (through the lens) uses only the small metering
flash prior to the main exposure to gauge how much light is reflected by the
scene. The Dimage A1 also includes a top-mounted hot shoe for attaching Minolta
external flash units (and any compatible third-party units). An external flash
sync terminal offers a standard "PC" style sync jack for connecting
to studio strobes or other external flash devices. Flash modes include Fill-Flash,
Red-Eye Reduction, and Rear Flash Sync, with Flash Compensation available from
-2 to +2 exposure equivalents (EV) in one-third-step increments. A Wireless
flash mode lets the camera work with certain Minolta-brand wireless flash units.
A manual flash mode fires the onboard flash at full, 1/4, or 1/16 power. Since
manual flash mode doesn't use a pre-flash, it's perfect for driving studio strobes
via conventional slave triggers.
Additional Dimage A1 features include a Movie (with sound) mode with Night exposure
option; Voice Memo mode; Standard and High Speed Continuous Advance modes; 2x
Digital Zoom; Interval Recording of two to 240 frames in one- to 60-minute intervals;
10-second Self-Timer; and three Sharpness settings. Five image quality levels
include RAW uncompressed files, and TIFF, Extra Fine, Fine, and Standard compression
settings. Resolution options for still images include 2,560 x 1920; 2,080 x
1,560; 1,600 x 1,200; and 640 x 480 pixels. Movie resolution is 316 x 240 pixels.
Not to be outdone on the output phase of digital imaging, Minolta has incorporated
Epson's PRINT Image Matching technology, which ensures that Dimage A1 images
captured in autoexposure mode and output on compatible Epson printers will be
automatically color balanced to provide true-to-life hues and saturation.
Powered by one NP-400 rechargeable lithium-ion battery pack (an optional AC
power adapter is available), as well as an accessory hand grip that lets you
power the camera from either six AA cells or two NP-400 packs, the Dimage A1
represents an amazingly versatile package for the serious amateur or prosumer
photographer. USB and A/V cables also accompany the camera, for connection to
a computer or television set. My prototype evaluation unit did not come with
a software CD, but I assume that Minolta will include a standard software bundle
along with the camera.
Design
Released as an update to last year's Dimage 7Hi model, the Dimage A1 shares
a similar external design, with the same all-black body and general styling.
The Dimage A1 features a true 5.0-megapixel (effective) CCD, sharp 7x optical
zoom lens, fine-grained image controls, and optional fully manual exposure control,
with a few minor improvements over the previous models. Updates include 14-bit
A/D conversion, a faster maximum shutter speed (1/16,000 second), a grip sensor
that controls Full-time AF, and a tilting LCD monitor, among others.
The Dimage A1 is similar in design to a traditional 35mm SLR, but an elongated
lens barrel on the left side of the camera gives the camera more of a "T"
shape, extending behind and in front of the body slightly, with a hand grip
on the right. Control layout is slightly different from the Dimage 7Hi, but
still logical and intuitive (once you get gist of things). The Dimage A1's rather
bulky body measures a substantial 4.61 x 3.34 x 4.46 inches (117 x 85.0 x 113.5
millimeters) with the lens at its shortest position, but the combination of
magnesium alloy chassis and (mostly) plastic body panels make it lightweight
for its size (approximately 23.4 ounces, or 663 grams with an NP-400 battery
and CompactFlash card loaded), but nonetheless a substantial handful. An accessory
camera bag would certainly be the preferred method of carrying and storing the
Dimage A1, but the positions of the eyelets for the included neck strap at least
let the camera hang level when it's suspended from them. (This last being a
detail I wish more camera manufacturers would pay attention to.)

The camera's front panel houses the Minolta GT 7x Zoom lens, Self-Timer light, and the front of the pop-up flash compartment. Encircling the lens are two adjustment rings: a rubberized grip on the front end for actuating the zoom lens, and a ribbed Manual Focus ring at the base of the lens. A set of 49mm filter threads on the inside lip of the zoom lens accommodates filters and conversion kit accessories, but I'd caution readers to be careful how heavy a lens they attach there. Because the threads are on the lens barrel itself, the zoom mechanism must support any weight attached there. A pair of tabs on the outside edge of the lens serve as a mount for the accessory lens hood. Also visible from the front of the camera are the Shutter button and Front Control dial, located at the top of the hand grip. An indentation near the top of the hand grip comfortably cradles your middle finger as it curls around the grip. One of the more interesting features of the Dimage A1 is the grip sensor on the front of the hand grip, visible in this shot as a set of vertical metallic bars. When activated, the grip sensor actually senses the presence of your hand and only triggers the Full-time AF function (or optionally, the electronic viewfinder) whenever the camera is held, saving some battery power. (You can turn this feature off through the setup menu, for working on a tripod or when wearing gloves, which Minolta states may decrease the effectiveness of the sensor. - It's evidently a skin-resistance sensor.)

The right side of the camera holds the CompactFlash memory card slot, covered by a hinged plastic door. The A1 accommodates Type I or II CF memory cards, including IBM MicroDrives. Just above the compartment door is the shared-use A/V Out / USB jack for direct connection to a computer or television set. At the very top of the right panel is one of the two neck strap attachment eyelets.

The left side of the camera features a host of controls, including the Function dial, flash sync terminal, Digital Effects dial, Auto/Manual Focus switch, Custom White Balance button, speaker, and Macro switch (on the side of the lens). The Function dial, located at the top of the panel, controls the Memory settings, Custom Function settings, Metering mode, Drive mode (Self-Timer, Continuous Shooting, etc.), White Balance, and ISO. The Effects button lets you adjust Contrast, Color Saturation, and effects Filters in conveniently small increments. Both dials have buttons in the center that activate whatever function you've selected with that dial. The Focus button simply switches back and forth between Single AF, Continuous AF, and Manual focus modes. The Custom White Balance button manually adjusts the white balance setting, while the Macro switch on the lens barrel activates the Macro shooting mode. The second neck strap attachment eyelet is at the top, next to the Function dial. Also visible on this side, at the edge of the electronic viewfinder eyepiece, is the diopter adjustment dial, which adjusts the viewfinder display to accommodate eyeglass wearers.
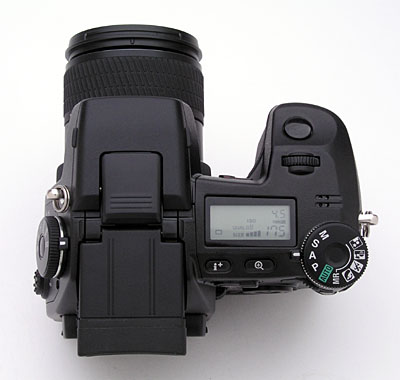
The top panel accommodates the pop-up flash compartment, with two small tabs on either side to hook a fingernail under to open the flash, and an external flash hot shoe on top, protected by a sliding plastic cover that is completely removable from the camera body. The hot shoe employs a custom electrode setup and mounting bracket for Minolta accessory flash units, and so isn't compatible with standard hot-shoe flashes. In addition, there are a number of controls that access various camera functions, including the Mode Dial, a Shutter button, a Selector wheel, and a small Data Panel display that shows battery status, camera settings, and the number of images remaining. The Information and Magnification buttons are just below the status display panel, and angle down toward the rear of the camera. A tiny microphone in front of the Mode dial records sound when shooting movies or recording voice memos.

The remaining controls are on the camera's rear panel, along with the electronic viewfinder eyepiece, LCD monitor, and battery compartment. The Dimage A1's electronic viewfinder (EVF) now features a high resolution TFT LCD, rather than the reflective, ferroelectric display used on earlier models in the line. The new display seems very sharp and clear, with none of the motion-induced artifacts seen in previous models. The viewfinder also tilts upward almost 90 degrees, offering a variety of viewing angles. When the camera is set to the Auto Display mode, an infrared sensor on the right side of the viewfinder eyepiece senses when your eye is near the viewfinder and automatically activates the EVF display. Control buttons on the back panel include the Display Mode switch (tucked in a corner beside the LCD monitor), which lets you choose between EVF and LCD display, or Auto switching between the two. Also on the rear panel are the Power button, Mode switch, Rear Control dial, Menu button, Four-Way controller, Quickview / Delete button, Anti-Shake button, and AE lock button. At the bottom of the rear panel, a connector compartment houses the DC In and Remote connector terminals, and is protected by a flexible flap.
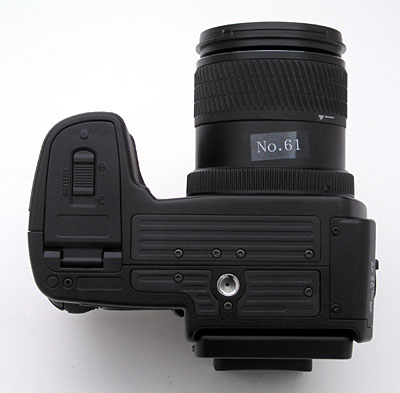
The camera's bottom panel is fairly flat, with a slightly textured grip pad surrounding the metal tripod mount. Also on the bottom panel is the camera's battery compartment, which features a locking, hinged door. The battery compartment is just far enough from the tripod mount to allow quick battery changes while working with a tripod, something I always look for in a digicam, given the amount of studio shooting I do.
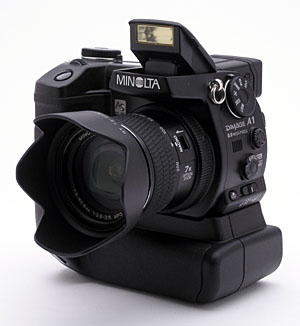

An optional power/grip unit is available for the A1, adding a vertical grip
handy for portrait-format shots, and allowing the camera to be powered by either
two NP-400 batteries, or by conventional rechargeable AA cells. I really liked
the increased battery life the NP-400 provided for the base unit, but the power
grip lets you have your cake and eat it too, powering the camera from more inexpensive
and widely available NiMH AA cells.
Viewfinder
 The
electronic viewfinder (EVF) is one area in which the DiMAGE A1 marks a significant
departure from the tradition established by the 7, 7i, and 7Hi. The earlier
cameras used a unique reflective ferroelectric LCD for their EVFs, which had
both strengths and weaknesses. On the positive side, the image was very smooth-looking
, with little or no visible pixelation, because each pixel of the ferroelectric
LCD displayed full color. (Rather than just red, green, or blue, as with conventional
LCD displays.) The 7-series cameras also had the first EVFs that I considered
truly usable in low light shooting conditions. On the downside, because the
ferroelectric LCD's pixels were time-multiplexed (they actually switched very
rapidly between red, green, and blue) and were fairly coarse with abrupt rectangular
edges, the EVF displayed odd "crackled glass" artifacts in response
to camera or subject motion. The net of all this is that people tended to either
love or hate the EVFs on the 7-series cameras, with the net vote probably coming
down on the side of not liking it.
The
electronic viewfinder (EVF) is one area in which the DiMAGE A1 marks a significant
departure from the tradition established by the 7, 7i, and 7Hi. The earlier
cameras used a unique reflective ferroelectric LCD for their EVFs, which had
both strengths and weaknesses. On the positive side, the image was very smooth-looking
, with little or no visible pixelation, because each pixel of the ferroelectric
LCD displayed full color. (Rather than just red, green, or blue, as with conventional
LCD displays.) The 7-series cameras also had the first EVFs that I considered
truly usable in low light shooting conditions. On the downside, because the
ferroelectric LCD's pixels were time-multiplexed (they actually switched very
rapidly between red, green, and blue) and were fairly coarse with abrupt rectangular
edges, the EVF displayed odd "crackled glass" artifacts in response
to camera or subject motion. The net of all this is that people tended to either
love or hate the EVFs on the 7-series cameras, with the net vote probably coming
down on the side of not liking it.
In the DiMAGE A1, Minolta has gone back to a more ordinary EVF design, based on conventional TFT LCD technology. In doing so though, they've at least used a very high-resolution LCD, so the resulting display is still very smooth, detailed, and easy on the eyes. (I don't have a spec on the EVF's pixel count, but it does seem to be pretty high resolution.) With a normal LCD, there's none of the "crackled glass" look, regardless of any camera or subject movement, and Minolta seems to have also managed to preserve the remarkable light sensitivity I saw in the EVFs of the earlier cameras. Overall, I think the EVF in the A1 is a worthy upgrade from that of the 7Hi and others before. it.
To expand a bit on the subject of EVFs, let me note that I've long held a hearty
dislike of them, for a variety of reasons. For one, resolution is often considerably
less than on the rear-panel LCD, and the view doesn't remotely compare to that
through a purely optical viewfinder. A bigger concern though, is that most EVF
displays are woefully inadequate for low-light shooting. The high refresh rate
required to provide a "live" view of the subject means that the CCD
just can't collect enough light in each frame to make the EVF display usable.
Time and again, I've seen EVF-equipped digicams that are capable of taking pictures
in conditions far darker than levels at which you can see what you're shooting
in the EVF. Without a low-light-capable viewfinder, you're reduced to guessing
where your subject is in the viewfinder.
That said, Minolta's EVFs in the DiMAGE 7, 7i, 7Hi, and now the A1 have proven
exceptions to my thinking. The Dimage A1's EVF works down to incredibly low
light levels, and also has very high resolution under normal lighting. I had
previously attributed the usability of the DiMAGE 7's EVF to its use of ferroelectric
LCD technology, but it now appears that it's other factors within the camera
itself that results in the excellent low-light performance. Below a certain
light level, it switches from a color display to a monochrome one (although
the final camera images are still captured in color), apparently as a way of
increasing sensitivity and reducing image noise. Whatever the case, the net
result is that the EVF on the Dimage A1 is about as sensitive as my own
eyes at a given illumination level, making it eminently usable at any light
level most users will care to shoot at. Given that it's about as sensitive as
the average eyeball, it's fair to say that a purely optical viewfinder wouldn't
improve low-light capability a great deal.
The Dimage A1's EVF also features the innovative auto-switching capability first
seen in the original Dimage 7. You can choose to have the viewfinder display
always appear on either the LCD or EVF, or switch between the two automatically.
Inset behind a pair of vertical windows on the right side of the viewfinder,
a set of infrared sensors detects your eye as it approaches the viewfinder,
switching the view to the EVF and disabling the LCD monitor if you have the
auto-switching option enabled. To save on battery power, you can optionally
(through the Setup menu) set the Auto mode to simply turn the EVF on and off,
keeping the LCD monitor disabled.
Minolta also addressed the only complaint I had about the auto-on feature of
the EVF. Previously, if you left the camera hanging from its neckstrap, the
EVF eyepiece would press against your chest, triggering the infrared eyeball-detector
circuit. While you could avoid the problem by flipping the tilting eyepiece
up when carrying the camera, that was a bit of a hassle, and easy to forget
to do. A new setup menu option fixes this problem by optionally coupling the
eyeball detector with the hand grip sensor. You can set up the A1 so its EVF
only turns on when you're looking through the EVF and your hand is on
the handgrip. Kudos to Minolta for a very clever solution to a minor but annoying
usability issue.
As noted, the electronic viewfinder eyepiece tilts upward 90 degrees, offering
a range of viewing angles. A Diopter Control dial adjusts the viewfinder to
accommodate eyeglass wearers, across a range of -5 to +0.5 diopters. (This covers
a wider range of eyesight than I'm accustomed to seeing in eyepiece adjustments.
It handled my 20/200 vision with no trouble at all.) The viewfinder has a reasonably
high eyepoint, making it fairly usable with eyeglasses, but the field of view
is slightly restricted when your eye is further from the eyepiece.
 The
rear-panel, 1.8-inch, TFT color LCD monitor is also offers a bright, clear image
display. New to the A1, the LCD monitor lifts off of the rear panel, and can
tilt upwards about 90 degrees, or downward by about 15 degrees. Like the electronic
viewfinder, the LCD monitor displays a range of exposure and camera information
in both Record and Playback modes, activated by the "i+" button. A
Histogram setting displays a small "live" histogram overlaid on the
viewfinder image, showing the distribution of tonal information in the image.
This is handy tool for determining any potential over or underexposure, before
capturing an image.
The
rear-panel, 1.8-inch, TFT color LCD monitor is also offers a bright, clear image
display. New to the A1, the LCD monitor lifts off of the rear panel, and can
tilt upwards about 90 degrees, or downward by about 15 degrees. Like the electronic
viewfinder, the LCD monitor displays a range of exposure and camera information
in both Record and Playback modes, activated by the "i+" button. A
Histogram setting displays a small "live" histogram overlaid on the
viewfinder image, showing the distribution of tonal information in the image.
This is handy tool for determining any potential over or underexposure, before
capturing an image.
 I've
often found digicam manual focus features of limited utility, largely because
it can be so hard to tell when you've achieved proper focus. LCD screens just
don't display enough image detail to be able to tell whether an image is exactly
in focus or not. Some manufacturers offer modes in which the viewfinder image
optionally can be magnified by 2x or 4x but even that often falls a little short.
(2x is clearly inadequate in my view, 4x starts to be useful.) In the A1, Minolta
offers viewfinder magnification of 2x or 8x to assist with manual focusing,
and the 8x level works very well for determining critical focus. Kudos again
for this feature, I'd like to see other manufacturers emulate it.
I've
often found digicam manual focus features of limited utility, largely because
it can be so hard to tell when you've achieved proper focus. LCD screens just
don't display enough image detail to be able to tell whether an image is exactly
in focus or not. Some manufacturers offer modes in which the viewfinder image
optionally can be magnified by 2x or 4x but even that often falls a little short.
(2x is clearly inadequate in my view, 4x starts to be useful.) In the A1, Minolta
offers viewfinder magnification of 2x or 8x to assist with manual focusing,
and the 8x level works very well for determining critical focus. Kudos again
for this feature, I'd like to see other manufacturers emulate it.
 In
Playback mode, the Dimage A1 optionally displays a fair amount of image information,
which is again controlled by the i+ button. The same button also accesses an
index display mode, which you can set via a menu option to show either four
or nine thumbnail images to a page. The Magnify button enlarges captured images,
so that you can more closely check on fine details. A histogram feature is also
available in Playback mode, by pressing the up arrow key.
In
Playback mode, the Dimage A1 optionally displays a fair amount of image information,
which is again controlled by the i+ button. The same button also accesses an
index display mode, which you can set via a menu option to show either four
or nine thumbnail images to a page. The Magnify button enlarges captured images,
so that you can more closely check on fine details. A histogram feature is also
available in Playback mode, by pressing the up arrow key.
Optics

| Free Photo Lessons | |
|
Equipped with a 7.2-50.8mm, glass lens with multiple aspherical elements, the
Dimage A1's lens is equivalent to a 28-200mm lens on a 35mm camera. This is
a very nice range of focal lengths. The 28mm wide angle setting is particularly
welcome, since most digicam lenses don't go that wide without accessory lens
adapters. Likewise, 200mm is a good medium telephoto length, about as long as
most folks can comfortably hand-hold without image stabilization, although Minolta's
new Anti-Shake feature should greatly help out here. Unlike most digicams I've
worked with, the lens zoom operates by rotating a collar around the lens barrel,
coupled mechanically to the lens elements themselves. I like the precise control
this gives, as opposed to the rocker switch controlled motor that most digital
cameras use to rack the lens in or out. It definitely requires two hands, but
the direct manual control will feel great to photographers accustomed to film-based
SLRs. (I will say that the action of the zoom lens feels a little "cheap"
though, with more of a plastic-on-plastic feel, rather than the smooth lubricated-metal
feeling I'm accustomed to in higher-end removable SLR lenses.)
The lens consists of 16 elements in 13 groups, including two AD (anomalous dispersion)
glass elements and two aspheric surfaces. All that dispersion/aspheric mumbo-jumbo
is by way of explaining that this is a very high quality lens. Way back when
I first tested the original DiMAGE 7, I was amazed by how little distortion
and corner softness it displayed, and as far as I can tell, the A1 still uses
the same lens. Images are very sharp corner to corner, with very little of the
softness I've come to expect from digicam lenses in the corners of the frame.
Aperture control can be either manual or automatic, with a maximum aperture
of f/2.8 at wide angle and f/3.5 at telephoto. Focus ranges from 1.6 feet (0.5
meters) to infinity in normal mode. Activated by a small switch on the lens
barrel, a Macro focusing mode focuses in on objects as close as about 5.25 inches
(13.3 centimeters) from the lens surface in telephoto mode. (Minolta follows
the practice from film-based photography of specifying focusing distance from
the "film" (CCD) plane of the camera, rather than the front element
of the lens. This avoids confusion over distances as the length of the lens
changes in response to zoom adjustments, but would lead one to expect that the
A1's macro performance is less than it actually is.) In my tests, the A1 captured
a minimum area of just 1.96 x 1.47 inches (50 x 37 millimeters), a very small
area indeed. You can enter Macro mode in either maximum wide angle or a small
range of telephoto lens positions. A plastic lens cap with spring-loaded catches
hooks into the inside lip of the lens, protecting it from dirt and scratches.
The lens cap has an eyelet for attaching a strap, to prevent it from being accidentally
lost.
The DiMAGE A1 provides both manual and automatic focus control. The camera's
specification sheet describes the autofocus system as a "Video AF system,"
which uses phase-detection focusing technology rather than the much more common
contrast-detection system. The advantage is that the camera not only determines
whether or not the lens is in focus, but also how far out of focus it is, and
in which direction (near or far). With this information, the camera should be
able to focus much more quickly, since it "knows" roughly how much,
and in which direction, to adjust the focus, rather than having to "hunt"
for the best focus at the outset. The AF system will still have to do some hunting
for the best setting, but it should spend less time doing so than a contrast-based
system. The D7Hi was one of the fastest-focusing prosumer digicams I'd tested,
and my testing of a production model A1 showed that it was at least as fast.
This system does seem to be pretty effective, as the A1 shows some of the shutter
lag times are among the fastest I've seen for autofocus-equipped prosumer digicams.
The DiMAGE A1's autofocus system offers both Single-Shot and Continuous AF settings.
In Single-Shot AF, the camera only sets the focus when the Shutter button is
halfway depressed. In Continuous AF mode, it adjusts focus at all times, continuously
keeping the frame in focus. While this definitely demands more power from the
battery, the grip sensors on the front of the hand grip tell the camera to focus
only when being held. The DiMAGE A1 lets you determine the area of the image
the camera uses to set the focus from, by selecting one of three autofocus options:
Wide Focus Area, Spot Focus Point, and Flex Focus Point. The default option
is Wide Focus area, indicated by a set of four widely-spaced brackets in the
viewfinder image. By pressing and holding down the center of the Four-Way Arrow
controller pad, you can switch between Wide Area and Spot Point autofocusing
modes (the latter indicated by a target crosshair in the center of the viewfinder).
If you release the controller pad when the Spot AF target is displayed, you
can then use the four arrow buttons to move the target around the viewfinder
area -- this is what Minolta calls Flex Focus Point AF. Wide Area AF bases its
focus on the most prominent subject detail in the portion of the image that
falls within the AF brackets. Spot Focus bases its focus on the very center
of the frame, where the target crosshairs reside. Finally, Flex Focus lets you
move the focus point to anywhere within the frame, by manually moving the target
crosshairs around the image area with the arrow buttons.
The Focus switch on the camera's left side toggles back and forth between Single
AF, Continuous AF, and Manual focus modes. In Manual Focus mode, turning the
ribbed ring around the base of the lens barrel adjusts focus. As you focus,
a distance readout reports the current focal distance in meters or feet at the
bottom of the LCD monitor (or EVF), under the MF icon. The Direct MF menu option
lets you manually tweak the autofocus selection without explicitly switching
over to MF mode. You simply halfway press the Shutter button (triggering the
autofocus system) and then rotate the focus ring to fine-tune the focus. This
is useful when the camera is having trouble focusing on a difficult subject,
but isn't too far off the mark.
As mentioned earlier, Minolta has implemented very handy 2x and 8x magnification
options to assist with focusing. In my experience, 2x really isn't enough to
determine fine focus using a camera's LCD screen, and 4x is a help, but only
marginally adequate. The 8x option offered by the A1 was a revelation though,
letting me set focus very precisely, shot after shot, on a wide variety of subjects.
Even relatively small movements of the focusing ring produced very noticeable
changes in the magnified display. The manual-focus focus-assist magnification
disappears as soon as you half-press the Shutter button, or press the magnify
button a second time.
The AE Lock button, located in the upper right corner of the back panel (below
the Mode dial), locks the focus for a specific portion of the subject without
having to hold the Shutter button down halfway. Pressing this button can also
lock exposure. You can configure this button in the settings menu to switch
between AF/AE Hold, AF/AE Toggle, AE Hold, or AE Toggle functions.
In addition to the 7x optical zoom, the DiMAGE A1 offers 2x Digital zoom. By
default, pressing the Magnification button on the top panel activates an instant
2x digital zoom. (Keep in mind that digital zoom simply enlarges the central
portion of the CCD image digitally, rather than magnifying it optically and,
as a result, image resolution decreases in direct proportion to the magnification
achieved.) In Manual Focus, this button optionally produces the temporary magnification
of 2x or 8x mentioned above.
A set of 49mm filter threads around the inside lip of the lens accommodates
Minolta's range of accessory filters and conversion lens kits. I really like
having the fixed filter threads on the front element of the zoom lens, making
it easy to attach auxiliary lenses and filters without any additional adapters
or other gadgets. I do worry a little about the wisdom of hanging very much
weight on the front of the telescoping lens assembly though. I guess it will
be fine for relatively lightweight attachments such as macro adapters and filters,
but I advise caution with any sort of larger accessory lens.
"3D" Predictive Focus Control and Subject Tracking
Based on information from Minolta, the A1 appears to have a much more sophisticated
AF system than found on previous Minolta digicams. Details are a little sketchy,
but when it's running in Continuous Autofocus mode, the A1's AF system monitors
the focusing distance, and projects it into the future. Using this information,
it continues to adjust the focus during what would otherwise be the "dead"
time between when the shutter button is fully pressed and when the camera actually
snaps the picture. This could help focus accuracy for moving subjects significantly,
particularly when using long telephoto focal lengths.
The A1 also incorporates Minolta's Subject Tracking AF, which we saw one form
of in their F100 and F300 consumer cameras. If you put the camera in Continuous
Autofocus mode and half-press and hold down the shutter button, the camera will
lock on and track a moving subject across the frame, adjusting focus as appropriate.
You need to initially have the subject under the active AF point, but from that
point on, it will follow the subject around the frame. I really don't have an
ability to evaluate capabilities like this quantitatively, but in playing with
it a bit, the AF point did indeed track subjects fairly well, across perhaps
80% of the total frame area. I couldn't move the camera too rapidly, or it would
lose the subject, sometimes hopping and re-locking on an adjacent object, but
the capability still goes quite a bit beyond what's available in other cameras
on the market.
Anti-Shake System
rand new in the A1 is the first vibration-reduction system on a Minolta digicam.
Details on it are sketchy, but it apparently actually moves the CCD assembly
to counteract camera movement, rather than the more usual approach of moving
an optical element inside the lens. I didn't conduct any sort of a formal test
with it, not having any quantitative way to measure its effects. I did find
it very effective (surprisingly so). To see the effect "live," I ran
the zoom all the way out to full telephoto, then turned on the 8x focus-assist
magnification on the LCD. With Anti-Shake inactive, it was virtually impossible
to keep the resulting LCD image stable when holding the camera by hand. When
I turned Anti-Shake on, the results were immediate and dramatic. The image quieted
down by what had to be a factor of four or more.
In my power testing, I found that Anti-Shake exacts a stiff price in terms of
power consumption, increasing power drain by fully 70% over similar operating
modes with Anti-Shake disabled. The A1 is very intelligent about when to turn
on Anti-Shake though, by default only turning it on when the shutter is half-pressed,
or when the 2x or 8x viewfinder magnification mode is enabled. A menu option
lets you further restrict Anti-Shake operation to the actual moment of exposure
itself, reducing the power hit even more.
I don't know how much of a premium the Anti-Shake function adds to the cost
of the A1, but hope it isn't too much. Optical stabilization makes a huge difference
in usability of longer telephoto focal lengths, but is a feature that has found
little support from a price standpoint in the past. (Other cameras incorporating
optical stabilization have generally not fared well against cheaper competition
lacking the feature.) I'm hopeful though, that the range of sophisticated user
that the A1 is so obviously aimed at will understand and fully appreciate the
value of Anti-Shake technology.
Exposure
| Free Photo Lessons | |
|
The DiMAGE A1 offers excellent exposure control, with very fine-grained adjustment
of such image attributes as sharpness, contrast, and color saturation. While
I found the camera's user interface a little confusing at first, with its myriad
buttons, dials, and switches, I liked it a lot once I got the hang of it. (The
combined use of functional dials, selection buttons, and the rotating command
wheel is similar to the design of Minolta's film cameras, and very reminiscent
of the earlier Sony DSC-D770, a camera that developed a significant "cult"
following. While something of a departure for the digicam market, this interface
has proven very popular with users of both Minolta's film cameras, and the much
earlier Sony camera.)
The Mode switch on the rear panel selects the basic operating mode: Record,
Playback, or Movie. Within Record mode, the Exposure Mode dial selects the camera's
exposure mode. Choices are Manual, Shutter Priority, Aperture Priority, Program
AE, Auto, Memory Recall, Portrait, Sports, Sunset, and Night Portrait modes.
In straight Auto mode, the camera controls everything about the exposure, except for flash, zoom, and focus. Program AE mode keeps the camera in charge of the exposure, while you have control over all other exposure options. While in Program AE mode, you can rotate either of the control dials to scroll between a range of equivalent exposure settings. Thus, you can bias your exposure toward a faster shutter speed or greater depth of field as circumstances dictate. Aperture Priority mode lets you select the lens aperture setting, from f/2.8 to f/11 depending on zoom, while the camera selects the most appropriate corresponding shutter speed. In Shutter Priority mode, the user selects the shutter speed, from 1/16,000 to 30 seconds, while the camera chooses the best corresponding aperture setting. Switching to Manual mode gives you control over both shutter speed and aperture, with a Bulb setting available for longer exposures. Exposure time in Bulb mode is determined by how long you hold down the Shutter button, up to a maximum of 30 seconds. (I strongly recommend use of the optional wired remote in Bulb mode, as the pressure of your finger on the shutter button is bound to jiggle the camera somewhat, blurring the image.)
As described above, the DiMAGE A1 also offers four preset scene modes (referred to as Digital Subject Programs). Controlled by a button on the earlier DiMAGE 7Hi, these modes are now accessed via the Exposure Mode dial. Portrait mode produces better-looking people shots by enhancing skin tones and decreasing the depth of field (to create a slightly blurred background). Sports mode provides faster shutter speeds to freeze action, and maintains focus on quickly moving subjects. In Sunset mode, the camera employs slightly slower shutter speeds to let in more of the ambient light, and lets you record the warm colors of the scene without compensating for them in the white balance system. In Night Portrait mode, the camera also uses a slower shutter speed to allow more ambient light into the image, however it also records true black values and preserves the bright colors of artificial lighting. The Exposure Mode dial also features a Memory Recall setting, which lets you save as many as five registers of settings. Selecting a setting automatically applies the settings to the camera, which can be recalled by turning the Exposure Mode dial to another position.
The DiMAGE A1's default metering mode is a 300-segment evaluative system, which takes readings throughout the image to determine exposure. Center-Weighted and Spot metering options are also available via the Function Dial. Spot metering is useful for high-contrast subjects, as it bases the exposure reading on the very center of the image, letting you set the exposure based on a small portion of your subject. Center-Weighted metering also bases the exposure on the center of the image, but the camera takes its readings from a much larger area in the middle of the frame. You can also hold or lock the exposure reading for a particular part of the image by pressing the AE Lock button on the back panel. This button can be programmed to act as either a "hold" or "toggle" control. "Hold" mode does just that, it holds the current setting until you release the AE Lock button again. Toggle mode locks and releases the exposure/focus setting with successive actuations of the AE Lock button. Halfway pressing the Shutter button also locks exposure and focus, but only in autofocus mode.
The DiMAGE A1's light sensitivity can be set to Auto, or to ISO equivalents of 100, 200, 400, or 800. As with other consumer and prosumer digicams that sport ISO 800 options though, I didn't find the ISO 800 setting to be particularly useful, as the image noise level was so high. A Noise Reduction option is newly available for longer exposures and higher ISO settings, and greatly reduces the amount of image noise that would otherwise result. Exposure compensation is adjustable from -2 to +2 exposure equivalents (EV) in one-third-step increments, and an auto-bracketing option can snap three shots in rapid succession, varying the exposure between each in steps of 0.3 or 0.5 EV units. Exposure compensation is adjusted using the Digital Effects dial, while auto bracketing is activated by rotating the Function Dial to the Drive position, pressing the center, and then rotating the Control dial until the auto bracketing icon appears in the LCD or EVF display. Exposure step size for auto bracketing is set through an option in the record-mode menu system.
Like the DiMAGE 7Hi before it, the DiMAGE A1 offers very flexible control over white balance, color rendition, and tonal range. Its white balance system offers a total of seven options, including Auto, Daylight, Tungsten, Fluorescent, Cloudy, Shade, and Custom, which is the manual setting. The Custom Set mode determines white balance by snapping a picture of a white card. The camera then adjusts its color balance to render the white card with a neutral hue, and saves the setting as the Custom option. As many as three Custom settings can be saved, very useful if you need to switch back and forth between different lighting conditions quickly.
Contrast and Color Saturation controls are adjustable in 11 steps across a fairly broad range of settings, using the Digital Effects dial on the camera's left side in conjunction with the Front Control dial next to the Shutter button. To make adjustments, you rotate the Digital Effects dial to either setting, press the button at its center, and then rotate the Control dial to choose the desired setting. The DiMAGE A1 also offers a Filter setting on the Digital Effects dial. Depending on the color mode selected through the Custom Settings menu, the Filter option adjusts the overall color cast of the image, again in 11 steps. The color range here varies from rather blue to rather yellow, exactly the color axis that you'd want to adjust to compensate for different color temperatures in your lighting. Positive adjustments warm the image, while negative adjustments produce a cooler color balance. In Black and White mode, the Filter effect tones the image from neutral to red, green, magenta, blue, and back to neutral (zero position).
The combination of fine steps and wide adjustment ranges in the Digital Effects controls mean you can really customize the A1 to exactly suit your preferences for color and tonality. Most cameras offering saturation, white point, and contrast variations treat them more as special effects, rather than as adjustments for fine-tuning camera response. We seem to be seeing more evidence of other manufacturers offering "fine tuning" options like this (Olympus prominent among them), but I'd really like to see it become more widespread.
The Color Mode option of the Record menu offers Natural and Vivid sRGB color modes, as well as Adobe RGB, Embedded Adobe RGB, Black and White, and Solarization settings. Adobe RGB color space has a much broader gamut or range of reproducible colors than does sRGB, the color space used by most digital cameras and computer monitors. (The Embedded option simply means that the color space information is embedded in the image file.) Adobe RGB images will look rather dull when displayed on monitors tuned to the sRGB standard, but when used in a color-managed work environment, they can capture and reproduce a much greater range of colors. For its part, Solarization partially reverses the tones in an image, while the Exposure Compensation adjustment controls the intensity of the effect. The record menu also offers a Sharpness adjustment, for controlling the amount of in-camera sharpening applied to an image.
Continuous Modes
The DiMAGE A1 features a range of continuous shooting modes, accessed via the "Drive" setting on the left-side Function dial. In addition to the standard Continuous Advance mode, the DiMAGE A1 also offers Interval, High-Speed Continuous, and Interval and Time-Lapse Movie modes. (Note that the Drive setting also access the Self-Timer and Auto Exposure Bracketing modes as well.) In standard Continuous Advance, the DiMAGE A1 captures approximately two frames per second, for as long as the Shutter button is held down (numbers are for small/basic images). Depending on the resolution and quality settings, as well as the amount of memory card space, the maximum number of frames and the frame rate will vary. In my testing, I found Continuous mode captures did indeed have a frame rate close to two frames per second, but saw some variability in the timing when shooting at smaller image sizes. The buffer seems to hold three shots, as the camera would grab three frames at the roughly 2 frame per second rate, then pause briefly before grabbing the next three. The pauses grew longer as more frames were captured, eventually becoming as long as 12-13 seconds.
High-Speed Continuous mode captures a series of full-size images at approximately 2.8 frames per second. Behavior was otherwise very similar to that of normal Continuous mode.
Interval mode captures a series of images at specific intervals over time, providing a built-in time-lapse capability. The DiMAGE A1 can capture up to 240 images in the sequence, with frame intervals ranging from 30 seconds to 60 minutes, and a delayed start time from 30 minutes to 24 hours.
Interval and Time-Lapse Movie mode creates a series of still images and a 640 x 480 movie clip at the Interval settings specified through the Record menu.
As mentioned above, the Drive setting also accesses the Self-Timer and Auto Exposure Bracketing modes. The Self-Timer fires the shutter either two or ten seconds after the shutter button is pressed. The shorter delay is very handy when you need to prop the camera on something to take a photo in dim lighting, and don't want the pressure of your finger on the shutter button to jiggle the camera. The ten-second delay is long enough that you can run around to get into the photo yourself. An LED lamp on the front of the camera blinks and the camera beeps as the self timer is counting down, the blink and beeps becoming faster in the last few seconds.
Auto Exposure Bracketing mode captures a series of three images (one at the
metered exposure, one underexposed, and one overexposed). You can set the exposure
variation between exposures to 0.3, or 0.5 EV. The A1's automatic bracketing
options go beyond simple exposure bracketing though. Turning the Rear Control
dial cycles through a range of bracketing options, including Continuous-Advance
Bracket, Single-Frame Advance Bracket, and Digital Effect Bracket (which brackets
either Filter, Contrast, or Color Saturation settings). The ability to bracket
hue, contrast, and color saturation is really helpful for handling difficult
subjects.
Movie and Sound Recording
The DiMAGE A1 has a Movie mode that records moving images with sound, for as long as the memory card has available space. The amount of recording time appears in the LCD or EVF monitor display, and appears to be limited only by memory card capacity. (That is, there is no arbitrary limit on the length of individual clips.) Movies are recorded at 320 x 240-pixel resolution. Through the Record menu, you can set the movie mode to Auto, Standard, or Night. Night mode records black and white movies in low lighting situations, and is far more effective in dim lighting than the vast majority of digicam movie options I've seen. The Auto setting tells the camera to automatically decide between Standard and Night modes, based on the exposure conditions.
A Voice Memo mode records either five or 15 seconds of audio to accompany still images. This mode must be enabled before image capture. When enabled, a microphone icon appears in the LCD/EVF display, and the camera automatically begins recording audio for the specified amount of time immediately after image capture.
Flash
 The DiMAGE A1 features a
built-in, pop-up flash, which operates in either Fill-Flash, Red-Eye Reduction,
Rear Flash sync, or Wireless modes. To release the flash from its compartment,
pull on the two small tabs on either side of the casing and lift up the flash
head. Close it again by simply pushing the flash head back down. The Flash mode
is changed through the Record settings menu. In Fill-Flash mode, the flash fires
with every exposure, regardless of lighting conditions. Red-Eye Reduction fires
a series of small pre-flashes before firing the flash at full power for the
exposure itself. This makes your subjects' pupils contract and reduces the occurrence
of the Red-Eye effect. The Rear Flash Sync mode fires the flash at the end of
the shutter time, rather than the beginning. If you have moving objects in a
relatively brightly lit environment, this will produce a sharp image of your
subject, with a "motion trail" following behind it. The flash is in
the Off position when it's closed. The Wireless mode lets the camera work with
wireless remote flash units, with four channels available through the settings
menu, so different camera/flash setups working in the same area won't interfere
with each other. (Minolta makes two flash units that support the DiMAGE A1's
wireless capability, the Program Flash 5600HS [D] and 3600HS [D].)
The DiMAGE A1 features a
built-in, pop-up flash, which operates in either Fill-Flash, Red-Eye Reduction,
Rear Flash sync, or Wireless modes. To release the flash from its compartment,
pull on the two small tabs on either side of the casing and lift up the flash
head. Close it again by simply pushing the flash head back down. The Flash mode
is changed through the Record settings menu. In Fill-Flash mode, the flash fires
with every exposure, regardless of lighting conditions. Red-Eye Reduction fires
a series of small pre-flashes before firing the flash at full power for the
exposure itself. This makes your subjects' pupils contract and reduces the occurrence
of the Red-Eye effect. The Rear Flash Sync mode fires the flash at the end of
the shutter time, rather than the beginning. If you have moving objects in a
relatively brightly lit environment, this will produce a sharp image of your
subject, with a "motion trail" following behind it. The flash is in
the Off position when it's closed. The Wireless mode lets the camera work with
wireless remote flash units, with four channels available through the settings
menu, so different camera/flash setups working in the same area won't interfere
with each other. (Minolta makes two flash units that support the DiMAGE A1's
wireless capability, the Program Flash 5600HS [D] and 3600HS [D].)
The DiMAGE A1 is also unusual in that it offers two methods of flash metering. Its default mode is called ADI, which stands for Advanced Distance Integration. In this mode, it bases its flash exposure on the lens aperture and distance feedback from the autofocus system, as well as on the light reflected back from a pre-flash. By determining how far away the target subject is, the camera knows how much flash power is required to illuminate it, and so is less likely to be fooled by subjects that are unusually light or dark overall. As a fallback, a Pre-Flash TTL (through the lens) method bases the exposure determination solely on a small metering flash before the main exposure. Used in conjunction with the spot autofocus option mentioned earlier, the ADI flash metering should be much more accurate with small subjects against a different colored background than the pre-flash method.
For use with studio strobes and conventional slave triggers, the DiMAGE A1 has a manual flash power option. This lets you set the flash power to Full, 1/4, or 1/16 power manually. In this mode, the flash fires only once, at the moment of exposure. The single flash prevents false triggering when working with conventional slave triggers.
The DiMAGE A1 also includes a top-mounted hot shoe for attaching an external
flash unit. The shoe design and contact arrangement are set up for Minolta's
own dedicated flash units, but I imagine that compatible models are available
from the major third-party flash manufacturers (Sunpak et. al.). Minolta's own
Program Flash models 2500(D), 3600HS(D), and 5600HS(D) work with the DiMAGE
A1, and two macro flashes (Macro Twin Flash 2400 and Macro Ring Flash 1200)
will work with an accessory macro flash controller.
An external flash sync terminal (the so-called "PC" style connector)
accommodates just about any third-party flash unit. This makes the DiMAGE A1
much more appealing to photographers who already have an existing strobe system
for the studio.
I had a chance to play a bit with a couple of Minolta's dedicated flash units
while I was testing the previous DiMAGE 7Hi, and must say I was impressed. I
only shot with the 5600 model (a conventional hot-shoe mounted unit, but with
the added capability of wireless control) in a fairly small area, so didn't
test the maximum range over which the wireless TTL control would function. (I'm
sure it has some maximum range over which it's effective, but don't know what
that is.) That said though, the camera/flash combination worked exceptionally
well. Very slick, given that no extra controller or other hardware is needed
to establish the wireless link between the flash and the camera. (This has to
be one of the neatest flash arrangements I've seen yet on a digicam!)
For closeup work, the T2400 macro twin flash is a very capable setup too. -
A large ring mounts to the front of the lens, and serves as a support mount
for a pair of tiny flash heads. The little flash heads are powered by a flash
controller that looks just like a normal hot-shoe flash unit, but has two sockets
on its front instead of the flash tube. The ring has multiple mounting points
around it for the little flash heads, so you can direct the light to come from
top, bottom, or either side with equal ease. The flash controller also lets
you set the power ratio between the two heads, so you can have a "main"
and "fill" light on your macro subject. Very flexible, very slick
(if not a little odd-looking). Highly recommended if you intend to do any really
extensive macro work. (This should be a great solution for people selling tiny
objects (coins, jewelry?) on eBay, looks like a sure winner for dentists looking
to document their work, entomologists wanting really good bug pictures, etc,
etc.)
Color Space
This is probably as good a place as any to talk about the DiMAGE A1's color
space. The original DiMAGE 7 used a proprietary color space with a much wider
color gamut than the sRGB space used by most digicams. (As well as by most computer
monitors, consumer-grade printers, etc.) The result was that it could capture
a much broader range of colors than other cameras, but this also meant that
the raw JPEGs straight out of the camera looked rather flat and dull when viewed
on a typical computer monitor. To get the full color to appear, you needed to
run the image files through Minolta's DiMAGE Viewer software utility, and convert
their color space back to sRGB. (Or whatever other working space you wanted
to use. Many graphics professionals work in the so-called "Adobe RGB"
space popularized by Photoshop(tm), which is supported by many graphics programs
and printers, and also offers an expanded color gamut.)
While the expanded color gamut was a real boon to graphics professionals and
others interested in breaking free of the constraints of sRGB, for the average
amateur it amounted to just one more step to go through before they could fully
enjoy their photos. Worse, if someone wasn't aware of the color space issue,
they'd probably write off the DiMAGE 7 as having rather flat, undersaturated
color.
With the DiMAGE 7i, Minolta stepped back closer to the mainstream in the color
space department, adopting a color space that was much closer to sRGB, to the
point that files from the 7i could be used in an sRGB environment without special
processing. While there was still some undersaturation in parts of the spectrum,
the 7i's unprocessed JPEG images were much more visually appealing than those
from the original 7.
With the DiMAGE 7Hi, Minolta further moved to embrace standard color space definitions,
but this time they also included an option for a space with a larger color gamut
than that supported by sRGB. The 7Hi had three color space options (plus black
& white and sepia), two based on sRGB, the third being the broader-gamut
"Adobe RGB" space. The two sRGB spaces are the default one, with normal
color rendering, and a "vivid" sRGB option, which boosts color saturation
a fair bit. The DiMAGE A1 follows in the footsteps of the 7Hi in this regard,
with the same color space options available.
This increased color-space flexibility will come as a welcome addition for many
pros and advanced amateurs who want to use their cameras in a color-managed
environment. The Adobe RGB space avoids many of the color limitations of the
sRGB space, which are most evident in highly-saturated reds. Working in Adobe
RGB lets you maintain detail in bright reds and greens that can't be properly
represented in sRGB space. Switching to Adobe RGB for your photography does
involve a fair degree of commitment though, as you'll need to set up your entire
workflow to support it, including both screen rendering on your computer's CRT
or LCD, and printing to your printer. Computer monitors are built to the sRGB
standard, and require software support (as in Adobe Photoshop or other high-end
image manipulation package) to portray Adobe RGB images properly. Likewise,
most consumer-grade photo printers assume sRGB as the starting point, again
needing color management to properly output Adobe RGB files. (Many professional
photo printers are set up to work in Adobe RGB by default though, so check to
see what your printer's default color space is.)
Shutter Lag/Cycle Times
When you press the shutter release on a digital camera, there's usually
a lag time before the shutter actually fires. This time allows the autofocus
and autoexposure mechanisms to do their work and can amount to a significant
delay in some situations. Since this number is rarely reported by manufacturers
or reviewers, and can significantly affect the picture-taking experience, I
routinely measure shutter lag and cycle times using an electronic test setup
I designed and built for the purpose. (Crystal-controlled timing, with a resolution
of 0.001 second.)
NOTE: My qualitative characterizations of camera performance below (that is, "reasonably
fast," "about average," etc.) are meant to be relative to
other cameras of similar price and general capabilities. Thus, the same
shutter lag that's "very fast" for a low-end consumer camera might
be characterized as "quite slow" if I encountered it on a professional
model. The comments are also intended as only a quick reference: If performance
specs are critical for you, rely on the absolute numbers to compare cameras,
rather than my purely qualitative comments.
|
|
||
| |
|
|
| Power On -> First shot | |
No wait for lens to extend, so reasonably fast. |
| Shutdown | |
No lens to retract, so time shown is that required for camera to finish writing data to the memory card. First time is for small data file, second is for full buffer of TIFF images on a fast card. (Lexar 24x WA.) Buffer-empty times for slow cards could be quite a bit longer. |
| Play to Record, first shot | |
Time until first shot is captured, from playback mode. Quite fast. |
| Record to play (max/min res) | 2.51/1.49 |
Top numbers for large/fine images, bottom ones for small/normal. First number of each pair is for camera having just captured an image, second number is for camera through processing last image, in resting state in capture mode. |
| Shutter lag, full autofocus |
|
First number is for lens at wide-angle setting, second is for telephoto. Very fast (!), interesting in that tele time is slightly shorter than wide-angle: Usually, the opposite is the case. |
| Shutter lag, continuous autofocus |
1.04/1.02 | First number is for wide-angle, second for telephoto. As is usually the case with cameras I test, continuous autofocus doesn't result in faster shutter response. To the contrary, in the case of the A1, it actually significantly slows it. Continuous AF may very well improve results with moving subjects, but if you subject isn't moving toward or away from you, use single autofocus for the best results. |
| Shutter lag, manual focus |
|
About average for prosumer cameras in its class. |
| Shutter lag, prefocus |
|
Faster than average, but by no means the fastest on the market. |
| Cycle Time, Single Shot Mode Large/Small JPEGs |
(25) |
First number is for large/fine files, second is for lowest resolution/quality. Buffer capacity in large/fine mode is 7 shots, after which the cycle time slows to about 5 seconds with a fast memory card. (Likely slower with a slow card.) After capturing a long series of large/fine shots, the buffer clears in about 25 seconds. At the small/basic quality setting, there seems to be no limit to the number of shots that can be captured without slowing. Oddly though, in small/basic mode, the cycle time is much more variable, with a standard deviation of 15%. (Low of 1.02, high of 1.65.) |
| Cycle Time, Single Shot Mode, RAW files |
2.28/6.05 (30) |
First number is interval between shots for first 6 captured, then stretches to 6.05 seconds. Buffer clears in 30 seconds with a fast card, likely longer with a slow one. |
| Cycle Time, Single Shot Mode, TIFF files |
2.95/11.5 (35) |
First number is interval between shots for first three captured, then stretches to 11.5 seconds. Buffer clears in 35 seconds with fast card, likely longer with slow one. |
| Cycle time, Normal Continuous Mode, Large/Small JPEG |
|
First number is for large/fine files, second is for smallest/lowest quality setting. In both modes, the camera captures bursts of three, with a pause to write data to the card between. In large/fine mode, the burst rate is always 0.52 seconds/frame. With small/basic, the first two shots are 0.52 seconds apart, the second and third are separated by 0.64 seconds. (odd) With large/fine files, the pause between the first and second groups of three shots are 1.31 seconds apart, but subsequent to that, the interval ranges from about 12.8 to 13.2 seconds. (May be longer with slower cards.) With small/basic files, the pause between groups of shots is always about 1.35 seconds. |
| Cycle time, Normal Continuous Mode, RAW files |
0.52-0.71 (29) |
Grabs bursts of five shots. Interval between shots within each burst varies from 0.52-0.71 seconds, with an average of 0.64 and a standard deviation of 9%. Interval between bursts is about 29 seconds with a fast card, is likely to be longer with a slower one. |
| Cycle time, Normal Continuous Mode, TIFF files |
0.56/0.66 (36) |
Bursts of 3 shots. Interval between first two is always 0.56 seconds, between second two is always 0.66. 35.7 seconds between bursts with a fast card, likely longer with a slower one. |
| Cycle time, High Speed Continuous Mode, large JPEGs |
0.35/13.6 (24) |
Bursts of 3 shots. Interval between shots is 0.35 seconds. Interval between bursts is 1.35 seconds between first and second burst, then 13.6 seconds for subsequent ones. Buffer clears completely in 24 seconds with fast card, likely longer with slower one. (Inter-burst delay also likely longer with slower card.) |
| Cycle time, High Speed Continuous Mode, small JPEGs |
0.35, 0.51, 1.44 (2.7) |
These are times for small/lowest-quality JPEG files. Oddly, the camera consistently shot with three different intervals, in a repeating pattern of three frames. Between the first and second frame, interval was 0.35 seconds, between second and third, interval was 0.51 seconds. Then between third and fourth, interval was 1.43 seconds. This pattern would then repeat indefinitely. Buffer cleared entirely in 2.65 seconds. |
| Cycle time, High Speed Continuous Mode, RAW files |
0.35/32.0 | Bursts of five frames. Always 0.35 seconds between frames, 32 seconds between bursts. Buffer fully clears in 32 seconds. Inter-burst and buffer clearing times will both likely be longer with slower memory cards. |
| Cycle time, High Speed Continuous Mode, TIFF files |
0.35/36.5 | Bursts of three frames. Always 0.35 seconds between frames, 36.5 seconds between bursts. Buffer fully clears in 36.5 seconds. Inter-burst and buffer clearing times will both likely be longer with slower memory cards. |
The DiMAGE A1 is every bit as fast as its predecessor, the DiMAGE 7Hi, which was one of the fastest prosumer cameras on the market. The A1's autofocus system is very fast, regardless of the zoom setting of the lens, with full-autofocus shutter lag times of roughly 0.61 seconds regardless of zoom position. (Most cameras have a faster shutter response with the lens set to its wide angle position, vs the telephoto setting.) This is faster than the vast majority of prosumer digicams currently on the market, making the A1 better suited for sports and other action photography than most competing models. Its manual and prefocus lag times are also pretty fast at 0.225 and 0.171 seconds respectively, but not as far ahead of the rest of the market as its full-autofocus performance is. Continuous-mode operation is pretty speedy as well, with cycle times of 0.52 seconds (1.92 frames/second) in normal continuous mode, and 0.35 seconds (2.86 frames/second) in high-speed continuous mode.
The A1's buffer capacity is a little puzzling. In single-shot mode, the camera can capture at least 7 shots without pausing, but in its continuous modes, it only captures images in bursts of three frames at a time. (The exception being RAW-format files, which permit sequence lengths of up to 5 frames.) A seven-shot buffer capacity is quite good for a prosumer camera, but the 3-frame burst length in continuous mode (when you arguably might most need more buffer capacity) is rather limiting.
Overall though, with fast autofocus-mode shutter response, quick single-shot cycle times, and a very fast high-speed continuous mode, combined with an excellent 7x zoom lens, the DiMAGE A1 is one of the better prosumer cameras on the market for sports and nature photography.
Operation & User Interface
The DiMAGE A1's user interface is much more sophisticated than most
digital cameras on the market, as it provides significant external control over
commonly used settings. As a result, the DiMAGE A1 should be more intuitive
for film-based photographers who are accustomed to the "tactile" interface
of the traditional 35mm SLR. The difference is immediately apparent in the mechanically-coupled
zoom lens control, which provides much more direct control than the motorized
rocker switch zooms used by most other digital cameras. The rubber collar grip
surrounding the lens barrel is clearly marked with corresponding focal lengths,
so you know immediately the zoom setting at which you're operating. Manual focus
is more of a "fly by the wire" adjustment, in which a ribbed focus
ring at the base of the lens is used to control the internal motor that actually
makes the adjustment. In my opinion, the zoom control is more important, however,
given that the majority of users will spend more time in Auto Focus rather than
Manual Focus mode.
With the notable exception of the overall flash operating mode, you can control
almost all of the essential camera functions without having to resort to the
on-screen LCD menu system. Most of the camera adjustments are made by rotating
a dial, pressing a button, and turning one of the control dials. This may sound
like a lot of steps, but in practice I've always found external mechanical controls
like these much faster to navigate than LCD menu options. In addition to the
Mode switch and Exposure Mode dial, the major interface elements include a pair
of function dials on the left side of the camera, Front and Rear Control dials,
and the top-panel LED data readout (or, you can refer to the LCD or electronic
viewfinder displays.) Initially, I found it a little awkward to have to view
the left side of the camera to select specific parameters, but after a few hours
of using the camera, I found myself simply counting the clicks on the dials
there to select the options I wanted. Bottom line, while they're rather unusual
in the digicam world, the DiMAGE A1's controls lend themselves to quick, sure
operation for experienced users in the heat of concentrated shooting sessions.
Control Enumeration

Shutter Button: Located on the top right-hand side of the camera, this button
sets exposure and focus (in autofocus mode) when half-pressed, and trips the
shutter when fully pressed.
![]()
Front Control Dial: This ridged wheel sits just behind the Shutter button,
conveniently under your index finger. All of the most commonly used camera settings
are adjusted by using this wheel in conjunction with one of the function dials
on the left side of the camera. It also controls aperture and shutter speed
in Aperture Priority and Shutter Priority exposure modes and shutter speed in
full-manual mode.

Exposure Mode Dial: In the right rear corner of the top panel, this dial
selects the camera's exposure mode. Options are Manual, Shutter Priority, Aperture
Priority, Program AE, Auto, Memory Recall, Portrait, Sports, Sunset, and Night
Portrait modes.
![]()
Information Button: Angled down from the top panel, just off the lower
left corner of the status display panel, this button controls the amount of
information displayed on the EVF and LCD screens while in Record and Playback
modes, and it activates the Index display in Playback mode.
![]()
Magnify Button: To the right of the Information button, this button can
be configured (via an LCD menu option) to either toggle the 2x digital zoom
in Record mode, or to magnify the center of the image by 2x or 8x for manual
focusing. (The 8x focus-check magnification is really useful, by far
the best focusing magnifier I've used in a digicam.) In Playback mode, this
button initially magnifies the image 2x, after which the up/down arrows on
the Four-Way Controller increase or decrease magnification in steps of 0.2x,
up to a maximum of 8x (depending on the image resolution).
![]()
Rear Control Dial: Below the Exposure Mode dial on the camera's
rear panel, this dial controls a variety of exposure settings when turned
while pressing a control button or turning a function dial.

AE Lock Button: On the back of the camera, just below the Rear Control
dial, this button locks exposure and/or focus, depending on how you've set
it up. An LCD menu option configures the button to match your shooting style.
The button can be programmed to either toggle the lock on or off, or only
hold the settings while depressed. It can also be configured to tie the AE
Lock area to the spot metering point.

Mode Switch: Just to the right of the EVF on the rear panel,
this switch sets the camera's main operating mode to Record, Playback, or
Movie.
Power Button: Located in the center of the Mode switch, this button turns the camera on and off.

Exposure /Flash Compensation Button: Directly below the Mode
switch, this button lets you adjust the overall exposure from -2 to +2 exposure
equivalents (EV) in one-third-step increments when pressed while turning the
Front Control dial. Located right under your right thumb as you grip the camera,
it's very easy to press this at the same time as turning the Control dial.
(Much easier than I'd have expected, a very quick, intuitive adjustment.)
This button also adjusts the flash exposure compensation, when pressed while
turning the Rear Control dial. Adjusting the flash exposure is unfortunately
a two-handed operation, but it's still nice not to have to enter the LCD menu
system to make the setting change. If the flash control has been set to Manual,
this adjustment controls the flash output directly, setting it to 1/4, 1/2
or full power. (Overall, a very nice implementation of combined ambient/flash
exposure adjustment.)

Display Mode Switch: Below the Exposure Compensation button and tucked
into the corner next to the LCD monitor, this switch controls the operation
of the rear-panel LCD and the EVF displays. The top position enables the EVF
only, while the bottom position enables only the LCD monitor. In the center
Auto position, marked as "A," the camera decides which screen to
activate, using a set of infrared sensors next to the EVF that tell when your
eye is near the EVF.

Four-Way Controller and OK Button: In the center of the rear panel, this
rocker control steps through selections within the LCD menu system and interacts
with various status messages or requests for confirmation that appear on the
LCD screen. You navigate the menus by pressing one of the four arrows around
the control's periphery, and confirm selections by pressing the OK button
in the center of the control. In Playback mode, the right and left arrows
scroll through captured images on the memory card, while the up arrow activates
a histogram display. In Record mode, pressing and holding the center of the
control switches the camera between Wide and Spot autofocus modes. Once in
Spot AF, rocking the control moves the Spot crosshair around the frame, implementing
Minolta's Flex Focus Point mode.

QV/Delete Button: Below the Four-Way Controller, the QuickView button
lets you quickly switch from Record to a Quick View mode to view just-captured
images. When viewing an image, pressing this button prompts the camera to
ask if you want to delete it.

Menu Button: While the DiMAGE A1 does make considerable use of external
controls, it also has an extensive LCD menu system, with four screens of menus
in both Record and Playback modes, with access to the Setup menus as well.
Pressing the Menu button calls up the menu system, pressing it a second time
dismisses it when you're done.

Anti-Shake Button: To the right of the Menu button, this button
toggles the camera's Anti-Shake System on and off. The button glows green
when activated, and a blue "shaking hand" icon appears in the lower
left corner of the LCD or EVF screen.

Function Dial: Located at the top of the camera's left side panel, this
dial is the primary interface for controlling the most frequently used camera
settings. You change a setting by rotating the dial to the appropriate position,
and then pressing the central button while rotating one of the ridged Control
dials. When you press the center button, the corresponding camera option is
displayed in isolation on either the LCD or EVF (whichever is in use), so
you can see its current value as you rotate the Control dial. Options here
include the following:

Digital Effects Controller: Below the Function Dial is the Digital Effects
Controller, labeled "EFFECT." Its operation is very similar to that
of the Function Dial, in that changes are made by rotating the dial to select
a function, pressing the central button, and scrolling the Control dial. Options
here include Contrast, Color Saturation, and Filter (a hue adjustment). Adjustments
are very fine-grained yet cover a wide range, permitting subtle customization
of the camera to your personal tastes or the needs of a particular subject.

Focus Switch: Just below the Digital Effects Controller, this sliding
switch controls the focus mode, selecting either Single AF, Continuous AF,
or Manual modes.
![]()
Custom White Balance Button: To the left of the Focus switch,
this button sets the manual white balance when pressed in Custom white balance
mode.

Manual Focus Ring: Surrounding the base of the lens barrel, this ribbed
ring controls focus when the camera is in Manual focus mode. This is a "fly
by wire" control, in that it isn't directly (mechanically) connected
to the optics, but rather commands an internal motor to move the lens elements.
In "Direct Manual Focus" mode, the camera initially focuses automatically,
then turns control over to the Focus Ring so you can fine-tune the focus manually.

Zoom Control Ring: A rubberized ring around the middle of the lens barrel,
this controls the optical zoom, moving the lens from wide angle to telephoto
positions. Unlike the zoom controls on most digicams I've tested, this collar
on the DiMAGE A1 is directly connected to the lens elements, providing very
precise, sure-footed all-mechanical control.

Macro Focus Switch: Located on the left side of the lens barrel, this
control engages the macro focusing option. Macro focus may be enabled at either
the wide-angle or at a short range of telephoto focal length settings of the
zoom lens.

Diopter Control Dial: Practically hidden on the left side of the optical
viewfinder, this tiny dial adjusts the viewfinder display to accommodate eyeglass
wearers. It varies the eyepiece diopter setting over an unusually broad range.

Battery Compartment Latch: Located in the center of the battery compartment
door on the bottom of the camera, this latch unlocks and opens the battery
compartment cover.
Camera Modes and Menus
![]() Still Capture Mode: Accessed
by turning the Mode switch to the red camera symbol, this is the mode for
all still-image capture operations. (Auto, Program AE, Aperture Priority,
Shutter Priority, Manual, Memory Recall, Portrait, Sports, Sunset, and Night
Portrait modes are set through the Exposure Mode dial.)
Still Capture Mode: Accessed
by turning the Mode switch to the red camera symbol, this is the mode for
all still-image capture operations. (Auto, Program AE, Aperture Priority,
Shutter Priority, Manual, Memory Recall, Portrait, Sports, Sunset, and Night
Portrait modes are set through the Exposure Mode dial.)
![]() Playback Mode: Indicated
by the green arrow symbol, enables playback of previously captured images
and movies.
Playback Mode: Indicated
by the green arrow symbol, enables playback of previously captured images
and movies.
![]() Movie Mode: Enables capture
of movie sequences with sound.
Movie Mode: Enables capture
of movie sequences with sound.
Still Picture Shooting Menu Basic Options
The following four menu screens are available in Record mode
by pressing the Menu button:
 Record
1:
Record
1:
 Record
2:
Record
2:
 Record
3:
Record
3:
 Record
4:
Record
4:
 Movie
Shooting Menu Options
Movie
Shooting Menu Options
Playback Menu Options
The Playback menu offers three pages of options, all accessed by pressing
the Menu button.
 Playback
1:
Playback
1:
 Playback
2:
Playback
2:
 Playback
3:
Playback
3:
Setup Menu Options -
The following menu options are available in any exposure mode, and are accessed
through the Setup tab at the top of any menu screen.
 Setup
1:
Setup
1:
 Setup
2:
Setup
2:
 Setup
3:
Setup
3:
 Setup
4:
Setup
4:
Image Storage and Interface
 The
DiMAGE A1 uses CompactFlash Type I or Type II memory cards for image storage.
The camera ships with only a 16MB card, clearly inadequate for the file sizes
produced by the A1. (A token gesture by Minolta to enabling purchasers to use
the camera straight out of the box, with the recognition that any serious user
will immediately purchase a high-capacity card on their own.) Third-party CF
cards are available separately in memory capacities as high several gigabytes,
either in the form of conventional Flash Memory, or as a rotating disc, as in
the IBM MicroDrives. The CompactFlash slot is on the right side of the camera,
covered by a hinged plastic door that opens easily and snaps shut crisply. The
card inserts with the connector edge going in first, and the rear of the card
facing the back of the camera. A small button beside the slot ejects the card
by popping it up slightly, letting you pull the card the rest of the way out
(put the eject button into a vertical position first by pulling up on its bottom
edge).
The
DiMAGE A1 uses CompactFlash Type I or Type II memory cards for image storage.
The camera ships with only a 16MB card, clearly inadequate for the file sizes
produced by the A1. (A token gesture by Minolta to enabling purchasers to use
the camera straight out of the box, with the recognition that any serious user
will immediately purchase a high-capacity card on their own.) Third-party CF
cards are available separately in memory capacities as high several gigabytes,
either in the form of conventional Flash Memory, or as a rotating disc, as in
the IBM MicroDrives. The CompactFlash slot is on the right side of the camera,
covered by a hinged plastic door that opens easily and snaps shut crisply. The
card inserts with the connector edge going in first, and the rear of the card
facing the back of the camera. A small button beside the slot ejects the card
by popping it up slightly, letting you pull the card the rest of the way out
(put the eject button into a vertical position first by pulling up on its bottom
edge).
Although individual CompactFlash cards cannot be write-protected or locked against
erasure or manipulation, the Dimage 7i lets you lock individual images or groups
of images through the Playback menu. Once protected, images cannot be erased
or manipulated in any way, except through card formatting. The Playback menu
also lets you delete images shown in the LCD display, format the number of images
in the Index display, create a custom slide show, set images up for printing
on DPOF compliant printers, and copy images to camera memory or a new CF card.
Four image resolution settings are available: 2,560 x 1,920, 2,080 x 1,560,
1,600 x 1,200, and 640 x 480 pixels. Files may be saved in any one of three
JPEG compression levels, as well as uncompressed TIFF (indicated on the camera
LCD as "SuperFine"), and a compact RAW format. (By its nature, the
RAW format only saves the full-resolution image size.) The number of remaining
images that can be stored on the memory card appears in the lower right corner
of the status display panel, in addition to the selected Resolution and Compression
settings. (A minor quibble: With very large memory cards and the smallest image
size/compression settings, the counter tops-out at 999, a minor annoyance.)
The table below summarizes the compression ratios and number of images that
can be stored on the 16MB memory card that ships in the box with the camera
in the US, with each Resolution / Quality (JPEG Compression) combination. (Note
the large size of the 640x480 files: If you're planning on shooting small images
for the web or email, you'll definitely need to re-save these at a higher JPEG
compression ratio.)
| Resolution/Quality 16MB Memory Card |
|
|
|
|
|
|
| Full Resolution 2560x1920 | Images | 2 | 1 | 3 | |
|
| Approx. Compression/KB |
2:1 7.5 MB |
1:1 14.7 MB |
3:1 5.0 MB |
2.6 MB |
1.5 MB |
|
| High Resolution 2080x1560 | Images | |
|
|
|
|
| Approx. Compression/KB |
|
9.7 MB |
3.4 MB |
1.8 MB |
1.1 MB |
|
| |
Images | |
|
|
|
|
| Approx. Compression/KB |
|
5.8 MB |
2.0 MB |
1.1 MB |
673 KB |
|
| |
Images | |
|
|
|
|
| Approx. Compression/KB |
|
922 KB |
422 KB |
321 KB |
250 KB |
|
A USB cable and interface software accompany the DiMAGE A1 for quick connection and image downloading to a PC or Macintosh computer. It appears as a "storage class" USB device, meaning that no driver software is needed for Mac OS versions 8.6 or later or for Windows Me, 2000, and XP. Download speed was quite fast, as I clocked it at 751 KBytes/second on my Windows XP machine. (A Sony VAIO 2.4 GHz, with 512 MB of RAM.)
Lost Images? - Download this image-recovery program so you'll have it when
you need it...
Since we're talking about memory and image storage, this would be a good time
to mention the following: I get a ton of email from readers who've lost photos
due to a corrupted memory card. It's tragic when it happens, there are few things
more precious than photo memories. Corrupted memory cards can happen with any
card type and any camera manufacturer, nobodies immune. "Stuff happens,"
as they say. A surprising number of "lost" images can be recovered
with an inexpensive, easy to use piece of software though. Given the amount
of email I've gotten on the topic, I now include this paragraph in all my digicam
reviews. The program you need is called PhotoRescue, by DataRescue SA. Read
our review of it if you'd like, but download the program now,
so you'll have it. It doesn't cost a penny until you need it, and even then
it's only $29, with a money back guarantee. So download PhotoRescue for
Windows or PhotoRescue for
Mac while you're thinking of it. (While you're at it, download the PDF
manual and quickstart
guide as well.) Stash the file in a safe place and it'll be there when you need
it. Trust me, needing this is not a matter of if, but when... PhotoRescue
is about the best and easiest tool for recovering digital photos I've seen.
(Disclosure: IR gets a small commission from sales of the product, but I'd highly
recommend the program even if we didn't.) OK, now back to our regularly
scheduled review...
Video Out
The DiMAGE A1 provides a video output jack with an accompanying video
cable. The signal timing can be set to NTSC or PAL via the Setup menu. The Video
output duplicates the contents of the LCD in all modes, permitting it to be
used as an auxiliary viewfinder.
Power
The DiMAGE A1 uses an NP-400 rechargeable lithium-ion battery pack
for power, or the optional AC adapter. The camera comes with a battery and
charger and shows excellent battery life, but I highly recommend picking up
a spare and keeping it freshly charged at all times.
Here are the power-consumption numbers I measured for the DiMAGE A1 in the
lab, along with estimated run times, based on a single lithium-ion cell:
| |
(mA @?v) |
(One 1500mAh lithium-ion pack) |
| Capture Mode, w/LCD | |
187 |
| Capture Mode, w/EVF | |
342 |
| Capture Mode, EVF off | |
402 |
| Half-pressed shutter w/LCD | |
156 |
| Half-pressed w/EVF | |
200 |
| Memory Write (transient) | |
|
| Flash Recharge (transient) | |
|
| Sleep | |
(1800 hours) |
| Image Playback | |
183 |
Overall, these are excellent battery life numbers, some of the best in the prosumer digicam marketplace. This constitutes dramatic progress relative to the previous 7-series DiMAGE models, which earned a well-deserved reputation for being rather power-hungry. I still highly recommend purchasing a second NP-400 battery pack, but the DiMAGE A1 has much better than average battery life.
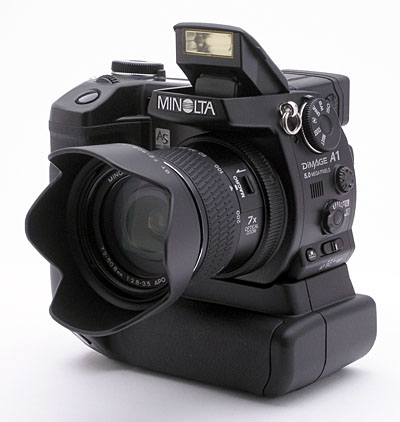
The A1 has an optional power grip available as an accessory, shown above. The grip accepts inserts holding either six AA cells or two NP-400 LiIon packs. The grip works with either ordinary alkaline AAs for emergency backup power, or NiMH AA cells for low-cost rechargeable operation. (Although it should be pointed out that a set of six high-capacity NiMH AAs only provides about 35% more power than does a single NP-400 carried inside the camera body itself. NiMH AAs might make sense as a backup solution, or as a cheaper, lower-performance alternative, but if you're really interested in maximum run times with the A1, think in terms of multiple NP-400 packs. They're very compact, and pack a load of power.)
In the Box
The DiMAGE A1 ships with the following items:
Recommended Accessories
Test Results
In keeping with my standard test policy, the comments given here summarize only
my key findings. For a full commentary on each of the
test images, see the DiMAGE A1's "pictures" page.
As with all Imaging Resource product tests, I encourage you to let your own eyes be the judge of how well the camera performed. Explore the images on the pictures page, to see how the A1's images compare to other cameras you may be considering.
Conclusion
| Free Photo Lessons | |
|
Throughout their evolution, I have continued to be impressed with Minolta's
DiMAGE series of digicams, from the 7 to the 7i, 7Hi, and now the A1. The
new DiMAGE A1 is a very nice upgrade to the 7Hi, adding the benefits of faster
shutter speeds, an effective Anti-Shake option, tracking autofocus, an intelligent
grip sensor, 14-bit A/D conversion, a tilting LCD monitor, and remote capture
capability to an already great camera. The tack-sharp, long-ratio zoom lens
and fast shutter response make it a nearly ideal camera for amateur sports
shooting, while the availability of a full auto mode is good for novices who
want to gradually learn more. As an added bonus, the DiMAGE A1 integrates
beautifully with Minolta's dedicated flash units, with built-in wireless TTL
flash metering capability and full control over the flashes' zoom heads. (Minolta's
very flexible twin-headed macro flash system deserves special mention here
as well, as one of the more flexible macro lighting systems I've seen.) Support
of Adobe RGB, including the ability to embed a color-space tag in its file
headers make it well suited for use in professional, color-managed work environments.
Image quality is excellent as well, with high resolution, very good color,
appropriate saturation, and contrast and saturation controls that cover a
useful range in fine steps. (The odd "speck" artifacts I saw in
the resolution target images didn't appear in any natural subjects I shot,
so I'm not giving the camera bad marks for them here.) With its panoply of
features and flexible control, the DiMAGE A1 is a serious contender at the
high end of the "prosumer" digicam market. Highly recommended.
Reader Comments!
Questions, comments or controversy on this product? Click
this link to see what other Imaging Resource readers have had to say about
the Minolta DiMAGE A1, or add comments of your own!

