Canon PowerShot A570 IS Operation
Despite Canon's proclivity for moving functions from menus to buttons and back again (not to mention moving buttons around), the Canon digicam user interface is both easy to remember and efficient to use. It does require a little study, but no more than any other sophisticated system. There are buttons for shot-by-shot control of things like EV, Flash and Focus settings while options like ISO, White Balance, Metering, Image Size and Resolution are just a press of the Function button away in the menu system.
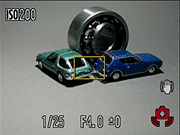 Record Mode LCD Display: In Record mode, the LCD reports various exposure settings, including camera modes, the Resolution and Quality settings, number of available images, ISO, Drive mode, and Metering mode. Half-pressing the Shutter button reports the Aperture and Shutter Speed settings, in all modes except Movie. Pressing the Display button cycles through the available display modes, including the image only, image with information, and no display at all (for using the optical viewfinder in dark locations, for example).
 Playback Mode LCD Display: In Playback mode, the LCD reports the image series number, Resolution and Quality setting, file name, and the date and time of image capture. Pressing the Display button once pulls up an enhanced information display, pressing twice will show a full information display with a histogram for checking the exposure. A third press cancels the information overlay entirely. The telephoto side of the zoom toggle lets you zoom in on a portion of the image, while the wide-angle side backs you out again, and lets you step out to an index view of captured images, displayed as nine thumbnails at a time. Zooming out one step past the point at which the index display appears adds a "jump" bar to the bottom of the screen, letting you jump forward or back nine images at a time, rather than scrolling from each image to the next individually.
Canon PowerShot A570 IS Modes and Menus
Record Mode: Marked on the Mode switch with the red camera icon, this mode sets up the Canon A570 IS for capturing still images or Movies. The following exposure modes are available:- Programmed Auto (P): The camera sets the shutter speed and aperture automatically, but you can adjust exposure with the EV setting. You can also change the ISO, Flash mode and Metering mode to affect exposure.
- Shutter Priority (Tv): You select the shutter speed and the camera selects the aperture.
- Aperture Priority (Av): You set the aperture and the camera sets the shutter speed.
- Manual (M): Provides direct and independent control of the aperture and shutter speeds, a true manual exposure mode.
- Auto: The camera controls everything about the exposure, except for Flash and Macro modes, and image size and quality settings.
- Portrait: Uses a large aperture setting to blur the background and keep the primary subject in sharp focus.
- Landscape: Employs a small aperture setting to keep both the background and foreground in focus.
- Night Snapshot: Allows you to take snapshots of people against night backgrounds by reducing the effects of camera shake even without using a tripod.
- Kids&Pets: Offers a faster shutter speed for capturing fast moving little ones.
- Indoor: Reduces blur from camera shake and maintains a subject's true color when shooting under tungsten or fluorescent light.
- Scene: Accesses the remaining preset Scene modes, including Night Scene, Foliage, Snow, Beach, Fireworks, Aquarium, and Underwater.
- Stitch Assist: Allows you to shoot overlapping images that can be merged into a single panorama on the computer.
- Movie: Records 640 x 480 at 30 or 15 frames per second, 320 x 240 pixels at 60, 30 or 15 fps, and 160 x 120 at 15fps.
Record Menu: Pressing the Menu button on the Canon A570 IS in Record mode displays the following options (not all options are available in all modes):
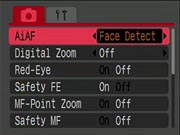 AiAF: Turns the 9-point AiAF system on or off or enables the Face Detect mode. When the AiAF system is on, the camera judges focus based on the subject's proximity to nine focus areas arrayed in the center of the image. When off, the camera bases focus on the very center of the frame. With Face Detect on, both focus and exposure are set by the face detection technology if a face is detected, otherwise the AiAF system will be used.
- Digital Zoom: Sets standard digital zoom, no zoom, or a zoom that starts at 1.5x or 1.9x, even when you're at wide angle. Not available in Wide Screen mode.
- Red-Eye Reduction: Turns the Red-Eye Reduction pre-flash on or off, which works with all flash modes.
- Safety FE: Enables or disables safety flash exposure, which adjusts shutter speed and aperture to protect highlights.
- MF-Point Zoom: Enables or disables a magnified view in the center of the LCD during manual focus.
- Safety MF: Enables or disables automatic fine focus after manual focus is set.
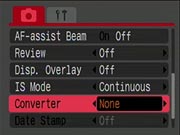 AF Assist Beam: Turns the AF Assist light on or off. If on, the light automatically illuminates in dark shooting conditions to help find focus.
- Review: Turns the instant image review function on or off, with available image display times from two to 10 seconds in one second steps, or Hold to keep the image on until you press the shutter button or turn the camera off.
- Display Overlay: Toggles among a display of grid lines, a 3:2 aspect ratio mask (for framing 4x6 images), or both.
- IS Mode: Sets the Image Stabilization mode to be Continuous, Shoot Only, Panning, or Off.
- Converter: Tells the camera if you have no converter attached, a WC-DC52, a TC-DC52A, or a 250D converter attached.
- Date Stamp: Only available in Postcard mode (set via the Function menu), allows printing of Date or Date and Time on photo.
 Set Print/Share Button: You can assign any of these functions to the Print/Share button: None, ISO, White Balance, Teleconverter, Display Overlay, or Display Off.
Playback Mode: This mode lets you review captured images and movies on the memory card, as well as erase them, protect them, or tag them for printing and transfer. The traditional green Playback symbol denotes this mode on the Mode switch. Pressing the Menu button displays the following options:
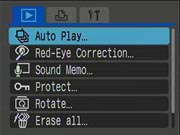 Auto Play: Automatically plays all captured images in a slide show.
- Red-Eye Correction: Corrects red eye in the selected image.
- Sound Memo: Records a short sound clip to accompany a captured image.
- Protect: Marks the current image for write-protection, or removes write-protection. Protected images cannot be deleted or manipulated, except through card formatting, which erases all files.
- Rotate: Rotates the current image.
- Erase All: Erases all files on the memory card, except protected ones.
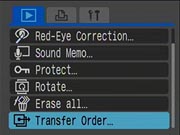 Transfer Order: Marks images to be transferred to a computer later.
Print Menu: This menu is available in Playback mode, simply by pressing the Menu button and selecting the Print tab. The bottom line of the display shows how many images are selected for printing and the active print method.
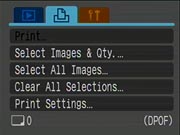 Print: Sends images tagged for printing to the printer.
- Select Images & Quantity: Allows you select images for printing and set the number of prints for each image selected.
- Select All Images: Selects all images on the memory card for printing.
- Clear All Selections: Clears all print selections.
- Print Settings: Brings up a menu of these options:
- Print Type: You can specify whether to print one image per page, an index of the images, or both.
- Date: Set printing of the date and time on or off.
- File No.: Set printing of the file number on or off.
- Clear DPOF data*: Set the option to clear the DPOF tag on or off.
Setup Menu: This menu is available in all exposure modes, simply by pressing the Menu button and selecting the Setup tab.
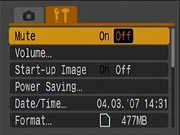 Mute: Turns the camera's start-up, operation, self-timer, shutter and playback sounds on and off.
- Volume: Displays the volume settings for the camera's start-up, operation, self-timer, shutter, and playback sounds.
- Startup image: Turns startup image display on or off.
- Power Saving: Accesses the camera's Auto Power Down and Display Off settings. Power Down can be enabled or disabled, and Display Off can be set to 10, 20, or 30 seconds, or 1, 2, or 3 minutes.
- Date/Time: Sets the camera's internal calendar and clock.
- Format: Formats the SD/MMC card, erasing all files (even those marked for write-protection).
 File Numbering: Specifies whether to reset file numbering with each new SDHC/SD/MMC card or continue numbering in sequence, regardless of memory card.
- Create Folder: Specifies whether to capture new images in a new folder or to create a new folder for new images after a certain time.
- Auto Rotate: Specifies whether images appear vertically in the LCD monitor when the camera is held vertically.
- Distance Units: Selects either m/cm or ft/in as the unit of measurement.
- Lens Retract: Selects how long the camera waits to retract lens after switching from Record to Playback mode (immediately or after one minute).
- Language: Sets the camera's menu language to one of 25 choices. English is the default setting.
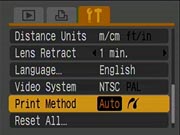 Video System: Sets the camera's video-out signal as NTSC or PAL.
- Print Method: Specify either Auto or PictBridge as the print method.
- Reset All: Restores factory default settings.
 Fujifilm GFX 50S Review
 Fujifilm X-T3 Review
 Olympus E-M5 III Review

Follow Imaging Resource