Canon A710 IS Design
The Canon PowerShot A710's compact body has a solid feel, thanks to its rugged body and healthy heft. Measuring 3.84 x 2.62 x 1.62 inches (98 x 67 x 41 millimeters), the A710 fits generous shirt pockets, coat pockets, purses, and hip packs, making it a good travel companion. The A710 has good balance, with its 9.45 ounce (268 gram) weight, with batteries and memory card, but isn't at all uncomfortable to carry, especially with the included wrist strap. The gunmetal gray body with dark grip and chrome accents pleases the eye.
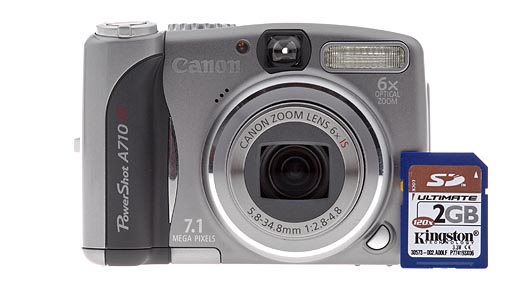
The A710's front panel features the telescoping 6x zoom lens, which extends an additional 1.5 inches when fully extended to telephoto range. Also on the front panel are the optical viewfinder window, small microphone, flash, and a light emitter that serves multiple purposes, including autofocus assist, red-eye reduction, and the self-timer countdown. On the lower right side of the lens (as viewed from the rear) is a small button that releases the ring around the lens barrel. Removing the ring allows you to attach a lens adapter for extended telephoto, wide angle, or macro capabilities. There's also a good-sized hand grip on the front panel, created by the battery compartment.
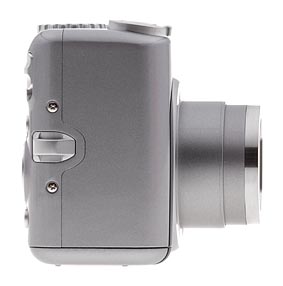
On the right side of the camera (as viewed from the rear) is the eyelet for attaching the wrist strap, which (unlike many) is easy to thread.
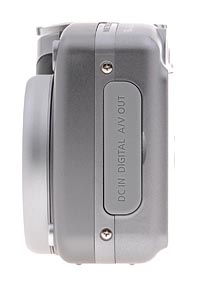
On the opposite side of the camera is the connector compartment, covered by a flexible, rubbery plastic flap that pops in and out of place. When opened, the flap remains connected to the camera body, and folds out of the way to accommodate cables. Inside the compartment are the DC In, Digital (USB), and A/V Out jacks.
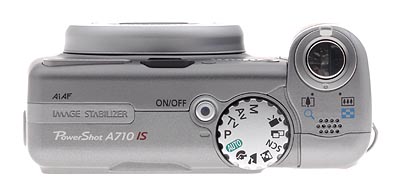
The Canon A710's top panel features a Mode dial with 13 shooting positions divided into three basic categories: Auto Exposure, Image Zone, and Creative Zone. The Shutter button is located diagonally in front of the Mode dial, with a Zoom lever surrounding it. Behind the Shutter button and Zoom lever is the camera's speaker. A Power button is on the other side of the Mode dial.
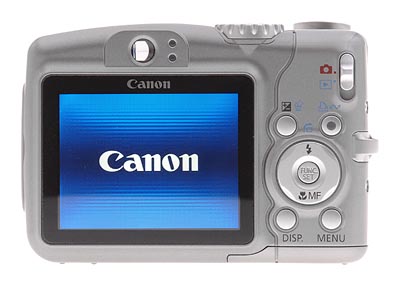
The rest of the exposure controls are located on the camera's rear panel, along with the optical viewfinder and 2.5 inch LCD monitor. The eye-level optical viewfinder features two LED lamps that report camera status. A Mode switch in the top right corner selects either Record or Playback modes. Below the Mode switch is a four-way multi-controller that navigates settings menus, pressing up, down, left, and right. Pressing the top edge also controls Flash mode, while the bottom edge accesses Macro and Manual Focus modes. A Set button at the center of the multi-controller confirms menu changes. Above the controller are the Exposure Compensation/Erase and Print/Share buttons. Below the controller are the Display and Menu buttons.
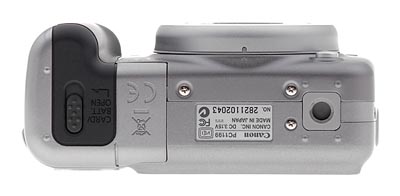
The Canon A710's bottom panel is reasonably flat, with a sliding door to access the battery compartment and a threaded plastic tripod mount off in the opposite corner. The battery door and tripod mount are far enough away from each other to make quick battery changes while working with a tripod. Inside the battery door are wells for two AA cells, a small slot for the tiny CR1220 battery that maintains the camera's clock settings when the main batteries are out, and the SD/MMC memory card compartment.
Canon A710 IS External Controls
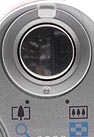
Shutter Button: Resting in the center of the Zoom lever, this button sets focus and exposure when halfway pressed, and fires the shutter when fully pressed.
Zoom Lever (see image above): Surrounding the Shutter button on the top panel, this lever controls the optical and digital zoom while in Record mode. In Playback mode (when not using the playback zoom), the wide setting displays a nine-image index display of all images on the memory card, and accesses a "Jump" function that lets you scroll through index display screens quickly. Alternatively, the telephoto position enlarges the currently displayed image as much as 10x, so that you can check on fine details.
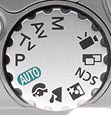
Mode Dial: Also on the camera's top panel, this large, notched dial is used to select the camera's shooting modes. Canon divides these functions into three categories: Auto, Image Zone, and Creative Zone. The options are as follows:

Auto: The camera controls everything about the exposure, except for Flash and Macro modes, image size and quality settings. Shutter speeds range from 1/2,000 to 1/8 second in Auto mode.- Creative Zone

Program AE (P): Places the camera in control of shutter speed and lens aperture, while you maintain control over everything else (i.e., white balance, ISO, metering, exposure compensation, flash, etc.). Shutter speeds range from 1/2,000 to one second in Program mode.
Shutter-Speed Priority AE (Tv): Allows you to control the shutter speed settings from 1/2,000 to 15 seconds, while the camera controls the aperture. All other exposure settings are available.
Aperture Priority AE (Av): Allows you to set the lens aperture from f/2.8 to f/8.0, while the camera controls the shutter speed, over a range from 1/2,000 to one second. (Max shutter speed is 1/1,500 at f/3.5 (wide) to f/6.3 (tele) and below, 1/2,000 at f/4.0 (wide) to f/7.1 (tele) and higher.) The maximum aperture depends on the zoom setting, ranging from f/2.8 at the wide angle end to f/4.8 at the telephoto position. In this mode, you maintain control over all other exposure variables.
Manual (M): Provides complete control over all exposure settings, including shutter speed and lens aperture. As with aperture-priority mode, the maximum aperture varies with the zoom setting from f/2.8 at wide angle to f/4.8 at telephoto. The fastest shutter speed varies with the aperture and zoom setting:- 1/1,500 at f/2.8-4.0 (wide) or f/2.8-6.3 (tele)
- 1/2,000 at f/4.0-8/0 (wide) or f/7.1-8.0 (tele)
- Image Zone

Portrait: Uses a large aperture setting to blur the background while keeping the primary subject in sharp focus.
Landscape: Employs a small aperture setting to keep both the background and foreground in focus. (May use a slower shutter speed, so a tripod is recommended.)
Night Scene: Uses slower shutter speeds and flash to even out nighttime exposures. The slow shutter speed allows more ambient light to be recorded in the low-light areas, while the flash freezes the subject. The Red-Eye Reduction mode can be used with this exposure mode to eliminate Red-Eye in night portraits.
Scene: Accesses more specific preset shooting modes, including Foliage, Snow, Beach, Fireworks, Color Accent, Color Swap, Night Snapshot, Indoor, Kids & Pets, and Underwater. (Color Accent lets you dim or brighten a specific color in the scene, while color swap lets you pick a color in the scene, and another color you want to swap it with in your photos. The results can be pretty bizarre, but could be a lot of fun if you're creatively-minded.)
Stitch-Assist: Allows you to record a series of images, either horizontally, vertically, to be "stitched" together into one large image or panorama on a computer.
Movie: Records up to 640 x 480-pixel 30-fps moving images with sound while space remains on the storage card. Pressing the right and left arrow keys cycles through Standard, Color Accent, Color Swap, Fast Frame Rate, and Compact modes. Fast Frame Rate shoots 320 x 240 pixels at 60 frames per second, and Compact mode reduces resolution to 160 x 120 pixels, at 15 frames per second.

Power Button: To the left of the Mode dial, this button turns the camera on or off.

Mode Switch: In the top right corner on the rear panel, this switch selects between Record and Playback modes.
Multi-Controller Rocker Button: This four-way rocker button actuates
left, right, up, and down, simulating arrow keys to navigate through settings
menus. In Record mode, the left and right buttons adjust available exposure
settings, as well as manual focus, when enabled. The top button controls flash
mode, while the bottom button accesses Macro and Manual Focus modes. In Movie
mode, the left and right buttons cycle through the available movie modes: Standard,
Color Accent, Color Swap, Fast Frame Rate, and Compact.
In Playback mode, the left and right buttons scroll through captured images, while the up arrow displays the jump search menu. When an image has been enlarged, all four arrows pan within the view.
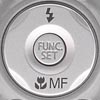
Function Set Button (see image above): In the center of the multi-controller, this button confirms menu selections. It also switches between available exposure adjustments in Manual mode. It also displays the following Function menu while in Record mode:
 ISO Speed: Sets the camera's sensitivity to Auto or Auto Hi (except in Manual),
or to 80, 100, 200, 400, or 800 ISO equivalents.
ISO Speed: Sets the camera's sensitivity to Auto or Auto Hi (except in Manual),
or to 80, 100, 200, 400, or 800 ISO equivalents.
- White Balance: Controls the color balance of images. Options are Auto, Daylight, Cloudy, Tungsten, Fluorescent, Fluorescent H, Underwater, and Custom (manual setting).
- Drive Mode: Accesses Continuous Shooting mode, and the three Self-Timer modes (a two- or 10-second delay, or the adjustable timer, which lets you program both the delay (from 0 to 30 seconds), and the number of shots to be taken once the delay expires from 1 to 10).
- My Colors: Enables Vivid Color, Neutral Color, Sepia, Black-and-White, Positive Film, Lighter Skin Tone, Darker Skin Tone, Vivid Blue, Vivid Red, Vivid Green, or Custom Color picture effects. Custom effects include 5-step adjustments for Contrast, Sharpness, Saturation, Red, Green & Blue hues, and Skin Tone.
- Flash Output: Adjusts the overall flash intensity from -2 to +2 EV in one-third step increments. In Manual mode, the flash fires only a single pulse, handy when you want to use the A710 with conventional "slave" triggers for external flash units.
- Light Metering System: Sets the metering mode to Evaluative, Center-Weighted Average, or Spot.
- Quality: Quality options are Superfine, Fine, and Normal.
- Frame Rate (Movie): Sets frame rate to 30 or 15 frames per second.
- Resolution: Specifies the image size. Still image resolutions are 3,072 x 2,304; 2,592 x 1,944; 2,048 x 1,536; 1,600 x 1,200; and 640 x 480 pixels. Postcard mode also offers 1,600 x 1,200 pixel resolution but greys out a portion of the screen top and bottom, showing the part of the image that won't fit on a standard 4x6 print. Wide Screen mode captures 3,072 x 1,728. Movie resolutions are 640 x 480, or 320 x 240 pixels.
![]()
Exposure Compensation/Erase Button: Directly above left of the controller,
this button lets you increase or decrease the exposure from -2 to +2 exposure
equivalents (EV) in one-third-step increments in Record mode. This function
is not available in Manual mode, since the user controls the exposure variables
directly there. In Playback mode, it displays the single-image erase menu.
![]()
Print/Share Button: To the right of the Exposure Compensation/Erase button
is the Print/Share button. When connected to a printer or Windows computer,
this button lights up, indicating that sync or printing is one button away.
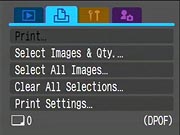 While the PowerShot A710 will work with any PictBridge-enabled printer, when connected to a Canon-brand printer, printing options are particularly robust. With a Canon-brand printer, options include print quality, selection of paper type, a range of paper sizes, and borderless or bordered page layouts. You can also crop images for printing directly from the camera, to improve their composition. Finally, you can choose to have the camera boost the color saturation, and/or apply noise reduction to the image as it's printed.

Display Button: Below left of the multi-controller and adjacent to the lower right corner of the LCD monitor, this button controls the information and image display modes in Record and Playback modes.
![]()
Menu Button: Left of the Display button, this button calls up the settings
menu in Record and Playback modes. It also dismisses the menu screen and backs
out of menu selections.

Battery Compartment Latch: Nestled in the center of the battery compartment door on the bottom of the camera, this sliding switch unlocks the door, so that it can slide forward and open.

Lens Ring Release Button: Tucked under the lens on the camera's front panel, this button releases the lens ring. Once unlocked, the lens ring can then be turned and removed to accommodate accessory lens kits.
 Fujifilm GFX 50S Review
 Fujifilm X-T3 Review
 Olympus E-M5 III Review

Follow Imaging Resource