Sony A100 Dynamic Range Optimization
One of the Sony A100's unique features is what Sony has chosen to call Dynamic Range Optimization (DRO for short). In discussing this, it's important to note that the DRO feature doesn't actually increase the camera's dynamic range, as that's fundamentally determined by the sensor and signal amplification electronics. It was thus no surprise that in our experimenting with the feature, the actual dynamic range of the camera remained the same, regardless of the DRO setting in use. What DRO actually does is to brighten the shadow areas of some images while still preserving highlight detail, thus making better use of the dynamic range that's actually available. If this description seems to belittle DRO's effect, make no mistake: Under the appropriate circumstances, it can have a very significant impact on your pictures.
DRO Operating Modes
The A100's Dynamic Range Optimization system has three settings, with different effects on the pictures. They are:
- Off: The camera operates normally, with no DRO processing performed.
- D-R: This is the "normal" setting for DRO, and the default operating mode for the camera. In this mode, the A100's processor evaluates the contrast and brightness of each image, and adjusts the tone curve used to map the raw sensor data to the final brightness values in the JPEG images. Sony says that this is more than a simple gamma-value adjustment, and we have no reason to believe otherwise. We'll discuss below when and how this adjustment seems to affect the images.
- D-R+: DRO "plus" mode performs the same analysis on the image as in normal D-R mode, but adds a further level of intelligence by adjusting the brightness of the image locally. Shadow areas are made brighter, highlights are held back a bit. (The shadow adjustments are much more evident, adjustments to highlight regions were very subtle in our tests.)
Of the three modes, we found the results in D-R+ by far the most dramatic and interesting, although we occasionally felt it went a little too far, and would have liked having an ability to dial down its effects somewhat. Standard D-R mode is much more subtle, and in many cases, we didn't like its effects as well. It did a good job with backlit subjects, but at the considerably expense of highlight detail, if there were any highlights present in the scene. It might be good for snapshooters who are more interested in midtone detail than highlights (a pretty fair description of the average American photo consumer, we're afraid), but more experienced shooters will probably want to avoid it.
While we weren't enthusiastic about standard D-R mode, D-R+ mode definitely seemed worthwhile. It sometimes got a little carried away with its corrections, but overall did an impressive job. If there were just a way to dial back its effects slightly, we'd be inclined to leave the camera in D-R+ mode all the time; but alas, no such control is offered. While this sort of automatic image adjustment has appeared previously in cameras from HP and Nikon, it has in the past always added quite a bit of processing time to each shot, so is of somewhat limited usefulness. On the A100, even D-R+ seems to add only about 0.7 second of processing per image, and its results on challenging subjects are more than worth this minor delay.
DRO Examples
We at first found it a little difficult to predict just when DRO would take effect on an image, as we captured a number of shots that had significant highlight or shadow areas but which DRO seemed to largely ignore. After quite a bit of experimentation, we concluded that DRO takes effect only when there are substantial areas of both strong highlight and deep shadow present in the image. DRO pretty much ignores shots that have lots of shadow with only small areas of strong highlight or vice versa. After a little thought, we realized that this is probably just what you'd want DRO to do: If an image has a lot of shadow but very little blown-out highlight area, the camera very rightly assumes that if you wanted a brighter image, you'd just boost the overall exposure. Likewise for high-key images with lots of highlight area but few shadows. Here again though, we often wished that we had a way of more directly telling DRO what we wanted it to do: Some shots we took had few blown highlights, but deep shadows that the camera could have brightened for us if, we'd only had some way of communicating that desire.
| Typical DRO Example | ||
| DRO Off | D-R | D-R+ |
 |
 |
 |
| The shot without DRO held detail in the highlights, but the deep shadows were totally plugged up. | In normal D-R mode, everything is a bit brighter, including the highlights. The shadows under the overhanging roof are nicely handled, but the foliage is still quite dark. | In D-R+ mode, the dark foliage is considerably brightened, as is the medium-dark in the background. At the same time the highlights are held well in check. There are however some artifacts to be found. |
The shots above show just the sort of image where DRO most applies, with significant areas of both strong highlight and deep shadow. The thumbnails above show the full image area; with DRO off, in the D-R mode, and in D-R+ mode. Here the normal D-R mode shows only a slight effect, but it's nonetheless quite evident in the shadows under the overhanging roof. The effect of D-R+ is quite evident in the shrubs in the foreground, and a lot of the darker foliage in the background, while the highlights are relatively undisturbed. Let's look at the highlights and shadows separately.
| DRO in Highlights | ||
| DRO Off | D-R | D-R+ |
 |
 |
 |
| The shot without DRO held pretty good detail in the strong highlights of the pillars. | In normal D-R mode, the boost needed to brighten the shadows blew out the highlights. (Although if you play with the image in Photoshop, it turns out there's still detail to be found there.)+ | In D-R+ mode, highlights are slightly brighter, but detail is still very well preserved. |
Here we see the effects of DRO on the strong highlights in the image above, and the reason why we don't like normal D-R mode that much: Where the original had at least some detail in the highlights, the D-R option pretty much blows it out. (Interestingly though, the detail is actually still there, as some work in Photoshop can bring it back.) If the intent is for this to be a set-it-and-forget-it function though, to our minds it loses too much detail in highlights. On the other hand, it does a very nice job with backlit subjects, something that consumers are arguably more concerned about than subtle highlights. We personally would disable normal D-R mode unless we were dealing with a backlit shot, but for point & shoot users it's probably a benefit overall.
D-R+ mode, on the other hand, does a very nice job with the highlights, holding every bit of detail as was present in the original exposure. Let's take a look at shadows next...
| DRO in Shadows (and Transitions) | ||
| DRO Off | D-R | D-R+ |
 |
 |
 |
 |
 |
 |
| The deep shadows of the non-DRO version were very dark indeed, with little or no detail visible. (Although there was plenty there that could be brought out in Photoshop.) | In normal D-R mode, the lighter shadows (similar to a typical backlit situation) are lightened nicely, and the deep shadows and the quarter-tones (in the shrubs at the bottom of the crop) are both brightened slightly. The deep shadows here could stand more brightening though. | In D-R+ mode,the darkest shadows are brought up quite a bit, without over-brightening the lower midtones or highlights. There's a very visible artifact along the sharp highlight/shadow boundary, though. The effect on lighter shadows is about the same as in D-R mode. |
The shadows are where DRO mode has its greatest effect, and its action there is quite impressive. Depending on your tastes though, it might be a bit too much of a good thing. The darkest foliage areas become quite light, taking on almost a hazy or ghostly look. Perhaps more problematic is the umbra that appears around bright objects, making the image look almost like a cut-out casting a shadow on a 2-D background. This is a case though, where it's important to remember that we're pixel-peeping a 10.2 megapixel image: The dark umbra that's so evident on-screen in the crop above right is all but invisible in even an 8x10 inch (roughly A4 size) print of this image.
Times When DRO Doesn't Apply
As noted earlier, there were some times when we'd expected to see DRO have a greater effect than it actually did. After some puzzling, we established that these situations were ones in which not enough of the image area was covered by both deep shadow and strong highlight. The example below shows a case illustrative of this:
| DRO in Shadows (and Transitions) | |
| DRO Off | D-R+ |
 |
 |
 |
 |
| Here's a shot with both highlights and very deep shadows, where one might expect to see DRO take a hand. | In actuality though, even D-R+ does nothing with this shot. The reason appears to be that there's not enough strong highlight area in the scene. |
In the shot above, there's both strong highlight and deep shadows, but DRO doesn't do anything. Why? After a little head-scratching and a number of shots with similar characteristics, we realized that DRO's analysis avoids making changes in scenes that lack relatively large areas of strong highlights.
Bottom line, Sony's Dynamic Range Optimization seems like a very worthwhile feature, but one that you need to understand to make the best use of. As noted, we weren't crazy about the default D-R mode, but recognize that it would help the typical consumer's snapshots quite a bit, particularly with the backlit subjects that seem to be so common in vacation photos. For the more sophisticated user, judicious use of both the D-R and D-R+ modes can bring a lot of benefits, but it can take a bit to get accustomed to their operation. Hopefully the above discussion and examples will save you some of the learning curve that we went up with them.
Limitations of Dynamic Range Optimization
DRO can be a pretty handy photographic tool, but it flat-out isn't available under a number of common operating conditions:
- Any metering mode except Multi-Segment metering (?!)
- In RAW or RAW+JPEG mode
- In Manual exposure mode
- D-R+ mode is only available at ISOs of 400 and below
- DRO is not available when converting from RAW using Sony's furnished software.
The low-ISO limitation on D-R+ mode makes sense: Since it's boosting the shadow areas so much, it'd reveal too much image noise at ISO 800 or 1,600. The other limitations seem a little strange. It's apparently using the multi-segment metering information to guide its operation, but you'd think that information would remain available to the processor even in other exposure modes. (Don't center-weighted or spot metering just use the same exposure sensor, simply placing different weights on the exposure data?) The metering-type limitation was particularly vexing, because we often wanted to use center-weighted metering to avoid the exposure variations discussed below.
And what about RAW+JPEG mode? It makes sense that DRO wouldn't apply to the RAW images, they're supposed to contain only data straight from the sensor, but why not let DRO apply to the JPEGs? You could argue that this would be the best of both worlds, letting the camera's tricky processing do what it would with the JPEG, but retaining the original sensor data as an unperturbed "digital negative."
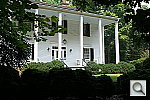
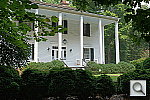
As noted earlier, besides these limitations, I also sometimes found myself wishing I could either increase or decrease the strength of the effect in DRO Plus mode. With some subjects (the "Sunlit Portrait" test shots of Marti, for instance), I would have preferred it to have a stronger effect. In other situations (the shot of the plantation house above, I would have liked slightly less of an effect. Why not give the user the options from -2 to +2 for D-R+ mode's application, as with contrast and saturation? I'd suggest that the default setting should be a bit less than the current Plus level, but give people a couple of notches above and below that level to experiment with.
On the whole, Sony's Dynamic Range Optimization looks like a significant innovation in digital exposure control (at least in its Plus form), but I'd like the user to have a bit more control over its application. It'll be interesting to see what the second generation of DRO looks like, it's certainly off to a promising start.
 Fujifilm GFX 50S Review
 Fujifilm X-T3 Review
 Olympus E-M5 III Review

Follow Imaging Resource