Sony A380 Image Quality
Color
Saturation & Hue Accuracy
Very good overall accuracy and saturation, with only minor shifts in hue and intensity.
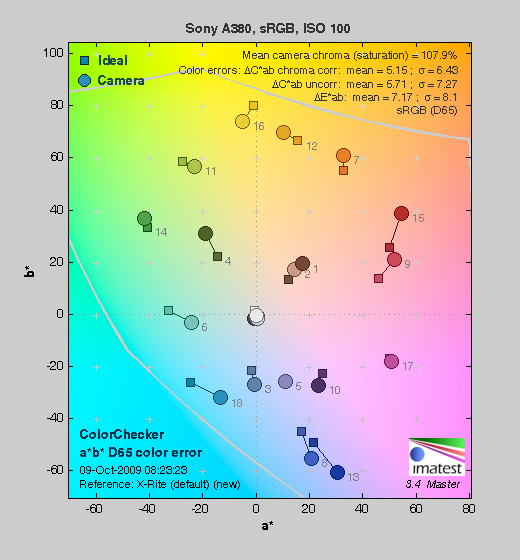 |
| In the diagram above, the squares show the original color, and the circles show the color that the camera captured. More saturated colors are located toward the periphery of the graph. Hue changes as you travel around the center. Thus, hue-accurate, highly saturated colors appear as lines radiating from the center. Click for a larger image. |
Saturation. The Sony A380 pushes strong reds, dark blues and some greens just a little, but actually undersaturates bright yellows, light greens, and cyan tones slightly. Its overall color saturation is a bit higher than the A330 and A230, but still more true to life than that of most consumer SLRs. Most consumer digital cameras produce color that's more highly saturated (more intense) than found in the original subjects. This is simply because most people like their color a bit brighter than life.
Skin tones. Here, with the color balanced properly for the light source, the Alpha A380's skin tones looked just about right. There were some slight red tints in places, but overall skin tone looked natural. Where oversaturation is most problematic is on Caucasian skin tones, as it's very easy for these "memory colors" to be seen as too bright, too pink, too yellow, etc.
Hue. The Alpha 380 showed only a few small color shifts relative to the mathematically precise translation of colors in its subjects, but had overall pretty good accuracy. Most noticeable were shifts in reds toward orange, cyan toward blue, as well as some shifts in yellows, blues and purples. Still, color accuracy was quite good. Hue is "what color" the
color is.
Saturation Adjustment
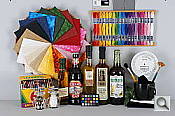
The Sony A380 has a total of seven saturation settings available, three above and three below the default saturation. This covers a pretty wide range of saturation levels, about as wide a range as you're likely to find photographically relevant, apart from special effects that are arguably better achieved in software. The fine steps between settings mean you can program the camera to just the level of saturation you prefer, a feature we look for in cameras.
| Saturation Adjustment Examples | ||||
 |
 |
 |
 |
 |
| -3 | -1 | 0 | +1 | +3 |
The table above shows results with several saturation settings, see the Thumbnails index page for more (look for the files named A380OUTBSATx.JPG). Click on any thumbnail above to see the full-sized image.
 |
 |
 |
| See full set of test images
with explanations See thumbnails of all test and gallery images |
||
Sensor
Exposure and White Balance
Indoors, incandescent lighting
Good color with Incandescent and Manual white balance settings, though warm results with Auto white balance. About average positive exposure compensation required.
 |
 |
| Auto White Balance +0.3 EV |
Incandescent White Balance +0.3 EV |
 |
|
| Manual White Balance +0.3 EV |
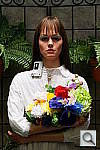
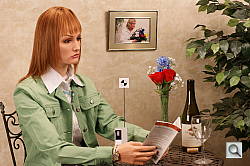
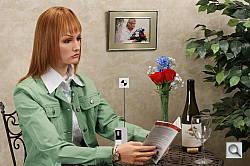
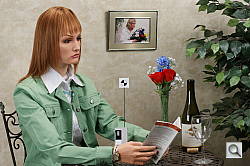
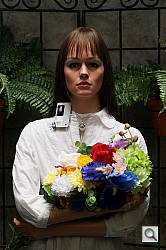
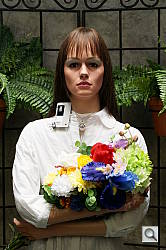
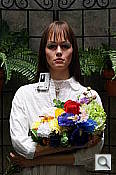
Indoors, under normal incandescent lighting, the Sony Alpha 380 produced overly warm color with its Auto white balance setting. Both the Incandescent and Manual settings produced more accurate results. It was a bit of a toss-up between them, as the Manual setting was just slightly cool and the Incandescent option a little warmer; We suspect most users would prefer the slight warmth of the results with the Incandescent white balance setting, as being more representative of the original lighting, without the very warm cast of the Auto setting. At +0.3 EV, the exposure compensation required was average for this shot. Color looks good throughout the frame, with only the slightest purplish tints in the blue flowers. (Many digital cameras reproduce these flowers with a dark, purplish tint, so the Alpha 380 actually performs a little better than average here.) Our test lighting for this shot is a mixture of 60 and 100 watt household incandescent bulbs, a pretty yellow light source, but a very common one in typical home settings here in the U.S.
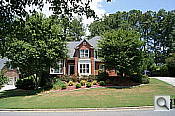
Outdoors, daylight
Very good results under harsh lighting, with good handling of contrast, detail, and color.
 |
 |
| Auto White Balance, +1.0 EV |
Auto White Balance, Auto Exposure |
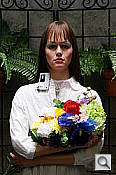
Outdoors, the Sony Alpha 380 performed well, but required slightly higher than average exposure compensation of +1.0 EV for our "sunlit" portrait shot to keep the face bright. The average among the cameras we've tested is +0.7 EV. Contrast is a little high, as you might expect under such harsh lighting, but the camera does a very good job of holding onto detail in both the deep shadows and bright highlights. Despite the apparent brightness, there are actually very few clipped highlights in the model's face and shirt, with most of the clipping occurring in the pendant and flowers. Only a few highlights were blown in the House shot at the default exposure as well, also a very good result. Color balance is good as well, with good saturation considering the bright lighting. Finally, the camera's contrast adjustment did a very nice job of toning down the exposure without creating any strong color variations in the skin (though skin tone did change slightly - See the Contrast series under the Extremes section below). Overall, very good performance.
See full set of test images with explanations
See thumbnails of all test and gallery images
Resolution
Very high resolution, 1,800 ~ 2,000 lines of strong detail.
 |
 |
| Strong detail to 2,000 lines horizontal Camera JPEG |
Strong detail to 1,800 lines vertical Camera JPEG |
 |
 |
| Strong detail to 2,000 lines horizontal ACR?processed RAW |
Strong detail to 1,800 lines vertical ACR?processed RAW |
Our laboratory resolution chart revealed sharp, distinct line patterns down to about 2,000 lines per picture height in the horizontal direction, and about 1,800 in the vertical direction. Complete extinction didn't occur until around 2,800 lines in the horizontal direction, and over 3,200 lines in the vertical. Unusually, we weren't able to do much better with Adobe Camera RAW processed RAW files, which says that the camera is doing a pretty good job here. Use these numbers to compare with other cameras of similar resolution, or use them to see just what higher resolution can mean in terms of potential detail.
See full set of test images with explanations
See thumbnails of all test and gallery images
Sharpness & Detail
Very good detail and sharpness, with relatively minor edge-enhancement on high-contrast subjects. Minimal noise suppression visible at base ISO.
 |
 |
| Good definition of high-contrast elements, with only minor evidence of edge enhancement. |
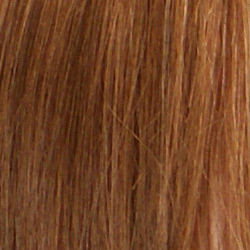
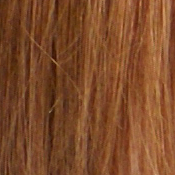
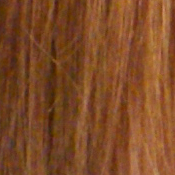
Subtle detail: Hair Noise suppression tends to blur detail in areas of subtle contrast, though detail remains strong in the darker parts of the model's hair here. |
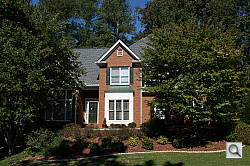
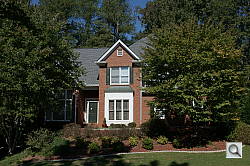
Sharpness. The Sony A380 produced very good detail, but softness in its kit lens didn't show off the camera's abilities to best advantage. The crop of the house and trees above is from an image shot with Sony's 24-70mm f/2.8 Carl Zeiss zoom, a really excellent optic, and shows the very good detail the A380 body is capable of. Some minor edge enhancement artifacts are visible on high-contrast subjects such as the crop above left, but overall results are still quite good. (Best results in post-processing would still be obtained by dialing down the in-camera sharpening an using strong/tight unsharp masking in Photoshop or other image editing software.) Edge enhancement creates the illusion of sharpness by enhancing colors and tones right at the edge of a rapid transition in color or tone.
Detail. The crop above right shows only minimal noise suppression, as the darker areas of the model's hair show a lot of detail. Individual strands are still distinguishable even in the lighter shadows, though they begin to merge as shadows deepens. All in all, a very good performance here, especially considering the high resolution. (Sony seems to have made real strides in their noise-reduction processing in the last year, as this round of Alphas do a much better job of holding onto subtle subject detail than did last year's models.) Noise-suppression systems in digital cameras tend to flatten-out detail in areas of subtle contrast. The effects can often be seen in shots of human hair, where the individual strands are lost and an almost "watercolor" look appears.
RAW vs In-Camera JPEGs
As noted above, the Sony A380 does a pretty good job at balancing between sharpness and visible sharpening artifacts in camera JPEGs. A little more detail can be obtained from carefully processing RAW files though, without introducing additional artifacts. Take a look below, to see what we mean:

In the table above, mousing over a link at the bottom will load the corresponding crop in the area above, and clicking the link will load the full resolution image. Examples include in-camera Fine JPEG, RAW file processed through Sony's Image Data Converter SR version 2 software, and RAW file processed through Adobe Camera Raw version 5.5, then sharpened in Photoshop. For the Sony A380's images shot with sharp primes or high-end zooms, I found best results with strong but tight 300% unsharp masking with an 0.3 pixel radius. (As above, this shot of the house & trees was captured with the Sony 24-70mm f/2.8 Carl Zeiss lens, to show the camera's detail rendering when not limited by the kit lens.)
Note: ACR renders colors somewhat differently than either the A380 or the Sony software, so the greens in the trees and blues in the sky are a bit different. There's no mistaking the increase in detail though, regardless of changes in color or tone.
ISO & Noise Performance
Low noise at the lower sensitivity settings, with very good results up to ISO 400. However, big jumps in noise at the highest settings.
| Noise Reduction = On (Default) | ||
 |
 |
 |
| ISO 100 | ISO 200 | ISO 400 |
 |
 |
 |
| ISO 800 | ISO 1,600 | ISO 3,200 |
The Sony Alpha 380 produced images with low noise at its lower sensitivity settings, with noise increasing and detail degrading progressively as you move to higher ISO settings. We like the way Sony's made the choice between noise and subject detail, and that the two trade off against each other in a smooth progression as you move from low ISOs to high ones, at least up to about ISO 400. At ISO 800, subject detail seems to take a bigger drop, and there's another change when you step up to 1,600, in that noise is held down, but at greater cost to subtle subject detail. Images at 1,600 and ISO 3,200 are notably less detailed than those at lower sensitivity levels. Of course, the impact of noise and detail loss are highly dependent on the size the photos are printed at, and pixel-peeping on-screen has surprisingly little relationship to how the images look when printed: See the Print Quality section below for recommended maximum print sizes at each ISO.
A note about focus for this shot: We shoot this image at f/4, using one of three very sharp reference lenses (70mm Sigma f/2.8 macro for most cameras, 60mm f/2.8 Nikkor macro for Nikon bodies without a drive motor, and Olympus Zuiko 50mm f/2.0 for Four Thirds and Micro Four Thirds bodies). To insure that the hair detail we use for making critical judgements about camera noise processing and detail rendering is in sharp focus at the relatively wide aperture we're shooting at, the focus target at the center of the scene is on a movable stand. This lets us compensate for front- or back-focus by different camera bodies, even those that lack micro-focus adjustments. This does mean, though, that the focus target itself may appear soft or slightly out of focus for bodies that front- or back-focused with the reference lens. We know this; if you click to view the full-size image for one of these shots and notice that the focus target is fuzzy, you don't need to email and tell us. :-) The focus target position will have been adjusted to insure that the rest of the scene is focused properly.
Extremes: Sunlit and low light tests
Very high resolution with excellent highlight and shadow detail. Good low-light performance, capable of capturing bright images in near darkness, however manual exposure was required and autofocus struggled at lower light levels.
 |
|
 |
| +0.7 EV | +1.0 EV | +1.3 EV |
Sunlight:
The Sony Alpha 380 handled the deliberately harsh lighting in the test above very well. Though contrast is a little high, shadow and highlight detail are both very good. The camera's contrast adjustment also did a good job of decreasing overall contrast without producing strong color variations; see the section below. The +1.0 EV exposure did the best job here, as the model's face was a bit too dim at +0.7 EV and we felt that too many highlights were lost at +1.3 EV. These shots were captured with the Sony A380's DRO (Dynamic Range Optimizer) control set to its default of "Standard." This seemed to help quite a bit with both exposure accuracy and highlight/shadow preservation on this difficult shot. Be sure to use fill flash in situations like the one shown above; it's better to shoot in the shade when possible.
Because digital cameras are more like slide film than negative film (in that they tend to have a more limited tonal range), we test them in the harshest situations to see how they handle scenes with bright highlights and dark shadows, as well as what kind of sensitivity they have in low light. The shot above is designed to mimic the very harsh, contrasty effect of direct noonday sunlight, a very tough challenge for most digital cameras. (You can read details of this test here.)
Contrast Adjustment
We really like it when a camera gives us the ability to adjust contrast and saturation to our liking. It's even better when those adjustments cover a useful range, in steps small enough to allow for precise tweaks. Just as with its saturation adjustment, the Sony A380's contrast setting meets both challenges.
| Minimum Contrast, default D-R setting | |
 |
 |
| Contrast set to lowest, +1.0 EV |
Contrast set to lowest, Auto Exposure |
At its lowest contrast setting, the A380 did a really excellent job of preserving highlight detail, maintaining natural-looking skin tones, and holding nice detail in the shadows. The A380 captures good color outdoors, though just slightly on the warm side. Overall, very good results here, especially when the contrast setting is tweaked. (This is a really tough shot; the Sony A380 does a much better than average job handling it.)
| Contrast Adjustment Examples | ||||
 |
 |
 |
 |
 |
| -3 | -1 | 0 | +1 | +3 |
The series of shots above shows results with several different contrast adjustment settings, showing the minimum step size around the default, as well as both extremes. While you can see the extremes, it's hard to really evaluate contrast on small thumbnails like these, click on any thumbnail to go to the full-size image.
One very nice feature of Sony's contrast adjustment is that it has very little effect on color saturation. Contrast and saturation are actually fairly closely coupled, it's a good trick to be able to vary one with out the other changing as well. Sony did a good job here.
Sony's DRO (Dynamic Range Optimization)
While the Sony A380's contrast adjustment feature works very well, their Dynamic Range Optimization system is a critical part of it. This system analyzes the range of brightness of each image, and adjusts the camera's image processing parameters accordingly, to make the best use of the available dynamic range. Three options are available on the A380: DRO Off, Standard D-R, and D-R Advanced (Plus). The default in most camera modes is Standard, but in Auto exposure mode, or in Portrait, Landscape or Macro, DRO is automatically set to Advanced. In Sports mode, DRO is set to Standard. DRO is set to Off in Sunset and Night Portrait/View mode. Unlike some higher-spec Sony SLRs, the A380 does not allow you choose the strength for the D-R effect. Standard D-R looks at the entire image and effectively adjusts contrast and brightness across the entire image for best effect. D-R Advanced analyzes everything, but makes local adjustments to bring out shadow detail and preserve highlights.
| DRO Examples | |||
 |
 |
 |
 |
| DRO Off +0 EV |
DRO Off +1.0 EV |
DRO Standard +0 EV |
DRO Advanced +0 EV |
 |
 |
 |
 |
| Highlight Retention | |||
 |
 |
 |
 |
| Shadow Detail / Noise | |||
As you can see from the crops above, to get a similarly exposed image without DRO enabled, exposure compensation of +1.0EV is required. Other than that, the effect of DRO is quite subtle (in this case anyway). You can see a bit more highlight detail with DRO set to Advanced versus Off, but DRO Standard seems to clip slightly more highlights than when DRO is set to Off. Shadow detail is similar in all three similarly exposed cases, but there is an increase in noise in the deepest shadows with DRO enabled. Note: the shadow crops have had levels adjusted equally (by sliding Photoshop's highlight slider to 100) on the right side of each to reveal the increase in shadow noise with DRO active.
| 1 fc 11 lux |
1/2 fc 5.5 lux |
1/4 fc 2.7 lux |
1/8 fc 1.3 lux |
1/16 fc 0.67 lux |
1/16fc No NR |
|
|---|---|---|---|---|---|---|
| ISO 100 |
2 sec f2.8 |
4 sec f2.8 |
8 sec f2.8 |
15 sec f2.8 |
30 sec f2.8 |
30 sec f2.8 |
| ISO 200 |
1 sec f2.8 |
2 sec f2.8 |
4 sec f2.8 |
8 sec f2.8 |
15 sec f2.8 |
15 sec f2.8 |
| ISO 400 |
0.5 sec f2.8 |
1 sec f2.8 |
2 sec f2.8 |
4 sec f2.8 |
8 sec f2.8 |
8 sec f2.8 |
| ISO 800 |
1/4 sec f2.8 |
0.5 sec f2.8 |
1 sec f2.8 |
2 sec f2.8 |
4 sec f2.8 |
4 sec f2.8 |
| ISO 1600 |
1/8 sec f2.8 |
1/4 sec f2.8 |
0.5 sec f2.8 |
1 sec f2.8 |
2 sec f2.8 |
2 sec f2.8 |
| ISO 3200 |
1/15 sec f2.8 |
1/8 sec f2.8 |
1/4 sec f2.8 |
0.5 sec f2.8 |
1 sec f2.8 |
1 sec f2.8 |
Low light. The Sony A380 was able to capture bright images at the lowest light level with the lowest sensitivity setting (ISO 100), but required the use of manual exposure mode. The A380's auto exposure (metering) did not work well at all at lower light levels, resulting in very underexposed images (by as much as 4 stops, at the darkest level tested here). Noise is relatively low up to ISO 800, and at higher ISOs consists mainly of chroma blotches. There's no sign of any banding issues or uncorrected hot pixels. Color balance looked good with the Auto white balance setting, though chroma noise impacts the color of darker midtones and shadows at higher ISOs.
The camera's autofocus system was able to focus on the subject down to just below the 1/4 foot-candle light level unassisted. This is a rather poor performance for an SLR, though the A380 was able to focus in complete darkness with the AF assist enabled. Since the Sony A380 doesn't use contrast detection for Live View, low-light AF performance was identical in Live View mode. Keep in mind that the longer shutter speeds here demand the use of a tripod to prevent any blurring from camera movement, Sony's Super SteadyShot not withstanding. (A useful trick is to just prop the camera on a convenient surface, and use its self-timer to release the shutter. This avoids any jiggling from your finger pressing the shutter button, and can work quite well when you don't have a tripod handy.)
How bright is this? The one foot-candle light level that this test begins at roughly corresponds to the brightness of typical city street-lighting at night. Cameras performing well at that level should be able to snap good-looking photos of street-lit scenes.
NOTE: This low light test is conducted with a stationary subject, and the camera mounted on a sturdy tripod. Most digital cameras will fail miserably when faced with a moving subject in dim lighting. (For example, a child's ballet recital or a holiday pageant in a gymnasium.) Digital SLRs like the Sony A380 do much better than point & shoots, but you still shouldn't expect a quick autofocus lock with moving subjects.
Output Quality
Print Quality
Great print quality, good color, sharp 16 x 20-inch prints at ISO 100.
The Sony A380's printed output is surprisingly good, with a fairly even approach across the ISO spectrum. ISO 100 shots are quite good at 16x20, great for wall display.
ISO 200 shots are softer, and though they're still fine at 16x20, they look better at 13x19 inches. ISO 400 shots also looked good at this size. ISO 800 shots are also quite usable, if only a touch soft at 13x19, though with a smattering of chroma noise in the shadows. Not bad for wall display, though. They look better at 11x14.
ISO 1,600 shots are usable at 11x14, but the chroma noise gets quite a bit larger and more noticeable; going down to 8x10 is much better. ISO 3,200 was a little rough at 8x10, though, yet quite usable at 5x7.
So overall, the Sony A380 made very good quality prints with low noise and good color, coming out significantly better than we expected from the onscreen analysis.
Testing hundreds of digital cameras, we've found that you can only tell just so much about a camera's image quality by viewing its images on-screen. Ultimately, there's no substitute for printing a lot of images and examining them closely. For this reason, we now routinely print sample images from the cameras we test on our Canon Pro9000 Mark II studio printer, and on the Pixma MP610 here in the office. (See the Canon Pixma Pro9000 Mark II review for details on that model.)
The images above were taken from our standardized test shots. For a collection of more pictorial photos, see our Sony Alpha DSLR-A380 Photo Gallery .
Not sure which camera to buy? Let your eyes be the ultimate judge! Visit our Comparometer(tm) to compare images from the Sony Alpha DSLR-A380 with those from other cameras you may be considering. The proof is in the pictures, so let your own eyes decide which you like best!
 Fujifilm GFX 50S Review
 Fujifilm X-T3 Review
 Olympus E-M5 III Review

Follow Imaging Resource