Back
to Full Olympus C-7000 Wide Zoom Review
Back
to Full Olympus C-7000 Wide Zoom ReviewGo to Olympus C-7000 Wide Zoom Data Sheet
Go to Olympus C-7000 Wide Zoom Pictures Page
Up to Imaging Resource Cameras Page
Use your browser's "Back" button to return to the previous page, or the links at the top and bottom of this page to navigate to related information. If you have difficulty fitting the text on this page onto your printer output, simply resize your browser window to a narrower width and print again.
Remember us when it's time to buy!
Dave here: Have our reviews been helpful to you? (Is this article you're reading right now useful?) Preparing this level of information on as many products as we do is incredibly hard work, not to mention expensive. Things on the Internet may look like they're free, but they're not. (As a lot of big dot.com companies are finding out these days.) Somewhere, somebody has to pay to produce worthwhile content. YOU can help us though, by remembering us when it comes time to make your purchase. Would you consider coming back to our site and clicking-through to one of our advertisers to make your purchase? Every dollar you spend with one of our advertisers helps us directly (in affiliate fees) or indirectly (the advertiser will keep renewing their ad contract with us). To make it easy for you to support us, here's a URL you can visit, to see all our current advertisers, with links to click on that will register your visit to them as having come from our site. It's up to you where you buy, but Mike, Mike, Kim, Yazmin, Marti and I would be really grateful if you'd help us out by choosing one of our advertisers to purchase from.
Thank you for your support!
Dave Etchells, Founder & Publisher
Visit our "Buy Now" Page:
https://www.imaging-resource.com/buynow.htm
Back
to Full Olympus C-7000 Wide Zoom Review
Go to Olympus C-7000 Wide Zoom
Data Sheet
Go to Olympus C-7000 Wide Zoom
Pictures Page
Up to Imaging Resource Cameras
Page
Olympus C-7000 Wide ZoomSeven megapixels, 5x zoom, great pictures, a ton of features, and great build quality - A real winner! Review First Posted: 11/26/04 |
|
 |
|
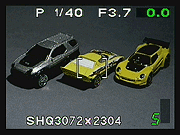
7.1-megapixel CCD, delivering 3,072 x 2,304-pixel
images |
| |
5x optical zoom lens |
|
| * | Extensive exposure
controls as well as contrast, saturation, and sharpness adjustments |
|
| |
RAW data and TIFF file
formats, as well as compressed JPEG |
|
| |
New "Redeye Fix" Playback option for removing redeye in-camera |
Manufacturer Overview: Olympus C-7000
Olympus has long been a dominant player in the digicam marketplace. They boast one of the broadest lineups of digicams in the industry, with numerous models ranging from pure entry-level point-and-shoot digicams to the exceptional E-1 SLR and the newer E-300 EVOLT. The 7.1-megapixel, 5x zoom Olympus C-7000 Zoom combines the flexibility of near-professional level exposure control to a compact, point-and-shoot body style. The Olympus C-7000 Zoom offers just about every "enthusiast" feature you could ask for, excellent image quality, and a small body size that's perfect for travel. At the same time though, its full-auto and scene modes make it easy for a novice to use. Camera body fit and finish is superb, possibly due to Olympus' bringing the lion's share of manufacturing for their high-end digicams back in-house. New to the Olympus C-7000 Zoom is a Red-eye Fix option in Playback mode, so that you can go back and remove any red-eye that manages to slip past the Red-Eye Reduction preflash. The camera also boasts five preset scene modes, a time-lapse photography mode, and movie with sound recording capabilities, in addition to the well-known features we've come to love on Olympus digicams. After working with it over a period of a couple of weeks, the Olympus C-7000 Zoom impressed us as one of the better choices on the market for a full-featured yet compact digicam.
Read on for the full details.
Olympus C-7000 High Points
Executive Overview
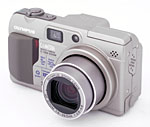
Following in the footsteps of previous Camedia C-Series digicams, Olympus presents the C-7000 Zoom, a slightly more compact, but still feature-laden digicam. With a 7.1-megapixel CCD for higher resolution images, and a full range of manual and automatic exposure controls, the Olympus C-7000 Zoom is well-suited to just about any user level. The C-7000 measures only 4.0 x 2.3 x 1.7 inches (102 x 59 x 43 millimeters), and should easily fit into most average shirt pockets. It's also relatively light weight, at 8.99 ounces (255 grams) with the card and battery. With its fairly sleek body (there are only a few slight protrusions), the C-7000 Zoom is easy to stash in a pocket, but I recommend a soft case for added protection.
The Olympus C-7000 Zoom offers a wide range of user controls, including a one-touch white balance function (with a very useful white balance adjustment feature for minor color tweaks), spot autofocus, wide-ranging contrast and sharpness adjustments, and QuickTime movies with sound. It also incorporates an advanced Noise Reduction System, which uses dark-frame subtraction to minimize background noise in long exposures shot under low light conditions. Happily, the C-7000 Zoom includes a couple of features that I missed on the previously released C-5000 model, namely the histogram feature, Multi-Spot metering mode, and adjustable AF mode. While those options are definitely a plus, the C-7000 Zoom goes even further with a Timelapse photography mode and in-camera Redeye Fix option, making it a very capable camera with plenty of exposure features to experiment with.
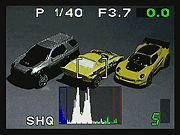
The Olympus C-7000 Zoom features both an optical, real-image viewfinder and a rear panel, 2.0-inch, color TFT LCD monitor, with approximately 206,000 pixels. When the LCD monitor is engaged, it automatically displays detailed exposure information, with the current exposure mode, f/stop setting, shutter speed, and exposure compensation overlaid on top of the viewfinder display (a nice feature not found on every digicam) and the number of images available in the current resolution setting, at the bottom of the monitor. The C-7000 Zoom also provides a very helpful numeric/bargraph distance display when using the Manual Focus option, as well as a digital zoom bar (activated when digital zoom is on) that shows the camera's 5x optical zoom in operation, and the progress of the digital zoom whenever you zoom past the range of the optical telephoto. In addition to the histogram display, the C-7000 Zoom offers a "Direct" histogram option, which displays the white and black areas of the frame in red and blue respectively, showing you directly which parts of the image may be under or overexposed. I actually found this much more useful than the histogram feature, as I could instantly tell which parts of the image were in danger. The blue and red only appear while you are framing the shot, and disappear when you press the shutter halfway.
The 7.9-39.5mm 5x zoom lens is equivalent to a 38-190mm lens on a 35mm camera, with a f/2.8 maximum aperture. In addition to the C-7000 Zoom's 5x optical zoom, images can be enlarged up to 6x with the digital zoom function, which Olympus calls "seamless." The zoom does pause before entering digital zoom, however, so you won't cross over into the digital zoom realm without being aware of doing so. (Users should be aware that digital zoom is not the same as optical zoom though, since the digital zoom merely and enlarges the center portion of the CCD. As a result, digitally enlarged images are invariably "softer" than ones enlarged via a zoom lens.)
The C-7000 Zoom's image file sizes include: 3,072 x 2,304; 2,592 x 1,944; 2,288 x 1,712; 2,048 x 1,536; 1,600 x 1,200; 1280 x 960; 1024 x 768; and 640 x 480 pixels. Image quality options include three JPEG compression ratios, plus uncompressed TIFF and RAW formats that produce full-resolution images free of compression artifacts.
The C-7000 Zoom offers all the exposure control you could ask for, including Program (P), Aperture Priority (A), Shutter Speed Priority (S), and Manual (M) exposure modes. Program mode controls both aperture and shutter speed, with exposure times as long as one second. Aperture and Shutter Priority modes give you control over aperture or shutter speed, while the camera chooses the best corresponding settings. When used in A or S modes, apertures range from f/2.8 to f/8.0 and shutter speeds from 1/2,000 to four seconds. The Manual exposure mode provides the same aperture range, but offers shutter times as long as 15 seconds. Setting the camera to 1/2,000 second in Manual mode requires that the aperture be set to f/4 or above; at f/2.8, f/3.2, and f/3.5 the maximum shutter speed is 1/1,600. (The same restriction on shutter speed applies in Aperture Priority mode as well.) There's also a selection of preset Scene modes, to make it easy to snap good-looking photos in what might otherwise be challenging conditions. Scene Program modes include Portrait, Sports, Landscape Portrait, Landscape Scene, and Night Scene modes. Although the Scene Mode option itself is accessed by a dial, changing between the various Scene modes is done in the menu, requiring at least eight button presses to change. (A little awkward, in my opinion.) Finally, the My Mode feature provides a custom setup for the camera, letting you select complex combinations of settings with a single menu choice.
The Olympus C-7000 Zoom provides five ISO options (light sensitivity settings) of Auto, 80, 100, 200, and 400; automatic exposure bracketing; Digital ESP, Spot, and Multi metering modes; and exposure compensation from +2 to -2 exposure values (EV) in one-third-step increments. White balance can be set to Auto, Daylight, Overcast, Tungsten, Daylight Fluorescent, Neutral Fluorescent, Cool Fluorescent, or Quick Reference (aka custom or manual white balance adjustment) to accommodate a variety of lighting conditions, while a white balance color adjustment function lets you fine-tune the color balance across a wide range from red to blue.
Image contrast, sharpness, and saturation adjustments are available through the Shooting menu, and a Function menu option allows you to capture images in black and white or sepia tone. There's also a 12-second self-timer option for self-portraits, and a Remote Control mode for use with the optional IR remote.
The Olympus C-7000 Zoom's Movie mode records QuickTime movies with sound, for maximum times dictated by its internal buffer memory, at either 640 x 480 or 320 x 240 pixels, and either 30 or 15 frames per second. A Sequence mode is available for capturing multiple images at up to 1.1 frames per second, with a Hi Sequence option that captures a maximum of two frames at 2.2 frames per second. A Panorama mode allows you to take up to 10 shots with the same exposure and white balance, for subsequent merging with the included Panorama Stitch software in the computer. (Note that the panorama option is only available when you're using Olympus-branded xD-Picture Cards.) There's also a Time-lapse mode for capturing a series of images over time, at preset intervals (perfect for capturing an opening flower, moving clouds, etc.).
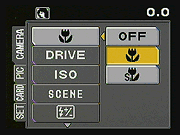
The camera's pop-up flash offers five operating modes (Flash Off, Auto-Flash, Forced Flash, Red-Eye Reduction, and Slow Sync), with flash range extending to approximately 12.8 feet (3.9 meters). The Slow Sync flash mode uses a slower shutter speed with the flash, to allow more of the ambient lighting into the photo, and includes the option to fire the flash at either the beginning or end of the exposure, as well as add a Red-Eye Reduction pre-flash. You also can increase or decrease the flash power from -2 to +2 EV in one-third-step increments through the Shooting menu.
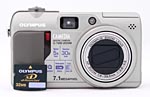
The Olympus C-7000 Zoom ships with a 32MB xD-Picture Card for image storage (larger capacity cards up to 512MB are available separately). You can connect the camera directly to your computer via a high-speed USB interface to download images, and Olympus' "Auto Connect USB" interface means the camera will automatically appear on your computer's desktop, if you're using Windows Me, XP, or 2000, or Mac OS 8.6 or later. A video output jack and cable let you play your images back on an external video monitor, which can also be used as a super-sized viewfinder in capture mode. Software shipped with the unit includes the Olympus Master utility package, which provides minor organization and editing tools, in addition to a panorama "stitching" application. Apple QuickTime and USB drivers for Macintosh and Windows are also supplied.
Design
 The latest introduction in
Olympus' Camedia C-Series, the C-7000 Zoom's outward appearance is thinner and
more compact than previous "C" models. Small and rectangular, with
only a few small protrusions, the C-7000 Zoom is a little more pocket-friendly
than its predecessors. Measuring 4.0 x 2.3 x 1.7 inches (102 x 59 x 43 millimeters),
the C-7000 Zoom should fit into larger shirt pockets, and will definitely find
room in most purses and larger coat pockets. The C-7000 Zoom weighs in at nine
ounces (255 grams) with the card and battery
installed, features a body design that combines structural plastic and metal
decorative panels. A thin wrist strap comes with the camera, providing a little
extra security in case the camera should slip out of your hands while shooting.
The latest introduction in
Olympus' Camedia C-Series, the C-7000 Zoom's outward appearance is thinner and
more compact than previous "C" models. Small and rectangular, with
only a few small protrusions, the C-7000 Zoom is a little more pocket-friendly
than its predecessors. Measuring 4.0 x 2.3 x 1.7 inches (102 x 59 x 43 millimeters),
the C-7000 Zoom should fit into larger shirt pockets, and will definitely find
room in most purses and larger coat pockets. The C-7000 Zoom weighs in at nine
ounces (255 grams) with the card and battery
installed, features a body design that combines structural plastic and metal
decorative panels. A thin wrist strap comes with the camera, providing a little
extra security in case the camera should slip out of your hands while shooting.

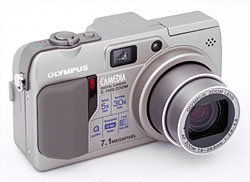
From the front of the camera, the edge of the zoom lever (upper left corner) is visible, as well as the lip of the flash compartment, microphone, AF illuminator, viewfinder window, self-timer alert light, and IR receiver (for the optional wireless remote control). The telescoping lens extends just over seven-eighths of an inch beyond the front of the camera body when powered on in any capture mode. The lens is protected by a shutter-like lens cover that automatically slides open when the lens extends, and likewise closes as the lens retracts. A small, rubbery hand grip provides reasonable real estate for your fingers to grab onto when holding the camera, and the rubbery textured covering helps give a more secure grip and a more friendly "feel" to the hand.
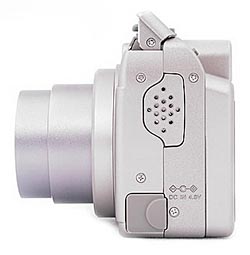
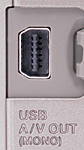
The right side of the camera features the USB / AV out shared jack, which is protected by a flexible, rubbery flap that remains tethered to the camera. Also on this side of the camera is the eyelet for attaching the wrist strap.

On the opposite side of the camera are the playback speaker and DC In jack. A rubbery flap protects the connector terminal from dust, and remains attached to the camera when opened.

The top of the camera holds the Zoom Lever, Shutter button (surrounded by the Zoom Lever), Power button, and pop-up flash compartment.

The majority of the camera's control buttons are on the rear panel, along with the 2.0-inch LCD monitor and optical viewfinder eyepiece. The Five-way navigation pad serves multiple functions, and is located next to the lower right corner of the display. An OK/Menu button is at its center. Adjacent to the top right corner of the LCD monitor are the AE Lock / Custom / Rotate and Quick View buttons. Angled down from the top panel on the right side are the AE / AF / Erase, Self-Timer / Remote / DPOF, and Flash / Protect buttons. A large Mode dial in the top right corner controls the camera's operating mode. Olympus seems to have rethought the mode dial with its latest models; this one is recessed and easy to use, yet isn't easily turned accidentally in a pocket or bag. Over on the top left side of the panel, also angled down from the top of the camera, is the Flash Release button. The optical viewfinder eyepiece sits almost dead center, and its view zooms in and out with the lens. A pair of LED lamps next to the eyepiece report the camera's status. An LED lamp in the lower right corner lights whenever the camera accesses the memory card. This serves as a warning not to open the battery/xD card access door until all activity has stopped.

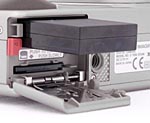
The bottom of the camera holds the shared battery and memory card compartment and a plastic screw-mount tripod socket, which is too close to the battery compartment for quick battery changes when mounted on a tripod. (This is something I always pay attention to, given the extensive amount of studio shooting I do with each camera.) The tripod socket is also off-center from the lens, making panorama shots with foreground objects more difficult.
Viewfinder
 The
C-7000 Zoom offers both a real-image optical viewfinder and a rear panel, 2.0-inch,
206,000-pixel, TFT color LCD screen. The optical viewfinder does not feature
a diopter correction adjustment, but does have a fairly high eyepoint, leaving
a reasonable amount of room between your eye and the finder for an eyeglass
lens to fit. Although the optical viewfinder zooms along with the lens, it does
not show the operation of the digital zoom, which can only be used when the
LCD monitor is on. A black set of brackets in the center of the field of view
marks the autofocus area, and helps you center your subjects. Two LED indicators
(one orange and one green) are adjacent to the viewfinder window, indicating
camera status with either glowing or blinking lights. If the green LED blinks,
the camera is either having trouble focusing, or there's a problem with the
memory card. A solid green LED indicates that focus is set and the camera is
ready to snap the picture. A flashing orange LED means that the flash is still
charging or there is a potential of camera shake, while a solid orange LED shows
that the flash is fully charged and ready to fire.
The
C-7000 Zoom offers both a real-image optical viewfinder and a rear panel, 2.0-inch,
206,000-pixel, TFT color LCD screen. The optical viewfinder does not feature
a diopter correction adjustment, but does have a fairly high eyepoint, leaving
a reasonable amount of room between your eye and the finder for an eyeglass
lens to fit. Although the optical viewfinder zooms along with the lens, it does
not show the operation of the digital zoom, which can only be used when the
LCD monitor is on. A black set of brackets in the center of the field of view
marks the autofocus area, and helps you center your subjects. Two LED indicators
(one orange and one green) are adjacent to the viewfinder window, indicating
camera status with either glowing or blinking lights. If the green LED blinks,
the camera is either having trouble focusing, or there's a problem with the
memory card. A solid green LED indicates that focus is set and the camera is
ready to snap the picture. A flashing orange LED means that the flash is still
charging or there is a potential of camera shake, while a solid orange LED shows
that the flash is fully charged and ready to fire.
The C-7000 Zoom's LCD monitor provides detailed information about exposure settings, including the currently selected f/stop, shutter speed, and exposure compensation adjustments across the top of the screen. Information on ISO speed, flash mode, drive mode, and the state of several other camera settings may optionally appear on the LCD screen, if the Shooting Menu (Camera sub-menu) "INFO" setting is turned on. There is no option to completely disable the information overlay, without turning the LCD screen off altogether. (I'd really like to be able to turn off the info overlay sometimes, to avoid obscuring critical subject details.)
In Aperture and Shutter Priority modes, the chosen aperture or shutter speed appears as a manually-set constant, while the second, automatically determined exposure value updates continuously in response to scene lighting and the exposure compensation setting. In Manual mode, the camera displays both the selected f/stop and shutter speed values (adjustable with the left / right and up / down Arrow buttons, respectively), while the exposure compensation readout serves as an exposure display, showing the amount the camera thinks your settings will over- or underexpose the subject. (The exposure display turns red if your chosen exposure is more than three EV units away from what the camera calculates to be correct.
 Through
the Camera menu, you can enable a histogram display, which displays a small
histogram over the lower portion of the frame, mapping out the tonal distribution.
A "Direct" option eliminates the histogram, but emphasizes any portion
of the frame that will be under or over exposed. Red dots indicate white areas,
while blue dots indicate any black areas. Thus, you get a larger (and more easily-read)
indication of which parts of the image will be under or overexposed. The Camera
menu also offers a Framing Guideline option, which divides the image area into
thirds, horizontally and vertically, to help you line up more difficult shots.
Through
the Camera menu, you can enable a histogram display, which displays a small
histogram over the lower portion of the frame, mapping out the tonal distribution.
A "Direct" option eliminates the histogram, but emphasizes any portion
of the frame that will be under or over exposed. Red dots indicate white areas,
while blue dots indicate any black areas. Thus, you get a larger (and more easily-read)
indication of which parts of the image will be under or overexposed. The Camera
menu also offers a Framing Guideline option, which divides the image area into
thirds, horizontally and vertically, to help you line up more difficult shots.
 When
using the LCD monitor to review captured images, you can zoom in on displayed
images as much as 5x, and then scroll around the enlarged image using the arrow
buttons. This is very handy for checking focus, small details, or precise framing.
There's also an Index display option, which shows nine thumbnail images at a
time, as determined by a setup menu option. Pressing the Zoom lever toward the
wide-angle position while in Index Display mode, pulls up the Calendar Display,
which displays the images on the card by date. A graphical calendar display
shows a tiny thumbnail of the first image captured on each date. A very handy
"Quick View" function lets you switch quickly from Shooting to Playback
mode by pressing the Quick View button on the rear panel. In Quick View mode,
the camera will display the most recently captured image on the LCD screen,
but you have essentially all of the Playback-mode options available to you,
and can scroll back and forth to other images, zoom in and out on them, and
call up the information display. You can revert to shooting mode either by pressing
the Quick View button again, or simply by half-pressing the Shutter button.
When
using the LCD monitor to review captured images, you can zoom in on displayed
images as much as 5x, and then scroll around the enlarged image using the arrow
buttons. This is very handy for checking focus, small details, or precise framing.
There's also an Index display option, which shows nine thumbnail images at a
time, as determined by a setup menu option. Pressing the Zoom lever toward the
wide-angle position while in Index Display mode, pulls up the Calendar Display,
which displays the images on the card by date. A graphical calendar display
shows a tiny thumbnail of the first image captured on each date. A very handy
"Quick View" function lets you switch quickly from Shooting to Playback
mode by pressing the Quick View button on the rear panel. In Quick View mode,
the camera will display the most recently captured image on the LCD screen,
but you have essentially all of the Playback-mode options available to you,
and can scroll back and forth to other images, zoom in and out on them, and
call up the information display. You can revert to shooting mode either by pressing
the Quick View button again, or simply by half-pressing the Shutter button.
A Record View function, enabled through the Shooting menu (Setup sub-menu),
briefly displays the most recently captured image on the LCD screen while the
image is being recorded to the memory card. This feature gives you the option
of deleting an image instantly by pressing the AE / AF / Erase button while
the review image is still onscreen. It's a great way to check your images without
spending time switching back and forth between Playback and Shooting modes.
In my tests, the C-7000's optical viewfinder was quite tight, showing only 77-81%
of the final frame area. Fortunately, its LCD viewfinder was almost 100% accurate.
(The overly tight optical viewfinder was one of the few weak points I found
on an otherwise excellent digicam.)
Optics
| Free Photo Lessons | |
|
 The
Olympus C-7000 Zoom is equipped with 5x, 7.9-39.5mm lens, providing a range
of angular coverage equivalent to that of a 38-190mm zoom on a 35mm film camera.
The lens has a maximum aperture of f/2.8 -f/4.8 (depending on the lens' current
zoom setting).
The
Olympus C-7000 Zoom is equipped with 5x, 7.9-39.5mm lens, providing a range
of angular coverage equivalent to that of a 38-190mm zoom on a 35mm film camera.
The lens has a maximum aperture of f/2.8 -f/4.8 (depending on the lens' current
zoom setting).
Focus ranges from 2.0 feet (60 centimeters) to infinity in Normal mode, with a Macro mode ranging from 0.3 feet (8 centimeters). A Super Macro mode lets you get as close as 0.8 inches (2.0 centimeters).
The camera's TTL (through the lens) autofocus system uses a contrast-detect method to gauge focus. The green LED next to the optical viewfinder glows solid as soon as the subject is in focus. (A flashing green LED generally means there's a problem focusing, so you may need to switch to Macro mode, back away from the subject, or get more light on it for the AF system to "see" by.) An AF-assist light on the front of the camera helps it focus in low lighting, and can be disabled through the camera's settings menu. Although the C-7000 Zoom doesn't feature an automatic focus lock, you can manually lock both exposure and focus by centering the desired portion of the subject in the frame, half-pressing the Shutter button, and then recomposing the image while continuing to half-press the Shutter button. The AE / AF / Erase button on the rear panel accesses the camera's AF area options (Spot, iESP, and Area). In Spot mode, the camera bases focus on the very center of the subject. iESP mode instead puts the camera in charge of the AF area. The Area option lets you manually select the AF area by moving the central AF target mark to virtually any position on the LCD display using the arrow keys. (Note that you cannot manually set the AF area if digital zoom is enabled, and the option will not show up on the menu either.) Additionally, the C-7000 Zoom's Fulltime AF option (enabled through the settings menu) continuously adjusts focus, regardless of whether the Shutter button is half-way pressed or not.
A manual focus option is available by pressing and holding the OK / Menu button on the back panel, which displays the manual focus distance scale on the LCD monitor. The up and down arrow keys adjust the focus distance, and the right and left keys select between MF and AF focus modes. When you adjust the focus manually, the LCD viewfinder display changes to show a 2x magnified view of the central portion of the image while you're actually adjusting the focus, to make it easier to see whether or not your subject is in focus. The display returns to normal size once you release the up or down arrow button. I really like the C-7000's use of a bar graph focusing distance display, combined with numbers indicating specific distances. Some cameras offer only a bar graph display, with no numeric information, a much less useful arrangement, in my opinion. Having specific numbers to refer to can be invaluable in low-light situations, where there's not enough light to see whether the subject is in focus on the LCD screen, and your only option is to estimate the distance to the subject.
As much as 6x of digital zoom is available in addition to the 5x optical zoom, increasing the C-7000 Zoom's total zoom range to 30x. Digital zoom is only accessible when the LCD monitor is engaged; when the LCD is turned off, the digital zoom returns to the 1x setting. It also cannot be used with the uncompressed TIFF and RAW modes. As always though, remember that digital zoom just "stretches" the image from the central portion of the CCD, which directly trades off resolution for magnification. Digital zoom images will always be softer and less sharp than those with equivalent magnification delivered entirely by an optical zoom lens.
Exposure
| Free Photo Lessons | |
|
In Program mode, the camera selects both the aperture and shutter speed (to a maximum of one second), while you control the remaining exposure options such as ISO, Exposure Compensation, White Balance, and metering mode. Aperture Priority lets you set the aperture from f/2.8 to f/8.0, while the camera chooses the best corresponding shutter speed. In Shutter Priority, you can select shutter speeds from 1/2,000 to four seconds, and the camera selects the best corresponding aperture setting. (Although the maximum aperture is limited to f/4.0 at the 1/2,000 second shutter speed.) In Manual mode, you control both aperture and shutter speed simultaneously. Shutter speed in Manual mode can range from 15 seconds to 1/2,000 second, but the 1/2,000 second speed is only available when the aperture is set to f/4 or higher; at f/2.8, f/3.2, and f/3.5 the maximum shutter speed is 1/1,600. (The same restriction on shutter speed applies in Aperture Priority mode as well.) In Manual mode, the exposure compensation display at the top of the LCD screen changes into an exposure meter, a helpful feature. As you scroll through various shutter speed/aperture combinations, the camera indicates whether or not it thinks the current setting will give you a correct exposure. It does this by showing the f/stop and shutter speed in green, and the difference between your settings and the "correct" exposure in white numerals, across a range of +/- 3 EV. If the differential exceeds three EV, the numbers turn red and stay fixed at a +/- 3 EV reading.
In addition to the four basic exposure modes, a "My Mode" option lets you save a set of exposure settings that can be accessed via the Mode dial. Thus, if you shoot under the same conditions frequently, you can save the settings and instantly recall them when needed. This can be very handy when you shoot frequently under the same conditions, such as in an office environment or any place where the lighting is controlled and constant.
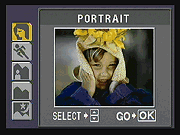 A
Scene setting on the Mode dial offers five preset modes for specific shooting
situations. Included are Portrait, Sports, Landscape Portrait, Landscape Scene,
and Night Scene modes. (The actual Scene setting is selected through the Scene
option of the Camera menu.) In Portrait mode, the camera captures individual
portraits with wider aperture settings, leaving the subject crisply focused
in front of a slightly blurred background, while Sports mode biases the exposure
system toward faster shutter speeds to freeze the action. The two Landscape
modes are set up for capturing broad vistas of scenery with or without people
in the foreground. Night Scene mode optimizes the camera for darker shooting
situations, keeping the exposure under automatic control but adjusting the ISO
and shutter speed for the best exposure.
A
Scene setting on the Mode dial offers five preset modes for specific shooting
situations. Included are Portrait, Sports, Landscape Portrait, Landscape Scene,
and Night Scene modes. (The actual Scene setting is selected through the Scene
option of the Camera menu.) In Portrait mode, the camera captures individual
portraits with wider aperture settings, leaving the subject crisply focused
in front of a slightly blurred background, while Sports mode biases the exposure
system toward faster shutter speeds to freeze the action. The two Landscape
modes are set up for capturing broad vistas of scenery with or without people
in the foreground. Night Scene mode optimizes the camera for darker shooting
situations, keeping the exposure under automatic control but adjusting the ISO
and shutter speed for the best exposure.
Two metering systems are available on the C-7000 Zoom: Spot and ESP multi-segment metering. Spot and ESP are accessed by pressing the AE / AF / Erase button on the camera's back panel. Under the default ESP multi-segment setting, the camera takes readings from a number of areas across the field of view, and evaluates both brightness and contrast between the areas to determine the best exposure. Spot metering reads the exposure from the very center of the image, so you can pinpoint the specific area of the subject you want properly exposed and lock in on that exposure (as well as the lens focus setting) by depressing the Shutter button halfway and holding it down while you recompose the scene. The AE Lock button also lets you lock exposure independently of focus, simply by pressing the button a single time. The exposure is then locked until the button is pressed again or the Shutter button is pressed. A Multi-Metering function is also available, and lets you take up to eight individual spot-meter readings from the center of the LCD monitor (inside the exposure brackets) by repeatedly pressing the AE Lock (AEL) button. Each reading is marked on a relative exposure scale across the bottom of the LCD panel, and then averaged to produce the overall reading. You lock the Multi-Spot reading by holding the AE Lock button down for one second (the word "Memo" appears in the LCD display), and can cancel it by pressing and holding the AEL button one last time. This is a very useful exposure option for advanced photographers.
In the main exposure modes (Program, Aperture Priority, Shutter Priority, and Manual modes), the C-7000 Zoom provides a range of ISO (light sensitivity) settings, including Auto, 80, 100, 200, and 400 ISO equivalents. Higher ISO settings naturally bring along with them higher levels of image noise, but I found the pattern of the C-7000 Zoom's noise to be unusually tight and fine-grained, making it less objectionable than that of many competing models.
Camera light meters assume that the world averages out to a mediumgray, and make their exposure decisions accordingly. This works wellmost of the time, but subjects that are very bright or dark overall cantrick the metering system. Light subjects will tend to be underexposed,while dark ones can be overexposed. In these situations, you need to beable to adjust the camera's default exposure to compensate for thesubject's overall tone. This is the function of the "exposurecompensation" adjustment. To adjust the exposure compensation on theC-7000 Zoom, simply press either the right or left Arrow buttons (inany exposure mode except Manual) to increase or decrease the exposurevalues (EV) in one-third-step increments, up to +/- 2 EV. The currentcompensation setting is displayed in the upper right corner of the LCD.(The LCD viewfinder must be enabled to adjust this setting, but once itis set, you can turn the LCD off to conserve power, and the settingwill remain in effect.)
Sometimes you aren't sure how best to adjust the exposure for agiven subject, and don't want to take the time to adjust the exposurecompensation manually. (The subject might move or go away while you'refiddling with the camera's controls.) The answer to this dilemma isfound in the C-7000's Auto Bracketing (BKT) function. Selected throughthe Shooting Mode Menu, this feature makes the camera automatically"bracket" the exposure for each shot by as much as +/- 2 EV in eitherthree- or five-step increments (0.3, 0.6, or 1.0 EV units each). Forexample, with a setting of five 0.3 EV steps, the camera willautomatically snap five shots, at exposure adjustments of -0.7, -0.3,0, +0.3, and +0.7 EV, insuring that at least one shot would be exposedjust right. The bracketing function centers its efforts around whateverexposure you've previously selected as the starting point, includingany exposure compensation adjustments you've made.
White Balance is also set in the Mode Menu, with Auto, One Touch (Manual), or one of six Preset options: Daylight, Overcast, Tungsten, Daylight Fluorescent, Neutral Fluorescent, or Cool Fluorescent, to accommodate a variety of lighting situations. In One Touch mode, white balance is calculated by placing a white card in front of the lens and pressing the OK button. You can also fine-tune the white balance setting with the "WB+/-" setting under the Picture submenu. An adjustment bar appears on the LCD screen, with options to increase or decrease the red or blue tones. (I really like this idea of fine-tuning the white balance. Most digicams tend to have slight biases in their white balance systems under various lighting conditions. Once you get used to how a particular camera shoots, it can be very helpful to have this sort of "tweaking" adjustment available to modify the color shift.)
The C-7000 Zoom has a 12-second Self-Timer for self-portraits or those occasions when you don't want to risk camera shake by pressing the Shutter button to make the exposure. A Remote Control mode works with the optional IR remote unit, letting you trip the shutter from a greater distance away. When the remote control is used to trip the shutter, there's always a two-second delay between pressing the remote's button and when the shutter actually fires. The Function menu option lets you capture images in Black & White or Sepia modes. The camera also offers contrast, sharpness, and saturation adjustments, all in +/- five-step increments.
Flash
 The C-7000 Zoom has a fairly
standard built-in, pop-up flash, with five basic operating modes: Auto, Red-Eye
Reduction, Fill Flash, Flash Off, and Slow Synchro modes. Flash range extends
to approximately 12.5 feet (3.8 meters) in wide angle mode. (In my own tests,
with the lens at its telephoto setting, range was closer to 8 feet.) The Slow
Synchro mode combines a slow shutter speed with the flash to let more ambient
light into the image. This results in more natural lighting behind flash-illuminated
subjects. When photographing moving subjects, Slow Synchro will record some
motion blur because of the longer exposure time, with the initial or final image
frozen by the flash exposure. The Slow 1 menu option fires the flash at the
beginning of the exposure (producing a blur in front of the subject),
while Slow 2 fires the flash at the end of the exposure (producing a blur behind
the subject, where you'd generally expect to see it). There's also a Slow Red-Eye
Reduction mode, for portraits. Another nice feature of the C-7000 Zoom's internal
flash system is its Flash Brightness adjustment, which allows you to change
the flash brightness from +2 to -2 EV in one-third-step increments. The flash
is in Off mode until it is popped up manually; it cannot be popped up automatically
regardless of mode even if the camera thinks it is necessary.
The C-7000 Zoom has a fairly
standard built-in, pop-up flash, with five basic operating modes: Auto, Red-Eye
Reduction, Fill Flash, Flash Off, and Slow Synchro modes. Flash range extends
to approximately 12.5 feet (3.8 meters) in wide angle mode. (In my own tests,
with the lens at its telephoto setting, range was closer to 8 feet.) The Slow
Synchro mode combines a slow shutter speed with the flash to let more ambient
light into the image. This results in more natural lighting behind flash-illuminated
subjects. When photographing moving subjects, Slow Synchro will record some
motion blur because of the longer exposure time, with the initial or final image
frozen by the flash exposure. The Slow 1 menu option fires the flash at the
beginning of the exposure (producing a blur in front of the subject),
while Slow 2 fires the flash at the end of the exposure (producing a blur behind
the subject, where you'd generally expect to see it). There's also a Slow Red-Eye
Reduction mode, for portraits. Another nice feature of the C-7000 Zoom's internal
flash system is its Flash Brightness adjustment, which allows you to change
the flash brightness from +2 to -2 EV in one-third-step increments. The flash
is in Off mode until it is popped up manually; it cannot be popped up automatically
regardless of mode even if the camera thinks it is necessary.
Special Exposure Modes
Movie Mode
The C-7000's Movie mode is accessed via the Mode dial on the camera's rear panel. Movies can be recorded with sound at either 640 x 480- or 320 x 240-pixel resolutions, at either 30 or 15 frames per second. At the SHQ quality setting (640 x 480 pixels, 30 frames per second), recording is limited to 20 seconds per clip. At the other resolutions and frame rates, however, recording is only limited by the space available on the memory card. Optical zoom is unavailable while recording movies, due to the noise of the lens moving in and out. However, you can use digital zoom, if enabled through the settings menu.
A very nice feature of the C-7000's movie mode is its "Index" capability, a great way of quickly seeing what's "inside" a movie file. In Movie Playback mode, selecting Index calls up a display of nine individual frames, equally spaced throughout the movie. You can scroll through all nine images at once using the left and right arrow keys, with each sampled frame remaining equidistant from the others. Pressing the OK button three times then saves the image as an individual still file.
Panorama Mode
The C-7000 Zoom offers a Panorama exposure mode when using an Olympus brand panorama-enabled xD-Picture Card. In this mode, the exposure and white balance for a series of shots are determined by the first exposure in the series, making them easier to stitch together in the computer later. The Panorama function is accessed in the Shooting menu through the Camera submenu. When activated, it provides light blue guide lines at the edges of the pictures to help you align successive shots, leaving enough overlap between them for the stitching software to do its job. Up to 10 shots can be taken in a panoramic series. Note that this function is only enabled by xD-Picture Cards with built-in panorama-related firmware found on Olympus brand memory cards. Images are saved individually and then assembled on a computer after they've been downloaded. (Note: If you don't want to use Olympus-branded xD-Picture Cards, you can accomplish the same end by shooting in Manual exposure mode to fix the exposure parameters, and daylight or Manual white balance mode, to fix the white balance.)
Sequence Modes
The C-7000 Zoom offers two Sequence modes that mimic the motor drive on a film camera. Normal Sequence mode continually records images as long as the Shutter button is held down, or until the buffer memory is full (this varies with the image quality and subject, as well as available memory card space). At the HQ quality setting, Olympus estimates that Sequence mode will capture 10 frames at 1.1 frames per second. (I clocked it at about 1.2 frames/second in this mode.) A Hi Sequence setting records a maximum of two frames at a rate of approximately 2.2 frames per second. (My sample of the camera actually shot at 3.3 frames/second in Hi Sequence mode.) See my test results below for more timing information.
Time-lapse Mode
Also accessed through the camera's shooting menu, Time-lapse mode captures a series of images at preset intervals, letting you record slow-moving events such as a flower opening. You can set the camera to capture as many as 99 consecutive images, with time intervals ranging from one to 59 minutes in one-minute increments. The camera will automatically shut itself off after the last image is captured.
Noise Reduction/Low Light
This isn't really a separate shooting mode, but deserves separate mention because of the impact it has on low light performance. All digital cameras are plagued by image noise on long exposures, particularly the "hot pixel" kind caused by leakage currents on the CCD array. This noise appears as isolated bright pixels of varying colors. Like many current higher-end cameras, the C-7000 Zoom employs a "dark frame subtraction" technique to remove the hot pixels. This means that when the noise reduction option is turned on, it takes the camera twice as long to complete an exposure, since it's actually taking two shots, one of the subject, and the other with the shutter closed. The second of these will contain only the CCD noise, which the camera then subtracts from the image of the subject. Having just said how significant noise reduction is though, in the case of the C-7000 Zoom, the basic images have so few hot pixels in them that the effect of the noise reduction processing is sometimes hard to see. I still recommend it for long time exposures, but the C-7000's images are remarkably "clean" to start with.
RAW-mode Image Editing
 This
is another feature that isn't at all an exposure mode, but there isn't really
any better place to discuss it. The C-7000 can shoot and store files in a "RAW"
file mode, which preserves the image data exactly as it came from the camera's
sensor. This allows later processing on the computer to adjust tone, color,
etc, with no incremental loss of image information. The C-7000 is fairly unique
though, in that it allows you to reprocess previously-captured RAW-mode images
into JPEGs right in the camera, making a wide range of adjustments to them in
the process. Adjustment options include image size/quality, white balance setting,
exposure compensation, Sharpness, Contrast, and Saturation. When editing a RAW-mode
image in the camera, the original image is left undisturbed, the modified image
being saved in a new file.
This
is another feature that isn't at all an exposure mode, but there isn't really
any better place to discuss it. The C-7000 can shoot and store files in a "RAW"
file mode, which preserves the image data exactly as it came from the camera's
sensor. This allows later processing on the computer to adjust tone, color,
etc, with no incremental loss of image information. The C-7000 is fairly unique
though, in that it allows you to reprocess previously-captured RAW-mode images
into JPEGs right in the camera, making a wide range of adjustments to them in
the process. Adjustment options include image size/quality, white balance setting,
exposure compensation, Sharpness, Contrast, and Saturation. When editing a RAW-mode
image in the camera, the original image is left undisturbed, the modified image
being saved in a new file.
Shutter Lag/Cycle Times
When you press the shutter release on a camera, there's usually a lag time before the shutter actually fires. This time is to allow the autofocus and autoexposure mechanisms time to do their work, and can amount to a fairly long delay in some situations. Since this number is almost never reported on, and can significantly affect the picture taking experience, I now routinely measure it with a custom test system I constructed for the purpose. (With crystal-controlled timing, accurate to 0.01% and with a timing resolution of 1 millisecond.) Here's the full set of timing numbers I measured for the Olympus C-7000 Zoom:
| |
||
| |
(secs) |
|
| Power On -> First shot | |
LCD turns
on and lens extends forward. Fairly fast. |
| Shutdown | |
First time is time to retract
lens, second time is worst-case buffer-clearing time. First number is
fast, second slow, but note that it corresponds to clearing the buffer
after 100+ small/basic shots in continuous mode. |
| Play to Record, first shot | |
Time until
first shot is captured. Quite fast. |
| Record to play | |
First time is that required
to display a large/fine file immediately after capture, second time
is that needed to display a large/fine file that has already been processed
and stored on the memory card. Both times are a little on the slow side
by current standards. |
| Shutter lag, full autofocus | |
First time is at full wide-angle, second is full telephoto. Very fast, and interestingly little variation between wide and telephoto lens settings. |
| Shutter lag, prefocus | |
Time to capture, after half-pressing
shutter button. Quite fast. |
| Cycle Time, TIFF | 11.05 | Times is an average, no buffering. Slow, but not for a 7-megapixel TIFF image. |
| Cycle Time, RAW | |
Times is an average, no
buffering. Slow, but not for a 7-megapixel RAW image. |
| Cycle Time, max/min resolution | 2.01 / |
First number is for large/fine files, second number is time for "TV" mode (640x480) images. Times are averages. In large/fine mode, shoots 4 images this fast, then slows to an irregular pace of about one every 5 seconds, and takes 10 seconds to clear the buffer. In TV mode, continues at this rate indefinitely, clearing the buffer after each shot. Not blazing speed, but not at all bad for a 7-megapixel camera. |
| Cycle Time, continuous High mode, max/min resolution | 0.34 (3.33 fps) |
Whether in large/fine mode or "TV" mode, shoots two shots at this rate. Times are averages. Buffer clears in 8 seconds for large/fine images, 3.5 seconds for TV size images. Very fast, but more buffer capacity would be very nice. |
| Cycle Time, continuous Low mode, max/min resolution | 0.97 / 0.85 (1.03 / 1.18 fps) |
First number is for large/fine files, second number is time for small/basic images. Times are averages. Shoots 4 images this fast in large/fine mode, or more than 100 images with smallest file size. Buffer clears in 13 seconds for large/fine shots, in 22 seconds for "TV" sized images. Decent speed. Buffer capacity for large/fine images is better than for high-speed continuous mode, but still not dramatic. (Note though, that buffer capacity is much greater, if you just drop down to "HQ" mode from "SHQ".) |
The Olympus C-7000 is a surprisingly fast camera for such a compact, high-megapixel model. It's very responsive to the shutter, with full-autofocus lag times of 0.53-0.54 second. (The delay is essentially the same regardless of lens zoom setting.) While not the fastest I've seen, the 0.157 second shutter lag when the camera is "prefocused" by pressing and holding down the shutter button before the shot itself is also very good. Cycle times in single-shot mode are quite good, if not startlingly so, at roughly 2 seconds/shot. High-speed continuous mode lets you shoot at just over 3 frames/second, but for only two shots in a row, before you have to wait for the memory card to catch up. This is an excellent frame rate, but the tiny buffer memory is rather limiting. Low-speed continuous mode allows for longer sequences of shots, but at the much slower rate of just over one frame/second. Overall though, the Olympus C-7000 is very responsive little camera.
Operation and User Interface
The C-7000 Zoom has a sensible user interface, with a lot of external control available to reduce time spent navigating the LCD menu system, although all controls are dependent on the LCD screen to report the current settings. A large Mode dial on the rear panel controls the camera's operating mode, and multi-functional buttons access a variety of frequently-used camera settings. Like previous Olympus digicams, the C-7000 Zoom's menu system has an initial menu screen with four shortcut buttons on it that lead to sub-menus for quick access of frequently-used menu items. These shortcuts are displayed on the screen as three or four buttons, each selected using the arrow key that corresponds to its position on the screen. Although it can take a little getting used to, this dual-level menu system does let you make adjustments to three of the most often used camera settings quite quickly, and imposes only a slight penalty for less-frequently accessed functions. The C-7000 Zoom's external control layout is similar to previous Olympus Camedia digicam setups, although some buttons have been moved around and functions combined. The AE Lock / Custom Function / Rotate button can have any one of eighteen different functions assigned to it through the Setup sub-menus. This lets you create a short cut to circumvent the menu system for a frequently-used adjustment. With its range of control buttons and menu options, it'll probably take a typical user an hour or so to get familiar with the camera's setup.
Control Enumeration

Power Button: Located on top of the camera, this button turns the camera
on and off. If the Mode dial is set to a capture position, the lens extends
or retracts as the camera is turned on or off.

Shutter Button: To the right of the Power button and nestled in
the center of the Zoom Lever, the Shutter button sets focus and exposure settings
when depressed halfway and triggers the shutter when fully pressed.
Zoom Lever: Surrounding the Shutter button on the top panel, the Zoom Lever controls the optical zoom in all exposure modes, and the digital zoom when enabled through the Shooting menu. In Playback mode, the lever switches between Index view, Calendar view (an unique mode that displays the first image taken on each day of the current month), normal image display, and playback zoom.
![]()
Flash Release Button: Tucked on the far left side of the camera's rear
panel, this button releases the flash from its compartment.
![]()
AE / AF / Erase Button: The first button
in a series to the right of the optical viewfinder, this button pulls up the
following AE and AF shortcut menus, which are navigable via the arrow keys.
In Playback mode, pressing this button lets you delete the currently displayed image.

Self-Timer / Remote / DPOF Button: To the right of the AE / AF / Erase
button, this button accesses the Self-Timer and Remote Control modes in any
capture mode. In Playback mode, this button pulls up the DPOF print settings
for captured images. You can designate whether to print the single image or
all images, as well as determine the number of prints, a date and time overlay,
or any cropping.

Flash / Protect Button: Following to the right of the Self-Timer /
Remote / DPOF button, this button controls the flash mode, cycling through Auto-Flash,
Red-Eye Reduction, Forced Flash, Flash Off, and Slow Sync modes. It is important
to note that if the flash is not popped up, this button does not respond. In
Playback mode, this button write-protects the displayed image. It can also remove
protection.
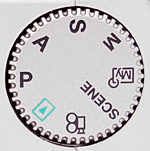
Mode Dial: The most obvious control on the rear panel of the C-7000
Zoom is the Mode Dial, which selects the various camera operating modes: Playback,
Program, Aperture Priority, Shutter Priority, Manual, My Mode, Scene, and Movie
modes.

AE Lock / Custom / Rotate Button: Adjacent to the top right corner
of the LCD monitor, this button locks the exposure when pressed in Record mode.
It can also be programmed through the settings menu to handle one of a number
of other functions as well. In Playback mode, this button rotates the displayed
image 90 degrees clockwise each time it is pressed.

Quick View Button: Below the AE Lock, / Custom / Rotate button, this
button pulls up the Quick View display of the most recently captured image.
Pressing the button a second time returns to record mode.
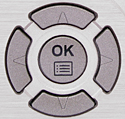
Five-way navigation pad: The largest control on the back
panel, the Five-way pad controls many of the C-7000 Zoom's operations. In all
Shooting modes except Manual, the left and right arrow keys increase or decrease
the exposure compensation setting (provided the LCD monitor is active). In Aperture
or Shutter Priority exposure modes, the up and down arrow keys adjust the lens
aperture or shutter speed settings, depending on which mode you've selected.
In Manual mode, the up and down arrows control shutter speed, while the left
and right arrows control aperture.
In Playback mode, the left and right arrows move forward or backward through the pictures stored on the card, or scroll around portions of the image in Zoom Playback mode.
In the LCD menu system, the arrow keys navigate through menu screens and select settings.
OK / Menu Button: Located in the center of the Five way navigation pad, this button activates the menu system on the rear panel LCD monitor and confirms selected menu settings in the LCD menu screens. If the LCD monitor is turned on when you press the OK / Menu button, it will call up the menu options and display them over the image. If the LCD monitor is off, it brings up the camera's menu system with no viewfinder image. Holding this button down for approximately two seconds brings up the Manual Focus distance display, along with the AF and MF icons. Highlighting the MF icon with the right arrow button engages the Manual Focus mode, after which the up and down arrow buttons adjust the focus.
Camera Modes & Menus
![]() Playback Mode:
This mode allows you to view previously captured images using the arrow pad
to scroll through frames stored in memory. The Zoom Lever switches the image
display to Index and Calendar Display modes when moved in the wide-angle direction,
and enlarges a single image when moved in the telephoto direction, by zooming
in to a maximum of 5x magnification. While zoomed in on an image, the arrow
buttons can be used to move the enlarged view around the full image area, allowing
you to inspect all parts of it.
Playback Mode:
This mode allows you to view previously captured images using the arrow pad
to scroll through frames stored in memory. The Zoom Lever switches the image
display to Index and Calendar Display modes when moved in the wide-angle direction,
and enlarges a single image when moved in the telephoto direction, by zooming
in to a maximum of 5x magnification. While zoomed in on an image, the arrow
buttons can be used to move the enlarged view around the full image area, allowing
you to inspect all parts of it.
![]() Programmed Exposure
(P): The camera selects both shutter speed and lens aperture, based on existing
light conditions and certain camera functions. For example, it uses a faster
shutter speed when the lens is in the telephoto position and a slower shutter
speed when the lens is in the wide-angle position.
Programmed Exposure
(P): The camera selects both shutter speed and lens aperture, based on existing
light conditions and certain camera functions. For example, it uses a faster
shutter speed when the lens is in the telephoto position and a slower shutter
speed when the lens is in the wide-angle position.
![]() Aperture Priority
(A): Lets you select the desired lens aperture (in 1/3-stop (EV) increments,
from f/2.8 to f/8), while the camera adjusts the shutter speed to achieve the
correct exposure. If the required shutter speed is beyond the camera's capabilities,
the shutter speed / aperture status numbers in the LCD will flash red.
Aperture Priority
(A): Lets you select the desired lens aperture (in 1/3-stop (EV) increments,
from f/2.8 to f/8), while the camera adjusts the shutter speed to achieve the
correct exposure. If the required shutter speed is beyond the camera's capabilities,
the shutter speed / aperture status numbers in the LCD will flash red.
![]() Shutter Priority (S):
Lets you select the desired shutter speed (in 1/3 EV increments, from 1/2,000
to four seconds), while the camera adjusts the aperture to achieve the correct
exposure. If the required aperture is beyond the camera's capabilities, the
shutter speed / aperture status numbers in the LCD will flash red.
Shutter Priority (S):
Lets you select the desired shutter speed (in 1/3 EV increments, from 1/2,000
to four seconds), while the camera adjusts the aperture to achieve the correct
exposure. If the required aperture is beyond the camera's capabilities, the
shutter speed / aperture status numbers in the LCD will flash red.
![]() Manual Mode (M):
Lets you select both the desired aperture (f/2.8 to f/8) and shutter speed (1/2,000
to 15 seconds) settings. The onscreen display that normally shows exposure compensation
adjustments becomes an exposure meter, showing the amount of under- or overexposure
the settings you've selected will result in. If the amount of over or underexposure
exceeds +/- 3 EV units, the settings displayed on the LCD screen turn red instead
of green, and the display remains at -3 or +3 EV.
Manual Mode (M):
Lets you select both the desired aperture (f/2.8 to f/8) and shutter speed (1/2,000
to 15 seconds) settings. The onscreen display that normally shows exposure compensation
adjustments becomes an exposure meter, showing the amount of under- or overexposure
the settings you've selected will result in. If the amount of over or underexposure
exceeds +/- 3 EV units, the settings displayed on the LCD screen turn red instead
of green, and the display remains at -3 or +3 EV.
![]() My Mode: Sets
up the camera according to a set of user-defined camera settings, specific to
shooting conditions. A huge range of exposure variables such as aperture, shutter
speed, white balance, etc. can all be saved. You can even save the lens zoom
position. My Mode settings are made through the Setup menu.
My Mode: Sets
up the camera according to a set of user-defined camera settings, specific to
shooting conditions. A huge range of exposure variables such as aperture, shutter
speed, white balance, etc. can all be saved. You can even save the lens zoom
position. My Mode settings are made through the Setup menu.
![]() Scene
Mode: This mode lets you select from range of preset shooting modes,
including:
Scene
Mode: This mode lets you select from range of preset shooting modes,
including:
Portrait:
This mode sets up the camera for capturing portraits. By using a larger aperture
setting, the camera exposes the subject in sharp focus in front of a slightly
blurred background.![]() Movie Mode:
Accessed by turning the Mode dial to the movie camera symbol, Movie mode lets
you capture movies with or without sound for as long as the memory card allows.
Movie Mode:
Accessed by turning the Mode dial to the movie camera symbol, Movie mode lets
you capture movies with or without sound for as long as the memory card allows.
Camera Menus
Shooting Menus
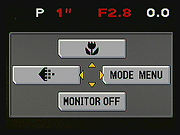 When
the Menu / OK button is pressed in any shooting mode, the menu screens shown
below appear. Menu options vary depending on the actual shooting mode. Depending
on the shooting mode you're in and whether you've chosen to reassign their functions
or not, three of the top-level menu items are Short Cuts to menu options controlling
by default (clockwise from the bottom) Monitor Off, Image Size/Quality, and
Macro mode. The fourth option takes you to the main Mode Menu itself. Since
the destinations of the short cut options are simply sub-levels inside the main
mode menu, I'll only show the main Mode Menu screens here:
When
the Menu / OK button is pressed in any shooting mode, the menu screens shown
below appear. Menu options vary depending on the actual shooting mode. Depending
on the shooting mode you're in and whether you've chosen to reassign their functions
or not, three of the top-level menu items are Short Cuts to menu options controlling
by default (clockwise from the bottom) Monitor Off, Image Size/Quality, and
Macro mode. The fourth option takes you to the main Mode Menu itself. Since
the destinations of the short cut options are simply sub-levels inside the main
mode menu, I'll only show the main Mode Menu screens here:
 Macro:
Activates Macro and Super Macro shooting modes, or returns to the normal
AF setting.
Macro:
Activates Macro and Super Macro shooting modes, or returns to the normal
AF setting.
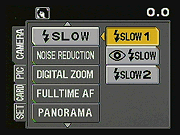 Slow
Synchro: Selects between Slow Synchro 1, Slow Synchro with Red-Eye
Reduction, and Slow Synchro 2. The Slow Synchro modes combine the flash
with long shutter times, to allow more of the ambient light to influence
the exposure. Slow synchro 1 and 2 differ in that 2 fires the flash at
the end of the shutter period (second curtain sync), while 1 fires it
at the beginning (first curtain sync).
Slow
Synchro: Selects between Slow Synchro 1, Slow Synchro with Red-Eye
Reduction, and Slow Synchro 2. The Slow Synchro modes combine the flash
with long shutter times, to allow more of the ambient light to influence
the exposure. Slow synchro 1 and 2 differ in that 2 fires the flash at
the end of the shutter period (second curtain sync), while 1 fires it
at the beginning (first curtain sync).
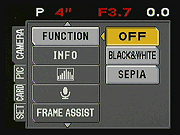 Function:
Lets you select between Black-and-White and Sepia color modes.
Function:
Lets you select between Black-and-White and Sepia color modes.
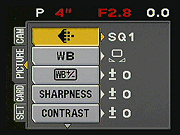 Quality:
Sets the camera's image quality to one of the following:
Quality:
Sets the camera's image quality to one of the following:
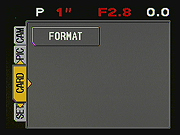 Card
setup: Formats the xD-Picture Card, erasing all images, even the write-protected
or Locked images.
Card
setup: Formats the xD-Picture Card, erasing all images, even the write-protected
or Locked images.
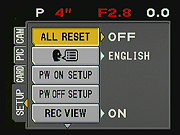 All
Reset: Resets the camera to its default settings whenever it's turned
off and back on again.
All
Reset: Resets the camera to its default settings whenever it's turned
off and back on again.
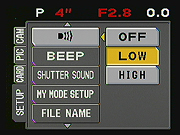 Volume:
Sets the camera's beep sound to Off, Low, or High.
Volume:
Sets the camera's beep sound to Off, Low, or High.
 Pixel
Mapping: Initiates automatic pixel mapping, which checks for bad pixels
in the CCD and maps them out. (Bad pixels shouldn't appear very often,
and Olympus only recommends running this function once a year.)
AF
Illuminator: Turns the AF illuminator on the front of the camera
on or off. If on, the light automatically comes on to help the camera
focus in dark situations.
Pixel
Mapping: Initiates automatic pixel mapping, which checks for bad pixels
in the CCD and maps them out. (Bad pixels shouldn't appear very often,
and Olympus only recommends running this function once a year.)
AF
Illuminator: Turns the AF illuminator on the front of the camera
on or off. If on, the light automatically comes on to help the camera
focus in dark situations.
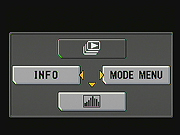
Playback Menu
Playback Mode is available by turning to the green Playback symbol onthe camera's
Mode dial, or by depressing the Quick View button in anyShooting mode. The Playback
Top Menu has three options, which differslightly between Shooting (Record) playback
and Movie playback:
Still Playback:
 Info:
Changes the amount of exposure information that is displayed with each recorded
image. Full information includes battery power (shown only if the batteries
are low), image quality, resolution, shutter speed, aperture, exposure compensation,
white balance, ISO, and file number. Minimum information includes only the
frame number, battery power, and quality setting. Movie files display only
the file number until you select the Movie Playback option.
Info:
Changes the amount of exposure information that is displayed with each recorded
image. Full information includes battery power (shown only if the batteries
are low), image quality, resolution, shutter speed, aperture, exposure compensation,
white balance, ISO, and file number. Minimum information includes only the
frame number, battery power, and quality setting. Movie files display only
the file number until you select the Movie Playback option. 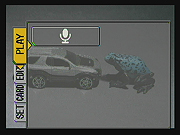 Sound
Memo: Lets you record a short sound caption to accompany
a captured image.
Sound
Memo: Lets you record a short sound caption to accompany
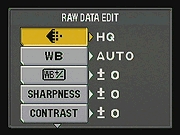
a captured image. 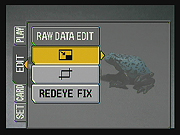 RAW
Data Edit: Provides in-camera
editing of RAW data files. You can adjust size/quality, white balance,
sharpness, contrast, and saturation.
RAW
Data Edit: Provides in-camera
editing of RAW data files. You can adjust size/quality, white balance,
sharpness, contrast, and saturation.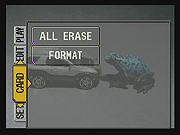 All
Erase: Allows you to erase all images on the xD-Picture Card,
except write-protected files.
All
Erase: Allows you to erase all images on the xD-Picture Card,
except write-protected files.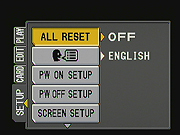 All
Reset: Resets the camera to its default settings or to set your
own custom default settings.
All
Reset: Resets the camera to its default settings or to set your
own custom default settings. 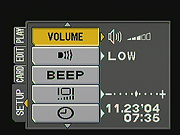 Playback
Volume: Sets the camera's sound volume for playback of recorded
sounds to one of six levels.
Playback
Volume: Sets the camera's sound volume for playback of recorded
sounds to one of six levels.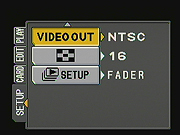 Video
Out: Designates the video signal as PAL or NTSC.
Video
Out: Designates the video signal as PAL or NTSC.
Image Storage and Interface
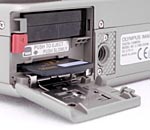 The
C-7000 Zoom uses xD-Picture Cards and comes with a 32MB card. Extra cards currently
can be purchased in sizes as large as 512MB from either Olympus or third parties.
(I strongly recommend buying at least a 128 MB card, to give yourself
enough space for extended outings.) Only Olympus-branded cards will enable the
camera's Panorama function, but third party models should otherwise be identical.
The
C-7000 Zoom uses xD-Picture Cards and comes with a 32MB card. Extra cards currently
can be purchased in sizes as large as 512MB from either Olympus or third parties.
(I strongly recommend buying at least a 128 MB card, to give yourself
enough space for extended outings.) Only Olympus-branded cards will enable the
camera's Panorama function, but third party models should otherwise be identical.
The Olympus C-7000 Zoom can store images in RAW, uncompressed TIFF, or compressed JPEG file formats. The TIFF setting is only available for the maximum resolution (3,072 x 2,304 pixels). RAW data is also saved at the maximum resolution, and the C-7000 Zoom has an editing option in the Playback menu for RAW files. JPEG compression levels include Super High Quality (SHQ), High Quality (HQ), and Standard Quality (SQ1 & SQ2). The myriad size options can be assigned to the camera's quality levels via the record setup menu, as shown in the table below. (Green table cells indicate image size options that can be assigned to each named quality setting.) Whatever image size/quality options are assigned to the five named quality settings can be quickly selected either by the "shortcut button" (see the description of the user interface later) or via the record setup menu.
| Size Options |
|
(3:2) |
|
2,288 x 1,712 | |
|
|
|
|
| |
|
||||||||
| |
|
|
|
|
|
|
|
|
|
| |
|
|
|
||||||
| |
|
|
|
||||||
| |
• |
• | |
|
|
||||
| |
|
• |
|
|
I appreciated the C-7000 Zoom's file naming protocol, which includesthe month and day at the beginning of the file name, and provides theoption of numbering images progressively from one card to the next, orof resetting the naming sequence for each card. The C-7000 Zoom letsyou write-protect individual images from accidental erasure by pressingthe Protect button on the rear panel.
As just mentioned, the C-7000 Zoom offers a large range of resolution and image compression settings. The table below shows all the available size/quality options, the number of each that can be stored on the included 32MB memory card, and the amount of image compression employed for each.
| Resolution/Quality 32 MB Memory Card |
Fine | Normal | RAW |
|
|
| 3072
x 2304 |
Images (Avg size) |
6 5.2 MB |
18 1.8 MB |
3 10.6 MB |
1 21.3 MB |
| Approx. Compression |
4:1 | 12:1 | 2:1 | - | |
| 2592 x 1944 | Images (Avg size) |
8 3.7 MB |
25 1.3 MB |
- | - |
| Approx. Compression |
4:1 | 12:1 | - | - | |
| 2288 x 1712 | Images (Avg size) |
11 2.9 MB |
32 981 KB |
- | - |
| Approx. Compression |
4:1 | 12:1 | - | - | |
| |
Images (Avg size) |
13 2.3 MB |
40 785 KB |
- | - |
| Approx. Compression |
4:1 | 12:1 | - | - | |
| |
Images (Avg size) |
22 1.4 MB |
64 497 KB |
- | - |
| Approx. Compression |
4:1 | 12:1 | - | - | |
| |
Images (Avg size) |
35 914 KB |
99 320 KB |
- | - |
| Approx. Compression |
4:1 | 12:1 | - | - | |
| |
Images (Avg size) |
53 594 KB |
153 208 KB |
- | - |
| Approx. Compression |
4:1 | 11:1 | - | - | |
| |
Images (Avg size) |
133 240 KB |
332 96 KB |
- | - |
| Approx. Compression |
4:1 | 10:1 | - | - | |
The C-7000 Zoom comes with interface software and cables for both Macintosh and Windows computers. It employs a USB Auto-Connect interface for high-speed computer connection. Like all of Olympus' most recent digicams, the C-7000 is a USB "storage class" device. This means it can connect directly to Mac OS Version 9.1 or later, or Windows Me or 2000 computers, without separate driver software. Storage-class or Auto-Connect connections are generally faster than device-class ones.
Downloading files to my Sony VAIO desktop computer running Windows XP (Pentium IV, 2.4 GHz), I clocked the C-7000 at 780 KBytes/second, a good if unspectacular transfer rate. (Cameras with slow USB interfaces run as low as 300 KB/s, cameras with fast v1.1 interfaces run as high as 600 KB/s. Cameras with USB v2.0 interfaces run as fast as several megabytes/second.)
Lost Images? - Download this image-recovery program so you'll have it when
you need it...
Since we're talking about memory and image storage, this would be a good time
to mention the following: I get a lot of email from readers who've lost photos
due to a corrupted memory card. Memory card corruption can happen with any card
type and any camera manufacturer, nobody's immune. A surprising number of "lost"
images can be recovered with an inexpensive, easy to use piece of software though.
Given the amount of email I've gotten on the topic, I now include this paragraph
in all my digicam reviews. The program you need is called PhotoRescue, by DataRescue
SA. Read our review
of it if you'd like, but download the program now, so you'll have it.
It doesn't cost a penny until you need it, and even then it's only $29, with
a money back guarantee. So download PhotoRescue
for Windows or PhotoRescue
for Mac while you're thinking of it. (While you're at it, download the
PDF manual
and quickstart
guide as well.) Stash the file in a safe place and it'll be there when you need
it. Trust me, needing this is not a matter of if, but when... PhotoRescue
is about the best and easiest tool for recovering digital photos I've seen.
(Disclosure: IR gets a small commission from sales of the product, but I'd highly
recommend the program even if we didn't.) OK, now back to our regularly
scheduled review...
Video Out
 The
C-7000 Zoom has a Video Out port that supports the NTSC and PAL timing formats.
The video output can be used for reviewing previously captured images and movies,
or running slide shows from the camera. It also shows all of the LCD menu screens,
as well as the preview display from the LCD viewfinder.
The
C-7000 Zoom has a Video Out port that supports the NTSC and PAL timing formats.
The video output can be used for reviewing previously captured images and movies,
or running slide shows from the camera. It also shows all of the LCD menu screens,
as well as the preview display from the LCD viewfinder.
Power
 The
C-7000 Zoom is powered by a single lithium-ion battery pack, or by an optional
AC adapter that can significantly extend battery life if you're doing a lot
of downloads on the computer or working in a studio environment. The table below
shows the power drain I measured in various camera operating modes, and the
corresponding projected run times with the provided LiIon battery pack.
The
C-7000 Zoom is powered by a single lithium-ion battery pack, or by an optional
AC adapter that can significantly extend battery life if you're doing a lot
of downloads on the computer or working in a studio environment. The table below
shows the power drain I measured in various camera operating modes, and the
corresponding projected run times with the provided LiIon battery pack.
| |
(@4.8 volts on the external power terminal) |
(1230 mA LiIon) |
| Capture Mode, w/LCD | |
|
| Capture Mode, no LCD | |
|
| Half-pressed shutter w/LCD | |
|
| Half-pressed w/o LCD | |
|
| Memory Write (transient) | |
|
| Flash Recharge (transient) | |
|
| Image Playback | |
|
With a worst-case run time of 109 minutes in capture mode with the LCD illuminated, the C-7000 has good battery life for a relatively compact digicam, but I still highly recommend purchasing a second battery right along with the camera itself. Battery life is a bit better with the LCD turned off (144 minutes), but the C-7000's optical viewfinder is so inaccurate that you'll probably spend most of the time with the LCD turned on.
Included Software
The C-7000 Zoom comes with a nice complement of software on the supplied CD. Direct camera control and image downloading are provided by Olympus' Master (previously known as Camedia Master) software package for both Mac and Windows platforms (Macintosh OS 8.6 and higher, Windows 98v2/Me/2000 Pro). USB drivers for both platforms and an Apple QuickTime reader are also included.
Master lets you download and organize images, as well as perform minor image correction and enhancement functions (such as adjusting contrast, sharpness, and color balance). The new Calendar View option included in the camera's Playback mode is also available in the Master software, and displays files according to their capture date. For panoramic images, Master supplies a "stitching" utility to piece together shots vertically or horizontally. A complete printing utility works with the DPOF settings and lets you print images directly to Olympus or other DPOF-compliant photo printers.
In the Box
The following items are included in the box:
Test Results
In keeping with my standard test policy, the comments given here summarize only my key findings. For a full commentary on each of the test images, see the C-7000 Zoom's "pictures" page.
Not sure which camera to buy? Let your eyes be the ultimate judge! Visit our Comparometer(tm) to compare images from the Olympus C-7000 Zoom with those from other cameras you may be considering. The proof is in the pictures, so let your own eyes decide which you like best!
As with all Imaging Resource product tests, I encourage you to let your own eyes be the judge of how well the camera performed. Explore the images on the pictures page, to see how the C-7000 Zoom's images compare to other cameras you may be considering.
Conclusion
| Free Photo Lessons | |
|
<<C-7000 Sample Images | Additional Resources and Other Links>>
Reader Comments!
Questions, comments or controversy on this product? Click
this link to see what other Imaging Resource readers have had to say about
the Olympus C-7000 Wide Zoom, or add comments of your own!