Nikon Coolpix P5000 Operation
The Coolpix P5000 is controlled by an easily grasped system of physical controls for frequently adjusted options, a Menu system for options that are changed less frequently and a Setup mode for basic camera behavior. The addition of a Command Dial to scroll through an option's settings is particularly useful even though the Multi-Selector duplicates much of that functionality. The five small buttons are easily made friends with and the Multi-Selector sits by itself, easy to access with your right thumb. It's such an intelligent layout you could operate the P5000 blindfolded.
Operable blindfolded, of course, until you need to use the Menu system. Even then, the large type makes it easy to read and the gray/black/yellow color scheme is pleasant to view -- and is especially clear about what is and is not selected, unlike the colorful menu systems on so many other digicams.
Record Mode Display In Record modes, the Display button just below the Function button in the column of five buttons alongside the LCD, toggles through up to four display settings. Those include Current Settings (essential camera settings overlaying the scene), Framing Guides (which divides the frame into nine sections using bold yellow grid lines), No Information other than the Record mode, Monitor Off (in PASM modes only).
Playback Mode Display In Playback mode, the Display button toggles through three display modes including Photo with Information (essential file and exposure information), Shooting data display (a small thumbnail above a histogram with file information and exposure data to the right), and Photo with no information. The T position zooms in or magnifies an image up to three times while the W position display captured images in index mode in groups of 4, 9 or 16 images.
Nikon Coolpix P5000 Modes and Menus
![]() Auto Mode: Indicated on the Mode dial with a green camera icon, Auto mode puts the camera in control over the exposure. You can still set Flash, EV, Focus mode, the Self-Timer, Image Size, Image Quality, and Zoom.
Auto Mode: Indicated on the Mode dial with a green camera icon, Auto mode puts the camera in control over the exposure. You can still set Flash, EV, Focus mode, the Self-Timer, Image Size, Image Quality, and Zoom.
![]() Anti-Shake Mode: Vibration Reduction and Best Shot Selector are both turned on and ISO Sensitivity raised to a maximum of ISO 1600 to reduce camera blur when the flash is off or you zoom in.
Anti-Shake Mode: Vibration Reduction and Best Shot Selector are both turned on and ISO Sensitivity raised to a maximum of ISO 1600 to reduce camera blur when the flash is off or you zoom in.
![]() High ISO Mode: In this mode, the camera automatically raises ISO sensitivity to a maximum of ISO 1600ro reduce blur in low light or when the subject is moving. This mode is preferred over Anti-Shake mode when shooting indoors or under low light.
High ISO Mode: In this mode, the camera automatically raises ISO sensitivity to a maximum of ISO 1600ro reduce blur in low light or when the subject is moving. This mode is preferred over Anti-Shake mode when shooting indoors or under low light.
![]() Programmed Auto Mode: Indicated by a 'P' on the Mode Dial, this mode sets both the shutter speed and aperture based on the meter reading. Turning the Command Dial sets alternate combinations of shutter speed and aperture for the same exposure, providing control over depth of field and motion blur.
Programmed Auto Mode: Indicated by a 'P' on the Mode Dial, this mode sets both the shutter speed and aperture based on the meter reading. Turning the Command Dial sets alternate combinations of shutter speed and aperture for the same exposure, providing control over depth of field and motion blur.
![]() Aperture Priority Mode: Indicated by an 'A' on the Mode Dial, this mode automatically sets the shutter speed for the meter reading based on the aperture you select with the Command Dial.
Aperture Priority Mode: Indicated by an 'A' on the Mode Dial, this mode automatically sets the shutter speed for the meter reading based on the aperture you select with the Command Dial.
![]() Shutter Priority Mode: Indicated by an 'S' on the Mode Dial, this mode automatically sets the aperture for the meter reading based on the shutter speed you select with the Command Dial.
Shutter Priority Mode: Indicated by an 'S' on the Mode Dial, this mode automatically sets the aperture for the meter reading based on the shutter speed you select with the Command Dial.
![]() Manual Mode: You set both the aperture and shutter speed independently using the Command Dial, switching between the two with the Exposure Compensation button (Right arrow).
Manual Mode: You set both the aperture and shutter speed independently using the Command Dial, switching between the two with the Exposure Compensation button (Right arrow).
![]() Scene Mode: Indicated by the word 'SCENE' on the Mode dial, Scene mode provides access to the P5000's Scene modes, designed for specific situations. These include Face-Priority AF, Portrait, Landscape, Sports, Night Portrait, Party/Indoor, Beach/Snow, Sunset, Dusk/Dawn, Night Landscape, Close Up, Museum, Fireworks Show, Copy, Back Light and Panorama Assist. In addition, the Voice Recording option allows you to record voice memos.
Scene Mode: Indicated by the word 'SCENE' on the Mode dial, Scene mode provides access to the P5000's Scene modes, designed for specific situations. These include Face-Priority AF, Portrait, Landscape, Sports, Night Portrait, Party/Indoor, Beach/Snow, Sunset, Dusk/Dawn, Night Landscape, Close Up, Museum, Fireworks Show, Copy, Back Light and Panorama Assist. In addition, the Voice Recording option allows you to record voice memos.
![]() Movie Mode: A Movie camera icon on the Mode Dial marks the Movie mode option to capture AVI format movies with monaural sound. Options available from the Menu system include 640x480 at 30 fps or 15 fps, 320x240 at 15 fps, 160x120 at 15 fps, Sepia at 320x240 at 15 fps, B&W at 320x240 at 15 fps. In addition, a Time Lapse option takes up to 1,800 stills at specified intervals, creating a silent movie as long as 60 seconds. Available recording time is shown on the LCD. Broadcast quality (640x480 at 30 fps) uses 3:40 per 256MB.
Movie Mode: A Movie camera icon on the Mode Dial marks the Movie mode option to capture AVI format movies with monaural sound. Options available from the Menu system include 640x480 at 30 fps or 15 fps, 320x240 at 15 fps, 160x120 at 15 fps, Sepia at 320x240 at 15 fps, B&W at 320x240 at 15 fps. In addition, a Time Lapse option takes up to 1,800 stills at specified intervals, creating a silent movie as long as 60 seconds. Available recording time is shown on the LCD. Broadcast quality (640x480 at 30 fps) uses 3:40 per 256MB.
![]() Setup Mode: This mode, indicated by the word 'SETUP' on the Mode Dial, accesses the Setup menu options described below to set the general behavior of the camera.
Setup Mode: This mode, indicated by the word 'SETUP' on the Mode Dial, accesses the Setup menu options described below to set the general behavior of the camera.
Record Menu: These options, available when you press the Menu button with the camera is in a Recording mode, may include:
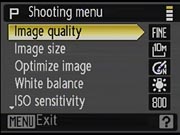 Image Quality: Sets the quality of the image captured by apply one of three JPEG compression ratios. Fine applies (roughly) 1:4 compression, Normal 1:8, and Basic 1:16. Normal is the default, optimizing the trade-off between file size and quality.
- Image Size: Sets the size of the image in pixels. Options are: 10MB at 3,648 x 2,736, 5MB at 2,592 x 1,944, 3MB at 2,048 x 1,536, 2MB at 1,600 x 1,200, 1MB at 1,280 x 960, PC at 1,024 x 768, TV at 640 x 480, 3:2 at 3,648 x 2,432, and 16:9 at 3,584 x 2,016. In Movie Mode, the options are: 640 x 480 and 30 or 15 fps, 320 x 240 at 15 fps, 160 x 120 at 15 fps, Time Lapse (up to 1,800 stills taken at specified intervals joined into a movie up to one minute long), Sepia 320 x 240 at 15 fps, and B&W 320 x 240 at 15 fps.
- Optimize Image: This option selects image processing options that include Normal (the default), Softer (softening outlines), Vivid (enhanced saturation, contrast and sharpness), More Vivid (maximized saturation, contrast and sharpness), Portrait (reduces contrast), Custom (allows individual adjustments to saturation, contrast and sharpness), and Black and White.
- White Balance: Adjusts the overall color balance of the image to match the light source. Options include Auto, White Balance Preset (a custom mode), Daylight, Incandescent, Fluorescent, Cloudy, and Flash.
- ISO Sensitivity: Options include Auto, 64, 100, 200, 400, 800, 1,600, 2,000, and 3,200. At ISO 3,200, image size is restricted to 5-Mp (2,592 x 1,944) or less.
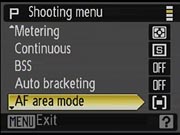 Metering: There are four exposure metering options: Matrix, Center-weighted, Spot, and Spot AF Area. The default Matrix reads the whole frame to determine the correct exposure. Center-weighted also reads the whole frame but puts more emphasis on the central portion. Spot reads just a small part of the center of the scene. Spot AF Area also reads just a small part of the scene, but that area is determined by the selected focus area.
- Continuous: This option determines shutter behavior. Single mode takes just one shot each time the Shutter button is pressed. Continuous mode can take up to eight shots at a rate of 0.8 frames per second with Normal image quality at 10-Mp image size. Continuous Flash mode can take up to three shots using flash at a rate of 0.8 fps. The flash must recharge before you can resume shooting in this mode. Interval Timer Shooting fires the shutter automatically at specific intervals. Options include 30 seconds, 1, 5, 10, 30, and 60 minutes.
- BSS: Enables or disables Best Shot Selector, which simply saves the largest (and therefore sharpest) JPEG in a series of up to 10 shots. The first shot in the series sets focus, exposure and white balance. Flash is disabled.
- Auto Bracketing: Varying exposure automatically over a series of shots, bracketing can be adjusted to either 0.3-step intervals (0 EV, +0.3 EV, -0.3 EV), 0.7-step intervals, or full-step intervals. Not available in Manual mode.
- AF Area Mode: Auto, recommended for snapshots, selects the closest subject in nine focus areas in the center of the scene. Manual enables the Multi-Selector to navigate 99 focus areas in the center of the scene. Press OK to end the navigation and OK again to change the focus area. Center focuses on the subject at the very center of the frame (holding down the Shutter button halfway locks focus so you can recompose the shot). The active target flashes green when the camera has found focus, red when it can not. In Auto mode, you have to half press the Shutter button to confirm what part of the subject the camera is focusing on.
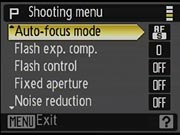 Auto-Focus Mode: Sets whether the camera focuses only when the Shutter button is pressed halfway (Single AF) or continuously until the Shutter button is pressed halfway (Full-time AF). In Movie mode, Single AF locks focus when the Shutter button is first pressed, preventing the microphone from recording the sound of the camera focusing.
- Flash Exposure Compensation: Adjust the flash level from -2.0 EV to +2.0 EV in 1/3 EV increments.
- Flash Control: The Auto setting uses the built-in flash when no external flash is attached. Built-in Off disables the built-in in favor of the external flash, even when the camera doesn't detect an external flash attached. (Handy for use with third-party flashes, which the camera may not recognize.)
- Fixed Aperture: Holds aperture as constant as possible throughout zoom range (helpful when using an external flash with manually-set flash exposure).
- Noise Reduction: Reduce noise in pictures taken at slow shutter speeds.
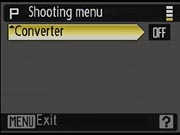 Converter: Sets up the camera for either the WC-E67 wide angle (24mm) or TC-E3ED telephoto (378mm) converter. If the wide angle converter is selected, a further option specifies whether Distortion Control is on or off.
- None: Do not optimize the camera for any converter lens.
- Wide-Angle Converter: Optimize the camera for the wide angle converter with a further option to specify whether Distortion Control is on or off. (Distortion control can remove the barrel distortion caused by both the camera lens and wide-angle converter.) Zoom all the way out to the widest angle focal length for use with the wide-angle converter.
- Telephoto Converter: Optimize the camera for the telephoto converter. Zoom all the way in, restricting zoom to telephoto focal lengths and disabling Focus Mode options.
Playback Menu: Accessed by pressing the Menu button in Playback mode, these options include:
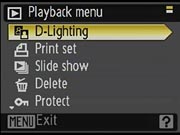 D-Lighting: This option enhances contrast and brightness in the shadow areas of the image. This feature can help backlit subjects, which are often underexposed. Thumbnails of the original and the corrected versions are displayed along with a confirmation dialog. If confirmed, the corrected version is saved as a new file, leaving the original undisturbed.
- Print Set: Allows you to create digital print orders for printing on a DPOF or PictBridge device or to delete print sets.
- Slide Show: Automatically plays back captured images on the memory card or internal memory. You can set the frame interval and set whether the show loops.
- Delete: Allows you to erase all images or selected images from the memory card or internal memory.
- Protect: Write-protects the current image (or removes protection), preventing it from being deleted or manipulated in any way except with card formatting.
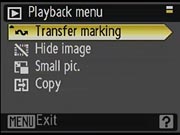 Transfer Marking: Marks images for transferring to a computer once connected. You can opt to mark all images or just selected images.
- Hide Image: Hides or reveals the selected image. Hidden images are protected from deletion except when formatting.
- Small Pic.: Creates a smaller copy of the current image. Choices are 640 x 480, 320 x 240, and 160 x 120.
- Copy: Copies files between the internal memory and memory card.
- Crop: While not strictly a Menu option, an image can be cropped when zoomed in by pressing the Menu button itself. Cropped images are saved as new files.
Setup Menu: This menu, which sets basic camera behavior, is only available on the Mode Dial.
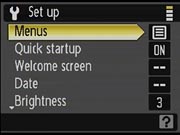 Menus: Select between text or icon display of menu options. Icon display fits more options on the screen at a time, but the icons can be a little cryptic.
- Quick Start: When enabled, the Welcome Screen and Startup Sound are disabled, providing a much quicker startup that waits only for the lens to extend.
- Welcome Screen: If Quick Start is disabled, start up will display either the Nikon Coolpix logo, the default animation sequence, or select an image of your own from either the camera's internal memory or the memory card (which is copied to the camera for use when the card is removed).
- Date: Sets the camera's internal clock and calendar. You can also set the Time Zone for home and travel destinations.
- Brightness: The brightness of the LCD monitor can be changed from the default setting of three on a scale of five.
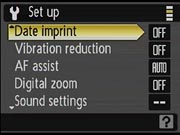 Date Imprint: Imprints the image capture date and time on the image. Options are Off, Date, Date and Time, and Date Counter (number of days between shooting date and a selected date, such as a birthday - The camera can store up to three different reference dates).
- Vibration Reduction: On by default, this option can disable the P5000's optical image stabilization feature for shooting on a tripod or when taking action shots. VR adds a slight post-capture delay.
- AF Assist: If enabled, the camera will use a bright orange beam to help set focus in dimly-lit scenes.
- Digital Zoom: Allows up to 4x digital zoom in addition to the 3.5x optical zoom when enabled. Crop mode, not available at the largest image sizes (10M, 3:2 and 16:9), limits digital zoom to magnifications at which cropping rather than interpolation can be used.
- Sound Settings: Controls the camera's Button (On, Off), Shutter(1, 2,3, or Off), and Volume (Loud, Normal, Off) sound options.
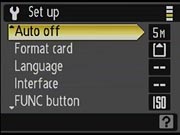 Auto Off: Sets the period of inactivity before the camera will shut itself off. Options are 30 seconds or 1, 5, or 30 minutes. Regardless of the option selected, the monitor will remain on for three minutes when menus are displayed, and 30 minutes during a Loop slide show.
- Format Memory/Format Card: This option formats either the internal memory or any inserted memory card, erasing all files (even protected ones).
- Language: Sets the menu language to one of 20. (More than just about any other cameras we've reviewed.)
- Interface: Sets the USB, Video, and Auto Transfer interface options. USB choices are MTP/PTP or Mass Storage, Video choices are NTSC or PAL, and Auto Transfer marks all newly-shot images for transfer.
- FUNC Button: Sets the Function button on the back panel to control ISO Sensitivity, Image Quality, Image Size, White Balance, or Vibration Reduction.
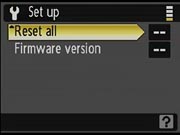 Reset All: Resets all camera settings to their defaults.
- Firmware Version: Displays the camera's current firmware version.
 Fujifilm GFX 50S Review
 Fujifilm X-T3 Review
 Olympus E-M5 III Review

Follow Imaging Resource