Nikon Coolpix 8800By: Shawn Barnett & Dave EtchellsNikon improves on its flagship 8 megapixel prosumer camera with a longer zoom and vibration reduction to improve long handheld shots. <<Design :(Previous) | (Next): Optics>> Page 4:ViewfinderReview First Posted: 09/16/2004, Updated: 11/23/2004 |
Viewfinder
 A
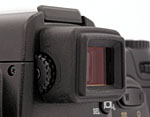
feature in the 8800 that came in with the Coolpix 5700 is the electronic viewfinder
(EVF), essentially a miniaturized version of the LCD monitor, complete with
information and menu screens, but sheltered from the sun behind a traditional
viewfinder eyepiece with an "optical viewfinder" feel. The Monitor
Select button on the right side of the viewfinder switches the view back and
forth between the EVF and LCD monitor displays. Though you can call up the LCD
menus in the EVF display, I found it rather tedious to actually make menu selections
that way. It's much easier to use the larger display of the LCD monitor for
menu navigation. Still, the EVF's informative display reports exposure settings,
camera mode settings, and battery information, all of which are useful during
normal operation. The EVF comes in handy when shooting outside in extremely
bright sunlight that washes out the LCD, or when nearby reflections just make
viewing an otherwise good outdoor LCD uncomfortable. A diopter adjustment dial,
tucked on the left side of the eyepiece, adjusts the view to accommodate eyeglass
wearers, and the micro-LCD used in the 8800's EVF has higher than average resolution,
with 235,000 pixels (101,000 more than the rear-panel LCD display). The high
eyepoint of this viewfinder allows eyeglass wearers to see the entire image
while wearing their glasses. Through the Setup menu, you can specify whether
the EVF or LCD monitor automatically activates by default at camera startup.
A
feature in the 8800 that came in with the Coolpix 5700 is the electronic viewfinder
(EVF), essentially a miniaturized version of the LCD monitor, complete with
information and menu screens, but sheltered from the sun behind a traditional
viewfinder eyepiece with an "optical viewfinder" feel. The Monitor
Select button on the right side of the viewfinder switches the view back and
forth between the EVF and LCD monitor displays. Though you can call up the LCD
menus in the EVF display, I found it rather tedious to actually make menu selections
that way. It's much easier to use the larger display of the LCD monitor for
menu navigation. Still, the EVF's informative display reports exposure settings,
camera mode settings, and battery information, all of which are useful during
normal operation. The EVF comes in handy when shooting outside in extremely
bright sunlight that washes out the LCD, or when nearby reflections just make
viewing an otherwise good outdoor LCD uncomfortable. A diopter adjustment dial,
tucked on the left side of the eyepiece, adjusts the view to accommodate eyeglass
wearers, and the micro-LCD used in the 8800's EVF has higher than average resolution,
with 235,000 pixels (101,000 more than the rear-panel LCD display). The high
eyepoint of this viewfinder allows eyeglass wearers to see the entire image
while wearing their glasses. Through the Setup menu, you can specify whether
the EVF or LCD monitor automatically activates by default at camera startup.
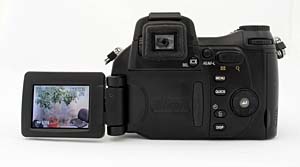
The 1.8-inch, 134,000-dot, low-temperature polysilicon TFT color LCD monitor features a swivel design, plus brightness and hue adjustment. The LCD monitor actually lifts up off of the back panel, flipping out toward the left side of the camera. Once opened, the LCD monitor can swivel around to face up or down over about a 270 degree range of rotation. You can also turn the LCD monitor around to face the camera and then close it to protect the monitor from any accidental scratches. I really like swiveling LCD designs, as they greatly increase the camera's shooting flexibility, allowing you to hold the camera at a variety of angles and still clearly see the LCD display. (They're particularly handy for over-the-head shots in crowds, or for ground-level macro shooting.)
A nice touch in the Coolpix 8800's LCD viewfinder implementation is that you can adjust not only the viewfinder brightness, but its color (hue) as well. A menu option lets you adjust the viewfinder color toward either the blue or the red ends of the spectrum, to help match the viewfinder display to the actual color balance of your captured images. I applaud this, but note that having control only over blue/red tints is only a partial solution. (Technically, you need separate controls for red, green, and blue, in order to be able to completely control the display color. You could getaway with only varying two of these relative to the third, but I suspect that full control would result in a bewildering user interface. Still, I'd like to see some attempt to offer more complete color adjustment. Big kudos to Nikon for providing any sort of LCD hue adjustment though.)
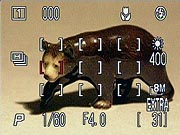 The
Coolpix 8800 features a new 9-point auto focus system. The camera automatically
chooses between nine different autofocus zones, or you can lock it in on any
one of them manually. In auto mode, only the areas the camera chooses will be
illuminated in red; otherwise they do not appear. In manual mode, all nine points
appear onscreen at all times, shown in white, while the selected point appears
in red.
The
Coolpix 8800 features a new 9-point auto focus system. The camera automatically
chooses between nine different autofocus zones, or you can lock it in on any
one of them manually. In auto mode, only the areas the camera chooses will be
illuminated in red; otherwise they do not appear. In manual mode, all nine points
appear onscreen at all times, shown in white, while the selected point appears
in red.
 Beyond
the zone-based AF indication though, the Coolpix 8800's viewfinder offers a
number of display options in capture mode. Pressing the DISP button cycles through
the various options, which include a basic display showing no information at
all (in Manual AF mode, the nine AF points appear), a display that includes
information on a fair number of camera settings, a display with a live histogram
graph overlaid on the image, and a new mode that adds a rectangular alignment
grid.
Beyond
the zone-based AF indication though, the Coolpix 8800's viewfinder offers a
number of display options in capture mode. Pressing the DISP button cycles through
the various options, which include a basic display showing no information at
all (in Manual AF mode, the nine AF points appear), a display that includes
information on a fair number of camera settings, a display with a live histogram
graph overlaid on the image, and a new mode that adds a rectangular alignment
grid.
 A
Quick Review function lets you quickly check the last exposure while still in
record mode, simply by pressing the Quick Review button above the LCD screen.
This isn't an uncommon feature on digicams, but what's absolutely unique on
the Coolpix cameras is the "picture in picture" review mode (shown
here), which opens a playback window in the upper left-hand corner of the display
screen, while keeping the viewfinder image live on the remaining LCD area. Note
too, that this image isn't restricted to the most recently captured photo. You
can scroll through all the images on the memory card by pressing the rocker
button arrows. The first press of the Quick Review button activates the picture
in picture review mode, a second press enables full-screen playback, and a third
press returns you to full capture mode. At any point, pressing the Shutter button
returns you to capture mode and snaps a picture.
A
Quick Review function lets you quickly check the last exposure while still in
record mode, simply by pressing the Quick Review button above the LCD screen.
This isn't an uncommon feature on digicams, but what's absolutely unique on
the Coolpix cameras is the "picture in picture" review mode (shown
here), which opens a playback window in the upper left-hand corner of the display
screen, while keeping the viewfinder image live on the remaining LCD area. Note
too, that this image isn't restricted to the most recently captured photo. You
can scroll through all the images on the memory card by pressing the rocker
button arrows. The first press of the Quick Review button activates the picture
in picture review mode, a second press enables full-screen playback, and a third
press returns you to full capture mode. At any point, pressing the Shutter button
returns you to capture mode and snaps a picture.
 In Playback mode, the LCD offers a wealth of information via several display
pages. In total, no fewer than six information screens are available, accessed
by first pressing the DISP button then turning the Command dial in playback
mode. The first display is the standard Playback information readout, which
reports the date and time of the shot, file name, quality setting, and the image
number on the card. The next three screens report a long listing of camera and
exposure settings, including the firmware version, focal length, shutter speed,
ISO, etc. A fourth information page shows a histogram view of the image, illustrating
the distribution of brightness values in the image, with the left edge corresponding
to pure black, and the right edge to pure white. Once you learn how to read
it, a histogram is very useful in determining whether you've managed to capture
a good exposure or not. Ideally, a well-exposed image would produce a histogram
curve that just filled the graph from left to right, indicating that it contained
a full range of tonal values. The final information screen shows lens, shutter,
and focus settings, and indicates (by the red brackets) what the autofocus system
had locked onto when the picture was taken. Histogram displays won't always
show you if only a small portion of your image is blown-out: To address this
need, the 8800 blinks those parts of the image that are overexposed, letting
you see exactly where you're losing highlight detail. Very nice. (Although
I've generally found the 8800's blinking highlights a little too aggressive
in what they choose to warn you about.)
In Playback mode, the LCD offers a wealth of information via several display
pages. In total, no fewer than six information screens are available, accessed
by first pressing the DISP button then turning the Command dial in playback
mode. The first display is the standard Playback information readout, which
reports the date and time of the shot, file name, quality setting, and the image
number on the card. The next three screens report a long listing of camera and
exposure settings, including the firmware version, focal length, shutter speed,
ISO, etc. A fourth information page shows a histogram view of the image, illustrating
the distribution of brightness values in the image, with the left edge corresponding
to pure black, and the right edge to pure white. Once you learn how to read
it, a histogram is very useful in determining whether you've managed to capture
a good exposure or not. Ideally, a well-exposed image would produce a histogram
curve that just filled the graph from left to right, indicating that it contained
a full range of tonal values. The final information screen shows lens, shutter,
and focus settings, and indicates (by the red brackets) what the autofocus system
had locked onto when the picture was taken. Histogram displays won't always
show you if only a small portion of your image is blown-out: To address this
need, the 8800 blinks those parts of the image that are overexposed, letting
you see exactly where you're losing highlight detail. Very nice. (Although
I've generally found the 8800's blinking highlights a little too aggressive
in what they choose to warn you about.)
 Also in Playback mode, the LCD offers a thumbnail index display, showing either
four or nine images to a page depending on the setting. The Zoom Rocker button
controls the index display, as the wide-angle side of the zoom lever increases
the number of thumbnails displayed (from one to four to nine). The telephoto
side returns to the single image display, and also activates the playback zoom,
which enlarges the displayed image up to 10x. When you're zoomed in on an image,
you can pan around the image with the rocker control. Pressing the shutter also
captures a cropped image of the current LCD display and saves it as a new file.
You can then zoom in on the cropped image even further. An unexpected plus.
Also in Playback mode, the LCD offers a thumbnail index display, showing either
four or nine images to a page depending on the setting. The Zoom Rocker button
controls the index display, as the wide-angle side of the zoom lever increases
the number of thumbnails displayed (from one to four to nine). The telephoto
side returns to the single image display, and also activates the playback zoom,
which enlarges the displayed image up to 10x. When you're zoomed in on an image,
you can pan around the image with the rocker control. Pressing the shutter also
captures a cropped image of the current LCD display and saves it as a new file.
You can then zoom in on the cropped image even further. An unexpected plus.
EVF Under Low Light
In playing with the 8800's EVF, I was pleased to discover that Nikon has
improved its functioning over that of the 8700, in a way that I'd asked for.
On the 8700, the EVF responded to the camera's ISO setting pretty directly:
Higher ISOs produced brighter EVF displays under darker conditions. I discovered
though, that changes in EVF sensitivity lagged changes in the ISO setting by
a few seconds. The viewfinder display was at least somewhat usable down to surprisingly
low light levels with the ISO set to 400, but it took a good 6-10 seconds for
the display to brighten after changing from a lower ISO setting. If I wanted
to shoot at lower ISO settings to minimize image noise, I had to set the ISO
up to 400 to frame the shot, then dial it back down to whatever value I wanted
to shoot at. This was feasible, but far from convenient.
In the 8800, the Nikon engineers have implemented what amounts to a "viewfinder only" ISO boost, that dramatically increases the sensitivity of the EVF and rear-panel LCD viewfinder under low light conditions, regardless of the ISO selected to shoot at. This viewfinder sensitivity boost is still applied fairly slowly, in that it can take a number of seconds for the viewfinder display to become usable in dark conditions after the camera has been exposed to bright lighting, but this seems like an entirely acceptable solution. - There's no longer any need to jack up the ISO just to frame the subject, then set it back down to actually take the shot. The net result is that the 8800's EVF is one of the best at low light levels that I've yet seen, usable down to 1/16 foot-candle. (That's about 4 f-stops down from typical city street lighting at night.) Kudos to the Nikon engineers, and thanks for listening to my suggestions!

Follow Imaging Resource: