Nikon Coolpix L12 Operation
Despite the Nikon Coolpix L12's limited manual control, the camera nice selection of external control buttons make for an easy-to-navigate user interface. Flash mode, Self-Timer mode, Macro mode, Record mode, Playback mode, Exposure Compensation, and an Erase function are all accessible via external controls. The Mode switch on the bottom of the back panel of the camera selects the main operating mode, while a multi-directional rocker control on the back panel navigates through on-screen menus and accesses some camera features directly. The LCD menu system is fairly short, with user-friendly icons in the Scene Assist modes, and easy to read large-print text for most menu selections. If you like, you can choose an icon-based menu system instead of the textual one, but I found the text-based menus much easier to understand and navigate. Operating the Nikon L12 is so straightforward I doubt you'll need the manual for much more than reference. It shouldn't take more than a few minutes to get into the swing of things.
 Record Mode LCD Display: In Record mode, the Nikon Coolpix L12's LCD reports limited status information, including Recording mode, the image size/quality setting, number of exposures remaining, battery level if the battery starts running low, etc. Half-pressing the Shutter button changes two white brackets to a teal color when focus is achieved. If focus is not achieved, the brackets show red. The Nikon Coolpix L12 doesn't show aperture or shutter speed information as some do, a feature that I personally miss seeing. If flash is not engaged and lighting is poor, the camera will display an ISO icon to indicate that light sensitivity is being automatically raised.
 Playback Mode LCD Display: In Playback mode, the Nikon Coolpix L12's LCD reports the date and time of capture, file name, image series number, resolution/quality setting, and more. It also displays an icon if the image is one that's been selected for quick download with Nikon's host software, as well as an icon indicating that you can record an audio note to accompany the image. Pressing the face-icon button on the top panel brings up a screen for D-Lighting, letting you choose whether or not to apply this exposure equalization. There's an option for disabling the information overlay in the Set-Up menu under Monitor settings but no "Show & Hide" info option as there is on most digital cameras. Pressing the Nikon Coolpix L12's zoom lever toward the wide-angle end zooms out to a four-image thumbnail view of photos stored on the card. Pressing it in the wide-angle direction a second time shows a nine-image thumbnail display, and a third press shows a 16-image display. Pressing the zoom control in the telephoto direction zooms in as much as 8x on the subject, handy for checking image details and focus.
Nikon Coolpix L12 Modes and Menus
Auto Record Mode: Activated by sliding the Nikon Coolpix L12's Mode switch to the Auto position (green camera icon), this mode places the camera in control of both aperture and shutter speed, as well as most other exposure features. Pressing the Menu button displays the following Shooting menu:
- Set Up: Displays a screen of submenus of configurable options, including:
 Shooting Menu: Takes you back to the Shooting menu, exiting the Setup Menu.
- Menus: Switches menus between lines of text and banks of icons.
- Quick Startup: Enables and disables the quick startup option (disables the welcome screen).
- Welcome Screen: Selects a static or animated Nikon startup screen, or lets you select an image of your own to appear when the camera starts up.
- Date: Sets time, date, and time zone.
- Monitor Settings:
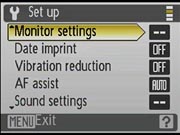
- Photo Info: Sets the monitor to Show info or Hide picture info, or Auto, to have it appear momentarily.
- Brightness: Adjusts the brightness of the LCD display.
Date Imprint: Disables or selects among Date, Date and Time, or Date Counter to imprint on each image captured. - Vibration Reduction: Turns Vibration Reduction on and off.
- AF Assist: Sets the AF-assist light to either Auto or Off.
- Sound Settings: Toggles Button sound on or off, adjusts volume for Shutter.
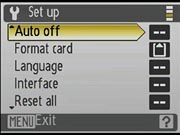 Auto Off: Sets the camera to power down after 30 seconds, one minute, five minutes or 30 minutes of inactivity, and toggles Sleep Mode on or off.
- Format Memory/Card: Formats the internal memory or SD memory card. Language: Select among 20 languages, including Czech, Danish, German, English, Spanish, French, Indonesian, Italian, Dutch, Norwegian, Polish, Portuguese, Russian, Finnish, Swedish, Simplified Chinese, Traditional Chinese, Japanese, Korean, or Thai.
- Interface: Sets USB mode to PTP or Mass Storage, Video mode to NTSC or PAL, and toggles Auto Transfer on or off. The PTP option supports automatic processing of camera images under Windows XP and Mac OS X operating systems (unless you want to mount the camera on the desktop), while Mass Storage is best for older operating systems. Mass Storage makes the camera appear as a hard drive to the operating system when plugged in via the USB cable.
- Reset All: Resets options to the factory defaults.
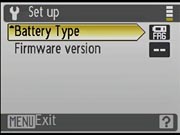 Battery Type: Allows you to tell the camera whether you are using Alkaline, NiMH, or Lithium AA batteries.
- Firmware Version: Shows the camera's current firmware version.
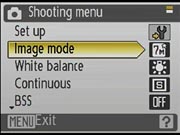 Image Mode:
- High (3072): 3,702 x 2,304 pixels with least compression
- Normal (3072): 3,702 x 2,304 pixels (default setting)
- Normal (2592): 2,592 x 1,944 pixels
- Normal (2048): 2,048 x 1,536 pixels
- PC Screen (1024): 1,024 x 768 pixels
- TV Screen (640): 640 x 480 pixels
- 16:9: 3,072 x 1,728 pixels
- White Balance: Chooses from Auto White Balance, PRE for custom presetting of white balance, Daylight, Incandescent, Fluorescent, Cloudy, and Flash.
- Continuous: Chooses among Single, Continuous, or Multi-Shot 16 capture modes.
 BSS: Best Shot Selector shoots up to 10 shots and picks the one with the least blur from camera shake or poor focus. Flash is automatically turned off in this mode, since it is intended for capture of natural light photos in low light.
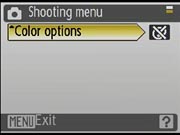
- Color Options: Sets the color mode to Standard, Vivid, Black and White, Sepia, or Cyanotype.
Scene Mode: This mode provides access to the Nikon Coolpix L2's 15 Scene modes.
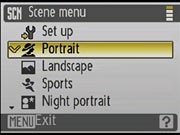 Set Up: Displays the same menu as Auto mode.
- Portrait: For portrait or soft skin effects, with slow shutter speeds and noise reduction if necessary.
- Landscape: Focus is set at infinity. This option is used for landscapes, cityscapes, and portraits featuring a landmark in the background.
- Sports: Enable Continuous shooting mode.
- Night Portrait: For portraits against a night scene background. Camera shake may occur. Noise reduction may be enabled.
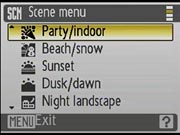 Party/Indoor: For candlelit scenes and other indoor background lighting. Focus is set to center of frame and noise reduction may be enabled.
- Beach/Snow: Preserves the brightness of sunlit water, sand, or snow by boosting the exposure.
- Sunset: Preserves the intense hues of sunsets or sunrises with focus set at infinity. Noise reduction may be enabled.
- Dusk/Dawn: For landscapes in natural light at dusk or before dawn with focus set at infinity. Noise reduction may be enabled.
- Night Landscape: Slow shutter speeds for night shots (tripod recommended) with focus set at infinity. Noise reduction may be enabled.
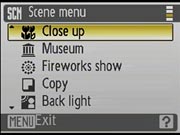 Close-Up: For macro work.
- Museum: Disables flash for natural light photography with focus set on center of the frame.
- Fireworks Show: Captures fireworks using a slow shutter (tripod recommended) with focus set at infinity.
- Copy: For sharp shots of printed text or whiteboard drawings with focus set at center of the frame. Noise reduction may be enabled.
- Back Light: For subjects standing in front of the light. Flash fires automatically in Fill mode with focus set at center of the frame.
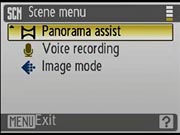 Panorama Assist: To take overlapping pictures that can later be merged into a single panoramic image.
- Voice Recording: Allows audio recording up to the maximum of the remaining memory space.
- Image Mode: Sets image quality and size, as above.
Movie Mode: This mode, indicated by a movie camera icon on the Mode switch, captures moving images with sound as long as the memory card has available space (provided that you have a fast enough memory card). Pressing the Nikon Coolpix L12's Menu button displays the following options:
- Set Up: Displays the same menu as Auto mode.
- Movie Options:
- TV Movie*: 640 x 480 pixels at 30 frames per second
- Small Size*: 320 x 240 pixels at 30 frames per second
- Small Size: 320 x 240 pixels at 15 frames per second
- Smaller Size: 160 x 120 at 15 frames per second
- Stop Motion Movie: Pictures can be taken at different intervals and joined into a silent movie.
- Auto Focus Mode: Selects Single AF (focuses only when shutter button is pressed) or Continuous AF (camera is always focusing, which uses more battery power and makes some moderate repetitive motor sounds).
Playback Mode: Pressing the Playback button on the Coolpix L12's back panel instantly enters Playback mode. Here, you can review captured images and movies, erase, enlarge, copy, and protect images, and also set them up for printing. Pressing the Menu button offers the following options:
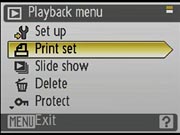 Set Up: Displays the same menu as Auto mode.
- Print Set: Sets the DPOF settings for captured images. The "Print Selected" option calls up an index display, letting you mark individual images for printing. Once images are marked, you can establish whether any text is overlaid on the image (such as image information or the date and time). You can also cancel print settings here with the "Delete Print Set" button.
- Slide Show: Automates a slide show of all still images on the memory card with three seconds between shots. You can also enable a looped playback that will play for 30 minutes before the camera goes into standby mode.
- Delete: Erases selected images from the memory card, or all images (except for write-protected ones).
- Protect: Write-protects individual images from accidental erasure or manipulation. A special display of the images on the card appears, which you scroll through and select images to be "locked." Protected images are only deleted through card formatting.
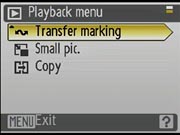 Transfer Marking: Marks all images or allows user to select specific images for auto transfer when the camera is connected to a computer running Nikon's software.
- Small Picture: Creates a lower resolution copy of an image with this tool, choosing from 640 x 480, 320 x 240, or 160 x 120. Great for pictures you know you'll want to email.
- Copy: Quickly copy images from internal to external memory or vice versa. Great for images you want to bring along or keep in memory for the startup screen.
 Fujifilm GFX 50S Review
 Fujifilm X-T3 Review
 Olympus E-M5 III Review

Follow Imaging Resource