This page has been formatted to facilitate printout of the review.
Use your browser's "Back" button to return to the previous page, or the links at the top and bottom of this page to navigate to related information. If you have difficulty fitting the text on this page onto your printer output, simply resize your browser window to a narrower width and print again.
Remember us when it's time to buy!
Dave here: Have our reviews been helpful to you? (Is this article you're reading right now useful?) Preparing this level of information on as many products as we do is incredibly hard work, not to mention expensive. Things on the Internet may look like they're free, but they're not. (As a lot of big dot.com companies are finding out these days.) Somewhere, somebody has to pay to produce worthwhile content. YOU can help us though, by remembering us when it comes time to make your purchase. Would you consider coming back to our site and clicking-through to one of our advertisers to make your purchase? Every dollar you spend with one of our advertisers helps us directly (in affiliate fees) or indirectly (the advertiser will keep renewing their ad contract with us). To make it easy for you to support us, here's a URL you can visit, to see all our current advertisers, with links to click on that will register your visit to them as having come from our site. It's up to you where you buy, but Mike, Mike, Kim, Yazmin, Marti and I would be really grateful if you'd help us out by choosing one of our advertisers to purchase from.
Thank you for your support!
Dave Etchells, Founder & Publisher
Visit our "Buy Now" Page:
https://www.imaging-resource.com/buynow.htm
 Back
to Full Nikon D1 Review
Back
to Full Nikon D1 Review
Go to Nikon D1
Data Sheet
Go to Nikon D1
Pictures Page
Up to Imaging Resource Cameras
Page
Nikon D1
The D1 WonderCam!
Review First Posted: May 12, 2000
|
MSRP $5580 US
|
| |
* |
True Nikon pro SLR that just
happens to be digital
|
|
* |
2.66 megapixel CCD, 2012 x
1312 pixel images
|
|
* |
ISO of 200, 400, 800,
1600
|
|
* |
4.5 frames per second,
super-fast shutter delay! |
|
* |
Part of Nikon "Total Imaging
System" - Compatible with 90% of all Nikon F-mount lenses ever
made! |
| |
|
|
|
Manufacturer
Overview
Nikon is one of the names that literally needs no
introduction in the world of photography. Long a leader in the film world, they
offer cameras for both the serious amateur and working professional. Their
professional line contains cameras like the legendary F3, continuously produced
for over 20 years now, and new "legends in the making" like the F5 and F100,
renowned for their toughness and advanced features. In the digital world, Nikon
has developed a commanding presence in the "prosumer" market with their Coolpix
series. They broke new ground for usability and features with their Coolpix 900
a couple of years back, building on that success with the 2 megapixel 950, and
now the 3 megapixel 990. The "Nikon Total Imaging System" also includes the
hugely successful LS-2000 and LS-30 Coolscan film scanners, which we've reviewed
previously.
About a year ago (in early 1999), Nikon announced their first
all-digital professional SLR, the D1. At the time, the specifications and
projected price point (2.7 megapixels and a list price of $5850 for the body)
rocked the pro camera world, and left many wondering whether Nikon could
actually do it. Well, it's now a year later, and Nikon's production is finally
starting to catch up with demand. (At least to the point that they were willing
to spring loose an evaluation unit for our testing.) Did Nikon hit the mark? We
think the answer is a resounding "yes": The D1 looks, works, and feels like a
Nikon SLR in every respect, and the image quality matches its performance in
other areas. But we're getting ahead of ourselves: Read on for all our findings
about this remarkable camera.
The all-Nikon, all-digital
studio!
Nikon announced two other products at the same time as the D1,
which combine with it to bring new capabilities to studio photographers. The
first is an exceptional tilt/shift macro lens, the PC (for perspective
correction) Micro Nikkor 85mm 1:2.8 D. This amazing lens provides greater tilt
and shift capabilities than any other lens currently on the market for the 35mm
format. The result is to convey to the D1 (and other Nikon SLRs) many of the
perspective and depth-of-field controls traditionally associated with
large-format view cameras. The second announcement was a special version of
their SB-28 speedlight, the SB-28DX. This new unit was designed specifically to
work with the D1 in TTL (through the lens) metering mode. The SB-28DX is also
impressive because it offers the capability to combine multiple speedlights into
a single system, all controlled by the camera through its TTL flash
metering.
The net result is a remarkably capable digital photography
system for studio work, all available from a single manufacturer. The small size
of the SB-28DX units makes them ideal for location work as well. For product
photography, the tilt/shift capabilities of the new PC Micro Nikkor mean you can
finally gain control over the perspective distortions typical in tabletop
photography setups. (Caused by the need to tilt the camera down on the subject,
causing converging parallels.) Likewise, the tilt capability can drastically
increase or decrease the effective depth of field, making it a cinch to
get all of the product into
focus. We saw these related developments as so significant that we imposed upon
Nikon to lend us not only the D1, but one of the first units of the PC Micro
Nikkor released for review anywhere, as well as a pair of SB-28DX speedlights,
and the miscellaneous cabling and adapters necessary to tie them together into
an integrated system with the D1. The results were very impressive, and are
detailed in separate "All-Nikon All-Digital Studio" report.(Sorry, that report's not quite ready
yet, but coming soon!)
Highlights
- 2.7 megapixel, 23.7 x 15.6 mm, 12 bit RGB CCD delivering 2000 x 1312 pixel
images.
- Single-lens reflex digital camera with interchangeable lenses (Supports
essentially all standard Nikon F mount lenses).
- Variable ISO (200, 400, 800 and 1600, 3200 and 6400 in "sensitivity up"
modes).
- TTL optical viewfinder with detailed information display.
- 2 inch, low temperature polysilicon TFT LCD with 114,000 pixels.
- Program, Shutter Priority, Aperture Priority and Manual exposure
modes.
- Continuous Shooting mode capturing up to 21 images at up to 4.5 frames per
second.
- Variable white balance with Auto, Preset, Incandescent, Fluorescent,
Direct Sunlight, Flash, Overcast and Shade
- Plus/Minus fine adjustment (arbitrary units) on white balance
settings.
- TTL autofocus with Single-Area or Dynamic-Area options.
- Topside hot shoe for external flash connection of Nikon Speedlight SB-28DX
flash as well as a second flash sync socket.
- TTL Matrix flash exposure, independent of ambient-light exposure
computation
- Front-Curtain Sync, Red-Eye Reduction, Red-Eye Reduction with Slow-Sync,
Slow Sync and Rear-Curtain Sync flash sync modes. (With compatible external
speedlight.)
- 3D Color Matrix, Center-Weighted and Spot metering options.
- Adjustable exposure compensation from -5 to +5 EV(!) in 1/3 EV increments
in all exposure modes.
- Shutter speeds from 30 to 1/16,000 seconds in 1/3 increments, and a Bulb
setting for longer exposures.
- Self-timer with a duration from two to 20 seconds.
- Secondary shutter release with lock for vertical-format shooting.
- Image storage on CompactFlash Type I or II.
- JPEG, uncompressed TIFF (RGB-TIFF and YCbCr-TIFF) and RAW data file
formats.
- DPOF (Digital Print Order Format) compliant.
Executive
Overview
We couldn't wait to get our hands on the Nikon D1!
(We're highly partial to cameras offering full manual control and loads of
features, and use Nikon prosumer SLRs for our own film-based photography.) With
a body design reminiscent of Nikon's high-end 35mm SLR, the F5, the D1 offers a
familiar look and feel for film-based pros, and is quick to get to know. The
standard Nikon F lens mount means that you can attach most of Nikon's 35mm
lenses with no problem (great for current Nikon 35mm shooters who already have a
full kit of lenses). Although the D1 is quite a bit heavier (2.5 lb. or 1.1 kg)
than the prosumer-level digicams we've reviewed in the past, we feel pretty
confident that pocket-sized portability isn't much of an issue with this
camera's potential buyers, all of whom will value the extraordinary control
provided by the D1 far above a few ounces of extra weight. Also, the weight is
due in part to the incredibly rugged magnesium metal body, which creates a rigid
optical platform designed to absorb unreasonable abuse with aplomb. (Handy for
pounding tent pegs while on safari. ;-) We were pleased to see the inclusion of
an external flash hot shoe on top of the camera as well as an external flash
sync socket in the design, giving you as much flash flexibility as any high-end
film-based Nikon SLR.
The very accurate TTL optical viewfinder means that
you have no need for the LCD panel as a viewfinder, saving some on battery power
consumption. (By its nature, barring a "pellicle" mirror, the very design of an
SLR precludes a "live" LCD viewfinder.) In addition to a dioptric adjustment
dial and a sliding protective cover, the viewfinder features a very detailed
information display that reports most of the camera's exposure settings and also
shows a set of five focus targets. An extremely flexible autofocus system means
that you can determine the type of autofocus (single, continuous or manual),
designate how it's used (single area, dynamic area, etc.) and even designate the
location of the autofocus target within the frame. Exposure-wise, there are so
many features on this camera that you'll have to read the entire review to get
them all. We'll just mention a few here that we find particularly
noteworthy.
To begin, you have the option of working in Program AE,
Aperture Priority, Shutter Priority or Manual exposure modes. Exposure settings
are easily changed by using a combination of control buttons and command dials
(no tedious LCD menu system here). An extensive if not somewhat cryptic Custom
Settings menu (accessed by pressing the CSM button and turning the sub and main
command dials) provides access to a huge range of camera settings, including how
various elements of the user interface itself work. For example, you can decide
which command dial controls the shutter speed or aperture, adjust the image
sharpness and contrast, determine whether or not the aperture changes as the
lens zooms or set exposure variables for the automatic bracketing, among many
others (there are 31 Custom Settings menu options in all). With the D1, you have
a much broader exposure compensation range than any other digicam we've seen
(March 2000), with a variable EV adjustment from -5 to +5 in 1/3 EV increments
(the increments can also be altered to 1/2 or one EV unit). White balance also
has a lot of flexibility, with options for Auto, Incandescent, Fluorescent,
Direct Sunlight, Flash, Overcast and Shade, all of which are adjustable from -3
to +3 (arbitrary units) in their intensity.
Three metering modes are
available: Spot, Center-Weighted and a very accurate Color 3D Matrix metering
option. ISO can be set to 200, 400, 800 or 1600, giving you tremendous exposure
flexibility. (Special "sensitivity up" modes are available that extend the
effective ISO to 3200 or 6400, albeit at the cost of pretty severe image noise.)
The auto bracketing feature takes three exposures of the same subject at
different exposure settings (which either you or the camera can control).
There's even a black and white monochrome exposure mode. Continuous Shooting
lets you capture up to 21 consecutive images at up to 4.5 frames per second, and
here again, you can select both the maximum number of shots as well as the frame
rate. The camera's flash sync mode menu lets you select when the flash fires.
Choose from Front-Curtain Sync, Slow-Sync, Rear-Curtain Sync, Red-Eye Reduction
and Red-Eye Reduction with Slow Sync. Because the D1 accommodates a variety of
Nikon's Speedlights, specific flash power and operation will vary depending on
the particular model you're using.
The 2.7 megapixel CCD gives you an
image size of 2000 x 1312 pixels. Image quality options include the usual Basic,
Normal and Fine but also RGB TIFF, YCbCr TIFF and RAW data formats (all listed
under the Hi quality option in the menu system). Image storage is on
CompactFlash Type I or II. As suggested by the Type II card slot, the D1
supports the 340 MB IBM MicroDrive for huge on-the-go storage capacity. The D1
utilizes a custom EN-4 Ni-MH battery pack for power and an AC adapter/charger is
included in the box. (We also highly recommend a spare battery pack). A design
plus we really enjoyed here is that the battery pack and card slot are both
accessible from the sides of the camera, meaning that you don't have to dismount
the camera from the tripod to access either compartment (this is something we
always pay attention to, given the amount of studio work we do).
The full
manual control, lack of LCD reliance and bevy of features will make the D1 a
coveted addition to any photographer's equipment bag. This camera is perfect for
the professional photographer as well as the (well-heeled) advanced amateur
ready for a digicam that's a no-compromise creative tool. We're thrilled to see
the carryover of Nikon's extensive exposure controls and features to the digital
world and glad to see the familiar styling which makes the D1 easy to get
acquainted with. Kudos to Nikon for creating a digital camera that's practical
in the studio and out in the field, with all the exposure and creative control
we could ask for: A true Nikon SLR in every respect!
Design
As
we've noted above, the Nikon D1 is first and foremost a Nikon SLR: It looks a
great deal like some of the professional film-based Nikon cameras currently on
the market, with a particularly strong resemblance to the F5. Its familiar
design and styling make it easy for professional photographers to transition
into the digital arena without having to negotiate a long learning curve.
Weighing in at a hefty 2.5 pounds (1.1 kg) excluding the lens, batteries and
flash, this camera is definitely solid (although we don't think that the
purchaser of this camera is going to be too concerned with pocket-sized
portability). The case and housing convey such a strong sense of impervious
solidity that we searched for some witty simile. Nothing sufficiently clever
came to mind, so we'll just leave you with the comment that it could probably
serve double-duty as a hammer or other cudgel without threat of damage to the
camera itself. The camera measures 6.2 x 6.1 x 3.4 inches (157 x 153 x 86 mm),
also without the lens, batteries and flash.
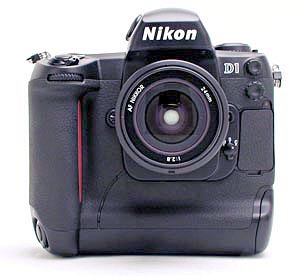
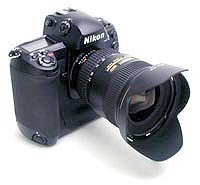
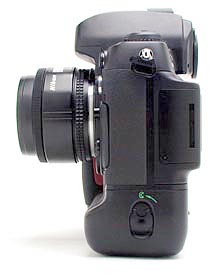
The front of the camera features a standard Nikon F lens mount, complete with
AF coupling and AF contacts. (The D1 body contains the necessary contacts to
support Nikon's latest AF-S "silent wave" autofocus lenses.) There's also a
depth of field preview button, sub- or secondary command dial, sync terminal for
an external flash, 10-pin remote terminal, lens release button, focus mode
selector dial and DC in and video out sockets (protected by a flexible rubber
flap).
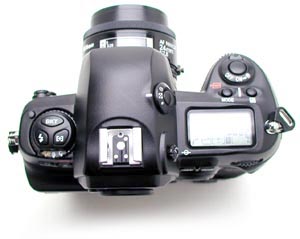
The top of the camera features the power switch, shutter button, mode and
exposure compensation buttons and a small status display panel that reports most
of the camera's settings. Also on top is a diopter adjustment dial for the
optical viewfinder, metering dial, mode dial and several control buttons (flash,
bracketing and AF area mode selector). The top of the camera also contains a hot
shoe for mounting an external flash unit. The hot shoe has the usual trigger
terminal in the bottom, as well as three other contacts for interfacing to Nikon
dedicated speedlights. Neck strap eyelets are located on both ends of the top of
the camera as well.
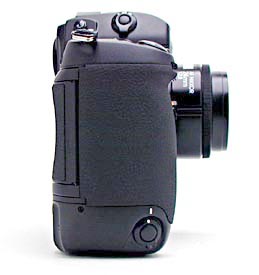
On the hand grip side of the camera, a second shutter release button
makes vertical shooting much easier. There's also a lock to prevent accidental
triggering. (We had a bit of that, until we realized what the rotating ring
around the second shutter button did.)
The opposite side of the camera features the battery compartment, which
locks into place with a sliding latch.
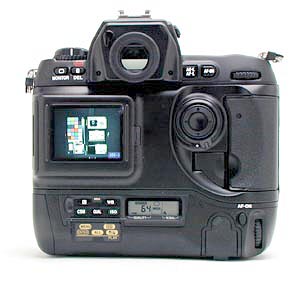
The back panel of the D1 is where most of the action takes place. The
large, bright LCD screen features a removable protective cover which just pops
on and off (if somewhat snugly). The protective cover is a nice idea, as the LCD
projects out the back of the camera further than any other feature, and so would
be subject to abrasion, sliding back and forth across your jacket or shirt
front, if the camera were hanging from a neck strap. Across the top are several
command buttons, including the Monitor, Delete, AE/AF Lock and AF-On buttons, in
addition to the main command dial. The LCD panel rests in the left center of the
back panel, along with a rocker toggle button, card slot cover release button
(beneath a small, plastic flap) and the CompactFlash slot which supports Types I
and II CompactFlash cards. Across the bottom of the back panel is another set of
control buttons beneath a protective metal flap (Menu, Custom setting, Quality,
ISO and white balance button), another status display panel which reports the
quality and white balance settings, an IEEE 1394 ("Firewire") connector and
another AF-On and command dial for vertical shooting.
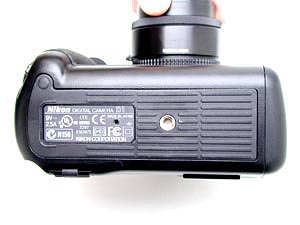
The very
flat bottom of the camera reveals only the metal tripod mount. We appreciate the
fact that neither the batteries nor the CompactFlash slot are accessed from the
bottom of the camera, since it enables you to change the batteries and
CompactFlash card without dismounting from the tripod. The large surface area of
the camera's bottom combines with the high-friction rubberized surface to
produce a very stable mounting surface for use with a
tripod.
Viewfinder
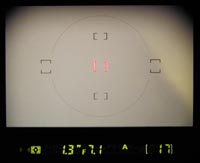 The D1 is equipped with an optical viewfinder
that works through the lens (the LCD monitor is for image playback only). The
circular optical viewfinder features a diopter adjustment dial and a sliding
protective shutter that is manually moved in and out of place by a small lever.
Nikon states that the optical viewfinder provides about 96 percent frame
coverage, which agrees well with our own measurements. An illuminated display
inside the viewfinder provides an information readout that includes focus
indicators, shutter speed, aperture, exposure mode, metering, shutter-speed
lock, aperture lock, AE lock, electronic analog display, frame counter, ready
light and five sets of focus brackets. (The picture at right is an actual view
through the viewfinder. Here, the central autofocus zone is selected, but you
can see the other four zones top, bottom, left and right.) The internal metal
shutter can be deployed (via the small lever just above and to the left of the
viewfinder eyepiece) to avoid exposure errors due to light entering the rear
element of the viewfinder during long exposures on a tripod,
The D1 is equipped with an optical viewfinder
that works through the lens (the LCD monitor is for image playback only). The
circular optical viewfinder features a diopter adjustment dial and a sliding
protective shutter that is manually moved in and out of place by a small lever.
Nikon states that the optical viewfinder provides about 96 percent frame
coverage, which agrees well with our own measurements. An illuminated display
inside the viewfinder provides an information readout that includes focus
indicators, shutter speed, aperture, exposure mode, metering, shutter-speed
lock, aperture lock, AE lock, electronic analog display, frame counter, ready
light and five sets of focus brackets. (The picture at right is an actual view
through the viewfinder. Here, the central autofocus zone is selected, but you
can see the other four zones top, bottom, left and right.) The internal metal
shutter can be deployed (via the small lever just above and to the left of the
viewfinder eyepiece) to avoid exposure errors due to light entering the rear
element of the viewfinder during long exposures on a tripod,
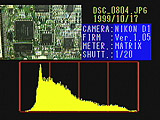 While the LCD panel on the D1 isn't usable as a viewfinder, it does
provide a great deal of information about your pictures after you've shot them.
Several screens of information are available, but the most interesting is the
optional histogram display, shown at right. (Click on the display to view an
animated image showing all four playback display screens.) The histogram display
is common among other professional digital digicams, and recently made an
appearance on Nikon's own Coolpix 990 prosumer model. The histogram display is
simply a graph of how many pixels there are in the image at each brightness
level: The brightness is the horizontal axis, running from black at the left to
white at the right. The height of the graph shows the relative number of pixels
having each brightness. This sort of display is very handy for determining under
or over-exposure. Ideally, the histogram would stretch across the entire width
of the display, using the full range of brightness values available. An
underexposed image will have a histogram with all the data lumped on the
left-hand side, with nothing reaching all the way to the right. Likewise, an
overexposed image will have all the data lumped on the right-hand
side.
While the LCD panel on the D1 isn't usable as a viewfinder, it does
provide a great deal of information about your pictures after you've shot them.
Several screens of information are available, but the most interesting is the
optional histogram display, shown at right. (Click on the display to view an
animated image showing all four playback display screens.) The histogram display
is common among other professional digital digicams, and recently made an
appearance on Nikon's own Coolpix 990 prosumer model. The histogram display is
simply a graph of how many pixels there are in the image at each brightness
level: The brightness is the horizontal axis, running from black at the left to
white at the right. The height of the graph shows the relative number of pixels
having each brightness. This sort of display is very handy for determining under
or over-exposure. Ideally, the histogram would stretch across the entire width
of the display, using the full range of brightness values available. An
underexposed image will have a histogram with all the data lumped on the
left-hand side, with nothing reaching all the way to the right. Likewise, an
overexposed image will have all the data lumped on the right-hand
side.
The histogram display is very helpful in telling whether you've got
the exposure right, but sometimes you'd like even more assurance: With digicams,
it's very important not to blow-out the highlights in a picture (rather like
slide film in that respect), since once you hit the maximum brightness, the
image just "saturates", and any highlight detail will be lost. A histogram
display does a pretty good job of telling you how the image as a whole is doing,
but what if there are just a few critical areas that you're worried about for
the highlights? If they're just a few areas, they won't account for many pixels.
That means any peak at the "white" end of the histogram graph will be pretty
small, and easy to miss (or just plain invisible). What to do?
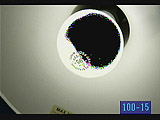 The folks at Nikon
recognized this problem, and provided another special display mode that they
simply call "highlights", accessible via the custom settings menu options 27-2
and 27-3. What this mode does is "blinks" any highlights that are saturated all
the way to pure white. It does this by taking the pure white areas on the LCD
and toggling them between white and black. The screenshot at right shows this
happening with the globe of a light bulb that we've deliberately overexposed.
This is a very slick feature, invaluable to photographers doing critical
product photography for publication. (We had bemoaned the lack of this feature
on the Coolpix 990 prosumer camera from Nikon, but reader Keat Lim wrote in to
let us know that this highlight detection mode is available in histogram mode on
the 990.Thanks, Keat!)
The folks at Nikon
recognized this problem, and provided another special display mode that they
simply call "highlights", accessible via the custom settings menu options 27-2
and 27-3. What this mode does is "blinks" any highlights that are saturated all
the way to pure white. It does this by taking the pure white areas on the LCD
and toggling them between white and black. The screenshot at right shows this
happening with the globe of a light bulb that we've deliberately overexposed.
This is a very slick feature, invaluable to photographers doing critical
product photography for publication. (We had bemoaned the lack of this feature
on the Coolpix 990 prosumer camera from Nikon, but reader Keat Lim wrote in to
let us know that this highlight detection mode is available in histogram mode on
the 990.Thanks, Keat!)
Ok, time for the quibbles:
What don't we like about the D1's LCD display? Well, for the most part, we like
it fine. There's one big oversight, IOHO: No "zoomed" playback mode! It's
becoming almost commonplace for prosumer digicams to have a playback mode that
lets you magnify the image in the LCD by 2-3x, letting you see critical details
that you couldn't begin to discern in the basic LCD image. We view this as an
enormously handy feature, and use it all the time to check the product shots we
do for the website. The Coolpix 990 and even 950 have this function. So why
isn't it on the D1? (We don't know, but sure hope it makes it onto the D2!
;)
Optics
In this
section, we usually discuss the lens characteristics of the camera we're
describing. In the case of the D1, you can attach pretty much any lens you want,
as long as it uses the Nikon "F" mount. The D1 features the standard F mount,
with both mechanical AF coupling for older lenses, and AF electrical contacts
for the latest AF-IF or AF-S Nikkor lenses with internal focus motors. With very
few exceptions, you can use the D1 with any F-Mount Nikkor lens ever made.
(Actually, we're not personally aware of any F-mount lenses that *wouldn't*
work, but do know that some of the really unusual Nikkor lenses from the past
(full-frame fisheye lenses?) had problems on some camera bodies, requiring
mirror lockup to function properly. - This is a vanishingly small percentage of
the possible lenses that could be used with the camera though, so you can safely
assume that most any F-mount lens in your camera bag will work just fine with
the D1.
Functions and exposure modes available with a given lens will
vary with the type: More recent Nikkors (the D-type models) include a microchip
that communicates focal-distance information to the camera. Lenses without the
"D" microchip won't support the "3D matrix metering" mode. Here's a table giving
a brief idea of the functionality available with different Nikkor lens types
(abstracted from the D1's manual).
|
Lens Type |
Functions Available |
Type D AF Nikkor
Lenses
(except IX models) |
All functions supported |
| Other Type D Nikkor
Lenses |
All functions except autofocus
supported |
Other AF Nikkor
Lenses
(Excluding F3AF) |
All functions except 3D color matrix metering and 3D
multi-sensor balanced fill-flash for D1 supported |
| AI-P Lenses
|
All functions except 3D color matrix metering, 3D
multi-sensor balanced fill-flash for D1, and autofocus
supported |
| Other Lenses
|
Other lenses can be used in aperture-priority or
manual mode with center-weighted or spot metering; electronic rangefinder
can be used with lenses with a maximum aperture of f/5.6 or
faster. |
Obviously, optical specifications vary greatly depending on the lens you
attach. One thing that struck us about the Nikkor lenses we used with the D1
though, was how vastly superior they were to the lenses on any of the "prosumer"
digicams we've tested to date: Chromatic aberration was essentially nonexistent,
barrel and pincushion distortion were very low, sharpness was excellent, etc.,
etc. It should probably be no surprise that a lens costing more than an entire
lower-end digicam would perform better than that camera's own lens, but the
magnitude of the difference in quality was amazing.
 One important note about
Nikkor optics on the D1: With linear dimensions of 15.6 x 23.7 mm, the CCD in
the D1 is a fair bit smaller than a 35mm film frame. Thus, the D1 is essentially
cropping into the central area of the normal 35mm field of view that any given
lens would have. The result is that the field of view of any lens attached to
the D1 will be narrower than the same lens on a Nikon film camera. The net
effect is that the D1 has a "focal length multiplier" of 1.5. Thus, a 50mm lens
on the D1 will behave much as a 75mm lens on a film-based Nikon SLR. This is
good news for sports photographers (all your telephoto lenses just got 50%
longer), but not so good for landscape photographers or others who shoot lots of
wide angle photos. The D1 was apparently part of the reason that Nikon came out
with the 17-35mm zoom lens that we used in much of our testing of the camera: On
the D1, this lens effectively translates into a 25.5 to 52.5mm, providing
moderate (rather than extreme) wide angle coverage.
One important note about
Nikkor optics on the D1: With linear dimensions of 15.6 x 23.7 mm, the CCD in
the D1 is a fair bit smaller than a 35mm film frame. Thus, the D1 is essentially
cropping into the central area of the normal 35mm field of view that any given
lens would have. The result is that the field of view of any lens attached to
the D1 will be narrower than the same lens on a Nikon film camera. The net
effect is that the D1 has a "focal length multiplier" of 1.5. Thus, a 50mm lens
on the D1 will behave much as a 75mm lens on a film-based Nikon SLR. This is
good news for sports photographers (all your telephoto lenses just got 50%
longer), but not so good for landscape photographers or others who shoot lots of
wide angle photos. The D1 was apparently part of the reason that Nikon came out
with the 17-35mm zoom lens that we used in much of our testing of the camera: On
the D1, this lens effectively translates into a 25.5 to 52.5mm, providing
moderate (rather than extreme) wide angle coverage.
As shown in the
illustration above, the CCD of the D1 is also much larger than that used in the
Coolpix 950. One consequence of this is that depth of field in lenses used with
the D1 will be much shallower at any given aperture value (f-stop) than with the
950. (Depth of field as a function of f-stop will match that of the same lenses
on 35mm cameras, even though the "effective focal length" is increased.) Many of
our test shots show the reduced depth of field of the D1 with typical Nikkor
lenses from Nikon's 35mm line, as compared to the same images shot with the 950
or 990.
 Given that the optical characteristics
will depend entirely on the lens attached, we'll instead concentrate here on the
focusing options and modes. There's a lot to talk about here, given the
extraordinary control and flexibility afforded by the D1's autofocus systems.
The D1 allows you to take advantage of auto or manual focus via a small dial on
the front of the camera, right next to the lens. Setting the switch to "M" puts
the camera into manual focus mode, "S" places it in Single Servo AF (focus
priority) and "C" puts it into Continuous Servo AF
Given that the optical characteristics
will depend entirely on the lens attached, we'll instead concentrate here on the
focusing options and modes. There's a lot to talk about here, given the
extraordinary control and flexibility afforded by the D1's autofocus systems.
The D1 allows you to take advantage of auto or manual focus via a small dial on
the front of the camera, right next to the lens. Setting the switch to "M" puts
the camera into manual focus mode, "S" places it in Single Servo AF (focus
priority) and "C" puts it into Continuous Servo AF (release priority). Single Servo simply
means that the camera sets focus only once, when the shutter button is first
pressed halfway, and is best for still objects. Continuous Servo means that the
camera continuously adjusts the focus, as long as the shutter button is halfway
pressed and is best for moving objects. The AF-On buttons (one for vertical
shooting and one for horizontal) perform the same function as halfway pressing
the shutter button by setting the focus.
(release priority). Single Servo simply
means that the camera sets focus only once, when the shutter button is first
pressed halfway, and is best for still objects. Continuous Servo means that the
camera continuously adjusts the focus, as long as the shutter button is halfway
pressed and is best for moving objects. The AF-On buttons (one for vertical
shooting and one for horizontal) perform the same function as halfway pressing
the shutter button by setting the focus.
 You also have the freedom of setting the autofocus area on
the D1. Pressing the AF Area Mode button on the top of the camera lets you
select between Single Area, Dynamic and Dynamic with Closest Subject Priority.
Single Area AF simply means that the camera judges focus based on one part of
the subject (using whichever bracket in the optical viewfinder you chose as the
active one). Dynamic AF employs all five of the autofocus brackets, or areas.
The camera first focuses on the subject in the central focus area. Whenever the
subject moves to a different AF area, the camera also shifts the focus to
"follow" the subject. This is great for irregularly moving subjects. Finally,
Dynamic AF with Closest Subject Priority means that the camera first focuses on
the closest object that falls into one of the five focus areas and then tracks
it as it moves. (Note that no focus area brackets are illuminated in the
viewfinder with this mode and that this mode doesn't work well with telephoto
lenses or poorly lit subjects, according to Nikon). In Single Area AF mode, you
can change the main focus area by unlocking the focus area selector (the rocker
toggle button on the back panel) and then shifting the focus area using the up,
down, right or left arrow keys. Then, simply lock the focus area selection by
sliding the switch back into place.
You also have the freedom of setting the autofocus area on
the D1. Pressing the AF Area Mode button on the top of the camera lets you
select between Single Area, Dynamic and Dynamic with Closest Subject Priority.
Single Area AF simply means that the camera judges focus based on one part of
the subject (using whichever bracket in the optical viewfinder you chose as the
active one). Dynamic AF employs all five of the autofocus brackets, or areas.
The camera first focuses on the subject in the central focus area. Whenever the
subject moves to a different AF area, the camera also shifts the focus to
"follow" the subject. This is great for irregularly moving subjects. Finally,
Dynamic AF with Closest Subject Priority means that the camera first focuses on
the closest object that falls into one of the five focus areas and then tracks
it as it moves. (Note that no focus area brackets are illuminated in the
viewfinder with this mode and that this mode doesn't work well with telephoto
lenses or poorly lit subjects, according to Nikon). In Single Area AF mode, you
can change the main focus area by unlocking the focus area selector (the rocker
toggle button on the back panel) and then shifting the focus area using the up,
down, right or left arrow keys. Then, simply lock the focus area selection by
sliding the switch back into place.
There are two methods for using the
AF Lock function. The first is to place the central subject in the selected
focus area, halfway press the shutter button, then re-align the composition and
fire the shutter. Alternatively, when using Single Servo AF, you can press the
AF-L/AE-L button to lock focus (and exposure, unless set for focus only in the
custom settings menu). Keeping this button pressed will lock focus and/or
exposure, even if the shutter button is released. This allows you to recompose
the photograph without keeping your finger on the shutter button, but on the
AE-L/AF-L button instead. (Thereby resulting in less chance that you'll
accidentally fire the shutter when you don't intend to.)
Exposure
Wow! In keeping
with the rest of its rich feature set, the D1 gives you a tremendous amount of
exposure control and multiple options that can get quite involved. Bear with us,
lots of explaining to do here...
First of all, the D1 gives you a choice between Program AE,
Manual, Aperture Priority and Shutter Priority exposure modes with shutter
speeds from 30 to 1/16,000 seconds available, as well as a Bulb setting for
longer exposures. A very nice touch is that, while in Program AE mode, you can
rotate the command dial to select different combinations of aperture and shutter
speed than the automatic program would choose. (That is, if the automatic
program would have chosen 1/125 second and f/5.6, you could instead direct the
camera to use 1/60 at f/8 or 1/30 at f/11, to get greater depth of field.) This
is a very handy option for those times when you need some measure of increased
control, but still want the camera to do most of the work for you.
An interesting feature when using
Manual exposure mode is the electronic analog exposure display visible in both
the optical viewfinder and the top-panel data readout. This shows the amount an
image will be over or under exposed, based on the settings you have selected and
helps you find the best exposure for the subject. We also liked the Command Lock
feature (the "L" button on the back panel, under the little protective flap next
to the rear data readout) which locks the shutter speed and/or aperture setting
so that it is not accidentally changed when using the command dial for another
purpose. (If you set either the shutter speed or aperture while holding down the
L button, a "lock" icon will appear next to the corresponding setting in both
the viewfinder and data readout displays, and that setting can't be changed
until you again depress the L button.) There's also a Capture Preview Mode which
allows you to view captured images on the LCD monitor before deciding whether to
save them to the memory card or delete them. A Custom Settings button (also on
the back panel) provides quick access to a *vast* range of special camera
settings. Pressing the button and rotating the command dial shows the item
number and the option currently selected (for example, "1-0" means option 1,
item 0). A full list of items and options is outlined in the manual and we'll go
into a little more detail on these later on.
ISO can be set to values of 200, 400, 800 or 1600 via the
ISO button on the back panel, and to values of 3200 or 6400 by using the
"sensitivity up" option on the custom settings menu (options 31-1 and 31-2). We
found the 3200 and 6400 values of little value though, because image noise was
so high. White balance can be set to Auto (useful from 4200K to 7000K),
Incandescent (set to about 3000K), Fluorescent (4200K), Direct Sunlight (5200K),
Flash (5400K), Overcast (6000K), Shade(7000K) and Preset (which allows you to
manually adjust the white value by using a white card or object as a reference
point). All white balance settings can be adjusted from -3 to +3 units on an
arbitrary scale by turning the sub-command dial (on the front of the hand grip)
while holding down the white balance button. Higher values correspond to a
decrease in the camera's white point, in degrees Kelvin (meaning the images
become "cooler" in appearance). This is a very nice feature, as we often wish we
could use one of a camera's standard white-balance settings, just a bit warmer
or cooler. To be sure, some experimentation would be required to familiarize
yourself with the impact of these "tweaked" white balance settings, but having
them available is a definite plus. The table below shows approximate color
shifts in degrees Kelvin for the various adjustments in each of the major white
balance settings. (Figures obtained from the Nikon Europe tech site.)
| Camera
Display--> |
-3 |
-2 |
-1 |
0 |
1 |
2 |
3 |
| Direct Sunlight |
460 |
300 |
140 |
0 |
-120 |
-260 |
-360 |
| Shade |
820 |
520 |
240 |
0 |
-240 |
-460 |
-680 |
| Overcast |
580 |
360 |
180 |
0 |
-180 |
-360 |
-500 |
| Incandescent |
300 |
200 |
100 |
0 |
-80 |
-160 |
-240 |
| Fluorescent |
280 |
180 |
100 |
0 |
-80 |
-160 |
-240 |
| Flash |
600 |
400 |
200 |
0 |
-200 |
-400 |
-600 |
Three metering options are available on the D1: Color 3D Matrix, Center-Weighted
and Spot. The Color 3D Matrix setting uses a 1005 pixel CCD sensor (separate
from the main image sensor) To avoid exposures due to light entering the rear
of the viewfinder during long exposures on a tripod, to meter exposure based
on several areas in the frame (useful when brightly colored or very dark subjects
occupy a significant portion of the frame). This is the same Color 3D Matrix
metering system used on the Nikon F5. Center-Weighted metering measures light
from the entire frame but places the greatest emphasis on a circular area in
the center (which you can determine the size of via custom settings menu option
14, a nice touch). Spot metering is pretty self-explanatory, taking a reading
from the dead center of the image (best when using the AE Lock function). The
D1 has a nifty trick with spot focus though: With D-type lenses, and in the
proper focus-area mode, the spot metering actually centers on the focus area
selected, giving you the option for off-center spot metering!
 Exposure compensation
on the D1 is adjustable from -5 to +5 EV(!) in 1/3 EV increments and is controllable
in all exposure modes. The Auto Bracketing feature takes up to three shots of
the same subject with varying exposure values determined by either the photographer
in Manual mode or by the camera in all other modes. Exposure settings for bracketing
can vary from -2 to +2 EV (values are added to the already chosen exposure compensation
value), with step sizes of 1/3, 1/2, or 1EV units, and the bracketing biased
toward either underexposure, overexposure, or centered about the main exposure
value.
Exposure compensation
on the D1 is adjustable from -5 to +5 EV(!) in 1/3 EV increments and is controllable
in all exposure modes. The Auto Bracketing feature takes up to three shots of
the same subject with varying exposure values determined by either the photographer
in Manual mode or by the camera in all other modes. Exposure settings for bracketing
can vary from -2 to +2 EV (values are added to the already chosen exposure compensation
value), with step sizes of 1/3, 1/2, or 1EV units, and the bracketing biased
toward either underexposure, overexposure, or centered about the main exposure
value.
On a more mundane level, the D1 has a self-timer feature that allows you to
set the time interval anywhere from two to 20 seconds and that is activated
by fully pressing the shutter button.
Another interesting feature is the Anti-Vibration Mode, which delays the exposure
until after the mirror shock has subsided and is available through the Custom
Settings Menu. (Obviously meant for times when the camera is on a tripod.) The
default setting allows for the image to be exposed as soon as the shutter is
released. By activating this function, the image isn't captured until a fraction
of a second after the shutter is released, giving time for vibrations from the
mirror actuation to damp out before the shutter is opened. Also through the
Custom Settings menu, you can adjust the image sharpness, tone compensation
and contrast, although we didn't experiment much with these settings. Pressing
the Quality button while turning the sub-command dial also accesses a black
and white monochrome shooting mode. As mentioned earlier, when reviewing images
in Playback mode, you can pull up a histogram and a highlight function to give
you a complete readout on the exposure. This is a useful tool to examine your
exposure in the camera instead of waiting to download and then deciding to reshoot.
Continuous Shooting Mode
The D1 offers a Continuous Shooting mode that shoots up to approximately 4.5
frames per second (up to 21 consecutive shots), depending on the amount of image
information and available CompactFlash space. Once the 21 frame limit is reached,
the camera is unable to record any more photographs until at least one of the
images is transferred from the buffer memory to the memory card. As the photos
are being transferred, the number of available consecutive photographs is displayed
in the viewfinder and on the status display panel when the shutter button is
halfway pressed. Through the Custom Settings menu, you can alter the frames
per second rate to three, two or one, as well as set the camera to save each
image directly to the memory card instead of filling up the buffer. The latter
option will significantly increase the amount of time between each exposure,
but extends the length of continuous sequences to equal whatever the capacity
of the memory card is. Likewise, you can also change the maximum number of exposures.
(See Shutter Lag & Cycle Time Tests below for an important tip on getting
the fastest performance out of the D1!)
Amazing Flash Unit!
Like most professional SLRs, the D1 doesn't carry a built-in
flash of its own, but rather is designed to work with external strobe systems,
or "Speedlights" as Nikon is fond of calling them. We were fortunate to have
not one but two of the special SB-28DX flash units to work with while we had
the D1, and felt the results & flexibility we found were impressive enough
to justify a completely separate section of the review to discuss them. Herewith
the story of the D1 & SB-28DX:
Flash
 The D1 carries a standard
Nikon hot shoe, compatible with a wide range of Nikon speedlights, as well as
many third-party flash units, albeit with a lower level of integration with
the camera. The manual includes a full list of compatible Nikon flash units,
and details the capabilities provided by each. (Note though, that the special
SB-28DX speedlight model is required for TTL metering with the D1.) There's
also a sync terminal for attaching another flash via a sync cable, giving you
even greater options. (Actually, see below for a discussion of multiple-flash
operation: It's pretty incredible!) With Nikon speedlight models SB-25, 26,
or 28, the flash will sync at shutter speeds as high as 1/500 of a second(!).
The D1 carries a standard
Nikon hot shoe, compatible with a wide range of Nikon speedlights, as well as
many third-party flash units, albeit with a lower level of integration with
the camera. The manual includes a full list of compatible Nikon flash units,
and details the capabilities provided by each. (Note though, that the special
SB-28DX speedlight model is required for TTL metering with the D1.) There's
also a sync terminal for attaching another flash via a sync cable, giving you
even greater options. (Actually, see below for a discussion of multiple-flash
operation: It's pretty incredible!) With Nikon speedlight models SB-25, 26,
or 28, the flash will sync at shutter speeds as high as 1/500 of a second(!).
 Five flash
sync modes are available by pressing the flash button on top of the camera.
Front-Curtain Sync fires the flash in sync with the opening of the front curtain
of the focal plane shutter, at the beginning of the exposure. Slow-Sync uses
a slower shutter speed in Program AE and Aperture Priority modes to bring out
background details by letting in more ambient light. Rear-Curtain Sync creates
a motion effect firing the flash just before the shutter closes. On longer exposures,
this results in a sharp image of the object, trailed by a blur caused by it's
motion before the flash fired. (When used with Program AE or Aperture Priority,
this slows the shutter speed to achieve the same effect as Slow-Sync). Red-Eye
Reduction emits a small pre-flash before firing the full flash to reduce the
red-eye effect. Finally, Red-Eye Reduction with Slow-Sync combines the two sync
modes and is available only with Program AE and Aperture Priority exposure modes.
Five flash
sync modes are available by pressing the flash button on top of the camera.
Front-Curtain Sync fires the flash in sync with the opening of the front curtain
of the focal plane shutter, at the beginning of the exposure. Slow-Sync uses
a slower shutter speed in Program AE and Aperture Priority modes to bring out
background details by letting in more ambient light. Rear-Curtain Sync creates
a motion effect firing the flash just before the shutter closes. On longer exposures,
this results in a sharp image of the object, trailed by a blur caused by it's
motion before the flash fired. (When used with Program AE or Aperture Priority,
this slows the shutter speed to achieve the same effect as Slow-Sync). Red-Eye
Reduction emits a small pre-flash before firing the full flash to reduce the
red-eye effect. Finally, Red-Eye Reduction with Slow-Sync combines the two sync
modes and is available only with Program AE and Aperture Priority exposure modes.
When using the external Speedlight, Nikon recommends
setting the camera to any metering method except Spot. After setting exposure
and the flash sync mode, set the Speedlight to TTL so that it meters through the
lens. ("DX" version of the SB-28 only.) You can also select the flash's
appropriate range for the subject and the ISO setting to match the camera's.
Because each Speedlight varies, you'll want to check the accompanying manual to
verify settings and proper usage.

Multi-Auto
Flash with the SB-28DX
When Nikon asked us what
accessories we wanted with the D1, we made the unusual request fortwoSB-28DX speedlights, along
with a variety of cabling and multi-flash accessories (notably an SC-17 remote
TTL flash cable, and an AS-10 multi-flash adapter. (We had the distinct
impression that the Nikon consignment manager thought we were a little
flash-obsessed!)
The reason we
wanted two Nikon speedlights was to experiment a little with the multi-flash
capability of the D1, as part of our "All-Nikon, All-Digital Studio" story.
Through various emails we've received, we've become aware of a significant
number of pro photographers using fairly modest digicam setups for serious
product photography and other studio shooting. Particularly with the advent of
Nikon's new PC Micro Nikkor 85mm 1:2.8 D, the prospects for serious studio work
in an all-digital environment seem better than ever. An important part of studio
work is complex lighting, with multiple light sources. While most studio pros
will already have a strobe pack (or two or five), we wanted to examine the
capabilities offered by just combining multiple Nikon speedlights. What we found
was very interesting, to the point that we concluded (admittedly based on rather
limited experimentation) that it should indeed be both possible and practical to
construct a fairly capable studio lighting system using only the Nikkor
speedlights. One benefit of doing so (for the relative novice at least) is that
the Nikon speedlights can take advantage of the powerful TTL (through the lens)
flash metering of the D1.
Important Note:The SB-28DX is a special model of Nikon's
flagship SB-28, specifically designed to interface to the D1. It will work like
a conventional SB-28 (as far as we know) on cameras other than the D1, but it's
special characteristics are critical to accurate TTL metering with the D1. (A
standard SB-28 won't work accurately.) The reason is that current Nikon film
SLRs offering TTL metering do so by using a flash sensor that reads the light
reflected from the film itself, during the actual exposure. In the case of the
D1, the optical characteristics of the CCD prevented such an approach. Instead,
the D1's flash-metering circuitry measures the flash output that is reflected
from the shutter curtain immediately before the exposure itself, and uses that
information to determine the exposure. (We're told that the SB-28DX emits a
special metering pulse immediately before the main flash, but we confess to
being unable to detect it - it must be *awfully* quick! The possibility of a
pre-flash from the SB-28DX though, suggests that it might require special
"smart" slave triggers to fire non-SB28 flash slave units properly.)
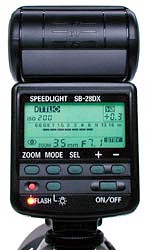 The SB-28DX really deserves an Imaging-Resource
level review all its own: It has more modes and functions than you can shake the
proverbial stick at (as hinted at by its control-panel display, shown at right),
and integrates beautifully with the D1. One indication of its complexity is its
96-page instruction book! Used in its simplest mode, an SB-28DX mounted atop the
D1's hot shoe takes advantage of subject-distance information obtained from the
chips inside D-series Nikkor lenses to implement what Nikon calls "3D Matrix
Metering." The result is that the basic flash, operating in its simplest
full-auto mode seems nearly incapable of making a bad exposure. Straight-on,
bounced from any direction, off-camera via an extension cable, it doesn't
matter. You can certainly use it to take unattractive pictures, but just about
all of them will be well-exposed!
The SB-28DX really deserves an Imaging-Resource
level review all its own: It has more modes and functions than you can shake the
proverbial stick at (as hinted at by its control-panel display, shown at right),
and integrates beautifully with the D1. One indication of its complexity is its
96-page instruction book! Used in its simplest mode, an SB-28DX mounted atop the
D1's hot shoe takes advantage of subject-distance information obtained from the
chips inside D-series Nikkor lenses to implement what Nikon calls "3D Matrix
Metering." The result is that the basic flash, operating in its simplest
full-auto mode seems nearly incapable of making a bad exposure. Straight-on,
bounced from any direction, off-camera via an extension cable, it doesn't
matter. You can certainly use it to take unattractive pictures, but just about
all of them will be well-exposed!
Used in conjunction with one or more additional SB-28DX
units, you can adjust the output of each unit to achieve a balanced exposure,
with separate output levels for main, fill, and sweep (background) lights. Our
evaluation of the SB-28DX in multi-flash mode was admittedly limited to some
rather crude tests of setting relative flash intensities on the main and remote
unit to achieve different light balances between the two units: We really didn't
have time (either with the unit, or in our overloaded schedule) to conduct
extensive "live" studio tests. We did see enough though, to convince ourselves
that multiple-flash studio photography with the D1 and multiple SB-28DX strobe
units would be quite practical. There are a few pieces of hardware that are key
to getting the whole assemblage to work. We'll share a couple of these here, to
help anyone interested in pursuing the all-Nikon, all-digital studio concept
further.
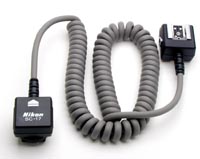 SC-17 Remote TTL cord
In an SB-28DX system, one flash must serve as the "master,"
with the others essentially daisy-chained off of it via SC-18 or SC-19 extension
cables. The only catch is thatallthe signals from the
D1's hot shoe must be connected to the master SB-28DX. This is trivial if you
want the main light to come from the vicinity of the camera, but what if that's
not what you're looking for? The answer is the SC-17 remote TTL cord, which
gives you a few feet of extension from the hot shoe contact to the flash itself.
(Nikon doesn't officially support it, but you can wire together multiple SC-17
units, or cut & extend the wires yourself. This obviously voids all
warrantees, etc., but we know photographers who routinely use 10-foot extension
cables cobbled together from butchered SC-17s.)
AS-10
Multi-Flash Adapter
 The SB-28DX
itself has a three-prong sync connector on its side, allowing you to directly
strap together two of them into a multi-flash setup, with one mounted on the
camera, and the other held off to the side. Once you've made that connection
though, all the available connector sockets are full. To combine more than two
SB-28DXs together, you need one or more AS-10 multi-flash adapter units. These
are little gadgets that fit on the hot shoe of the flash, and offer three sync
sockets to chain additional speedlights off of. What we found most useful about
the AS-10 though (not needing the additional sync sockets in our 2-flash setup)
was the 1/4-inch threaded tripod socket on its bottom. This let us mount the
remote flash securely on a spare tripod, leaving our hands free without
requiring an assistant.
The SB-28DX
itself has a three-prong sync connector on its side, allowing you to directly
strap together two of them into a multi-flash setup, with one mounted on the
camera, and the other held off to the side. Once you've made that connection
though, all the available connector sockets are full. To combine more than two
SB-28DXs together, you need one or more AS-10 multi-flash adapter units. These
are little gadgets that fit on the hot shoe of the flash, and offer three sync
sockets to chain additional speedlights off of. What we found most useful about
the AS-10 though (not needing the additional sync sockets in our 2-flash setup)
was the 1/4-inch threaded tripod socket on its bottom. This let us mount the
remote flash securely on a spare tripod, leaving our hands free without
requiring an assistant.
SC-18 and SC-19 extension
cables
 These are rather
pedestrian, simply consisting of 3-prong extension sync cables. Useful to know
what they are though: The SC-18 is a 1.5 meter unit, while the SC-19 is a 3.0
meter unit. Use these to carry sync signals between flash units in a
multi-strobe setup. (Maximum official cable length is 10 meters or 33 feet.
Again, we know photographers who use longer home-brew cables, but such lengths
aren't supported by Nikon and may not work reliably.)
These are rather
pedestrian, simply consisting of 3-prong extension sync cables. Useful to know
what they are though: The SC-18 is a 1.5 meter unit, while the SC-19 is a 3.0
meter unit. Use these to carry sync signals between flash units in a
multi-strobe setup. (Maximum official cable length is 10 meters or 33 feet.
Again, we know photographers who use longer home-brew cables, but such lengths
aren't supported by Nikon and may not work reliably.)
In our test shooting, we had a bit of a finicky time
balancing light output between strobe units properly: The SB-28DXs are complex
beasts, more so than most digicams we're accustomed to testing. We were able to
get the multi-flash strapup working though, and achieved a variety of very
"different" (my wife's term for something ugly but interesting) lighting effects
with the combination. We had the clear sense that a day's experimentation in the
studio with the flash units tucked inside our softbox and mounted on a tripod or
two would result in a very flexible and powerful lighting system. Clearly *way*
beyond the capabilities of any shoe-mount flash system we've ever seen
before!
Other SB-28DX tricks
While we've
focused on the SB-28's multi-unit sync capabilities, it has a host of other
features, some vital, others whimsical. In the former category is its ability to
automatically zoom to match its coverage area to lenses ranging from 24 to 85mm.
Flip down a built-in diffuser, and the range extends to 18mm at the wide angle
end. The obvious advantage of this zooming capability is that it's flash power
is concentrated into a tighter beam for telephoto use, extending its range: It
has an ISO 200 guide number of 33.6m or 107 feet. At f/2.8, this translating to
a maximum range of 38 feet at ISO 200, and the 85mm zoom setting. Another nifty
addition is a fairly powerful autofocus illuminator lamp on the front of the
unit, permitting accurate autofocus operation in total darkness. Finally, in the
whimsical category, the SB-28 has a stroboscope setting, in which it emits a
stream of flashes, at repetition rates of anywhere from 1 to 50 flashes per
second. The number of flashes that can be emitted in this mode depends on both
the intensity of each flash, as well as the repetition rate. Values range from 4
flashes at 20-50 fps (flashes per second) and 1/8 power to 90 flashes at 1/64
power and 1-2 fps. (Fun for humans, but our cat hates it.)
A cautionary
note
Shortly after posting this review, we heard from
Juergen Specht of the D1 mailing list that a number of his members have reported
variable results (eg, inconsistent exposure) with the SB-28DX operating in the
"DTTL" (through the lens metering) mode. Juergen himself now uses the SB-28DX in
its "auto" mode almost exclusively, to avoid the problem. We didn't experience
this in our own testing, but it appears a number of D1 owners have... (Juergen
didn't give us instructions for joining his list, but the listserver address is
[email protected].
(Note that's a "1", not an "i" or an "l" in the list name.)
Shutter Lag/Cycle Times
When you press the shutter release on a
camera, there's usually a lag time before the shutter actually fires. This time
allows the autofocus and autoexposure mechanisms time to do their work and can
amount to a fairly long delay in some situations. Since this number is almost
never reported on, and can significantly affect the picture taking experience,
we now routinely measure it.
Almost a year ago when the D1 was first announced, we asked
Richard LoPinto (VP of Nikon's Professional Division, and the "father" of the D1
in the US) what the D1's shutter lag was. He replied "58 milliseconds" (0.058
seconds). We have to confess we assumed there was some marketing hype involved
in that spec, and that the actual camera couldn't possibly be *that* fast. Well,
we were wrong: The D1 is phenomenally responsive to the shutter button, and very
fast from shot to shot as well.
It turns out the D1 actually does have a shutter lag of only 58 milliseconds, as
proven by our own measurements in the lab! This ultra-fast shutter response only
occurs when the camera is manually focused or prefocused by half-pressing the
shutter button before the exposure itself. Autofocus performance will be
dependent on the lens you're using with the camera: We clocked the 17-35mm zoom
we tested at only 0.40 seconds. (This is one of Nikon's latest "Silent Wave"
lenses.) Needless to say, these shutter-delay times are enormously faster than
anything we've encountered in the consumer digicam world. It's safe to say that
the D1's reflexes are quite a bit quicker than yours!
Shot to shot cycle time was 3.34
seconds in single-frame mode, where the camera waits to write each image to the
memory card before capturing the next one. This is still quite fast compared to
many consumer digicams, but the real speed comes when you're working in
continuous-shooting mode. in continuous mode, the D1 can grab up to 21
full-resolution images at up to 4.5 frames per second. This is fast for any
camera, and particularly so for a digital one.
Finally, the D1 starts up and shuts down quite quickly,
taking only about a half-second from power-on to the first image captured, and
shutting down in effectively no time at all. (Not surprising, since there's no
lens to retract, as in many consumer cameras.) It switches from record to play
mode in 2.75 seconds, and from play to record mode almost instantly.
A tip for maximum cycle-time performance with the
D1.
We're indebted to Nikon technical rep
Fred Sisson for pointing out the following tip to us. As our shutter lag/cycle
time tests showed, the D1 is much faster between shots
in Continuous mode, since it doesn't wait to write image data to the memory card
between shots, just letting it accumulate in the huge RAM buffer first. Thus, if
you're concerned about maximum cycle-time performance, you'll want to leave the
camera in Continuous mode even when you're shooting single frames. The only
problem with this is that the very fast 4.5 fps performance of Continuous mode
can frequently lead to multiple frames of the same shot, captured before you can
manage to get your finger off the shutter button. An excellent solution to this
dilemma is to use the custom settings menu option 25-2, which slows the
Continuous-mode frame rate to 2 fps. This gives you enough time to get your
finger off the shutter release after each shot, yet still gives you ultra-fast
shot to shot times.
A related trick is to set the camera's "image status"
operating mode to Capture-Preview mode, via custom settings menu option 1-1.
This causes the camera to pause and display the results of each shot on the
rear-panel LCD before writing it to the card. With this mode set, you can use
the Single-Shot exposure mode for checking lighting, composition, and exposure,
discarding test shots as you go. Then, when everything's set, switch to
Continuous Mode for the actual shooting. This is a very useful configuration,
combining the best of both worlds of on-the-fly image review and high speed
shooting.
Operation and User
Interfaces
We found the user interface on the D1 surprisingly
straightforward and simple to use, particularly in light of its amazing array of
functions and features. We especially appreciated the fact that the majority of
the camera settings don't depend on an LCD menu system--they're all controlled
by separate buttons and dials that use the smaller status display windows
instead. The only menu dependent on the LCD is the Playback menu, which also
holds the camera setup options. Overall, the control setup and layout is
reminiscent of the Nikon F5, so we found no difficulties on that score although
a quick read of the manual should set anyone at ease who isn't familiar with
other Nikon cameras. Our single quibble about user-interface design had to do
with the "Custom Settings Menu", with it's 31 setting options and numerous
sub-options, each of which is identified solely by a numeric value. Admittedly,
CSM functions are ones that you're less likely to change in the course of normal
shooting, and any that you do use frequently are easily committed to memory.
Still, you really need to carry around a pocket reference card if you intend to
make extensive use of these features in daily shooting. We did find though, that
we learned the settings we used frequently fairly quickly, after only a couple
of days of playing with the camera.
Control
Enumeration

Depth of Field Preview Button: Located on the front of the
camera, on the top left side (viewed from the front) next to the lens, this
button allows you to check the depth of field for the current aperture setting
by looking through the viewfinder, which provides an approximate idea of the
depth of field.

Focus Mode Selector Dial: Located on the front
of the camera, on the right side next to the lens, this dial selects between
Manual, Single Servo and Continuous Servo focus modes.
Lens
Release Button: Also on the front of the camera, on the right side next to
the lens, this button releases the lens from its mount when
pressed.

Sub-Command Dial: Located on the front of the hand
grip, just beneath the power switch, this dial is used for selecting secondary
values in many operating modes and menus. Among other functions, it fine-tunes
the white balance across the -3 to +3 range (arbitrary units) when holding down
the white balance button. It also accesses the Black and White shooting mode
when turned while pressing the Quality button. While pressing the Custom
Settings button, this dial allows you to change the option set for each item
number. When turned while pressing the Bracket button, the dial changes the
bracketing step size (in EV units). In Manual exposure mode, the dial sets the
aperture (can be altered through the Custom Settings menu). Adjusts the
combination of aperture and shutter speed in Program AE mode.

Power
Switch: Located on the top right of the camera, this switch turns the camera
on and off. It also turns on a blue illumination for both status display panels
(on top and on the back panel) when shooting in dark
situations.
Shutter Button: Located on the top of the camera,
encircled by the power switch, this button sets exposure and focus when halfway
pressed and fires the shutter when fully pressed.
Exposure
Compensation Button: Located on the top of the camera, just beneath the
shutter button, pressing this button while turning the main command dial changes
the exposure compensation value from -5 to +5 in 1/3 EV
increments.

Exposure Mode / Format Button: Located
directly to the left of the Exposure Compensation button, pressing this button
while turning the main command dial sets the exposure mode (Program AE, Manual,
Aperture Priority and Shutter Speed Priority). In Playback mode, pressing this
button simultaneously with the Delete button (also labeled Format) formats the
memory card.

Metering Selector: Located on top of the camera,
this selector wheel surrounds a small black button. Pressing the button and
turning the wheel allows you to select between Spot, Center-Weighted and Color
3D Matrix metering options.

Diopter Adjustment Knob:
Located directly beside the metering selector, this knob adjusts the optical
viewfinder to accommodate eyeglass wearers.
Mode Dial Lock
Release: (See photo of mode dial below.) Located on the top left side of the
camera (when looking at the back), next to the mode dial, this button releases
the mode dial to select the camera mode.

Mode Dial: Located
on the top left of the camera, this dial selects between PC, Playback, Single,
Continuous and Self-Timer modes.
Auto Bracketing Button: (See
photo of mode dial above. The Auto Bracket button is the one labeled "BKT".)
Located on the top of the camera, encircled by the mode dial and next to the
Flash and Focus Area buttons, this button turns on the auto bracketing function
(when pressed while turning the main command dial).
Flash Sync Mode
Button: (See photo of mode dial above. Flash sync button is the one with a
lightning bolt icon on it.) Located directly beside the Auto Bracketing button,
this button cycles between five flash sync modes (Front-Curtain Sync, Slow-Sync,
Rear-Curtain Sync, Red-Eye Reduction and Red-Eye Reduction with Slow-Sync) when
held down while turning the main command dial.
AF Area Mode Button: (See photo of mode dial
above. AF Area Mode button is the one with the [+] label.) Located directly
beside the Flash Sync Mode button, this button cycles through the autofocus area
modes when pressed while turning the main command dial. Available options are
Single Area, Dynamic and Dynamic with Closest Subject Priority.

Monitor Button: Located on the top left side of
the back panel, this button turns the LCD monitor on and off.

Delete /
Format Button: Located to the right of the Monitor button, this button
deletes individual images. When pressed in conjunction with the Mode button,
formats the CompactFlash card.

Eyepiece Shutter Lever: Located on
the left side of the optical viewfinder, this lever opens and closes the
protective shutter that covers the viewfinder.
AE/AF Lock Button:
Located on the top right side of the back panel, this button locks the exposure
and/or focus when pressed (can be set through the setup menu to lock one or the
other or both).
AF Start / Cancel
Button: Located to the right of the AE/AF Lock button, this button sets the
autofocus when pressed (performs the same function as halfway pressing the
shutter button). When viewing images on the LCD screen, acts as the Cancel
button to cancel deletion of an image as well as to cancel menu selections when
in the Playback menu.
Main Command
Dial: Located directly to the right of the AF Start / Cancel button, this
dial is used to select various camera settings when turned in conjunction with
the Auto Bracketing, Flash Sync Mode, AF Area Mode, Exposure Compensation, Mode,
Quality, Custom Settings, ISO and White Balance buttons. In Aperture Priority
and Shutter Speed Priority modes, this dial sets either the aperture or shutter
speed settings. In Manual exposure mode, the dial sets the shutter speed (can be
altered through the Custom Settings menu).

Focus Area Selector and
Lock / Rocker Toggle Button: Located on the right side of the back panel,
this rocker toggle button and locking switch control the autofocus area in
Record mode. The switch unlocks the autofocus area and the four arrow buttons
let you decide where to set the main autofocus area (by choosing one of the five
brackets). In Playback mode, the rocker toggle button's up and down arrows
scroll through captured images while the right and left arrow buttons cycle
through various information displays about the image (frame number; frame
number, filename, date, time and file type; image only; photo information page
one; and photo information page two). The arrow buttons also navigate through
the Playback menu when displayed on the LCD monitor.
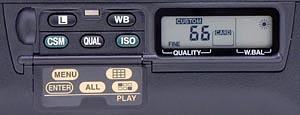
Rear
control panel buttons:
The next series of five controls we describe are
all located in a small control panel area on the rear panel of the camera, at
bottom left. They are protected by a small metal cover that flips down to reveal
the pushbuttons.
Command Lock / Menu Button: Located on the bottom
left of the back panel and protected by a metal cover, this button locks the
shutter speed and aperture values when in record mode, to prevent them from
being accidentally changed. In Playback mode, this button pulls up the Playback
menu.
White Balance / Thumbnail Button: Located to the right of
the Command Lock / Menu button, this button selects the white balance setting
when pressed while turning the main command dial. Options are Auto,
Incandescent, Fluorescent, Direct Sunlight, Flash, Overcast, Shade and Preset
(which allows you to manually adjust the white value by using a white card or
object as a reference point). All white balance settings can be adjusted from -3
to +3 (arbitrary units, see the Exposure section above for a translation into
degrees Kelvin) by turning the sub-command dial (on the front of the hand grip)
while holding down the white balance button. In Playback mode, pressing this
button pulls up a nine image thumbnail index display.
Custom Setting /
Execute Button: Located beneath the Command Lock / Menu button, this button
cycles through the custom settings menu items when pressed while turning the
main command dial in Record mode. After selecting a menu item, the option can be
changed by then turning the sub-command dial. For example, values are displayed
as 1-0, with the 1 being the item number and the 0 being the option number.
Pressing this button in conjunction with the ISO button resets all the Custom
Settings to their defaults. In Playback mode, this button executes menu
selections. Click here for a list of all the options available on the Custom
Settings Menu.
Image Quality / Select All Button: Located to the
right of the Custom Settings button, this button selects the image quality
setting in Record mode when used in conjunction with the main command dial.
Quality choices are Hi (RAW data), Hi (YCbCr TIFF), Hi (RGB TIFF), Fine, Normal
and Basic. In Playback mode, this button serves as a Select All, to perform
various functions on all images at once, such as delete and
protect.
Sensitivity / Multiple Select Button: Located to the
right of the Quality / Select All button, this button sets the ISO equivalent in
Record mode while turning the main command dial. Options are 200, 400, 800 and
1600 (or HI-1 and HI-2, depending on the setting in the Custom Settings menu).
Pressing this button in conjunction with the Custom Settings button resets the
Custom Settings menu to the defaults. In Playback mode, this button allows you
to select multiple images in the thumbnail index display.

Card
Slot Release Button: Located on the back panel, protected by a plastic flap,
this button releases the CompactFlash card slot cover so that the card can be
removed.

Vertical AF-ON Button: Located on the bottom
right of the back panel, this button serves the same purpose as the main AF-ON
button, but is used when shooting vertically.

Vertical Command Dial:
Located directly beside the vertical AF-ON button on the lower right corner of
the back panel, this dial serves the same purpose as the main command dial but
is used when shooting vertically.

Vertical Shutter Release Button and
Lock: Located on the bottom of the right side of the camera (when looking at
the back panel), this locking shutter button can be used when shooting
vertically. The sliding lock keeps it from accidentally firing when shooting
horizontally.
Camera Modes and Menues
PC Mode: Accessed by turning the mode dial to the PC position, this
mode allows the camera to download images while connected to a computer.
 Playback
Mode: Accessed by turning the mode dial to the Play position, this mode
allows you to review captured images and delete or protect them as well as set
them up for printing. Pressing the Menu button in this mode calls up the
Playback menus with these options:
Playback
Mode: Accessed by turning the mode dial to the Play position, this mode
allows you to review captured images and delete or protect them as well as set
them up for printing. Pressing the Menu button in this mode calls up the
Playback menus with these options:
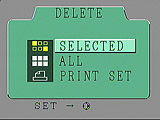
- Delete: accesses the Delete submenu:
Selected: deletes
selected images.
- All: deletes all images.
- Print Set: deletes the print order files created using the Print
option.
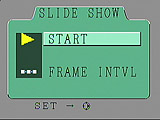
- Slideshow: accesses the Slide Show submenu which allows you to
view
all captured images in a slide show format. Options are:
- Start:starts the show.
- Interval: sets the time interval between each image (two, three,
five and 10 seconds).
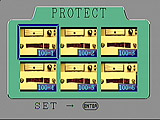
- Protect: protects selected images from accidental deletion (but not
from card formatting).
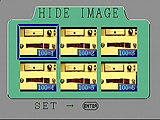
- Hide Image: allows selected images to be hidden or revealed during
playback mode operations.

- Print Setup: allows images to be set up for printing using the DPOF
(Digital Print Order Format). Options are:
- Done: confirms the print order and exits the menu.
- Copies: selects the number of copies to be printed.
- Date: overlays the date the image was captured on the printed
image.
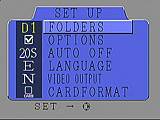
- Setup: calls up the camera setup menu with the following options:
- Folders: creates new folders for recording images or selects
folders for playback.
- Options: selects whether or not to display a histogram and/or
blown highlights when images are displayed in single image playback, capture
preview and record and review.
- Auto Off: sets the length of time before the monitor turns off in
Playback mode.
- Language: selects the language for menus and messages (choose
between German, English, French and Japanese).
- Video Output: selects between NTSC and PAL video formats. (US
models ship with cabling for NTSC connections. European models presumably
include PAL cables.)
- CardFormat: formats the CompactFlash memory card.
Single-Frame Shooting Mode: Accessed by turning the mode dial to the
"S" position, this mode allows you to capture single images by pressing the
shutter button. The following exposure modes are available here (accessed by
pressing the Mode button and turning the main command wheel):
- Program AE: puts the camera in charge of the shutter speed and
aperture settings, although you can vary its choices by turning the command
dial. (That is, you can increase or decrease the aperture the camera has
chosen, and the camera will vary the shutter speed to maintain the same
overall exposure value. Once you've chosen an offset in the aperture/shutter
combination, the camera will continue to control the exposure automatically,
while maintaining the aperture/shutter bias you've selected.) This ability to
select a persistent bias for the exposure system strikes us as very useful, in
many case more so than conventional Aperture or Shutter Priority metering (see
below). This is because the "tweaked" Program AE will track even radical
changes in subject lighting, not being constrained to a single aperture or
shutter speed.
- Aperture Priority: allows you to set the aperture value while the
camera automatically selects the appropriate shutter speed.
- Shutter Speed Priority: allows you to set the shutter speed value
while the camera automatically selects the appropriate aperture.
- Manual: lets you select both the aperture value and shutter
speed.
Continuous Shooting Mode: Accessed by turning the mode dial to the "C"
position, this mode allows you to take up to 21 consecutive shots at up to 4.5
frames per second (maximum number of shots and frame rate is variable through
the Custom Settings menu). Exposure is set with the first
shot.
Self-Timer Mode: activates the self-timer mode, which is
triggered by the shutter button. The time interval is variable through the
Image Storage & Interface
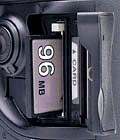 The D1 uses CompactFlash memory cards for
image storage, accommodating Type I and II sizes. A 96MB card shipped with our
sample unit, but the retail boxes apparently include no memory card with the
camera. (We bet IBM sells a lot of Microdrives to D1 owners!) We were glad to
find the CompactFlash slot very accessible, allowing us to quickly change the
card while mounted to a tripod. The D1 utilizes a folder arrangement that allows
users to organize images in the camera and a sequential frame counter option to
avoid problems with overwriting files when copying them to the
computer.
The D1 uses CompactFlash memory cards for
image storage, accommodating Type I and II sizes. A 96MB card shipped with our
sample unit, but the retail boxes apparently include no memory card with the
camera. (We bet IBM sells a lot of Microdrives to D1 owners!) We were glad to
find the CompactFlash slot very accessible, allowing us to quickly change the
card while mounted to a tripod. The D1 utilizes a folder arrangement that allows
users to organize images in the camera and a sequential frame counter option to
avoid problems with overwriting files when copying them to the
computer.
Captured images can be individually write protected through the
Play mode settings menu. Write protected files are only immune to accidental
deletion, not card reformatting. File formats include several levels of
compressed JPEG files as well as RGB TIFF, YCbCr TIFF and RAW data modes. Below
are the approximate number of images and their compression ratios for a 96 MB
card. RGB TIFF is the familiar uncompressed TIFF format that can be read by most
any imaging program. The YCbCr TIFF is also an uncompressed mode, dealing with
data more closely to the format in which it comes from the CCD. While still
uncompressed, it is a more compact data format, resulting in images that are
only 5,184 KBytes, vs 7,747 KB for RGB mode. The "raw" file format stores the
data exactly as it comes from the CCD array, an even more compact format, at
3,961 KB. Since the "raw" format is completely proprietary though, it can only
be processed by Nikon's "Nikon Capture" software, sold separately (which we
didn't have the opportunity to evaluate). Late-breaking addendum: Mike
Chaney's excellent Qimage
Pro program can now not only read the D1's Raw file format, but
apparently does a significantly better job of color translation than does
Nikon's own software! For the trivial $30 fee, this is a program that literally
*every* D1 owner should purchase! Even more late-breaking addendum: We
just learned of Eric Hyman's excellent Bibble program,
which appears to offer fantastic color-correction for D1 images. At only $50 for
Bibble, we'd also put it on the absolute must-have list for every D1
owner! (Which one should you get? - Why not both? Each offers capabilities the
other lacks, and for $80 for the pair of programs, you really can't go
wrong!)
| Resolution/Quality vs Image Capacity
|
2000 x 1312 Resolution |
|
Images |
Approx. Compression |
| HI RAW data |
23 |
1:1 |
| HI YCbCr TIFF |
18 |
1:1 |
| HI RGB TIFF |
12 |
1:1 |
| Fine Quality |
66 |
5:1 |
| Normal Quality |
132 |
11:1 |
| Basic Quality |
265 |
22:1 |
Video Out
 US
and Japanese models of the D1 come with an NTSC video cable for connection to
a television set or VCR (European models come with the appropriate PAL cable).
This allows images to be played back on the TV screen and recorded to video
tape, with all the Playback menu options available.
US
and Japanese models of the D1 come with an NTSC video cable for connection to
a television set or VCR (European models come with the appropriate PAL cable).
This allows images to be played back on the TV screen and recorded to video
tape, with all the Playback menu options available.
Power
 The D1 uses an EN-4 Ni-MH battery pack (7.2 V DC, 2000
mAh) which can be recharged with an optional MH-16 or MH-15 Quick Charger. You
can also purchase an EH-4 AC adapter separately (100-240 V AC) which is useful
for saving battery power when performing mundane tasks such as reviewing or
downloading images. An indicator on the status display panel lets you know approximately
how much battery power is left and if no indicators appear at all, the battery
is completely exhausted. As always, we heartily recommend purchasing a spare
battery pack and keeping it charged for long shooting days or for shooting in
cold weather (which can zap battery power quickly).
The D1 uses an EN-4 Ni-MH battery pack (7.2 V DC, 2000
mAh) which can be recharged with an optional MH-16 or MH-15 Quick Charger. You
can also purchase an EH-4 AC adapter separately (100-240 V AC) which is useful
for saving battery power when performing mundane tasks such as reviewing or
downloading images. An indicator on the status display panel lets you know approximately
how much battery power is left and if no indicators appear at all, the battery
is completely exhausted. As always, we heartily recommend purchasing a spare
battery pack and keeping it charged for long shooting days or for shooting in
cold weather (which can zap battery power quickly).
The special connections used between the D1 and EN-4 battery pack prevented
us from performing our usual power-consumption measurements on the D1. Our sense
though, was that battery life was quite good, as we managed literally several
hundred exposures on a single battery charge. Still, our standard recommendation
of buying a second battery pack stands: Murphy's law applies very directly to
digicam power sources, meaning you'll always run out of battery capacity at
the worst possible moment....
Included Software
|
The software they didn't include...
|
(But that you should)
Few people realize just how *much* you can improve your digicam
images through clever processing in Photoshop. Greatly (!) increased
sharpness, reduced noise, and even ultra-wide dynamic range (light-to-dark
range) by combining multiple exposures. Fred Miranda and uber-Photoshop
expert Fred Miranda has packaged some of his Photoshop magic in
a collection of powerful and affordably priced "actions." Check
out his site, the results are pretty amazing! |
|
The D1 ships with the "Nikon View" software, which provides very basic manipulation
and cataloging capabilities for images captured by the camera. A much more advanced
package called Nikon Capture is available separately, but we didn't receive
a copy of it for testing.
Test
Results
In keeping with our standard policy, our comments
here are rather condensed, summarizing our key findings: For a full commentary
on each of the test images, see the D1's "pictures"
page.
As with all Imaging Resource camera tests, we encourage you
to let your own eyes be the judge of how well the device performed: Explore the
images on the pictures page, to see how well the
D1 performed, and how its images compare to other cameras you may be considering
buying.
Overall, the Nikon D1 turned in an exceptional performance. About
the best we can say of it is that it's a true Nikon Pro SLR that just happens to
be digital. Resolution was very good, verging on exceptional, although some
consumer-level cameras actually test slightly better, given their 3.34 megapixel
sensors, vs the 2.66 megapixel one in the D1. Likewise, we felt the color could
have been a little better, particularly given the excellent color Nikon's new
990 consumer camera produces. The D1's color is more generally more accurate, in
that it doesn't tend to over-saturate colors in the way that many consumer
digicams do. On the other hand, it produces somewhat odd coloration in skin
tones, and we've noticed that blue skies appear somewhat muted. While we didn't
get a chance to test it, it appears that Mike Chaney's excellent Qimage Pro program
does a superb job of color management with the D1's "raw" format files, straight
from the CCD. (Not to say the D1's color was so bad, just that we had higher
expectations, given it's premium price and position.) Although we captured
almost no images in "raw" format before we had to return the D1 test unit, Qimage Pro is
apparently particularly effective in improving the D1's handling of flesh tones.
- For $30, no D1 shooter should be without Qimage!(Please note that
we have no business relationship whatsoever with Mike Chaney or Qimage Pro.)
Addendum: A number of readers have written it to tell us of Eric
Hyman's excellent Bibble software, which
appears to do even better than Qimage on the color-correction front (although it
lacks Qimage's high-ISO noise filtering). At only $50 for Bibble, we'd also put
it on the absolute must-have list for every D1 owner! (Which one should
you get? - Why not both? Each offers capabilities the other lacks, and for $80
for the pair of programs, you really can't go wrong!)
One of the major
strengths of the D1 is its ability to use virtually any Nikon F-mount lens made
in the last 30 years or so. This means that resolution will be significantly
affected by the lens you choose to use with it. In our testing, we ran through
both the lenses we received from Nikon (the new 85mm tilt/shift Micro, and
17-35mm f/2.8 zoom), as well as essentially all the lenses in our own kit. The
winner turned out to be our own 105mm f/2.8 Micro Nikkor (if only by a nose). As
to the specifics of the test, we "called" the D1's resolution as being 800 lines
per picture height in both vertical and horizontal directions, although there
was a slight amount of aliasing before that point was reached. Significant
detail was visible all the way out to 900 lines per picture height, but aliasing
became progressively greater. The D1's in-camera sharpening is fairly subtle, so
the res target images had a slightly soft appearance relative to some other
cameras. (We were in particular comparing images to those from Nikon's own
Coolpix 990, which applies a somewhat heavy-handed sharpening internally.) We
tried our usual trick of applying fairly strong unsharp masking in Photoshop
(300% at 0.5 pixel radius), and felt it created a much crisper-looking image,
without introducing any halos or significant artifacts. Bottom line, the images
produced by the D1 are very sharp, and it seems to do a particularly good job of
reproducing very fine details. (Wires or tiny tree branches against the sky,
etc.)
As you'd expect from a high-end Nikon professional SLR, exposure
control was absolutely phenomenal. The variety of options and modes are far
beyond what would fit in this brief summary, but suffice to say that the D1
offered every exposure option we could conceive of (and a few we couldn't), as
well as a very accurate metering system, thanks to Nikon's 3-D color matrix
metering. Multiple focus zones, and the ability to have the spot-metering
actually track the focus area were an unexpected and very welcome
plus.
Because it has much larger CCD elements than typical consumer
digicams (big pixels mean more light sensitivity), the D1 does very well when
shooting in low-light conditions. At ISO 1600, its noise levels are about
equivalent to the better consumer-level digicams shooting at ISO 400. Although
the D1 offers special "gain up" settings with ISO equivalents as high as ISO
6400, we felt that the image noise at those settings was too high for the images
to be usable. In practice, we obtained very good images down to the darkest
level our studio light meter would measure accurately, 1/16 of a foot-candle
(about 0.7 lux). This is really dark, to the point it was hard to find
our way around the studio! We did notice a slightly odd behavior that we've seen
reported by other users: At higher ISO ratings (1600 and above, although very
slightly visible at ISO 800), the image noise in the D1 has a slight patterning
to it, in the form of vertical stripes of greater and lesser noise perhaps 50
pixels or so wide. A fairly subtle effect, but there if you look for
it.
Viewfinder accuracy of the D1 was quite good, as you'd expect from a
pro SLR. Nikon specifies the viewfinder accuracy as 96%, which agreed well with
our own measurements. Optical performance (distortion and aberration) will
obviously depend on the lenses you use: We were impressed though, by just how
much better the professional Nikkor glass was than the lenses on the
consumer-level digicams we're accustomed to testing. Probably no surprise, when
the cost of one lens was more than an entire "prosumer" camera, but the improved
quality really was quite remarkable.
As for Macro performance (a category
we regularly report on here), what you get from the D1 depends entirely on what
lens you use. We did our Macro test with our 105mm f/2.8 Micro Nikkor macro
lens. Given the stellar performance of this lens in our other tests, it's no
surprise that we were very pleased with the D1's performance in the macro
category: It captured a minimum area of only 0.95 x 0.62 inches (24.10 x 15.81
mm), with a very comfortable working distance of about 12 inches: Not as
"microscopic" as some consumer cameras (the Coolpix 950 and 990 in particular
come to mind), but the 12 inch working distance is fantastic...
As a
bottom line to our tests, the Nikon D1 is clearly a worth candidate to carry the
Nikon legacy into the digital era: It provides all the control and exceptional
"build" quality of a professional Nikon SLR, with a high-resolution digital
sensor seamlessly integrated. Very highly recommended!
Conclusion
What a camera! The Nikon D1
should be a welcome addition to any photographer's bag of tricks, amateur and
professional alike. We found so many superlatives in our testing of the D1 that
we're hard-pressed to know how to condense them all down to a brief "concluding"
statement. Suffice to say that the incredible exposure control, flexibility of
lenses and flash units, and features, features, features lead us to heartily
recommend the D1 to anyone looking for a digicam that's truly a professional
picture-taking tool. (We recommend at the same time though, that you purchase a
copy of Mike Chaney's Qimage software
though, to help in situations requiring really critical color translation.) The
D1 is evidently in the process of enjoying great commercial success, which we
find unsuprising, given its capabilities and likeness to Nikon's popular F5 film
camera, and the excellent performance of its digital components. Overall, a
phenomenal tool, fully worthy of the name and reputation of Nikon!
Coming Soon!
<<D1 Sample Images
| Additional Resources and Other Links>>
Reader Comments!
Questions, comments or controversy on this product? Click
this link to see what other Imaging Resource readers have had to say about
the Nikon D1, or add comments of your own!
 While the LCD panel on the D1 isn't usable as a viewfinder, it does
provide a great deal of information about your pictures after you've shot them.
Several screens of information are available, but the most interesting is the
optional histogram display, shown at right. (Click on the display to view an
animated image showing all four playback display screens.) The histogram display
is common among other professional digital digicams, and recently made an
appearance on Nikon's own Coolpix 990 prosumer model. The histogram display is
simply a graph of how many pixels there are in the image at each brightness
level: The brightness is the horizontal axis, running from black at the left to
white at the right. The height of the graph shows the relative number of pixels
having each brightness. This sort of display is very handy for determining under
or over-exposure. Ideally, the histogram would stretch across the entire width
of the display, using the full range of brightness values available. An
underexposed image will have a histogram with all the data lumped on the
left-hand side, with nothing reaching all the way to the right. Likewise, an
overexposed image will have all the data lumped on the right-hand
side.
While the LCD panel on the D1 isn't usable as a viewfinder, it does
provide a great deal of information about your pictures after you've shot them.
Several screens of information are available, but the most interesting is the
optional histogram display, shown at right. (Click on the display to view an
animated image showing all four playback display screens.) The histogram display
is common among other professional digital digicams, and recently made an
appearance on Nikon's own Coolpix 990 prosumer model. The histogram display is
simply a graph of how many pixels there are in the image at each brightness
level: The brightness is the horizontal axis, running from black at the left to
white at the right. The height of the graph shows the relative number of pixels
having each brightness. This sort of display is very handy for determining under
or over-exposure. Ideally, the histogram would stretch across the entire width
of the display, using the full range of brightness values available. An
underexposed image will have a histogram with all the data lumped on the
left-hand side, with nothing reaching all the way to the right. Likewise, an
overexposed image will have all the data lumped on the right-hand
side.