 Back
to Full Canon EOS D30 Digital SLR Review
Back
to Full Canon EOS D30 Digital SLR ReviewGo to Canon EOS D30 Digital SLR Data Sheet
Go to Canon EOS D30 Digital SLR Pictures Page
Up to Imaging Resource Cameras Page
Use your browser's "Back" button to return to the previous page, or the links at the top and bottom of this page to navigate to related information. If you have difficulty fitting the text on this page onto your printer output, simply resize your browser window to a narrower width and print again.
Remember us when it's time to buy!
Dave here: Have our reviews been helpful to you? (Is this article you're reading right now useful?) Preparing this level of information on as many products as we do is incredibly hard work, not to mention expensive. Things on the Internet may look like they're free, but they're not. (As a lot of big dot.com companies are finding out these days.) Somewhere, somebody has to pay to produce worthwhile content. YOU can help us though, by remembering us when it comes time to make your purchase. Would you consider coming back to our site and clicking-through to one of our advertisers to make your purchase? Every dollar you spend with one of our advertisers helps us directly (in affiliate fees) or indirectly (the advertiser will keep renewing their ad contract with us). To make it easy for you to support us, here's a URL you can visit, to see all our current advertisers, with links to click on that will register your visit to them as having come from our site. It's up to you where you buy, but Mike, Mike, Kim, Yazmin, Marti and I would be really grateful if you'd help us out by choosing one of our advertisers to purchase from.
Thank you for your support!
Dave Etchells, Founder & Publisher
Visit our "Buy Now" Page:
https://www.imaging-resource.com/buynow.htm
Back
to Full Canon EOS D30 Digital SLR Review
Go to Canon EOS D30 Digital SLR
Data Sheet
Go to Canon EOS D30 Digital SLR
Pictures Page
Up to Imaging Resource Cameras
Page
Canon EOS D30 Digital SLRCanon's first digital SLR packs 3 megapixels of CMOS sensor into a speedy, compact body! (Smallest/lightest digital SLR as of August, 2000) Review First Posted: 8/27/2000 |
|
 |
|
Canon EOS SLR designed ground-up to be digital |
|
|
3.25 megapixel CMOS sensor, 2226 x 1460 pixel images | |
|
|
ISO of 100, 200, 400, 800, 1600 | |
|
|
3 frames per second, photo-centric design – touch shutter button in Play mode and camera returns to Record mode! | |
|
|
Compatible with all Canon EF lenses, focal length multiplier of 1.6 |
Manufacturer Overview
Ask a photographer, be they professional or amateur, to name the first couple
of camera manufacturers that they can think of, and chances are that one of
those would be Canon. Ask the same photographer what the Canon name means to
them, and many would suggest that they associated the name with innovation,
the company having brought such technological advances as Eye-Controlled Focusing
(Canon EOS 5, 1992) and the USM ultrasonic motors used in the more recent Canon
EF lenses, which are extremely quiet and very fast.
Canon film cameras cover the full range from models such as those targeted at
professionals (the EOS 1 and 1N for example, and more recently the EOS 1V announced
at PMA last February) to those targeted at the consumer (such as the tiny ELPH
series or the EOS Rebel cameras). Up until the Photo Marketing Association Show
in Las Vegas, February 2000, however, Canon was conspicuously absent from the
higher end of the digital camera market, electing instead to provide camera
bodies to Kodak, who similarly to their arrangement with Nikon, reworked the
bodies and fitted the necessary digital internals for use by professionals.
Instead, Canon focused on the consumer market, with numerous consumer-level
models, mainly following the design aesthetic of their ELPH cameras, in small,
rugged metal cases.
Like many others in our field, and doubtless along with many practicing photographers,
we continued to speculate that Canon's entry to the higher end of the digital
camera marketplace with a true interchangeable-lens SLR body based on an EOS
camera could not be far away. With cameras such as Nikon's D1 and Fuji's FinePix
S1 Pro already shipping, or well on their way, and Kodak creating a name for
themselves with their very expensive, but extremely capable Pro cameras, Canon
simply had to make an entry to the market or risk arriving too late for the
party. At PMA 2000, our speculation proved correct when we brought readers the
very first news and photos of Canon's upcoming Digital EOS camera, provoking
great interest and much speculation as to the new camera's capabilities. The
company showed a camera body under glass, noting that the final production versions
would feature a resolution of more than 3 megapixels, and that the camera would
use Canon EF lenses - little more information was to be forthcoming until May
2000, when Canon officially announced the EOS D30.
When the official announcement finally arrived, it brought a number of surprises
along with it. First and foremost was Canon's choice of a CMOS image sensor:
Until the EOS D30, CMOS sensors had been seen as unsuitable for a high-end digital
camera because of problems with image quality and manufacturing as compared
to CCD sensors - even though CMOS has been touted by many as the holy grail
of image sensors due to potential cost savings. Canon announced that they had
developed their own CMOS sensor, and that their scientists had managed to find
ways to solve CMOS' image quality deficiencies - but there was understandably
still a great desire from photographers to see the proof of this, in the form
of sample photos. Along with the CMOS sensor issue, Canon's EOS D30 offered
the same maximum "normal" ISO rating (1600) as Nikon's D1, but went
one step further at the other end of the scale down to ISO 100. Canon also chose
to give the D30 a 32MB buffer memory offering a speedy burst-mode of some 3
frames per second for 8 frames, and a resurrection of the CCD-RAW (only in this
case, CMOS-RAW) format which made an appearance on the PowerShot Pro
70.
With its high specifications compared to consumer digicams, it is inevitable
that people will want to compare the EOS D30 to Nikon's D1, albeit with a much
lower price tag - but Canon has been quite adamant from the get-go that the
D30 was not a rival to the D1, something that we'd agree with. For one thing,
the D1 features a build which we've described before as somewhat akin to a tank
- it is heavy, and very dust/water resistant. The D30 by contrast makes no attempt
at the seals and strengthening required of a camera that must - in some cases
literally - be taken to the battlefields and back. Not that the D30 lacks chassis
strength, by any means, but it is not on the same level as the D1, or Canon's
own remarkable EOS 1V film camera. The EOS D30 also doesn't offer as high a
shutter speed as the D1, nor as high a flash sync, and so on - all these features
are good by comparison to consumer SLR levels, but not quite at a "Pro"
level.
As we understand it, Canon does have plans for a Nikon D1 rival, but the EOS
D30 is not intended to be that camera - what we've heard from some sources (and
not Canon or Kodak, we must note) is that an agreement with Kodak specifically
forbids the company to manufacture a professional-level digital SLR before the
end of this year. Even if this is not the case, Canon certainly has set a precedent
in the past for first creating a mid-level camera, before filling out its product
lines with the high-end and low-end models, and we'd expect much the same process
to occur with Canon's digital EOS cameras. All that said, the D30's specifications
and performance will certainly give the Nikon D1 a (hard) run for the money.
While the environmental seals and ultimate shooting speed may not quite be there,
this is clearly a camera designed with the sensibilities of professional photographers
in mind.
One thing we can be certain of: There is a huge pent-up demand in the market
for an interchangeable lens digital SLR that accepts Canon EF lenses. Large
numbers of photographers have cases full of Canon EF glass, looking for a digital
SLR costing less than $10,000 to use them on. With the D30 list-priced at $3,500,
and selling on the street for close to $3,000, it definitely addresses the cost
issue. Of course, cost is only part of the equation: Image quality and functionality
are equally important. Does the D30 make the grade? We'd emphatically say yes,
as we'll share with you below.
Highlights
Design
Canon's EOS D30 can be looked at essentially as an EOS series SLR camera,
it looks and feels very similar to the film cameras with which it shares the EOS
name, and bears a particularly strong resemblance to the EOS Rebel G camera (known
in Europe as the EOS 500N, and in Japan as the EOS Kiss). This similarity to the
EOS line will make transition to digital much easier for photographers used to
the EOS film cameras, without having to relearn much of how the camera is laid
out. With a weight of some 1.7 pounds (0.8 kg) or so without batteries, lens or
flash card, the D30 is some 9% lighter than its nearest rival the Fuji FinePix
S1 Pro, and 47% lighter than Nikon's D1 (although the D1 has a portrait grip built-in,
and the EOS weight does not include its optional portrait grip, which adds another
13.5 ounces (including the second battery). While it couldn't necessarily be described
as "light", at the time of this writing (August 2000) the EOS D30 does
take the title of "lightest interchangeable-lens SLR digital camera"
— and the difference in weight with other SLR digital cameras is sure to
be noticed and appreciated. Despite it's relatively svelte proportions though,
the EOS D30 has a solid heft and conveys a strong sense of high build quality.
The camera measures 5.9 x 4.2 x 3 inches (149.5 x 106.5 x 75 mm), also without
the lens, batteries and flash. This is a touch (0.1") wider than the S1 Pro,
but a hefty 0.7" shorter and about 0.2" slimmer. Nikon's D1 is 0.3"
wider and deeper than the EOS D30, and a full 2 inches taller — but this
again does not account for the D1's built-in portrait grip, and the D30's accessory
grip adds about 1.75 inches to its height.
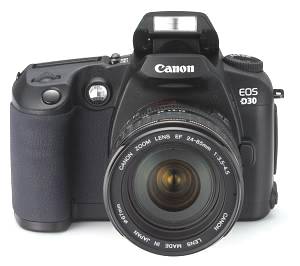
The front of the camera features a standard Canon EF lens mount. There's also the lens release button, a depth of field preview button (on the lower left of the lens mount), a flash popup button (on the upper left of the lens mount) and the redeye reduction lamp/focus illuminator light (the clear window on the upper right of the camera). (A side note: If you haven't seen one of these krypton-filled focus-assist lights, you'll likely be as amazed as we were: It's hard to imagine something that small putting out that much light!)

The top of the camera features the shutter button, mode dial and a small status display panel that reports most of the camera's settings. Also on top are the main dial and several control buttons (metering mode, flash exposure compensation, drive mode, AF mode and white balance). The top of the camera also contains a hot shoe for mounting an external flash unit. The hot shoe has the usual trigger terminal in the bottom, as well as four other contacts for interfacing to Canon EX Speedlite flashes, and a locking hole. Fixed neck strap eyelets are located on both ends of the top of the camera as well.

On the hand grip side of the camera, towards the rear of the handgrip there is a large door which opens forward, behind which the CompactFlash slot (which supports Type-I and Type-II cards including the IBM MicroDrive is located. Underneath the CompactFlash slot is a small gray eject button for removing the CompactFlash cards.
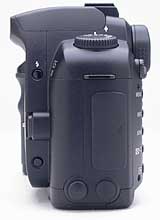
The opposite side of the camera features a hinged rubber door behind which are the digital (USB) and NTSC/PAL switchable video out sockets. Below this door are two more socket, the front of which has a screw-in plastic cover and is a PC flash sync terminal, whilst the rear socket is for an N3 remote control and features a push-in rubber cover. Neither of the covers for these two sockets is connected to the camera body. You can also see more clearly in this picture the depth of field preview button (bottom) and flash popup button (top) on the side of the lens mount.
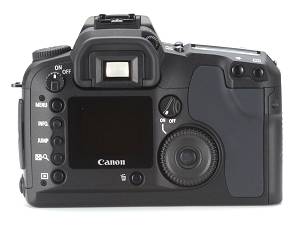
The back panel of the EOS D30 is home to many of the camera's controls, as well as the large, bright LCD screen. Down the left-hand side are the main power on/off switch, as well as several buttons related to menus and playback, including the Menu, Info, Jump, Index/Enlarge and Playback buttons. Underneath the LCD screen is the Delete button, and to the right of the screen is the quick control dial, in the center of which is the set button. Above and to the left of the quick control dial is the quick control dial switch, which enables/disables the quick control dial. The LCD panel itself is located near the left center of the back of the camera, and directly above it is the optical viewfinder. On the top right corner of the optical viewfinder is the diopter adjustment knob, which is recessed slightly to prevent accidental changes to it, and features a knurled surface to give grip. Finally, on the top right corner of the camera are the AE/FE lock button and the focusing point selector button.
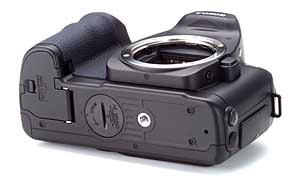
The very flat bottom of the camera reveals the metal tripod mount, as well as the cover for the CR2025 backup button battery, and the main BP-511 Lithium Ion battery chamber cover. The cover is removable, and when installing the optional portrait grip on the camera you first remove the cover, allowing the battery chambers in the portrait grip itself to be connected through to the main battery chamber. A small lever in the outside edge of the battery chamber cover serves to unlock it so that it may be opened. Due to the location of the battery chamber at the very right-hand edge of the camera in the handgrip, it should remain accessible with the camera on a tripod. The large surface area of the camera's bottom provides a stable mounting surface for use with a tripod.
An optional extra for the Canon EOS D30 is its portrait grip, which also doubles as a way of doubling the camera's battery life. Seen above from the front, the portrait grip is connected to the camera by way of the tripod socket. With the battery chamber cover removed, the "dummy battery" protruding from the top right of the portrait grip extends into the D30's battery chamber, allowing the battery contacts to be extended through to the grip's own battery chambers. The shutter button is just visible on the lower right corner of the portrait grip, and also visible is a knurled dial which is used to screw/unscrew the screw on the top of the portrait grip into the D30's tripod socket.

On the back of the portrait grip, we see the dual battery chambers, and the other side of the dial for locking/unlocking the portrait grip to the camera. There's also a slide switch which opens the battery compartment. At bottom right are duplicate controls for the AE/AF and focus zone selector buttons.
Finally, on the bottom of the portrait grip we see a metal tripod thread, allowing
the camera to be tripod-mounted even when the portrait grip is being used. There's
also another metal neckstrap eyelet recessed into the base of the portrait grip,
allowing the camera to be hung around your neck portrait-style (a nice touch,
we think!) The shutter button and a duplicated main dial are to be found on
the bottom right corner of the portrait grip, and just above and to the right
of these, tucked safely away on the inside of the bulge below the dummy battery
is a switch which can be used to disable the controls on the portrait grip (which
you'll find very useful the first time you leave the grip attached to the camera
and revert to landscape shooting — were it not for this switch, you'd be
driving yourself nuts taking photos of people's waists every time you bumped
the shutter button on something!)
The illustration below expands on the cross-section above, showing how light passes through the D30's body to both the autofocus and flash sensors. As shown by the red lines, autofocus happens by virtue of a partially transmissive region in the middle of the main mirror. A secondary mirror reflects the light down to the base of the camera body, where it passes through a lens, reflects from yet another mirror, and thence into the AF sensor itself. Focusing can thus be continuous right up until the mirror flips up for the exposure itself.
The TTL (through the lens) flash sensor resides at the top of the camera, behind the pentaprism. Here, a small mirror and lens pick off a portion of the light passing to the viewfinder. (Note that this is before the focusing elements of the viewfinder optics, so it achieves more area coverage than you might expect.) The light reflects from a mirror, passes through a lens, and thence to the photodiode that measures returning flash energy. This design requires a pre-flash for metering, but is the same system used by other EOS cameras. This means that all EOS-compatible Canon flash units will be fully functional with the EOS D30. This approach also avoids the difficulties inherent in adapting camera designs based on Off-The-Film (OTF) flash metering. The disadvantage is that the metering occurs a small fraction of a second before the shutter opens. The strong advantage though is that it alleviates problems relating to differences between sensor and film reflectivity. (We found the flash metering of the D30 to be exceptionally accurate.)
The real "guts" of the D30 is a cast plastic optical box holding the lens mount on the front, the pentaprism on top, and the CMOS image sensor on the rear. This compact arrangement is a major factor in the small profile and light weight of the D30 overall.
Here's a look at the D30's optical box from the back, revealing several interesting features, as detailed in the photo's caption:
Overall, modularity seems to be a key word in the design of the D30: Canon's engineers obviously weren't designing with one camera in mind, but an entire family. In our conversations with them, Canon USA's technical folks made much of the component shown in the photo below, the "Engine" that handles the D30's image processing. Again, note our comments in the photo caption below.

The shot below shows both why the D30 has a very rigid, rugged "feel", but also part of why Canon themselves don't claim it to be a "professional" model. The body is composed of heavy gauge stamped metal: Very rugged and rigid, but clearly not in the same class as the die-cast body of the EOS-1V. Still, there's no doubt that this isn't a "plastic" camera!
CMOS versus CCD & what's it all mean?
Earlier in this review, we promised readers a look at the CMOS image
sensor used in Canon's EOS D30 digital camera. This is certainly not a standard
section in our reviews, but we felt that Canon's choice of CMOS was very significant!
To understand what CMOS sensor technology can bring to a digital camera, first
of all you need some understanding of how CCD and CMOS sensors work, and what
they do differently.
CCD, or Charge-Coupled Device image sensors, were invented at the end of the
1960s by scientists at Bell Labs, and were originally conceived not as a method
of capturing photographic images, but as a way of storing computer data. Obviously
this idea didn't catch on; today we instead have RAM (Random Access Memory)
chips in our computers which are, ironically enough, manufactured using the
CMOS process.
Where CCDs did catch on, however was recording images — by 1975 CCDs were
appearing in television cameras and flatbed scanners. The mid 80s saw CCDs appearing
in the first "filmless" still cameras… CCDs rapidly attained
great image quality, but they weren't perfect. Perhaps most significantly, CCDs
required a manufacturing process which was different to that used for manufacturing
other computer chips such as processors and RAM. This means that specialized
CCD fabs have to be constructed, and they cannot be used for making other components,
making CCDs inherently more expensive.
Interline Transfer CCDs consist of many MOS (Metal Oxide Semiconductor) capacitors
arranged in a pattern, usually in a square grid, which can capture and convert
light photons to electrical charge, storing this charge before transferring
it for processing by supporting chips. To record color information, colored
filters are placed over each individual light receptor making it sensitive to
only one light color (generally, Red, Green and Blue filters are used, but this
is not always the case). This gives a value for one color at each pixel, and
the surrounding pixels can provide eight more values, four each of the two remaining
colors from which they may be interpolated for our original pixel.

After the exposure is complete, the charge is transferred row by row into a read-out register, and from there to an output amplifier, analog/digital converters and on for processing. This row-by-row processing of the CCD's light "data" is where the sensor gets the term "Charge-Coupled" in its name. One row of information is transferred to the read-out register, and the rows behind it are each shifted one row closer to the register. After being "read out", the charge is released and the register is empty again for the next charge. Repeat the process a number of times, and eventually you read out the entire contents of the CCD sensor. (Think of a bucket brigade, moving water from point A to point B by pouring it from one bucket into the next...)

A number of disadvantages to this approach to sensor design now become apparent, in addition to the already mentioned cost. For one thing, the entire contents of the CCD must be read out, even if you're only interested in a small part thereof (for example, when using the digital zooms that are all the vogue in digital cameras, you have no interest in a large part of the sensor's data, so why take the time to read it out?) There are also a number of supporting chips required for the CCD sensor, each of which adds to the complexity and size of the camera design, increasing cost and power consumption. CCDs also suffer from blooming (where charge "leaks" from one light receptor into surrounding ones), "fading" (a loss of charge as it is passed along the chain before being read out), and smearing (where the image quality can be adversely affected by light arriving during the read-out process, leaving streaks behind bright scene areas).
There's also the issue of speed. The step by step process used in a CCD is not exactly conducive to very high speed, and for just this reason a second type of CCD exists. The Frame Interline Transfer CCD features a read-out register as large as the light receptor area is, allowing the entire contents of the CCD to be read out in one pass. This, though, adds significantly to the area of silicon required, and hence to the cost of the CCD.
This is where CMOS image sensors step in. CMOS, or Complementary Metal Oxide Semiconductor, is actually a generic term for the process used to create these image sensors, along with numerous other semiconductor items such as computer RAM, processors such as those from Intel and other manufacturers, and much more. CMOS image sensors can be made in the same fabs as these other items, with the same equipment. This technology is, of necessity, very advanced with the amount of competition in processor and other markets contributing to new techniques in CMOS fabrication. Add to this that there is a very significant economy of scale, when your fab can make not only CMOS image sensors, but other devices as well, and you find that CMOS image sensors are much cheaper to make than CCDs.
This cost advantage is even more significant when you consider the way a CMOS sensor works. The Active Pixel CMOS image sensors used in digital imaging are very similar to a CCD sensor, but with one major difference — supporting circuitry is actually located alongside each light receptor, allowing noise at each pixel to be canceled out at the site. Further to this, other processes can be integrated right into the CMOS image sensor chip, eliminating the need for extra chips — things such as analog/digital conversion, white balancing, and more can be built into the CMOS sensor. This reduces cost of supporting circuitry required, as well as camera complexity, and also power consumption, as does the fact that CMOS sensors require a significantly lower voltage than CCD sensors. CMOS sensors themselves also claim lower power consumption than CCD sensors, with one manufacturer claiming their CMOS sensors draw some 10x less power than equivalent CCD sensors.
CMOS sensors have other advantages, as well. For one thing, they can be addressed randomly. If you're only interested in a certain area of the image, you can access it directly and don't need to deal with the unwanted data. Blooming and smearing are also less of a problem with CMOS sensors. CMOS sensors are capable of much higher speeds than their CCD rivals, with one CMOS chip we've heard of capable of running at over 500 frames per second at megapixel resolution.
With these advantages, you'd think CMOS would be a shoe-in to replace CCD in digital cameras, but thus far it has really only impacted the lower end of the market, with CMOS rapidly becoming dominant in the entry level digital cameras and tethered cameras. Why hasn't CMOS taken over at the high end? Well, up until now, image quality has not been on a par with CCD… CMOS sensors, with their many amplifiers at each pixel, suffer from so-called "fixed pattern noise". The amplifiers aren't all equal, and this creates a noise pattern across the image. In the D30's CMOS sensor, Canon has tackled this by first taking the image off the CMOS sensor in 10 milliseconds, and then reading just the fixed-pattern noise from the sensor in the following 10 milliseconds. Subtract the second image from the first, and you neatly remove the noise.
There's also the fact that CMOS sensors are generally less sensitive than their CCD counterparts. High end "Full Frame" CCD image sensors have a "fill factor" of 100%, because the whole CCD sensor area is being used for light capture — but in a CMOS sensor the fill factor is lower, because the extra circuitry alongside each pixel takes up space. This space can't be used to capture light, and so you lose some of it… Two techniques exist to combat this — firstly reducing the size of this support circuitry, and secondly the microlens. Reducing the size of the support circuitry is the less ideal of the two methods — the smaller you make it, harder the sensor is to manufacture, and the more expensive it becomes. The microlens is considered to be the better answer, then. Essentially, the support circuitry is covered by an opaque metal layer, and a microscopic lens is placed over the entire area of the light receptor and support circuitry, redirecting the light that would otherwise fall on the support circuitry and focusing it on the light receptor.

Canon's EOS D30 is the first high-end digital camera we've seen using CMOS technology, and it is likely that the projected price advantage the camera has in comparison with its nearest rivals (the Fuji FinePix S1 Pro and Nikon D1) is in large part due to the choice of the CMOS image sensor. The image sensor in the EOS D30 is only ever so slightly smaller than those used in these two cameras, and significantly bigger than the sensors used in consumer cameras, as can be seen in the comparison photo above, which shows the CCD sensor from Canon's PowerShot S20 digital camera alongside the CMOS sensor from the EOS D30. The illustration below shows the difference in sizes (to scale) of a consumer CCD, the EOS D30 sensor, the D1/Fuji S1 Pro sensors, an APS film frame, and a standard 35mm frame.

Canon thus far has been fairly closed-mouthed about their CMOS sensor technology,
but have talked about a few details of it. As with other Active-Pixel CMOS sensors,
theirs does in fact have a signal amplifier located at each pixel site. More
intriguing though, is that they also claim to have an A/D (analog to digital)
converter at each individual pixel site as well. If this last is true, then
it must be a very different sort of A/D than is normally used with CCDs, as
those circuits are quite complex and space-consuming. We suspect we'll hear
more details as Canon's patent position is solidified, but it sounds as though
there's been some genuine innovation in Canon's back labs. It's unusual these
days to see a company moving toward vertical integration, developing component
technology in-house rather than farming it out to specialist companies. As the
digicam market continues to evolve, it will be interesting to see whether Canon's
sensor technology will constitute a competitive advantage for them relative
to other manufacturers.
Viewfinder
The D30's viewfinder is excellent on all fronts, providing great information,
easy use, and high accuracy. While we don't have a formal test for it, the "eyepoint"
of the viewfinder seemed quite high, making it comfortable to use with eyeglasses.
The dioptric correction is also excellent, covering a broad range from -3 to
+1 diopters. We measured its accuracy at 96%, agreeing well with Canon's official
specification of 95% frame coverage. The viewfinder display conveys a lot of
information about exposure and camera status, as shown in the illustration below.
(Courtesy Canon USA, Inc.)

Important to note in discussing the D30's viewfinder system is that the rear-panel
LCD display is not usable as a viewfinder, but optical viewfinder by
a mirror that intercepts the image on the way to the shutter and the sensor.
Thus, when the camera isn't actively taking a picture, the light from the
lens is directed only to the optical viewfinder, and so isn't available to
the sensor to drive a live viewfinder display on the LCD. With the exception
of the Olympus E-10 (which uses a beamsplitter prism instead of a mirror,
at some cost in light sensitivity), all digital SLRs operate in this fashion.
 While
not strictly a viewfinder function, the capture-mode Info display shown on
the rear-panel LCD screen probably deserves mention at this point. The optical
viewfinder carries quite a bit of information about camera status as shown
above, but there's even more available on the rear panel, just by pressing
the "Info" button. Rather than the exposure settings shown in the
optical finder, this display shows shooting mode, autobracketing and flash
exposure compensation, shots and memory card space remaining, ISO setting,
and the status of all custom-function options selected, albeit in a very terse
numerical format. Between this screen, the optical viewfinder display, and
the LCD data readout on the camera's top, the D30 is one of the most "informative"
cameras we've yet worked with.
While
not strictly a viewfinder function, the capture-mode Info display shown on
the rear-panel LCD screen probably deserves mention at this point. The optical
viewfinder carries quite a bit of information about camera status as shown
above, but there's even more available on the rear panel, just by pressing
the "Info" button. Rather than the exposure settings shown in the
optical finder, this display shows shooting mode, autobracketing and flash
exposure compensation, shots and memory card space remaining, ISO setting,
and the status of all custom-function options selected, albeit in a very terse
numerical format. Between this screen, the optical viewfinder display, and
the LCD data readout on the camera's top, the D30 is one of the most "informative"
cameras we've yet worked with.
Optics
As with other digital SLRs we've tested, there's not a great deal to report
in the "optics" sections of this review. The Canon EOS D30 accepts
all standard EF-series Canon lenses, a collection that includes something on
the order of 75-80 currently produced models, and a total of about a hundred
designs over the history of the line. Key features of the Canon EF lens series
are models with the exceptionally fast, silent "ultrasonic" focusing
mechanism ( a coreless motor built into the lens body itself), and the exceptional
range of optically stabilized models that permit hand-holding way beyond
light levels that would normally require the use of a tripod.

As we mentioned earlier in this review, like most digital SLRs, the sensor
in the EOS D30 is smaller than a 35mm film frame. This means that the "effective"
focal length of your lenses will be 1.6x their normal values on 35mm cameras.
Just to be clear, nothing's changed about the lenses or their behavior, it's
just that the CMOS sensor is effectively cropping a smaller area out of the
lens' coverage circle. The net result is that shooting really wide angle photography
is tough with digital SLRs, the D30 included. At the other end of the scale
though, it's like having a 1.6x teleconverter on your lenses with no cost in
light loss or sharpness. Thus, a 300mm telephoto has the same "reach"
as a 480mm on your 35mm film camera. - And of course, a f/2.8 300mm is a lot
cheaper than a f/2.8 500mm! The net of it is that a 31 mm focal length has the
same angular coverage as a 50mm lens on a 35mm SLR, and the common 17-35mm zoom
lenses have a range equivalent to 27-56mm on film cameras.
When we tested the production model D30, we asked Canon for a broad range of
lenses, including the 24-85mm model shown in the illustration above, a high-end
28-70mm f/2.8 L-series lens, a 100mm f/2.8 macro, and a wonderful 100-400mm
L-series "IS" (Image Stabilization) zoom. This last was excellent
fun at kids soccer games: The 1.6x focal length multiplier of the D30 meant
this was equivalent to a 160-640mm zoom. With the optical stabilization, we
could actually hand-hold shots at maximum telephoto with relative impunity.
Combined with the ~ 3 frames per second speed of the D30 and the high capacity
of the 340MB Microdrive we used in the camera, it convinced us that equipment
really can make you a better photographer!
We tested the various lenses quite extensively, with the results and test shots
detailed on the D30's
pictures page. We were surprised to find how well the relatively inexpensive
24-85mm lens did against its much higher-priced brethren: Wide open, the hands-down
winner for corner to corner sharpness was the 100mm fixed focal length macro.
Other than some fairly severe coma in the far upper left-hand corner of the
frame with the 24-85mm wide open, it was actually sharper than the 28-70mm overall.
Stopped down, it easily held its own with the other lenses too. When we tested
the Nikon D1, we tried a number of different lenses on it as well, including
some true "consumer" grade units. The lenses we had available for
testing on the D30 didn't extend as far down the price scale, but we were still
surprised by how well the 24-85mm did overall. In our assessment, it would make
an excellent general-purpose companion for the D30.
Autofocus System
This is an area where we're probably least qualified to comment, given the relatively
small amount of time we've spent with professional-grade SLRs. The D30 has an
autofocus system with three sensors, arrayed horizontally across the frame.
You can manually select which of these three you want the camera to pay attention
to (handy for off-center subjects), or you can let the camera decide. When it's
operating in automatic AF mode, it will use the sensor corresponding to the
part of the subject closest to the camera.
AF speed with the Canon "USM" (Ultra Sonic Motor) lenses is quite
fast, but we found that the camera had a little trouble following fast-moving
action in the soccer games we shot. Also, it was very prone to being fooled
if a player momentarily passed between the camera and the subject we were following.
Canon advertises that the D30 has the same "focus prediction" of its
high-end EOS 1v and 1nRS, which should be able to handle situations like this.
We haven't used those higher-end film cameras, but were a little surprised that
the D30 was so easily tricked by moving subjects like this. It's possible that
the much greater number of AF sensors in cameras like the EOS-1v (45 AF sensor
areas) would greatly improve upon this performance.
Not to cast undue aspersions on Canon's AF technology though: Compared to most
digicams we've tested, autofocusing was very fast and sure-footed, and we rarely
if ever got an out-of-focus image except in "pathological" situations
like that described above.
Exposure
As you'd expect, the EOS D30 provides exceptionally complete exposure control.
Standard exposure modes include the usual program, aperture-priority, shutter-priority,
and full manual, as well as some "image zone" (scene-based preset)
modes, and one of the most unique (and uniquely useful) modes we've yet seen,
an Automatic Depth-of-Field mode. The "image zone" exposure modes
include Portrait, Landscape, Close-up, Sports, and Night Scene modes. These
modes preset a variety of camera parameters to make it easier for non-expert
photographers to achieve good exposures in a variety of standard shooting situations.
The full Auto mode takes over all camera functions, making the D30 into a very
easy to use point and shoot camera, albeit a very capable one.
As noted, we were most impressed with the Automatic Depth-of-Field mode. This
mode uses all three autofocus zones to determine the amount of depth in the
active subject area. Once it has determined the range of focusing distances
present across the three zones, it automatically computes the combination of
aperture and shutter speed needed to render all three zones in sharp focus.
This strikes us as a remarkably useful feature, even for professional photographers:
In many situations, you want to keep several subjects in focus, while at the
same time trying for the highest shutter speed (largest aperture) that will
permit that. In practice, faced with such situations, we've generally resorted
to just picking the smallest aperture feasible and hoping for the best. With
the D30's A-DEP mode, the camera takes the guesswork out of this process and
gives you the fastest shutter speed it can manage while still keeping things
in focus. (In playing with this, we were often surprised by how large an aperture
in fact would work: We frequently would have chosen a much smaller aperture
to stay on the safe side.)
We also liked the way Canon implemented the automatic exposure bracketing on
the D30: You can set the total exposure variation (across three shots) at anywhere
from +/- 1/3 EV all the way up to +/- 2 EV. The nice part is that the automatic
variation is centered about whatever level of manual exposure compensation you
have dialed in. Thus, you could set positive compensation of 0.7EV, and then
have the camera give you a variation of +/- 2/3 EV about that point.
Speaking of exposure compensation, the D30 also lets you specify the step size
for EV adjustments. The default is a step size of 1/2 EV, but you can set an
increment of 1/3 EV unit via the LCD menu system. (Frankly, we've always found
that 1/3 EV compensation is just about ideal for digicam: 1/2 EV steps are just
too broad to set critical highlight exposures accurately.)
 We
really liked the amount of information the D30 gives you about its exposure,
not only in terms of the settings it's using, but in the form of feedback on
how pictures you've captured turned out. You can select an "Info"
display mode when viewing captured images on the rear-panel LCD screen, which
produces the display shown at right. Notable here is that you not only can see
all the exposure parameters, but you get excellent feedback on the tonal range
of the image itself. One form of feedback is the histogram display at upper
right, which shows how the tonal values are distributed within the image. Histogram
displays are useful for directly seeing how the overall exposure turned out
in an image, but we've found them to be of limited usefulness for making critical
judgments about highlight exposure.
We
really liked the amount of information the D30 gives you about its exposure,
not only in terms of the settings it's using, but in the form of feedback on
how pictures you've captured turned out. You can select an "Info"
display mode when viewing captured images on the rear-panel LCD screen, which
produces the display shown at right. Notable here is that you not only can see
all the exposure parameters, but you get excellent feedback on the tonal range
of the image itself. One form of feedback is the histogram display at upper
right, which shows how the tonal values are distributed within the image. Histogram
displays are useful for directly seeing how the overall exposure turned out
in an image, but we've found them to be of limited usefulness for making critical
judgments about highlight exposure.
Digital cameras need to be exposed more or less like slide film, in that you
need to zealously protect your highlight detail: Once you've hit the limit of
what the sensor can handle, the image "clips" and all detail is lost
in the highlight areas. The thing is that it's quite common for critical highlights
to occupy only a very small percentage of the overall image area. Because they
correspond to such a small percentage of the total image pixels, the peak at
100% brightness can be very hard to distinguish in the histogram display. To
handle such situations, the D30 blinks any pixels that are 100% white on its
screen, alternating them between black and white. This makes localized overexposure
problems leap out at you, making it very easy to control the critical highlight
exposure precisely. (The sample image shown in the display above is a pathological
example, chosen to show how the feature works: In practice, you'd probably never
overexpose an image that badly.)
Because we didn't notice it until the very day we were due to ship the D30 production
model back to Canon, we didn't experiment very much with the Bulb exposure option
that's available when operating the camera in full-manual exposure mode. Normally,
exposure times are limited to a maximum of 30 seconds in aperture or shutter
priority modes, but in manual mode, you can expose for as long as 999 seconds
by selecting "bulb" mode and holding down the shutter button for as
long as you want the shutter to remain open. Obviously, 999 second exposures
aren't really a practical reality: Sensor noise totally swamps the signal long
before that point is reached. Given how clean the exposures were at 15-30 seconds
in our low-light testing though, it seems that exposures on the order of 60-100
seconds should produce quite usable images. (Particularly if the noise-reduction
system is enabled, and especially if you're shooting at lower temperatures.)
A final feature deserving comment is the D30's separation of the autoexposure
and autofocus lock functions. In consumer-level digicams, half-pressing the
shutter button locks exposure and focus simultaneously. You can use this to
deal with an off-center subject by pointing the camera at the subject, locking
exposure and focus, and then reframing the picture before finally snapping the
shutter. The only problem is that you sometimes need to perform a more radical
recomposition of the subject in order to determine the proper exposure. For
instance, you may want to zoom in on the subject, grab an exposure setting,
and then zoom back out before taking the picture. Situations like that require
locking the exposure independently of the focusing, and the D30 provides for
just such eventualities by way of a separate AE lock button on the back of the
camera, right under your right thumb. A very handy feature indeed, for those
times you need it.
Low Light Capability
This was an area where we were genuinely surprised by Canon's CMOS technology:
Given past experience with CMOS sensors in low-end cameras, we'd expected poor
dynamic range and noise performance. At high ISO values, the D30 is indeed somewhat
noisy, in both the Red and Blue channels. (See our comparative analysis of the
"Three Titans" digital SLRs, which appears separately. Canon does
have a remarkably effective noise-reduction technology that kicks in on exposures
longer than one second though. This is an optional feature, activated by the
Custom Functions submenu on the LCD menu system. (It's also important to note
that this noise-reduction ONLY affects time exposures though: It has no effect
whatsoever on exposures less than one second long, contrary to speculation elsewhere
on the Internet.) We have more coverage elsewhere, but we couldn't resist inserting
a small sample here: The images below were shot at 1/16 of a foot-candle (about
0.13 lux), at ISO 100. This was a 25 second time exposure, an amazingly long
exposure for a digital camera. The image on the left shows the result with no
noise reduction, while the one on the right shows the result with noise reduction
engaged. Needless to say, the noise reduction works incredibly well! Our shots
taken at 1/16 foot-candles were almost as bright and clear as those taken at
full daylight illumination!

Another thing to note about the D30's low light behavior is how well-balanced
the colors are: These shots were taken with the camera set to Automatic White
Balance, and the colors could hardly have been better. Finally, the autofocus
assist light worked quite well out to distances of perhaps 20 feet or so, letting
the camera focus effectively (if somewhat more slowly than at normal illumination
levels) even in complete darkness. Overall, a very impressive performance!
Flash
The EOS D30's built-in flash was very effective in our tests. Canon's rated
guide number of 39 feet (12 meters) at ISO 100 would suggest a range of about
14 feet at f/2.8, a result that agreed well with our testing. We were also impressed
by how accurate flash exposure was, as it didn't seem to be fooled by unusual
subjects such as the light-on-dark of our Davebox flash range test target. (Some
cameras have a tendency to overexpose this due to the dark background.) It's
hard to overstate how easy it was to get exceptional results with it and in
fact, we felt we really had to go out of our way to get a bad exposure! Kudos
to Canon on this feature!
The D30 gives you a great deal of control over flash exposure, allowing you
to adjust flash and ambient exposure independently of each other, in 1/2 or
1/3 EV increments. This makes it very easy to balance flash and ambient lighting
for more natural-looking pictures. The camera also boasts a custom function
for "Auto flash brightness reduction" that is particularly useful
when using the flash for fill illumination in daylight shooting conditions.
With this mode enabled, if the ambient light is above a certain level, the camera
will assume you're using the flash in a "fill" mode, and will automatically
back off its intensity a bit, to avoid washing out the natural lighting.
Another nice touch was the "Flash Exposure Lock" button, which fires
the flash under manual control before the actual exposure, to determine the
proper exposure setting. This struck us as very handy, akin to the more conventional
autoexposure lock function for handling difficult ambient lighting conditions.
Several of the more impressive features of the Canon flash system depend on
the dedicated 550 EX speedlight. (While multiple Canon speedlights will work
just fine with the D30, their previous top-end 540EX unit apparently does not,
so you'll need the new 550EX to fully tap the D30's flash potential. Among these
are true FP (focal plane) flash sync, flash exposure bracketing with external
flash units, and flash modeling. FP sync requires a flash unit to provide uniform
light output for a fairly long duration; long enough for the focal plane shutter
curtain to fully traverse the "film" plane (sensor plane in the case
of the D30). In the case of the D30, this requires a flash duration of 1/200
second. Uniform, long-duration flash pulses like this permit use of shutter
speeds as high as the 1/4000 second maximum that the D30 is capable of. This
can be invaluable when you want to exclude ambient light from the exposure.
We explained Flash Exposure Bracketing (FEB) and flash exposure compensation
above, so won't review those features in the context of external flash operation.
What does deserve separate comment is the "Flash Modeling" feature
of the F550EX speedlight when used with the D30. With a F550EX connected to
the D30, pressing the camera's depth-of-field preview button causes the speedlight
to fire at 70 flashes per second for about a second. This creates the illusion
of a constant light source for your eyes, letting you preview the lighting on
your subject when the flash fires. VERY handy, and likely to save lots of shoot/check/reshoot
time!
As alluded to above, the "X-sync" speed of the D30 is 1/200 second.
(This is the maximum shutter speed that can be used on the D30 when working
with a non-dedicated, FP-capable speedlight.) When used with higher-powered
studio strobe systems, Canon recommends a maximum shutter speed of 1/60 second
or slower, to accommodate the time/intensity profile of such units. Finally,
via a custom function menu setting, you can program the D30 to use a shutter
speed of 1/200 second in aperture-priority exposure mode regardless of ambient
light levels. (We guess this is useful, if you know you're going to be hopping
in and out of flash mode, but other than a convenient preset for the shutter
speed, it's little different than simply using manual mode to set both shutter
speed and aperture.)
A final benefit of the dedicated Canon speedlights is that they carry powerful
autofocus assist illuminators that can extend the range of the built-in AF assist
light of the D30. We don't have any specs on the 550EX strobe, but its illuminator
apparently provides greater dark-focusing range than the D30 can achieve alone.
Continuous Shooting Mode
Among digital SLRs currently on the market, the D30 comes in about midway in
terms of shooting speed. The continuous shooting mode is rated by Canon at 3
frames per second, although our own tests on the evaluation unit timed it at
about 2.7 fps. This is considerably faster than the 1.5 fps of the Fuji S1 Pro,
but a good bit slower than the 4.5 fps of Nikon's D1. Fast enough for you? -
You'll have to be the judge of that. Professional sports shooters will doubtless
want more, but for most situations, we think the D30 will be plenty fast enough.
Shutter Lag/Cycle Times
We'll have a more complete set of test figures when we get a little more time
with a final production model D30 a bit later. In the meantime though, we wanted
to provide our readers with at least some indication of the D30's speed. (It's
pretty fast.) Here's the numbers we managed to collect on it in the short time
we had:
|
|
||
|
|
|
|
| Power On -> First shot |
|
Time is delay until first shot captured after power-on.
|
| Shutdown |
|
No lens to retract as on consumer units, so effectively instant. Longer, variable time until CF card is done writing.
|
| Play to Record, first shot |
|
Time is delay until first shot captured. VERY fast!
|
| Record to play (max res) |
|
First time is for low-res display, fills-in with full res later.
|
| Shutter lag, full autofocus |
|
Highly lens-dependent. This was minimum for static subject, sequential pictures.
|
| Shutter lag, manual focus |
|
Quite fast, not as fast as D1 or S1 however. |
| Shutter lag, prefocus |
|
No faster than manual focus. (No white balance/exposure until shutter opens.) |
| Cycle Time, full res JPEG |
|
Very Fast |
| Cycle Time, full res JPEG |
|
Very Fast |
User Interface
The D30's user interface is very similar to that of a traditional 35mm SLR film
camera, with the exception of the LCD monitor on the back panel. Current users
of Canon EOS SLRs should immediately feel at home. We generally comment on whether
or not a camera's controls permit single-handed operation, but in the case of
pro-level cameras like the D30, this is much less of a consideration, since
the cameras' bulk and typical shooting scenarios generally demand the use of
two hands anyway. We greatly appreciated the fact that the basic exposure controls
are adjustable through the external camera control buttons and dials, greatly
reducing your dependence on the rear-panel LCD menu system. The ability to program
the Set button for quick changes of menu items such as ISO speed, image quality,
and parameters even further reduces reliance on the LCD menu. When you do venture
into the menu system, all of the camera's playback and setup options are available
in all shooting modes, although the erase, index display, image information,
and playback zoom functions are only available in Playback mode. Overall, we
found the D30's user interface straightforward and efficient, although the number
of options controlled by a relatively small number of buttons does require some
study to become familiar with.

Power Switch: This small switch resides in the top left corner of the
camera's rear panel, to the left of the viewfinder eyepiece. As you'd expect,
it turns the camera on or off.

Mode Dial: Positioned on the left side of the camera's top panel, this
dial sets the exposure mode. Exposure modes are divided into three zones, the
Image, Easy Shooting, and Creative zones. The Image Zone encompasses the Night
Scene, Sports, Close-Up (Macro), Landscape, and Portrait exposure modes. The
Easy Shooting Zone includes all of the previously mentioned exposure modes,
plus the Full Automatic exposure mode. Finally, the Creative Zone refers to
the Program AE, Shutter Speed Priority AE, Aperture Priority AE, Manual Exposure,
and Auto Depth of Field Priority AE exposure modes. (We will discuss these modes
in more detail under the Camera Modes and Menus section of this review.)

Shutter Button: Located on top of the right hand grip, this button fires
the shutter when fully pressed, and sets focus and exposure when halfway pressed
in automatic exposure mode. Halfway pressing this button while turning the quick
control dial sets the exposure compensation when shooting in any of the Creative
Zone exposure modes.

Lens Release Button: Located on the front of the camera this rectangular
button just to the right of the lens mount unlocks the lens from the mount when
pressed. The lens can then be removed by rotating it about 45 degrees to disengage
the bayonet mounting flanges.
![]()
Flash Button: Located on the left side of the prism housing, above the
lens release button and just below the popup flash compartment, this button
releases the popup flash into its operating position when the camera is on.
(The popup flash cannot be raised when the camera is turned off.)

Depth of Field Preview Button: Positioned on the side of the lens mount
housing, just beneath the lens release button, this button lets you preview
the depth of field by stopping down the lens aperture to the current setting
in any of the "Creative Zone" exposure modes. (Like most modern SLRs,
the D30 normally focuses and meters with the lens wide open, stopping down to
the selected aperture just as the picture is being taken.) When an external
flash is connected, this button also fires a rapid series of flashes for one
second, so that you can check shadows, light balance, and other effects, allowing
the flash to be used as a modeling light. (This feature requires use of a Canon
dedicated speedlight that supports this capability, such as the model 550EX.)

Main Dial: Resting on top of the camera on the right side (as viewed
from the back), this ridged wheel controls some of the camera's basic operations
in any of the "Creative Zone" exposure modes. (That is, in non-programmed
exposure modes such as aperture- or shutter-priority and full manual mode.)
When used in conjunction with the appropriate control buttons on the camera's
top, the Main Dial also controls the autofocus mode, focusing area selection,
metering mode or drive mode. In Aperture Priority and Shutter Priority modes,
this dial sets the lens aperture or shutter speed. In Manual mode, the dial
sets the shutter speed.
![]()
Metering Mode / Flash Exposure Compensation Button: Just off the top
left corner of the small LCD display panel on top of the camera is the shiny,
black Metering Mode / Flash Exposure Compensation Button. Pressing this button
while rotating the Quick Control Dial between the three metering modes: Evaluative,
Partial, and Center-Weighted Averaging. Pressing the button while turning the
Main Dial sets the flash exposure compensation from -2 to +2 in 1/2 EV increments,
for both the built-in flash and any Speedlight EX external flash unit. (Flash
exposure compensation cannot be used in any of the "Easy Shooting"
modes.) Through the Custom Function menu, you can change the flash exposure
compensation adjustment step size to 1/3 EV increments.
![]()
Drive Button: Located beneath the metering mode button, this shiny, blue-green
button controls the camera's drive mode. Pressing it while turning either control
dial cycles through Single Shooting, Continuous Shooting, and Self-Timer drive
modes.
![]()
AF Mode / White balance button: Just behind the drive button, this small,
gray button controls the autofocus and white balance modes. Pressing the button
while turning the Main Dial sets the autofocus mode to One Shot or AI Servo.
(One Shot is for still subjects, while AI Servo is better for moving subjects,
since it causes the camera to focus continuously.) Pressing this button while
turning the Quick Control Dial sets the white balance to Auto, Daylight, Cloudy,
Tungsten, Fluorescent, Flash, or Custom ( manual ) mode, to match a variety
of light sources. Both functions are only available in the Creative Shooting
Zone.

Diopter Adjustment Dial: Located outside the top right corner of the
viewfinder eyepiece, this dial adjusts the optical viewfinder's focus to accommodate
eyeglass wearers, across an unusually wide range of -3 to +1 diopter.
![]()
Menu Button: Situated below the Power Switch, this button accesses the
D30's LCD-based operating menu in all modes. Pressing the menu button a second
time cancels the menu display.
![]()
Info Button: Just below the menu button, this button displays the current
exposure settings on the LCD screen when pressed. In Playback mode, pressing
this button brings up an information screen that reports the exposure settings
that the picture was taken with, and also displays a small histogram, which
graphs the exposure values throughout the image.
![]()
Jump Button: Directly below the Info button, this button allows you to
jump 10 frames forward or backward when viewing images in Playback mode. Once
pressed, a jump bar appears in the LCD screen, and jumping is controlled by
turning the Quick Control Dial forwards or backwards. The Jump button is active
only in playback mode.
![]()
Index / Enlarge button: Just below the Jump button, this button displays
a nine image, thumbnail index display when pressed once. A second press enlarges
the currently displayed image to 3x. (Turning the Quick Control Dial allows
you to move around within the enlarged image, to check the details.) The Index/Enlarge
button is active only in playback mode.
![]()
Play Button: The final button on the left side of the back panel, this
button puts the camera into Playback mode, regardless of the Mode Dial setting.
(Turning the Quick Control Dial in this mode scrolls through captured images.)
Playback mode can be canceled by hitting the Play button again, or by touching
the shutter button. (The D30 is a "shooting priority" camera: It's
always ready to shoot a picture, regardless of its current mode. Simply pressing
the shutter button returns it immediately to capture mode.)
![]()
Erase Button: Resting beneath the lower right corner of the LCD monitor,
this button accesses the erase menu, which allows you to erase the current image
or all images on the card (except for protected ones). There is also an option
to cancel. The Erase function works in Playback mode and the quick review mode
only.

Quick Control Dial Switch: Located on the back of the camera just above
the Quick Control Dial, this switch activates and deactivates the Quick Control
Dial, helping prevent any unintentional changes in camera settings.

Quick Control Dial: To the right of the LCD monitor on the camera's back
panel, this dial selects various camera settings and menu options when turned
while pressing a control button or while in an LCD menu screen. When shooting
in the Creative Zone (except for Manual Exposure mode), turning the dial while
halfway pressing the shutter button sets the exposure compensation (from -2
to +2 in 1/3 or 1/2 EV increments). In Playback mode, this dial scrolls through
captured images on the CompactFlash card. It also navigates the index display
and scrolls around within an enlarged image. Depending on a Custom Funciton
menu setting, it can also be used to control ISO speed or image quality.
![]()
Set Button: Located in the center of the Quick Control Dial, this button
confirms menu selections and camera settings when using the LCD menu system.
Through the Custom Function menu, this button can be programmed to control the
image quality or ISO speed in conjunction with the Quick Control Dial. (The
default is for it to have no function in record mode.)

AE / FE Button: At the top right corner of the camera's back panel, marked
with an asterisk, this button locks the exposure until the shutter button is
pressed. When pressed while the flash is activated, this button locks the flash
exposure, which signals the camera to fire a small pre-flash to measure the
exposure before locking it. (This decoupling of exposure lock from autofocusing
is a very useful "pro" feature seldom seen on lower-end cameras.)

Focus Area Selector Button: Just beside the AE / FE button, this button
allows you to choose the focus area manually or automatically in Program AE,
Shutter Speed Priority AE, Aperture Priority AE, or Manual Exposure modes. Pressing
the button and rotating either control dial cycles an automatic setting, or
your choice of three manually-selected focus areas. The automatic setting bases
the focus on the position of the subject within the frame, and its proximity
to one of three focusing points (shown as three small boxes arranged horizontally
in the viewfinder). Your choice of focusing area is reflected in the top-panel
LCD data readout by the position of a small "o" in the LCD data readout:
If all three "o"s are displayed, the camera is auto focus-area selection
mode.
Camera Modes and Menus
![]()
Night Scene Mode: The first mode in the "Easy Shooting Zone",
Night Scene is for taking pictures of people at sunset or at night. The autofocus
mode is automatically set to One Shot. Drive mode is set to Single Shot, and
metering mode is set to Evaluative. Quality is also automatically set, to the
2160 x 1440 Fine compression level. Since slower shutter speeds will be used,
a tripod is recommended to prevent movement from the camera. The built-in flash
is available, and the ISO setting is adjustable (a speed of 400 or faster is
recommended). If the shutter speed chosen by the camera is longer than about
1/60 second, the flash will pop up automatically. If Night Scene mode is used
in daylight, the camera operates the same as in Full Automatic mode.
![]()
Sports Mode: This mode uses a faster shutter speed to capture fast-moving
subjects. The autofocus mode is automatically set to AI Servo. Drive mode is
set to Continuous Shooting, and metering mode is set to Evaluative. Quality
is automatically set to the 2160 x 1440 Fine compression level.The onboard flash
isn't available in this mode (since it can't cycle fast enough to keep up with
the continuous exposure mode), but ISO is adjustable (a setting of 400 or faster
is recommended).
![]()
Close-Up Mode (Macro Mode): Turning the mode dial to the macro flower
symbol sets the camera for capturing smaller subjects such as flowers, small
details, etc. The autofocus mode is automatically adjusted to One Shot, the
drive mode is set to Single Shot, and the metering mode is set to Evaluative.
Image quality setting is again set to 2160 x 1440 Fine. Close-up mode takes
advantage of the current lens' minimum focal distance, however, an EOS dedicated
macro lens and the Macro Ring Lite MR-14EX are recommended for better close-up
photography. (Unlike the macro mode on most consumer digicams, Macro mode on
the D30 has no effect on lens focusing range, as that parameter is entirely
determined by the lens being used.)
![]()
Landscape Mode: Landscape mode combines slower shutter speeds with smaller
aperture settings to increase the depth of field when shooting broad vistas
and sweeping landscapes. The built-in flash is automatically disabled, even
if it's already raised. Because this mode uses slower shutter speeds, a tripod
may be needed. Image quality is set to 2160 x 1440 Fine.
![]()
Portrait Mode: This mode uses a large aperture setting to decrease the
depth of field, which blurs the background to emphasize the subject. ISO is
adjustable and the built-in flash may be used. As with the previous modes, image
quality is automatically set to 2160 x 1440 Fine.
![]()
Full Automatic Mode: The final mode in the Easy Shooting Zone, Full Automatic
is indicated on the Mode Dial by a green rectangular outline. In this mode,
the camera makes all exposure decisions with the exception of ISO, which is
adjustable through the menu system. Image quality is again set to 2160 x 1440
Fine, autofocus mode is set to AI Servo, drive mode is set to Single Shot, and
the metering mode is set to Evaluative.
![]()
Program AE: This is the first mode in the Creative Zone of the Mode Dial.
Program AE works similarly to the Full Automatic exposure mode, but allows more
control over the exposure variables. Aperture and shutter speed are automatically
selected by the camera, but you can bias the exposure to larger or smaller apertures
by turning the Main control dial, which will change the combination of aperture
and shutter speed so as to maintain the same exposure value, but with a different
choice of aperture/shutter speed. Turning the Quick Control dial in this mode
adjusts the exposure compensation setting, to increase or decrease overall exposure.
![]()
Shutter Speed Priority AE: This mode allows you to manually set the shutter
speed anywhere from 30 to 1/4,000 seconds, while the camera chooses the best
corresponding aperture setting. You have control over all other exposure variables,
including exposure compensation.
![]()
Aperture Priority AE: The opposite of Shutter Speed Priority mode, Aperture
Priority AE allows you to set the lens aperture (with available ranges depending
on the lens in use), while the camera selects the most appropriate shutter speed.
Again, you have control over all other exposure variables, including exposure
compensation.
![]()
Manual Exposure: This mode provides the same range of exposure control
as the other Creative Zone exposure modes (except for exposure compensation),
but lets you control both shutter speed and lens aperture independently. The
shutter speed range is extended to include a bulb setting, allowing long exposures
from one to 999 seconds. A display in the top LCD panel reports whether your
settings are under, over, or correctly exposed.
![]()
Automatic Depth of Field AE: This is the final mode in the Creative Zone,
and is meant for taking pictures of large groups or landscapes. This mode puts
the camera in control of both the shutter speed and aperture values, but you
can adjust the other exposure variables. (This mode cannot be used if the lens
focus mode is set to manual.) When shooting in Automatic Depth of Field AE,
the camera sets both the exposure and focus distance to achieve a sharp focus
over a wide depth of field. It uses the autofocus system to measure the distance
to the subjects covered by each of the three autofocus zones, and then attempts
to set the focusing distance and lens aperture so as to render all three subject
areas in sharp focus. (Pretty slick!)
Playback Mode: This mode is entered by pressing the Play button on the
back panel. Playback mode lets you erase images, protect them, or set them up
for printing on DPOF compatible devices. You can also view images in an index
display, enlarge images to 3x, view a slide show of all capured images, or rotate
an image. The Info. button activates an information display, which reports the
exposure settings for the image and graphs the exposure values on a small histogram.
Operating Menu: This menu is available in all of the camera modes, though
a few of the capture-related options are only available in the Creative Zone.
Pressing the Menu button calls up the Operating menu.
 Quality: Sets the image size and the compression ratio (Creative Zone only). Options are Large/Fine (2160 x 1440), Large/Normal (2160 x 1440), Small/Fine (1440 x 960), Small/Normal (1440 x 960), and RAW (2160 x 1440, with lossless compression).
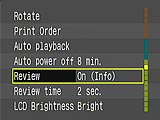 Rotate: Rotates the currently displayed image 90 degrees clockwise or counterclockwise.
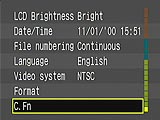 Date/Time: Sets the camera's internal date and time.
Image Storage and Interface
The EOS D30 utilizes CompactFlash (Type I and II) memory cards as its image
storage medium, which should never be removed from the camera while in use.
(Removing a card while the camera is still writing to it could cause permanent
damage to the card.) A 16MB card comes with the camera, but upgrades are available
to 30MB and 48MB from Canon, and as large as 224MB from third parties, or even
1 Gigabyte in the form of the IBM MicroDrive. We shot all our test images with
a 340 megabyte MicroDrive, and can't say enough about what a pleasure it made
the camera to use. If you're spending the money for a D30, don't skimp on the
memory card: Our recommendation is to get a MicroDrive and have done with it.
Below are the approximate compression ratios and maximum images for a 16MB card:
| Resolution/Quality vs Image Capacity |
|
|
||
|
|
Compression |
|
Compression |
|
| CCD RAW file |
|
|
|
|
| Fine Quality |
|
|
|
|
| Normal Quality |
|
|
|
|
The CCD RAW mode listed above deserves some explanation: This
is a format that records all the data from the CCD, exactly as it comes from
the A/D conversion process. It is losslessly compressed, meaning that
the file is reduced to a smaller size, but without losing any data in the
process.
The D30 has a USB port for rapid file transfers to the host computer, which
we timed at a transfer rate of 257 KBytes/second (10.6 megabytes of data in
41.3 seconds). This is much faster than RS-232 (which the D30 also apparently
supports), but is a little slower than average among USB cameras we've tested,
and much slower than a dedicated USB card reader. (Dedicated card readers
can get pretty close to the theoretical 1 megabyte/second transfer rate of
the USB bus itself.)
![]() One
of the first things any new digicam owner will need is a larger memory card
for their camera: The cards shipped with the units by the manufacturers should
really be considered only "starter" cards, you'll definitely want a higher
capacity card immediately. - Probably at least a 32 megabyte card for a 1.3
or 2 megapixel camera, 64 megabytes or more for a 3, 4, or 5 megapixel one.
(The nice thing about memory cards is you'll be able to use whatever you buy
now with your next camera too, whenever you upgrade.) To help you shop for
a good deal on memory cards that fit the D30, we've put together a little
memory locater, with links to our price-comparison engine: Just click on the
"Memory Wizard" button above to go to the Canon memory finder, select your
camera model , and click the shopping cart icon next to the card size you're
interested in. You'll see a list of matching entries from the price-comparison
database. Pick a vendor & order away! (Pretty cool, huh?)
One
of the first things any new digicam owner will need is a larger memory card
for their camera: The cards shipped with the units by the manufacturers should
really be considered only "starter" cards, you'll definitely want a higher
capacity card immediately. - Probably at least a 32 megabyte card for a 1.3
or 2 megapixel camera, 64 megabytes or more for a 3, 4, or 5 megapixel one.
(The nice thing about memory cards is you'll be able to use whatever you buy
now with your next camera too, whenever you upgrade.) To help you shop for
a good deal on memory cards that fit the D30, we've put together a little
memory locater, with links to our price-comparison engine: Just click on the
"Memory Wizard" button above to go to the Canon memory finder, select your
camera model , and click the shopping cart icon next to the card size you're
interested in. You'll see a list of matching entries from the price-comparison
database. Pick a vendor & order away! (Pretty cool, huh?)
Lost Images? - Download this image-recovery program so you'll
have it when you need it...
Since we're talking about memory and image storage, this would be a good time
to mention the following: I get a ton of email from readers who've lost photos
due to a corrupted memory card. It's tragic when it happens, there are few
things more precious than photo memories. Corrupted memory cards can happen
with any card type and any camera manufacturer, nobody's immune. "Stuff
happens," as they say. A surprising number of "lost" images
can be recovered with an inexpensive, easy to use piece of software though.
Given the amount of email I've gotten on the topic, I now include this paragraph
in all my digicam reviews. The program you need is called PhotoRescue, by
DataRescue SA. Read our review of it if you'd like, but download the program now,
so you'll have it. It doesn't cost a penny until you need it, and even then
it's only $29, with a money back guarantee. So download PhotoRescue for
Windows or PhotoRescue for
Mac while you're thinking of it. (While you're at it, download the
PDF manual and quickstart
guide as well.) Stash the file in a safe place and it'll be there when you
need it. Trust me, needing this is not a matter of if, but when...
PhotoRescue is about the best and easiest tool for recovering digital
photos I've seen. (Disclosure: IR gets a small commission from sales of
the product, but I'd highly recommend the program even if we didn't.)
OK, now back to our regularly scheduled review...
Video Out
An NTSC video cable comes packaged with US models of the D30 (presumably PAL
for European ones), allowing you to connect the camera to your television set
for image playback. The video signal can be switched between NTSC and PAL via
a menu preference. All menus, etc. appear on the external video monitor, but
do note that it won't work as a viewfinder for the same reason that the rear-panel
LCD won't. (The SLR optics mean that the sensor is only exposed to light when
the shutter is open.)
Power
 The
EOS D30 uses a new battery form factor developed by Canon to be a standard across
multiple product lines (film and digital still cameras, video cameras, etc.)
The new batteries are a bit larger than a 2CR5 lithium cell, and look like two
of the smaller LiIon batteries now becoming popular in compact digicams glued
together. Canon calls the new cell a BP-511 battery pack, and it provides 1100
mAh at 7.4 volts for a fairly hefty wallop of 8.1 watt-hours. A separate charger
comes in the box with the D30, as well as one of Canon's standard "dummy
battery" pigtails to let the charger power the camera. Going into our power
tests, we felt that the CMOS sensor should translate into lower power consumption,
and it looks like we were right, as you can see in the table below:
The
EOS D30 uses a new battery form factor developed by Canon to be a standard across
multiple product lines (film and digital still cameras, video cameras, etc.)
The new batteries are a bit larger than a 2CR5 lithium cell, and look like two
of the smaller LiIon batteries now becoming popular in compact digicams glued
together. Canon calls the new cell a BP-511 battery pack, and it provides 1100
mAh at 7.4 volts for a fairly hefty wallop of 8.1 watt-hours. A separate charger
comes in the box with the D30, as well as one of Canon's standard "dummy
battery" pigtails to let the charger power the camera. Going into our power
tests, we felt that the CMOS sensor should translate into lower power consumption,
and it looks like we were right, as you can see in the table below:
|
|
|
| Capture Mode, w/LCD |
|
| Capture Mode, no LCD |
|
| Half-pressed shutter w/LCD |
|
| Half-pressed w/o LCD |
|
| Memory Write (transient) |
|
| Flash Recharge (transient) |
|
| Image Playback |
|
Particularly notable here is how low the power consumption is
when in capture mode but not actively capturing a picture. At only 80 mA,
one of the BP-511 cells could keep the D30 powered-up all day (13+ hours,
to be precise). When you press the shutter, the camera grabs a gulp of power,
but still only about the same amount as a prosumer digicam running with the
display off, and we were running a MicroDrive in the D30 when we did took
these power measurements. (MicroDrives do take more power than standard CF
memory cards.) The LCD panel seems fairly parsimonious in its power usage
as well, at only 370 mA in playback mode. These results matched our personal
sense of the camera, that it had very good battery life over a couple days
of fairly heavy usage in the studio, most of it with a MicroDrive inside it.
(Update from the production model: We consistently were amazed at just how
long the D30's batteries seemed to last. They just kept going, and going,
and going...)
Included Software
| |
||
|
The big news here is that the included software (ZoomBrowser EX, TWAIN drivers, and a Photoshop plug-in for Mac users) directly support the CCD RAW file format, which captures the full 12-bit data directly from the CCD. This allows post-exposure processing and adjustment with no loss of quality. (Since computers only use 8 bits of information per red, green, and blue color channel, the full 12 bits of data that are originally captured offers about four additional f-stops of range beyond what would be present in an 8 bit file. Not all of this is directly usable, but having access to the original 12 bit data can often get you an additional 2 f-stops of more of exposure latitude with essentially no penalty in image quality.) Kodak professional SLR digicams have been famous for this capability for years, but the Fuji S1 Pro doesn't offer it at all, and Nikon charges an additional $500 for the software required to access this function on the D1. To our minds, having the CCD RAW capability provided in the box is a huge benefit, not to be understated. Any professional should be interested in this capability, contributing an additional $500 cost advantage to the EOS D30 relative to the Nikon D1. (And the Fuji S1 Pro of course, doesn't offer a CCD RAW at all.) Not to get too wrapped up in one feature, this clearly isn't a "must have" function, but it can be tremendously useful in retrieving that one of a kind photo with a blown exposure setting. VERY nice!

All that said though, the ZoomBrowser EX software is far from perfect. The most glaring lack we found in it is that it doesn't support any post-exposure tonal adjustment, which is one of the most useful features of the Kodak software when used with their cameras. Given the dynamic range that should be provided by the 12 bit digitization, post-exposure tonal adjustment ("exposure" adjustment, really) could be highly effective, and "save" many shots that might otherwise be lost.

The changes you can make to the D30's RAW-captured files are quite useful though, in that they constitute reasonable tweaks away from the default values. Both the contrast and color saturation adjustments do exactly what you'd expect them to, without affecting overall exposure or hue values. For some reason, virtually every camera we've tested that has a contrast adjustment option has ended up changing the exposure along with the contrast. Most often, they take the (almost totally useless) approach of fixing the highlight value and adjusting the shadow end of the tonal curve. Thus, a "low contrast" shot with these cameras still has blown-out highlight values, with the difference being that the shadows don't extend quite as far into the black. What we really want to have happen would either be the exact opposite (blown highlights being the exposure error most to be avoided with digicams), or to have both ends of the tonal scale compressed somewhat, darkening the highlights, lightening the shadows, and leaving the midtones alone. This last is exactly what the contrast adjustment on the D30's software does. Better yet, you can load the software's corrections into the camera's firmware, creating custom camera settings that will replicate the software's adjustments on the fly, as the pictures are taken.
ZoomBrowser's color saturation adjustment is likewise both understated and intelligent. Here again, competing cameras with saturation adjustment settings frequently go overboard, producing muddy, unattractive color with the low saturation setting, or neon-bright colors in the high-saturation mode. Canon's color controls are quite understated, mirroring the differences between different film emulsions quite successfully. The low saturation color is duller, but well within what we would consider an acceptable/useful range. Likewise, the high saturation setting produces bright colors akin to some of the more saturated color films currently in vogue (although perhaps not quite as bright as some of the more extreme film emulsions). Overall, the net effect is very usable.
The one adjustment we felt could have used more work was the sharpness control. We felt it covered a bit too narrow a range to be useful, and even in the "high" setting, produced less sharpening than most cameras we've tested in their "normal" settings. Our preference for critical sharpening is always to use an industrial-strength imaging application like Photoshop or Nik Sharpener, but if there's going to be an in-camera option for sharpening, we'd like to see it have a little more range than Canon provides in the ZoomBrowser/Custom Setting option for the D30.
Probably the most significant limitation of ZoomBrowser EX is that it's slow. (!) Our test PC is only a 350 MHz Pentium III, rather sluggish by current standards. Still, it's hard for us to imagine what the software could possibly be doing for the close to two minutes (yes, we said two minutes) it takes to process each image extracted from the RAW format. Worse, there's no way you can conveniently batch-up multiple images needing different settings applied to them. You can select a series of image adjustments and batch-process any number of images with that set, but if you want to apply different settings to multiple batches of images, each batch will require a separate visit to the computer. Unless you commonly need to apply the same set of variations to all your images as a matter of course, using ZoomBrowser is painfully slow. Hard to argue with the price (included free with the camera), but the leisurely pace will have you climbing the walls in short order.
Canon's made a great start on RAW-format processing with ZoomBrowser EX, but we sincerely hope there's a new version in the works for release soon. (Note to the Canon engineers, if any of you happen to read this - Here's our wish list: 1) Post-exposure tonal adjustments - basically the ability to "re-expose" the image from the RAW file. 2) The ability to queue-up images for conversion with different adjustments associated with each. 3) MORE SPEED. 4) Better sharpening control.)
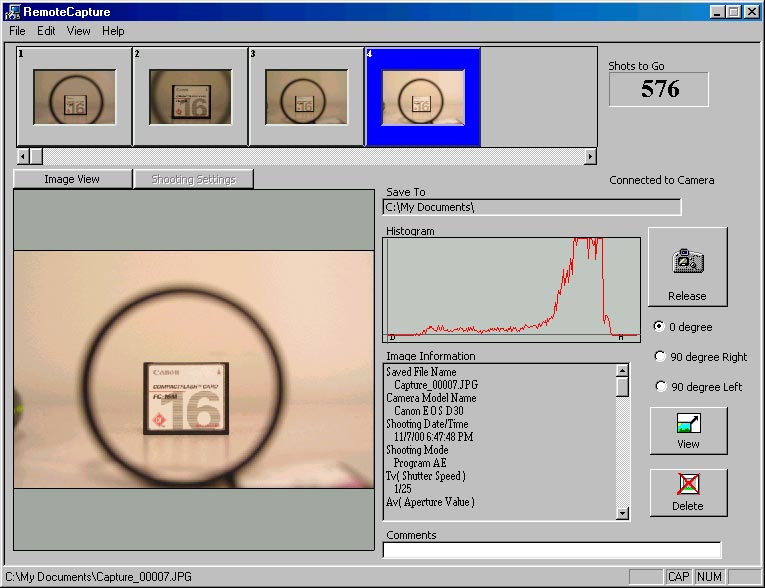
The D30 software also includes the Remote Capture application, which can operate the camera via the USB link. This could be useful in studio work or event photography, but the speed of the USB bus just isn't up to a true interactive environment, in our opinion: In large/fine resolution mode, it takes almost 17 seconds to download each image into the computer after you click the The D30 software also includes the Remote Capture application, which can operate the camera via the USB link. This could be useful in studio work or event photography, but the speed of the USB bus just isn't up to a true interactive environment, in our opinion: In large/fine resolution mode, it takes almost 17 seconds to download each image into the computer after you click the "Release"
Test Results
As always in Imaging Resource reviews, we strongly encourage you to let
your own eyes be the judge of how the camera under test performed: Check out
the D30's Picture Analysis page for actual reference
images from the D30, shot under controlled conditions.
In our preliminary review of the D30, we lacked the proper version of Canon
software to interpret the large number of RAW images we collected. We've now
reshot all our test images with the production model, and have had the opportunity
to process many of these from the RAW format as well. At the time we performed
the original analysis though, we prepared a comparison piece we called the "Three
Titans" page, that compares the EOS D30 with the other two major SLR
digicams it compete with, the Nikon D1 and Fuji S1 Pro. We think the results
of this comparison will be of interest to anyone planning to purchase any of
these three digicams.
At the time of our initial review, we commented that we made somewhat of an
exception to our normal rule of not testing preproduction camera models extensively
for the EOS D30. This was partly because Canon USA made available to us a unit
that was supposedly the closest in the world to the final production models.
We were told that, to all intents and purposes, the unit we tested would prove
to be virtually identical to final production models. As it happens, our subsequent
testing of a full-production unit bore out those claims, as we found nothing
in the production model that changed any of our conclusions about the D30 or
its images.
We feel that several things stand out about the EOS D30's images. The first
thing that struck our eye was that they appeared somewhat soft for a three-plus
megapixel digicam, particularly a professional model. Closer examination revealed
though that the level of detail they contained was actually quite exceptional.
The difference apparently lies in the fact that Canon (wisely, we think, for
a professional camera) has chosen to treat the images delicately, vis a vis
the in-camera sharpening algorithms. The reason we applaud this decision is
that image sharpening is something you simply can't undo once it's been done.
Thus, if the way a camera sharpens the image doesn't meet your aesthetics or
practical needs, you're simply out of luck. On the other hand, if the images
are left largely unsharpened, you're free to apply whatever sophisticated sharpening
algorithm you'd like after the fact, in imaging software like Photoshop(tm)
and various other programs. In playing with the test images we shot with the
D30, we found that relatively strong, low-radius unsharp masking in Photoshop
(150-200%, 0.3-0.4 pixel radius) brought out dramatic detail without introducing
undesirable artifacts. Once subjected to this sort of processing, the D30 images
in fact looked better (to our eyes, at least) than what we've seen from most
other digicams.
We also noted the excellent color of the D30, which seemed accurate and bright,
without any over-saturation. The one area of (slight) weakness we noted was
in bright yellows, and to a lesser extent bright reds, which were somewhat undersaturated.
Our experimentation with the saturation and tonal adjustments available in Canon's
ZoomBrowser software working from the RAW format files showed a very nice ability
to choose more or less color saturation though, without obvious exaggeration.
The third thing that really stood out with the D30 was how well it did at low
light levels. The bright autofocus-assist light worked well, but even without
it, the camera could focus well below 1 foot-candle (about 11 lux). Beyond its
focusing ability, the D30's low light performance was exceptional in how consistently
the camera behaved when compared to more ordinary shooting conditions: Automatic
metering was accurate, all the way out to 30 second exposure times, white balance
and color accuracy was extraordinary, and noise in time exposures (more than
one second) was excellent when the noise reduction processing was enabled.
We did find the D30's images to be slightly higher in noise than other SLR digicams.
We actually found it to be less objectionable in many ways when compared to
noise in some other cameras though, because it had such a small, tight "grain
structure" to it: We usually see sensor noise appearing as more of an area
affect, with large blotches of the image lighter or darker in the various color
channels. Apparently inherent in Canon's CMOS sensor technology is an ability
to avoid "bulk defects" resulting from the semiconductor fabrication
process. (Our guess is that this is related to the per-sensor amplification
and digitization circuitry, as opposed to CCD architecture, which dictates that
signal processing be conducted at the edges of the chip.) The net result is
that the D30's images look exceptionally smooth to the eye: Flat tint areas
look buttery-soft and smooth, with none of the blotchiness that characterizes
noise from CCD-based cameras we've tested in the past. Overall, the D30's images
have a distinctive and exceptionally appealing "look" to them.
On more quantitative fronts, we found that, although the D30's images tend to
be slightly soft, due to the aforementioned very restrained use of in-camera
image sharpening, the level of resolution and detail is truly exceptional. In
fact, it's actually the highest of any 3 megapixel digicam we've tested to date.
(October, 2000) Overall, we "called" the D30's resolution as 850 lines
per picture height vertically, and 900 horizontally before aliasing became visible,
although detail was clearly visible beyond 1000 lines per picture height in
both directions.
Canon rates the D30's viewfinder as being 95% accurate, which agrees well with
our measurement of 96%. Flash uniformity here was very good, but that's to be
expected, as we were shooting with the 100mm lens on the camera. Even the 28mm
lens didn't stretch the flash's coverage in the slightest, although again that's
not too surprising, given that a 28mm lens on the D30 is only equivalent to
a 45mm on a 35mm film camera. (And thus has a relatively narrow field of view.)
We normally report on lens distortion in this part of our analysis, but in the
case of the D30, any such distortion will be entirely dependent on the lens
used with it. As we noted earlier though, the Canon lenses we tested with the
D30 were uniformly of exceptionally high quality, and we were particularly impressed
that the less expensive 24-85mm zoom performed as well as it did.
Overall, the D30 delivered exceptionally high quality images, with excellent
detail, excellent color, excellent tonal range, and very good noise performance.
Conclusion
Even though Canon themselves don't bill the EOS D30 as a "professional"
camera, we see it as exactly what a huge number of Canon-shooting professionals
have been waiting for. Its controls, handling, and performance are in every
way suited to professional usage. While not coming anywhere near the speed or
incredible ruggedness of the EOS 1V film camera or its brethren, the D30 nonetheless
shows solid engineering, and at nearly 3 frames per second is fast enough for
most applications. When you toss in its excellent image quality, generous ISO
speed capability, superb low-light shooting, excellent flash integration, and
compatibility with the full range of Canon EF lenses, it'd be a bargain at twice
the price. With a suggested retail price in the US of $3,500, and an initial
"street" price closer to $3,000, it represents an incredible value.
(Particularly when you consider that this price includes the software necessary
to access the CCD RAW file format.) Even more amazing, this is obviously just
the first of a planned extensive line of Canon pro digital SLRs. Look out world,
Canon's on a roll, and the digital photography landscape is changing yet again...
For the better! Highly recommended!
<<EOS D30 Sample Images | Additional Resources and Other Links>>
Reader Comments!
Questions, comments or controversy on this product? Click
this link to see what other Imaging Resource readers have had to say about
the Canon EOS D30 Digital SLR, or add comments of your own!
