Nikon D40x Shooting Display
Shooting Mode options
|
 |
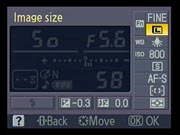
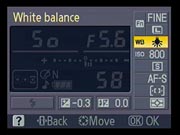
Here's a look at the back panel while in shooting mode, with the display option set to "Graphic." The shutter speed and current aperture setting are shown graphically on tthe left, numerically on the right, and a list of settings that can be controlled from this screen run down the right side of the display. Total images remaining on the card are visible in the bottom of the display.
In this shot, the camera happened to be in Landscape scene mode, indicated by the little icon in the upper right corner. The scene modes disable some setting options in the right column, in this case the white balance and metering mode options are greyed-out.
|
|
 |
Here we're back in programmed exposure mode, so all the right-side options are enabled, as well as normal and flash exposure compensation settings along the bottom. Note the changes in the graphical display on the left: The dashed line around the circle extends further in the clockwise direction, indicating a faster shutter speed. The circle in the middle representing the lens aperture is closed down some, indicating that the lens is stopped down from maximum aperture. The negative exposure compensation that's dialed in (-2.7 EV) is reflected in the dotted line under the exposure values, showing an underexposure.
This strikes us as one of the better camera status displays we've seen to date. All the important settings are readily accessible, and clearly displayed. (To activate the setting screens and make changes, you press the multi-function "i" button just off the LCD's lower left corner. Navigate to the various options with the four-way rocker control, use the central OK button to make selections.)
|
|
 |
Here's what the "Classic" shooting display looks like. Some settings and option indicators are a bit easier to read, and the shutter speed and aperture numbers in particular are big and easy to see. This mode may be more appealing to experienced shooters, and those who have a harder time reading tiny numbers on LCD displays. |
|
|
The shots below show how the various shooting options are controlled.
When you select and activate an option, an "image assisted" display helps novices understand what the different settings do.
|
| Image Quality |
 |
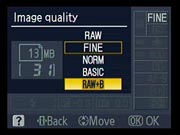 |
Not a lot to see here, just the usual options for image quality. Interesting (and sad) to note though, that the D40x only offers Basic JPEG quality in its RAW+JPEG mode. |
|
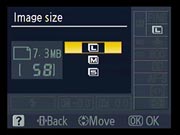
| Image Size |
 |
 |
 |
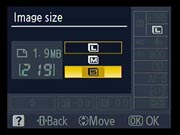 |
The D40x's three image sizes are:
- 3,872 x 2,592
- 2,896 x 1,944
- 1,936 x 1,296
The number at the bottom of the frame is the shots remaining on the card at the current size/quality setting.
|
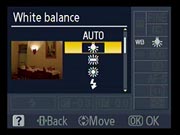
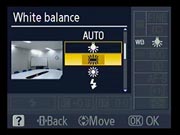
| White Balance |
 |
 |
 |
 |
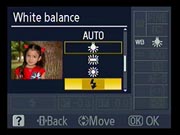 |
(Other screens hold options for Auto, Cloudy, Shade, and Preset White Balance, with example images for each.) |
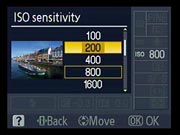
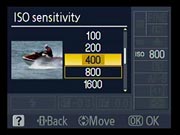
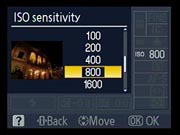
ISO
(Light Sensitivity) |
 |
 |
 |
 |
 |
 |
|
|
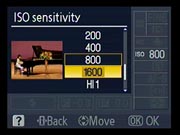
ISO options range from 200 to 1,600, plus a "Hi1" mode that equates to 3,200. Note the use of pictures to suggest the type of situations calling for various ISO settings. |
| Shooting Mode |
 |
 |
 |
 |
 |
 |
|
|
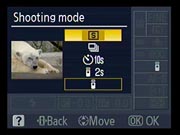
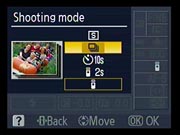
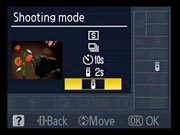
Single Shot mode |
Continous Shooting mode |
Self-timer mode, options of 2, 5, 10, or 20 second delay set via Custom Settings menu. |
Delayed remote release, shutter fires 2 seconds after (optional) remote trigger is pressed and camera focuses. |
Quick-Response Remote mode: Camera fires as soon as it focuses after remote trigger has been pressed. |
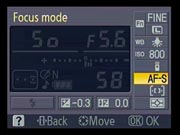
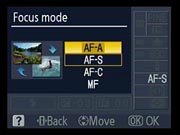
| Focus Mode |
 |
 |
 |
 |
 |
|
|
|
Auto-servo AF: Camera decides whether to use single or continuous AF adjustment automatically |
Single-Servo AF: Camera focuses only once, when shutter button is half-pressed. |
Continuous-Servo AF: Camera focuses continuously when shutter button is held halfway down. |
Manual focus: User focuses manually with focus ring on lens. (Lens must be set to M or M/A mode, depending on lens type.) |
|
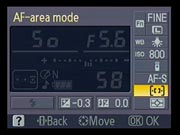
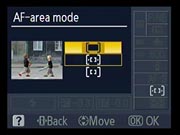
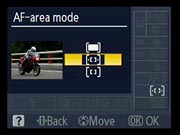
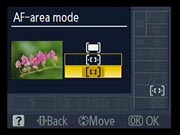
| AF-Area Mode |
 |
 |
 |
 |
|
|
|
|
Closest Subject: camera selects AF area for subject closest to the camera. |
Dynamic Area: User selects AF area, but camera will track if subject moves to another AF area. |
Single Area: User selects focus area, camera always uses the area chosen. |
|
|
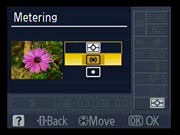
| Metering Pattern |
 |
 |
 |
 |
|
|
|
|
3D Matrix Metering |
Center-Weighted Metering |
Spot Metering (Spot meter follows whichever of the 3 AF points is active.) |
|
|
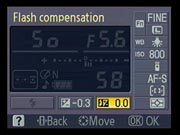
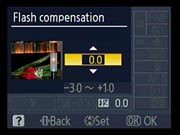
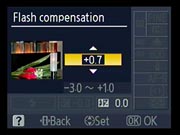
Flash Level
(Flash Exposure Comp) |
 |
 |
 |
 |
|
|
|
|
The flash exposure adjustment range is +1.0 to -3.0 EV in 1/3 EV steps.
Note how the sample image brightness tracks the exposure setting. |
|
|
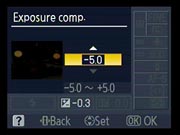
| Exposure Comp |
 |
 |
 |
 |
 |
|
|
|
Exposure compensation range is +/- 5 EV. Note how the example picture changes brightness with the adjustment. |
|
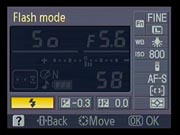
| Flash Mode |
 |
 |
 |
 |
 |
 |
|
|
Fill Flash (always on) In Auto and some scene modes, this option switches to Auto Flash. |
Red-eye Reduction: AF-assist lamp ights before flash fires, to make subjets' pupils contract, minimizing red-eye. |
Slow Sync with Red-eye: Slower shutter speed balances flash and ambient lighting, AF-assist lamp helps minimize red-eye effect. |
Slow Sync mode: Slower shutter speed balances flash and ambient exposure levels. |
Rear-Curtain Sync mode: Long exposure used, but flash fires just before shutter closes, producing blurs behind moving objects, with a sharp image from the flash at the front of the streak. |