Back
to Full Nikon D50 Review
Back
to Full Nikon D50 ReviewGo to Nikon D50 Data Sheet
Go to Nikon D50 Pictures Page
Up to Imaging Resource Cameras Page
Use your browser's "Back" button to return to the previous page, or the links at the top and bottom of this page to navigate to related information. If you have difficulty fitting the text on this page onto your printer output, simply resize your browser window to a narrower width and print again.
Remember us when it's time to buy!
Dave here: Have our reviews been helpful to you? (Is this article you're reading right now useful?) Preparing this level of information on as many products as we do is incredibly hard work, not to mention expensive. Things on the Internet may look like they're free, but they're not. (As a lot of big dot.com companies are finding out these days.) Somewhere, somebody has to pay to produce worthwhile content. YOU can help us though, by remembering us when it comes time to make your purchase. Would you consider coming back to our site and clicking-through to one of our advertisers to make your purchase? Every dollar you spend with one of our advertisers helps us directly (in affiliate fees) or indirectly (the advertiser will keep renewing their ad contract with us). To make it easy for you to support us, here's a URL you can visit, to see all our current advertisers, with links to click on that will register your visit to them as having come from our site. It's up to you where you buy, but Mike, Mike, Kim, Yazmin, Marti and I would be really grateful if you'd help us out by choosing one of our advertisers to purchase from.
Thank you for your support!
Dave Etchells, Founder & Publisher
Visit our "Buy Now" Page:
https://www.imaging-resource.com/buynow.htm
Back
to Full Nikon D50 Review
Go to Nikon D50
Data Sheet
Go to Nikon D50
Pictures Page
Up to Imaging Resource Cameras
Page
Nikon D50Nikon develops an "entry-level" SLR loaded with features for less than $750. (Body only) Review First Posted: 05/20/2005, Updated: 08/10/2005 |
|
 |
|
Price breakthrough brings high-quality digital body for under $750. |
| |
6.1 megapixel CCD, 3,008 x 2,000 pixel images | |
| |
ISO from 200 to 1600 | |
| |
3 frames per second with instant power-up | |
| |
Part of Nikon "Total Imaging System" | |
| |
Compatible with >90% of all Nikon F-mount lenses ever made! |
Nikon D50 Manufacturer Overview
As I always seem to say, Nikon is truly a name that needs no introduction in the world of photography, long associated with superior lenses and rugged, functional cameras. In the digital world, they arguably kicked off the era of the mass-market professional digital SLR with their original D1 several years ago. They went through a bit of a lull a bit over a year ago, which ended with the breakthrough D70, a particularly strong product that combined an excellent feature set with an excellent "kit" lens and equally good picture quality to become one of the leading cameras of the last year.
Now, the Nikon D50 extends most of the capabilities of the D70 down to a lower price point and in a somewhat simplified format that seems intended to capture the hearts, minds, and pocketbooks of the vast "family photographer" market. As you'll see in the review that follows, the Nikon D50 provides a superb combination of ease of use and advanced features, in a trimmer, more compact package than the previous D70. As the digital SLR market continues to move more mainstream, the Nikon D50 appears perfectly poised to capture a broad segment of it, providing great ease of use without "dumbing down" its capabilities for more advanced users.
There's still clearly a place for the D70 (now updated as the D70s), but from what we've seen in our tests, the new Nikon D50 seems poised to be another huge success for the company as the SLR market expands into the more purely consumer realm.
High Points
D50 vs Other Nikons
Given all that's new and improved with the D50, I thought it would be helpful to readers to compare its features against those of the earlier D100, as well as against various other manufacturer's models. Here's the results of our (myself and news editor Mike Tomkins) poring through the spec sheets for the various cameras, as well as my own previous tests and reviews. The first table below compares the D50 with current and recent Nikon models in its price/performance range, while the table on the following page shows how it stacks up against various models by other manufacturers.
| Nikon D50 vs other Nikon SLRs | |||||
| Manufacturer |
Nikon |
Nikon |
Nikon |
Nikon |
|
| Model |
D50 |
D70 |
D70s |
D100 |
|
| Imaging System |
Sensor Manufacturer | Sony | Sony | Sony | Sony |
| Sensor Type | CCD | CCD | CCD | CCD | |
| Color Filter Array | RGB | RGB | RGB | RGB | |
| Total Megapixels |
6.24 |
6.24 |
6.24 |
6.31 |
|
| Effective Megapixels | 6.1 | 6.1 | 6.1 | 6.1 | |
| Effective Sensor Size (mm) |
23.7 x 15.6 |
23.7 x 15.6 |
23.7 x 15.6 |
23.7 x 15.6 |
|
| Focal Length Multiplier (approx.) |
1.5x |
1.5x |
1.5x |
1.5x |
|
| Image Processor |
Not stated |
Not stated |
Not stated |
Not stated |
|
| Viewfinder | Type |
Eye-level pentamirror |
Eye-level pentamirror |
Eye-level pentamirror |
Eye-level pentaprism |
| Coverage |
95% |
95% |
95% |
95% |
|
| Magnification (-1 diopter with 50mm lens at infinity) |
0.75x |
0.75x |
0.75x |
0.8x |
|
| Eyepoint (mm) |
18 |
18 |
18 |
20 |
|
| Dioptric Adjustment Range (diopters) |
-1.6 to +0.5 |
-1.6 to +0.5 |
-1.6 to +0.5 |
-2.0 to +1.0 |
|
| Focusing Screen |
B-type BriteView clear matte screen Mark V |
B-type BriteView clear matte screen Mark V, with on-demand grid lines |
B-type BriteView clear matte screen Mark V, with on-demand grid lines |
B-type BriteView clear matte screen Mark II, with on-demand grid lines |
|
| Viewfinder Info Display |
5 focus area brackets/spot metering areas, center-weighted metering area, "no memory card" warning, battery status, focus confirmation, focus area/AF-area mode, AE lock indicator, FV lock indicator, shutter speed, aperture value, electronic analog exposure display, flash compensation indicator, exposure compensation indicator, Auto ISO indicator, number of exposures remaining/buffer space/preset WB recording indicator/exposure compensation value/flash compensation value/PC mode indicator, flash-ready indicator |
5 focus area brackets/spot metering areas, center-weighted metering area, on-demand framing grid, focus confirmation, focus area/AF-area mode, AE/FV lock indicator, battery status, shutter speed, aperture value, electronic analog exposure display, flash compensation indicator, exposure compensation indicator, Auto ISO indicator, number of exposures remaining/buffer space/preset WB recording indicator/exposure compensation value/flash compensation value/PC mode indicator, flash-ready indicator |
5 focus area brackets/spot metering areas, center-weighted metering area, on-demand framing grid, focus confirmation, focus area/AF-area mode, AE/FV lock indicator, battery status, shutter speed, aperture value, electronic analog exposure display, flash compensation indicator, exposure compensation indicator, Auto ISO indicator, number of exposures remaining/buffer space/preset WB recording indicator/exposure compensation value/flash compensation value/PC mode indicator, flash-ready indicator |
5 focus area brackets/spot metering areas, center-weighted metering area, on-demand framing grid, focus confirmation, metering mode, AE/FV lock indicator, battery status, shutter speed, aperture value, electronic analog exposure display, exposure mode, flash compensation indicator, exposure compensation indicator, number of exposures remaining/buffer space/exposure compensation value/flash compensation value, flash-ready indicator |
|
| Depth of Field Preview |
Not available |
Enabled with depth-of-field preview button |
Enabled with depth-of-field preview button |
Enabled with depth-of-field preview button |
|
| Recording System |
Recording Media / Quantity / Slot Type |
Secure Digital card |
Type I or II CF card / Microdrive |
Type I or II CF card / Microdrive |
Type I or II CF card / Microdrive |
| Compatible File System |
FAT 16 / FAT 32 |
FAT 16 / FAT 32 |
FAT 16 / FAT 32 |
FAT 16 / FAT 32 |
|
| Recording Formats |
RAW (NEF), JPEG |
RAW (NEF), JPEG |
RAW (NEF), JPEG |
RAW (NEF), JPEG |
|
| Maximum Resolution |
3008 x 2000 |
3008 x 2000 |
3008 x 2000 |
3008 x 2000 |
|
| Reduced Resolutions (JPEG only) |
2256 x 1496; 1504 x 1000 |
2240 x 1488; 1504 x 1000 |
2240 x 1488; 1504 x 1000 |
2240 x 1488; 1504 x 1000 |
|
| RAW + JPEG Recording |
Yes, basic JPEG only |
Yes, basic JPEG only |
Yes, basic JPEG only |
No |
|
| Color Space & White Balance |
User-Selectable Color Space |
Yes sRGB (two variants) + Adobe RGB |
Yes sRGB (two variants) + Adobe RGB |
Yes sRGB (two variants) + Adobe RGB |
Yes sRGB (two variants) + Adobe RGB |
| Processing Parameters (Contrast, Sharpness, Saturation, Color Tone) / # of Increments |
7 options each for sharpness and contrast, 3 options for saturation. 7-step hue adjustment. Digital vari-programs preset various processing parameters as well, and color space III boosts saturation somewhat, particularly in greens. |
7 options each for sharpness and contrast, 3 options for saturation. 7-step hue adjustment. Digital vari-programs preset various processing parameters as well, and color space III boosts saturation somewhat, particularly in greens. |
7 options each for sharpness and contrast, 3 options for saturation. 7-step hue adjustment. Digital vari-programs preset various processing parameters as well, and color space III boosts saturation somewhat, particularly in greens. |
5 options for sharpening, 6 for contrast, 7 for hue, none for saturation. Second sRGB color space boosts saturation somewhat. |
|
| Preset WB settings |
6 (Daylight, Cloudy, Shade, Incandescent, Fluorescent, Flash) |
6 (Daylight, Cloudy, Shade, Incandescent, Fluorescent, Flash) |
6 (Daylight, Cloudy, Shade, Incandescent, Fluorescent, Flash) |
6 (Daylight, Cloudy, Shade, Incandescent, Fluorescent, Flash) |
|
| Manual Color Temperature Setting Range |
(No Kelvin option, but very broad Preset WB range) |
(No Kelvin option, but very broad Preset WB range) |
(No Kelvin option, but very broad Preset WB range) |
(No Kelvin option, but very broad Preset WB range) |
|
| WB Adjustment Range |
Not available |
±3 steps in 1-step increments 10 mireds per step |
±3 steps in 1-step increments 10 mireds per step |
±3 steps in 1-step increments 10 mireds per step |
|
| Autofocus System |
Type |
TTL phase detection by Nikon Multi-CAM900 autofocus module |
TTL phase detection by Nikon Multi-CAM900 autofocus module |
TTL phase detection by Nikon Multi-CAM900 autofocus module |
TTL phase detection by Nikon Multi-CAM900 autofocus module |
| # of Focusing Points (Focusing Point Type) |
5 points |
5 points |
5 points |
5 points |
|
| Superimposed Focus Point Display | Yes | Yes | Yes | Yes | |
| AF Working Range |
EV -1 ~ 19 (ISO 100) |
EV -1 ~ 19 (ISO 100) |
EV -1 ~ 19 (ISO 100) |
EV -1 ~ 19 (ISO 100) |
|
| AF-assist Beam |
Bright incandescent lamp, (Range approx. 3.0 m, 9.8 ft, depending on lens.) Not dependent on flash setting. |
Bright incandescent lamp, (Range approx. 3.0 m, 9.8 ft, depending on lens.) Not dependent on flash setting. |
Bright incandescent lamp, (Range approx. 3.0 m, 9.8 ft, depending on lens.) Not dependent on flash setting. |
Bright incandescent lamp, (Range approx. 3.0 m, 9.8 ft, depending on lens.) Not dependent on flash setting. |
|
| One-shot AF |
Available in all modes |
Available in all modes |
Available in all modes |
Available in all modes |
|
| AI Servo (Tracking) AF |
Available in all modes (D50 adds AF-A mode, for auto selection of one-shot or tracking AF, compared to D70/D70s). |
Available in all modes |
Available in all modes (D70s adds all-area search priority function, compared to D70). |
Available in all modes |
|
| AI Focus AF |
Slightly different, but closest-subject focus priority available in all modes |
Slightly different, but closest-subject focus priority available in all modes |
Slightly different, but closest-subject focus priority available in all modes |
Slightly different, but closest-subject focus priority available in all modes |
|
| Exposure Control |
Shooting Modes |
11 - Program, shutter-priority AE, aperture-priority AE, Manual, Auto, Portrait, Landcape, Close up, Sports, Child, Night Portrait. |
11 - Program, shutter-priority AE, aperture-priority AE, Manual, Auto, Portrait, Landcape, Close up, Sports, Night Landscape, Night Portrait. |
11 - Program, shutter-priority AE, aperture-priority AE, Manual, Auto, Portrait, Landcape, Close up, Sports, Night Landscape, Night Portrait. |
4 - Program, shutter-priority AE, aperture-priority AE, manual mode. |
| Metering Zones |
420 |
1,005 |
1,005 |
10 |
|
| Metering Modes |
1) 3D Color Matrix Metering II with 420-segment RGB sensor. (2) Center-weighted: Weight of 75% given to 8mm dia. circle in center of frame. (3) Spot: Meters 3.5 mm dia. circle (about 2.5% of frame) centered on active focus area. |
1) 3D Color Matrix Metering with 1,005-pixel RGB sensor. (2) Center-weighted: Weight of 75% given to 6, 8, 10, or 13 mm dia. circle in center of frame. (3) Spot: Meters 2.3 mm dia. circle (about 1% of frame) centered on active focus area. |
1) 3D Color Matrix Metering with 1,005-pixel RGB sensor. (2) Center-weighted: Weight of 75% given to 6, 8, 10, or 13 mm dia. circle in center of frame. (3) Spot: Meters 2.3 mm dia. circle (about 1% of frame) centered on active focus area. |
1) 3D Matrix Metering with 10-segment SPD. (2) Center-Weighted: Weight of 60% given to 8 mm dia. circle in center of frame. (3) Spot Metering: Meters 3.0 mm dia. circle (about 2% of frame) centered on active focus area. |
|
| Metering System Working Range |
1) EV 0 ~ 20 (3D color matrix or center-weighted metering) 2) EV 2 ~ 20 (spot metering) (ISO 100 equivalent, f/1.4 lens, 20°C/68°F) |
1) EV 0 ~ 20 (3D color matrix or center-weighted metering) 2) EV 2 ~ 20 (spot metering) (ISO 100 equivalent, f/1.4 lens, 20°C/68°F) |
1) EV 0 ~ 20 (3D color matrix or center-weighted metering) 2) EV 2 ~ 20 (spot metering) (ISO 100 equivalent, f/1.4 lens, 20°C/68°F) |
1) Matrix Metering: EV 0 ~ 21; 2) Center-Weighted Metering: EV 0 ~ 21; 3) Spot Metering: EV 3 ~21 (at normal temperature, ISO 100 equivalent, f/1.4 lens) |
|
| ISO Range / Extended |
200 ~ 1600 / -- |
200 ~ 1600 / -- |
200 ~ 1600 / -- |
200 ~ 1600 / 3200, 6400 |
|
| Exposure Compensation |
+/- 5EV in 1/2 or 1/3EV increments |
+/- 5EV in 1/2 or 1/3EV increments |
+/- 5EV in 1/2 or 1/3EV increments |
+/- 5EV in 1/2 or 1/3EV increments |
|
| Automatic Exposure Bracketing |
3 shots, 1/3, 1/2, 2/3 or 1 EV steps |
2 or 3 shots, 1/3, 1/2, 2/3 or 1 EV steps |
2 or 3 shots, 1/3, 1/2, 2/3 or 1 EV steps |
2 or 3 shots, 1/3, 1/2, 2/3 or 1 EV steps |
|
| Shutter Speeds, Frame Rate, Shutter Lag |
Shutter Type |
Combined mechanical and CCD electronic shutter |
Combined mechanical and CCD electronic shutter |
Combined mechanical and CCD electronic shutter |
Electronically controlled mechanical |
| Shutter Speed Range |
1/4000 ~ 30 sec. in steps of 1/3 or 1/2 EV, bulb |
1/8000 ~ 30 sec. in steps of 1/3 or 1/2 EV, bulb |
1/8000 ~ 30 sec. in steps of 1/3 or 1/2 EV, bulb |
1/4000 ~ 30 sec. in steps of 1/3 or 1/2 EV, bulb |
|
| Maximum Frames Per Second / Buffer depth |
2.47 fps / 16 frames (JPEG large/fine) |
2.92 fps / 21 frames (JPEG large/fine) |
3.05 fps / 15 frames (JPEG large/fine) |
2.88 fps / 6 frames (JPEG large/fine) |
|
| Shutter lag, full AF (sec.) |
0.27 |
0.34 - 0.49 |
0.29 - 0.32 |
0.15 |
|
| Shutter lag, prefocus (sec.) |
0.114 |
0.124 |
0.106 |
0.100 |
|
| Startup time (sec.) |
~0.25 |
~ Zero |
~0.4 |
0.63 |
|
| Flash | Built-in Flash / Guide Number at ISO 100. |
Yes (12 meters / 39 feet) |
Yes (12 meters / 39 feet) |
Yes (12 meters / 39 feet) |
Yes (12.7 meters / 42 feet) |
| Max flash x-sync speed. (sec.) |
1/500 (!) |
1/500 (!) |
1/500 (!) |
1/180 |
|
| Flash Exposure Compensation |
-3 to +1 EV, 1/3 or 1/2 EV steps |
-3 to +1 EV, 1/3 or 1/2 EV steps |
-3 to +1 EV, 1/3 or 1/2 EV steps |
-3 to +1 EV, 1/3 or 1/2 EV steps |
|
| Slow-sync flash |
1st or 2nd curtain |
1st or 2nd curtain |
1st or 2nd curtain |
1st or 2nd curtain |
|
| PC Sync Terminal |
Hot shoe only |
Hot shoe only |
Hot shoe only |
Hot shoe only |
|
| Nikon Advanced Wireless Lighting support | Only with attached SB-800 flash or SU-800 wireless controller | Camera can act as wireless controller | Camera can act as wireless controller | n/a | |
| Playback System |
LCD Size / Pixel Count |
2.0 in LCD / 130,000 pixels |
1.8 in LCD / 130,000 pixels |
2.0 in LCD / 130,000 pixels |
1.8 in LCD / 118,000 pixels |
| Enlarged Playback / Scroll |
1.1 - 4.7x in 10 steps / Yes |
1.1 - 4.7x in 10 steps / Yes |
1.1 - 4.7x in 10 steps / Yes |
1.1 - 9x in 10 steps / Yes |
|
| LCD Monitor Brightness Adjustment Range |
5 steps |
5 steps |
5 steps |
5 steps |
|
| Automatic Rotation for Vertical Shots |
Yes |
Yes |
Yes |
No |
|
| Other Features | Computer Connection |
Yes, PTP-compliant (v2.0 standard, v2.0 speed) |
Yes, PTP-compliant (v2.0 standard, v1.1 speed) |
Yes, PTP-compliant (v2.0 standard, v1.1 speed) |
Yes, USB 1.1 |
| Direct Printing (PictBridge-compliant printers) |
Yes |
Yes |
Yes |
No |
|
| Menu Languages |
13 (Japanese, German, English, Spanish, French, Portuguese, Russian, Korean, Italian, Traditional Chinese, Simplified Chinese, Dutch, Swedish) |
10 (Japanese, German, English, Spanish, French, Korean, Italian, Simplified Chinese, Dutch, Swedish) |
10 (Japanese, German, English, Spanish, French, Korean, Italian, Simplified Chinese, Dutch, Swedish) |
5 (Japanese, German, English, Spanish, French) |
|
| Camera Default Reset |
Yes |
Yes |
Yes |
Yes |
|
| Custom Functions (Quantity / Settings) |
Yes (6 / 20) |
Yes (9 / 25) |
Yes (9 / 25) |
Yes (24) |
|
| Remote Control |
Optional IR |
Optional IR |
Optional, compatible with MC-DC1 or ML-L3 |
Optional, 10-pin remote terminal available in optional Multi Function Battery Pack |
|
| Info LCD Panel / Illumination |
Yes / No |
Yes / Yes (dedicated button) |
Yes / Yes (dedicated button) |
Yes / Yes (dedicated button) |
|
| Number of Command Dials |
1 |
2 |
2 |
2 |
|
| Ultrasonic CCD dust-removal function |
No |
No |
No |
No |
|
| Body Structure | Body Cover/Chassis |
Largely Plastic |
Largely Plastic |
Largely Plastic |
Plastic / Metal |
| Power System | Battery Compatibility |
EN-EL3 CR2 pack is an added-cost accessory |
EN-EL3, CR2 pack (3 cells) |
EN-EL3, EN-EL3a (Ships with EN-EL3a, 1500 mAh vs 1400 mAh for EN-EL3) CR2 pack is an added-cost accessory |
EN-EL3 |
| Rated Shooting Capacity at 20C/68F |
100% AE: 2000 50% Flash: 400 |
100% AE: 2000 50% Flash: 400 |
100% AE: 2500 50% Flash: 500 |
100% AE: 1600 50% Flash: 370 |
|
| Dimensions & Weight | Dimensions (WxHxD, mm) |
133 x 102 x 76 |
140 x 111 x 78 |
140 x 111 x 78 |
144 x 116 x 80.5 |
| Weight (body only) |
540 g / 19 oz. |
595 g / 21 oz. |
600 g / 21 oz. |
700 g / 24.7 oz. |
|
| Operational Environment |
Operating Temperature Range |
0 ~ 40C / 32 ~ 104F |
0 ~ 40C / 32 ~ 104F |
0 ~ 40C / 32 ~ 104F |
0 ~ 40C / 32 ~ 104F |
| Operating Humidity Range |
< 85% |
< 85% |
< 85% |
< 85% |
|
| Kit Lens | Focal length/aperture |
18-55mm f/3.5-5.6G ED |
18-70mm f/3.5-4.5G ED |
18-70mm f/3.5-4.5G ED |
- |
| Lens Compatibility | Lens Mount / Compatibility |
|
|
|
|
D50 vs Competing Models
| Nikon D50 vs other manufacturer's SLRs | ||||||||||
| Manufacturer |
Nikon |
Canon |
Canon |
Canon |
Konica Minolta |
Olympus |
Pentax |
Pentax |
Sigma |
|
| Model |
D50 |
EOS 300D Digital Rebel |
EOS 350D Digital Rebel XT |
EOS 20D |
Maxxum 7 Digital |
EVOLT E-300 |
*ist D |
*ist Ds |
SD10 |
|
| Imaging System |
Sensor Manufacturer | Sony | Canon | Canon | Canon | Unknown | Kodak | Sony | Sony | National Semiconductor / Foveon |
| Sensor Type | CCD | CMOS | CMOS | CMOS | CCD | CCD | CCD | CCD | X3 CMOS | |
| Color Filter Array | RGB | RGB | RGB | RGB | RGB | RGB | RGB | RGB | None | |
| Total Megapixels |
6.24 |
6.5 |
8.2 |
8.25 |
6.3 |
8.9 |
6.31 |
6.31 |
3.5 x 3 photosensors |
|
| Effective Megapixels | 6.1 | 6.3 | 8.0 | 8.5 | 6.1 | 8.15 | 6.1 | 6.1 | 3.4 x 3 photosensors | |
| Effective Sensor Size (mm) |
23.7 x 15.6 |
22.7 x 15.1 |
22.2 x 14.8 |
22.5 x 15.0 |
23.7 x 15.6 |
17.3 x 13.0 |
23.7 x 15.6 |
23.7 x 15.6 |
20.7 x 13.8 |
|
| Focal Length Multiplier (approx.) |
1.5x |
1.6x |
1.6x |
1.6x |
1.5x |
2.0x |
1.5x |
1.5x |
1.7x |
|
| Image Processor |
Not stated |
SLR-DIGIC |
DIGIC II |
DIGIC II |
Not stated |
Not stated |
Not stated |
Not stated |
Not stated |
|
| Viewfinder | Type |
Eye-level pentamirror |
Eye-level pentamirror |
Eye-level pentamirror |
Eye-level pentaprism |
Eye-level pentaprism |
Eye-level Porro Mirror system |
Eye-level pentaprism |
Eye-level pentaprism |
Pentaprism |
| Coverage |
95% |
95% |
95% |
95% |
95% |
94% |
95% |
95% |
97% vertical, 98% horizontal |
|
| Magnification (-1 diopter with 50mm lens at infinity) |
0.75x |
0.8x |
0.8x |
0.9x |
0.9x |
1.0x |
0.95x |
0.95x |
0.77x |
|
| Eyepoint (mm) |
18 |
21 |
21 |
20 |
25 |
20 |
Unknown |
Unknown |
18 |
|
| Dioptric Adjustment Range (diopters) |
-1.6 to +0.5 |
-3.0 to +1.0 |
-3.0 to +1.0 |
-3.0 to +1.0 |
-3.0 to +1.0 |
-3.0 to +1.0 |
-2.5 to +1.5 |
-2.5 to +1.5 |
-3 to +1 |
|
| Focusing Screen |
B-type BriteView clear matte screen Mark V |
Fixed, all-matte screen |
Fixed, precision matte screen |
Fixed, precision matte screen |
Spherical Acute Matte (G-type as standard) |
Fixed (Matte with AF/Metering marks) |
Natural-Bright-Matte focusing screen |
Interchangeable Natural-Bright-Matte focusing screen (AF Frame Matte screen included as standard; AF Split-Image Matte and AF Scale Matte screens available as optional accessories) |
Unknown |
|
| Viewfinder Info Display |
AF information (AF points, focus confirmation, AF area mode, AE/AF lock indicator), exposure information (shutter speed, aperture value, manual exposure, AE/AF lock indicator, exposure level, flash exposure compensation indicator, exposure compensation indicator), shots remaining/buffer space/pre-set white balance recording indicator/PC mode indicator, flash-ready indicator, "no memory card" warning, battery level |
AF information (AF points, focus confirmation light), exposure information (shutter speed, aperture value, manual exposure, AE lock, exposure level), flash information (flash ready, red-eye reduction lamp on, high-speed sync, FE lock), shots remaining, CF card information |
AF information (AF points, focus confirmation light), exposure information (shutter speed, aperture value, manual exposure, AE lock, exposure level, AEB in progress, exposure warning), flash information (flash ready, red-eye reduction lamp on, high-speed sync, FE lock, flash exposure compensation), maximum burst, CF card information |
AF (AF points, focus confirmation light), exposure (shutter speed, aperture value, manual exposure, AE lock, exposure compensation amount, AEB level, partial metering area), flash (flash ready, red-eye reduction lamp on, high-speed sync, FE lock, flash exposure compensation amount), warnings (exposure warning, improper FE lock warning, CF card full warning, CF card error warning, no CF card warning, busy), maximum burst for continuous shooting, shots remaining |
(sorry, don't have the list for this one) |
AF information (AF frame, focus confirmation), aperture value, shutter speed, exposure compensation amount, flash indicator, AE lock, white balance, metering mode, battery check, exposure mode, number of "storable sequential pictures" (not seen on prototype) |
Out of image area: Built-in flash status, AF sensor pattern, in-focus, shutter speed, aperture, exposure compensation factor, bar graph. Within image area: AF frame with superimposed AF sensor point, spot AF frame. |
Flash information, Picture mode (Standard, Portrait, Landscape, Macro, Action, Night scene portrait), In-focus, Shutter speed, Aperture value, Exposure compensation factor, Manual white balance, Manual focus, ISO sensitivity warning, Auto exposure lock signal |
(sorry, don't have the list for this one) |
|
| Depth of Field Preview |
Not available |
Enabled with depth-of-field preview button |
Enabled with depth-of-field preview button |
Enabled with depth-of-field preview button |
Enabled with depth-of-field preview button |
Enabled with depth-of-field preview button |
Enabled with depth-of-field preview position on power switch |
Enabled with depth-of-field preview position on power switch |
Enabled with depth-of-field preview button |
|
| Recording System |
Recording Media / Quantity / Slot Type |
Secure Digital card |
Type I or II CF card / Microdrive |
Type I or II CF card / Microdrive |
Type I or II CF card / Microdrive |
Type I or II CF card / Microdrive |
Type I or II CF card / Microdrive |
Type I or II CF card / Microdrive |
Secure Digital card |
Type I or II CF card / Microdrive |
| Compatible File System |
FAT 16 / FAT 32 |
FAT 16 / FAT 32 |
FAT 16 / FAT 32 |
FAT 16 / FAT 32 |
FAT 16 / FAT 32 |
FAT 16 / FAT 32 |
FAT 16 / FAT 32 |
FAT 16 / FAT 32 |
FAT 16 |
|
| Recording Formats |
RAW (NEF), JPEG |
RAW (CRW), JPEG |
RAW (CR2), JPEG |
RAW (CR2), JPEG |
RAW (MRW), JPEG |
RAW (ORF), JPEG, TIFF |
RAW (PEF), JPEG, TIFF |
RAW (PEF), JPEG, TIFF |
RAW (X3F) |
|
| Maximum Resolution |
3008 x 2000 |
3072 x 2048 |
3456 x 2304 |
3504 x 2336 |
3008 x 2000 |
3,264 x 2,448 |
3008 x 2008 |
3008 x 2008 |
2268 x 1512 |
|
| Reduced Resolutions (JPEG only) |
2256 x 1496; 1504 x 1000 |
2048 x 1360; 1356 x 1024 |
2496 x 1664; 1728 x 1152 |
2544 x 1696; 1752 x 1168 |
2256 x 1496; 1504 x 1000 |
3,200 x 2,400, 2,560 x 1,920, 1,600 x 1,200 1,280 x 960 1,024 x 768 640 x 480 |
2400 x 1600; 1536 x 1024 |
2400 x 1600; 1536 x 1024 |
1512 x 1008; 1134 x 756 |
|
| RAW + JPEG Recording |
Yes, basic JPEG only |
Yes, Middle Fine JPEG only, embedded in RAW |
Yes, any resolution |
Yes, selectable JPEG resolution / compression |
Yes, selectable JPEG resolution (fine compression only) |
Yes, Selectable JPEG resolution / compression |
No |
No |
No |
|
| Color Space & White Balance |
User-Selectable Color Space |
Yes sRGB (two variants) + Adobe RGB |
Yes sRGB + Adobe RGB |
Yes sRGB + Adobe RGB |
Yes sRGB + Adobe RGB |
Yes sRGB (two variants) + Adobe RGB |
Yes sRGB + Adobe RGB |
Yes sRGB + Adobe RGB |
Yes sRGB + Adobe RGB |
n/a (color space depends on software) |
| Processing Parameters (Contrast, Sharpness, Saturation, Color Tone) / # of Increments |
7 options each for sharpness and contrast, 3 options for saturation. 7-step hue adjustment. Digital vari-programs preset various processing parameters as well, and color space III boosts saturation somewhat, particularly in greens. |
5 (Same as 10D, but new is default sets: one mimics 10D settings and one boosts contrast, saturation, and sharpening for snappier prints. This is the factory default setting) |
5 (Same as original Digital Rebel, but with the addition of a Black and White mode that includes tone and contrast adjustments.) |
5 |
5 |
5 options each for sharpness, saturation, and contrast. Normal/Low/High-key Gradation adjustment |
3 options each for contrast, sharpness and saturation |
3 options each for contrast, sharpness and saturation |
n/a (processing parameters depend on software) |
|
| Preset WB settings |
6 (Daylight, Cloudy, Shade, Incandescent, Fluorescent, Flash) |
6 (Daylight, Cloudy, Shade, Incandescent, Fluorescent, Flash) |
6 (Daylight, Cloudy, Shade, Incandescent, Fluorescent, Flash) |
6 (Daylight, Cloudy, Shade, Incandescent, Fluorescent, Flash) |
6 (Daylight, Shade, Cloudy, Tungsten, Fluorescent, Flash) |
14 (Auto, Custom, plus 12 Kelvin Temperature settings correlated with common light sources, such as incandescent, various types of fluorescent, etc.) |
11 (Auto, Daylight, Shade, Cloudy, Fluorescent [white, neutral, or daylight], Tungsten, and three Manual settings) |
9 (Auto, Daylight, Shade, Cloudy,Tungsten Light, Fluorescent Light [White, Daylight, Neutral], Manual) |
8 (Auto, Sunlight, Shade, Overcast, Incandescent, Fluorescent, Flash, Custom) |
|
| Manual Color Temperature Setting Range |
(No Kelvin option, but very broad Preset WB range) |
None |
None |
2800 ~ 10000K in 100K increments |
2500 ~ 9900K in 100K increments |
2,000 ~ 10,000K (16 settings, varying increments) |
None |
None |
None |
|
| WB Adjustment Range |
Not available |
±3 steps in 1-step increments 5 mireds per step |
±9 steps in 1-step increments 5 mireds per step |
±3 steps in 1-step increments 5 mireds per step |
±3 steps in 1-step increments Arbitrary step size (approx. 10 mireds per step in most modes) |
±7 steps in 1-step increments, unknown step size |
Not available |
Not available |
None |
|
| Autofocus System |
Type |
TTL phase detection by Nikon Multi-CAM900 autofocus module |
TTL-CT-SIR with a CMOS sensor (TTL secondary image registration, phase detection) |
TTL-CT-SIR with a CMOS sensor (TTL secondary image registration, phase detection) |
TTL-CT-SIR with a CMOS sensor (TTL secondary image registration, phase detection) |
TTL phase detection with CCD line sensors |
TTL phase detection |
TTL phase-matching by SAFOX VIII |
TTL phase-matching by SAFOX VIII |
TTL phase difference detection |
| # of Focusing Points (Focusing Point Type) |
5 points |
7 points (1 cross-type, 2 horizontal-type, 4 vertical-type) |
7 points (1 cross-type, 2 horizontal-type, 4 vertical-type) |
9 points, 1 cross type and 8 single-axis |
9 points, 8 lines with center cross-hair sensor |
3 points |
11 points |
11 points |
1 point |
|
| Superimposed Focus Point Display | Yes | Yes | Yes | Yes | Yes | Yes | Yes | Yes | n/a | |
| AF Working Range |
EV -1 ~ 19 (ISO 100) |
EV 0.5 ~ 18 (ISO 100) |
EV 0.5 ~ 18 |
EV 0.5 ~ 18 |
EV-1 ~ EV18 (ISO 100) |
EV 0 ~ 19 |
EV0 to EV19 (ISO 200) |
EV0 to EV19 (ISO 200) |
EV2 to 18 (ISO 100) |
|
| AF-assist Beam |
Bright incandescent lamp, (Range approx. 3.0 m, 9.8 ft, depending on lens.) Not dependent on flash setting. |
Yes, stroboscopic flash (Range: Approx. 4.0m / 13.1ft. at center, approx. 3.5m/11.5ft. off-center) Note: Only available when flash is enabled. |
Yes, stroboscopic flash (Range: Approx. 4.0m / 13.1ft. at center, approx. 3.5m/11.5ft. off-center) |
Yes, stroboscopic flash (Range: Approx. 4.0m / 13.1ft. at center, approx. 3.5m/11.5ft. off-center) |
Yes, stroboscopic flash |
With built-in flash unit, and on dedicated Olympus external flash units. Note: Only available when flash is enabled. |
Yes, stroboscopic flash |
Yes, stroboscopic flash |
No |
|
| One-shot AF |
Available in all modes |
Enabled in Portrait, Landscape, Close-up (Macro), Night Portrait, and A-DEP modes. |
Enabled in Portrait, Landscape, Close-up (Macro), Night Portrait, and A-DEP modes. Selectable in Program, Shutter Priority, Aperture Priority and Manual modes. |
Enabled in Portrait, Landscape, Close-up (Macro), Night Portrait, and A-DEP modes. Selectable in Program, Shutter Priority, Aperture Priority and Manual modes. |
Available in all modes |
Locked by first position of Shutter Button / OK Button (Customizable) |
Available in all modes |
Unknown |
Unknown |
|
| AI Servo (Tracking) AF |
Available in all modes (D50 adds AF-A mode, for auto selection of one-shot or tracking AF, compared to D70/D70s). |
Enabled in Sports mode only. |
Enabled in Sports mode. Selectable in Program, Shutter Priority, Aperture Priority and Manual modes. |
Enabled in Sports mode. Selectable in Program, Shutter Priority, Aperture Priority and Manual modes. |
Available in all modes |
Available in Continuous AF Mode |
Available in Continuous AF Mode |
Unknown |
Unknown |
|
| AI Focus AF |
Slightly different, but closest-subject focus priority available in all modes |
Enabled in Full Auto, Flash Off, Program, Shutter Priority, Aperture Priority, and Manual modes. |
Enabled in Full Auto and Flash Off modes. Selectable in Program, Shutter Priority, Aperture Priority, and Manual modes. |
Enabled in Full Auto and Flash Off modes. Selectable in Program, Shutter Priority, Aperture Priority, and Manual modes. |
Available in all modes |
Predictive AF for moving subjects, but doesn't appear to track across AF areas. |
Unknown |
Unknown |
Unknown |
|
| Exposure Control |
Shooting Modes |
11 - Program, shutter-priority AE, aperture-priority AE, Manual, Auto, Portrait, Landcape, Close up, Sports, Child, Night Portrait. |
12 - Program AE (Full Auto, Portrait, Landscape, Close-up, Sports, Night Portrait, Flash Off, Program), shutter-priority AE, aperture-priority AE, depth-of-field AE, manual exposure, ETTL autoflash |
12 - Program AE (Full Auto, Portrait, Landscape, Close-up, Sports, Night Portrait, Flash Off, Program), shutter-priority AE, aperture-priority AE, depth-of-field AE, manual exposure, ETTL autoflash |
12 - Program AE (Full Auto, Portrait, Landscape, Close-up, Sports, Night Portrait, Flash Off, Program), shutter-priority AE, aperture-priority AE, depth-of-field AE, manual exposure, ETTL autoflash |
8 - Full Auto, Program, shutter-priority AE, aperture-priority AE, manual, three memory register settings |
9 - Program, aperture-priority AE, shutter-priority AE, Manual, Portrait, Landcape, Close up, Sports, Night Landscape, plus:
14 Scene modes (Landscape, Landscape+Portrait, Night Scene, Night+Portrait, Fireworks, Sunset, Portrait, High Key, Macro, Documents, Museum, Sport, Beach & Snow, and Candle) |
6 - Auto exposure with Hyper Program, Programmed AE, Shutter-Priority AE, Aperture-Priority AE, Metered Manual, bulb |
13 - Auto, Programmed AE, Shutter-Priority AE, Aperture-Priority AE, Metered Manual, Bulb, Normal, Portrait, Landscape, Macro, Moving Object, Night Scene Portrait, Flash Off |
4 - Programmed AE, Shutter-Priority AE, Aperture-Priority AE, Manual |
| Metering Zones |
420 |
35 |
35 |
35 |
14 |
Not stated |
16 |
16 |
8 |
|
| Metering Modes |
1) 3D Color Matrix Metering II with 420-segment RGB sensor. (2) Center-weighted: Weight of 75% given to 8mm dia. circle in center of frame. (3) Spot: Meters 2.3 mm dia. circle (about one percent of frame) centered on active focus area. |
Evaluative (linked to any AF point), center weighted average (set automatically in manual mode), 9% partial |
Evaluative (linked to any AF point), center weighted average, 9% partial |
Evaluative (linked to any AF point), center weighted, 9% partial |
14-segment honeycomb-pattern metering, Center-weighted, Spot |
Digital ESP (evaluative), center-weighted, spot |
Multi, Center-Weighted, and Spot |
Multi, Center-Weighted, and Spot |
Evaluative, Center, Center-weighted Average |
|
| Metering System Working Range |
1) EV 0 ~ 20 (3D color matrix or center-weighted metering) 2) EV 2 ~ 20 (spot metering) (ISO 100 equivalent, f/1.4 lens, 20°C/68°F) |
EV 1 ~ 20 |
EV 1 ~ 20 |
EV 1 ~ 20 |
1) EV 0 ~ 20 (14-segment honeycomb-pattern or center-weighted metering) 2) EV 3 ~ 20 (spot metering) (ISO 100 equivalent, f/1.4 lens) |
1) Digital ESP/Center Weighted Average; EV 1 ~ 20 2) Spot; EV 3 ~ 17 (50mm F2, ISO 100) |
1) EV 0 ~ 21 (ISO200) 2) Multi-segment - EV 1 ~ 21.5 |
EV 1 ~ 21.5 |
EV 1 ~ 20 |
|
| ISO Range / Extended |
200 ~ 1600 / -- |
100 ~ 1600 / -- |
100 ~ 1600 / -- |
100 ~ 1600 / 3200 |
100 ~ 1600 / 3200 |
100 ~ 400 / 1600 |
200 ~ 1600 / 3200 |
200 ~ 1600 / 3200 |
100 ~ 800 / 1600 |
|
| Exposure Compensation |
+/- 5EV in 1/2 or 1/3EV increments |
+/- 2EV in 1/3EV increments |
+/- 2EV in 1/2 or 1/3EV increments |
+/- 2EV in 1/2 or 1/3EV increments |
+/- 3EV in 1/2EV increments, or +/- 2EV in 1/3EV increments |
+/- 5EV in 1, 1/2 or 1/3EV increments |
+/- 3EV in 1/2EV increments, or +/- 2EV in 1/3EV increments |
±2 EV in 1/2EV or 1/3EV increments |
±3 EV in 1/3EV increments |
|
| Automatic Exposure Bracketing |
3 shots, 1/3, 1/2, 2/3 or 1 EV steps |
+/- 2EV in 1/3EV increments |
+/- 2EV in 1/2 or 1/3EV increments |
+/- 2EV in 1/2 or 1/3EV increments |
+/- 2EV in 1/2 increments |
3 shots in +/- 1, 1/2, or 1/3 EV steps |
3 shots in +/- 1/2, or 1/3 EV steps |
3 shots within range of ±0.5EV, ±1.0EV, ±1.5EV (0.5EV steps) or ±0.3EV, ±0.7EV, ±1.0EV (0.3EV steps) |
3 shots within ±3EV in 1/3 EV steps |
|
| Shutter Speeds, Frame Rate, Shutter Lag |
Shutter Type |
Combined mechanical and CCD electronic shutter |
Mechanical, all speeds electronically controlled |
Mechanical, all speeds electronically controlled |
Mechanical, all speeds electronically controlled |
Mechanical (?) |
Mechanical Focal Plane, electronically controlled |
Mechanical Focal Plane, electronically controlled |
Mechanical Focal Plane, electronically controlled |
Mechanical Focal Plane, electronically controlled |
| Shutter Speed Range |
1/4000 ~ 30 sec. in steps of 1/3 or 1/2 EV, bulb |
1/4000 ~ 30 sec. (1/3EV increments) and bulb |
1/4000 ~ 30 sec. (1/2 or 1/3EV increments) and bulb |
1/8000 ~ 30 sec. (1/2 or 1/3EV increments) and bulb |
1/4000 ~ 30 sec. in steps of 1/3 or 1/2 EV, bulb |
1/4000 ~ 30 sec. , 1/3, 1/2, 1EV step selectable, bulb |
1/4000 ~ 30 sec. (1/2EV increments) and bulb |
1/4000 ~ 30 sec. and bulb |
1/6000 ~ 30 sec. and bulb (30 sec. max) |
|
| Maximum Frames Per Second / Buffer depth |
2.47 fps / 16 frames |
2.5 fps / 4 frames |
3 fps / 14 frames |
5 fps / 23 frames |
2.75 fps / 15 frames |
2.58 fps / 4 frames |
2.6 fps / 6 frames |
2.8 fps / 8 frames (manufacturer spec) |
1.9 fps / 6 frames |
|
| Shutter lag, full AF (sec.) |
0.27 |
0.25 - 0.28 |
0.20 - 0.24 |
0.15 - 0.16 |
0.266 |
0.37 |
0.23 |
(Not tested yet) |
0.23 |
|
| Shutter lag, prefocus (sec.) |
0.114 |
0.142 |
0.095 |
0.077 |
0.117 |
0.1 |
0.13 |
(Not tested yet) |
0.11 |
|
| Startup time (sec.) |
~0.25 |
3.09 |
0.25 |
0.25 |
1.4 |
2.1 |
0.5 |
(Not tested yet) |
0.6 |
|
| Flash | Built-in Flash / Guide Number at ISO 100. |
Yes (12 meters / 39 feet) |
Yes (13 meters / 43 feet) |
Yes (13 meters / 43 feet) |
Yes (13 meters / 43 feet) |
Yes (12 meters / 39 feet) |
Unknown |
Yes (11 meters / 36 feet) |
Yes (15.6 meters / 51 feet) @ ISO 200 |
n/a |
| Max flash x-sync speed. (sec.) |
1/500 (!) |
1/200 |
1/200 |
1/250 |
1/160 (anti-shake off) / 1/125 (anti-shake on) |
1/180 |
1/150 |
1/180 |
1/180 |
|
| Flash Exposure Compensation |
-3 to +1 EV, 1/3 or 1/2 EV steps |
No |
+/- 2EV in 1/2 or 1/3EV increments |
+/- 2EV in 1/2 or 1/3EV increments |
+/- 2EV in 1/2EV increments |
+/- 2 EV in each 1, 1/2, or 1/3 EV steps |
-3 to +1 EV, 1/2 EV steps |
-2 to +1 EV (1/2 EV steps) |
None |
|
| Slow-sync flash |
1st or 2nd curtain |
1st curtain only |
|
|
1st or 2nd curtain |
1st or 2nd curtain |
1st or 2nd curtain |
Unknown |
1st or 2nd curtain |
|
| PC Sync Terminal |
Hot shoe only |
Hot shoe only |
Hot shoe only |
Yes |
Hot shoe only |
Hot shoe only |
Hot shoe only |
Hot shoe only |
Hot shoe only |
|
| Playback System |
LCD Size / Pixel Count |
2.0 in LCD / 130,000 pixels |
1.8 in. LCD / 118,000 pixels |
1.8 in. LCD / 115,000 pixels |
1.8 in. LCD / 118,000 pixels |
2.5 in LCD / 207,000 pixels |
1.8 in LCD / 134,000 pixels |
1.8 in LCD / 118,000 pixels |
2.0 in. LCD / 210,000 pixels |
1.8 in LCD / 130,000 pixels |
| Enlarged Playback / Scroll |
1.1 - 4.7x in 10 steps / Yes |
1.5~10x in 15 steps / Yes |
1.5~10x in 15 steps / Yes |
1.5~10x in 15 steps / Yes |
4.7x max / Yes |
2, 3, 4, 10x / Yes |
Up to 12x / Yes |
12x max. / Yes |
4x max. / Yes |
|
| LCD Monitor Brightness Adjustment Range |
5 steps |
5 steps |
5 steps |
5 steps |
11 steps |
7 steps |
15 steps |
Unknown |
3 steps |
|
| Automatic Rotation for Vertical Shots |
Yes |
Yes |
Yes |
Yes |
Yes |
No |
No |
Unknown |
No |
|
| Other Features | Computer Connection |
Yes, PTP-compliant (v2.0 standard, v2.0 speed) |
Yes, PTP-compliant, USB v 1.1 |
Yes, USB 2.0, PTP-compliant |
Yes, USB 2.0, PTP-compliant |
Yes, PTP-compliant (v2.0 standard, v2.0 speed) |
Yes, PTP-compliant (v2.0 standard, v1.1 max speed) |
Yes, USB v1.1 |
USB 2.0 High Speed (PTP compliance unknown) |
Yes, USB v1.1 and IEEE 1394 FireWire |
| Direct Printing (PictBridge-compliant printers) |
Yes |
Yes |
Yes |
Yes |
Yes |
Yes |
No |
Yes |
No |
|
| Menu Languages |
13 (Japanese, German, English, Spanish, French, Portuguese, Russian, Korean, Italian, Traditional Chinese, Simplified Chinese, Dutch, Swedish) |
12 (English, German, French, Dutch, Danish, Finnish, Italian, Norwegian, Swedish, Spanish, Simplified Chinese, and Japanese.) |
15 (English, German, French, Dutch, Danish, Finnish, Italian, Norwegian, Swedish, Spanish, Simplified Chinese, Russian, Traditional Chinese, Korean,and Japanese.) |
12 (English, German, French, Dutch, Danish, Finnish, Italian, Norwegian, Swedish, Spanish, Simplified Chinese, and Japanese.) |
8 (English, German, French, Spanish, Italian, Swedish, Simplified Chinese, and Japanese.) |
2 (English, Japanese) - More coming in production models? |
6 (English, French, German, Spanish, Italian, Japanese) |
9 (English, French, German, Spanish, Italian, Russian, Chinese, Korean, Japanese) |
4 (English, Japanese, German, French) |
|
| Camera Default Reset |
Yes |
Yes |
Yes |
Yes |
Yes |
Yes |
Yes |
Unknown |
Yes |
|
| Custom Functions (Quantity / Settings) |
Yes (6 / 20) |
No |
Yes (9 / 24) |
Yes (17 / 61) |
Yes (20 / 44) |
No |
Yes (22 / 53) |
Yes (18) |
No |
|
| Remote Control |
Optional IR |
Optional, Compatible with Remote Switch RS-60E3, Remote Controller RC-5 / RC-1 |
Compatible with Remote Switch RS-60E3, Remote Controller RC-5 / RC-1 |
N3-type remote control |
Optional, compatible with RC-1000S or RC-1000L |
Optional IR |
Optional IR |
Yes, details unknown |
Optional RS-21 wireless |
|
| Info LCD Panel / Illumination |
Yes / No |
Yes / Yes (dedicated button) |
Yes / Yes (dedicated button) |
Yes / Yes (dedicated button) |
No / N/A |
No / n/a |
Yes / Yes |
Unknown |
Yes / No |
|
| Ultrasonic CCD dust-removal function |
No |
No |
No |
No |
No |
Yes |
No |
No |
No |
|
| Body Structure | Body Cover/Chassis |
Largely Plastic |
Largely Plastic, aluminum frame |
Largely plastic, aluminum frame |
Magnesium Alloy / Stainless Steel |
Magnesium Alloy (front) / Plastic (rear) |
Metal Alloy |
Largely plastic / Stainless Steel frame |
Largely plastic / Stainless Steel frame |
Largely plastic |
| Power System | Battery Compatibility |
EN-EL3 CR2 pack is an added-cost accessory |
Main: BP-511 / BP-512 Backup: CR2016 |
Main: NB-2LH Backup: CR2016 |
Main: BP-511 / BP-512 Backup: CR2025 |
NP-400 |
BLM-1 |
2 x CR-V3 or 4 x AA |
2 x CR-V3 or 4 x AA |
2 x CR-V3 or 4 x AA |
| Rated Shooting Capacity at 20C/68F |
100% AE: 2000 50% Flash: 400 |
100% AE: 600 50% Flash: 400 |
100% AE: 600 50% Flash: 400 |
100% AE: 650 50% Flash: 500 |
100% AE: 600 50% Flash: 400 |
Unknown |
No flash : 1000 |
Unknown |
Unknown |
|
| Dimensions & Weight | Dimensions (WxHxD, mm) |
133 x 102 x 76 |
140 x 111 x 72.9 |
126.5 x 94 x 64 |
144 x 105.5 x 71.5 |
150 x 106 x 77.5 |
146 x 85 x 64 |
129 x 94.5 x 60 |
125 x 92.5 x 66 |
152 x 120 x 79 |
| Weight (body only) |
540 g / 19 oz. |
560 g / 19.7 oz. |
485 g / 17.1 oz. |
685g / 24.2 oz. |
760 g / 26.81 oz |
580g / 20.5 oz |
550 g / 19.4 oz |
505 g / 17.8 oz. |
785 g / 27.7 oz. |
|
| Operational Environment |
Operating Temperature Range |
0 ~ 40C / 32 ~ 104F |
0 ~ 40C / 32 ~ 104F |
0 ~ 40C / 32 ~ 104F |
0 ~ 40C / 32 ~ 104F |
0 ~ 40C / 32 ~ 104F |
0 ~ 40C / 32 ~ 104F |
Not stated |
Not stated |
Not stated |
| Operating Humidity Range |
< 85% |
< 85% |
< 85% |
< 85% |
Not Stated |
30 - 90% |
Not stated |
Not stated |
Not stated |
|
| Kit Lens | Focal length/aperture |
18-55mm f/3.5-5.6G ED |
- |
- |
- |
- |
14-45mm f3.5 - f5.6 |
- |
- |
18-50mm |
| Lens Compatibility | Lens Mount / Compatibility |
|
EF / All EOS lenses, plus EF-S lenses |
EF / All EOS lenses, plus EF-S lenses |
EF / All EOS lenses, plus EF-S lenses |
A-type / All A-type lenses except MD and MC series manual focus lenses. AF Macro 3x - 1x f/1.7-2.8 lens cannot be used with Anti-Shake, nor does Anti-Shake work with any lens with a macro release. |
Zuiko Digital, Four Thirds System Lens |
KAF / compatible with PENTAX KAF2-, KAF- and KA-mount lenses. Power zoom function not available. K-mount lenses usable with restrictions. S-mount lenses usable with adapter and restrictions. 67/645 lenses usable adapter and restrictions. |
KAF / compatible with PENTAX KAF2-, KAF- and KA-mount lenses. Power zoom function not available. K-mount lenses usable with restrictions. S-mount lenses usable with adapter and restrictions. 67/645 lenses usable adapter and restrictions. |
SA mount lenses |
Nikon D50 User Report
By Shawn Barnett
Through 2003 and 2004, it was starting to look like mighty Nikon was in danger of falling permanently behind its traditional camera-making rivals, especially in the area of SLRs, both professional and consumer. Canon's Digital Rebel announced in 2003 had surprised the market with its low price and excellent image quality, and Nikon's only early response was a pre-announcement of the D70 to keep Canon's sub-$1,000 SLR from wooing the many Nikon faithfuls eager to switch to digital SLR photography. With Christmas coming on, the Digital Rebel was looking pretty attractive. Canon's EOS 1D Mark II, 1Ds Mark II, and EOS 20D rounded out their semi-pro and professional lines, giving them market leadership in the professional digital SLR arena.
2005 has seen Nikon answer this challenge though, starting with the impressive Nikon D2X, a powerful professional digital SLR that offers the best of both high resolution and high speed photography in one camera, something Canon users would require two cameras to achieve (both the 1Ds Mark II and 1D Mark II). Though the D2X doesn't offer the 16 megapixels of the 1Ds Mark II, its 12 megapixel images are excellent, taking scaling to very large sizes exceptionally well. In a sense, it offers an alternative to the two Canons that makes a lot of sense for news agencies and pros of all kinds.
Whether it's by design or not, I notice a pattern when comparing the Canon and Nikon SLRs. None of the cameras Nikon is currently offering are directly comparable to their Canon rivals. The Nikon D70 was aimed at the Digital Rebel and EOS 10D, but it ended up somewhat closer to the more expandable and higher resolution 20D, and ultimately fell somewhere between the two in terms of price, capability, and even in the users it attracted.
The new Nikon D50 follows suit, offering a feature set that lies somewhere between those of the Digital Rebel and the new Digital Rebel XT in size, weight, cost, and capabilities. It has a 6 megapixel imager that produces excellent images in a lightweight package that is slightly smaller than the D70. While the D70 was targeted at the enthusiast crowd, the D50 is clearly aimed at the family photographer.

Feel
Like the D70, the Nikon D50 has a well-balanced feel in the hand. Though it is smaller, the D50 still feels substantial, as if it were carved from a solid piece of strong plastic. I would still say that the Nikon D70 has a better, more refined look and feel but the D50 is nonetheless very good, feeling less like a fragile camera and more like something that could survive the rigors of family life.
As with any camera, the first thing you'll notice is how well the grip was designed. Here the D50 again falls between other cameras on the market. We went on at some length about our opinion on the Rebel XT's grip. We felt it was too small for most male users, yet the informal survey I conducted among women indicated that they found the XT's small grip very appealing. I conduced the same test among a small sample of women, using the Nikon D50, Canon EOS Digital Rebel, and the Digital Rebel XT. All found they preferred the XT, with the D50 coming in second. On the other hand (no pun intended), men included in our survey strongly preferred the D50 and Digital Rebel over the XT for its superior grip area.
My own testing, which includes at least a few hours (sometimes months) shooting each of the cameras, indicates a preference for the D70's grip overall, with its deep cut inside the grip for the pads of the fingers to sink into, something missing from all other cameras I routinely shoot with. The 20D and Digital Rebel come in after that, then the D50. My only criticism of the D50 grip is a lack of rubbery texture to enhance the grip; other than that, I think it offers an excellent compromise for the target market, which will of course include many different hand sizes.
Controls
The number of buttons and dials has been reduced on the D50 compared to the D70. In general, this simplifies the controls, and brings them more in line with what the Digital Rebel offers. For example, while the 20D and D70 offer two control wheels for exposure control, both of the Digital Rebels and the D50 offer only one. On the D70, many users never know that the front Main Command dial is even there, and I've gotten email from folks who were frustrated by their inability to set aperture in Manual mode because they never noticed the front dial. (These folks just needed to read the manual, of course, but since most don't it makes perfect sense to remove controls that might cause confusion among amateurs.) Lacking the second command dial, both of the Digital Rebels and the D50, require that you press the exposure compensation button in Manual mode to adjust the Aperture.
Buttons on the D50 are also significantly bigger for easier identification, but are also more recessed than those on the D70, probably to help avoid accidental activation. As for button statistics on the various competitors, the D50 has 13 total (including the shutter and lens release buttons), the D70 has 16, and the Rebel XT has 19 buttons. Fewer controls are not always better, however. Two of the Rebel's more important buttons are dedicated to zoom in playback mode, a function that's a little more complicated with the D50. Nevertheless, the D50's control layout is excellent, with clear markings and only a few nested functions (buttons that serve multiple purposes).
LCD
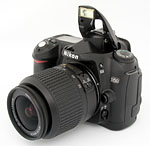
The D50's 2 inch LCD bests all four other cameras mentioned here, with the D70, 20D and both Digital Rebels being 1.8 inches. Fonts naturally appear bigger on this screen, and the effect is something reminiscent of a preschool illustration, though it does not appear it is intentional. It is a bright, clear, readable screen, and an excellent menu system. A detailed status LCD sits on the camera's top panel, offering nearly the same content as the D70.
Momma don't take my SD card away
On the right side, opening with a slide toward the back, is a small door that conceals the SD card slot. This is the first Nikon SLR to use SD memory, though most of Nikon's point & shoot models and the latest Pentax SLRs use SD as well. For the market, this choice makes sense. Though high capacity CompactFlash cards are generally cheaper, it shouldn't be long before 2 and 4 GB SD cards are available at reasonable prices; and for now, you can get about 280 full 6.1 megapixel frames on a 1GB SD, quite a few shots in anybody's book. It is also true that Compact Flash cards can be had with greater read/write speeds, but the D50's sizeable buffer and fast write times mean that users should hardly notice a difference. In single shot mode, the D50 can take a shot every half second until the buffer gets full at around 23 frames. From there, it takes a shot every 0.7 seconds. Since most folks don't shoot that many frames in rapid succession, it's not likely to be an issue.
There are only two drawbacks to SD cards that potential buyers need to remember: They're easier to lose and they're easy to launch. Nikon has taken care of the latter problem. Usually when you press down on the card to release it, most SD-based devices are spring-loaded enough that they can launch the memory card across the room. Nikon appears to have taken some extra measures to keep that from happening. Just as with their battery retention mechanism, something holds onto the SD card even after it's been pressed in and ejected. A gentile pull frees it from the camera's soft but sure grip. This is the first consumer device I've seen with this kind of sophisticated mechanism. As for losing the cards, well, that's something you'll need to buy cases for, because SD cards are as light as potato chips, and I manage to find them in some of the strangest places. The only good news here is that I've never had one fail even after going through the washer and dryer. (Don't try this at home, though. ;-)
Lens
The first lens to come in the D70 kit was a high-quality ED glass lens with a metal body. It was an expensive lens going up against a reasonable quality Canon lens that came with a simple plastic body that was not very expensive at all. Nikon's new DX lens for the D50 is also an ED glass element, only now with a plastic body. Surely, just as with the Digital Rebel, it's one of the areas Nikon chose to cut costs to meet the $900 price point. Its build is tight, its appearance and action smooth, and its focus motor is quiet. This 18-55 lens matches specs exactly with what ships with the lowest price XT kit lens, with a f/3.5-5.6 aperture, except for the claim of Extra-low Dispersion glass on the Nikon optic. In our tests, relative to the excellent 18-70mm lens shipped as part of the D70 kits, the 18-55 gives up some optical performance, in terms of a bit higher chromatic aberration and softer corners at some focal lengths, although it's by no means a bad optic. Also available at the D50's launch is the ED 55-200, f/4-5.6, a lens that also has the lightweight build of the 18-55. Together, they should give photographers an excellent range of focal lengths, at a reasonable price.
Autofocus
AF speed is about equal to competitors, though differences in lens design make it difficult to do a side-by-side comparison.
One problem that I noticed in the D70 that seems to have migrated to the D50 is that neither focuses as well as I'm used to seeing from the Canons I've worked with. Though the D50 has an AF illuminator that works without the flash popped up (a very nice feature, as the Canon's flash has to be deployed because it uses a pulsed flash for AF assist), the Canon XT consistently performed better for me in low light and in low contrast scenarios. I had the XT, 20D and D50 arrayed on my desk for comparison, and was trying a few shots to see which shutter mechanism was quieter, aiming the cameras at my white polo shirt. It had texture and pattern to it, but it was mostly white. Both Canons focused instantly. The D50 ran all the way to infinity, then all the way back, and gave up. Trying to focus on text on a white page in a shaded window from five feet away got similar results. This isn't a huge problem until you try to focus with the AF point at the center in Single point mode and your subject is wearing a white, or other uniform-color shirt. You'll do better in these situations either moving the AF point manually, or setting the camera in another mode. Most often, the camera focuses fine, but I have been frustrated a time or two, more often than with other SLRs of this class.
Image capture
The D50 is a breeze to use. Like most modern SLRs, digital or otherwise, there's a nice, safe green zone to select so you can just compose your shot and press the shutter. The camera chooses the AF point, exposure, and pops up the flash if necessary, and the results are usually excellent. This bears emphasizing for the D50's target market: Set to green mode, it truly becomes a "point & shoot" camera. (So novice users in the family should have no need to feel intimidated by it.) There are also the traditional pre-defined exposure modes, like Portrait and Landscape, and the four modes that give the user more traditional photographic control, like Program, Aperture, Shutter, and Manual modes.
New to the mix is a mode that has long been needed in this range of cameras, which Nikon calls Child mode. I can't tell you how many emails I get from parents asking for a camera that can help them capture their active children, especially given how slow some digital cameras are at setting focus. Child mode not only sets the camera to focus on the closest object--most likely the child--it sharpens images and makes colors more vibrant while keeping the skin tones under control. In general, I recommend people with active kids look to an SLR, because only an SLR can really keep up with busy toddlers, or kids playing sports. I told my18 month old to run around while I snapped pictures, and got two out of four shots in focus and of reasonable quality. If you have a child of your own, you know that's pretty darn good. Child mode is a welcome addition that will be particularly popular for the D50's most likely group of buyers.
Also new is Nikon's default color choice. Instead of the D70's bias toward more technically accurate color, Nikon took a page from the Rebel's Parameter 1 setting and chose the more saturated IIIa (sRGB) mode as the D50's default, originally intended for nature and landscapes, according to the manual. Consumers have consistently shown that they expect color from their cameras that's more vivid than real life, so this was wise. Users can enter Optimize Image/Custom mode to change this color mode setting to either Ia for more "normal" color, or to Adobe RGB, but most users should leave it at its default.
Impressive
When I first heard there would be a new Nikon SLR below the D70's price point, I expected a cheap, stripped down, hollowed out shell; a shadow of the D70's excellence. Not so. The D50 is sharp, solid, and appears to be quite capable. It's in every way a credit to the Nikon line, and it stands strong against the other fine SLRs on the market. Based on its size, price, ease of use, and strong feature set, the D50 will be an excellent "family" SLR, one that offers room to grow as the family grows and changes. It would also make a natural second body for the D70 owner with an expanding lens collection. It's missing one key component that the enthusiast is likely to want, which is the ability to remotely control other flashes from the built-in strobe, but existing D70 owners already have cameras that can do that.
Competition is good, and it's nice to see Nikon back in the game with another solid offering. Though I said that the D50 falls between the 6 megapixel Digital Rebel and 8 megapixel XT, it compares well with either. The major difference most will focus on is resolution, but in all truth, there just isn't that much difference between an 8 megapixel and a 6 megapixel sensor. (Comparing the widths of the images in pixels between the D50 and the Canon Rebel XT shows a difference of only 15%, favoring the Rebel. To my mind, that doesn't amount to enough of a reason to go with one camera over another.) Ultimately, much will come down to your preferences in color, your level of comfort with the different-sized grips on the cameras, or fine differences between their respective feature sets. Definitely check out the sample photos from all three cameras in our Comparometer(tm), or examine the random shots captured with each in our Sample Photo Galleries. If possible, arrange to hold each in your hands before making the final purchase decision, as the ergonomics are quite different. Bottom line though, the Nikon D50 is an impressive offering in the entry-level digital SLR market, a camera that takes great pictures, is comfortable to hold, easy on the pocketbook, easy to use, and that has the features to grow with you as your skills mature. If you're in the market for an affordable digital SLR, the Nikon D50 deserves your very strong consideration.
Features Overview
Following on the heels of the wildly popular D70, Nikon has introduced the lower-priced and physically smaller Nikon D50. Looking much like a 35mm SLR (and the D70), the Nikon D50 has a professional, though somewhat simplified appearance. Equipped with a 6.1 megapixel CCD, the D50 captures very high-resolution images with superb detail and excellent color. Replete with both auto and manual exposure modes, the Nikon D50 is ready for whatever type of shooting its owner desires, with an instant-on feature for immediate picture-taking, and several scene modes that bias the settings for the best results in a number of common shooting situations.
Capitalizing on the broad line of Nikon optics, the D50 has a standard F lens mount that accommodates most of Nikon's 35mm lenses. This is one of the key advantages of SLR cameras: Interchangeable lenses offer greater flexibility than even high-end prosumer cameras, despite the latter's attachable accessory lenses. Use of the near-historic F mount means that a huge range of lenses originally developed for film cameras can operate on the Nikon D50, although older lens models may have quite a few limitations.
The Nikon D50 offers several focusing options, including Manual, Auto-Servo AF, Single-Servo AF, and Continuous-Servo AF for moving subjects. (The Auto-Servo option is new with the D50.) A five point AF system can be used in three modes: Single Area, Dynamic Area, and Closest Subject.
The D50 features a true TTL (through the lens) optical viewfinder, complete with information display along the bottom. This shows shutter speed, exposure compensation, flash status, focus point and mode, focus lock, and flash status, among a wealth of other information.
The five focus areas are marked by round-edged rectangles that overlay the image. Whether chosen by the user or the camera, the active focus area is highlighted in red when focus lock is achieved under dim lighting, or turns black if the light in the frame is brighter.
A diopter correction slider next to the viewfinder can be adjusted from -1.6 to +0.5 to accommodate eyeglass wearers; optional corrective lenses are available that extend the range from -5 to +3.
As is the case with most digital SLRs, the Nikon D50's LCD monitor is solely for viewing captured images and displaying the menu system, not for framing shots. (I'm careful to mention this for those potential users accustomed to composing pictures in point-and-shoot rangefinder-style digital cameras, who are considering moving up to a more capable camera.) Also important to know is that digital SLR cameras capture only stills, not video or audio.
In playback mode, five information screens are available, giving a great deal of detail, plus histogram and highlight displays. The highlight display shows any blown-out highlights, flashing the overexposed areas from white to black. This is something we'd like to see on all digital cameras, including consumer models, to let you know when portions of a photo have been overexposed.
Because this is meant as a consumer SLR, Nikon has added quite a few Scene modes in addition to the usual Program, Aperture Priority, Shutter Priority, and Manual exposure modes. The Nikon D50 has a full Auto mode for point-and-shoot convenience, as well as Portrait, Landscape, Close Up, Sports, Child, and Night Portrait. All are quickly selected from the Mode Dial, which turns left or right with no limiter built in. In Program mode, where most intermediate photographers will probably spend a lot of time, rotating the Command dial adjusts through the possible combinations of aperture and shutter speed while maintaining proper exposure. This allows the user to decide dynamically whether they want to emphasize depth of field or speed of capture based on the scene. It is not available in full Auto mode, or in any of the Scene modes.
Using a combined mechanical and CCD electronic shutter, the Nikon D50 is able to achieve speeds from 30 seconds to 1/4,000 second, and the "x-sync" speed for flash usage is a blazing 1/500 second. In manual mode, Bulb is also available, for indefinite exposure lengths. Bulb exposures can also be controlled via remote, an important feature for blur-free long exposures. The shutter opens two seconds after the remote is activated, and doesn't shut until the remote is activated again, or the camera battery dies.
Nikon's trademark 3D color matrix metering is available by default when using G or D type lenses. It's considered "3D" because it gathers distance information from the lens to further optimize the meter's effectiveness. Inherited from the Nikon D2H and F5 is the very high resolution of this 3D matrix metering system. Where the D70 had a 1,005-pixel metering sensor, the Nikon D50 has a 420-pixel metering sensor, separate from the main image sensor, that covers the entire frame. Matrix metering is useful for backlit subjects or when very dark or light subjects occupy a significant portion of the frame. Center Weighted metering is also available, which measures light from the entire frame, but places the greatest emphasis on a circular area in the center. Spot metering takes a reading centered on the active focus area, best when using the AE lock function, because it lets you meter off of a face or other area of primary importance and then recompose. The spot meter on the D50 bases its reading on approximately one percent of the total frame area, providing very precise exposure determination. These latter two metering options are only available in the Program, Shutter, Aperture, and Manual modes; the camera defaults to Matrix in the full Auto and Scene modes.
Sensitivity settings range from ISO 200 to 1,600. A special noise reduction mode can reduce noise in longer exposures with shutter speeds slower than about one second. When Noise Reduction is active, the time to process each image more than doubles, and "Job NR" blinks across the top of the status LCD while the processing is taking place. Just as was the case with the D70 before it, my tests showed that having NR active on the D50 also slowed continuous exposures even in bright lighting, regardless of the shutter speed being used. - This despite the fact that the NR processing is only supposed to apply to very long exposures. The amount of space in the buffer also decreases with NR on.
In Program, Shutter, Aperture, and Manual modes, exposure can be adjusted between -5 and +5 EV in increments of 1/3 EV. The camera can also be set to adjust EV in 1/2 EV increments, if you prefer. EV adjustment values show on the status LCD only when the EV adjustment button is pressed, though in the viewfinder the scale is skewed on the exposure readout any time an exposure compensation has been specified.
Auto Bracketing can help you with EV adjustments of up to plus or minus 2 EV. The camera will take one shot underexposed by the amount you set, one at the "metered exposure" (determined by the camera in Program, Shutter, and Aperture mode; by the user in Manual mode), and one overexposed. Three presses on the shutter are required to complete each bracketing sequence. The sequence can also be applied to flash exposures and white balance settings. (White Balance Bracketing can only be done in JPEG mode.) In the case of White Balance, Auto Bracketing works a little differently. Instead of requiring three presses on the shutter to complete the sequence, only one press is required to produce the desired number of frames. A little experimentation is required, as is a thorough read of the manual. The benefits of using this feature could be significant, however, when you're just not sure about the white balance settings and the shot is critical.
White balance can be left in Auto, where the camera will adjust the color temperature from 3,500 to 8,000 Kelvin using both the 420- pixel RGB exposure sensor and the CCD image sensor. The camera also offers a range of preset options, from Incandescent (3,000K) through Fluorescent (4,200K), Sunlight (5,200K), Flash (5,400K), Cloudy (6,000K), and Shade (8,000K). You can also preset a white balance by pointing the camera at a white or gray object, or it can be copied from an existing photograph. The D50 also offers Hue, Tone, and Sharpness adjustments. Tone curves can be set to Auto or set from Normal (0 adjustment) to Low Contrast (-2), Medium Low (-1), Medium High (+1), High Contrast (+2), and Custom. Custom allows the user to download a custom tone curve created in Nikon Capture 4 on a PC.
There are three color modes, two of them sRGB, and one Adobe RGB. The first sRGB (mode I) is optimized for skin tones, and is the default setting. The second setting is Adobe RGB (mode II), offering a wider gamut than sRGB, meaning that it can capture and deliver more colors to a program like Photoshop, especially in the green range. It is recommended for photos that will be modified extensively on a computer. The second sRGB (mode III) is optimized for landscape shots, and apparently more closely approximates the color space of the previous D100.
A continuous capture mode captures a maximum of ~2.5 frames per second, depending on the amount of available memory space and the image size and quality settings. The D50 is a bit of a step down from the original D70 in this area, as the original D70 could capture large/fine JPEG images at a rate of 3 frames/second for nine frames, and then could continue grabbing a frame every 2.2 seconds until its memory card filled. (And shooting in large/medium quality mode, the D70 could run at 3 frames/second continuously until the memory card was full.)
The Nikon D50's built-in pop-up flash has an ISO 200 Guide Number of 15m/49ft (ISO 100 Guide Number would be 11/36; though the D50's ISO starts at 200, so this is only stated for comparison with other cameras and flash units). When a CPU lens is on the camera, Nikon's i-TTL is invoked, allowing complex measurements via low-power "almost invisible" preflashes right before the main flash, that the camera combines with distance information from the lens' CPU. This is excellent for fill flash, because the D50 uses its 420-segment Matrix meter to balance foreground lighting against backlighting. (Nikon's matrix-metered balanced fill flash is one of their more amazing technologies. I can say from personal experience that it works so well that you can just use it, without having to think about relative brightness levels, etc. - One of those great pieces of technology that just works seamlessly and transparently.)
Flash sync modes include Front-curtain sync, Red-eye reduction, Slow sync, Slow sync with red eye reduction, Rear- and Slow rear-curtain sync. In full Auto, Portrait, and Macro modes, Auto front curtain sync, Auto with red eye, and Off are the only options. In Night Capture mode, both Auto flash modes are of necessity Slow sync. Flash Exposure Compensation allows the user to adjust brightness from -3 to +1 EV, the lower end of that range providing for very subtle fill-flash effects.
The Nikon D50 uses SD memory cards for image storage. (A departure from Nikon's prior SLRs, which all used CompactFlash cards.) In addition to three JPEG compression levels, images can also be saved as NEF-format compressed RAW images, or simultaneously as RAW + JPEG files. Resolutions are 3,008 x 2,000, 2,256 x 1,496, and 1,504 x 1,000 pixels. A USB cable comes with the camera for uploads, as well as Nikon PictureProject software and a 30-day free trial of Nikon Capture. A video cable appropriate for the market (NTSC or PAL) is also included.
One EN-EL3 Lithium Ion battery pack powers the D50, providing 7.4V at 1400mAh. Though the battery looks very much like the Canon BP-511, they're not compatible. A nice touch in the D50's design is that the battery is gently gripped by the battery compartment walls when it's partly removed. This helps keep it from landing on the floor accidentally, despite the lack of an internal retention latch.
Design
With a very similar appearance to the Nikon D70, the D50 is slightly simpler in appearance and noticeably smaller in size. (As I've mentioned elsewhere, the D50 really seems to be a camera crafted to fit "family" requirements, easier to use than its big brothers, and easier to hold for people with smaller hands.) The camera is quite attractive, built of a black polycarbonate body with red, silver, and gray accents, and also comes in a silver body style as well. Anyone familiar with Nikon's film or digital cameras will appreciate the similarity of most controls on the D50. The body's plastic body shell and smaller size are responsible for its low weight of 19 ounces, or 540 grams stripped of battery, lens, body cap, and monitor cover. With the battery and a memory card installed, it weighs in at 22.1 ounces (626 grams), just slightly lighter than the original D70.
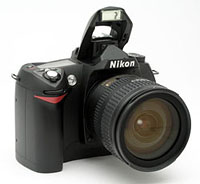 |
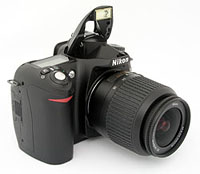 |
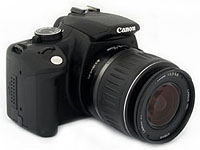 |
Nikon D70 |
Nikon D50 |
Canon Digital Rebel XT |
The shot above should help you get an idea of the differences in size between the D50, the D70 (the new D70s has the same body as the D70 shown here), and the Canon Digital Rebel XT. As you can see, the D50 is noticeably smaller than the D70, but not nearly as small as the Rebel XT. How you feel about that will likely depend a lot on your hand size. Both the D50 and Rebel XT have clearly been designed with women's hands in mind, as they're both much more comfortable for people with smaller hands to grip than their larger brethren. On the flip side though, these smaller cameras may feel uncomfortable to people with larger hands. That's certainly been my own experience with the Rebel XT: While I like it's features and photo quality a great deal, it's one of the most absolutely maddening cameras to use of any I've tested. - The XT's handgrip is just too darned small for my hands, with the result that my fingertips and fingernails get mashed into the camera body when I'm shooting with it. In similar fashion, I don't find the D50 nearly as comfortable as the D70, but it isn't as outright uncomfortable as the XT is for me. All in all, I think the D50 is a good compromise, size-wise, for a camera that might be used by people with both large and small hands. (Hence, an excellent choice as a "family" camera, that would be used by Mom, Dad, and the kids.)
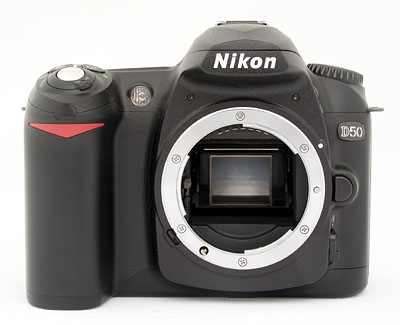
The metal F-style lens mount is the Nikon D50's most prominent feature, and certainly one of its most valuable, offering compatibility with a massive array of quality Nikkor lenses. A D-shaped button just left of the lens serves to release the lens lock. (All directions are noted as if reader were holding the camera face out.) Below this, a switch facing off to the left chooses between AF and Manual focus modes. Above the lens release button is the flash pop-up button, which also controls the sync mode and flash exposure compensation. The AF assist light is on the opposite side of the lens.
The Depth of Field Preview button has been removed on the D50, for those more familiar with the D70. Also missing from the D50 is the sub-command dial that the D70 sported, on the front of the hand grip, just below the shutter button. To my mind, this makes the D50's user interface a bit more convoluted, when you need to set both shutter speed and aperture (as in Manual exposure mode), but the users the D50 is intended for will most likely be making much less use of the deeper levels of exposure control that the sub-dial facilitated.
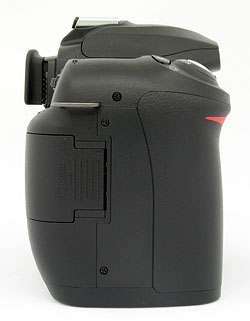
The right side of the camera has only the neck strap eyelet and the SD memory card slot. The card slot features a plastic door that slides toward the rear panel before opening.
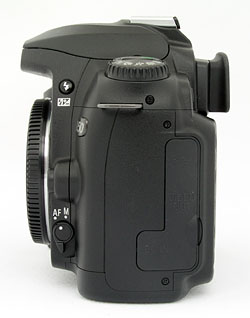
The left side of the D50 has the other neckstrap eyelet and a rubber door covering DC in, USB, and Video Out ports. Here you also get a better look at the AF/Manual focus selector switch and the Flash pop-up button.
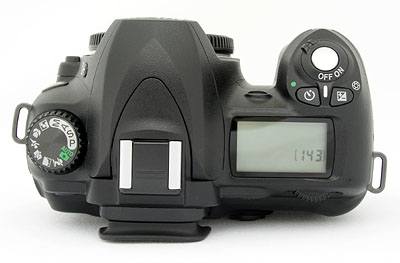
On top we see the pop-up flash and hot shoe, both in-line with the lens. To the right of the flash head and shoe is the Status LCD. Most of the status information visible in the viewfinder is available here, plus a few extras. Many features can be set here via button/dial combinations without having to enter the main menu, an excellent benefit as you become more familiar with the camera. On this side of the camera we also have the Shutter button, surrounded by the power switch. The Self-Timer button is just behind that, and next to it is the Exposure Compensation button. Left of the flash is the Mode dial, which can be turned in any direction, without limit. (Nice that you don't have to turn a long ways backward to get between some settings, as some other cameras force you to do.)
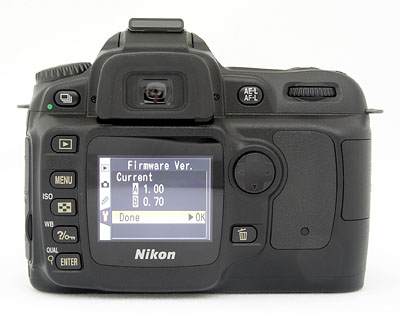
The rear panel holds the camera's remaining controls. Eyeglass wearers will appreciate the reasonable standoff of the viewfinder, as well as its rubber eye cup. A sliding diopter correction control is nestled to the right of the viewfinder. Just left of center is the 2.0-inch LCD (minus the protective cover previously included on the D70). Upper left of the LCD is the Shooting mode button. Down the left side of the screen are the Playback, Menu, ISO/Thumbnail, White Balance/Protect/Help, and Image Quality/Size/Enter/Zoom buttons. Above right of the screen are the Auto Exposure/Auto Focus Lock button and the Command dial. Below these are the Multi selector navigator and the Delete button.
The bottom panel has slightly raised ribs traversing it, to provide better friction when mounted on a tripod head. Otherwise, it's very flat, making for nice, level mounting on tripods. The metal tripod mount is aligned with the optical axis of the lens. (This will somewhat simplify parallax control on shots to be stitched into panoramas, but note that you'll still need to offset the axis of rotation slightly forward, to position it under the optical center of whatever lens you're using.) The battery compartment is on the right side of the body. A thumbnail-activated lock releases the battery door, and the battery pops loose slightly. A nice touch here is that the battery won't just drop out onto the floor, even though there is no sub-latch to keep it in place once the door opens. It will pop out perhaps 3/4 inch or so, but then encounters a little by-design resistance from the walls of the battery compartment. It takes a purposeful tug to remove it. Opposite the battery compartment on the left side (when viewed from the back) is a very tiny rubber Reset button to be used as a last resort, when the camera cannot be reset by other means.
Viewfinder
Like all SLRs, the Nikon D50 by definition has an optical viewfinder that receives light through the same lens that will direct light to the imager when the mirror flips up and the shutter opens. Rangefinder-style cameras have separate optics for viewfinder and imager, so the image can be slightly off due to what's called parallax error. This is largely eliminated with LCD viewfinders on consumer-grade digital cameras, but these LCDs usually lag behind reality at least a little bit, making it harder to track rapidly moving subjects. LCD viewfinders also tend to have a hard time in dim lighting, where an optical SLR like the D50 does just fine. Since SLR designs let you look through the same lens the camera will shoot through, you naturally get more accurate framing, but without the delay or low-light problems that LCD viewfinders tend to bring. An illuminated display inside the viewfinder provides detailed camera and exposure information, including focus area indicators, "no memory card" warning, battery status, focus confirmation, focus mode, shutter speed, aperture, metering, AE lock, FV lock, exposure and flash compensation, frame counter, and flash ready light.
Lacking on the D50 is the handy viewfinder "grid" overlay that the D70 had. This was an optional 3x3 grid of lines that could be turned on or off in the viewfinder to help you line up horizontal or vertical subjects. Like the D70 (and most other inexpensive digital SLRs), the D50 uses a Pentamirror viewfinder. While Pentamirrors are supposed to be less bright than the more expensive pentaprism viewfinders, I've personally never found much to complain about the view through pentamirror systems.

 The 2.0-inch LCD panel is not usable as a viewfinder on digital SLRs, for the simple reason that the mirror is directing light to the optical viewfinder, completely obscuring the digital sensor until the time of exposure. It can, however, provide a good deal of information after an image has been captured. Five different display screens are available, ranging from limited file information, to very detailed lists of the settings, plus a histogram, and an overexposure alert. The histogram is a graph of how many pixels in the image have each brightness level. The brightness is the horizontal axis, running from black on the left to white on the right. The height of the graph shows the number of pixels at that brightness level. This kind of display can be very helpful in determining over- or underexposure. An evenly-exposed, low-contrast subject would create a histogram that stretches across the entire width of the display, using the full range of brightness values available. An underexposed image will have a histogram with all the data lumped on the left of the histogram, and an overexposed image would be bunched up on the right.
 Another display mode that's useful is the Highlights display, which flashes any overexposed areas, alternating white and black. Few objects should appear as pure white in a well-exposed photograph, because few objects in the real world are pure, saturated white to our eyes. Obvious exceptions are light sources, like lamps or the sun. The flashing Highlights display is thus very useful for seeing any parts of the image that might be overexposed. It's particularly helpful when only isolated highlight areas are overexposed. Because the histogram display shows the distribution of all the pixels in the image, small overexposed areas don't produce a noticeable blip on the graph, making them easy to miss. The Highlights display takes care of that, by calling attention to overexposed regions very directly.
 Though it's a little buried in the control buttons, the D50 has the ability to zoom in on photos up to 4.7x to examine focus in playback mode. The animated series of shots shows how this works. As you enter a zoomed playback mode, the display changes from a 3:2 ratio view, which shows the entire image, to a 4:3 ratio, matching the dimensions of the LCD. Once you've entered zoomed playback mode, pressing the Thumbnail display button (of all things) while rotating the Command dial zooms in on the image. Once zoomed, you can use the Four-way rocker to move around inside the image. Pressing the Thumbnail display button toggles to a display showing the position for your zoomed window within the normal-sized image, indicated by a bold red outline. You can move this window around with the Rocker Pad control, and then pop back into the zoomed view by releasing the Thumbnail button again. This may all sound a little complicated, and it is, but after very little acclimation, I found I could move around within the enlarged display very fluidly using this arrangement. See the animated screen shot above for a whirlwind tour of the feature. Pressing Playback Zoom/Quality/Enter button zooms you in and out by 2x, and you can move around with the navigator button.
Optics
| Free Photo Lessons | |
|
Functions and exposure modes available with a given lens will vary greatly depending on type. G and D type lenses include a microchip that communicates focal distance information to the camera. Lenses without the microchip will disable 3D-Matrix metering mode. See the table below for a brief idea of the functionality available with different Nikkor lens types (abstracted from the D50's manual, used by courtesy of Nikon USA, Inc.)
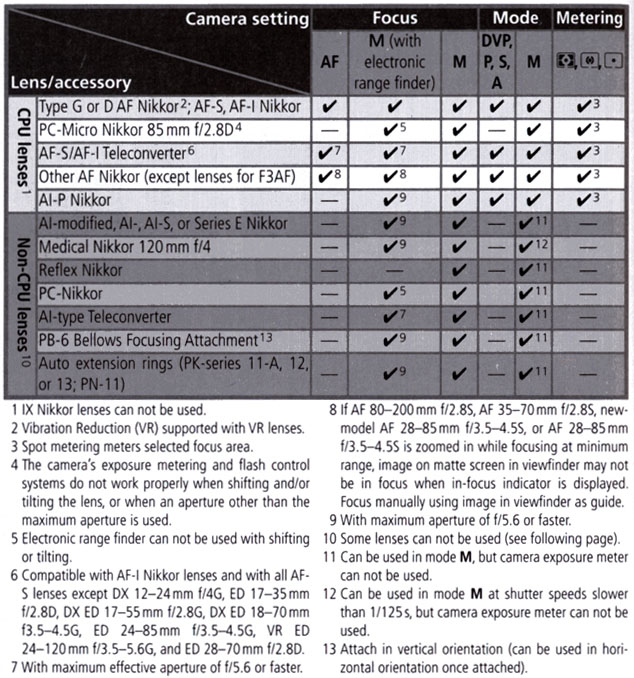
The Nikon D50 comes in two packages, either bundled with a "kit" lens that's been designed as a good all-around zoom lens (18-55mm, f/3.5-4.5), or just the body by itself. (The 18-55mm lens is another difference between the D50 and the D70. The D70's kit lens is a more substantial-feeling 18-70mm f/3.5-4.5 optic. Based on our testing, the 18-55 looks like a decent enough lens, but the 18-70mm does hold an edge in optical quality.)
Focus options
The Nikon D50 lets you take advantage of auto or manual focus via a small switch on the front of the camera, next to the lens. Setting the switch to "M" puts the camera into manual focus mode, and AF puts it into Auto Focus mode. (Many Nikkor lenses also have an Auto/Manual focusing switch on their barrels. If the switch on the lens barrel is set to "M," focusing will be under manual control, regardless of the setting of the switch on the camera body.) As just noted above though, most AF-S lenses with the built-in Silent Wave focus motor let you manually focus the lens at any time, regardless of the camera's focus setting. To select between the three types of AF, you need to go to the camera's Custom Menu and choose between AF-A (Auto Servo), AF-S (Single Servo), and AF-C (Continuous Servo). Single Servo simply means that the camera sets focus only once, when the Shutter button is first pressed halfway, and is best for still objects. Continuous Servo means that the camera continuously adjusts the focus, as long as the Shutter button is halfway pressed, and is best for moving objects. The Auto setting (newly added to Nikon's D-series SLR line with the D50) puts the camera in charge of the servo mode, depending on the movement of the subject.
There's an important difference between the Nikon D50 and the D70 in how the two cameras behave in out-of-focus conditions. The D70 would let you fire the shutter in Continuous Servo mode if the lens hadn't achieved focus, but not in Single Servo mode. The D50 never fires the shutter if the lens isn't focused. (Unless of course, you have the camera or lens set to manual focus operation.) This more restrictive shooting could be an inconvenience to more experienced shooters, but will almost certainly be a benefit to novices, as the camera itself will guard against capturing out-of-focus images.
As discussed earlier, focus can be confined to one of the five specific focus points in both Single Area mode, and in Dynamic Area which offers focus tracking. Single Area AF simply means that the camera sets focus based on the specific area you've designated. Dynamic AF employs all five of the autofocus areas. When Dynamic Area focusing is enabled, the camera first focuses on the subject in the chosen focus area. After the camera has initially "locked on" to the subject, if it moves to a different AF area, the camera will shift its focus to "follow" the subject. This is great for irregularly moving subjects. (Sports and kids come to mind.) In both Dynamic and Single Area AF modes, you can change the primary focus area using the up, down, right, or left arrow keys. Closest Subject Priority was automatically enabled in both Dynamic and Single Area on Nikon's much-earlier D100 SLR, but now occupies its own slot in the control system, controlled via a custom settings menu option. Closest Subject Priority means that the camera will focus on the closest object that falls under one of the five focus points.
There are two methods by which you can lock focus on the Nikon D50. The first is via the Shutter button, placing your subject in the selected focus area, halfway pressing and holding the Shutter button, then realigning the composition and firing the shutter. (This is the default behavior of the Shutter button, but it can be disabled. Unlike most cameras, you can choose whether or not the Shutter button also locks exposure, via an option on the Custom Settings menu.) Alternatively, when using Single Servo AF, you can press the AF-L/AE-L button to lock focus (and exposure, unless the button is set for focus-only in the Custom Settings menu). Keeping this button pressed will maintain the focus and/or exposure lock, even if the Shutter button is released. This lets you recompose the photograph without having to keep your finger on the Shutter button, but rather on the AE-L/AF-L button instead. (Reducing the chance that you'll accidentally trip the shutter when you don't intend to.)
There are several options available for the AE-L/AF-L button, which can be set via the Custom Settings Menu. You can program it to lock either focus or exposure separately, or both together (the default). You can also change its operation so a single press locks and holds the exposure setting. (No need to keep the button pressed down.) Finally, you can set the AE/AF lock button so it alone controls the autofocus system, meaning the autofocus won't actuate when the Shutter button is half-pressed, only when the AE/AF lock button is pressed instead. Finally there's the FV lock option, which locks the flash level and keeps it locked until the button is pressed again.
If you're a novice user considering purchasing a Nikon D50, and all this focus/exposure lock gobbledegook sounds confusing, don't let it worry you: The camera's default operation is very straightforward, but the availability of features like these is really liberating for more advanced users.
Sensor Cleaning!
Everyone understands that lenses sometimes get dust on them and need to be cleaned, and there are a lot of lens-cleaning cloths, solutions and other accessories on the market that work well. BUT, what do you do when your sensor gets dusty? Dust specks on the sensor tend to show up when shooting at very small apertures, appearing as dark blobs on your images. They're distracting at best, a terrible nuisance at worst, if you end up having to retouch every image to rid of them.
Most of us are naturally leery about the idea of poking around inside the delicate innards of our d-SLRs to wrestle with recalcitrant dust specks. Gently blowing the sensor surface (actually, the surface of the anti-aliasing filter) with compressed air gets rid of some dust, but there's invariably a lot that just stays stuck, no matter what. So what do you do?
If you've got dust specks on your sensor (and sooner or later you will), you're going to need to clean it. There are a lot of products out there intended to address this need, but a distressing number of them work poorly (if at all), and many are grossly overpriced. Advertising hype is rampant, with bogus pseudo-scientific jargon and absurd product claims run rampant. And prices - Did I mention prices? How about $100 for a simple synthetic-bristle brush?
So how do you know what product to use?
We don't pretend to have used everything currently on the market, but can tell you about one solution that worked very well for us. The "Copper Hill" cleaning method is straightforward and safe, and in our routine usage here at Imaging Resource, highly effective. Better yet, the products sold by Copper Hill Imaging are very reasonably priced. Best of all, Nicholas R (proprietor of Copper Hill) has put together an amazingly detailed tutorial on sensor cleaning, free for all.
Sensor cleaning is one of the last things people think about when buying a d-SLR, but it's vital to capturing the best possible images. Take our advice and order a cleaning kit from Copper Hill right along with your d-SLR, so you'll have it close at hand when you need it: You'll be glad you did!
(Other than a few backlinks on their site, we receive no promotional consideration from Copper Hill. We just think their sensor cleaning products are among the best on the market, and like their way of doing business. - We think you will too. Check them out.)
Exposure
| Free Photo Lessons | |
|
ISO sensitivity (light sensitivity) ranges from 200 to 1,600, adjustable by pressing the ISO button and turning the Command dial to change the setting on the Status LCD. It can also be changed in the menu. A Noise Reduction mode in the settings menu reduces fixed-pattern image noise when shooting at the higher sensitivity settings at longer exposure times. White balance modes include Auto, which covers almost the entire range from 3,500K to 8,000K. It can also be set manually for Incandescent (3,000K), Fluorescent (4,200K), Sunlight (5,200K), Flash (5,400K), Cloudy (6,000K), Shade (8,000K), or Preset, which the user sets based on a white or gray object in the scene or a pre-captured photograph. There is no white balance option for specifying color temperature directly in degrees Kelvin. As is usually the case with the cameras we test, neither Auto nor Incandescent reach down far enough to handle the household incandescent lighting that's so common in the US. Why can't digital camera companies make auto white balance options with enough range to cover this very common light source? The solution for users of the D50 is easy enough, you just need to use its Preset white balance option, which easily handles incandescent lighting. - But this is something that could well present a difficulty for the many novice users who'll undoubtedly end up shooting with the D50.
Speaking of white balance, this is another area where a feature from the D70 has been dropped: The D70 had a "tweak" adjustment associated with each of its standard white balance settings, that let you adjust the color balance warmer or cooler, just for that particular setting. This was very handy for getting the Incandescent setting to almost fully compensate for household incandescent lighting. Perhaps in part because the sub-command dial that was used to make this adjustment has been left off of the D50, the white balance "tweak" adjustment has been left off as well. This could be a feature that would push sophisticated users to the D70 (or more likely, the new D70S that's replacing it), over the D50, but it's not likely to be an issue for a majority of the D50's intended users.
The Nikon D50 has three metering options, 3D Matrix, Center Weighted, and Spot. The 3D Matrix setting integrates exposure information from 420 areas across the entire screen, as opposed to most multisegment sensors that have from 10 to 35 areas to analyze. (The D70 actually read from 1,005 pixels, but it's not clear whether this would translate into a noticeable difference in metering accuracy.) The scene viewed by the metering sensor is compared to a large database of common photographic situations to help the camera decide whether the image consists of (for example) a backlit subject, a dark foreground object, or some other tricky arrangement. This information is enhanced (essentially made "3D") by the focus distance information shared from the microchip inside Nikon's D- and G-series lenses.
As to the other metering options for the Nikon D50, center-weighted metering takes a light reading from the entire image area, but places the greatest emphasis on a circular area in the center. Spot metering in the D50 bases its reading from a 3.5mm circle centered on the active focus area (about 2.5% of the frame), excellent for quick measurements such as from a subject's face without having to move closer to the subject to get an accurate reading.
The Nikon D50's Exposure Compensation adjustment lightens or darkens the overall exposure anywhere from -5 to +5 EV units, in one-third step increments. It can also be adjusted to work in half step increments, but my own experience with digital cameras has been that half-step increments really aren't fine enough. Note though, that exposure compensation does not work in any of the camera's Digital Vari-Program modes. (Which I guess makes sense, since the whole point of those modes is to make photography automatic.)
An auto-bracketing feature takes three shots of the same subject with varying exposure values determined by either the photographer in manual mode or by the camera in all other modes. The exposure steps for bracketing can vary across a range of -2 to +2 EV (values are added to the already chosen exposure compensation value), in increments of either one-third or one-half. Through the Custom Settings menu, the Bracketing function can also be set to adjust white balance. (By default, both ambient and flash exposures are bracketed.)
I personally find automatic exposure bracketing a very useful feature on an SLR, although it does leave me with three times as many images to sort through on the computer later. As good as the D50's exposure system is, there's always a chance that I might prefer an exposure that's just a tad over or under the value the camera would choose on its own. Leaving my SLR (a D70, as it happens) set to continuous shooting mode, and the auto exposure bracketing turned on, I can very quickly grab three versions of each shot, so I'll be assured of having just the exposure I want when I get back home. The D70's auto bracketing options are a bit more sophisticated than those of the D50, in that it offers options to shoot either two or three frames in each bracket. I almost always use mine in 3-frame mode, and I suspect that 99.9% of the D50's users will never miss the 2-frame brackets of the D70.
 The Nikon D50 also offers Sharpness, Tone Compensation (Contrast), and Hue adjustments, accessed through the "Optimize Image" option on the Shooting menu. For those familiar with the concept of the "color wheel", which arranges visible colors in a circle, Nikon's Hue adjustment will make sense: It offers a range of adjustment from -9 to +9 degrees around the color wheel. (A complete circuit of the wheel being 360 degrees.) If you don't carry a degree-calibrated color wheel in your head, I've provided the illustration of a color wheel at right. The dark bars show the total shift that the full 18 degree range of adjustment offered by the D50's hue control can produce. - As you can see, it's a fairly subtle adjustment. Note too, that the effect on any given color will depend on where that color is around the wheel. For red colors, a positive adjustment will shift the red toward orange, while a negative adjustment will shift it toward purple. For blues though, positive adjustments shift the color toward purple, while negative adjustments shift it toward cyan.
When reviewing images on the LCD monitor, you can call up a histogram and a blinking-highlight function to give you a complete readout on the exposure. These are both useful tools for examining your exposure in the camera instead of waiting to download images and then deciding to reshoot. The blinking highlights are the simplest to interpret - Just knock down the exposure a step or two if you see too many parts of your image blinking at you. The histogram is a bit more subtle, but once you've learned to read it, it's an excellent guide to knowing where you're at in terms of overall exposure.
Continuous Shooting Mode
Nikon claims that the D50's Continuous Shooting mode captures 2.5 frames per second, depending on the amount of image information and available SD space. Our own laboratory timing tests produced numbers that agreed very well with Nikon's 2.5 frame/second claim. (We measured 2.47 frames/second.) The number of shots you can capture continuously at this rate before having to wait for the memory card to catch up will vary with the file format you're saving to, the memory card speed, and even the subject content. (Shots of very plain objects with little detail compress better, so you can shoot more of them before the camera's internal memory buffer gets full.) With a deliberately hard-to-compress test target, we found that the D50 could shoot 4 RAW (NEF format) images, 16 large/fine JPEGs, or more than 100 small/basic JPEGs before its capture rate slowed. - A very good performance for a more or less "entry level" digital SLR.
Flash
 Built into the Nikon D50 is a pop-up flash unit, which operates in one of four modes: Red-Eye Reduction, Red-Eye Reduction with Slow Sync, Slow Sync, and Rear-Curtain Sync. Red-Eye Reduction mode pulses the very bright autofocus assist lamp before the main flash exposure, to reduce the Red-Eye Effect in shots of people. Red-Eye Reduction with Slow Sync works in a similar fashion, but combines the flash with a slower shutter speed for night portraits. (This reduces the harsh effect of nighttime flash shots, allowing more of the ambient illumination into the picture.) Slow Sync mode works with shutter speeds as slow as 30 seconds (!) to preserve color and background lighting effects in night shots. Finally, Rear-Curtain Sync fires the flash at the end of the exposure, producing light trails behind moving subjects, rather than in front of them. In all flash modes, the flash fires with every exposure. Closing the flash disables it completely. The Flash popup button to the left of the flash doubles as a Flash Compensation button, adjusting the overall brightness of the flash from -3 to +1 EV in one-third-step increments when the Exposure Compensation button is also held down while turning the Command dial. (That's a lot of button-pressing and turning, but I didn't find it all that awkward in practice.) Pressing the Flash popup button while rotating the Command dial cycles through the available flash modes.
The Nikon D50's internal flash is fairly powerful, with a guide number of 11 meters or 36 feet at ISO 100 (TTL Auto mode). That's a bit of an odd rating, given that the minimum ISO on the D50 is 200, but so many flash units are marketed based on their guide numbers at ISO 100 that Nikon doubtless felt a guide number rating at that sensitivity level would be the most meaningful to consumers. At ISO 200, the corresponding guide number would be 15 meters or 49 feet. This means that an f/2.8 lens will give you an effective range of about 17.5 feet, an impressive distance for an on-camera flash.
The Nikon D50 is also impressive in that its highest flash-sync shutter speed (the speed at which its focal plane shutter is fully open, permitting the flash to illuminate the entire sensor) is 1/500 second. This is very fast, makes it easier to emphasize the effect of the flash over ambient lighting, as well as to shoot fill-flash exposures with relatively large aperture settings under relatively bright lighting.
Also included on the Nikon D50 is an external flash hot shoe, just behind the pop-up flash compartment. The hot shoe accommodates Nikon accessory flash units, as well as a wide range of third party flashes. The full range of flash sync modes remains available for compatible flash units. Different Nikon Speedlights offer different features when used on the D50. The tables below (again used by courtesy of Nikon USA, Inc.) shows the features available when using various Nikon Speedlights with the D50. (Note that while many older flash units will work in non-TTL auto mode with the D50, but the full power of i-TTL is only available with the SB-600 and SB-800 models. Also, note that the SB-600 and SB-800 have powerful built-in autofocus assist illuminators that take over that function when coupled with the D50. With older flash models, the D50 has to provide its own AF-assist lighting.
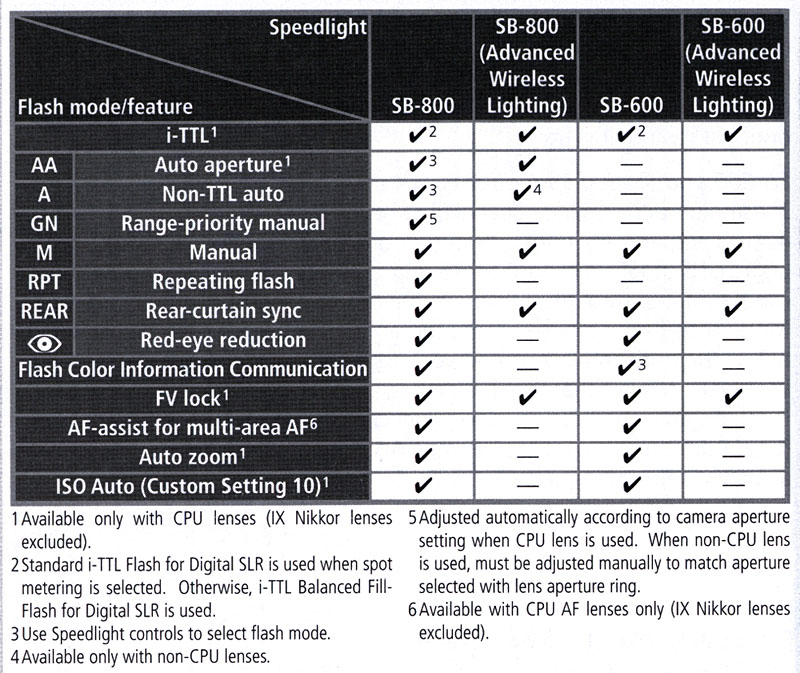
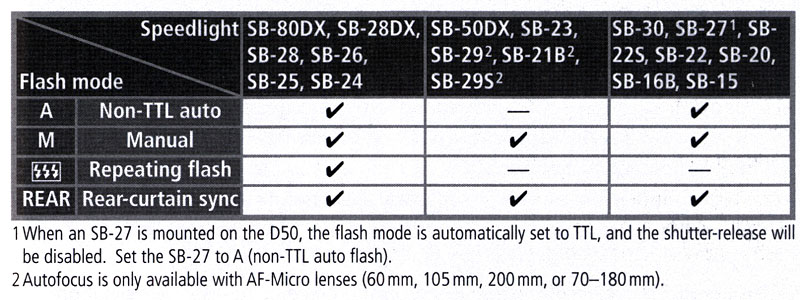
3D Matrix Flash Metering
The "3D" aspect of the Nikon metering system is that it uses subject distance information from the lens (only available with D or G-type lenses) to guide its exposure decisions. This is particularly key with flash exposures, because flash illumination falls off quite strongly as the subject gets further from the camera. With 3D Matrix Flash Metering users don't have to give a second thought to balancing the flash with ambient lighting. Just snap a few test shots to see how much fill you want, decide what level you need (for instance, -2EV). Then set that level of flash compensation, set the flash to "fill" mode, and that's it. This is really a case of technology working perfectly in the service of creativity. The camera just quietly does its job, so you can focus on composition, color, interacting with your subjects, etc. It doesn't remove the creative decisions of how you want to light your subject, it simply removes the technicalities from the equation.
Wireless Remote TTL (iTTL) Flash
The D50 brings Nikon's unique "iTTL" wireless through the lens flash metering and control first seen on the D2H down to an entry-level d-SLR. When the D2H was first introduced, the phenomenal capability of iTTL flash operation actually struck me as a being a bigger innovation than the D2H itself.
Nikon has long been known for their 3D matrix metered fill-flash capability, and the exceptional ease it brings to fill-flash exposures. With iTTL (the "i" is for "intelligent" TTL), they're further extending the capabilities of their flash technology. In the D50, iTTL makes use of the 420-element RGB sensor used for the main exposure system, the accuracy of the metering pre-flash has been improved, and wireless capability has been dramatically expanded, with the implementation of true multi-unit, TTL wireless flash autoexposure. To me, that's the most amazing part of the new flash technology: Not just that it provides automatic flash operation without wires, but that it offers true Through The Lens (TTL) metering for flash exposures, even with multiple remote flash units: With an SB-800 speedlight as a master controller, up to three separate groups of SB-600 and SB-800 strobes can be controlled independently, each group consisting of an unlimited number of units.
Wireless TTL flash capability is one area though, where the D50 suffers somewhat relative to its big brother the D70. The higher-end D70 can itself serve as a master controller, although it can only control one group at a time, and its internal strobe can't contribute to the exposure when it's acting as a controller. The D50 lacks the ability to act as a master controller, instead requiring that an SB-800 unit connected to its hot shoe perform that function.
When I first heard about it, the whole wireless TTL system sounded like just so much magic, but it's actually pretty straightforward once you know what it's doing. (Straightforward, but no doubt requiring a lot of clever engineering.) The key to it all is strobe circuitry that can turn on and off very quickly, and fire multiple precisely timed bursts in a very short period of time. The iTTL system uses this capability in two ways. First, it uses rapid series of very brief pulses of the strobes to let the Master Controller "talk" with the various groups of remote units. The Master can command groups of remotes to fire either very brief pulses for metering, or more powerful flashes for the exposure itself. It does this by sending treating the flash head as a digital data channel, encoding commands about the type and intensity of pulse to fire in the form of rapid bursts of light.
The second way that the fast-pulse capability facilitates iTTL is by making it possible to determine exposure levels from multiple flash groups very quickly. (The speed is important, as you don't want the flash exposure determination to introduce an unacceptable shutter lag when working with multiple groups of speedlights.)
The way the iTTL system works is that the camera tells the Master controller to individually command each group of remote flashes to fire a metering pulse. Using its internal TTL sensors, the camera measures the amount of light coming from each strobe group, and integrates the light readings from all of the strobes with the ambient light coming through the lens. Via the Master controller, it then tells each strobe group how much light to emit for the exposure itself, and triggers them to fire when the shutter is opened.
If this sounds like a lot that has to go on before the shutter opens, that's because it is. It all happens very quickly though, without introducing an appreciable delay in the shutter release. (If you have several groups of strobes involved in a single exposure, and have quick enough visual reflexes, you can actually see a very brief period of flickering strobe flashes before the main exposure itself.)
The results are really pretty amazing. You can more or less scatter strobe units around the set any which way you want, and the iTTL system will deliver not only an accurate default exposure, but perfect control over the light being delivered by each group.
Given that the Nikon D50 can't itself act as a master flash controller, I won't spend any more time here describing Nikon's wireless flash system. Interested readers can refer to my coverage of the Nikon Wireless Lighting system in my Nikon D70 review, or in the Nikon Wireless Lighting video we made at the Spring 2005 PMA show, describing how we used a set of four Nikon flash units to capture perfectly-lit product photos with a portable setup.
Shutter Lag / Cycle Times
When you press the shutter release on a camera, there's usually a lag time before the shutter actually fires. This time allows the autofocus and autoexposure mechanisms time to do their work and can amount to a fairly long delay in some situations. Since this number is rarely reported on (and even less often reported accurately), and can significantly affect the picture taking experience, I now routinely measure it, using a custom test system I built for the purpose, accurate to 0.001 second. Here are the numbers I measured for the Nikon D50. (These results have now been updated based on tests of a production model of the D50. As it turns out, the updated figures are almost identical to those from the prototype sample.)
| (Data from a final production model) |
||
| |
(secs) |
|
| Power On -> First shot | |
Hold the shutter button down and turn power on - pow! (Very fast.) |
| Shutdown | |
First time is simple shutdown, second time is worst-case buffer-clearing time. (Also very fast.) |
| Play to Record, first shot | |
Nearly instantaneous. |
| Record to play | |
First time is that required to display a large/fine file immediately after capture, second time is that needed to display a large/fine file that has already been processed and stored on the memory card. Both times are quite fast. |
| Shutter lag, full autofocus | |
Very fast. (Measured with 18-55mm "Kit" lens at telephoto setting) |
| Shutter lag, manual focus | 0.134 |
Quite fast. |
| Shutter lag, prefocus | 0.114 |
Time to capture, after half-pressing shutter button. Quite fast. |
| Cycle Time, RAW/max/min resolution | 0.49 |
Times are averages. Shoots at this pace regardless of resolution. In RAW mode, shoots 4 frames this fast, then slows to about 1.4 seconds per shot. In large/fine mode, shoots 23 frames this fast, then slows to about 0.66 seconds per shot. Continues at this pace indefinitely in TV (640x480) mode. Buffer takes 5 seconds to clear in RAW or large/fine mode, clears after each shot in TV mode. Very good, particularly for an "entry level" SLR. |
| Cycle Time, Continuous RAW/max/min resolution | 0.41 (2.47 fps) |
Times are averages. Shoots at this pace regardless of resolution. In RAW mode, shoots 4 frames this fast, then slows to about 1.4 seconds per shot. In large/fine mode, shoots 16 frames this fast, then slows to about 0.67 seconds per shot. Continues at this pace seemingly indefinitely in TV mode. Buffer takes 5 seconds to clear in RAW or large/fine mode, about a second in TV mode. Very good. |
Very good performance, particularly for an "entry level" digital camera. Even though the D50 is intended to be an "entry level" SLR, it's no slouch in the performance department. It's slightly slower in continuous mode than the D70 or D70S (2.5 frames/second, vs 3.0), but its buffer depth is very good, and its autofocus speed is excellent. - Shutter lag in full-autofocus mode with the 18-55mm "Kit" lens is a very good 0.265 second, noticeably faster than the 0.342-0.486 second we measured for the original D70 and its 18-70mm kit lens. Shutter lag is perhaps one of the biggest issues that will lead amateur photographers to step up from all-in-one "prosumer" digital cameras to SLR models, and the Nikon D50 does very well in this respect. - This should be an extremely enticing camera for people with young families and lots of fast-paced action to capture. (Or for amateurs looking for a camera to shoot sports photos with, etc, etc.)
Operation and User Interface
The Nikon D50 may look a little intimidating to new users at first, even though its controls are pared-down slightly from those on the D70. Given the entry-level focus of the D50 though, it's important to note right up front that it's dead easy to operate in its fully automatic "green zone" mode, buttons and knobs notwithstanding.
Looking closer at the control interface, we immediately see that a few of the D70's external controls (such as metering mode) are now only accessible through the LCD menu on the D50, and the sub-command dial that was used for a lot of secondary control settings on the D70 is gone as well. This makes some of the camera's more advanced options slightly more difficult to access, but also leaves a less cluttered interface for novice users. All in all, I really like the overall control layout, which places the main shooting controls on top of the camera and the rest on the back panel. The Mode dial is dedicated to the 11 exposure modes and nothing else (no ISO or white balance options), keeping it simple for the user. Changing shutter speed, aperture, metering mode, etc. is quick and simple, using the Command dial in combination with several other buttons.
The LCD menu itself is well organized and simple to navigate, with four main tabbed menu pages. When shooting, the detailed information display in the viewfinder window does a good job of communicating current camera settings. Anyone already familiar with Nikon's SLRs, whether film or digital, will have no trouble operating the D50. For less experienced users, an hour or two spent with the manual and camera together should be enough to get comfortable with even its more advanced options. - And it's easy to start with the camera in "green zone" mode (almost without reading the manual at all), and then gradually explore the more advanced functions as you gain experience.

Lens Release Button: Tucked on the right side of the lens mount (when looking at the front), this button releases the lens from its mount when pressed and held as you turn the lens. It's best to hold the lens with your right hand while pressing the button and turning the lens to the left.
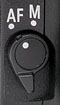
Focus Mode Switch: Below the Lens Release button, this switch puts the camera into Auto or Manual focus modes.

Flash Sync Mode/Compensation Button: Just left of the flash in the front, holding this button and rotating the Command Dial cycles between the five flash sync modes (Fill, Red-Eye Reduction, Red-Eye Reduction with Slow Sync, Slow Sync, and Rear Curtain Sync). Pressing and holding this button as well as the +/- button while turning the Command dial chooses flash compensation values.

Power Switch: Surrounding the Shutter button on the top right of the camera, this switch turns the camera on and off.
Shutter Button (see image above): In the center of the Power switch, on the top of the camera, this button sets focus (when in autofocus mode) when halfway pressed and fires the shutter when fully pressed.
When an image is displayed on the LCD monitor, halfway pressing the Shutter button dismisses the display and immediately readies the camera for shooting. (Nice, you'll never have to blame the camera for missing a quick shot, just because you happened to be viewing an image on the LCD when the critical moment occurred.)

Exposure Compensation Button: Directly behind and right of the Shutter button on the top of the camera, pressing this button while turning the Command dial sets the Exposure Compensation from -5 to +5 exposure equivalents (EV) in one-third step increments. One-half step increments can be selected instead via a Custom Menu setting. Pressing this button in Manual exposure mode and rotating the Command dial sets the aperture. Pressing this button with the Flash Sync button on the side of the flash accesses the Flash Compensation setting.

Self-Timer/Remote Control Button: Directly to the left of the Exposure Compensation button, this button cycles through the Self-Timer, Delayed Remote, Quick Response Remote, and Timer Off modes when pressed repeatedly. Pressing this button in conjunction with the Shooting mode button resets the camera to its default settings.
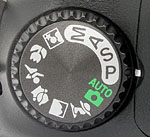
Mode Dial: Dominating the left side of the camera's top panel (as viewed from the rear), this dial selects the camera's exposure mode from the following:
![]()
Shooting Mode Button: Located in the top left corner of the rear panel, this button switches between Single frame and Continuous shooting modes when pressed while turning the Command dial. Pressing and holding down this button together with the Self-Timer button resets the camera's basic settings.
![]()
Playback Button: Just off the top left corner of the LCD monitor, this button displays the most recently captured image, putting the camera into Playback mode. Once an image is displayed, the arrow keys navigate through the other images saved on the memory card. This button also dismisses the image display.
![]()
Menu Button: Below the Playback button, this button displays or dismisses the LCD menu system.
![]()
ISO/Thumbnail View Button: Just below the Menu button, this button works in capture mode to set the ISO. Press and hold this button and rotate the Command dial to adjust the ISO. When the camera is displaying captured images in Playback mode, pressing this button repeatedly cycles between four-image and nine-image thumbnail displays and a full-screen display. The chosen display mode remains selected indefinitely, even if the camera is turned off. When a thumbnail view is activated, you can scroll a cursor through the thumbnail images very rapidly with the rocker pad. Pressing the Enter button magnifies the image that's currently selected. Once an image has been magnified, turning the Command dial while the Thumbnail View button is held down changes the level of magnification, showing the current zoomed display area as a red-bounded rectangle. Releasing the Thumbnail View button displays the magnified portion of the image full-screen. See the previous Viewfinder section of this review for a more complete description of this function.
![]()
White Balance/Protect/Help Button: Directly below the ISO / Thumbnail View button, this button changes the white balance setting when pressed while turning the Command dial. In Playback mode, this button write-protects individual images, protecting them from accidental deletion. (Note though, that even "protected" images will be lost when a card is reformatted.) If an image is already protected, pressing the Protect button removes protection. When in Menu mode/Custom Settings, pressing and holding this button brings up help to explain each custom setting.
![]()
Quality/Enter/Magnify Button: Just below the Protect button, this button confirms menu selections. In conjunction with the Command dial, it sets image resolution and compression. Finally, it also activates the playback magnification, when a captured image is displayed in the LCD monitor.
![]()
Diopter Adjustment Switch: Sitting vertically next to the right side of the viewfinder eyepiece, this slide control adjusts the optical viewfinder to accommodate eyeglass wearers. (Range is -1.6 to +0.5 diopters. Not quite as broad as some cameras, it can't quite compensate for my own 20:180 vision.)

AE/AF Lock Button: Located just right of the viewfinder, this button locks the exposure and/or focus when pressed. The settings remain locked as long as you hold the button down, regardless of any action of the shutter button. Several options for this control can be set via the Custom Settings Menu. You can program it to lock either focus or exposure separately, or both together (the default). You can also change its operation so a single press locks and holds the exposure setting. (No need to keep the button pressed down.) Finally, you can set the AE/AF lock button so it alone controls the autofocus system, meaning the autofocus won't actuate when the shutter button is half-pressed, only when the AE/AF lock button is pressed instead.
![]()
Command Dial: The Command dial is located on the back of the camera, in the upper right hand corner, right under your right thumb. Used in conjunction with other buttons, this controls a variety of camera settings.

Multi-Selector Button: Just off the top right corner of the LCD monitor on the back panel, this rocker button navigates through menu options in any LCD menu.
In Playback mode, the rocker pad's right and left arrows scroll through captured images while the up and down arrow buttons cycle through various information displays for each image. When you zoom in on an image in playback mode, the rocker pad lets you scroll around the magnified image.

Delete Button: Just below the locking switch of the Four-Way Arrow pad, this button deletes individual images in Playback mode, with a confirmation screen to give you the opportunity to change your mind.
Camera Menus
The Nikon D50 has a very extensive menu system, but it's cleanly organized as a set of tabbed screens, as on the D70 and D100 before it. On the D50 though, a combination of the larger LCD screen and subtly enhanced text and graphics make for an unusually readable menu system. There are four menus on the D50: Playback, Shooting, CSM (Custom Settings Menu) and Set Up. All menu entries are selected via the Multi-Selector button. The menus themselves are chosen via a "tabbed" interface, with icons on the left of the screen corresponding to the four menus. All screens can be reached whether the camera is in playback or record mode. There's also a very nice "help" function that provides plain-English descriptions of virtually every menu screen, simply by pressing the WB/?/Lock button next to the LCD. The D70 had a similar help system, but it was only available for the Custom Settings Menu items. The D50 extends this useful feature to almost every menu screen.
In the section below, rather than reproduce every menu screen in the main body of the review, I've shown screenshots for only the top level of each menu, with clickable links in the descriptive text leading to the individual screens.
Playback Menu
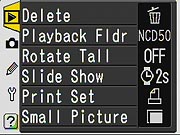
| Playback Menu | |||
| Top-Level Selection |
Second-Level | Third-Level | Notes |
| Delete | - Selected |
- Select image from thumbnail display |
Select one or multiple images, then execute with "Enter" button.
Delete All doesn't affect images that have been "protected" via the WB/help/protect button |
| Playback Folder | - Current - All (view) |
"All" will also display DCF-compliant image from other manufacturers that may be on the same card. | |
| Rotate Tall | - Yes - No (view) |
Images captured in "portrait" orientation are rotated onscreen to display in their original orientation. (The camera can even tell whether you had the grip side up or down.) | |
| Slide Show | - Start - Frame Interval (view) |
- Select frame interval, 2-10 seconds | |
| Print Set | - Select/set - Deselect all? (view) |
- Select image from thumbnail display, if select/set is chosen | |
| Small Picture | - Select picture - Choose Size (view) |
- Select image from thumbnail display, if select/set is chosen -Image sizes: |
|
Shooting Menu
| Shooting Menu Options | |||
| Top-Level Selection |
Second-Level | Third-Level | Notes |
| Optimize Image | - Normal
|
(For Custom option only)
- Done (accept settings)
|
Direct print affects sharpening and image rendering.
Portrait and Landscape make subtle, specific color and tonal-rendering adjustments. Custom tone compensation option enables curve loaded from computer I and III color modes are both sRGB, but III has higher saturation. NOTE - you must select "Done" for custom settings to be registered. |
| Long exp. NR | - Off - On (view) |
Only affects exposures longer than one second.
(I found little need for this, the basic exposures are very clean.) |
|
| Image Quality | - NEF (Raw) - JPEG Fine - JPEG Normal - JPEG Basic - NEF + JPEG Basic (view) |
Note that only option for NEF + JPEG is for Basic (lowest) JPEG quality. | |
| Image Size | - L (3,008 x 2,000) - M (2,256 x 1,496) - S (1,504 x 1,000) (view) |
||
| White bal. | - Auto - Incandescent - Fluorescent - Dir. sunlight - Flash - Cloudy - Shade - PRE Preset (view)
|
(Preset option only) | All options let you fine-tune white balance +/- three units.
Manual option (PRE) is nice, in that it gives you the choice of setting directly or using a previously-shot photo on the card. |
| ISO | - 200 - 400 - 800 - 1600 (view) |
||
Custom Settings Menu (CSM)
When you first turn it on, the Nikon D50 displays only the "Simple" Custom Settings Menu (CSM) options, which are the first six options listed below. You can enable the "Detailed" CSM via an option on the setup menu. For those interested, I've provided links below to view each of the help screens. Also, for menu items, I've highlighted the default option with boldface type.
| Custom Settings Menu Options | |||
| Top-Level Selection |
Second-Level | Third-Level | Notes |
| -- Menu Reset | - No |
Resets the CSM options to their default values. | |
| 01 Beep | - On - Off |
Beep sounds for focus confirmation, remote release, or self-timer countdown. | |
| 02 Autofocus | - AF-A |
AF-A auto selects either AF-S (Single) or AF-C (Continuous) modes. Single or continuous autofocus. (As with other d-SLRs though, AF operates only when shutter button is half-pressed or AE-L/AF-L button is fully pressed, regardless of this setting.) | |
| 03 AF-area mode | - Single area - Dynamic area - Closest subjct |
Single and Dynamic area let you select the primary AF point. Closest subject lets the camera choose whichever area has the closest subject detail.
Single is the default for P, S, A, M and Macro modes. Closest subject is the default for the Scene modes other than Macro. |
|
| 04 No SD Card? | - Release Locked - Enable Release |
Prevents shutter release if there's no SD card in the camera. (Helps avoid shooting a pile of photos without "film" in the camera.) |
|
| 05 Image review | - On - Off |
Enables or disables the immediate review of an image on the LCD screen after each shot. | |
| 06 Flash Level | - -3 to +1 EV |
Adjusts the intensity of the on-board flash.
|
|
| 07 AF assist | - On - Off |
Enable or disable the AF-assist light. Light only comes on if it's needed.
If SB-800 or SB-600 is attached, camera will use the strobe's AF assist illuminator. |
|
| 08 AF area illm | - Auto - Off - On |
Controls the subtle backlighting of the active AF point when the AF system actuates. In Auto mode, the backlight doesn't activate when you're shooting a bright subject. | |
| 09 ISO Control | - On - Off |
Enables Auto ISO in Auto and Scene modes. | |
| 10 ISO Auto | - Off - On |
On: - Done - P,A, DVP mode |
Boosts ISO automatically in creative exposure modes (P, A, or Digital Vari Program (scene) modes) when set to On, you can select the slowest shutter speed beyond which the camera will raise sensitivity. Options range from 1/125 to 1/8 second. |
| 11 EV step | - 1/3 step - 1/2 step |
Sets step size (in EV units) for aperture, shutter, and exposure compensation adjustment. | |
| 12 BKT set | - AE & flash |
The D50's auto bracketing feature can control either normal and flash exposure or white balance variation. | |
| 13 Metering | - Matrix - Center-weighted - Spot |
(See the discussion under the Exposure section of this review for details on these options.) | |
| 14 AE-L/AF-L | - AE/AF Lock - AE Lock only - AF Lock only - AE Lock hold - AF-ON - FV Lock |
Controls the function of the AE/AF lock button.
Most modes release the lock after the shutter is tripped, but "AE Lock hold" holds the AE setting until the button is pressed again. AF-ON causes the camera to autofocus when the AE/AF button is pressed. FV Lock fires a metering flash and locks flash exposure when the AE/AF button is pressed. |
|
| 15 AE Lock | - AE-L/AF-L button - + Release bttn |
The first option locks AE with the AE-L/AF-L button only, the second also permits AE lock with a half-press of the shutter button.
(This is unusual, most digital cameras by default lock exposure when the shutter button is half-pressed.) |
|
| 16 Flash mode | - TTL - Manual |
- Full Power - 1/2 Power - 1/4 Power - 1/8 Power - 1/16 Power |
Sets flash mode. Manual option leads to screen to set power level, from Full down to 1/16. |
| 17 Monitor off | - 10 sec - 20 sec - 1 min - 5 min - 10 min |
Delay after which rear-panel LCD switches off if no activity. | |
| 18 Meter-off | - 4 sec - 8 sec - 16 sec - 30 min |
Length of time the meter displays the exposure setting after it's been activated. (By either a shutter half-press or a press of the AE-L/AF-L button.) Unless the AE-Lock hold option is selected, the meter will continuously update while it's active, as the scene or camera settings change. | |
| 19 Self-timer | - 2 sec - 5 sec - 10 sec - 20 sec |
Duration of self-timer delay. | |
| 20 Remote | - 1 min - 5 min - 10 min - 15 min |
Sets the length of time the camera will wait for a signal from the infrared remote control before reverting to single-shot or continuous mode, whichever was last in effect. | |
Setup Menu
| Setup Menu Options | |||
| Top-Level Selection |
Second-Level | Third-Level | Notes |
| Format | - No - Yes |
Erases all files on card, including any images hidden or "protected" | |
| CSM Menu | - Simple - Detailed |
The camera defaults to showing only the "Simple" Custom Settings Menu. Selecting "Detailed" here enables display of the full CSM. | |
| Date | - Set | Sets the date and time. | |
| LCD Brightness | -2 to +2 | The camera displays a gray scale on its LCD as an aid to setting the LCD brightness. | |
| Video mode | - NTSC - PAL |
Selects video timing for US/Japan or European compatibility. | |
| Language | - German - English - Spanish - French - Italian - Dutch - Portuguese - Russian - Swedish - Chinese (Traditional) - Chinese (Simplified) - Japanese - Korean |
What? No Urdu?
;-) |
|
| Image comment | - Done - Input comment - Attach comment (view) |
(Input comment) | Embeds an alphanumeric character string in the EXIF header of captured images.
Comments are visible in Picture Project or Nikon Capture 4, versions 4.1 and later. |
| USB | - Mass storage - PTP |
Chooses protocol for USB port. Mass Storage tends to transfer faster, PTP links to automatic camera-download software on Mac OS 10 and Windows XP. | |
| Folders | - Select folder |
(Select folder)
(New) (Rename) |
Select which folder will be used for both image storage and playback. |
| File No. Seq | - Off - On - Reset |
If on, camera will remember and continue file number sequence from one card to the next, and across erase/format operations. | |
| Mirror lock-up | - Yes - No |
For sensor cleaning, locks mirror up and shutter open. Turn off camera to reset. AC adapter not required.
NOTE: Don't confuse this with a mirror lockup mode that locks the mirror pre-exposure, to minimize camera shake from mirror bounce. (The D50 doesn't have that feature.) |
|
| Dust ref photo | - Yes - No |
Capture a special "Dust Reference" image that can be used with Nikon Capture 4 to automatically touch-out the images of dust specks on the sensor. | |
| Firmware Ver. | Displays current camera firmware version. | ||
| Image rotation | - Automatic - Off |
The D50 has an orientation sensor that records the position of the camera in the file headers, allowing the images to display in their correct orientation on the camera's LCD or in Nikon's software. This option disables this, useful if you're going to be using in an orientation (straight up or straight down) that would result in incorrect orientation data being recorded. | |
Image Storage and Interface
The Nikon D50 uses SD memory cards for image storage, and does not come with a memory card, so you'll need to purchase one separately. The D50 utilizes a folder arrangement that lets you organize images in the camera and a sequential frame counter option to avoid problems with overwriting files when copying them to a computer.
Captured images can be individually write-protected via the Protect button on the back panel. Note that write-protected files are only immune to accidental deletion, not card reformatting. Unlike CompactFlash cards though, SD cards do have a write-protect switch on the cards themselves. When locked, a SD card cannot be written to by the camera, nor can any images on it be deleted or the card reformatted.
Three image sizes are available: Large (3,008 x 2,000 pixels), Medium (2,256 x 1,496 pixels), and Small (1,504 x 1,000 pixels). File formats include several levels of JPEG compression, as well NEF (RAW) data mode. The latter file format stores the data exactly as it comes from the CCD array, in a losslessly compressed format. Since the NEF format is completely proprietary though, you need Nikon's "Picture Project" or "Nikon Capture" software to read it, or any of several third-party RAW-format converters. As noted, the compressed RAW format is a "lossless" compression, making it difficult to determine the actual amount of compression that will be used for any given file.
Below are the approximate number of images and their compression ratios for a 256 MB SD card. I highly recommend that you consider a 256 MB card as the bare minimum for this camera: If you own one of these, you're going to want to take a lot of pictures without having to stop and download them to your computer.
| Resolution/Quality 256 MB Memory Card |
Fine | Normal | |
|
|
| 3008 x 2000 |
Images (Avg size) |
70 3.6 MB |
138 1.8 MB |
262 975 KB |
34 7.5 MB |
| Approx. Compression |
5:1 | 10:1 | 19:1 | 2:1 | |
| 2256 x 1496 |
Images (Avg size) |
124 2.1 MB |
236 1.1 MB |
428 596 KB |
- |
| Approx. Compression |
5:1 | 9:1 | 17:1 | - | |
| 1504 x 1000 | Images (Avg size) |
262 975 KB |
470 544 KB |
750 341 KB |
- |
| Approx. Compression |
5:1 | 8:1 | 13:1 |
- | |
The Nikon D50 connects to the host computer via a USB port, as either a Mass Storage or PTP device. The PTP protocol allows Mac OS X and Windows XP to recognize the D50 as a camera, so they can launch camera-specific operating system software. The Mass Storage option lets the camera appear as a standard removable disk device. I personally find the Mass Storage option to be more convenient, as it doesn't force me through the clunky OS software, and is faster to boot.
Connected to my 2.4 GHz Pentium IV-equipped Sony VAIO desktop computer running Windows XP, I measured the D50's download speed at a blistering 3,486 KB/second in Mass Storage mode, an incredibly rapid pace. (I didn't measure the transfer rate in PTP mode, speeds there though, are generally quite a bit slower.)
Lost Images? - Download this image-recovery program so you'll have it when you need it...
Since we're talking about memory and image storage, this would be a good time to mention the following: I get a ton of email from readers who've lost photos due to a corrupted memory card. It's tragic when it happens, there are few things more precious than photo memories. Corrupted memory cards can happen with any card type and any camera manufacturer, nobody's immune. "Stuff happens," as they say. A surprising number of "lost" images can be recovered with an inexpensive, easy to use piece of software though. Given the amount of email I've gotten on the topic, I now include this paragraph in all my digicam reviews. The program you need is called PhotoRescue, by DataRescue SA. Read our review of it if you'd like, but download the program now, so you'll have it. It doesn't cost a penny until you need it, and even then it's only $29, with a money back guarantee. So download PhotoRescue for Windows or PhotoRescue for Mac while you're thinking of it. (While you're at it, download the PDF manual and quickstart guide as well.) Stash the file in a safe place and it'll be there when you need it. Trust me, needing this is not a matter of if, but when... PhotoRescue is about the best and easiest tool for recovering digital photos I've seen. (Disclosure: IR gets a small commission from sales of the product, but I'd highly recommend the program even if we didn't.) OK, now back to our regularly scheduled review...
Video Out
 US and Japanese models of the Nikon D50 come with an NTSC video cable for connection to a television set or VCR (European models come with the appropriate PAL cable). The camera's video timing can be switched back and forth between NTSC or PAL via a menu option. Any and all screens visible on the rear panel LCD are also visible through the video port.
Power
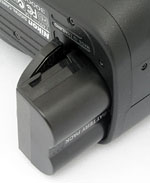 The Nikon D50 uses Nikon's EN-EL3 lithium-ion battery pack or an optional AC adapter for power. An indicator on the status display panel lets you know approximately how much battery power is left.
I didn't have access to the external AC adapter when testing the D50, so wasn't able to conduct my usual direct measurements of power consumption. - And battery life on a d-SLR will also vary greatly depending on the lens used and how much the focus motor has to operate.
In the manual, Nikon themselves offer the following characterizations of the D50's battery life:
Example 1 - 2000 Shots
Zoom Nikkor AF-S DX 18–55 mm f/3.5–5.6G lens; continuous shooting mode; continuous-servo autofocus; image quality set to JPEG Basic; image size set to M; shutter speed 1/250s; shutter-release pressed half way for three seconds and focus cycled from infinity to minimum range three times with each shot; after six shots, monitor turned on for five seconds and then turned off; cycle repeated once exposure meters have turned off.
Example 2 - 400 Shots
AF-S DX 18–55 mm f/3.5–5.6G lens; single-frame shooting mode; single-servo autofocus; image quality set to JPEG Normal; image size set to L; shutter speed 1/250s; shutter-release pressed half way for five seconds and focus cycled from infinity to minimum range once with each shot; built-in Speedlight fired at full power with every other shot; AF-assist illuminator lights when Speedlight is used; cycle repeated once exposure meters have turned off; camera turned off for one second with every ten shots.
My own experience seemed to thoroughly support Nikon's battery life claims. The D50/EN-EL3 combination seemed to offer really excellent battery life, as I could shoot literally hundreds of photos without draining the battery. Casual users almost certainly won't need a second, spare battery. If you plan really long shooting days or plan to shoot in cold weather (which can greatly reduce battery capacity), you may want to pick up a second battery to use as a spare.
In the Box
Included in the box with the D50's body box are the following items:
Included Software
The D50 ships with Nikon's PictureProject software, as well as a 30-day free trial of Nikon Capture, their higher-end program for much more extensive manipulation of NEF-format images. Both packages are compatible with both PC and Mac computers, big kudos to Nikon for that.
PictureProject is a relatively new piece of software for Nikon (introduced with the D70 in 2004), replacing the previous Nikon View. Nikon had talked up PictureProject quite a bit prior to my first seeing the original 1.0 version, so I approached it with a pretty positive mindset. My initial reaction was disappointment over how clunky it was to use with NEF files, and its rather lightweight features, but as I spent more time playing with it, I found myself liking it quite a bit more. (Unlike some other reviewers, I do think it's a bit of a step up from Nikon View.)
Some of my negative reaction to PictureProject may be that I'm just not the sort of user it's intended for: It's clearly aimed at novices and first-time digicam owners, so it's long on automation of file import and simple organizational tools, but rather short on any sort of workflow to support effective use of NEF files, or for efficiently processing large numbers of images. Granted, Nikon wants to protect sales of their high-end Capture 4 software program, but I do think PictureProject could have been made a good bit more capable without treading on Capture 4's toes. As it is, I'm afraid that PictureProject puts the D50 at something of a disadvantage relative to the software package that ships with Canon's Digital Rebel, which includes Adobe's excellent Photoshop Elements right in the box with the camera.
That said, PictureProject does have some nice features for organizing your images, and I liked its email integration quite a bit. Also, Nikon has significantly enhanced its feature set in version 1.5 (the version shipped with the D50), so it now presents a much more complete set of capabilities for novice users who don't want to delve into a separate imaging application.
I don't normally review bundled software in my camera reviews, but given that many of the target customers for the Nikon D50 may never reach beyond PictureProject, will devote some time to it here. Here's a brief look at PictureProject's interface and a few of its features. (The screenshots below are all from the Windows version of the program.):
Main Screen

PictureProject is a reasonably competent organizing tool, you can assign keywords to images, tag interesting ones for easier recall, and group them into multiple "collections." (For instance, one collection could be "Family Birthdays," and another could be "Photos of Katie." Pictures from Katie's birthday could logically belong to both collections.) Images can belong to more than one collection, making it easy to create multiple groupings. The main screen shows an array of thumbnails, and you can mark individual pictures as being tagged for quick reference, protected, or hidden. Clicking the "Keyword" tab in the left panel lets you create keywords and assign them to images. Finally, you can search by file name, keyword, or date, and can restrict your searches to only those files that have been tagged, protected, or both.

By double-clicking on an image, you can edit it in several ways, including rotating, cropping, redeye removal, and adjusting its brightness, color saturation, and sharpening. You can also convert it to Sepia or Black/White, using the Photo Effects option.

The screen shots above show the controls available for each of the options in the Photo Enhance panel of the Edit screen. Nikon has added a fair bit to PictureProject's capabilities, but one huge omission is that there doesn't appear to be any way to adjust a photo's color balance. (!) This is a critical failure in my mind, because shots captured under incandescent lighting so often need adjustment to reduce the yellow cast that the camera frequently leaves in the image. Also, while you can now use any of the Photo Enhance tools on NEF (RAW) image files, the ability to adjust white balance on NEF images that was present in version 1.0 of the program now appears to have been removed.
Speaking of NEF files, that was (and still is) one of my primary beefs with the program. You can convert NEFs to JPEG format en masse, but if you want to save to TIFF, the only way to do so is by exporting the file to another program like Photoshop(tm). In addition to this one-at-a-time limitation on NEF file export to another application, if you want to make any adjustments to a NEF file inside PictureProject, it forces you to save the whole NEF file back to disk before you can go back to Organize mode, export the file as a JPEG, or transfer it to another application. There's no way to export a modified (or unmodified) NEF file directly from Edit mode without having to wait for the file to be saved to disk first.
File Menu |
Edit Menu |
Photo Menu |
 |
 |
 |
View Menu |
Tools Menu | Window Menu |
 |
 |
|
Since I just mentioned the export capability (or lack thereof) in Edit mode, the shots above show the program's various menus. Version 1.5 added quite a few capabilities here, and a number of options that previously appeared under the Tools menu have now been moved elsewhere.

As you'd expect, PictureProject can display essentially all the information embedded in the file headers, including exposure information and even provides access to the IPTC fields, and version 1.5 has significantly enhanced this access. (Rather strange IMHO, in a very consumer-oriented program, as the IPTC fields are really only of interest to photojournalists or others working inside large organizations.) Apart from the IPTC data, the information available in version 1.5 is about the same is in version 1.0, but has been spread across more screens.

One of PictureProject's weakest points is its online help system. There's just not much there. (The screen shot above shows all there is to see.) While there's a pretty good electronic (PDF file) manual shipped on a second CD, I don't think it begins to make up for the paucity of help within the program itself. - And frankly, the electronic manual could stand to have better detail in several areas as well.

PictureProject's printing capabilities are actually quite nice. There are plenty of options for printing one or more images per page, and to include EXIF exposure information as well. Besides the screen shown above, there's also a screen oriented toward outputting index prints, which also includes the ability to show full EXIF data. (I could see myself using this to create hardcopy catalogs of my shots.)

Another clever, but optional, added-cost capability of PictureProject is its "muvee" option, which sets animated "slide shows" (for lack of a better term) to music, combining zooms, pans and fades of a selected group of images with a music track of your choice. The result is actually fairly appealing, and can be output to either MPEG1 or Windows Media Video formats, either for playback on the computer, or for inclusion in an email message. Sadly though, the muvee feature is only available in the Windows version of the application. Note too, that the muvee feature is only available as an added-cost upgrade from the free version bundled with the camera.

PictureProject includes a very nice email option, that takes care of resizing the images for you, and packaging them in an outgoing email message. You can select the size you want the emailed images to be, and whether you want to present them as a single index print photo, or as individual files. Where the original version of PictureProject apparently sent the emails itself, version 1.5 instead launches your email client for you, creates a blank message and attaches the image(s) you've selected to it. All in all, a very nice feature that I suspect even a lot of advanced users would use.

Finally, a new addition to PictureProject is the ability to burn CDs with your photo collections on them. You can either save the original photos, or you can "optimize" them for the CD, setting them all to the same size and image quality. In the "optimized" mode, you can also choose to include a QuickTime slideshow movie, and/or a MPV Slideshow document. Pretty slick!
Overall, as I said at the beginning, I started out expecting great things from PictureProject, became more than a little disappointed, but finally ended up liking the package fairly well. If you're an advanced user, you'll probably find yourself frustrated with its lack of an effective workflow for plowing through large numbers of images, tweaking as you go. It's wholly inadequate for working with NEF files, and I think Nikon has committed a serious error there, crippling PictureProject in that regard, to try to protect sales of Capture 4. This is one area where Canon's d-SLRs win hands down over Nikon's. The most inexplicable lack in PictureProject though, is the inability to make any adjustment to images' color balance (or contrast, for that matter), a very common need of even novice photographers.
Still, if you're primarily a "point and shoot" sort of user, PictureProject is a very nice little package. Given that the D50 is really aimed at first-time SLR users and young families in particular, PictureProject could be a good fit for the camera's primary market. Even for sophisticated users, it'd make a nice tool for the Significant Other to use to manage the family photo archives. All in all, a pretty nice little software package, likely to be enough for many novice users.
Test Results
In keeping with my standard test policy, the comments given here summarize only my key findings. For full details on each of the test images, see the D50's "pictures" page.
For a look at some more pictorial photos from this camera, check out our Nikon D50 Photo Gallery.
For the real nitty-gritty image-analysis details, read my D50 Imatest Results page.
Not sure which camera to buy? Let your eyes be the ultimate judge! Visit our Comparometer(tm) to compare images from the Nikon D50 with those from other cameras you may be considering. The proof is in the pictures, so let your own eyes decide which you like best!
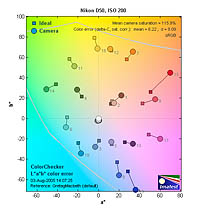 Color: Good color, very bright, to suit consumer tastes. Mode I sRGB and Adobe RGB more restrained though. Slight color casts, but within the range of what's acceptable. Auto white balance has a hard time with household incandescent, but manual white balance handles a very wide range of lighting. Aimed as it is at consumers looking for their first d-SLR, the Nikon D50's default color rendition is very bright and saturated looking. (The chart at right shows the color error map from Imatest for the D50's default Mode III color space. See the Imatest Results Page for further details.) Some purists may find the resulting images a little overdone, but the lower-saturation "Mode I" sRGB color space is much more subdued. The Mode II Adobe RGB color handling strikes a good balance between saturation and technical accuracy. The D50's white balance system produced slight color casts in many of my test shots, but the casts were indeed slight, to the extent that most users probably won't notice them. Like a great many digital cameras, the D50's automatic white balance system had a hard time handling household incandescent lighting, producing a strong yellow cast. Its Incandescent white balance option appears to be balanced to professional tungsten studio lighting, and so also produced warm casts with household incandescents. The good news though, is that the D50's Manual white balance option handled a very broad range of lighting with ease. Overall, the Nikon D50's color should prove pleasing to most consumers, and its alternate color space settings should please advanced users as well.
| Dynamic Range (in f-stops) vs Image Quality (At camera's minimum ISO) |
||||
| Model | 1.0 (Low) |
0.5 (Medium) |
0.25 (Med-High) |
0.1 (High) |
| Fujifilm S3 Pro | -- | 10.3 | 9.02 | 7.9 |
| Nikon D50 | 10.7 | 9.93 | 8.70 | 7.36 |
| Canon EOS 20D | 10.3 | 9.66 | 8.85 | 7.29 |
| Canon Digital Rebel XT | 10.3 | 9.51 | 8.61 | 7.11 |
| Olympus EVOLT | 10.8 | 9.26 | 8.48 | 7.07 |
| Canon Digital Rebel | 10.1 | 9.11 | 8.47 | 6.97 |
| Pentax *istDs | 10.2 | 10 | 8.87 | 6.9 |
| Nikon D2x | -- | 8.93 | 7.75 | 6.43 |
| Nikon D70S | 9.84 | 8.69 | 7.46 | 5.85 |
| Nikon D70 | 9.81 | 8.76 | 7.58 | 5.84 |
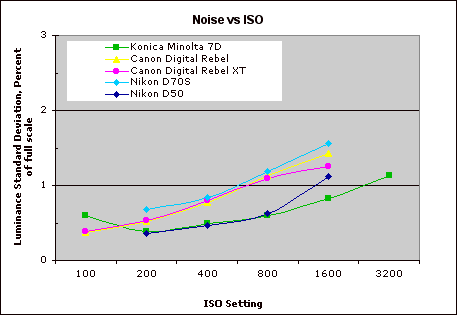
Conclusion
| Pro: | Con: |
|---|---|
|
|
| Free Photo Lessons | |
|
<<D50 Sample Images | Additional Resources and Other Links>>
Reader Comments!
Questions, comments or controversy on this product? Click
this link to see what other Imaging Resource readers have had to say about
the Nikon D50, or add comments of your own!