![]() Back to DC265 Review
Back to DC265 Review
Go to DC265 Data Sheet
Go to DC265 Pictures Page
Up to Imaging Resource Cameras Page
 |
|
1,536 X 1,024 pixel resolution |
|
|
External flash sync, w/manual aperture | |
|
|
Optional manual focus setting | |
|
|
3X optical zoom, + 2X digital | |
|
|
Improved startup time, up to 6 full-res images in rapid succession. | |
|
|
Reduced image compression with "Super
Quality" mode. |
Preface
Kodak has long been a leader in digital imaging, having created
some of the very first all-digital cameras as long ago as 1991.
Kodak opened new territory last year, with their DC260, which
combined high resolution with the then-brand-new Digita scripting
language from FlashPoint. They thus addressed not only the upper
end of the picture-taking marketplace (with features such as external
flash sync), but also offered more opportunities for third parties
to integrate the camera into customized applications and workflows.
Full details on Digita were a bit slow in coming, and only now
does it seem to be reaching its full potential. Nonetheless, the
DC260 was an important step in the ongoing integration of computer
and camera.![]()
Now, Kodak has significantly enhanced the capabilities
of the DC260 in the upgraded DC265 model. The new unit boasts
a substantially faster processor, improved power management, much
larger "buffer" memory for longer shot sequences without
pausing, and more-extensive use of the Digita scripting language
in the as-shipped unit. It also includes a lower-compression "Super"
image-quality mode. Other pluses include faster LCD refresh, and
the inclusion of high-capacity NiMH rechargeable batteries and
charger. Although not mentioned in the Kodak literature, our tests
indicate that Kodak has also improved the color-handling and increased
image contrast somewhat. The result takes the famous "Kodak
color" that has characterized Kodak's digicams to a new level.
(We also observed this new level of color in the other models
recently introduced by Kodak, the DC200 and DC240.)![]()
Kodak officially rates the DC265 as capable of producing
photo-quality output up to a 8x10 print size, and we agreed, finding
that even full-page 8x11 (~A4) images hold together surprisingly
well on high-quality inkjet printers.![]()
High-Points Overview
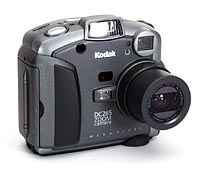
Design
The DC265 has the identical body used for the DC265 (and the DC220),
following the design style established by the earlier DC210, but
in size and layout more of a departure from the appearance of
film-based point & shoots. It does still look more like a
camera than a computer peripheral, preserving the visual familiarity
of the DC210. The DC265 is clearly not intended to be a "pocket"
camera though, weighing in at a hefty 1.2 pounds (525g) without
its four AA-cell batteries installed, and measuring 4.6 x 2.2
x 4.2 inches (118 x 57 x 106 mm).![]()
Viewfinder
The DC265 provides both an optical viewfinder and 2-inch LCD panel,
which can be turned on when the camera is in capture mode, to
"preview" images before they're captured. At other times,
the LCD is used for reviewing previously-captured photos, or to
display menus used for setting camera status. (The DC265's LCD-based
menu system is a model of clarity and ease-of-use: See the screenshots
later in this article.) Like all current-technology LCDs though,
the view panel in the DC265 is power-hungry: Either get some extra
rechargeable batteries, or limit your LCD usage!![]()
The optical viewfinder of the DC265 is clear and bright,
and varies its focal length to track the operation of the zoom
lens. It is a bit more accurate than is typical for digital camera
viewfinders, showing slightly more than 90% of the CCD frame.
Our test sample's optical viewfinder had an annoying defect though:
The entire image was rotated 2-3 degrees relative to that captured
by the CCD sensor. Because ours was one of a small number of hand-assembled
preproduction units, we're guessing that this rotation was simply
a preproduction glitch caused by an inaccurate assembly jig: We
previously have seen this phenomena on one other camera in preproduction
(from a different manufacturer), and it was corrected in the final
production units. We can't imagine a flaw this trivial to address
persisting into Kodak's production models. ![]()
The optical viewfinder has a moderately high "eyepoint,"
making it usable for eyeglass wearers, although no diopter adjustment
is provided to compensate for impaired vision directly. The viewfinder
also has the desirable characteristic of being relatively insensitive
to lateral eye position: The view doesn't change at all if your
eye happens to be off-center in any direction. Finally, addressing
a complaint we had with the DC210, the viewfinder and LCD panel
are placed such that most folks' noses won't smudge the LCD while
they're looking through the viewfinder.![]()
We've found the LCD viewfinders on Kodak cameras to be
significantly more accurate than those on most digital point &
shoots, and the DC265 continues this welcome tradition: When operating
in viewfinder mode, the '265s LCD is absolutely accurate, and
can be relied upon to display exactly what the CCD will capture,
at within the limits of the 2" LCD. Our one gripe about the
LCD viewfinder on the DC265 is that, while it has a fairly rapid
refresh rate (seemingly a good bit faster than that of the DC260),
the way in which data is clocked from the CCD to the LCD still
results in a lag between updating of the red image and the blue/green
channels. This produces a fairly severe separation of the image
into red- and cyan-colored ghosts when the subject moves rapidly,
or when the camera is panned at all quickly. We found this rather
distracting, although it isn't an issue for most subjects. Action
sports shots could be rather difficult with the DC265 though![]()
Optics
The DC265 sports a sharp 3x autofocus zoom lens, with a focal
length range equivalent to 38-115mm on a 35mm film camera. Its
autofocus ranges from 8 inches (0.3 m) to infinity. (The close-focusing
capability is a noticeable improvement from the 12 inch minimum
focus distance of the earlier DC260.) (LATE-BREAKING NOTE: We're
confused here: We were told that the DC265 focused to 8 inches,
and our evaluation unit appeared to do just find at that distance.
Kodak's official literature on the web states the minimum distance
as 12 inches though. - Perhaps this will be the spec of the final
production units? Despite the improved performance of our test
unit, we'll have to "officially" go with Kodak's publicly-stated
value of 12 inches.) The aperture range runs from f3.0 at the
wide angle end of the zoom or f4.7 at the telephoto end, to f22,
a wider-than-normal range. In external-flash mode, the lens aperture
can be controlled manually, in 1-stop increments across its entire
range. This makes professional flash photography highly practical
with the DC265, a still-rare capability among "prosumer"
digital cameras.![]()
Focus Options
The DC265 provides a number of focusing options: At the time of
our initial review of the DC260, some of these capabilities were
absolutely unique in the marketplace. Now, several competing models
offer some of these features, but the range of options is still
rare.![]()
The default focusing mode is "multi-spot" autofocus,
in which focus information is computed at three separate points
within the field of view, and the results averaged to determine
optimum focus. (The '265s documentation doesn't say though, just
where the three autofocus areas are located in the frame, but
the icons on the camera and in the manual seem to suggest that
they're spread across the image area horizontally. Our contacts
at Kodak have told us that the focus area is roughly centered
at infinity and tends slightly toward the bottom of the frame
as the camera-to-subject distance decreases.) A second mode provides
"single-spot" autofocus, in which only the center of
the frame is examined to determine optimum focus setting. In both
autofocus modes, you can "lock" the focus by pointing
the camera at the object you want to focus on, half-depressing
the shutter trigger, and then (with the shutter button still depressed),
shift the camera to achieve your desired framing. Once everything's
set, press the shutter button the rest of the way to take the
picture. (Note that this procedure also "locks" exposure
at the same time as the focus is set.)![]()
Besides its two separate autofocus modes, the DC265 also
provides manual focus control This is especially useful in situations
involving off-center subjects, or foreground objects that you
want the camera to ignore in its focusing. It's also very useful
when shooting under conditions of poor lighting, where autofocus
would be less accurate. (Note our comments below on the DC265's
focus-assist illuminator feature, though.) A total of 9 preset
manual-focus distances are provided, spread in an approximately
even logarithmic series from 1.5 feet (50 cm) to infinity. In
practice, the number of steps provided is a little limited for
use at maximum aperture, and at the telephoto end of the zoom
range, but fine at wider angle settings and smaller apertures.
By any stretch though, the manual focusing ability of the DC265
is miles ahead of many of its competitors, which lack manual focus
options.![]()
Autofocus Illuminator
Although the furor of a year ago over poor autofocus performance
of digicams in low-light conditions has subsided somewhat, low-light
autofocus remains a sore point for many users: What good is an
on-camera flash, if the camera refuses to take the picture because
it can't focus properly? To address this problem, Kodak has built
an autofocus illuminator (a very bright LED on the front of the
camera body) into the DC265. When the ambient light level is too
low for reliable autofocus operation, this LED flashes briefly
when the shutter button is pressed, casting a circular light pattern
onto the subject. The camera uses this to focus properly, and
can therefore achieve accurate focus operation, even in complete
darkness. (Note though, that the illuminator will give you away
if you're trying for a candid shot in a dim room: Switching to
manual focus will keep the illuminator from flashing, if so desired.)![]()
Digital Zoom
The DC260 was Kodak's first excursion into the realm of "digital
zoom" technology, whereby the camera manipulates the image
digitally to increase the apparent zoom ratio. The DC265 continues
the capability, which has now become nearly universal in the marketplace.![]()
"Digital Zoom" can be a confusing term, given
that it isn't really a "zoom" at all, as most people
are used to in film cameras; and that two very different methods
are used to implement it in various digicams. At its simplest,
some cameras "zoom" simply by chopping-out the central
portion of the image, and presenting it as a finished file of
smaller size. The DC265 takes the more aggressive approach of
having the camera actually interpolate data from the central portion
of the CCD array to produce a full-sized, albeit "softer"
image. (No new information is being produced in the image, what's
there is just being interpolated further.) Kodak's implementation
in the DC265 goes most of the competition one better though: Rather
than simply an on/off 2x zoom, the '265 digital zoom operates
smoothly across a 1:2 range, in a manner more akin to optical
zooms. The digital zoom only takes effect when the LCD viewfinder
is turned on, since that's the only way you can tell what area
is being captured. With the LCD viewfinder enabled, the digital
zoom picks up smoothly once you reach the end of the optical zoom
range, giving much more control over framing than the simple on/off
digital zoom approach. With Kodak's smooth digital zoom, you also
needn't trade off any more resolution than needed to make your
shot.![]()
The digital zoom user interface is one area where we were
pleased by the changes Kodak has made relative to the earlier
DC260: On the DC260, if you kept the zoom toggle pressed in the
"T" direction with the LCD viewfinder on, the digital
zoom would take effect almost immediately after the optical zoom
reached its limit. Thus, it was sometimes difficult to use the
LCD finder without accidentally engaging the digital zoom. On
the DC265 though, the digital zoom only engages after you first
release the zoom toggle, and then again press it to the "T"
position. While it sounds like a small thing, we found this to
be a significant improvement in the camera's user interface.![]()
Accessory Threads!
One of the most frequently-heard user requests for the DC260 was
for some way to attach accessory lenses for close-up shooting,
color correction, etc. Unfortunately, the normal thread-mounting
approach used for accessory devices wouldn't work on the DC265,
because the telescoping mechanism of the 265's lens assembly wouldn't
be able to stand up to the torque required to remove a balky lens
filter. For a long time, it looked like DC260 owners would have
to forever eschew accessory optics. Fortunately, coincident with
the release of the DC265, both Kodak and an independent company
have developed solutions for mounting accessory lenses on both
the 260 and 265. (In preparing this review, we didn't get a chance
to use Kodak's solution, but it apparently is very similar to
the Xtend-A-Lens product
we tested from Williams & Associates.)![]()
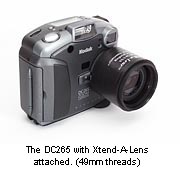 The trick to both the Kodak and
Xtend-A-Lens gadgets is to friction-mount a tubular adapter to
the heavy plastic body ring that surrounds the base of the lens.
This adapter has standard filter threads on the other end of it,
to which you can mount all manner of accessory gadgets. (The photo
at right shows the Xtend-A-Lens adapter mounted on the DC265.
It provides standard 49mm filter threads just ahead of the lens'
maximum extension.) When we first heard of this solution, we confess
to being a little skeptical about the robustness of a friction-mount
on the body ring: Could it possible stand up to a stack of dual-element
macro lenses, or a hefty tele-adapter? We're happy to report that
the Xtend-A-Lens was a very pleasant surprise in this regard.
While we didn't test it with a massive tele-adapter, we did hang
a couple of 62mm dual-element Nikkor macro adapters off the front,
and never felt the slightest qualm about their security there.
Sounds great, you're saying, but what's it cost? - How about nothing?
(Well, maybe $5 or so for the raw materials.) Williams & Associates
has even posted a set
of instructions for making your own adapter at no charge!
We suspect though, that most people will opt to pay them the very
reasonable $20 they ask for fully-assembled units. Click
here for more details and sample images. For those wanting
the official Kodak solution, it's only slightly more expensive,
at $24.95, and can be ordered from dealers as part number 867-5027.
(Note that the Kodak unit has 37mm filter threads, vs the 49mm
threads of the Xtend-A-Lens.) Kodak doesn't sell the device on-line,
but does have a web
page on their site describing it.
The trick to both the Kodak and
Xtend-A-Lens gadgets is to friction-mount a tubular adapter to
the heavy plastic body ring that surrounds the base of the lens.
This adapter has standard filter threads on the other end of it,
to which you can mount all manner of accessory gadgets. (The photo
at right shows the Xtend-A-Lens adapter mounted on the DC265.
It provides standard 49mm filter threads just ahead of the lens'
maximum extension.) When we first heard of this solution, we confess
to being a little skeptical about the robustness of a friction-mount
on the body ring: Could it possible stand up to a stack of dual-element
macro lenses, or a hefty tele-adapter? We're happy to report that
the Xtend-A-Lens was a very pleasant surprise in this regard.
While we didn't test it with a massive tele-adapter, we did hang
a couple of 62mm dual-element Nikkor macro adapters off the front,
and never felt the slightest qualm about their security there.
Sounds great, you're saying, but what's it cost? - How about nothing?
(Well, maybe $5 or so for the raw materials.) Williams & Associates
has even posted a set
of instructions for making your own adapter at no charge!
We suspect though, that most people will opt to pay them the very
reasonable $20 they ask for fully-assembled units. Click
here for more details and sample images. For those wanting
the official Kodak solution, it's only slightly more expensive,
at $24.95, and can be ordered from dealers as part number 867-5027.
(Note that the Kodak unit has 37mm filter threads, vs the 49mm
threads of the Xtend-A-Lens.) Kodak doesn't sell the device on-line,
but does have a web
page on their site describing it.![]()
We just spent a fair amount of time and space dealing with
a relatively minor, third-party accessory; something we normally
don't do. In this case though, we felt the topic well worth it,
as SO many DC260 users have begged for a solution like this for
so long. The ability to add front-element accessories corrects
what many had seen as a serious handicap of the DC260, and opens
new creative vistas for it and the 265.![]()
Image Size
As we write this (Mid-April, 1999), there's been a lot of "buzz"
and interest about the 2 megapixel cameras many manufacturers
are introducing. We usually avoid pixel-counting exercises, encouraging
people to look instead at our test images, and decide for themselves
how much resolution a given camera does or doesn't have. There's
been such a frenzy though over the magical 2 megapixel designation
though, that we feel compelled to include a brief mention of it
here: All of the 2 megapixel cameras we've seen to date have a
maximum image size of 1600 x 1200 pixels. That's a lot of pixels,
but note that it's only 64 pixels wider than the 1536 captured
by the DC265! (The vertical dimension adds a bit more, 176 additional
pixels.) To be sure, there's a fair increase in overall area with
the 2 megapixel units, but perhaps not as much as the current
feeding frenzy in the marketplace would suggest. Our point here
is that people looking for a high-end "prosumer" digital
camera shouldn't discount the DC265 too much relative to 2 megapixel
designs, as the difference may be less than you'd expect... (For
a bit more discussion on this, and some "theoretical"
sample images, check out our "How
many pixels" article.)![]()
Exposure
Kodak rates the DC265 at an equivalent ISO speed of 100, and available
lens apertures range from f3.0-f14 at the maximum wide-angle setting,
to f4.7-f22 at maximum telephoto. The autoexposure system provides
exposure times ranging from 1/4 to 1/400 seconds, although a special
time-exposure mode lets you manually set exposure times from 1/2
to 16 seconds, in 1/2-second increments. Again, this is a significant
upgrade from the DC260: It had a maximum exposure time of 4 seconds,
although you could get out to 16 seconds through the use of the
Digita scripting. (While a few of the latest competing high-end
digicams now have time-exposure capabilities, long time-exposures
capability are still a rare feature in the marketplace.) (April,
1999) Based on its published specs, the DC265 should be able to
handle light levels ranging from EV -0.5 to EV 17.5, an incredible
range. In our actual testing though, we found the camera performed
well only down to an illumination level of about EV5, although
it produced a somewhat-usable picture as low as EV4. This is VERY
dim though: Unless you're trying to take pictures by moonlight,
you'll probably find the DC265's performance in this area satisfactory.![]()
Given the unusual flexibility of its focusing options,
the 265's single auto-exposure mode seems limited by comparison.
While the exposure lock (mentioned in conjunction with focus lock
earlier) and the EV-compensation (discussed below) are helpful
in dealing with difficult exposure situations, we would still
like to see a spot-metering mode. While you can fudge with the
EV control and exposure lock to make the best of an inaccurate
autoexposure setting, spot metering will often let you reach out
and expose for exactly the right part of the subject. On the other
hand, we found the 265's exposure system to be more accurate than
most, handling our difficult outdoor portrait test subject with
much greater accuracy than we're accustomed to seeing.![]()
Following Kodak tradition, the DC265 provides a +/- 2f-stop
(+/- 2 EV unit) exposure override capability in 1/2 stop increments,
easily accessible via the top-panel buttons adjacent to the LCD
screen. This does much to increase the usefulness of the camera,
allowing the operator to adjust the exposure to compensate for
backlighting, or light subjects against dark backgrounds. Also
accessible via the top panel, a 10-second self-timer feature lets
the photographer get in the picture with the subjects.![]()
The built-in flash has an effective range of 1.0 to 9.8
feet ( 0.3 to 3.0 m). Its five operating modes include auto, red-eye
reduction, fill (in which the flash always fires, regardless of
the overall scene brightness), fill with red-eye, and off. In
our testing, the flash performed well within its specified range,
and was also able to throttle-down effectively for "macro"
work, at the 12-inch minimum focusing distance. (This last has
been a rarity for point & shoot cameras in the past, as they
tended to badly wash-out closeup shots when the flash was used.)![]()
A major feature of the DC265 is its ability to work with
external flash units. (While the DC265 no longer stands alone
in the marketplace with this capability, as the DC260 did, effective
coupling with external flash is still fairly rare.-- April, 1999)
A standard "PC" connector on the side of the camera
body provides the physical interface, and a special "external
flash" exposure mode lets you explicitly set the lens aperture
in one-stop increments between f3.0 and f22. Although we didn't
test this feature quantitatively, we did plug a generic autoexposure
flashgun into the the PC jack and played around a fair bit with
the combination. The results were very encouraging: The explicit
aperture setting allowed us to regulate exposure while using the
flash, and flash timing seemed well-synched with the shutter.
While some digicam owners have experimented with slave-triggered
external strobes, the DC265's ability to control the lens aperture
independently puts its flash capabilities into an entirely different
league.![]()
Shutter Lag and Cycle Times
When you press the shutter release on a camera, there's usually
a lag time before the shutter actually fires. This time is to
allow the autofocus and autoexposure mechanisms time to do their
work, and can amount to a fairly long delay in some situations.
Since this number is almost never reported on, and can significantly
affect the picture-taking experience, we now routinely measure
it, using a little Windows utility developed by Digital
Eyes.![]()
We measured the DC265's shutter delay at between 1.3 and
2.1 seconds with full autofocus, 0.6 seconds with manual focus,
and 0.3 seconds with the focus and exposure preset by half-pressing
the shutter release prior to the shot itself. The variation in
the full-autofocus number is due to the variable behavior of the
autofocus system, depending on the distance to the subject: It
appears that the lens starts its autofocus cycle focused on infinity,
and then racks in until accurate focus is achieved. Thus, the
closer the subject, the longer it takes the lens to achieve focus,
with the maximum time being about 2.1 seconds in our tests. This
full-autofocus performance is toward the slower end of the range
for high-end digicams, but performance using the pre-focus option
is quite fast and on a par with other models on the market.![]()
Shot to shot cycle time on the DC265 is very good, taking
advantage of its huge buffer memory and fast processor. We measured
cycle times ranging from 4.1 down to 2.9 seconds, depending on
image size and autofocus setting; excellent performance for a
camera of this resolution level. After 6 high-resolution shots
had been taken, the camera took about 15 seconds to process enough
image data to allow the next picture to be taken. (This is also
a substantial improvement relative to the earlier DC260.)![]()
We've commented on this aspect of digital camera operation
before, but it deserves special attention: Cycle time is an easy
parameter to ignore, but has a tremendous impact on the picture-taking
experience. The greatly improved multi-shot cycle time of the
DC265 made a huge difference in our experience and perception
of the camera, and was an important part of why we liked the upgraded
model so much.![]()
The Digita Operating Environment and Scripting Language
When the DC260 was announced, it was the first camera to use the
Digita environment and language from FlashPoint, and information
on the scripting language, its capabilities, and development tools
was hard to come by. A year later, the software
developers kit (SDK) is readily available from FlashPoint
on-line, people are routinely developing programs in it for various
vertical applications, and some genuinely useful functions are
being implemented. (We used the "resolution series"
script to automatically capture images at every combination of
image size and compression ratio, for many of our test shots.
This app saved us literally hours of picture-taking time!)![]()
A full treatment of the Digita language is far beyond the
scope of even an Imaging Resource camera review, so we'll instead
refer readers to several online resources for more information,
including FlashPoint's own
site, and the DigitaCamera
web site. We did want to give some sense of what can be accomplished
in Digita, so we present here a brief sketch of FlashPoint's just-released
"DigitaFX" application, which provides for rudimentary
image manipulation within the camera itself(!)![]()
Digita F/X
There's been a lot of talk about the Digita operating environment
and the associated scripting language, but few people realize
that the "environment" also permits the creation of
complete APPLICATIONS. These applications can go well beyond the
limits of simple scripting, essentially using the camera's processor
as a general-purpose computer.![]()
One of the first (and most interesting to date) of these
applications is Digita F/X, a surprisingly capable image-manipulation
package that runs INSIDE the DC265 and other Digita-equipped digital
cameras! The possibilities here are intriguing, particularly when
combined with the recently defined "Digital Print Order Format"
or DPOF, which is also supported by the DC265. DPOF allows camera
users to mark images for later print output by hardcopy devices
also supporting DPOF. (Such as Kodak's latest generation of Print
Magic stations now in about 30,000 locations worldwide.) With
the addition of Digita F/X, you now have a complete imaging solution,
without any need for a computer in the middle! (We can imagine
Intel and Microsoft execs cringing as we write this.)![]()
While Digita F/X won't let you retouch your images, it
does provide a surprisingly complete range of image-adjustment
tools, including an auto tone adjustment, brightness & contrast,
color correction (RGB, as well as hue/saturation), sharpening
& blurring, and a host of special effects. - For the sake
of a $20 piece of software (taking about 800K bytes on your camera's
CF card), you can turn your camera into a complete image-processing
system!![]()
![]()
We'll give you a (very) brief tour of Digita F/X here:
See the Flashpoint web site
for more details.![]()
You launch Digita F/X by selecting a menu option while
in "Review" mode, which shuts down the camera. Pressing
the power button brings the camera back up running the Digita
F/X application. You quit the app in similar fashion, by pressing
the "exit" key and rebooting again. Here's what it looks
like when it's running:![]()
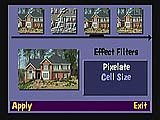
| When Digita F/X boots up, you'll see the index screen that lets you scroll through the images stored on the camera's memory card, and select the one you want to work with. Once the desired image is displayed in the lower portion of the window, you can choose to either "adjust" it, or apply an "effect" to it. Adjustments include automatic tone and color balance, tonal balance (brightness and contrast), sharpen, blur, color balance (RGB adjustments), conversion to a grayscale image, color saturation, "colorization" (hue and saturation), and posterization. Effects include emboss and pixelate, textures (mosaic, stucco, underwater, and water color), and transformations (mirror, flip (top/bottom), and rotate 90, 180, or 270 degrees). (Image rotations aren't supported on the DC220 camera, only the DC260 or DC265.) |  |
|
When Digita F/X boots up, you'll see the index screen that lets you scroll through the images stored on the camera's memory card, and select the one you want to work with. Once the desired image is displayed in the lower portion of the window, you can choose to either "adjust" it, or apply an "effect" to it. Adjustments include automatic tone and color balance, tonal balance (brightness and contrast), sharpen, blur, color balance (RGB adjustments), conversion to a grayscale image, color saturation, "colorization" (hue and saturation), and posterization. Effects include emboss and pixelate, textures (mosaic, stucco, underwater, and water color), and transformations (mirror, flip (top/bottom), and rotate 90, 180, or 270 degrees). (Image rotations aren't supported on the DC220 camera, only the DC260 or DC265.) You select an adjustment or effect by scrolling through a set of thumbnails showing previews of the effect, while descriptions of the operations appear in the lower part of the screen. (The screen shot at right shows the screen for the Pixelate Effect option.) |
 |
| Once an adjustment or effect is chosen, you'll be taken to a screen showing a larger preview of the effect chosen, along with controls to adjust the relevant parameters. (The screen shot at right shows the control screen for the Tone adjustment.) |  |
| After you've made the changes desired, you can save the modified image, via the control screen shown at right. To guard against fatal errors of judgement, Digita F/X always saves the image to a different "album" on the memory card, and gives you the option of changing its name as well. (If you decide you don't want to modify the image, choosing "Un-Apply" will cancel the operation, and take you back to the adjustment/effect selection screens. | 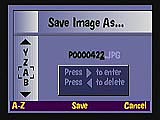 |
|
There's plenty of room for creative license with Digita F/X: The shots below are cropped from a full-resolution camera image, showing "before" and "after" versions, with the "Watercolor" effect filter applied. 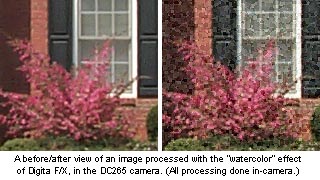 |
|
![]()
It strikes us that the real utility of Digita F/X will
be in applying fairly prosaic modifications to captured images,
such as sharpening and tonal correction, before printing the images
out on a PictureMaker or Digita-equipped inkjet printer, using
the DPOF capabilities of the DC265. One also wonders though, if
FlashPoint will provide for the Digita Scripting capability to
be combined with Digita F/X operators, allowing fully-automated,
in-camera image processing.![]()
This has been a rather lengthy excursion into the functions
of one specific Digita-based application, but we wanted to give
some sense of the potential of Digita in the course of talking
about the DC265's other capabilities. We think there's a lot of
potential here that is only just now beginning to be tapped!![]()
Operation and User Interface
(The depth of the DC265's user interface makes this a LONG section!
Click here if you want
to skip to the discussion of image storage and interface...)![]()
The user interface and operation of the DC265 is easily
one of its most distinguishing characteristics, and probably the
feature most likely to spark debate as well. As the one of a still
limited number of cameras incorporating the "Digita"
camera operating system and scripting language (two others being
its little brother the DC220, and its predecessor the DC260),
the DC265 offers new capabilities for modifying the camera's behavior
to suit specific applications and worfklows. Kodak has always
maintained an excellent interface for third-party developers,
but the release of the Digita operating system extends this further
than has ever been the case before.![]()
As wonderful as the computer-like capabilities of the DC260
were, we complained a fair bit about the computer-like need for
the camera to "boot up" prior to use. In the case of
the DC260, this process required fully 15 seconds or more, removing
some of the spontaneity that digital photography offers. In the
DC265, a faster processor and firmware changes have reduced this
start-up time to on the order of 10 seconds. Likewise, shutdown
time has been cut to a maximum of 5 seconds, whereas the DC260
could take as long as 40 seconds if it needed to process images
in the buffer memory. (The DC265 still has to process any data
in the buffer memory before it turns the power off, but it retracts
its lens and goes into "shutdown mode" within 5 seconds
of pressing the power button.)![]()
While we're once talking about the power button, it's worthwhile
pointing out another minor but useful change Kodak's made on the
DC265: A frequent annoyance on the DC260 was the tendency for
users to hit the power button by mistake when intending to take
a picture (it's located on top of the camera, just behind the
shutter button). This initiated a shutdown, and required waiting
through the lengthy re-boot before you could finally take the
shot. On the DC265, a delay has been inserted between pressing
the power button to shut down and actually powering-off the camera:
You now have to hold down the power button for about two seconds
before it will shut down the camera. In our experience, this has
now all but eliminated the problem of accidental shutdowns.![]()
The handling of "buffer memory" and "background"
processing of images is an area of huge improvement in the DC265
over the DC260. As digital camera resolution has increased, the
time required to process the images and save them to the camera's
memory has increased as well. Although faster processors have
helped somewhat, until recently, digital cameras lagged far behind
film-based units in their responsiveness and shot-to-shot cycling.
We discussed the DC265's excellent shot-to-shot cycle time performance
earlier, but some further discussion of buffer memory and camera
operation is warranted here, as this is an area where the DC265
really shines.![]()
The DC260's buffer memory was sufficient to allow you to
capture two maximum-resolution images in rapid succession, but
would then require you to wait for a fairly long time (20-30 seconds)
after that, before you could take the next shot. The ability to
grab two pictures fairly quickly was great, but the long delay
before the third could be taken was frequently an annoyance. Also,
while the camera was processing images, you couldn't change settings,
or otherwise get ready for the next shot. With the DC265 though,
all this is changed. First, a *MUCH* larger buffer memory lets
you capture up to 6 full-resolution images before having to pause,
and the camera requires only about 15 seconds to free-up enough
memory to allow capture of picture number 7. In practice the 6
full-resolution images were enough that we almost never found
ourselves waiting for the camera between shots. Even better, essentially
all camera controls remain "live" while the DC265 is
processing images in the background. This makes it easy to change
flash or white balance settings, image resolution, exposure compensation,
etc, without having to wait for the camera to get done with its
processing. This may seem like a relatively minor issue, but the
difference in the "feel" of the camera is enormous.
Not having to plan your shots around the camera's ability to process
them greatly frees the creative process: If we had to pick one
characteristic of the DC265 that we liked most over the DC260,
the improved "burst" performance would have to be it!![]()
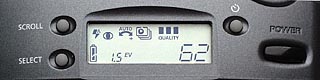
![]() The feedback the DC265 gives you
on its memory and image-processing status is very useful as well:
Two indicators relating to memory performance and availability
appear in the LCD viewfinder display. In the image at right, the
upper row of blocks correspond to available space in the CompactFlash
memory card: Red-filled blocks indicate used space, while white-filled
ones show available storage. The horizontal, thermometer-style
display under the row of red and white blocks shows buffer memory
status: The gray portion of the bar shows buffer memory currently
in use, holding images waiting to be processed, while the white
portion shows available buffer memory. Although our usage of the
camera rarely exercised the buffer memory to its fullest extent,
we can envision sports or other applications in which the photographer
may want to wait before beginning a sequence of images until sufficient
buffer memory had become available.
The feedback the DC265 gives you
on its memory and image-processing status is very useful as well:
Two indicators relating to memory performance and availability
appear in the LCD viewfinder display. In the image at right, the
upper row of blocks correspond to available space in the CompactFlash
memory card: Red-filled blocks indicate used space, while white-filled
ones show available storage. The horizontal, thermometer-style
display under the row of red and white blocks shows buffer memory
status: The gray portion of the bar shows buffer memory currently
in use, holding images waiting to be processed, while the white
portion shows available buffer memory. Although our usage of the
camera rarely exercised the buffer memory to its fullest extent,
we can envision sports or other applications in which the photographer
may want to wait before beginning a sequence of images until sufficient
buffer memory had become available.![]()
As was doubtless evident in our earlier comments, the DC265
is an unusually flexible device with many options (external flash,
time exposure, time-lapse photography, multiple focus modes, etc).
It should come as no surprise then, that the user interface needs
a lot of screens and menu options to manage all this functionality.
Kodak has created a very clear series of screens and menus to
control the camera, but the result is still a "deep"
interface that can take a little while to navigate. Fortunately,
the most-frequently accessed controls can be reached through the
top-panel LCD and pushbuttons, which provide a much shorter route
to the desired functions. (Top-panel controls available in capture
mode include flash functions, +/- EV compensation, still/burst/time-lapse
enabling, compression level selection, and self-timer enabling.)![]()

Camera setup is effected through a combination of a back-panel
mode-select rotary switch, a 4-way rocker button located inside
the mode-select ring, "display" and "menu"
buttons to the left of the LCD panel, and three unlabeled "soft
buttons" arranged along the bottom of the LCD. Extensive
use is made of the LCD panel for displaying menus and option choices,
which are then selected through a combination of the various buttons
and controls.![]()
Overall operation of the DC265 is divided into four modes,
of which only 3 actually affect camera operation. The four modes,
selected by a back-panel rotary switch, are Capture, Review, Connect,
and Info. These are fairly self-explanatory, except perhaps "Info"
mode. Presently, selecting "Info" displays a screen
on the LCD panel showing the camera's firmware version, and directing
you to a web location
for the "latest info", or to the FlashPoint
site for information on the Digita language and operating
environment.![]()
With the preceding as background, we'll now step through
the various operating controls and modes of the DC265, beginning
with the top-panel controls:![]()
![]() Self-Timer
Mode
Self-Timer
Mode
The Self-Timer mode has its own button on the top of the camera.
You can use the self-timer in conjunction with any of the camera
settings you've enabled, like many other camera models. Depressing
the Self-Timer button provides a 10 second delay between when
you press the Shutter button and the when the shutter fires.![]()
Scroll and Select Buttons
Also located on top the camera are the Scroll and Select buttons,
shown below. These buttons provide you with a way to quickly change
the flash mode, exposure compensation, picture type (still, burst,
or time-lapse), and quality settings to meet your needs without
entering the LCD menu system. Simply press the scroll button until
the setting you want is flashing on the Status display. Then,
press the select button to move through the available options.
Pressing the Scroll button a second time confirms what you selected,
or if you don't press a button for 5 seconds, the current selection
is automatically confirmed.
 Zoom Toggle
The Zoom Toggle switch is located on the back of the camera, in
the top-right corner. Move the switch to the right to zoom in
(3x) on your subject, to the left for a wide-angle shot. Turning
on the LCD and moving the toggle switch to the right enables the
camera's (2x) digital zoom capabilities.![]()
Mode Dial & Four-Way Controller
The DC265 Zoom Camera can operate in one of four different modes.
You use the Mode Dial button on the rear of the camera to select
the mode in which you want to operate:
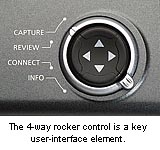 Capture - To capture your
images, and set camera options using the LCD menus.
Capture - To capture your
images, and set camera options using the LCD menus.The Four-Way Controller button is on the rear of the camera
in the center of the Mode Dial. The Controller contains up/down
and left/right arrow buttons that you use to scroll through the
camera menu options on the LCD, and to scroll through pictures.![]()
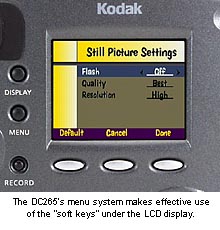 Softkeys
Located just under the LCD, these buttons are used to confirm
selections displayed just above the button on the LCD screen.
You use these buttons, in conjunction with the Four-Way Controller,
in Capture and Review Modes when choosing camera settings and
reviewing images.![]()
Display and Menu Buttons
Display-Activates the LCD for viewing of images and menu options.
Menu-Displays the available menu options when in Capture or Review
Mode.![]()
Record Button
After choosing an image in Review Mode, or QuickView mode after
capture, press this button to record up to 45 seconds of audio
data for the current image.![]()
Capture Mode Menu Options
With the Mode Dial on the rear of the camera set to Capture, pressing
the Menu Button provides a variety of different options for capturing
your images:![]()
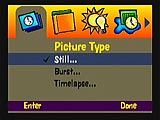 Picture Type Menu:
Lets you select the type of picture that you want to capture,
and specify the picture's characteristics:
Picture Type Menu:
Lets you select the type of picture that you want to capture,
and specify the picture's characteristics:
Note that you can also use the Scroll and Select buttons on
top of the camera to choose a Picture type, and modify the Flash
and Quality settings. When choosing a picture type in this manner,
other parameters for that picture type (resolution, burst rate
or time-lapse interval, etc.) will be as previously-selected in
the LCD menu system.![]()
 Album Menu: Allows
you to organize and store images to in-camera albums on the memory
card. There are three options from which you can choose:
Album Menu: Allows
you to organize and store images to in-camera albums on the memory
card. There are three options from which you can choose:
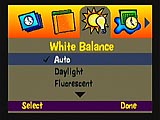 White Balance Menu: Select
one of five white balance settings depending on the current lighting
conditions:
White Balance Menu: Select
one of five white balance settings depending on the current lighting
conditions:
 Watermark Menu: Allows you
to "watermark" images by placing a text or logos on
the images that you capture. You can position the watermark anywhere
on the picture by specifying offsets, and you can choose from
a variety of text and background colors, including transparency
settings. There are four Watermark options from which you can
choose:
Watermark Menu: Allows you
to "watermark" images by placing a text or logos on
the images that you capture. You can position the watermark anywhere
on the picture by specifying offsets, and you can choose from
a variety of text and background colors, including transparency
settings. There are four Watermark options from which you can
choose:
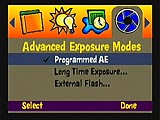 Advanced Exposure Modes Menu:
Allows you to choose one of three exposure modes:
Advanced Exposure Modes Menu:
Allows you to choose one of three exposure modes:
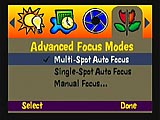 Advanced Focus Modes Menu:
Lets you choose the way focus is determined when capturing images:
Advanced Focus Modes Menu:
Lets you choose the way focus is determined when capturing images:
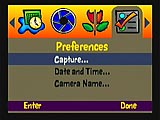 Preferences Menu: Lets you
set preferences with regard to image capture, date and time, and
camera name:
Preferences Menu: Lets you
set preferences with regard to image capture, date and time, and
camera name:
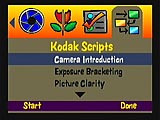 Kodak Scripts Menu: Lets you
run scripts that are stored on the camera's memory card to further
customize your picture-taking experience. The scripts loaded on
the Picture Card shipped with the DC265 appear on the Kodak Scripts
set-up screen. The DC265 comes with several scripts preloaded,
as well as others that are included on the CD ROM that comes with
the camera. Any scripts on the CD ROM must be uploaded to the
camera's memory card from a host computer by using utility software
that Kodak provides for this purpose, or by copying them onto
the card directly using a CF card reader/writer. Examples of some
scripts include an Exposure Bracket script that prompts you to
capture three versions of the same subject at different exposure
levels to get the best shot, and adding a Super quality setting
(in addition the Good, Better, Best settings) to your camera.
Note that the Kodak Scripts menu is created by scripts
on the memory card shipped with the camera. It won't appear otherwise
(eg, on other cards not carrying the scripts on them.) Note, too,
that script-created entries can appear on ANY menu in the LCD
menu system.
Kodak Scripts Menu: Lets you
run scripts that are stored on the camera's memory card to further
customize your picture-taking experience. The scripts loaded on
the Picture Card shipped with the DC265 appear on the Kodak Scripts
set-up screen. The DC265 comes with several scripts preloaded,
as well as others that are included on the CD ROM that comes with
the camera. Any scripts on the CD ROM must be uploaded to the
camera's memory card from a host computer by using utility software
that Kodak provides for this purpose, or by copying them onto
the card directly using a CF card reader/writer. Examples of some
scripts include an Exposure Bracket script that prompts you to
capture three versions of the same subject at different exposure
levels to get the best shot, and adding a Super quality setting
(in addition the Good, Better, Best settings) to your camera.
Note that the Kodak Scripts menu is created by scripts
on the memory card shipped with the camera. It won't appear otherwise
(eg, on other cards not carrying the scripts on them.) Note, too,
that script-created entries can appear on ANY menu in the LCD
menu system.
Review Mode
 Use Review mode to view your images after
you capture them. When you change from Capture to Review Mode,
the LCD automatically activates and displays your images. Initially,
the last image captured appears full screen on the LCD. The image
may contain date and time information and other image markings
depending on whether or not the "Overlay" feature is
turned on (in the LCD menus available in Review Mode). We liked
the "Overlay" option (shown in the screen shot at right),
and also liked the fact that it can be turned off, to allow you
to see the full image unobstructed. When enabled, the overlay
bars display the image number, date, time, type of shot (this
last via an icon), and provide options relevant to the image being
viewed. Options include:
Use Review mode to view your images after
you capture them. When you change from Capture to Review Mode,
the LCD automatically activates and displays your images. Initially,
the last image captured appears full screen on the LCD. The image
may contain date and time information and other image markings
depending on whether or not the "Overlay" feature is
turned on (in the LCD menus available in Review Mode). We liked
the "Overlay" option (shown in the screen shot at right),
and also liked the fact that it can be turned off, to allow you
to see the full image unobstructed. When enabled, the overlay
bars display the image number, date, time, type of shot (this
last via an icon), and provide options relevant to the image being
viewed. Options include:
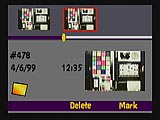
As noted above, in review mode, the LCD display normally shows one image at a time. Pressing the Display button once though, puts the camera into what we've called "Index" mode, in which you can very rapidly scan through images stored on the memory card. In this mode, you'll see a "film strip" area at the top of the LCD, containing tiny thumbnail versions of images you've captured (assuming there's more than one picture currently stored on the memory card). The left/right arrows on the rocker control let you scroll quickly through the images, and a slightly larger copy of the currently-selected image appears in the lower portion of the window, along with information showing the date and time of capture, image number, and type of image that it is (still, burst, time-lapse). Pressing the Display button again shows you this image full-size. When in index mode, you'll have two or three options available, relating to the currently-selected image:
 Review Mode Menu
Options:
Review Mode Menu
Options:
Move to Album Menu: Allows you to move previously-marked images into a predefined album area on the PC Card, or allows you to create a new album for storage purposes. Use the up/down arrows on the Four-Way Controller to choose the album option that you want.
Review Preferences Menu:
 Slideshow: Lets you choose
the time interval for viewing your images in a slideshow on your
television. You first need to connect the camera to your TV with
the video cable supplied. You can set the time interval to between
1 and 99 seconds. In addition you can turn sound on and off,
and choose whether or not you want to images to run in a continuous
loop.
Slideshow: Lets you choose
the time interval for viewing your images in a slideshow on your
television. You first need to connect the camera to your TV with
the video cable supplied. You can set the time interval to between
1 and 99 seconds. In addition you can turn sound on and off,
and choose whether or not you want to images to run in a continuous
loop.
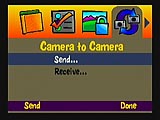 Camera to Camera Menu: Allows
you to copy previously marked pictures to another camera in Send
mode, or to received images from another camera in Receive mode.
Camera to Camera Menu: Allows
you to copy previously marked pictures to another camera in Send
mode, or to received images from another camera in Receive mode.
Kodak Scripts Menu:![]() As
mentioned in the Capture section, Kodak Scripts are scripts that
are stored on the camera's memory card to further customize your
picture-taking or picture-reviewing experience. In Review mode,
the following script is available for selection:
As
mentioned in the Capture section, Kodak Scripts are scripts that
are stored on the camera's memory card to further customize your
picture-taking or picture-reviewing experience. In Review mode,
the following script is available for selection:
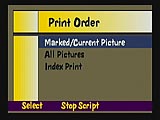 Print Order: Lets you select
previously marked images or all images on the PC Card for printing.
Also lets you choose how many copies of the image to print. This
information is stored to the picture card along with the image
in a special file format. This format can be read by some inkjet
printers or by Kodak Picture Maker kiosks. When you insert the
picture card into a reader on the Picture Maker, for example,
the kiosk will fulfill your order, printing the quantity of each
image that you've specified using the Print Order script. You
can set different print quantities for different images by selecting
each set of photos for which you want the same number of prints,
and then setting the quantity in the Print Order script. Then,
go back to select the next group of photos, which will be printed
in a different quantity. (Unfortunately, once an image is marked
and a quantity set, it looks like you're committed: We couldn't
find any way to remove a print order for a file, as there's no
"quantity zero" or "delete order" option
available.)
Print Order: Lets you select
previously marked images or all images on the PC Card for printing.
Also lets you choose how many copies of the image to print. This
information is stored to the picture card along with the image
in a special file format. This format can be read by some inkjet
printers or by Kodak Picture Maker kiosks. When you insert the
picture card into a reader on the Picture Maker, for example,
the kiosk will fulfill your order, printing the quantity of each
image that you've specified using the Print Order script. You
can set different print quantities for different images by selecting
each set of photos for which you want the same number of prints,
and then setting the quantity in the Print Order script. Then,
go back to select the next group of photos, which will be printed
in a different quantity. (Unfortunately, once an image is marked
and a quantity set, it looks like you're committed: We couldn't
find any way to remove a print order for a file, as there's no
"quantity zero" or "delete order" option
available.)
Connect Mode
When you want to connect the camera to a PC for downloading of
images, you first need to place the camera in Connect mode. Connect
mode enables the data port on the side of the camera for image
transfer. As mentioned below, the DC265's data port is dual-mode,
providing either a standard RS-232 serial connection, or the faster
USB connection, depending on the cable used. (No configuration
setting is required on the camera to select between the two types
of ports: Just plug the cable in and go.![]()
Info Mode
Info Mode displays information about the DC265 Camera including
the software version number, the location on the Kodak web site
where youcan get more information about the camera, and website
for FlashPoint Technology, where you can find additional information
on the Digita programming language used for creating scripts to
further customize your camera and your picture-taking experience.![]()
Image Storage
and Interface
The DC265 has no "hardwired" permanent memory, relying
instead on removable "Kodak Picture Cards," which are
tiny (1 3/8 x 1 5/8 inch) (35 x 41 mm) flash memory cards conforming
to the CompactFlash (CF) standard. A 16-megabyte (MB) Picture
Card ships with the camera (up from 8 megs with the DC260), and
additional cards ranging in size from 2 MB to 128 MB (!) can be
readily purchased on the open market. With a standard PC Card
adapter, you can read images directly from the Picture Cards into
computers equipped with PCMCIA slots or PC card readers (see the
notes below on "finished file format"). Depending on
the image size and quality setting chosen, a 16 MB card will store
anywhere from 11-174 pictures. Given the current low cost of memory,
we heartily recommend a second memory card as an accessory for
digital cameras that support removable storage. ![]()
Standard RS-232 serial port technology is beginning to
show its age badly in digital camera applications, simply taking
too long to move the 200-600 Kbyte files that have become common.
Recognizing this, the DC265 also includes USB and IrDA ports for
much higher-speed data transfer. Support for both USB and IrDA
was rather spotty under Windows '95, but improved dramatically
under Windows '98. In our case, our Windows machine lacks IrDA
ports, but has USB ports built-in. On the Apple side of the world,
new Macs now routinely come equipped with USB ports, offering
a high-speed interface, which Kodak now supports directly, "out
of the box."![]()
If your computer has either a PC Card (also called PCMCIA)
slot, or a PC Card reader, you'll really appreciate the "Finished
File Format" feature of the DC265: Files are stored on the
Picture Cards in the final format needed by your computer. This
means that when you plug a Picture Card (in the optional PC Card
adapter or an external card reader) into your computer, you can
immediately read, view, or copy the images on it either from the
computer's desktop, or directly from within your favorite image-handling
software. The "finished file" format is no longer "news"
in the digicam world, as essentially all current models provide
this feature. We mention it here though, for those readers who
may only be familiar with Kodak's earlier cameras, such as the
DC120: Those models used proprietary file formats inside the camera,
requiring the use of Kodak's software to get images off the memory
cards. - The "finished file" approach is much more convenient.![]()
Album Settings
The CF storage cards used by the DC265 are available with very
large capacities (cards as large as 128 megabytes had been announced
at this writing, in April 1999, and 80 megabyte units were currently
shipping). This means you could potentially have hundreds of images
in the camera's memory. That large a quantity of images could
be very unwieldy, if your only option were the scrolling filmstrip
interface we describe earlier in the Review Mode functional description.
To handle such situations, the DC265 provides an "Albums"
option, by which you can define and manipulate groups of images.
Once one or more "albums" are defined in the camera's
memory, you can send any new pictures captured to the album of
your choice, or select "No Album" to let new images
accumulate in the general storage area. (Recognizing the dual
home/business usage of many digital cameras, "Albums"
can be a great way to separate family images from those captured
for business.)![]()
Video Out
The DC265 can also display photos directly on TV monitors, supporting
both American (NTSC) and European (PAL) signal formats. This makes
the camera a very useful presentation tool, particularly when
equipped with a higher-capacity storage card. Some cameras support
playback of images modified in the computer to add titles or other
markings, but others do not. Happily, the DC265 is in the former
category: We modified an image from it, adding a caption using
Paint Shop Pro on a Windows machine, and successfully displayed
it after loading the modified image back onto the CompactFlash
memory card. This dramatically improves the camera's usefulness
as a presentation tool. The only drawback is that the reloaded
image lacked the low-res copy that the DC265 uses in "index"
mode, and to display the images quickly when scrolling through
them. Thus, the modified image took longer to display on-screen
than an unmodified one. On the other hand, when working with "standard"
resolution images (768x512 pixels), the display time is only about
two seconds per image, a very workable speed for presentations.
Bottom line: The DC265 can easily serve double-duty as an effective
portable presentation tool (including up to 45 seconds of audio
per slide - see below)!![]()
By the way, don't think the video-out capability is restricted
to business uses! -- A slide show of a business trip can do a
lot to help reconnect the harried business traveler to his or
her family upon their return. Even better, "real time"
slide shows of family get-togethers can be great fun as well.
Overall, you may find yourself getting more use out of the video
output than you initially think...![]()
Sound Recording
That's right - sound! The DC265 contains both a microphone and
speaker, so you can attach sound directly to any image file. You
can record sound for a picture anytime the picture is being displayed:
Either during the "review" display in capture mode,
or while viewing the image in review mode. To record, you press
the small black "record" button on the left-hand side
of the camera back, and speak in a normal tone of voice. You can
review what you've recorded, and either save it or delete it and
record a new copy. Once saved, sounds stay with the picture files,
unless you explicitly delete them. Images displayed during a slide
show will play their sound clip as well. The manual makes no mention
of how long a sound clip can be attached to each image: In our
experimentation, we could record a maximum length of 45 seconds,
quite a bit of talking!![]()
When downloading files to the computer, attached sound
data can be saved to disk as separate .wav files, either with
the same name as the main picture, or under a different name altogether.
![]()
Power
Power for the DC265 is provided by 4 internal AA batteries, or
by an optional AC adapter than can significantly extend battery
life if you're doing a lot of downloads via the serial port. As
we mentioned earlier, LCD panels on digital cameras really "eat"
batteries, and the DC265's is no exception. Fortunately, one of
the enhancements of the DC265 over the earlier DC260 is that the
'265 includes a set of high-capacity (1450 mAh) rechargeable NiMH
batteries and a charger in the box! (Big kudos to Kodak for this:
Rechargeable batteries are a necessity with any digicam, so their
inclusion with the '265 will save you $40-50 or so.) Note that
while Kodak doesn't specifically prohibit any battery type in
their documentation, the do particularly caution against operating
the unit with the LCD panel on for more than 30 minutes when using
Lithium batteries, because they could "heat up significantly."
(You'd better believe it!) Although Lithium batteries have very
high power capacities, we don't recommend them in high-power cameras
like the DC265. - Save yourself a lot of grief, and buy an extra
set or two of rechargeable batteries!![]()
Included Software
The DC265 ships with a very capable software package, including
programs for both the Mac and Windows operating systems. For both
platforms, Kodak includes copies of Adobe's PhotoDeluxe software
(the new "business" edition on the PC side, the standard
one on the Mac), and their very user-friendly web-page editor,
PageMill (version 3.0, as of this writing in April, 1999.)![]()
On the PC, several pieces of software are provided to help
you connect to the camera, and manage your images once they're
imported to the computer. Camera connectivity is provided in two
forms, via "Mounter" software and TWAIN drivers. The
"Mounter" software is unique, and makes transferring
images to the host computer completely trivial, by letting the
camera appear to the computer as a disk drive. (That is, it shows
up in Windows Explorer as if there were a drive named "DC265".
It doesn't get assigned a drive letter, but in all other ways
acts like a read-only disk.) This arrangement is pretty slow (the
term "glacial" comes to mind) when using a standard
serial-port connection, but is quite speedy, and very useful when
the camera is connected via a USB port. The Mounter application
works with Windows 95, 98, and NT (now referred to as "Windows
2000).![]()
The TWAIN drivers work like any other such software that
we've used on the PC, allowing images to be imported into a wide
range of programs: Just select the driver for the DC265 in your
application's "Select TWAIN driver" menu option, and
then do a normal TWAIN image-import. The Kodak TWAIN software
is quite versatile, even allowing a picture to be taken under
computer control, while the camera is connected.![]()
A third piece of software is provided for the PC, called
"DC265 Properties". This program allows the computer
to see and control all of the DC265 settings and options that
are normally controlled via the LCD menu system.![]()
The last (and largest) piece of PC-specific software Kodak
provides is their "Picture Easy" program, which provides
for virtually all aspects of image management, from capture and
download through management using "albums" on your hard
drive, to manipulation and color correction, printing, and even
email. The albuming and easy printout capabilities of Picture
Easy are very handy, although our personal preference is to use
individual, dedicated-purpose software for each of the functions
Picture Easy provides. Admittedly though, the various pieces you
might assemble from various software vendors wouldn't integrate
as seamlessly as the various parts of Picture Easy, not to mention
they'd cost a fair chunk of additional money. All things considered,
Picture Easy provides a comprehensive image-management and -manipulation
capability in a single package. (And it's free with the camera.)![]()
On the Mac side, there are two different camera-control
applications: The Kodak DC265 Zoom Plug-in, and a copy of Digita
Desktop for the Mac, from FlashPoint. Due to the rather delicate
software state of our main Mac system at the time of this review,
we didn't load and test either of these, but would anticipate
that their operation would be very similar to the equivalent programs
on the PC side. Important to note too, that USB is fully supported
on the Mac platform as well, not only for machines with built-in
USB, but apparently also for those with USB provided via a PCI-bus
card.![]()
Test Results
In every Imaging Resource product review, we encourage you to
let your own eyes be the judge of how well the devices performed:
In keeping with our standard policy, the comments here are highly
condensed, summarizing our key findings. For a full
commentary, see the DC265 Pictures
page. (You're also welcome to download the images (for
personal use only) to see how they look when output on your own
printer.)![]()
Overall, we were quite impressed with the DC265: The earlier
DC260 had done a generally good job, but there were a number of
areas that begged for improvement. The first and most obvious
was better responsiveness: Although the 260's buffer memory allowed
two shots in rapid succession, in practice, we found ourselves
waiting for the camera far too much. Many users also clamored
for an uncompressed image-storage mode. While the DC265 still
compresses the image files, even in its highest image-quality
mode, the amount of compression is less, and the image quality
noticeably improved thereby. Much of the experience of the DC265
though, is made up of subtle improvements, which in themselves
would seem insignificant. The sum of them though, is to substantially
improve the "friendliness" (for lack of a better term)
of the camera.![]()
On the image quality front, the DC265 did quite well: You'll
have no qualms about printing its images at 8x10 (well, maybe
6.66 x 10, that being the aspect ratio of the 265's images), and
color was noticeably improved beyond the already-excellent level
of the DC260. Contrast also appears to have been boosted, producing
"snappier" images, but also making the camera more prone
to losing detail in the highlights or shadows. Our personal preference
is for somewhat flatter (less contrasty) images, relying on post-processing
in an image-manipulation program to arrive at the final result.
Setting our prejudices aside though, we note that most people
probably prefer a camera that produces good prints with little
fiddling, and the DC265 fills that bill very well indeed.![]()
Detail and resolution are very good, with visual resolution
of about 700 lines per picture height in both horizontal and vertical
directions. Performance at far field (focused at infinity) is
very good also.![]()
The LCD viewfinder has the dead-on accuracy we've come
to expect from Kodak digital cameras, showing exactly 100% of
the final image area. The optical viewfinder is less so, but still
more accurate than most, a bit more than 90% of the final image.
(Our prototype unit had a "twist" of about 2 degrees
in the optical viewfinder though: We're pretty confident this
is a preproduction, hand-assembly glitch that won't be an issue
in final production models, but feel compelled to mention it,
as we did in fact observe it.)![]()
Low light performance of the DC265 is quite good, the camera
producing very usable images down to a light level of about EV6,
although we observed some artifacts in the image when taking very
long exposures.![]()
Macro performance of the DC265 was quite good also, capturing
a minimum area of 2x3 inches (51 x 76 mm) at the 8-inch (20 cm)
minimum focusing distance. The availability of both Kodak and
third-party filter-thread adapters extends this performance considerably
though, depending only on how much glass (in the form of accessory
macro lenses) you want to hang on the front. (Per our earlier
note, although our tests produced the results just described,
Kodak's official specs for the camera call for a 12 inch minimum
focusing distance, and this is the value readers should count
on in final production units.)![]()
Conclusion
The Kodak DC265 is an evolutionary product, basically an enhanced
version of the groundbreaking DC260, as it's model number indicates.
The impact of a year's worth of user input and feedback is very
apparent though, in the numerous minor enhancements (and some
major ones) relative to its predecessor. The overall package ends
up being more than the sum of its parts, retaining all the capabilities
of the DC260, yet resulting in a much more responsive-feeling
picture-taking tool. It's hard for us to quantify this effect,
but our overall impression was that of a camera that's much more
"comfortable" to use for taking pictures - having all
the capabilities, but removing some of the ergonomic annoyances
we found in the DC260. The DC260 was a huge success for Kodak,
and we expect that the DC265 will be as well.
Reader Comments!
See
what other Imaging Resource readers have had to say about the
DC265, or add comments of your own. (Read
what's here, then add your own!)
This document copyright (c) 1999, The Imaging
Resource, all rights reserved. Visitors
to this site may download this document for local, private,
non-commercial use. Individuals who have themselves
downloaded this page may print a copy on their personal printers
for convenience of reading and reference. Other than this explicit
usage, it may not be published, reproduced, or distributed in
print or electronic and/or digital media without the express written
consent of The Imaging
Resource.