Panasonic DMC-L10 Modes and Menus
Capture Modes: When powered on, the camera is automatically placed into Record mode. The Exposure Mode dial on top of the camera sets the main shooting mode, with the following options:
 Full Auto: This mode places the camera entirely in control of the exposure, though the user can adjust the exposure compensation and determine the flash mode.
 Program AE (with Shift): This mode places the camera in control over both aperture and shutter speed, while the user has access to all other menu functions.
 Aperture Priority: Lets the user control the aperture setting while the camera selects the best shutter speed. (The aperture range varies with the lens in use.)
 Shutter Priority: The opposite of Aperture Priority, allows the user to set the shutter speed, from 1/4,000 to 60 seconds, while the camera selects the most appropriate aperture setting.
 Manual: Provides complete user control over the exposure, including both aperture and shutter speed settings. A Bulb shutter setting also becomes available in this mode, allowing variable length exposures for as long as you hold down the shutter button.
 Custom: Up to three sets of shooting modes and settings can be stored, and are accessed quickly in this mode.
 Scene Mode: Adjusts camera settings (color rendering, flash mode, etc.) to optimize for different subject types: Sunset, Food, Babies (including keeping track of birthdays for two different children, so the Panasonic software can display the child's age along with the photo), and Pets.
 Night Portrait: Allows slower shutter speeds. Balances the foreground subject illuminated by flash with the ambient light of the background. Sub-options include Night Portrait, Night Scenery, Illuminations (outdoor lighting at night), and Creative Night Scenery, which allows changes in the aperture value for special effects.
 Sports: Adjusts ISO and controls shutter speed to freeze fast-moving subjects. Sub-options include Normal Sports (intelligent ISO control & high shutter speeds), Outdoor Sports (the same, but lower ISOs for shooting in good lighting), Indoor Sports (favors higher ISO speeds for indoor lighting), and Creative Sports (allows direct control of shutter speed).
 Macro: This mode is for close-up pictures of small objects, enhancing color in flowers, etc. Sub-options include Normal Macro (closest-subject focus priority), ISO Macro (senses subject movement and boosts ISO as needed to reduce subject blur) and Creative Macro (allows direct control of the aperture setting).
 Scenery: Optimizes settings to produce sharp, colorful landscapes.
 Portrait: Optimizes camera settings to reproduce warm, soft skin tones against a slightly blurred background. Sub-options include Normal Portrait (large aperture and soft skin tones), Outdoor Portrait (compensates for backlighting), Indoor Portrait (intelligent ISO control to prevent blurring) and Creative Portrait (allows direct control of aperture setting).
Panasonic L10 Menus
Pressing the Menu button provides access to the camera's full menu system. The following options are available in most camera modes as menu tabs down the left side of the display. (Full auto mode greatly reduces the available options, to simplify camera operation.)
| Record Menu 1 Options | ||
|
Top-Level
Selection |
Second-Level
|
Notes
|
|
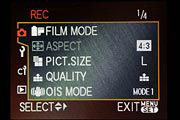
Film Mode
|
- Standard:
- Dynamic: - Nature: - Smooth: - Nostalgic: - Vibrant: - Standard B&W: - Dynamic B&W: - Smooth B&W: - My film 1: - My film 2:
|
Standard setting, no manipulation. Boosts the contrast and saturation. Enhanced Red/Green/Blue Lower contrast Saturation and contrast are both lowered. Saturation and contrast are boosted even more than Dynamic mode. Standard B&W setting, no manipulation. B&W setting, boosts the contrast. B&W setting, smooths the picture while retaining skin texture. Custom film setting 1. Custom film setting 2. My Film settings allow you to change the contrast, sharpness, saturation and noise reduction by five units each, creating two custom presets |
|
Aspect Ratio
|
- 4:3 |
Select normal, film or HDTV wide screen aspect ratios for images. Only available in Live View Mode.
|
|
Picture Size
|
- L
- M - S |
Specifies the pixel dimensions of the pictures you will take.
|
|
Quality
|
- Fine
- Standard - RAW & Fine JPEG - RAW & Std JPEG - RAW (no JPEG) |
Specifies the compression level and file type of images.
|
|
OIS Mode
|
- Mode 1
- Mode 2 - Mode 3 |
Optical Image Stabilizer modes. Mode 1 is continuous, Mode 2 is on when the shutter is pressed, Mode 3 is used when panning.
|
| Record Menu 2 Options | ||
|
Top-Level
Selection |
Second-Level
|
Notes
|
|
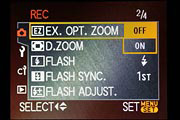
Ex. Opt. Zoom
|
- On
- Off |
When shooting at less than maximum image size, integrates an intelligent digital zoom with the lens' zoom ring, providing a greater zoom range without pixel interpolation. Only available in Live View Mode.
|
|
D. Zoom
|
- Off
- 2X - 4X |
Adds a fixed digital magnification (w/lower image quality) of 2x or 4x. Only available in Live View Mode.
|
|
Flash
|
- Auto Flash
- Auto Flash w/red-eye reduction - Forced Flash on - Forced Flash on w/red-eye reduction - Slow Sync. - Slow Sync. w/red-eye reduction |
Selects the flash mode.
|
|
Flash Sync.
|
- 1st
- 2nd |
Select either first or second shutter curtain sync.
|
|
Flash Adjust
|
- +/-2 EV scale
|
Adjusts flash power higher or lower.
|
| Record Menu 3 Options | ||
|
Top-Level
Selection |
Second-Level
|
Notes
|
|
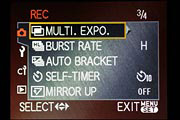
Multi. Exposure
|
- Start
- Autogain (on or off) |
Merges multiple exposures into a single image. If autogain is set on, picture brightness is adjusted according to the number of pictures taken. If set off, exposure will be adjusted to match the subject.
|
|
Burst Rate
|
- H
- L |
High or Low speed burst rate. (3 fps or 2 fps)
|
|
Auto Bracket
|
- Step
- Sequence |
Shoot groups 3 pictures with user selectable EV steps (1/3 to 2 EV between shots) and the sequence of the bracketed shots (under/nominal/over) can also be set by the user.
|
|
Self Timer
|
- 10 Seconds
- 10 Seconds/3 pics - 2 Seconds |
Enables the Self Timer mode.
|
|
Mirror Up
|
- On
- Off |
Mirror locks up prior to a picture being taken for less camera shake with long exposures.
|
| Record Menu 4 Options | ||
|
Top-Level
Selection |
Second-Level
|
Notes
|
|
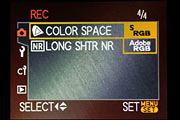
Color Space
|
- SRGB
- Adobe RGB |
Select the color space for images to be recorded in.
|
|
Long Shutter NR
|
- On
- Off |
If enabled, the camera will shoot a "dark frame" for noise subtraction on long exposures.
|
| Playback Menu 1 Options | ||
|
Top-Level
Selection |
Second-Level
|
Notes
|
|
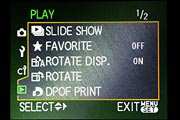
Slide Show
|
- Start
- Duration X Sec. |
Starts the slide show. Duration lets you see each photo for X seconds (1-5) or you can run the slide show manually.
|
|
Favorite
|
- On
- Off - Cancel |
In Favorite mode, you can mark images as your "Favorites", and then choose to show only those images in slide shows.
|
|
Rotate Disp.
|
- On
- Off |
When enabled, if a picture was shot with the camera held vertically, it will be displayed on the LCD vertically.
|
|
Rotate
|
- On
- Off |
Allows you to manually rotate the selected picture.
|
|
DPOF Print
|
- Single
- Multi - Cancel |
Selects pictures for printing on a DPOF-compatible printer.
|
| Playback Menu 2 Options | ||
|
Top-Level
Selection |
Second-Level
|
Notes
|
|
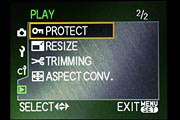
Protect
|
- Single
- Multi - Cancel |
Protect pictures that you do not want deleted. (Note though, that they aren't protected against memory card reformatting.)
|
|
Resize
|
- Displays picture
|
Allows you to resize your pictures. (Only resizes down to smaller sizes.)
|
|
Trimming
|
- Displays picture
|
Lets you crop pictures by zooming in until you have the framing you want, then pressing the shutter button.
|
|
Aspect Conv.
|
- 3:2
- 4:3 |
Lets you change the aspect ratio of 16:9 images.
|

| Custom Menu 1 Options | ||
|
Top-Level
Selection |
Second-Level
|
Notes
|
|
Cust. Set Mem.
|
- C1 |
You can maintain up to 3 separate custom shooting profiles. |
|
AF/AE Lock
|
- AE |
Lock the Auto exposure, Auto Focus or both.
|
|
AF/AE Lock Hold
|
- On
- Off |
Allows you to fix the focus and exposure even if you release the AFL/AEL button prior to the shot.
|
|
ISO Limit Set
|
- Off |
Sets maximum Auto ISO limit or can be set to off.
|
|
Dial Set
|
- Rear dial Exp Comp |
Change which control dial adjusts these settings.
|

| Custom Menu 2 Options | ||
|
Top-Level
Selection |
Second-Level
|
Notes
|
|
Focus Priority
|
- On |
If on, camera will not take a picture until your camera is in focus. |
|
AF Assist Light
|
- On |
When enabled, AF assist light will come when shooting in dim lighting. (Note that the L10 uses its flash head for AF-assist, so you must have the flash raised for AF assist to work.)
|
|
AF + MF
|
- On
- Off |
Allows manual focusing after autofocus is done.
|
|
AF - LED
|
- On |
If on lights a small LED in the AF frame where the subject is focused.
|
|
Live View AF
|
- Phase Difference AF |
Sets which autofocus method to use when using Live View.
|

| Custom Menu 3 Options | ||
|
Top-Level
Selection |
Second-Level
|
Notes
|
|
Pixel Refresh
|
- Yes |
Maps-out bad sensor pixels. Panasonic recommends doing this once a year. |
|
Display Set
|
- Rec. Info, on/off |
Each of these options may be set to on or off. If enabled, they are displayed on the LCD in Live View mode.
|
|
Menu Resume
|
- On
- Off |
If set on, the camera will remember the last menu screen you were using, even if the camera is turned off.
|
|
Shoot W/O Lens
|
- On |
If set on, you can activate the shutter button without a lens mounted.
|

| Setup Menu 1 Options | ||
|
Top-Level
Selection |
Second-Level
|
Notes
|
|
Clock Set
|
- Hr/min/M/D/Y |
Sets cameras time and date. |
|
World Time
|
- Hr/min/M/D/Y |
Sets cameras time and date for a particular location.
|
|
Monitor
|
- Monitor brightness
- -3/+3 adjustment |
Darken or brighten the LCD monitor.
|
|
LCD Auto
|
- On |
When set to on, when taking pictures with the optical viewfinder, the LCD monitor will turn off when the shutter button is pressed halfway.
|
|
Auto Review
|
- Off |
Selects the time that an image is displayed on the LCD monitor after the picture is taken.
|
| Setup Menu 2 Options | ||
|
Top-Level
Selection |
Second-Level
|
Notes
|
|
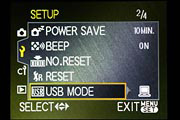
Power Save
|
- Off |
Turns camera off after a specified period of inactivity. |
|
Beep
|
- On |
Sets the beep for the focus confirmation, self-timer and the alarm.
|
|
No. Reset
|
- Yes
- No |
Resets the file numbers.
|
|
R. Reset
|
- Yes |
Resets most menu options back to their default settings.
|
|
USB Mode
|
- Select on connection |
Selects how the camera connects with your computer or printer.
|
| Setup Menu 3 Options | ||
|
Top-Level
Selection |
Second-Level
|
Notes
|
|
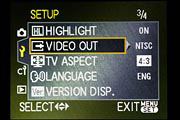
Highlight
|
- On |
If on, any blown highlight areas will blink when the image is played back on the LCD screen. |
|
Video Out
|
- NTSC |
Selects video output signal timing (NTSC for the US & Japan, PAL for most of the rest of the world.)
|
|
TV Aspect
|
- 16:9
- 4:3 |
Matches the video output's aspect ratio to that of your TV.
|
|
Language
|
- English |
Select the menu language.
|
|
Version Disp.
|
- Body Firmware |
Displays the version of firmware the body and lens have.
|
| Setup Menu 4 Options | ||
|
Top-Level
Selection |
Second-Level
|
Notes
|
|
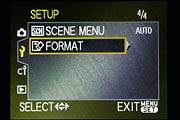
Scene Menu
|
- Off |
Chooses whether or not the sub-option menu automatically appears when the camera is switched into one of its scene modes. |
|
Format
|
- Yes |
Formats the memory card.
|
 Fujifilm GFX 50S Review
 Fujifilm X-T3 Review
 Olympus E-M5 III Review

Follow Imaging Resource