![]() Back to Full Minolta Dimage Scan
Speed Review
Back to Full Minolta Dimage Scan
Speed Review
Go to Dimage Scan Speed Pictures Page
Up to Imaging Resource Scanners Page
|
Original Review Date: January 31, 1999 |
 |
|
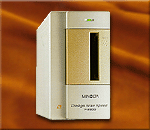
High-end "personal" film scanner |
|
|
2820 dpi resolution (32.5 meg file from 35mm neg!) | |
|
|
12 bits per channel, 3.6 Dmax specification | |
|
|
High-speed SCSI interface (card included | |
|
|
Software accommodates beginners AND experts | |
|
|
Optional APS adapter |
Overview
Minolta is a company with long experience in the world of film,
and extensive digital expertise that has so far been applied primarily
in the areas of office electronics and imaging (copiers &
printers). Recently though, they've been making significant waves
in the digital camera and scanner markets, with their highly capable
(and expandable!) Dimage EX 1500 Zoom digital camera, and a whole
line of film scanners covering everything from APS to 35mm, to
medium-format photography. We'll be reviewing the full range of
the Dimage scanners, beginning with the Dimage Scan Speed that's
the subject of this review.![]()
The Minolta Dimage Scan Speed film scanner is quite a bit more
capable than some of the "personal" film scanners we've
reviewed in the past, positioned at the upper end of the "enthusiast"
market with a list price as of this writing of $1,299. In many
respects, its capabilities reach into the lower end of the "professional"
market. We see it fitting the needs of users ranging from well-heeled
photo enthusiasts, to businesses and professional photographers
looking for top performance on a budget. In support of this market,
we found the Dimage software did a particularly good job of providing
the power demanded by pros, while remaining very approachable
for the amateur.![]()
"High Points" Overview
The Basics
The Dimage Scan Speed is a desktop device about the size of a
hefty novel standing on edge. (The long side down.) It measures
3.6 x 6.3 x 10.7 inches (90.5 x 160.5 x 272 mm), and weighs about
4.4 pounds (2 kg). Interface to the host computer is via a high-speed
SCSI-2 interface, meaning you'll need to have such a port installed
in your computer to use it. (Macs typically come equipped with
SCSI connections: On a Windows machine, you'll need to have an
interface card installed. Appropriate cards range from $100 to
$300 in price. The manual lists a number of Adaptec SCSI cards
from the 1500 and 2900 series that are suitable. The only restriction
seems to be that the 1500-series boards don't work with NEC PC98xx
computers.) The standard unit can scan 35mm negatives or slides,
in either black and white or color. An optional APS adapter is
available for scanning that film type.![]()
The software CD shipped with the unit supports both Mac and Windows
platforms. Standalone scanning applications are provided for both
platforms, as well as a Photoshop acquire plug-in for the Mac,
and TWAIN drivers for the PC. (NOTE: Minolta specifies that the
scanner requires either Windows '95 release 2 (OSR2), or Windows
'98. If you're running Windows '95, be sure to check the revision
level you have installed.)![]()
Scanning resolution can be as high as 2820 dpi (a 2700-element
CCD covering the width of a 35mm slide or negative). This produces
maximum image sizes of 2688x4032 pixels for 35mm (32.5 megabytes),
or 1920x3328 for APS (19.2 megabytes).![]()
A note about scanner resolution, as compared to that of digital
cameras: The 10.8 megapixel resolution of the Dimage Scan Speed
is even higher than you might expect, when compared to the resolution
of a digital camera. Because the scanner's CCD samples each pixel
in all three red, green, and blue color channels, it's really
equivalent to a digital camera with a 32 megapixel sensor and
"striped" color filters. Thus, the first thing most
people notice about images scanned from negatives and slides is
the extraordinary level of detail captured. That said, the Dimage
Scan Speed's scan resolution of 2820 dpi is at the top of the
field for 35mm/APS scanners.![]()
Another important scanning parameter is "bit depth,"
a measure of both color accuracy and the maximum density range
the scanner can recognize. (8 bits per channel is good, 10 better,
and 12 the best you'll commonly find in desktop scanners.) The
Dimage Scan Speed captures a full 12 bits per pixel.![]()
Scanner Optics & Light Path
Film scanners tend to take one of two approaches in their optical
design, providing either fixed or adjustable focus. The Dimage
Scan Speed employs fixed-focus optics. Given the extreme resolution
of most film scanners, we're surprised that the lenses can be
designed with enough depth of field to insure sharp focus in the
face of minor variations in the film plane position. We're surprised,
but the fixed-focus approach nonetheless seems to work quite well,
as evidenced by the performance of the Dimage Scan Speed. The
upside of fixed-focus designs of course, is that you don't have
to worry about focusing, either in the form of twiddling a thumbwheel,
or by waiting while the scanner adjusts its focus for every scan.
In our testing, the Dimage Scan Speed produced sharp images every
time, the sole exclusion being one orientation of our unusual
"USAF 1951" resolution target, which is a glass slide
with the pattern deposited on one side of it. With the pattern
facing one way, we got sharp results, but decidedly blurry ones
with it facing the other. We saw no evident focus deficiencies
while scanning normal slides or negatives.![]()
The Dimage Scan Speed uses a special fluorescent light source,
producing strong spectral peaks in the red, green, and blue portions
of the spectrum. We observed that this diffuse illumination source
produced somewhat "softer" scans than some other scanners.
The resulting scans had less of a razors-edge on fine detail,
but were also much more forgiving of film defects and film grain.
A good analogy (for those old darkroom aficionados out there)
would be the difference between condenser and diffusion enlargers:
The condenser optics tend to produce sharper images, but at the
cost of greatly enhanced grain, while diffusion enlargers create
a softer look. Note in this though, that while the scans produced
by the Dimage Scan Speed have a somewhat "softer" appearance
to them, they in fact appear to carry an extremely high level
of detail, as evidenced by the results from our WG-18 (ISO-12233)
resolution target scans. ![]()
Film Handling
The Dimage Scan Speed uses plastic slide- and filmstrip-holders
to carry the film to the scanner: You first place the media to
be scanned into the holder, then insert the holder into the scanner.
The holders have detent notches on them that provide repeatable
film positioning, and yet allow for manual advance of the film
between frames. During scanning, the holder and film is moved
past a fixed CCD array. The filmstrip holder can accommodate strips
of 35mm film up to six frames in length, and the slide holder
up to four slides. Both holders are reversible, a necessary feature
for their use: Inserted into the scanner, you can access half
of the total film frames by sliding the adapter in or out. To
reach the remaining frames, you remove the adapter, flip it end
for end, and reinsert it.![]()
We found both the slide and film holders to be quite effective
and easy to use. The film adapter is hinged, but only to the extent
that a plate flips up to expose the recess into which the film
is laid. (Unlike many "clamshell" designs, the slot
holding the film is a fixed structure.) The back pressure plate
then hinges back down and latches, clamping the film flat. This
arrangement did a particularly good job of handling curled or
damaged film, regardless of whether the film was curled side-to-side,
or along its length. The film-holding slot is about a half-millimeter
wider than the film itself, doing a good job of constraining the
film position, yet still allowing minor adjustments to be made
for fine alignment relative to the limits of the scanning area.
We did find that the filmstrip holder crops the 35mm frame very
slightly, about 3% in both vertical and horizontal directions
by our reckoning. (For some reason, this appears to be a common
characteristic of strip-film holders.)![]()
The slide holder is also constructed of plastic, with four slots
along the top edge into which the slides may be loaded. The edges
of each slot set absolute limits for the horizontal position of
the slide mount, but there's a bit more play (about a full millimeter
side-to-side) with slides than is present in the filmstrip adapter.
This is probably a good thing, as it allows you to correct for
film misaligned in its mount: You can manually tweak the slides
to achieve about two degrees of rotation in either direction,
as needed. (Despite this looseness, we had no difficulty aligning
slides square to the holder, as the edges of the "windows"
in the holder provided good reference surfaces to align to, and
simply "bottoming out" the slide in the slot yielded
good alignment if the film was properly positioned in the slide
mount.) The slide holder is also a little unusual in the way that
the slides "float" between two sets of spring-loaded
fingers. This seemed to do a good job of keeping the film plane
well-centered about the point of optimum focus. The centering
fingers gripped a particularly thick plastic-and-glass slide mount
quite a bit more firmly than they did standard cardboard ones,
but handled a wide range of mounts well.![]()
System Interface and Included Software
The Dimage Scan Speed uses a SCSI-2 connection to the host computer,
providing the high speed data transfer necessary to handle the
large amounts of data the scanner can generate. No SCSI card is
included with the unit, but Minolta lists several models of Adaptec
cards that the unit can be used with. (Adaptec is pretty much
the standard for SCSI cards: You can find cheaper ones, but the
Adaptec models are more likely to be compatible with a wide range
of equipment. Note in particular, that some scanners, CD-ROM drives,
and other equipment ships with low-cost SCSI cards included. In
many cases, these are "dedicated" cards, that will only
run the particular device they're shipped with. If you're buying
a card to support the Dimage Scan Speed, take our advice and get
a "name brand" Adaptec unit. The hassle you'll save
will be more than worth it!)![]()
Once connected to the computer, the Dimage Scan Speed is controlled
through an excellent software interface that we'll describe in
greater detail below. As noted earlier, the scanner-control software
takes the form of standalone applications on both the Mac and
PC, as well as a Photoshop plug-in on the Mac, and a TWAIN component
on the PC. A particular strength of the Dimage software is the
extent to which it provides powerful controls for experienced
users, while at the same time offering a simple interface for
novices.![]()
A nice touch in the Dimage Scan Speed package was the inclusion
of Adobe's Photoshop LE, for both Mac and Windows. Photoshop LE
is a slightly trimmed-down version of the full Photoshop package,
the primary omissions being support for color spaces other than
RGB (such as CMYK, for commercial offset printing), and less in
the way of color management. At one time, it was quite common
to find Photoshop LE or even a full version of Photoshop bundled
with many scanning devices. The combination of policy changes
at Adobe (implemented in the form of radically higher prices to
their bundling partners), and ever-tightening margins and declining
retail prices in the scanner market have all but eliminated Photoshop
from the "bundle" market. We applaud Minolta's inclusion
of this program with the Dimage Scan Speed though: We suspect
that many potential purchasers of the Scan Speed will be upgrading
their imaging capability with the acquisition, and won't already
have a copy of Photoshop. While trimmed-down somewhat from the
capabilities of the full version, Photoshop LE is a dramatic step
up from the "dumbed-down" interface and capabilities
of Adobe's PhotoDeluxe, a much more common software bundle component
these days. Don't get us wrong, PhotoDeluxe is an excellent program,
but is clearly targeted at the casual user. Even at that though,
we've long felt that removing key features such as the "levels"
control is no gift to the end-user. While it may make the program
easier to use, such simplification ultimately leaves users at
a dead end, with nowhere to go as their skills and abilities improve.
Photoshop LE is adequate to the needs of most semi-pro users,
and will provide the full range of capabilities that most users
will need to achieve the best results. Flame off for now, but
repeated kudos to Minolta for taking the cost hit and including
Photoshop LE with the scanner. One parting shot: You can't buy
Photoshop LE, only the full version of Photoshop, which routinely
sells for well over $500. Given that the LE version will be enough
for the majority of users, the argument could be made that its
inclusion in the Dimage Scan Speed bundle will save many people
$500 or more. This fact alone is a significant differentiator
for the Minolta's product.![]()
Speeds and Feeds
As its name suggests, the Dimage Scan Speed is intended to be
a fast scanner. In our testing, we found that it did indeed zip
along pretty quickly. This appeared to be due partly to the basic
mechanism and electronics (which moves the film and digests the
data rapidly), and partly to the fixed-focus optics: When you
tell the unit to begin scanning, there's no delay for focus adjustment
before the scan starts. The unit does make one pass over the negative
or slide first though, to determine an autoexposure level, a process
that takes 4-5 seconds. Scanning throughput was quite good with
the unit, helped by the flexible, easy-to-use software, but also
by the fast scan times themselves. (We haven't in the past explicitly
measured preview and scan times, so won't have comparable numbers
for many scanners we've previously tested. From this point on
though, we'll begin measuring these throughput-related timings
on a routine basis...) Running the Dimage Scan Speed from an Adaptec
SCSI card on our 350 MHz Pentium-II Windows machine, we measured
the following scan times:
|
|
|
|
Preview w/autoexposure: |
20 seconds |
|
Preview w/o autoexposure: |
16 seconds |
|
Low res (~600dpi) full-frame scan: |
21 seconds |
|
Full res (2820 dpi) full-frame scan: |
44 seconds |
Operation and User Interface
Other than the actual scans themselves, most of the story to be
told about a film scanner has to do with the software that drives
it, and to what extent the combination of hardware and software
makes it easy to produce good-quality scans. Accordingly, we'll
devote a sizable of this review to talking about the software
that drives Minolta's Dimage family of scanners, and the Dimage
Scan Speed in particular.![]()
As noted several times already, we feel that Minolta has done
a particularly good job of balancing capability with ease-of-use.
This is a difficult equation to optimize, as the needs of "beginners"
and "experts" can vary so widely. At the same time,
the goal should be to provide a smooth gradation of capability,
not introducing any abrupt hurdles to overcome as the users advance
in their sophistication. Minolta has accomplished this difficult
design goal by providing very basic, visually-oriented contrast/brightness
adjustments for neophytes, while at the same time offering fairly
sophisticated histogram and tone curve controls for those comfortable
with more complex adjustments, and who need the control they provide.![]()
As we write this, we're still searching for our "formula"
that works best for scanner reviews, but are generally settling
on a format in which we step through the scanner controls in the
approximate order that a user would encounter them. (For a more
complete walk-through of scanner operation, check out Minolta's
excellent web site for their scanners: They've put together a
comprehensive "on-line demo" of how the software works.)![]()
The Preview Screen and Command Window
The most basic options and functions of the Dimage Scan Speed
scanner are controlled via the Command window, shown below. The
Command window contains two list boxes, two status displays, and
a total of ten buttons, which we describe below, moving from left
to right, top to bottom in the screen shot: (NOTE: This and
all screen shots following have been scaled-down to better fit
the 'web page -- The actual screens are larger and much more readable!)

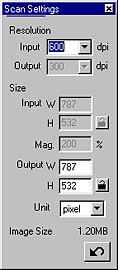 Scan Settings Button -
Brings up the Scan Settings window (shown at right), where you
can manually adjust the input and output scan resolutions and
set the units you want to work in (pixels, inches, or cm). NOTE
that you can't set the resolution values when your units are
set to pixels, as in the screenshot at right.
Scan Settings Button -
Brings up the Scan Settings window (shown at right), where you
can manually adjust the input and output scan resolutions and
set the units you want to work in (pixels, inches, or cm). NOTE
that you can't set the resolution values when your units are
set to pixels, as in the screenshot at right. Preferences Window
The preferences window (not shown) controls a number of overall settings governing
scanner operation. Most people will rarely need to visit this
screen, as the default settings will suffice for many applications.
About the only control you're likely to need to change with any
regularity is the one for Color Depth, and even then, the non-default
settings are likely to be useful to only a small cadre of advanced
users. Herewith the Preferences functions:
APS Settings - not having had the APS attachment to play with, we didn't have an opportunity to experiment with these, and the main manual offered no description. Below are our "best guesses" as to what they do:
Prescan Window
This window (shown below) is "home base" for the scanning
process. From here, you'll launch off into other functions within
the software, to adjust color balance, contrast, or tonal range.
Controls here also adjust preview orientation, data readout, and
exposure parameters for sequential scans. See the text following
the screen shot for a description of the individual buttons and
controls.
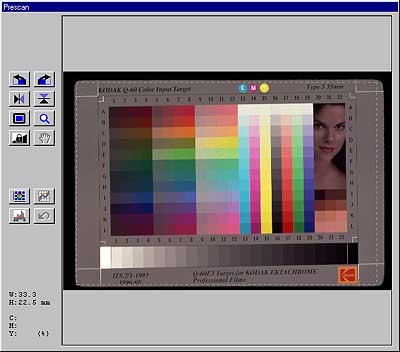
Here are the Prescan Window controls, reading from left to right
and top to bottom, for all the buttons down the left-hand side
of the screen:
Orientation and Viewing Controls
Image Adjustment Controls
(Buttons in this group take you to other screens, to adjust the
scan settings.)
Readouts/Information Displays
At the bottom left-hand corner of the Prescan window, there are
two sets of readouts, one showing the dimensions of the current
cropping frame, in mm, and the other the RGB (or CMY) values of
the point under the cursor in the preview window.
Variations Adjustments
It's often difficult for novices to decide what to do to an image
to make it look better. More contrast? Less brightness? A little
of both? Frequently, after playing with an image for a few minutes,
you end up with something that looks worse than when you started!
Yet, even the rankest amateur can generally tell whether picture
"A" looks better than picture "B". Taking
advantage of this, Minolta offers a "Variations" tool,
as shown in the screen shot below. Here, the current contents
of your cropping frame are displayed in the center of a matrix
of images, with those around the edges of it representing the
effects of more or less contrast or brightness. (Contrast variations
run vertically, brightness variations horizontally.) If you decide
you like one of the variations presented more than the current
image, just click on it: It becomes the new reference sample,
and the variations adjust to reflect changes relative to the new
center image. By continuing to click on the image that you like
best, you can quickly home in on the optimum brightness/contrast
setting.![]()

After you've set the contrast and brightness, you can then
correct the overall color balance of the image, by adjusting the
R, G, and B slider controls at upper left. Always wait to adjust
the color until after you've made the brightness & contrast
changes though, as you'll frequently find that perceived color
problems diminish once the brightness and contrast are properly
set.![]()
The "Variations" screen also has a button that enlarges
the current selection to full-screen size, making it easier to
assess the current picture quality. We felt that this feature
was marred slightly by the fact that the enlarged image is only
a pixel-replicated copy of the original area, which can lead to
rather pixelated images if your cropping frame is small relative
to the overall film area.![]()
Histogram Adjustments
As we noted earlier, Histogram adjustments are by far our preferred
method for quickly correcting tone and color problems in digital
images! For those not familiar with histograms though, a brief
explanation would probably be in order.![]()
A histogram is simply a graph of how many pixels in an image have
each possible brightness value. A large peak on a histogram graph
means there's a lot of pixels (a large area) with roughly the
same brightness values. Likewise, if the histogram curve is near
zero, it means relatively few pixels have those brightness values.
To understand how this helps image adjustment, we've included
a couple of sample images at right, showing two images set up
with different brightness and contrast settings, and the histograms
associated with each.![]()
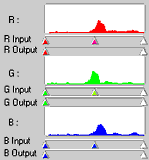
 Dull, flat image has a compressed histogram, with no information above the midtone level in any channel. |
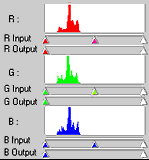 |
In the first sample, we have a rather low-contrast, dark image. Low contrast means that there's not a great deal of difference in the brightness values between the brightest and darkest pixels. "Dark" means that the bulk of the pixels in the image have fairly low brightness values. In the histogram curves for this image, note how the right-hand side of the curves (high brightness values) are flat, because there aren't any pixels with those brightness values. Also, note how the histogram curves occupy a fairly small amount of the horizontal space allotted to them.
 Well-balanced image shows full range of tonal values in histogram, in all channels. |
 |
By contrast (no pun intended!), observe the image above: Contrast
and brightness are about right, and the results are readily evident
in the histogram curves for it. Notice how the curves occupy much
more of the available horizontal space, meaning that pixel values
are spread much more evenly across the available tonal range.
Notice too, how you can even tell about color balance from histogram
displays. Notice the large "hump" near the middle of
each curve? What object in the image do you suppose this large
group of pixel values corresponds to? (It's the background.) Now,
if we want the background to be a neutral gray, what do you suppose
the display would look like. (The peaks in red, green, and blue
would all line up with each other, meaning that the average R,
G, and B values would be about the same.) Can you guess how the
color balance needs to be adjusted to achieve this?![]()
Notice the sliders under the individual histogram curves. These
are used to set the brightness values the scanner will consider
to be the minimum (black), maximum (white), and a middle value
(gray), for each of the color channels. If you move the "black"
slider up from the leftmost position, you're telling the scanner
to treat that value as "zero" for the color channel
involved. Any values darker than that will also be treated as
zero, and values brighter than it will be proportionately stretched
downward so that the brightness values will extend smoothly down
to zero. Likewise, the "white" slider on the right sets
the value that will be considered as a maximum, and mapped to
a digital value of 255. Anything brighter will also be set to
255, and darker values will be "stretched" smoothly.
The middle slider sets the value that the scanner will put in
the middle of the brightness scale (the "50%" point).
Anything brighter than the level set by the slider will be made
brighter than 50%, anything darker will be made darker. Thus,
to lighten the image overall, you'd move this slider to the left,
so that more of the brightness values would be pushed above the
50% point. (This all sounds more complicated than it is: You'll
figure out what the sliders do after just a couple of minutes
of playing around.)![]()
The histogram screen includes "before" and "after"
previews, and a number of controls for adjusting the image. At
middle left are three of the most immediately useful tools, the
eyedroppers for setting white, black, and gray points. If you
select the black eyedropper button, and then click on a point
in the left-hand preview window, that point will be set as the
"black" point, and the individual red, green, and blue
black-point sliders will all adjust automatically to make it so.
Likewise, selecting the white eyedropper button and clicking in
the left-hand preview window will set that point as the "white"
point, moving the red, green, and blue white-point sliders as
needed. (Anyone want to guess what the gray eyedropper button
does?) In practice, you'll find that the eyedropper controls offer
a very quick way to color-balance many problem images in a matter
of seconds.
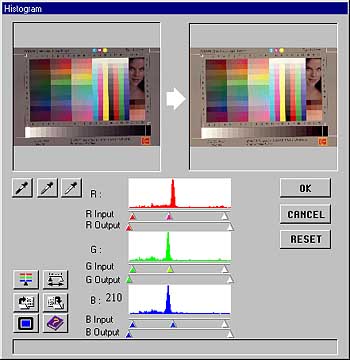
Part of the beauty of the Dimage Scan's histogram screen is
the way it shows histograms for all three color channels separately,
yet also allows you to operate on all the channels at the same
time, if you wish. By default, you can adjust any of the slider
controls independently of any other. What if you want to make
an overall adjustment to the image as a whole, though? In the
lower left-hand corner, the button with the three colored bands
on it is the "RGB synchro button." Clicking this button
locks the sliders for the red, green, and blue histograms together,
so that moving any one of them moves the sliders for the other
two colors the same amount.![]()
The other control buttons in the lower left-hand corner let you
see the effects of your adjustments on the histogram, as well
as save and retrieve complete sets of adjustments once created.
This last ability is a particularly welcome one, as many lower-end
scanners don't permit you to save adjustments for later use. Often,
we find ourselves wanting to save a group of settings before engaging
in further experimentation, so we have a known good point to return
to if our twiddling goes awry. Also, you may have a group of photos
shot under similar conditions that would all benefit from the
same treatment.![]()
One odd point about saved and subsequently recalled histogram
corrections though: When the DSS Scan software applies a previously
saved correction to an image, it does so on top of whatever correction
may currently be in effect. Thus, the effects of recalled corrections
are cumulative with any you've already applied. If you want to
return to a prior state, you'll need to reset all corrections
(using the Reset button) before applying the saved settings. (This
isn't any sort of a problem, but was different than how we expected
the saved settings to work. We're passing the information along
here to hopefully save our readers a few minutes of puzzlement
when they encounter the behavior for the first time.)![]()
A full treatment of histogram-based tonal adjustments is far beyond
the scope of this review, but we encourage users to spend some
time playing with the controls on this screen: They're simple
to master, but quite powerful to use.![]()
Tone Curve Adjustments
The tone curves window (shown below) offers a set of controls
that are at once easier to understand than those of the histogram
display, yet considerably less straightforward to apply effectively.
Even here though, minor tweaks by Minolta contribute greatly to
ease-of-use.![]()
In concept, tone curve controls are as simple as can be: They're
nothing more than a graph of output brightness values against
input brightness values. Essentially, they say "whenever
you see brightness 'x', replace it with brightness 'y'. The input
brightness values (those of your original image) are arranged
along the horizontal axis of the graph, and the output values
(those your image will come to assume) are arranged along the
vertical axis. Again, the easiest way to understand how a tone
curve works is to play with one. A little experimenting will reveal
that a steeply sloping curve produces high contrast, while a flatter
one produces less. Likewise, a curve bulging upward results in
a brighter image overall, and one drooping downward makes for
a darker one. The Dimage Scan software lets you adjust either
the overall RGB curve, or each of the color channels (red, green,
and blue) individually.
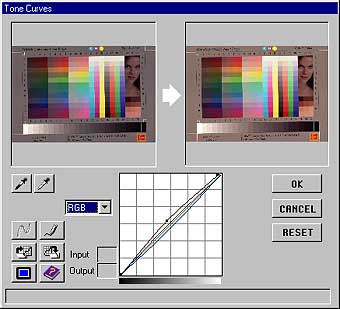
Tone curve controls let you adjust parts of the tonal scale,
without affecting others. As such, they're more powerful than
the histogram controls, but you have less feedback as to what
parts of the image you're affecting, and it's much easier to get
lost in your adjustments with them. Experienced graphics professionals
rely on tone-curve adjustments almost exclusively though, because
they provide such a high degree of control over the tone and color
balance of images.![]()
The tone curve controls in the Dimage Scan software work like
those of most any high-end image editing program: You can click
any point on the curve and drag it, and the rest of the curve
will bend smoothly to pass through the point you've defined. You
can set multiple control points by clicking on more than one part
of the curve. You also have the ability to draw your own curve,
using a pencil tool, allowing you to create abrupt discontinuities
if desired. Minolta added a unique twist to the tone curves though,
in the form of white and black-point eyedropper controls, which
work in the same way as the equivalent controls on the histogram
screen. While a seemingly minor point, the eyedroppers can quickly
make gross adjustments in the overall tone and color balance,
and provide a good jumping-off point for your own finer adjustments.
Test Results
As always with Imaging Resource reviews, we encourage you to let
your own eyes be the final judge: Look at the sample images, download
them, print them out on your own printer, and decide for yourself
how well the Dimage Scan Speed would meet your requirements!![]()
Overall, the Dimage Scan Speed turned in a very competent performance,
easily besting the current crop of "consumer" film scanners
in most areas. (As you'd expect from a scanner selling for $1,299,
vs as little as $300 for the low-end devices.) Particularly when
compared to the digital cameras that constitute the other major
review focus of this site, readers are bound to be impressed with
the incredible amounts of detail a scanner like the Dimage Scan
Speed can extract from a slide or negative.![]()
We found that the Dimage Scan Speed produced very good scans with
the default settings, and excellent ones with only minor tweaking
of the scan controls. On the PC, the default settings tended to
produce slide scans that were slightly dark, but a minor bump
of the midtone point using the histogram control would quickly
bring the overall tone into a reasonable range. By comparison,
scans of color negatives were a bit light, but a minor drop of
the midtone point tended to quickly compensate. Color balance
overall was quite good, although by default, the scanner tended
to add a bit of magenta to things (red and blue together). We
suspect this might be an attempt to compensate for typical computer
monitors, which tend to have a very bluish white-point, frequently
as high as 9300K. Again, it wasn't too difficult to compensate
for this tendency, and the ability to save and recall sets of
tone and color corrections was a valuable feature. Overall color
accuracy was excellent, with color saturation just a notch away
from the very best we've seen to date (January, 1999). We did
notice a tendency on the transparency (slide) shots to undersaturate
greens somewhat, though...![]()
Resolution of the Dimage Scan Speed was excellent, but hard to
"call" based on our standard test targets. The reason
for this is that an unusually low level of "aliasing"
had us convinced we could easily see discernible detail in the
WG-18 target all the way out to 1800 line pairs per picture height
in both horizontal and vertical directions. This doesn't make
sense, given that there are only 2600 pixels vertically in the
resolution-target image, meaning we really "shouldn't"
be able to see anything beyond about 1300 line pairs/picture height.
Nonetheless, the scanner clearly resolves the target out to 1400
lp/ph, and a good bit beyond. (Note that the slight cropping the
scanner did to the 35mm frame wouldn't be nearly enough to produce
the increase in apparent resolution we observed.)![]()
The USAF resolution target gave (as usual) more conservative resolution
figures, with the scanner resolving cleanly down to 35.9 line
pairs/mm, (912 line pairs/inch), and with some aliasing, down
to 45.8 lp/mm (1163 line pairs/inch). With natural subjects, the
scanner's fluorescent light source produced a somewhat softer,
less grainy look than some other units we've tested, although
there seemed to be no loss of detail information in the scans
associated with this softer "look".![]()
See for Yourself!
Take a look at the test images from the Dimage Scan Speed, download
them, print them out, and see if this scanner meets your needs!![]()
Conclusion
In the Dimage Scan Speed, Minolta has crafted a combination of
capabilities and software features into a unit that produces good
image quality with a minimum of tweaking. Even better, when it
does come time to manipulate color and tone, the software controls
provide a full range of capabilities, satisfying users ranging
from rank amateur to experienced![]()
Reader Comments!
See what other
Imaging Resource readers have had to say about the Dimage Scan Speed,
or add comments of your own. (Do you have a Dimage Scan Speed? Share your experience!)
Read what's here, then add your own!![]()