Canon EOS-10DCanon revamps their hugely popular D60 SLR, with ahost of improvements and a dramatic price cut!<<Executive Overview :(Previous) | (Next): Viewfinder>> Page 3:DesignReview First Posted: 02/27/2003 |
Design
With a control layout and body design similar to the earlier EOS
D30 and D60, Canon's latest in the"Compact" EOS line of digital cameras,
the EOS 10D, also carries forward the same body style as the film cameras with
which it shares the EOS name. Photographers already accustomed to EOS film cameras
will find the transition to digital much easier with these digital models, as
the camera's layout is very similar. With a weight of some 2.05 pounds (932.6
grams) or so with the batteries and flash card, but minus the lens, the 10D
has a bit more heft than the D60, perhaps due in part to the addition of metal
body panels to more parts of the camera. This makes it the heaviest of the "consumer"
digital SLRs, tipping the scales relative to the Fuji S2 Pro, the Nikon D100,
and the Sigma SD9. Still, it doesn't feel at all heavy in the hand, is well-balanced,
and certainly a lot lighter than the "industrial strength" Canon EOS-1D
and 1Ds. Along with its greater heft though, the 10D conveys a much greater
sense of ruggedness than the D60, thanks in large part to the extensive use
of metal body panels throughout. Both the D60 and the 10D have metal internal
frames, but the D60 used a good deal of plastic in its outer body covering.
On the 10D, most of this has been replaced with metal. Despite the increase
in weight and a slightly different body styling though, the EOS-10D measures
almost exactly the same as its predecessor, being only couple tenths of a millimeter
wider and about a millimeter taller than the D60. Body dimensions of the 10D
are 5.9 x 4.2 x 3.0 inches (149.7 x 107.5 x 75 millimeters).
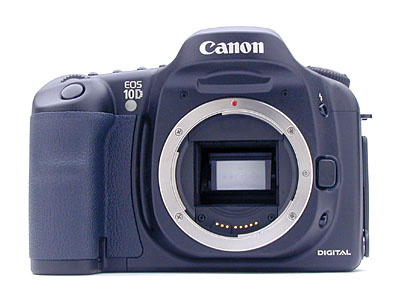
The front of the camera features a standard Canon EF lens mount. There's also the lens release button, a depth of field preview button (on the lower left of the lens mount as viewed from the rear), a flash head release button (on the upper left of the lens mount) and the redeye reduction lamp/focus illuminator light (the frosted window at upper left in the view above).
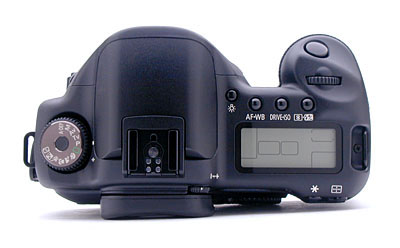
The top of the camera features the Shutter button, Mode dial and a small status display panel that reports most of the camera's settings. An LCD Illuminator button next to the status display panel backlights the display for better viewing in dark shooting conditions. Also on top are the Main dial and several control buttons (Metering Mode / Flash Exposure Compensation, Drive Mode / ISO, and AF Mode / White Balance). The top of the camera also contains a hot shoe for mounting an external flash unit. The hot shoe has the usual trigger terminal in the center, as well as four other contacts for interfacing to Canon EX Speedlite flash units, and hole for a locking pin to prevent rotation of the speedlight. Fixed neck strap eyelets are located on both sides of the top panel as well.
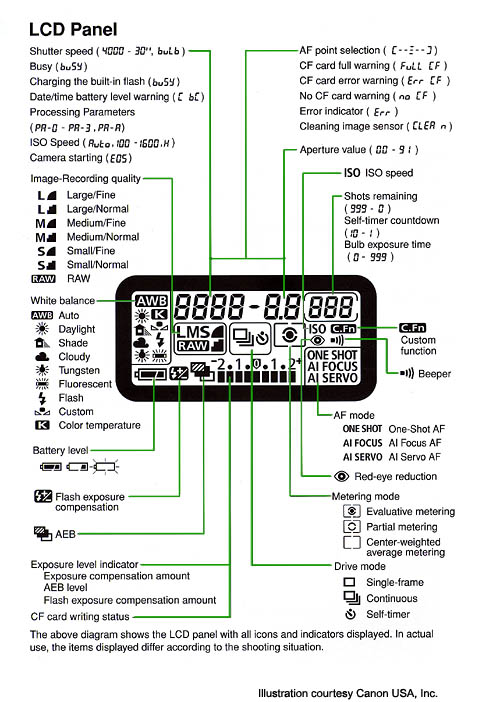
The top-panel data readout conveys a wealth of information about the current status of the camera and its settings. Here's an illustration showing all possible segments and icons and their interpretation:
On the hand grip side of the camera, towards the rear of the handgrip is a large door which slides back and out to reveal the CompactFlash slot (which supports Type-I and Type-II cards, including the IBM MicroDrive). Inside the compartment, underneath the CompactFlash slot is a small gray eject button for removing the card. A small hole in the compartment door allows an LED to shine through, showing when the camera is accessing the card.

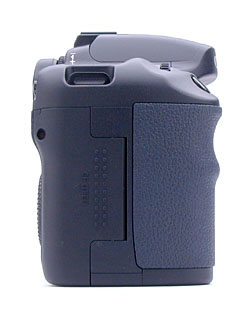
The opposite side of the camera features a hinged rubber flap covering the digital (USB) and Video Out sockets. Below this are two more sockets, likewise protected by a rubber flap. The forward of these sockets is a standard PC flash sync terminal, while the rear socket is for an N3 remote control. (While the large flap does a good job of sealing the digital and video sockets against dust and moisture, I found it a little tricky to get its various projections and dimples properly seated after having it open. To really protect the sockets, you'll have to exert extra care to get the flap firmly seated on all sides.) This picture also shows the Depth of Field Preview button (bottom) and Flash Pop-up button (top) on the side of the lens mount a little more clearly.
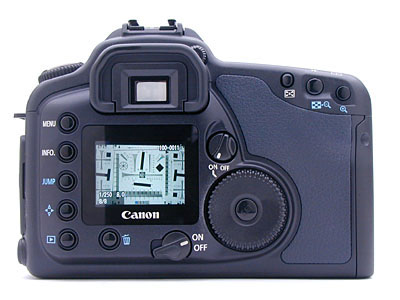
The rear panel of the EOS 10D is home to the bulk of the camera's controls, as well as the large, bright LCD screen. Beneath the LCD monitor's lower right corner is the main power on/off switch. Lining the left side of the LCD monitor are several buttons related to menus and playback, including the Menu, Info, Jump, Direction, and Playback buttons. Underneath the LCD screen is the Delete button, and to the right of the screen is the Quick Control dial, in the center of which is the Set button. Above and to the left of the Quick Control dial is the Quick Control Dial switch, which enables or disables the Quick Control dial. The Set button in the center of the Quick Control Dial acts as a menu selection button. On the top right corner of the optical viewfinder is the diopter adjustment knob, recessed slightly to prevent accidental changes, and featuring a ridged surface to give grip. Finally, the top right corner of the rear panel features the Assist, AE/FE Lock / Index, AF Point / Enlarge buttons. After testing as many Canon cameras as I have, I think I'm finally coming to terms with the Quick Control dial. - While Canon has always seemed exceptionally proud of this control device, at first approach, I didn't like it at all. Now, five or six camera reviews later, I've actually become quite attached to it, really appreciating how quickly you can use it to navigate the 10D's menu structure. Consequently, for any photographers who might share my initial reaction to it, I'd suggest that you give it a fair chance, and try living with it for a while before dismissing it as unwieldy.

The very flat bottom of the camera reveals the metal tripod mount, as well as the cover for the CR2025 clock-backup button battery, and the main BP-511 Lithium Ion battery chamber cover. The main battery compartment cover is removable, necessary when installing the optional portrait grip on the camera. A small latch lever at the outside edge of the battery chamber cover unlocks it so that it may be opened. The battery compartment cover is far enough from the tripod socket that you should be able to swap batteries without removing the camera from your tripod mount. The large surface area of the camera's bottom provides a stable mounting surface for use with a tripod, even with fairly large lenses attached.
CMOS Versus CCD & What's It All Mean?
Back when the D30 was first introduced, Canon's use of a CMOS image
sensor was seen as pretty revolutionary, and it still is to some extent. To
my mind, the D30's widely noted superb tonality can be traced directly to the
CMOS sensor technology Canon used in building it. Accordingly, I think it appropriate
to include the following section (copied from our D30 review) here, to give
a little background on CMOS vs CCD sensor technology. (Thanks to IR News Editor
Mike Tomkins for his work in researching and largely writing this technology
briefing.)
To understand what CMOS sensor technology can bring to a digital camera, first
of all you need some understanding of how CCD and CMOS sensors work, and what
they do differently. CCD, or Charge-Coupled Device image sensors, were invented
at the end of the 1960s by scientists at Bell Labs, and were originally conceived
not as a method of capturing photographic images, but as a way of storing computer
data. Obviously this idea didn't catch on; today we instead have RAM (Random
Access Memory) chips in our computers which are, ironically enough, manufactured
using the CMOS process.
Where CCDs did catch on, however was recording images — by 1975 CCDs were
appearing in television cameras and flatbed scanners. The mid 80s saw CCDs appearing
in the first "filmless" still cameras… CCDs rapidly attained
great image quality, but they weren't perfect. Perhaps most significantly, CCDs
required a manufacturing process which was different to that used for manufacturing
other computer chips such as processors and RAM. This means that specialized
CCD fabs have to be constructed, and they cannot be used for making other components,
making CCDs inherently more expensive.
Interline Transfer CCDs consist of many MOS (Metal Oxide Semiconductor) capacitors
arranged in a pattern, usually in a square grid, which can capture and convert
light photons to electrical charge, storing this charge before transferring
it for processing by supporting chips. To record color information, colored
filters are placed over each individual light receptor making it sensitive to
only one light color (generally, Red, Green and Blue filters are used, but this
is not always the case). This gives a value for one color at each pixel, and
the surrounding pixels can provide eight more values, four each of the two remaining
colors from which they may be interpolated for our original pixel.
After the exposure is complete, the charge is transferred row by row into a readout register, and from there to an output amplifier, analog/digital converters and on for processing. This row-by-row processing of the CCD's light "data" is where the sensor gets the term "Charge-Coupled" in its name. One row of information is transferred to the readout register, and the rows behind it are each shifted one row closer to the register. After being "read out", the charge is released and the register is empty again for the next charge. Repeat the process a number of times, and eventually you read out the entire contents of the CCD sensor. (Think of a bucket brigade, moving water from point A to point B by pouring it from one bucket into the next...)

A number of disadvantages to this approach to sensor design now become apparent,
in addition to the already mentioned cost. For one thing, the entire contents
of the CCD must be read out, even if you're only interested in a small part
thereof (for example, when using the digital zooms that are all the vogue in
digital cameras, you have no interest in a large part of the sensor's data,
so why take the time to read it out?) There are also a number of supporting
chips required for the CCD sensor, each of which adds to the complexity and
size of the camera design, increasing cost and power consumption. CCDs also
suffer from blooming (where charge "leaks" from one light receptor
into surrounding ones), "fading" (a loss of charge as it is passed
along the chain before being read out), and smearing (where the image quality
can be adversely affected by light arriving during the readout process, leaving
streaks behind bright scene areas).
There's also the issue of speed. The step by step process used in a CCD is not
exactly conducive to very high speed, and for just this reason a second type
of CCD exists. The Frame Interline Transfer CCD features a readout register
as large as the light receptor area is, allowing the entire contents of the
CCD to be read out in one pass. This, though, adds significantly to the area
of silicon required, and hence to the cost of the CCD.
This is where CMOS image sensors step in. CMOS, or Complementary Metal Oxide
Semiconductor, is actually a generic term for the process used to create these
image sensors, along with numerous other semiconductor items such as computer
RAM, processors such as those from Intel and other manufacturers, and much more.
CMOS image sensors can be made in the same fabs as these other items, with the
same equipment. This technology is, of necessity, very advanced with the amount
of competition in processor and other markets contributing to new techniques
in CMOS fabrication. Add to this that there is a very significant economy of
scale, when your fab can make not only CMOS image sensors, but other devices
as well, and you find that CMOS image sensors are much cheaper to make than
CCDs.
This cost advantage is even more significant when you consider the way a CMOS
sensor works. The Active Pixel CMOS image sensors used in digital imaging are
very similar to a CCD sensor, but with one major difference — supporting
circuitry is actually located alongside each light receptor, allowing noise
at each pixel to be canceled out at the site. Further to this, other processes
can be integrated right into the CMOS image sensor chip, eliminating the need
for extra chips — things such as analog/digital conversion, white balancing,
and more can be built into the CMOS sensor. This reduces cost of supporting
circuitry required, as well as camera complexity, and also power consumption,
as does the fact that CMOS sensors require a significantly lower voltage than
CCD sensors. CMOS sensors themselves also claim lower power consumption than
CCD sensors, with one manufacturer claiming their CMOS sensors draw some 10x
less power than equivalent CCD sensors.
CMOS sensors have other advantages, as well. For one thing, they can be addressed
randomly. If you're only interested in a certain area of the image, you can
access it directly and don't need to deal with the unwanted data. Blooming and
smearing are also less of a problem with CMOS sensors. CMOS sensors are capable
of much higher speeds than their CCD rivals, with one CMOS chip we've heard
of capable of running at over 500 frames per second at megapixel resolution.
With these advantages, you'd think CMOS would be a shoe-in to replace CCD in
digital cameras, but thus far it has really only impacted the lower end of the
market, with CMOS rapidly becoming dominant in the entry level digital cameras
and tethered cameras. Why hasn't CMOS taken over at the high end? Well, up until
now, image quality has not been on a par with CCD… CMOS sensors, with their
many amplifiers at each pixel, suffer from so-called "fixed pattern noise".
The amplifiers aren't all equal, and this creates a noise pattern across the
image. In their CMOS sensors, Canon has tackled this by first taking the image
off the sensor in 10 milliseconds, and then reading just the fixed-pattern noise
from the sensor in the following 10 milliseconds. Subtract the second image
from the first, and you neatly remove the noise.
There's also the fact that CMOS sensors are generally less sensitive than their
CCD counterparts. High end "Full Frame" CCD image sensors have a "fill
factor" of 100%, because the whole CCD sensor area is being used for light
capture — but in a CMOS sensor the fill factor is lower, because the extra
circuitry alongside each pixel takes up space. This space can't be used to capture
light, and so you lose some of it… Two techniques exist to combat this
— firstly reducing the size of this support circuitry, and secondly the
microlens. Reducing the size of the support circuitry is the less ideal of the
two methods — the smaller you make it, harder the sensor is to manufacture,
and the more expensive it becomes. The microlens is considered to be the better
answer, then. Essentially, the support circuitry is covered by an opaque metal
layer, and a microscopic lens is placed over the entire area of the light receptor
and support circuitry, redirecting the light that would otherwise fall on the
support circuitry and focusing it on the light receptor.
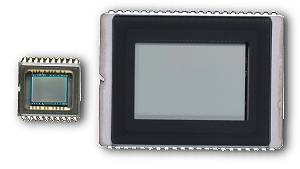
Canon's EOS 10D is now the third high-end digital camera we've seen using CMOS technology, and it is likely that the apparent price advantage the camera has in comparison with its nearest rivals (the Nikon D100, Fuji S2 Pro, and Sigma SD9) is in large part due to the choice of the CMOS image sensor. (Not to mention Canon's in-house semiconductor fabrication capability.) The image sensor in the EOS 10D is only ever so slightly smaller than those used in these two cameras, and significantly bigger than the sensors used in consumer cameras, as can be seen in the comparison photo above, which shows the CCD sensor from Canon's PowerShot S20 digital camera alongside the CMOS sensor from the original D30. The illustration below shows the difference in sizes (to scale) of a consumer CCD, the EOS D30/60/10D sensor (all three are the same size), the D1/D1x/Fuji S1 Pro sensors (also all the same size), an APS film frame, and a standard 35mm frame.
Canon has continued to be fairly closed-mouthed about their CMOS sensor technology, but have talked about a few details of it. As with other Active-Pixel CMOS sensors, theirs does in fact have a signal amplifier located at each pixel site. More intriguing though, is that they also claim to have an A/D (analog to digital) converter at each individual pixel site as well. If this last is true, then it must be a very different sort of A/D than is normally used with CCDs, as those circuits are quite complex and space-consuming. I keep expecting that we'll hear more details as Canon's patent position is solidified, but so far not much information has been forthcoming. It does seem though, that there's been some genuine innovation in Canon's back labs. It's unusual these days to see a company moving toward vertical integration, developing component technology in-house rather than farming it out to specialist companies. Canon has been moving strongly in the opposite direction, bringing not only sensor technology in-house, but the processing circuitry as well, with their much-vaunted DIGIC chip. Based on the pricing of the 10D, it does appear that there's been some monetary advantage in this approach.
Reader Comments! --> Visit our discussion forum for the Canon EOS-10D!

Follow Imaging Resource: