Back
to Full Canon EOS-10D Review
Back
to Full Canon EOS-10D ReviewGo to Canon EOS-10D Data Sheet
Go to Canon EOS-10D Pictures Page
Up to Imaging Resource Cameras Page
Use your browser's "Back" button to return to the previous page, or the links at the top and bottom of this page to navigate to related information. If you have difficulty fitting the text on this page onto your printer output, simply resize your browser window to a narrower width and print again.
Remember us when it's time to buy!
Dave here: Have our reviews been helpful to you? (Is this article you're reading right now useful?) Preparing this level of information on as many products as we do is incredibly hard work, not to mention expensive. Things on the Internet may look like they're free, but they're not. (As a lot of big dot.com companies are finding out these days.) Somewhere, somebody has to pay to produce worthwhile content. YOU can help us though, by remembering us when it comes time to make your purchase. Would you consider coming back to our site and clicking-through to one of our advertisers to make your purchase? Every dollar you spend with one of our advertisers helps us directly (in affiliate fees) or indirectly (the advertiser will keep renewing their ad contract with us). To make it easy for you to support us, here's a URL you can visit, to see all our current advertisers, with links to click on that will register your visit to them as having come from our site. It's up to you where you buy, but Mike, Mike, Kim, Yazmin, Marti and I would be really grateful if you'd help us out by choosing one of our advertisers to purchase from.
Thank you for your support!
Dave Etchells, Founder & Publisher
Visit our "Buy Now" Page:
https://www.imaging-resource.com/buynow.htm
Back
to Full Canon EOS-10D Review
Go to Canon EOS-10D
Data Sheet
Go to Canon EOS-10D
Pictures Page
Up to Imaging Resource Cameras
Page
Canon EOS-10DCanon revamps their hugely popular D60 SLR, with ahost of improvements and a dramatic price cut! Review First Posted: 02/27/2003 |
|
 |
|
Canon EOS SLR designed ground-up to be digital |
|
|
6.3-megapixel CMOS sensor, 3,072 x 2,048 pixel images | |
|
|
ISO of 100, 200, 400, 800, 1600, 3200 | |
|
|
Three frames per second, photo-centric design – touch shutter button in Play mode and camera returns to Record mode. | |
| * | Compatible with all Canon EOS system lenses and accessories, focal length multiplier of 1.6 | |
|
|
Multiple improvements and enhancements throughout the camera. |
Manufacturer Overview
Look along the sidelines of any professional sports game, and the array of big,
white Canon lenses will speak volumes of Canon's presence and reputation in
the world of professional photography. If you ask experienced photographers
what the Canon name means to them, many would suggest that they associate the
name with innovation, the company having brought such technological advances
as Eye-Controlled Focusing (Canon EOS 5, 1992) and the USM ultrasonic motors
used in the more recent Canon EF lenses, which are extremely quiet and very
fast.
Canon film cameras cover the full range from models such as those targeted at
professionals (the EOS 1 and 1N for example, and more recently the EOS 1V, to
those aimed toward the consumer (such as the tiny ELPH series or the EOS Rebel
cameras). Back at the Spring 2000 PMA show, Canon announced the EOS-D30, their
first digital SLR, in the process turning the Digital SLR market on its ear
with its excellent features and image quality and surprisingly aggressive price.
Now, Canon has once more upped the ante and upset the D-SLR pricing apple cart
(to mix metaphors a little), by updating last year's already highly affordable
D60 SLR with the new EOS-10D, in the process dropping the price to an announced
Suggested Retail price of $1999 at introduction. (Note that this is the "suggested
list price," not the "Minimum Advertised Price," which is generally
lower, and usually the price that cameras are sold for in the US. - We'll have
to see what the actual street price ends up being once quantities of the EOS-10D
appear on dealer shelves.
While the EOS-10D has the same roughly six megapixel resolution as the D60, Canon has built in a host of improvements, from a metal-alloy outer housing to a greatly improved autofocus system, improved electronics, with a faster processing chip, improved signal processing algorithms to reduce noise and improve color fidelity, and many more besides. There are so many improvements to so many aspects of camera performance and image quality that I suspect even some D60 owners will be tempted to upgrade. Or to simply purchase a 10D to have a second body. All in all, an impressive upgrade to an already excellent camera, and accompanied by a respectable price drop. Read on for all the details!
Highlights
Comparison with the EOS-D60
Many of our readers will be familiar with Canon's earlier D60 SLR, a hugely popular model throughout 2002. The table below highlights similarities and differences between the EOS-10D and the EOS-D60. Areas in which the 10D's specs constitute an improvement over the D60 are highlighted. (Thanks to Canon USA Technical Info Department and Chuck Westfall for concisely assembling this information.):
Canon EOS 10D vs. EOS D60
Imaging
SystemImaging Element/Effective
Pixels
CMOS/6.30 Megapixels
Effective Sensor Size
15.1 x 22.7mm
35mm Focal Length Equivalent
Approx. 1.6x
Image Processor
SLR-DIGIC
Pre-DIGIC
Recording
SystemRecording Media/Quantity/Slot
Type
CF card/1 slot/Type
I or II
Compatible File Formats
FAT 16/32
FAT 16
Recording Formats
RAW (CRW),
JPEG
Maximum Resolution
3072 x 2048
Reduced Resolutions (JPEG
only)
2048 x 1360,
1356 x 1024
RAW + JPEG Recording
Yes/Selectable JPEG resolution/compression
Yes/Middle Fine JPEG only
Color Space &
White BalanceUser-Selectable Color Space
Yes
sRGB + Adobe RGBNo
sRGB only
Processing Parameters
(Contrast, Sharpness, Saturation, Color Tone)/# of IncrementsYes/5
Yes/3
# of preset WB settings
6
5
Manual Color Temperature Setting
Range
2,800 ~ 10,000K
in 100K incrementsNone
WB Bracketing Range (JPEG
only)
±3 steps
5 mireds per stepNone
Autofocus
System# of Focusing Points/Superimposed
Display
7/Yes
3/Yes
AF Working Range
EV 0.5 ~ 18
One Shot AF Speed
Faster
Fast
Predictive AF Minimum Tracking
Distance
at 50kph/30mph with EF 300/2.8L IS USM8m/26.4 ft.
12m/39 ft.
AF Point Registration/Assist
Button
Yes
No
Exposure
ControlShooting Modes
12
11
Metering Zones
35
Metering Modes
Evaluative,
center weighted, partial
Metering System Working Range
EV 1 ~ 20
EV 2 ~ 20
ISO Range/Extended
100 ~ 1600/3200
100 ~ 1000/ --
Shutter Speeds,
Framing RateShutter Type
Mechanical,
all speeds electronically controlled
Shutter Speed Range/Maximum
X-Sync Speed
1/4000 ~ 30
sec. & B/Ê 1/200
Maximum Frames Per Second/Burst
Rate
3 fps/9 frames
3 fps/8 frames
Built-in Flash
Built-in Flash/GN @ ISO 100,
ft.
Yes/39
Yes/36
Playback
SystemPlayback Monitor Size/Type/Pixel
Count
2 in./LCD/118,000
2 in./LCD/114,000
Enlarged Playback/Scroll
2x~10x/Yes
3x/No (9 segments)
LCD Monitor Brightness Adjustment
Range
5 steps
2 steps
Automatic Rotation for Vertical
Shots
Yes
No
Other Features
Direct Printing (CP-100, BJ
Photo Direct)
Yes
No
Menu Languages
12
4
Camera Default Reset
Yes
No
Custom Functions (Quantity/Settings)
17/61
14/38
LCD Panel Illumination
Yes (dedicated button)
Yes
Body Structure
Body Cover/Chassis
Magnesium Alloy
Plastic/Stainless Steel
Power System
Battery Compatibility
BP-511/BP-512
BP-511
Shooting Capacity at 20C/68F
100% AE: 650
50% Flash: 500100% AE: 620
50% Flash: 490
Dimensions & Weight
Dimensions (WxHxD,mm)
149.7 x 107.5 x 75
149.5 x 106.5 x 75
Weight
790g/27.9 oz.
780g/27.5 oz.
Operational
EnvironmentOperating Temperature Range
0~40C/32~104F
Operating Humidity Range
85%
Executive Overview
Canon's EOS-D60 digital SLR was arguably one of the most in-demand
digital cameras throughout all of 2002. Consequently, it was great surprise
to many of us (myself included) when dealers began running out of them in early
2003, and word came down that it was no longer being manufactured. Now, just
prior to the Spring 2003 PMA show, the reason becomes clear: Not content to
rest on their laurels, Canon had something even better up their corporate sleeve.
What's most impressive about the EOS-10D though (apart from the astonishing
$700 drop in retail price relative to the D60) is the sheer number and scope
of the improvements that Canon has made in it. Apart from the specifications
of pixel count and sensor size, shutter speed and basic metering system, there's
hardly an aspect of camera operation that hasn't been significantly improved.
The new model offers the same excellent exposure control and image quality (actually,
better image quality), but with an improved, seven-point autofocus system, updated
electronics, a faster processing chip, improved signal processing algorithms
to reduce noise and improve color fidelity, improved autofocus performance,
multiple color space capability, direct printing capability, and much more.
The camera body itself looks much the same as that of the D60, but now sports
magnesium-alloy body panels and an enhanced control layout. The camera's 6.3-megapixel
CMOS sensor captures the same maximum resolution of 3,072 x 2,048 pixels, with
two JPEG compression levels and a RAW format, but image quality appears to have
been stepped up another notch. Exposure control is very similar to the previous
D60, with the addition of a new "Flash Off" shooting mode, and the
EOS 10D continues to operate and feel much like its 35mm EOS cousins.
Like the D30 and D60, the EOS 10D features Canon's standard EF lens mount, which accommodates a host of lenses. Aperture and focal ranges will vary with the lens in use, but the camera itself has an improved autofocus system that uses a seven-point array for more accurate focus (as opposed to the D60's three-point AF system). Seven AF points are laid out in a cross pattern in the viewfinder display, and the camera assesses all seven points to determine the proximity of the subject and consequently the best point to use in determining focus. The same One-Shot and AI Servo AF modes are available, the latter adjusting focus continuously for moving subjects, and the 10D's AF system is considerably more nimble than that in the D60 and the D30 before it. The EOS 10D offers what Canon terms "Predictive AF," which basically tracks the rate at which a subject is approaching or receding from the camera, and accurately focuses based on the subject's predicted position. (A features that sports photographers will no doubt appreciate.) An AI Focus AF mode switches back and forth between One Shot and AI Servo AF modes, depending on whether or not the subject is moving. Additionally, you have the ability to manually select one of the seven AF points as the controlling focus point, or leave the area selection under automatic control. The EOS 10D offers a TTL optical viewfinder, which displays an impressive amount of exposure information. The 1.8-inch, rear-panel, color LCD monitor is for image review and menu display only. The EOS 10D also features a small status display panel on its top panel, which reports a large number of camera settings as well.
Exposure control on the EOS 10D is exceptional, with a full range of exposure modes to choose from. Basic exposure modes include full Auto, Program AE, Aperture Priority, Shutter Priority, Manual, and Auto Depth of Field modes. Auto Depth of Field mode is quite useful, in that it intelligently uses the seven AF points to determine the nearest and most distant points of the subject. It uses that information to get the best depth of field while using the fastest shutter speed possible. Within what Canon calls the "Image Zone," are a handful of preset scene modes, including Portrait, Landscape, Close-up (Macro), Sports, Night Portrait, and Flash Off. The newest addition here is the Flash Off mode, which essentially disables the flash but leaves exposure under automatic control. With these scene modes, the 10D becomes approachable for even rank amateurs. Shutter speeds on the EOS 10D range from 1/4,000 to 30 seconds, with a Bulb mode available in Manual mode that allows shutter times as long as 999 seconds. Metering modes include Evaluative (can link to any AF point), Partial, and Center-Weighted. The camera's Exposure Compensation function increases or decreases the overall exposure from -2 to +2 exposure equivalents (EV) in either 1/2 or 1/3-step increments. The EOS 10D also features Auto Exposure Bracketing, ISO values from 100 to 3,200, and AE lock. White balance options include six presets, an Auto setting, Custom setting (manual adjustment), and a Kelvin temperature setting with a range from 2,800 to 10,000 degrees Kelvin. You can also bracket white balance through an LCD menu option. Color space options include sRGB and Adobe RGB, and the Parameters setting lets you adjust contrast, saturation, sharpness, and color tone.
The EOS 10D has a Self-Timer mode, which provides a (fixed) 10-second delay after the Shutter button is pressed before the shutter actually opens. You can also trip the shutter remotely with the optional wired remote control, which plugs directly into the camera body. A Continuous Shooting mode captures a maximum of nine frames at approximately three frames per second, while the Shutter button is held down. In addition to the top-mounted external flash hot shoe and PC sync terminal, the EOS 10D has a built-in, pop-up flash with Redeye Reduction and Slow Sync settings. A Flash Exposure Compensation function controls the flash exposure, and a Flash Exposure Bracketing option works similarly to the normal Auto Exposure Bracketing.
Images are stored on CompactFlash Type I or II memory cards, and the EOS 10D is compatible with the IBM MicroDrives. (The 10D also supports FAT 32 directory structures, allowing it to use memory cards more than 2GB in size.) The camera doesn't come with memory card, so I highly recommend picking up at least a 128MB card for starters (really though, plan on at least a 512MB), given the camera's high resolution and handy RAW+JPEG file format. A USB cable connects the camera to a computer, and accompanying software CDs feature Canon's EOS DIGITAL Solution Disk software and a copy of Adobe Photoshop Elements 2.0. The Canon software is required for processing the camera's RAW files, including those saved with an embedded JPEG image. The EOS 10D also features a Video Out jack, and comes with a cable for connecting to a television set. For power, the EOS 10D uses a Canon BP-511 battery pack, and comes with one battery and a charger. (I highly recommend picking up a spare and keeping it charged and ready.)
Design
With a control layout and body design similar to the earlier EOS
D30 and D60, Canon's latest in the"Compact" EOS line of digital cameras,
the EOS 10D, also carries forward the same body style as the film cameras with
which it shares the EOS name. Photographers already accustomed to EOS film cameras
will find the transition to digital much easier with these digital models, as
the camera's layout is very similar. With a weight of some 2.05 pounds (932.6
grams) or so with the batteries and flash card, but minus the lens, the 10D
has a bit more heft than the D60, perhaps due in part to the addition of metal
body panels to more parts of the camera. This makes it the heaviest of the "consumer"
digital SLRs, tipping the scales relative to the Fuji S2 Pro, the Nikon D100,
and the Sigma SD9. Still, it doesn't feel at all heavy in the hand, is well-balanced,
and certainly a lot lighter than the "industrial strength" Canon EOS-1D
and 1Ds. Along with its greater heft though, the 10D conveys a much greater
sense of ruggedness than the D60, thanks in large part to the extensive use
of metal body panels throughout. Both the D60 and the 10D have metal internal
frames, but the D60 used a good deal of plastic in its outer body covering.
On the 10D, most of this has been replaced with metal. Despite the increase
in weight and a slightly different body styling though, the EOS-10D measures
almost exactly the same as its predecessor, being only couple tenths of a millimeter
wider and about a millimeter taller than the D60. Body dimensions of the 10D
are 5.9 x 4.2 x 3.0 inches (149.7 x 107.5 x 75 millimeters).
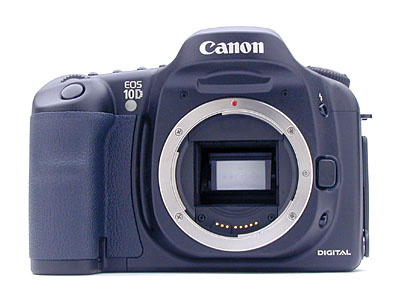
The front of the camera features a standard Canon EF lens mount. There's also the lens release button, a depth of field preview button (on the lower left of the lens mount as viewed from the rear), a flash head release button (on the upper left of the lens mount) and the redeye reduction lamp/focus illuminator light (the frosted window at upper left in the view above).
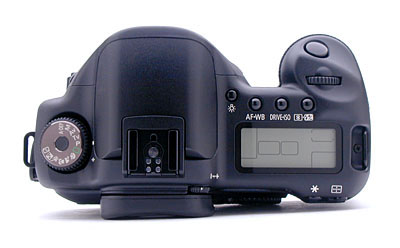
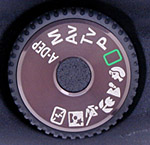
The top of the camera features the Shutter button, Mode dial and a small status display panel that reports most of the camera's settings. An LCD Illuminator button next to the status display panel backlights the display for better viewing in dark shooting conditions. Also on top are the Main dial and several control buttons (Metering Mode / Flash Exposure Compensation, Drive Mode / ISO, and AF Mode / White Balance). The top of the camera also contains a hot shoe for mounting an external flash unit. The hot shoe has the usual trigger terminal in the center, as well as four other contacts for interfacing to Canon EX Speedlite flash units, and hole for a locking pin to prevent rotation of the speedlight. Fixed neck strap eyelets are located on both sides of the top panel as well.
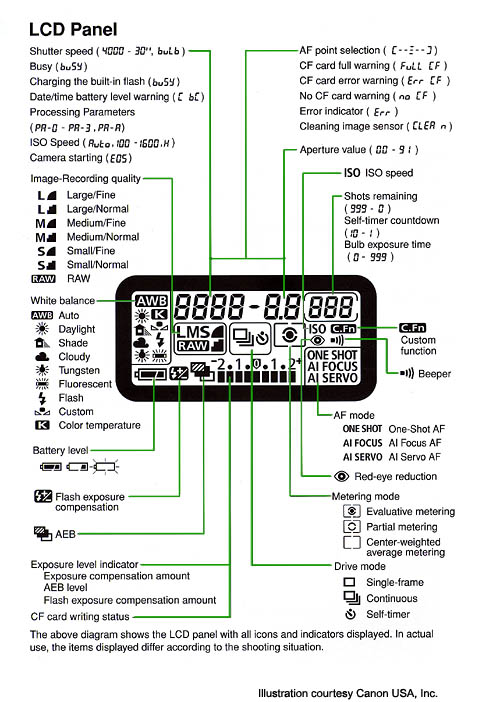
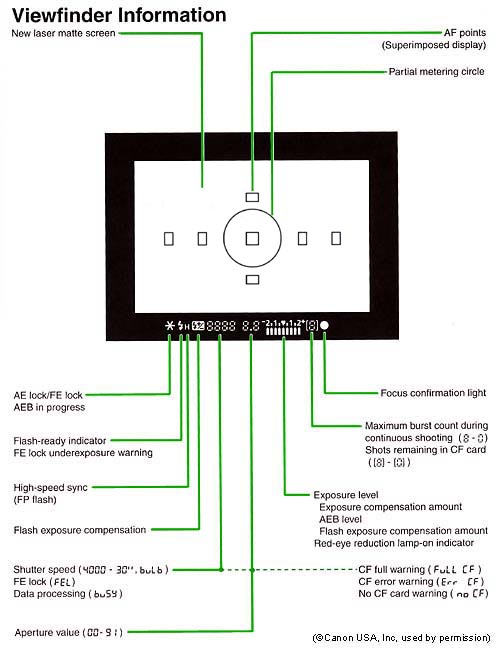
The top-panel data readout conveys a wealth of information about the current status of the camera and its settings. Here's an illustration showing all possible segments and icons and their interpretation:
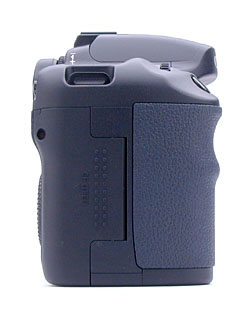
On the hand grip side of the camera, towards the rear of the handgrip is a large door which slides back and out to reveal the CompactFlash slot (which supports Type-I and Type-II cards, including the IBM MicroDrive). Inside the compartment, underneath the CompactFlash slot is a small gray eject button for removing the card. A small hole in the compartment door allows an LED to shine through, showing when the camera is accessing the card.

The opposite side of the camera features a hinged rubber flap covering the digital (USB) and Video Out sockets. Below this are two more sockets, likewise protected by a rubber flap. The forward of these sockets is a standard PC flash sync terminal, while the rear socket is for an N3 remote control. (While the large flap does a good job of sealing the digital and video sockets against dust and moisture, I found it a little tricky to get its various projections and dimples properly seated after having it open. To really protect the sockets, you'll have to exert extra care to get the flap firmly seated on all sides.) This picture also shows the Depth of Field Preview button (bottom) and Flash Pop-up button (top) on the side of the lens mount a little more clearly.
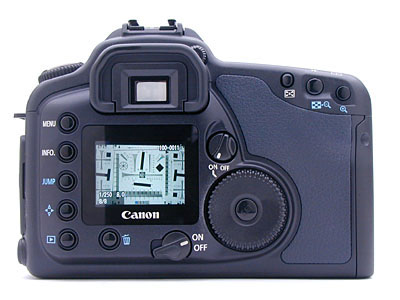
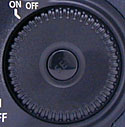
The rear panel of the EOS 10D is home to the bulk of the camera's controls, as well as the large, bright LCD screen. Beneath the LCD monitor's lower right corner is the main power on/off switch. Lining the left side of the LCD monitor are several buttons related to menus and playback, including the Menu, Info, Jump, Direction, and Playback buttons. Underneath the LCD screen is the Delete button, and to the right of the screen is the Quick Control dial, in the center of which is the Set button. Above and to the left of the Quick Control dial is the Quick Control Dial switch, which enables or disables the Quick Control dial. The Set button in the center of the Quick Control Dial acts as a menu selection button. On the top right corner of the optical viewfinder is the diopter adjustment knob, recessed slightly to prevent accidental changes, and featuring a ridged surface to give grip. Finally, the top right corner of the rear panel features the Assist, AE/FE Lock / Index, AF Point / Enlarge buttons. After testing as many Canon cameras as I have, I think I'm finally coming to terms with the Quick Control dial. - While Canon has always seemed exceptionally proud of this control device, at first approach, I didn't like it at all. Now, five or six camera reviews later, I've actually become quite attached to it, really appreciating how quickly you can use it to navigate the 10D's menu structure. Consequently, for any photographers who might share my initial reaction to it, I'd suggest that you give it a fair chance, and try living with it for a while before dismissing it as unwieldy.

The very flat bottom of the camera reveals the metal tripod mount, as well as the cover for the CR2025 clock-backup button battery, and the main BP-511 Lithium Ion battery chamber cover. The main battery compartment cover is removable, necessary when installing the optional portrait grip on the camera. A small latch lever at the outside edge of the battery chamber cover unlocks it so that it may be opened. The battery compartment cover is far enough from the tripod socket that you should be able to swap batteries without removing the camera from your tripod mount. The large surface area of the camera's bottom provides a stable mounting surface for use with a tripod, even with fairly large lenses attached.
CMOS Versus CCD & What's It All Mean?
Back when the D30 was first introduced, Canon's use of a CMOS image
sensor was seen as pretty revolutionary, and it still is to some extent. To
my mind, the D30's widely noted superb tonality can be traced directly to the
CMOS sensor technology Canon used in building it. Accordingly, I think it appropriate
to include the following section (copied from our D30 review) here, to give
a little background on CMOS vs CCD sensor technology. (Thanks to IR News Editor
Mike Tomkins for his work in researching and largely writing this technology
briefing.)
To understand what CMOS sensor technology can bring to a digital camera, first
of all you need some understanding of how CCD and CMOS sensors work, and what
they do differently. CCD, or Charge-Coupled Device image sensors, were invented
at the end of the 1960s by scientists at Bell Labs, and were originally conceived
not as a method of capturing photographic images, but as a way of storing computer
data. Obviously this idea didn't catch on; today we instead have RAM (Random
Access Memory) chips in our computers which are, ironically enough, manufactured
using the CMOS process.
Where CCDs did catch on, however was recording images — by 1975 CCDs were
appearing in television cameras and flatbed scanners. The mid 80s saw CCDs appearing
in the first "filmless" still cameras… CCDs rapidly attained
great image quality, but they weren't perfect. Perhaps most significantly, CCDs
required a manufacturing process which was different to that used for manufacturing
other computer chips such as processors and RAM. This means that specialized
CCD fabs have to be constructed, and they cannot be used for making other components,
making CCDs inherently more expensive.
Interline Transfer CCDs consist of many MOS (Metal Oxide Semiconductor) capacitors
arranged in a pattern, usually in a square grid, which can capture and convert
light photons to electrical charge, storing this charge before transferring
it for processing by supporting chips. To record color information, colored
filters are placed over each individual light receptor making it sensitive to
only one light color (generally, Red, Green and Blue filters are used, but this
is not always the case). This gives a value for one color at each pixel, and
the surrounding pixels can provide eight more values, four each of the two remaining
colors from which they may be interpolated for our original pixel.
After the exposure is complete, the charge is transferred row by row into a readout register, and from there to an output amplifier, analog/digital converters and on for processing. This row-by-row processing of the CCD's light "data" is where the sensor gets the term "Charge-Coupled" in its name. One row of information is transferred to the readout register, and the rows behind it are each shifted one row closer to the register. After being "read out", the charge is released and the register is empty again for the next charge. Repeat the process a number of times, and eventually you read out the entire contents of the CCD sensor. (Think of a bucket brigade, moving water from point A to point B by pouring it from one bucket into the next...)

A number of disadvantages to this approach to sensor design now become apparent,
in addition to the already mentioned cost. For one thing, the entire contents
of the CCD must be read out, even if you're only interested in a small part
thereof (for example, when using the digital zooms that are all the vogue in
digital cameras, you have no interest in a large part of the sensor's data,
so why take the time to read it out?) There are also a number of supporting
chips required for the CCD sensor, each of which adds to the complexity and
size of the camera design, increasing cost and power consumption. CCDs also
suffer from blooming (where charge "leaks" from one light receptor
into surrounding ones), "fading" (a loss of charge as it is passed
along the chain before being read out), and smearing (where the image quality
can be adversely affected by light arriving during the readout process, leaving
streaks behind bright scene areas).
There's also the issue of speed. The step by step process used in a CCD is not
exactly conducive to very high speed, and for just this reason a second type
of CCD exists. The Frame Interline Transfer CCD features a readout register
as large as the light receptor area is, allowing the entire contents of the
CCD to be read out in one pass. This, though, adds significantly to the area
of silicon required, and hence to the cost of the CCD.
This is where CMOS image sensors step in. CMOS, or Complementary Metal Oxide
Semiconductor, is actually a generic term for the process used to create these
image sensors, along with numerous other semiconductor items such as computer
RAM, processors such as those from Intel and other manufacturers, and much more.
CMOS image sensors can be made in the same fabs as these other items, with the
same equipment. This technology is, of necessity, very advanced with the amount
of competition in processor and other markets contributing to new techniques
in CMOS fabrication. Add to this that there is a very significant economy of
scale, when your fab can make not only CMOS image sensors, but other devices
as well, and you find that CMOS image sensors are much cheaper to make than
CCDs.
This cost advantage is even more significant when you consider the way a CMOS
sensor works. The Active Pixel CMOS image sensors used in digital imaging are
very similar to a CCD sensor, but with one major difference — supporting
circuitry is actually located alongside each light receptor, allowing noise
at each pixel to be canceled out at the site. Further to this, other processes
can be integrated right into the CMOS image sensor chip, eliminating the need
for extra chips — things such as analog/digital conversion, white balancing,
and more can be built into the CMOS sensor. This reduces cost of supporting
circuitry required, as well as camera complexity, and also power consumption,
as does the fact that CMOS sensors require a significantly lower voltage than
CCD sensors. CMOS sensors themselves also claim lower power consumption than
CCD sensors, with one manufacturer claiming their CMOS sensors draw some 10x
less power than equivalent CCD sensors.
CMOS sensors have other advantages, as well. For one thing, they can be addressed
randomly. If you're only interested in a certain area of the image, you can
access it directly and don't need to deal with the unwanted data. Blooming and
smearing are also less of a problem with CMOS sensors. CMOS sensors are capable
of much higher speeds than their CCD rivals, with one CMOS chip we've heard
of capable of running at over 500 frames per second at megapixel resolution.
With these advantages, you'd think CMOS would be a shoe-in to replace CCD in
digital cameras, but thus far it has really only impacted the lower end of the
market, with CMOS rapidly becoming dominant in the entry level digital cameras
and tethered cameras. Why hasn't CMOS taken over at the high end? Well, up until
now, image quality has not been on a par with CCD… CMOS sensors, with their
many amplifiers at each pixel, suffer from so-called "fixed pattern noise".
The amplifiers aren't all equal, and this creates a noise pattern across the
image. In their CMOS sensors, Canon has tackled this by first taking the image
off the sensor in 10 milliseconds, and then reading just the fixed-pattern noise
from the sensor in the following 10 milliseconds. Subtract the second image
from the first, and you neatly remove the noise.
There's also the fact that CMOS sensors are generally less sensitive than their
CCD counterparts. High end "Full Frame" CCD image sensors have a "fill
factor" of 100%, because the whole CCD sensor area is being used for light
capture — but in a CMOS sensor the fill factor is lower, because the extra
circuitry alongside each pixel takes up space. This space can't be used to capture
light, and so you lose some of it… Two techniques exist to combat this
— firstly reducing the size of this support circuitry, and secondly the
microlens. Reducing the size of the support circuitry is the less ideal of the
two methods — the smaller you make it, harder the sensor is to manufacture,
and the more expensive it becomes. The microlens is considered to be the better
answer, then. Essentially, the support circuitry is covered by an opaque metal
layer, and a microscopic lens is placed over the entire area of the light receptor
and support circuitry, redirecting the light that would otherwise fall on the
support circuitry and focusing it on the light receptor.
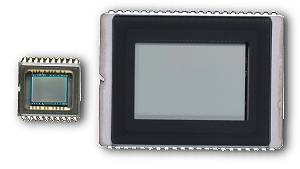
Canon's EOS 10D is now the third high-end digital camera we've seen using CMOS technology, and it is likely that the apparent price advantage the camera has in comparison with its nearest rivals (the Nikon D100, Fuji S2 Pro, and Sigma SD9) is in large part due to the choice of the CMOS image sensor. (Not to mention Canon's in-house semiconductor fabrication capability.) The image sensor in the EOS 10D is only ever so slightly smaller than those used in these two cameras, and significantly bigger than the sensors used in consumer cameras, as can be seen in the comparison photo above, which shows the CCD sensor from Canon's PowerShot S20 digital camera alongside the CMOS sensor from the original D30. The illustration below shows the difference in sizes (to scale) of a consumer CCD, the EOS D30/60/10D sensor (all three are the same size), the D1/D1x/Fuji S1 Pro sensors (also all the same size), an APS film frame, and a standard 35mm frame.
Canon has continued to be fairly closed-mouthed about their CMOS sensor technology, but have talked about a few details of it. As with other Active-Pixel CMOS sensors, theirs does in fact have a signal amplifier located at each pixel site. More intriguing though, is that they also claim to have an A/D (analog to digital) converter at each individual pixel site as well. If this last is true, then it must be a very different sort of A/D than is normally used with CCDs, as those circuits are quite complex and space-consuming. I keep expecting that we'll hear more details as Canon's patent position is solidified, but so far not much information has been forthcoming. It does seem though, that there's been some genuine innovation in Canon's back labs. It's unusual these days to see a company moving toward vertical integration, developing component technology in-house rather than farming it out to specialist companies. Canon has been moving strongly in the opposite direction, bringing not only sensor technology in-house, but the processing circuitry as well, with their much-vaunted DIGIC chip. Based on the pricing of the 10D, it does appear that there's been some monetary advantage in this approach.
Viewfinder
Virtually identical to the D60's viewfinder, the 10D's optical viewfinder is
again excellent, providing a wealth of information and great accuracy. Because
the 10D now features seven AF points, the viewfinder shows seven focus point
boxes arrayed in a cross pattern. (This is the only difference I can see in
the 10D's viewfinder, relative to that of the D60.) Lining the bottom of the
display is a strip of information reporting everything from aperture and shutter
speed to flash status and the maximum number of burst shots available. While
I don't have a formal test for it, the "eyepoint" of the viewfinder
seemed fairly high, making it usable with eyeglasses, although I had to press
the lenses of my glasses up against the eyecup to see the full viewfinder area.
The dioptric correction is also excellent, covering a broad range from -3 to
+1 diopters. I measured its accuracy at 95.6 percent, closely agreeing with
Canon's official specification of 95 percent frame coverage. (I have to say
though, that I'd really like to see it be a full 100% coverage. Viewfinder inaccuracy
is a pet peeve of mine.) The viewfinder display conveys a lot of information
about exposure and camera status, as shown in the illustration below. (Courtesy
Canon USA, Inc.)
It's important to note in discussing the 10D's viewfinder system is that
the rear-panel LCD display is not usable as a viewfinder. Instead,
the optical viewfinder uses a mirror to intercept the image on the way to
the shutter and the sensor. Thus, when the camera isn't actively taking a
picture, the light from the lens is directed only to the optical viewfinder,
and so isn't available to the sensor to drive a live viewfinder display on
the LCD. With the exception of the Olympus E-10 and E-20 (which use a beam-splitter
prism instead of a mirror, at some cost in light sensitivity), all digital
SLRs operate in this fashion.
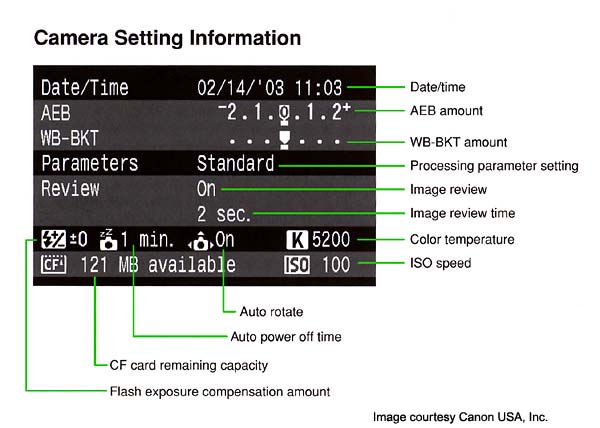
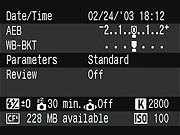 While
not strictly a viewfinder function, the capture-mode Info display shown on
the rear-panel LCD screen deserves mention here. The optical viewfinder carries
quite a bit of information about camera status as shown above, but there's
even more available on the rear panel, just by pressing the Info button. Rather
than the exposure settings shown in the optical viewfinder, this display shows
date/time, autoexposure bracketing amount, white balance bracketing amount,
processing parameter setting, image review status, image review time, color
temperature setting (if selected), ISO speed, auto rotate status, auto power
off time, flash exposure compensation amount, and megabytes of remaining memory
card capacity. Between this screen, the optical viewfinder display, and the
LCD data readout on the camera's top, the 10D offers no shortage of information.
While
not strictly a viewfinder function, the capture-mode Info display shown on
the rear-panel LCD screen deserves mention here. The optical viewfinder carries
quite a bit of information about camera status as shown above, but there's
even more available on the rear panel, just by pressing the Info button. Rather
than the exposure settings shown in the optical viewfinder, this display shows
date/time, autoexposure bracketing amount, white balance bracketing amount,
processing parameter setting, image review status, image review time, color
temperature setting (if selected), ISO speed, auto rotate status, auto power
off time, flash exposure compensation amount, and megabytes of remaining memory
card capacity. Between this screen, the optical viewfinder display, and the
LCD data readout on the camera's top, the 10D offers no shortage of information.
Here's what all the numbers and indicators in the information display mean:
Optics
| Free Photo Lessons | |
|
As with other digital SLRs I've tested, there's not a great deal to report in the "optics" section of this review. The Canon EOS 10D accepts all standard EF-series Canon lenses, a collection that includes roughly 56 currently produced models, and more than 100 released since the series began in 1987. Key features of the Canon EF lens series are models with the exceptionally fast, silent "ultrasonic" focusing mechanism ( a coreless motor built into the lens body itself), and the exceptional range of optically stabilized models that permit hand-holding way beyond light levels that would normally require the use of a tripod.
Like most digital SLRs, the sensor in the EOS 10D is smaller than a 35mm film
frame. This means that the "effective" focal length of your lenses
will be 1.6x their normal values on 35mm cameras. Just to be clear, nothing's
changed about the lenses or their behavior, it's just that the CMOS sensor is
effectively cropping a smaller area out of the lens' coverage circle. The net
result is that shooting really wide angle photography is tough with digital
SLRs, the 10D included. At the other end of the scale though, it's like having
a 1.6x teleconverter on your lenses with no cost in light loss or sharpness.
Thus, a 300mm telephoto has the same "reach" as a 480mm on your 35mm
film camera. And of course, a f/2.8 300mm is a lot cheaper than a f/2.8
500mm! The net of it is that a 31mm focal length has the same angular coverage
as a 50mm lens on a 35mm SLR, and the common 16-35mm zoom lenses have a range
equivalent to 25.6-56mm on film cameras.
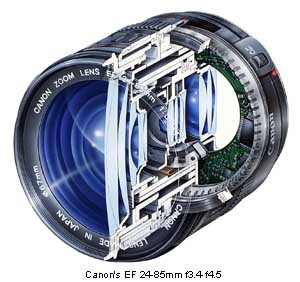
When I tested the original D30, I asked Canon for a fair range of lenses to
test as well. (My favorite was the 100-400mm optically-stabilized zoom, equivalent
to a 160-640 mm zoom on a 35mm camera. Great fun at my son's soccer game, and
the optical stabilization was really a dream to use, worked extremely well.)
The surprise contender was their 24-85mm lens (shown above), equivalent to a
38-136mm. It showed some bad coma in the upper left-hand corner of the frame
when wide open, but outperformed a costly 28-70mm L-series lens overall. The
hands-down winner for corner to corner sharpness though was a 100mm f/2.8 fixed
focal length macro lens. I've found that digital cameras really show up the
least lens defects, so getting good glass to use with your high-end SLR is very
important. That said, the relatively inexpensive 24-85mm EF-series zoom mentioned
earlier turned in a surprisingly good performance. (For my testing of the 10D,
I had on hand the 100mm macro lens again (for res-target shots, to insure maximum
sharpness), the L-series 28-70 f/2.8, and a sample of their new L-series 16-35mm
f/2.8. I haven't done any definitive lens testing of the new 16-35mm yet, but
have to say it's a very sweet little lens. - More compact than I'd expected
for it's f/2.8 constant aperture.)
Autofocus System
This is an area where I'm probably least qualified to comment, given the relatively
small amount of time I spend in "live" shooting situations with professional-grade
SLRs, but my impression of the 10D's AF system was very favorable overall. The
10D has an autofocus system with seven sensors, arrayed in a cross pattern in
the center of the frame. You can manually select which of these you want the
camera to pay attention to (handy for off-center subjects), or you can let the
camera decide. When it's operating in automatic AF mode, it will use the sensor
corresponding to the part of the subject closest to the camera. When shooting
in full Automatic exposure mode, the camera selects either One Shot or AI Servo
AF focus modes, depending on the state of the subject. (You can also set the
camera to do this in other modes, by selecting the AI Focus AF mode.) If the
subject remains stationary, the camera remains in One Shot AF mode. However,
if the subject begins to move, the camera automatically switches over to AI
Servo AF and begins tracking the subject as it moves. This is a handy feature,
letting you automatically track moving subjects without having to manually adjust
the focus mode. In any of the Creative Zone modes, you can set the AF mode to
One Shot, AI Focus AF, or AI Servo AF. The 10D employs a technology that Canon
calls Predictive AF, which means that if the subject approaches or retreats
at a constant rate, the camera can track the subject and predict the focus distance
before the image is captured. Thus, you get the correct focus exactly at the
moment of exposure. The AF system's low light limit is EV 0.5, which combined
with the AF assist lamp, provides excellent focusing in dim lighting conditions.
The AF system is one of the areas in which the EOS-10D has been significantly
upgraded relative to the system used in the D30 and D60 before it. Besides the
expansion to 7 AF zones, the new system is a good bit faster as well. Canon
rates the performance of their AF systems by the point at which they cease to
be able to track an object moving at a constant speed toward the camera, using
a given lens. - The closer an object gets, the more rapidly the focusing point
will change, so minimum focusing distance at a constant approach speed does
provide a good measure of AF speed. Using Canon's EF 300/3.8 IS USM lens as
the basis of comparison, the EOS-10D can track an object moving at 30 mph (50
kph) down to a minimum distance of 26.4 feet (8 meters). Under the same conditions,
the D60 would lose focus tracking at a distance of 39 feet or 12 meters. Thus,
by this measure, the EOS-10D's AF system is half again as fast as that of the
D30 and D60 before it.
The above notwithstanding, I did encounter a few situations where the 10D's
autofocus had problems, delivering out-of-focus images. Significantly though,
these were all situations where I'd manually selected an AF point, wanting to
set focus on a specific part of the subject. (One of Marti's eyes, for example,
in my standard "Outdoor Portrait" shot.) What I suspect happened was
that the AF sensor I'd chosen ended up over a low-contrast region (for example,
Marti's cheek) as I pressed the shutter, giving the camera little to judge focus
with. The AF point indicator I'd chosen would flash to indicate that the camera
was focusing, but I was given no sign that the focusing hadn't been successful.
Operator error, in other words. As far as I can tell, I never experienced a
focus failure when using the camera in any of it's automatic focusing modes.
The moral of this tale is to exercise particular caution when you're working
with a manually-selected AF point, to insure that you're giving the camera something
usable to focus on.
| Free Photo Lessons | |
|
The Aperture Priority and Shutter Priority modes work much the same as on any
other camera, allowing you to adjust one exposure variable while the camera
selects the other for the best exposure. A Custom menu setting enables a "safety
shift," which automatically adjusts the exposure to compensate for sudden
changes in brightness. Program mode keeps both variables under automatic control,
while Manual mode gives you control over everything. The Automatic Depth-of-Field
mode (A-DEP) uses all seven autofocus zones to determine the depth of field
in the active subject area. Once it has determined the range of focusing distances
present across the seven zones, it automatically computes the combination of
aperture and shutter speed needed to render the nearest and furthest points
in sharp focus. This is a remarkably useful feature, even for professional photographers.
In many situations, you want to keep several subjects in focus, while at the
same time trying for the highest shutter speed (largest aperture) that will
permit that. In practice, faced with such situations, I've usually resorted
to just picking the smallest aperture feasible and hoping for the best. With
the 10D's A-DEP mode, the camera takes the guesswork out of this process and
gives you the fastest shutter speed it can manage while still keeping things
in focus. (In playing with this, I was often surprised by how large an aperture
in fact would work. I frequently would have chosen a much smaller aperture to
stay on the safe side.)
A new feature on the EOS 10D is an ISO speed extension, which increases the
10D's maximum ISO speed to 3,200. (Default ISO is 100, other normal options
are 200, 400, 800, and 1,600.) For adjusting the exposure, the 10D's Exposure
Compensation setting increases or decreases overall exposure from +/-2 EV in
either one-half or one-third EV increments. The default step size is 1/2 EV,
but you can set an increment of 1/3 EV via the camera's Custom menu. (Frankly,
I've always found that one-third EV compensation is just about ideal for digicams.
One-half EV steps are just too broad to set critical highlight exposures accurately.)
Automatic exposure bracketing on the EOS 10D lets you set the total exposure
variation (across three shots) at anywhere from +/- 1/2 or 1/3 EV all the way
up to +/- 2 EV. The nice part is that the automatic variation is centered around
whatever level of manual exposure compensation you have dialed in. Thus, you
could set positive compensation of 0.7EV, and then have the camera give you
a variation of +/- 2/3 EV around that point. Whatever EV step size is set through
Custom menu also sets the bracketing step size.
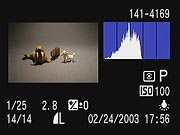 I
really like the amount of information the 10D gives you about its exposure,
not only in terms of the settings it's using, but in the form of feedback on
how pictures you've captured turned out. You can select an "Info"
display mode when viewing captured images on the rear-panel LCD screen, which
produces the display shown at right. Notable here is that you not only can see
all the exposure parameters, but you get excellent feedback on the tonal range
of the image itself. One form of feedback is the histogram display at upper
right, which shows how the tonal values are distributed within the image. Histogram
displays are useful for directly seeing how the overall exposure turned out
in an image, but I've found them to be of limited usefulness for making critical
judgments about highlight exposure.
I
really like the amount of information the 10D gives you about its exposure,
not only in terms of the settings it's using, but in the form of feedback on
how pictures you've captured turned out. You can select an "Info"
display mode when viewing captured images on the rear-panel LCD screen, which
produces the display shown at right. Notable here is that you not only can see
all the exposure parameters, but you get excellent feedback on the tonal range
of the image itself. One form of feedback is the histogram display at upper
right, which shows how the tonal values are distributed within the image. Histogram
displays are useful for directly seeing how the overall exposure turned out
in an image, but I've found them to be of limited usefulness for making critical
judgments about highlight exposure.
Digital cameras need to be exposed more or less like slide film, in that you
need to zealously protect your highlight detail. Once you've hit the limit of
what the sensor can handle, the image "clips" and all detail is lost
in the highlight areas. The problem is that it's quite common for critical highlights
to occupy only a very small percentage of the overall image area. Because they
correspond to such a small percentage of the total image pixels, the peak at
100 percent brightness can be very hard to distinguish in the histogram display.
To handle such situations, the 10D blinks any pixels that are 100 percent white
on its screen, alternating them between black and white. This makes localized
overexposure problems leap out at you, making it very easy to control the critical
highlight exposure precisely. (The sample image shown in the display above is
a pathological example, chosen to show how the feature works. In practice, you'd
probably never overexpose an image that badly.)
 Besides
the abovementioned exposure information and feedback, the 10D's playback options
include a thumbnail index display, normal full-frame viewing of captured images,
and a zoomed view, as shown at right. There's also a "jump" mode,
activated via the Jump button on the rear panel of the camera. Jump mode lets
you very quickly move through images stored on the memory card, jumping 10 shots
at a time. The zoomed playback option is another area where the 10D improves
greatly on the performance of the D60. The D60 had only a 3x fixed zoom level,
and you could only view 9 separate segments of the image, moving stepwise between
them. In contrast, the E10D's image playback can be zoomed in very small steps
anywhere from 2-10x. Once you've zoomed in at any level, you can scroll the
zoomed window all around the image area, using the large rear-panel control
dial and one of the rear-panel buttons to control direction and movement. Very
slick, a welcome improvement!
Besides
the abovementioned exposure information and feedback, the 10D's playback options
include a thumbnail index display, normal full-frame viewing of captured images,
and a zoomed view, as shown at right. There's also a "jump" mode,
activated via the Jump button on the rear panel of the camera. Jump mode lets
you very quickly move through images stored on the memory card, jumping 10 shots
at a time. The zoomed playback option is another area where the 10D improves
greatly on the performance of the D60. The D60 had only a 3x fixed zoom level,
and you could only view 9 separate segments of the image, moving stepwise between
them. In contrast, the E10D's image playback can be zoomed in very small steps
anywhere from 2-10x. Once you've zoomed in at any level, you can scroll the
zoomed window all around the image area, using the large rear-panel control
dial and one of the rear-panel buttons to control direction and movement. Very
slick, a welcome improvement!
Another feature deserving comment is the 10D's separation of the autoexposure
and autofocus lock functions. In consumer-level digicams, half-pressing the
Shutter button locks exposure and focus simultaneously. You can use this to
deal with an off-center subject by pointing the camera at the subject, locking
exposure and focus, and then reframing the picture before finally snapping the
shutter. The only problem is that you sometimes need to perform a more radical
recomposition of the subject in order to determine the proper exposure. For
instance, you may want to zoom in on the subject, grab an exposure setting,
and then zoom back out before taking the picture. Situations like that require
locking the exposure independently of the focusing, and the 10D provides for
just such eventualities by way of a separate AE lock button on the back of the
camera, right under your right thumb. A very handy feature indeed, for those
times you need it.
The EOS 10D offers a full range of White Balance settings, including six presets,
an Auto setting, Custom setting, and Kelvin temperature setting. The six presets
include Daylight, Shade, Cloudy, Tungsten, Fluorescent, and Flash. The Custom
setting bases color balance on a previous exposure, meaning you can snap an
image of a gray card and base the color temperature on that image. The Kelvin
temperature setting lets you get even more specific, and offers a range of temperatures
from 2,800 to 10,000 degrees Kelvin. A White Balance bracketing option snaps
three images at different color balances, much like the Auto Exposure Bracketing
feature. Bracketing steps are from -/+ 3 stops in whole-stop increments. (Each
stop corresponds to 5 mireds of a color conversion filter.) The EOS10D also
offers a Parameters option through the LCD menu, which lets you select Adobe
RGB color space, or set up as many as three Parameters setups. Each setup lets
you adjust Contrast, Sharpness, Saturation, and Color Tone, but the custom setups
are all based on the sRGB color space. The white balance bracketing and Adobe
RGB color space option are both new features on the 10D.
Low Light Capability
When operating the camera in full-manual exposure mode, the EOS 10D offers
a Bulb exposure setting for very long exposures. Normally, exposure times are
limited to a maximum of 30 seconds in Aperture- or Shutter-Priority modes, but
in Manual mode, you can expose for as long as 999 seconds by selecting Bulb
mode and holding down the Shutter button for as long as you want the shutter
to remain open. Obviously, 999-second exposures aren't a practical reality,
as sensor noise will totally swamp the signal long before that point is reached.
Still though, the 10D seems quite able to take very long exposures with
very little image noise resulting. - Like the D60, the 10D employs noise reduction
algorithms that automatically reduce excess image noise from long exposures.
A full discussion of image sensor noise is beyond the scope of this review,
but the simple story is that the most obvious and objectionable noise you'll
see in long digicam exposures is so-called "fixed pattern" noise,
caused by variations in "dark current" between sensor pixels. "Dark
current" is just what it sounds like. Current (a signal) appears even when
the sensor isn't being exposed to light. When you look at a long time exposure
shot with a digital camera, you'll often see very bright pixels, where minor
manufacturing defects have resulted in unusually high "dark current"
levels. Often called "hot pixels," these flecks of color are very
distracting visually.
The normal way to deal with hot pixels is to take an exposure with the camera's
shutter closed, immediately after shooting the subject. If this "dark frame"
is exposed for the same time as the subject was, you can largely eliminate the
hot pixel problem by subtracting the dark frame information from the actual
exposure. In practice, this works fairly well, but has the disadvantage that
you have to wait for the dark frame exposure to be taken, requiring an appreciable
amount of time in the case of long time exposures. (If you shot a one-minute
exposure for the photo itself, you'll have to wait another minute for the dark
frame exposure to be made.)
While most other high-end digicams on the market use a dark frame subtraction
method to deal with image noise, the 10D (like the D60 before it) appears to
be doing something very different, as there's very little delay between the
end of the primary exposure and the writing of the image file to the memory
card. There's clearly no "dark frame" exposure involved. I suspect
that this advanced noise reduction processing in the 10D is another consequence
of the "active pixel" CMOS technology Canon developed internally.
Having active circuitry associated with each pixel in the sensor array allows
lots of fancy processing that would be impossible otherwise, and it looks like
Canon's noise reduction system takes advantage of this.
| What's up with RAW? | |
|
Flash
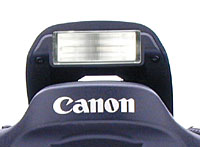 The
EOS 10D's built-in flash has a guide number rating of 43 feet (13 meters) at
ISO 100, translating to a range of about 15 feet at ISO 100 with a f/2.8 lens.
(Reasonably powerful, but not dramatically so.) The 10D gives you a great deal
of control over flash exposure, allowing you to adjust flash and ambient exposure
independently of each other, in one-half or one-third EV increments. This makes
it very easy to balance flash and ambient lighting for more natural-looking
pictures. The camera also boasts a custom function for "Auto Flash Brightness
Reduction" (Custom Function 14) which is particularly useful when using
the flash for fill illumination in daylight shooting conditions. With this mode
enabled, if the ambient light is above a certain level, the camera will assume
you're using the flash in a "fill" mode, and will automatically back
off its intensity a bit, to avoid washing out the natural lighting.
The
EOS 10D's built-in flash has a guide number rating of 43 feet (13 meters) at
ISO 100, translating to a range of about 15 feet at ISO 100 with a f/2.8 lens.
(Reasonably powerful, but not dramatically so.) The 10D gives you a great deal
of control over flash exposure, allowing you to adjust flash and ambient exposure
independently of each other, in one-half or one-third EV increments. This makes
it very easy to balance flash and ambient lighting for more natural-looking
pictures. The camera also boasts a custom function for "Auto Flash Brightness
Reduction" (Custom Function 14) which is particularly useful when using
the flash for fill illumination in daylight shooting conditions. With this mode
enabled, if the ambient light is above a certain level, the camera will assume
you're using the flash in a "fill" mode, and will automatically back
off its intensity a bit, to avoid washing out the natural lighting.
Another nice touch was the Flash Exposure Lock button, which fires the flash
under manual control before the actual exposure, to determine the proper exposure
setting. This struck me as very handy, akin to the more conventional autoexposure
lock function for handling difficult ambient lighting conditions. A Flash Exposure
Compensation feature controls the flash exposure +/- 2 stops in 1/2 or 1/3-stop
increments.
Several of the more impressive features of the Canon flash system depend on
the dedicated 550 EX speedlight. (While a number of Canon speedlights will work
just fine with the 10D, their previous top-end 540EX unit apparently does not,
so you'll need the new 550EX to fully tap the 10D's flash potential.) Among
these are true FP (focal plane) flash sync, flash exposure bracketing with external
flash units, and flash modeling. FP sync requires a flash unit to provide uniform
light output for a relatively long period of time, long enough for the focal
plane shutter curtain to fully traverse the "film" plane (sensor plane
in the case of the 10D). On the 10D, this requires a flash duration of 1/200-second.
Uniform, long-duration flash pulses like this permit use of shutter speeds as
high as the 1/4,000-second maximum that the 10D is capable of. This can be invaluable
when you want to exclude ambient light from the exposure.
Here's the rundown on Canon Speedlights and their compatibility with the 10D:
| Speedlight Model | On-Camera Capability | E-TTL Wireless Compatibility |
| 550EX | All | Master or Slave |
| 480EG | External auto plus manual operation | None |
| 540EZ | Manual operation only | None |
| 430EZ | Manual operation only | None |
| 420EX | All | Slave Only |
| 420EZ | Manual operation only | None |
| 380EX | All | None |
| 220EX | All | None |
| 200E | Not Compatible | None |
| 160E | Not Compatible | None |
| MR-14EX Macro Ring | All | Master Only |
| MT-24EX | All | Master Only |
| ST-E2 transmitter | E-TTL, attach to camera | Master Only |
| Non-dedicated shoe-mount units | Manual operation only | n/a |
| Studio strobe packs | Manual operation only, connect via threaded PC sync socket on camera body | n/a |
You'll note the references to "E-TTL remote" capabilities in the
table above. Canon's Speedlight system permits TTL flash metering with multiple
remote units, and even allows you to set differential power ratios between the
slaved units, over a six-stop flash exposure range.
The "Flash Modeling" feature of the 550EX speedlight is quite useful.
With a F550EX connected to the 10D, pressing the camera's Depth of Field Preview
button causes the speedlight to fire at 70 flashes per second for about one
second. This creates the illusion of a constant light source for your eyes,
letting you preview the lighting on your subject when the flash fires. VERY
handy, and likely to save lots of shoot/check/reshoot time!
As alluded to above, the "X-sync" speed of the 10D is 1/200-second.
(This is the maximum shutter speed that can be used on the 10D when working
with a non-dedicated, FP-capable speedlight.) When used with higher-powered
studio strobe systems, Canon recommends a maximum shutter speed of 1/60-second
or slower, to accommodate the time/intensity profile of such units. Finally,
via a Custom menu setting, you can program the 10D to use a shutter speed of
1/200-second in Aperture-Priority exposure mode regardless of ambient light
levels. (I guess this is useful, if you know you're going to be hopping in and
out of flash mode, but other than a convenient preset for the shutter speed,
it's little different than simply using Manual mode to set both shutter speed
and aperture.)
A final benefit of the dedicated Canon speedlights is that they carry powerful
autofocus assist illuminators that can extend the range of the built-in AF assist
light of the 10D. The AF assist beam on the 550EX is rated as good to about
50 feet, versus the roughly 13 feet of the lamp on the 10D itself. (Note that
the ST-E2 wireless sync transmitter can also be used for AF assist during non-flash
photography, a handy trick.)
Overall, I was very impressed with how well the 550EX worked in concert with
the EOS-10D. Thanks to the true TTL flash metering, exposures were always spot-on,
no matter what sort of wild bounce/diffusion combinations I was experimenting
with. The flash exposure compensation control also provided very fine-grained
control over the balance between flash and ambient illumination. Very impressive.
Continuous Shooting Mode and Self-Timer
Among digital SLRs currently on the market, the 10D comes in about midway in
terms of shooting speed, very competitive with units it'll be stacked up against
in the marketplace. The Continuous Shooting mode is rated by Canon at three
frames per second, a number that matched almost exactly my own tests (which
showed a frame rate of 2.94 seconds). This is about on a par with the 2.88 frames
per second of the Fuji S2 Pro, and Nikon D100, but a good bit slower than the
blazing eight frames per second of Canon's own EOS-1D. Fast enough for you?
You'll have to be the judge of that. Professional sports shooters will doubtless
want more (they being a primary target of the EOS-1D), but for most situations,
I expect the 10D will be plenty fast enough.
The camera's Drive setting also accesses a Self-Timer mode, which opens the shutter 10 seconds after the Shutter button is pressed, giving you time to dash around in front of the camera.
Shutter Lag/Cycle Times
When you press the shutter release on a camera, there's usually a delay or lag
time before the shutter actually fires. This time allows the autofocus and autoexposure
mechanisms time to do their work and can amount to a fairly long delay in some
situations. Since this number is almost never reported on, and can significantly
affect the picture taking experience, I now routinely measure it.
NOTE: My qualitative characterizations of camera performance below (that is, "reasonably
fast," "about average," etc.) are meant to be relative to
other cameras of similar price and general capabilities. Thus, the same
shutter lag that's "very fast" for a low-end consumer camera might
be characterized as "quite slow" if I encountered it on a professional
model. The comments are also intended as only a quick reference: If performance
specs are critical for you, rely on the absolute numbers to compare cameras,
rather than my purely qualitative comments.
|
|
||
|
|
|
|
| Power On -> First shot |
|
Fairly fast. |
| Shutdown |
|
Effectively zero, as there is no lens to retract. Camera may spend more or less time writing the contents of its buffer memory to the memory card, but that'll depend a great deal on what you were shooting, how full the buffer was, and how fast the memory card is that you're using. |
| Play to Record, first shot |
|
Time from playback mode to ready to shoot. Very fast, as camera has "shooting priority," is always ready to shoot. |
| Record to play (max res) |
|
Time to display large/fine file immediately after shot is captured. Fairly fast Camera apparently has to write image to card before it can display. |
| Shutter lag, full autofocus |
|
AF speed will vary greatly depending on lens used. This time was with Canon 16-35mm zoom lens, focusing at fairly close range (about a meter). Very fast. |
| Shutter lag, manual focus |
|
Time with same lens as above, but set to manual focus mode. Also very fast. (In the "full AF" time above, the lens was already focused on the target from the previous shot, hence the AF and manual focus times are the same.) |
| Shutter lag, prefocus |
0.231 |
Delay with shutter button half-pressed and held before the exposure. Very fast. Second time is for Continuous AF with the camera in AI Servo mode, also quite fast. Not the very fastest times I've seen in an SLR (which are somewhere around 0.059 seconds), but much faster than most consumer cameras. |
| Cycle Time, large/fine JPEG |
|
Very fast. Shoots at around 0.42-second minimum intervals for first nine shots, then slows to about one second per shot. Time is with Lexar 256MB CompactFlash card. With slower Mr. Flash card, times are similar. First nine shots at about 0.42-second minimum intervals, then about 1.22-second minimum intervals. |
| Cycle Time, small/basic JPEG |
|
Very fast. Nearly identical performance to large/fine files, same buffer capacity, only buffer clearing time reduces with small files. |
| Cycle Time, RAW mode |
|
RAW mode cycle times are the same while filling "first buffer" (first eight shots), drop to right about two seconds for "second buffer." Buffer clearing times ranged from 131.36 seconds with Mr. Flash card to 50.62 seconds with Lexar card. Note that RAW mode also embeds a JPEG file. Times are for RAW plus a small/basic JPEG. |
| Continuous Mode, large/fine JPEG |
(2.94 fps) |
This fast for nine shots. Buffer clearing ranged from 30.25 seconds with Mr. Flash to 13.8 seconds with Lexar. |
| Continuous Mode, small/basic JPEG |
(2.94 fps) |
Same speed and run length as large/fine files. Buffer clearing from 6.95 seconds with Mr. Flash to 5.37 seconds with Lexar. |
| Continuous Mode, RAW mode |
(2.94 fps) |
Same speed and run length as large/fine. Buffer cleared in 37.13 seconds with Lexar card. (89.60 seconds with Mr. Flash.) |
Overall, the EOS-10D is a pretty fast camera. It's roughly three frames/second in continuous mode is pretty equivalent to the speeds of competing SLRs, and shutter lag is very good. The 9-frame buffer memory is great for capturing rapid action, and in all but the most intensive sports photography applications, should prove more than adequate.
Two Buffer Memories?
As with the D60 before it, though I was puzzled by how quickly the 10D seemed
to process each shot after its buffer filled (e.g., after the first nine shots),
but how long it took to completely clear the buffer. If it was snapping additional
images every second or so, how could it take 28 to 85 seconds for the buffer
to empty completely? Out of curiosity, I experimented with much longer
run lengths, and discovered that the 10D apparently has two buffers
(just like the D60): After the first buffer fills, shooting proceeds at a
somewhat slower pace for some number of shots (until the second buffer fills?),
after which cycle times increase pretty dramatically.
Shooting in continuous mode, saving files in the large/fine JPEG format, the first nine shots were captured at intervals of about 0.34 seconds. The interval between shots eight and nine was 1.14 seconds, and then the intervals between shots nine through 27-35 were about 0.84 seconds. (The point at which the "second buffer" filled varied quite a bit depending on the subject matter I was shooting.) After that point, the interval jumped to about 2.4 seconds, and remained there. Shooting in continuous mode and saving RAW format files, the behavior is similar, but the number of shots the "second buffer" holds is less, and the eventual slowdown much more severe. In RAW mode, performance is identical for the first 9 shots, then the camera pauses for 2.04 seconds before the 10th shot, and then alternates between 1.67 and 1.88 seconds for the next 6 shots. Finally, it slows to about 7 seconds between shots for shots number 17 and above.
Unlike the D60 though, I didn't observe this behavior in single-shot mode. After the first nine shots that filled the main buffer memory, the cycle time between shots fluctuated wildly, ranging from 0.61 to 4.03 seconds.
I'm not sure how to interpret these results, but the bottom line is a bit more graceful degradation of cycle time once you get past the limits of the primary buffer memory than is usually the case.


LCD Illuminator Button: Diagonally up and to the left of the AF Mode / White
Balance button, this button illuminates the status display window with an orange
backlight for a few seconds. (This is a particularly welcome enhancement
over the D60.)

Diopter Adjustment Dial: Located outside the top right corner of the
viewfinder eyepiece, this dial adjusts the optical viewfinder's focus to accommodate
eyeglass wearers, across an unusually wide range of -3 to +1 diopter.

Menu Button: Topping a column of buttons along the left side of the LCD
monitor, this button accesses the 10D's LCD-based operating menu in all modes.
Pressing the Menu button a second time cancels the menu display.

Info Button: Just below the Menu button, this button displays the current
exposure settings on the LCD screen when pressed. In Playback mode, pressing
this button brings up an information screen that reports the exposure settings
that the picture was taken with, and also displays a small histogram, which
shows the number of pixels having each possible brightness value.

Jump Button: Directly below the Info button, this button allows you to
jump 10 frames forward or backward when viewing images in Playback mode. Once
pressed, a jump bar appears in the LCD screen, and jumping is controlled by
turning the Quick Control Dial forwards or backwards. The Jump button is active
only in Playback mode.

Direction Button: Just below the Jump button, this button changes the
direction that the Quick Control dial moves an enlarged image view across the
screen. When an image has been enlarged, the Quick Control dial either moves
the view up and down or left and right, and this button controls the direction
of the scroll.

Play Button: The final button on the left side of the back panel, this
button puts the camera into Playback mode, regardless of the Mode dial setting.
(Turning the Quick Control dial in this mode scrolls through captured images.)
Playback mode can be canceled by hitting the Play button again, or by touching
the Shutter button. (The 10D is a "shooting priority" camera. It's
always ready to shoot a picture, regardless of its current mode. Simply pressing
the Shutter button returns it immediately to capture mode.)

Erase Button: Resting beneath the lower right corner of the LCD monitor,
this button accesses the Erase menu, which allows you to erase the current image
or all images on the card (except for protected ones). There is also an option
to cancel. The Erase function works in Playback mode and the quick review mode
only.

Quick Control Dial Switch: Located on the back of the camera just above
the Quick Control dial, this switch activates and deactivates the Quick Control
dial, helping prevent any unintentional changes in camera settings.
Quick Control Dial: To the right of the LCD monitor on the camera's back
panel, this dial selects various camera settings and menu options when turned
while pressing a control button or while in an LCD menu screen. When shooting
in the Creative Zone (except for Manual exposure mode), turning the dial while
halfway pressing the Shutter button sets the exposure compensation (from -2
to +2 in one-third or one-half EV increments). In Playback mode, this dial scrolls
through captured images on the CompactFlash card. It also navigates the index
display and scrolls around within an enlarged image.
Set Button: Located in the center of the Quick Control dial, this button
confirms menu selections and camera settings when using the LCD menu system.
Through the Custom Function menu, this button can be programmed to control the
image quality, parameters, or image playback in conjunction with the Quick Control
dial. (The default is for it to have no function in record mode.)
Assist Button: In the top right corner of the rear panel, this button
lets you instantaneously switch to a preset registered AF point when pressed
in conjunction with the Focus Area Selector button. A Custom menu function lets
you program this button to switch to the registered AF point when pressed on
its own. It can also be programmed to control Exposure Compensation, aperture
setting, or FE Lock functions.

AE / FE Button: To the right of the Assist button and marked with an
asterisk, this button locks the exposure until the Shutter button is pressed.
When pressed while the flash is activated, this button locks the flash exposure,
which signals the camera to fire a small pre-flash to measure the exposure before
locking it. (This decoupling of exposure lock from autofocusing is a very useful
"pro" feature seldom seen on lower-end cameras.) Through the Custom
menu, you can program this button to lock exposure and focus together, or only
one of the variables.

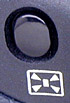
Focus Area Selector Button: Just beside the AE / FE button, this button
allows you to choose the focus area manually or automatically in Program AE,
Shutter-Priority AE, Aperture-Priority AE, or Manual Exposure modes. Pressing
the button and rotating either control dial cycles through an automatic setting,
or your choice of seven manually-selected focus areas. The automatic setting
selects the active focus point(s) based on the position of the subject within
the frame, and its proximity to the seven focusing points (shown as seven small
boxes arranged in a cross pattern in the viewfinder). Whenever you press this
button, your current choice of focusing area is reflected in the top-panel LCD
data readout by the position of a dash (or series of dashes) in the LCD data
readout. Turning the Quick Control dial adjusts the focus area vertically, while
the Main dial adjusts horizontally.
![]()
Flash Off Mode: The first mode in the Easy Shooting Zone, Flash Off mode
disables both the internal flash unit and any external flash unit connected.
Focus is set to AI Focus mode, drive mode is set to Single, and metering is
set to Evaluative. The camera controls ISO and Auto white balance as well.
![]()
Night Scene Mode: This mode is for taking pictures of people at sunset
or at night. The autofocus mode is automatically set to One Shot. Drive mode
is set to Single Shot, and metering mode is set to Evaluative. Since slower
shutter speeds will be used, a tripod is recommended to prevent movement from
the camera. The built-in flash is automatically enabled and synched with the
slower shutter speed, so subjects need to remain still after the flash fires
to avoid ghostlike afterimages. ISO is automatically adjusted by the camera.
(For night exposures without the flash, Canon recommends shooting in Landscape
mode.)
![]()
Sports Mode: This mode uses a faster shutter speed to capture fast-moving
subjects. The autofocus mode is automatically set to AI Servo. Drive mode is
set to Continuous Shooting, ISO is set to Auto, and metering mode is set to
Evaluative. The onboard flash isn't available in this mode (since it can't cycle
fast enough to keep up with the continuous exposure mode).
![]()
Close-up Mode (Macro Mode): Turning the Mode dial to the macro flower
symbol sets the camera for capturing smaller subjects such as flowers, jewelry,
and other small details. The autofocus mode is automatically adjusted to One
Shot, the drive mode is set to Single Shot, and the metering mode is set to
Evaluative. ISO is set to Auto. Close-up mode takes advantage of the current
lens' minimum focal distance. However, an EOS dedicated macro lens and the Macro
Ring Lite MR-14EX are recommended for better close-up photography. (Unlike the
macro mode on most consumer digicams, Macro mode on the 10D has no effect on
lens focusing range, as that parameter is entirely determined by the lens being
used.)
![]()
Landscape Mode: Landscape mode combines slower shutter speeds with smaller
aperture settings to increase the depth of field when shooting broad vistas
and sweeping landscapes. This mode is also good for night scenes without people
in them. The built-in flash is automatically disabled, even if it's already
raised. Because this mode uses slower shutter speeds, a tripod may be needed.
Metering is again set to Evaluative and ISO to Auto.
![]()
Portrait Mode: This mode uses a large aperture setting to decrease the
depth of field, which blurs the background to emphasize the subject. ISO is
set to Auto, metering to Evaluative, and AF mode to One Shot.
![]()
Full Automatic Mode: The final mode in the Easy Shooting Zone, Full Automatic
is indicated on the Mode dial by a green rectangular outline. In this mode,
the camera makes all exposure decisions with the exception of image quality.
Autofocus mode is set to AI Focus. (AI Focus evaluates subject movement, automatically
sets either one-shot AF or AI Servo AF automatically.) Drive mode is set to
Single Shot, and the metering mode is set to Evaluative.
![]()
Program AE: This is the first mode in the Creative Zone of the Mode Dial.
Program AE works similarly to the Full Automatic exposure mode, but allows more
control over the exposure variables. Aperture and shutter speed are automatically
selected by the camera, but you can bias the exposure to larger or smaller apertures
by turning the Main control dial, which will change the combination of aperture
and shutter speed so as to maintain the same exposure value, but with a different
choice of aperture/shutter speed. Turning the Quick Control dial in this mode
adjusts the exposure compensation setting, to increase or decrease overall exposure.
![]()
Shutter-Priority AE: This mode allows you to manually set the shutter
speed anywhere from 1/4,000 to 30 seconds, while the camera chooses the best
corresponding aperture setting. You have control over all other exposure variables,
including exposure compensation.
![]()
Aperture-Priority AE: The opposite of Shutter-Priority mode, Aperture-Priority
AE allows you to set the lens aperture (with available ranges depending on the
lens in use), while the camera selects the most appropriate shutter speed. Again,
you have control over all other exposure variables, including exposure compensation.
![]()
Manual Exposure: This mode provides the same range of exposure control
as the other Creative Zone exposure modes (except for exposure compensation),
but lets you control both shutter speed and lens aperture independently. The
shutter speed range is extended to include a Bulb setting, allowing long exposures
from one to 999 seconds. A display in the top LCD panel reports whether the
camera thinks your settings will result in under, over, or correctly exposed
photos.
![]()
Automatic Depth of Field AE: This is the final mode in the Creative Zone,
and is meant for taking pictures of large groups of people, landscapes with
foreground detail, or any subject with elements of interest at varying distances
from the camera. This mode puts the camera in control of both the shutter speed
and aperture values, but you can adjust the other exposure variables. (This
mode cannot be used if the lens focus mode is set to manual.) When shooting
in Automatic Depth of Field AE, the camera sets both the exposure and focus
distance to achieve a sharp focus over a wide depth of field. It uses the autofocus
system to measure the distance to the subjects covered by each of the three
autofocus zones, and then attempts to set the focusing distance and lens aperture
so as to render all three subject areas in sharp focus.
Playback Mode: This mode is entered by pressing the Play button on the
back panel. Playback mode lets you erase images, protect them, or set them up
for printing on DPOF compatible devices. You can also view images in an index
display, enlarge images to 3x, view a slide show of all captured images, or
rotate an image. The Info button activates an information display, which reports
the exposure settings for the image and graphs the exposure values on a small
histogram.
Operating Menu: This menu is available in all of the camera modes, though
a few of the capture-related options are only available in the Creative Zone.
Pressing the Menu button calls up the Operating menu.
 Quality:
Sets the image size and the compression ratio. Options are Large/Fine (3,072
x 2,048 pixels), Large/Normal (3,072 x 2,048 pixels), Medium/Fine (2,048 x
1,360 pixels), Medium/Normal (2,048 x 1,360 pixels), Small/Fine (1,536 x 1,024
pixels), Small/Normal (1,536 x 1,024 pixels), and RAW (3,072 x 2,048 pixels,
with lossless compression).
Quality:
Sets the image size and the compression ratio. Options are Large/Fine (3,072
x 2,048 pixels), Large/Normal (3,072 x 2,048 pixels), Medium/Fine (2,048 x
1,360 pixels), Medium/Normal (2,048 x 1,360 pixels), Small/Fine (1,536 x 1,024
pixels), Small/Normal (1,536 x 1,024 pixels), and RAW (3,072 x 2,048 pixels,
with lossless compression). Parameters:
Lets you reference any of up to three sets of image-processing parameters
loaded into the camera through the accompanying software. These parameters
can affect contrast, sharpness, color saturation, and color tone adjustments
in the same way that the Canon's RAW Image Converter software does when processing
RAW format images. Also available are Standard and Adobe RGB settings.
Parameters:
Lets you reference any of up to three sets of image-processing parameters
loaded into the camera through the accompanying software. These parameters
can affect contrast, sharpness, color saturation, and color tone adjustments
in the same way that the Canon's RAW Image Converter software does when processing
RAW format images. Also available are Standard and Adobe RGB settings. Review:
Determines whether images appear on the LCD monitor immediately after they
are taken. Options are On, On (Info), or Off. The On (Info) setting displays
the image along with an exposure information readout and histogram.
Review:
Determines whether images appear on the LCD monitor immediately after they
are taken. Options are On, On (Info), or Off. The On (Info) setting displays
the image along with an exposure information readout and histogram. Format:
Reformats the CompactFlash card, which erases all files (even protected ones).
Format:
Reformats the CompactFlash card, which erases all files (even protected ones).Custom Functions: The custom function submenu is accessed through the
main operating menu (see above). The custom functions let you adjust how many
of the EOS-10D's more basic functions operate. Here's a list of the contents
of the Custom Function menu, and the options associated with each:
 01-Set
Button Function when Shooting: Controls the function of the Set button
when in shooting mode. Options are:
01-Set
Button Function when Shooting: Controls the function of the Set button
when in shooting mode. Options are:
 07-AF
Point Registration: Lets you register a frequently-used AF point as the
home position.
07-AF
Point Registration: Lets you register a frequently-used AF point as the
home position.
 13-Assist
Button Function: Controls the function of the Assist button.
13-Assist
Button Function: Controls the function of the Assist button.
Image Storage and Interface
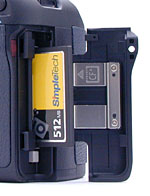 The
EOS 10D utilizes CompactFlash (Type I and II) memory cards as its image storage
medium, which should never be removed from the camera while in use. (Removing
a card while the camera is still writing to it could cause permanent damage
to the card.) The EOS 10D does not ship with a memory card, so you'll want to
purchase a large capacity card right away. I'd recommend picking up at least
a 128MB card for starters, given the EOS 10D's large, 3,072 x 2,048-pixel maximum
resolution. The table below shows card capacities and approximate compression
ratios for the various file sizes and types, based on a 138MB memory card. Like
the D60 before it, the 10D is fully compatible with IBM MicroDrives and other
Type II CompactFlash devices.
The
EOS 10D utilizes CompactFlash (Type I and II) memory cards as its image storage
medium, which should never be removed from the camera while in use. (Removing
a card while the camera is still writing to it could cause permanent damage
to the card.) The EOS 10D does not ship with a memory card, so you'll want to
purchase a large capacity card right away. I'd recommend picking up at least
a 128MB card for starters, given the EOS 10D's large, 3,072 x 2,048-pixel maximum
resolution. The table below shows card capacities and approximate compression
ratios for the various file sizes and types, based on a 138MB memory card. Like
the D60 before it, the 10D is fully compatible with IBM MicroDrives and other
Type II CompactFlash devices.
New on the EOS-10D is support for the so-called FAT 32 directory structure.
(Like most other digicams on the market, the earlier D60 supported only FAT
16.) The larger address space provided by FAT 32 is necessary for managing high-capacity
memory cards of 2GB or greater capacity. This hasn't been an issue until now,
but recently announced CF cards with capacities as high as 4 GB require FAT
32 support to use them.
|
Resolution/Quality 128MB Memory Card |
|
|
|
|
| Full Resolution 3,072x2,048 |
Images (Avg size) |
19 6.64 MB |
50 2.36 MB |
1.26 MB |
| Approx. Compression |
2.9:1 (Lossless) |
7:1 |
|
|
| Medium Resolution 2,048x1,360 |
Images (Avg size) |
- | 96 1.33 MB |
692 KB |
| Approx. Compression |
- | 6:1 |
|
|
| Low Resolution 1,536x1,024 |
Images (Avg size) |
|
871 KB |
449 KB |
| Approx. Compression |
|
|
|
|
The RAW mode listed above deserves some explanation. This is a format that records all the data from the sensor, exactly as it comes from the A/D conversion process. It is lossless compression, meaning that the file is reduced to a smaller size, but without losing any data in the process. It thus preserves all the original data from the sensor, but is nevertheless much more compact than an equivalent TIFF file. (The effective compression ratio relative to final file size is about 2.9 to 1.)
NOTE that the 10D's RAW format automatically includes an embedded JPEG as
well, which several of Canon's various software packages can extract via a
new button labeled "Extract JPEG." (RAW Image Converter applet,
TWAIN driver, Mac plug-in.) This should provide a quicker workflow for situations
where your final file format is JPEG. (Although I think my personal preference
would be for the dual-file RAW/JPEG approach used in the EOS-1D.)
The 10D has a USB port for (reasonably) rapid file transfers to the host computer.
I say "reasonably" fast, because the USB connection obviously aren't
nearly as speedy as the FireWire (IEEE 1394) connection on Canon's EOS-1D
and the Nikon D1x and D1h.) Unfortunately, the 10D's USB connection also doesn't
appear to be nearly as fast as those of many other cameras currently on the
market. - When I plugged it into my 2.4 GHz WindowsXP-based Sony VAIO desktop,
I clocked its download speed at only 305 KBytes/second. This is on the lower
end of the scale for USB-connected cameras I've tested. (The overall range
is from about 300 KB/sec to a bit over 600 KB/sec.) It therefore looks like
you'll need to consider picking up a fast card reader as part of your EOS-10D
purchase.
Lost Images? - Download this image-recovery program so you'll have it
when you need it...
Since we're talking about memory and image storage, this would be a good time
to mention the following: I get a ton of email from readers who've lost photos
due to a corrupted memory card. It's tragic when it happens, there are few
things more precious than photo memories. Corrupted memory cards can happen
with any card type and any camera manufacturer, nobody's immune. "Stuff
happens," as they say. A surprising number of "lost" images
can be recovered with an inexpensive, easy to use piece of software though.
Given the amount of email I've gotten on the topic, I now include this paragraph
in all my digicam reviews. The program you need is called PhotoRescue, by
DataRescue SA. Read our review of it if you'd like, but download the program now,
so you'll have it. It doesn't cost a penny until you need it, and even then
it's only $29, with a money back guarantee. So download PhotoRescue for
Windows or PhotoRescue for
Mac while you're thinking of it. (While you're at it, download the
PDF manual and quickstart
guide as well.) Stash the file in a safe place and it'll be there when you
need it. Trust me, needing this is not a matter of if, but when...
PhotoRescue is about the best and easiest tool for recovering digital
photos I've seen. (Disclosure: IR gets a small commission from sales of
the product, but I'd highly recommend the program even if we didn't.)
OK, now back to our regularly scheduled review...
Video Out
A video cable comes packaged with the 10D, allowing you to connect the camera
to your television set for image playback. The video signal can be switched
between NTSC and PAL via a menu preference. All menus, etc. appear on the external
video monitor, but do note that it won't work as a viewfinder for the same reason
that the rear-panel LCD won't. (The SLR optics mean that the sensor is only
exposed to light when the shutter is open.)
Power
 The EOS 10D uses the same BP-511 battery form factor first seen on the D30,
and now appearing as a standard design in many of Canon's camera and camcorder
lines. These batteries are a bit larger than a 2CR5 lithium cell, and look like
two of the smaller LiIon batteries, now becoming popular in compact digicams,
glued together. The BP-511 battery pack provides 1100 mAh at 7.4 volts for a
hefty charge of 8.1 watt-hours. A separate charger comes in the box with the
10D, but the 10D does not appear to include the "dummy battery"
pigtail to power the camera from AC power. The charger that ships with it doesn't
have any provision for connecting the dummy battery pigtail to it, nor is a
pigtail included in its standard bundle - You'll need to purchase the AC adapter
kit ACK-E2 if you need to run the camera from AC power.
The EOS 10D uses the same BP-511 battery form factor first seen on the D30,
and now appearing as a standard design in many of Canon's camera and camcorder
lines. These batteries are a bit larger than a 2CR5 lithium cell, and look like
two of the smaller LiIon batteries, now becoming popular in compact digicams,
glued together. The BP-511 battery pack provides 1100 mAh at 7.4 volts for a
hefty charge of 8.1 watt-hours. A separate charger comes in the box with the
10D, but the 10D does not appear to include the "dummy battery"
pigtail to power the camera from AC power. The charger that ships with it doesn't
have any provision for connecting the dummy battery pigtail to it, nor is a
pigtail included in its standard bundle - You'll need to purchase the AC adapter
kit ACK-E2 if you need to run the camera from AC power.
Lacking the ability to power the camera from an external power source, I wasn't
able to conduct my usual power-consumption measurements. For what it's worth
though, battery life seemed to be very good, as I could shoot literally all
day before getting a low-battery indication. (The D60's circuitry drew very
little power when it was in capture mode but not actively capturing an image.
Assuming that the 10D works more or less the same, you could expect a single
BP-511 cell to power it for as much as 10 hours in capture mode.)
Of course, regardless of how good a camera's battery life is, there's rarely
an excuse to not purchase at least one extra battery to bring along as a hot
spare. Plan on buying a second battery along with your 10D, it'll save you a
world of grief later on when the battery that you were sure was full of juice
runs out of gas in the middle of an important shoot.
Included Software
| |
||
|
The 10D ships with a pretty complete complement of software on both Mac and Windows platforms, including Canon's EOS DIGITAL Solution Disk (version 11), and a copy of Adobe Photoshop Elements. The EOS DIGITAL Solution Disk enables image downloading and management, as well as the necessary tools to process the camera's RAW files. Adobe Photoshop Elements is a streamlined version of the larger Photoshop application, and offers creative editing tools.
Not Included: "Brainware"
Every manufacturer includes some level of needed software with their cameras,
but what's missing is the knowledge and experience to know what to do with
it. For lack of a better term, I've called this "Brainware." There's
a lot involved between snapping the shutter, and watching a beautiful, professional-quality
print spool off your printer, and there's sadly very little guidance as to
how to get from point A to point B.
Fortunately, Uwe Steinmueller of OutbackPhoto.com has come up with an excellent series of e-books that detail every step of the process, show actual examples of files moving through the workflow, and the final results. If you want to get the absolute best prints possible from your digital files, you owe it to yourself to purchase one of the Outback Photo Digital Workflow books.
In the Box
The EOS 10D comes with the following items in the box:
- Neck strap.
- Eye cup.
- BP-511 battery pack and charger.
- CR2025 lithium battery.
- Video cable.
- USB cable.
- Two software CDs.
- Instruction manuals and registration information.
Test Results
While Canon told me that there could be minor tweaks made to the camera
between the unit I was given and the final production models, they felt that
any such changes would be minor. Based on the excellent performance turned in
by my test unit, I'd have to agree. Still, there's a remote chance that production
models may differ.
In keeping with my standard test policy, comments given here summarize only my key findings. For a full commentary on each of the tests, see the EOS-10D's "Pictures" page. Also, for more "pictorial" sample images, check out the Gallery Page, with a number of shots taken by resident Pro Gibbs Frazeur.
As with all Imaging Resource product tests, I encourage you to let your own eyes be the judge of how well the camera performed. Explore the images on the pictures page, to see how the EOS-10D's images compare to other cameras you may be considering.
Conclusion
| Free Photo Lessons | |
|
Oh - in case it wasn't obvious, this one is *highly* recommended!
Order the Canon
EOS-10D through our certified affiliate reseller.
Guaranteed good service and competitive bundles.
* Help support this site and future reviews! *
<<EOS-10D Sample Images | Additional Resources and Other Links>>
Reader Comments!
Questions, comments or controversy on this product? Click
this link to see what other Imaging Resource readers have had to say about
the Canon EOS-10D, or add comments of your own!