Canon EOS-1D Mark IV Live View
Like many SLRs these days, the Canon 1D Mark IV features a Live View mode for its rear-panel LCD monitor. The Live View mode lets you use the LCD monitor as a large viewfinder, and offers an exposure simulation option which displays the expected outcome of your chosen exposure settings. Live View must be enabled through Setup Menu 2 for either still images alone, or for movies and stills. Once enabled, the Set button is used to activate or disable Live View mode on the EOS 1D Mark IV, and the still image shooting mode in use is retained as you switch back and forth between Live View and regular shooting.
The Canon 1D Mark IV's Live View mode feature set is comprehensive, and the display offers a lot of information such as current settings, exposure, and composition aids (see illustration below, courtesy of Canon USA). The Canon 1D Mark IV groups several settings related to Live View and Movie shooting in a Live View function settings screen, which is somewhat confusingly located in Setup Menu 2, rather than where one might expect to find it in one of the Record menus. A nice feature of Canon's Live View mode is that it doesn't immediately stop the live view feed when you entre the camera's menu system, or switch between operating modes. Some rival cameras will immediately terminate the live view stream and drop the camera's mirror in either instance, causing unnecessary wear and tear on the mirror and shutter mechanisms if you were intending to immediately continue live view shooting.
The 1D Mark IV's Live View mode offers three autofocus modes, selected through the Live View function settings screen: "Quick mode," which employs the camera's dedicated phase-detection sensor, as it would when using the optical viewfinder, plus two contrast-detection autofocus types -- "Live mode" and "Face Detection Live mode" -- which both operate on data streamed from the image sensor itself. Face Detection Live mode can detect multiple faces in the frame, but only selects (and indicates) one face on which the camera will set focus and exposure. The selected face can be changed by pressing the multicontroller to jump through the detected faces. The contrast detection modes are slower than phase-detection focusing, but don't require the mirror briefly drop to redirect light to the phase-detection AF sensor, which interrupts the live view display in Quick mode. The contrast detection modes can also be more accurate, and allow the AF point to be positioned anywhere within the image frame (except for the extreme edges), rather than being limited to the 1D Mark IV's 45 fixed AF points. On the flip side, Quick mode AF can be noticeably faster, even when taking account of the time to cycle the mirror, especially when shooting in low-light or with low-contrast subjects. Quick mode is also better suited to moving subjects, which can make it challenging to achieve a focus lock using contrast detection AF. Manual focus is also supported, with 5x or 10x image magnification to assist. In Live View mode, evaluative metering is always used to determine correct exposure, though exposure compensation is available.
You can enable one of two different overlays, which divides the screen with either a 2x2 grid, or a 5x3 grid, useful for precise image framing. You can also specify how long the camera's metering system should remain active without user interaction, within a six-step range from four seconds to thirty minutes. It's overruled by the Auto Power Off function, so whichever timer is shorter will apply.
The EOS Utility software (included with the camera) allows you to shoot remotely via USB connection while viewing the Live View image on your computer. You can also display the Live View image on a TV via the provided A/V cable or on an HDTV with an optional HDMI cable. The Canon 1D Mark IV comes equipped with a temperature sensor, and if the internal temperature exceeds an undisclosed threshold, Live View will be disabled to protect internal circuitry from overheating. A high temperature icon is displayed on the LCD monitor to warn the user that image degradation may be occurring, and that the camera may disable Live View until normal operating temperature is restored.

Like a larger version of the optical viewfinder, the Live View display reports the exposure information along the bottom of the screen, with additional settings and info overlaid to the left and right, as well as the selected focus area(s). The amount of information displayed can be varied by pressing the INFO button, toggling through four display modes -- image only, image plus basic exposure information, image plus detailed exposure information, and image plus detailed exposure information and either an RGB or luminance histogram (with the choice of histogram type being made, rather confusingly, by the Histogram option in Playback Menu 2.)
| Canon EOS-1D Mark IV Live View options | |
 |
 |
|
The Canon 1D Mark IV offers a comprehensive set of options for Live View mode, enough to warrant its own page in the Record menu. It's rather confusingly accessed from Setup Menu 2, rather than the Record menus.
|
Varying amounts of information can be displayed in Live View mode. Pressing the INFO button adds information in stages, starting with no information and just the magnifying frame, a display with minimal information across the bottom, another with more info overlaid on the left and right sides, and finally with an added RGB or luminance histogram, depending on which is selected in Playback Menu 2. (The histogram is not translucent or movable, so it unfortunately obscures a good portion of the display.)
|
 |
 |
|
A 2x2 grid can be overlaid to aid composition or alignment.
|
An alternate 5x3 grid overlay option (Grid 2) is also available.
|
 |
 |
|
The 1D Mark IV's Live View mode offers overlays during settings changes similar to those available with the LCD enabled during regular shooting. One important difference is that the overlay for the AF/Drive button also incorporates AF point selection selected with the Multi Controller, since the button dedicated to this in regular shooting controls the magnification in Live View mode..
|
Here, the effect of changing exposure compensation is simulated. (Note that info overlay has been disabled in this particular animation.)
|
 |
 |
|
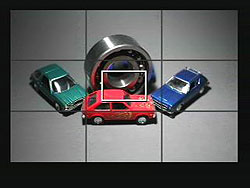
When using contrast-detect ("Live") AF, the focus area is bounded by a white rectangle. It can be moved around the frame (except to extreme edges) using the Multi Controller, to select the desired focus area. The focus area is highlighted in green when focused, just like a Canon point-and-shoot. If focus is not achieved, the box turns red. There is also a "Live face detection" mode, which can detect multiple faces. If the face selected by the camera (as indicated by a white frame) is not the face you intended, you can select another detected face by using the Multi Controller.
|
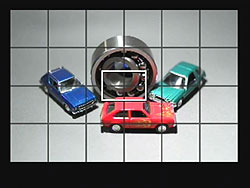
Pressing the zoom button magnifies what's in the magnifying frame by 5x. Pressing the zoom button again zooms in to 10x, great for checking critical focus, or for manually focusing. You can move the magnified area around the frame using the Multi Controller, with the legend at bottom right serving as a guide. If "Face Detection Live AF" mode is enabled, magnifying the image is not possible, though you can always check critical focus by magnifying the captured image, or temporarily switching to Manual focus mode.
|
 Fujifilm GFX 50S Review
 Fujifilm X-T3 Review
 Olympus E-M5 III Review

Follow Imaging Resource