 Back
to Full Canon EOS 20D Review
Back
to Full Canon EOS 20D ReviewGo to Canon EOS 20D Data Sheet
Go to Canon EOS 20D Pictures Page
Up to Imaging Resource Cameras Page
Use your browser's "Back" button to return to the previous page, or the links at the top and bottom of this page to navigate to related information. If you have difficulty fitting the text on this page onto your printer output, simply resize your browser window to a narrower width and print again.
Remember us when it's time to buy!
Dave here: Have our reviews been helpful to you? (Is this article you're reading right now useful?) Preparing this level of information on as many products as we do is incredibly hard work, not to mention expensive. Things on the Internet may look like they're free, but they're not. (As a lot of big dot.com companies are finding out these days.) Somewhere, somebody has to pay to produce worthwhile content. YOU can help us though, by remembering us when it comes time to make your purchase. Would you consider coming back to our site and clicking-through to one of our advertisers to make your purchase? Every dollar you spend with one of our advertisers helps us directly (in affiliate fees) or indirectly (the advertiser will keep renewing their ad contract with us). To make it easy for you to support us, here's a URL you can visit, to see all our current advertisers, with links to click on that will register your visit to them as having come from our site. It's up to you where you buy, but Mike, Mike, Kim, Yazmin, Marti and I would be really grateful if you'd help us out by choosing one of our advertisers to purchase from.
Thank you for your support!
Dave Etchells, Founder & Publisher
Visit our "Buy Now" Page:
https://www.imaging-resource.com/buynow.htm
Back
to Full Canon EOS 20D Review
Go to Canon EOS 20D
Data Sheet
Go to Canon EOS 20D
Pictures Page
Up to Imaging Resource Cameras
Page
Canon EOS 20DSlightly smaller and lighter upgrade brings greater speed and ease of use along with higher res and lower image noise. Review First Posted: 08/19/2004, Update: 11/19/2004 |
|
 |
|
Canon EOS SLR designed from the ground-up to be digital |
| |
8.2-megapixel CMOS sensor, 3,504 x 2,336 pixel images | |
| |
ISO of 100, 200, 400, 800, 1600, 3200 | |
| |
Five frames per second, photo-centric design – touch shutter button in Play mode and camera returns to Record mode. | |
| * | Compatible with all Canon EOS system lenses as well as new EF-S with a focal length multiplier of 1.6 | |
| |
Multiple improvements and enhancements throughout the camera. |
Manufacturer Overview
Learn how to really use full-functioned cameras like this one - Visit our free Photo Lessons area!
Canon cameras are a staple at any event where you're likely to see a
group of professional photographers clicking away, their signature white lenses
and red rings dominating the sidelines at sporting events worldwide. If you
ask experienced photographers what the Canon name means to them, many would
say that they associate the name with innovation, the company having brought
such technological advances as Eye-Controlled Focusing (Canon EOS 5, 1992) and
the USM ultrasonic motors used in the more recent Canon EF lenses, which are
extremely quiet and very fast.
Free Photo Lessons
Canon film cameras cover the full range from models such as those targeted at
professionals (the EOS 1 and 1N for example, and more recently the EOS 1V, to
those aimed toward the consumer (such as the tiny ELPH series or the EOS Rebel
cameras). Back at the Spring 2000 PMA show, Canon announced the EOS-D30, their
first digital SLR, in the process turning the Digital SLR market on its ear
with its excellent features and image quality and surprisingly aggressive price.
The D30 was followed by the very popular D60, then last year's 10D brought a
metal alloy skin and stainless steel frame to the mid-range pro line, among
other technical improvements
While it has a similar look, the EOS 20D has upgrades and improvements in so many areas that it's difficult to decide which to mention first. It is the culmination of all Canon has learned over the past year from consumer and professional photographers regarding the cameras currently in the market, from the EOS Digital Rebel to the EOS 10D, all the way up to the 1Ds and 1D Mark II. Naturally, Canon has also kept improving the technology of their sensors and processors over the years, which they characteristically fold into the latest model. The result for this year is the 20D: a camera that is smaller, lighter, and faster with a higher resolution imager, while retaining most of what users loved about the 10D. Read on, there's a lot of ground to cover.
Highlights
Comparison with the EOS-10D
| Canon EOS-10 vs. EOS-20D Comparison | ||
| Camera | EOS-20D | EOS-10D |
| Sensor Type | 22.5 x 15.0mm CMOS w/ RGBG filter | 22.7 x 15.1mm CMOS w/ RGBG filter |
| Sensor Resolution (total) | 8.8 megapixels | 6.5 megapixels |
| Sensor Resolution (effective) | 8.25 megapixels | 6.3 megapixels |
| Sensor Improvements | Incorporates improvements from the EOS-1D Mark II. Larger microlenses, size of gaps between microlenses reduced by 50%. Greater area of each pixel on the sensor sensitive to light, due to elimination of transistors in each pixel. Canon claims higher sensitivity, higher dynamic range | N/A |
| ISO Sensitivity | ISO 100 - 1600 (extendable to 3200) |
|
| Image Noise | Higher sensitivity CMOS sensor and new second-generation on-chip 3-stage noise reduction circuit. Digital control circuit board has two dedicated ground layers and low-noise amplification. Noise is lower at all ISO ratings, especially above ISO 400. Canon claims ISO 1600 on the 20D is approximately equivalent to ISO 400 on the 10D, a two stop improvement. | N/A |
| Noise Reduction | New long-exposure noise reduction feature, using dark frame subtraction. Shoots a second identical shot after image capture with shutter closed, then subtracts this frame to remove fixed long-exposure noise. Can be enabled on exposures over 1 second with Custom Function 02-1. Power to the output amp and circuit-driving standard current is cut off during long exposures to reduce noise. | N/A |
| White Balance Improvements | Auto White Balance accuracy improved for more natural color. Auto white balance more stable, especially at high ISO settings. Skin tone accuracy and color reproduction of reds at low color temperatures such as tungsten improved. Variations in flash color temperature accounted for in color processing for Auto or Flash white balance. Magenta / Green and Blue / Amber white balance bias can be adjusted separately or in combination in nine single-level increments using the Multi-Controller. | N/A |
| White Balance Bracketing | White Balance Bracketing up to +/- 3 levels in 1-level increments. Bracketing sequence can be set with Custom Function 09. White Balance Bracketing can be used in combination with White Balance Correction and Auto Exposure Bracketing. | No |
| Lens Compatibility | EF and EF-S | EF only |
| Reflex Mirror Improvements | New high-speed mirror drive. New mirror swing-up mechanism and smaller mirror allow compatibility with EF-S lenses. | N/A |
| Shutter Unit Improvements | New APS-C sized high-speed compact shutter unit. Shutter blades have lower inertial mass, shorter travel distance and stronger magnets for better control. Semiconductor switch replaces traditional sync contacts, preventing scorching and frictional wear, and increasing acceptable trigger circuit voltage to 250V max. | N/A |
| Shutter Speed | 1/8000 sec. to 30 sec., bulb | 1/4000 sec. to 30 sec., bulb |
| X-sync | 1/250 sec. | 1/200 sec. |
| Burst Speed | 5 frames per second | 3 frames per second |
| Burst Depth (Large / Fine JPEG) | 23 frames | 9 frames |
| Burst Depth (RAW) | 6 frames | 9 frames |
| Start-up Time (approx.) | 0.2 seconds | 2.3 seconds |
| Shutter Lag (approx.) | 65 milliseconds | 90 milliseconds |
| Viewfinder Blackout Time (approx.) | 115 milliseconds | 140 milliseconds |
| Autofocus Type | TTL-CT-SIR with AF-dedicated CMOS sensor | TTL-CT-SIR with a CMOS sensor (TTL secondary image registration, phase detection) |
| Number of Focusing Points | 9 points (1 cross-type, 8 single-axis). | 7 points (1 cross-type, 2 horizontal-type, 4 vertical-type) |
| Autofocus Working Range (at ISO 100) | EV -0.5 -18 | EV 0.5 ~ 18 |
| AF Point Selection Method | AF Point Selection button, then Multi-Controller or Main Dial / Control Dial. If Custom Function 13-1 or 13-2 set, the Multi-Controller or Quick Control Dial can be used to select the AF point without using the AF Point Selection button first. | AF Point Selection button, then Main Dial / Control Dial |
| Autofocus Improvements | Central cross-type focusing point has two sets of vertical line-sensitive linear pixel arrays, and dual line vertical component with twice as many pixels for horizontal line detection. Uses a wider-baselength measurement system with f/2.8 or faster lenses. Triple the focusing precision with max apertures f/2.8 or larger, full cross-type performance with max. apertures as small as f/5.6. The 20D is the first camera to offer an f/2.8-compatible sensor outside of the EOS-1 and EOS-3 series cameras. Off-center focusing points feature a 30% longer baselength than the 10D, are sensitive to max. apertures as small as f/5.6. Focus system overall is more precise, more sensitive. | |
| Viewfinder Improvements | Newly developed Precision Matte focusing screen with optimized microlens layout and curvature. Increases viewfinder brightness, reduces viewfinder coloration, makes it easier to distinguish precise point of focus, particularly with lenses f/2.8 or faster. AF Point Indicator LED on upper rear of pentaprism shines light through SI prism and pentaprism, then projected on reflective acrylic plate between pentaprism and focusing screen. Results in AF points being easier to see in all light levels. | N/A |
| Built-In Flash | Rubber stopper cushions flash pop-up. New latch mechanism reduces gap around flash when closed. Flash height is 18.6mm higher than the 10D's built-in flash at center-line, reducing red-eye and chance of lens blocking flash. Positions of reflector and xenon flash tube optimized, transparency of fresnel flash panel increased for wider 17mm field of coverage (27mm equivalent in 35mm) with same guide number as 10D flash. | N/A |
| Flash Metering | E-TTL II | E-TTL |
| Flash Metering Improvements | Incorporates improvements from the EOS-1D Mark II. Ambient light measurement before pre-flash and distance information from lens helps to identify and ignore highly reflective or specular objects, avoiding underexposure. | N/A |
| Flash White Balance | Internal flash and Speedlight 580EX send color temperature data to the processor each time the flash fires. This corrects for slight variations in flash color temperature due to battery condition, flash duration, etc. | |
| Image Processor | DIGIC II | DIGIC |
| Image Processor Improvements | Incorporates improvements from the EOS-1D Mark II. New 4-channel 16MHz high-speed signal reading, new signal processing algorithm, lower power consumption. Canon claims "huge" increase in CompactFlash write speed, better handling of high saturation, bright subjects, improved auto white balance precision and stability (especially at high ISO), wider dynamic range in highlights. Direct Printing speed "significantly" improved. | N/A |
| Data Writing | Images written to CompactFlash simultaneously with image shooting, reducing buffer clear time. Buffer no longer needs to be empty for shooting to continue. | Images written to CompactFlash after shooting stops. Buffer must clear before shooting can continue. |
| Control and Layout Improvements | Direction and Assist buttons removed, replaced with eight way multi-controller with push-in central button function. Quick Control Dial switch gone, combined with main Power switch. Access lamp moved from inside battery compartment to lower right of Quick Control Dial. Top indicator LCD display icons rearranged, icons added for B&W (Monochrome) mode and White Balance Correction. | N/A |
| Menu System | Menu can be accessed while camera is writing to CompactFlash card. Camera ready to shoot "instantly" when shutter button is half-pressed in menu or playback. Three menu sections (Shooting, Playback, Setup). Tab (icon and color code) of current menu is shown at upper left of LCD. New indicator at upper right of LCD shows what will happen when the jump button is pressed. | Menu cannot be accessed while camera is writing to CompactFlash card. Camera takes 0.28 seconds to return from menu or playback to being ready to capture an image. Single operating menu |
| Menu System Improvements | Function to prevent shutter release when there is no CF card installed is now a menu item, not a custom function. White Balance Compensation feature added. Adobe RGB is now a separate setting, and can be combined with sharpening, contrast, saturation, or color tone adjustments. Image Review and Image Review Time settings from EOS-10D have been combined. Three new menu languages have been added. | N/A |
| Processing Parameters | 6, including B&W / Monochrome, with five filter effects (none, yellow, orange, red and green) and five color tone options (none, sepia, blue, purple and green) | 5 |
| Custom Functions | 18 custom functions. New or changed functions are: C. Fn-02, long exposure noise reduction, works with shutter speeds of 1 second or longer. C. Fn-03, Flash sync speed in Av mode has had the flash sync speed changed to a fixed 1/250 sec. C.Fn-05 on the EOS 10D, “AF-assist beam/Flash firing,” has been split in two, C. Fn-05 (AF-assist beam: Emits, Does not emit, Only ext. flash emits) and C. Fn-07 (Flash firing: 0: Fires and 1: Does not fire- that is, all flash units will not fire). C. Fn-06, Exposure level increments, has been changed to 0: 1/3 stop and 1: 1/2 stop. C. Fn-08, ISO expansion (to ISO 3200), off/on. C. Fn-13, enables the AF point to be selected with the Multi-controller directly or with the Quick Control Dial / Main Dial. C Fn-14, changes E-TTL II from evaluative metering to averaging of the entire image for flash metering. C. Fn-18, adds original image verification data automatically, for use with the optional accessory Data Verification Kit DVK-E2. Five Custom Functions deleted from the EOS 10D: Shutter release without a CF card, (moved to a menu setting); AF point registration and Assist button function, (the Assist button has been removed); RAW + JPEG simultaneous recording, (replaced by 13 Quality settings selected directly from the menu), Daylight fill-flash and auto reduction control of flash exposure (replaced by C. Fn-14, E-TTL II, evaluative or average.) |
17 custom functions |
| Connectivity | USB 2.0 | USB 1.1 |
| RAW File Format | .CR2 (Canon RAW, Second Edition), as used on the EOS-1D Mark II. | .CRW (Canon RAW) |
| Compliance | EXIF 2.21, DPOF 2.0 | EXIF 2.2, DPOF 1.1 |
| Direct Printing Improvements | In-camera image trimming possible (8 horizontal steps, 5 vertical steps). Direct Printing speed "significantly" improved. | N/A |
| Power Source | BP-511A, BP-511, or BP-512 main battery. CR2016 backup battery in main battery compartment. | BP-511 or BP-512 main battery. CR2025 backup battery in separate compartment. |
| Power Source Improvements | BP-511A has 25% more battery life than BP-511 or BP-512 (1390mAh vs. 1100mAh). Battery life is approx. 50% higher than EOS-10D as power to the output amp and circuit-driving standard current is cut off during long exposures. | N/A |
| Battery Grip Compatibility | BG-E2 (accepts two BP-511A, BP-511, BP-512 or six Alkaline / NiMH / Lithium AA batteries) | BG-ED3 (accepts two BP-511 batteries only) |
| Bundled Charger | CG-580 compact battery charger | CB-5L compact battery charger |
| Size | 144 x 105.5 x 71.5 millimeters | 149.7 x 107.5 x 75mm |
| Weight | 685 g, body only (thanks to smaller shutter unit, mirror box, main mirror, pentaprism, focusing screen and viewfinder optical unit, and 100 fewer parts than 10D.) | 790g, body only |
| Finish | Exterior paint pattern is finer than before. | N/A |
| . | ||
Executive Overview
Too many digital camera purchase decisions are based on pixel count. Most folks look for the highest megapixel count and then pray the camera manufacturer managed to make the camera usable as well. For the record, the EOS 20D has more pixels than most cameras on the market today, at 8.2 megapixels rivaling its bigger, pricier brother, the professional EOS 1D Mark II. But pixel count isn't the most important aspect of the EOS 20D. The 20D impressed us across a wide range of capabilities that reach far beyond mere megapixels. There are too many refinements to point to one that stands out above all the others, but the exciting part is that none of the refinements are there just to make a sale at the retail counter. Every aspect of the 20D is focused on one purpose: to help photographers make excellent images. Our tests indicate that the images are indeed excellent--quite possibly the best we've seen.
As I grip the 20D and turn it around to look from all sides, I see no stickers, no gee-whiz features, no colorful panels or inlays designed to give a "professional" or futuristic look. The 20D is all business. A black body with black buttons and black wheels with silver and blue words and icons. It is a tool, and as such it has only and exactly what's needed to get the job done.
The controls, a refinement of the 10D and Digital Rebel interface, offer very little that is new, just the tried and true EOS design, now more fully streamlined. Even the new Multi-controller is as black as the surrounding body, with no explanatory graphics or words. Its function is obvious and it is effective. Operating in eight directions plus one (pressing straight down to confirm selections) it is tailor-made for selecting any of the outer eight AF points, and pressing straight down re-centers the AF point. You can also use it to pan around in an image in playback mode. It is far superior to using the Quick Control dial on the back, which required the user to press the "change direction" button to the left of the LCD on the EOS 10D to switch between left and right or up and down directions. The new Multi-Controller also comes into play when moving a trimming frame around when doing an in-camera image crop (a new feature) and when setting the sophisticated yet simple white balance correction feature (more on this later).
Aside from the Multi-Controller, externally the 20D is mostly a 10D, just a little smaller and about 3.5 ounces lighter. Almost one quarter inch was shaved off the right side and just a few sixteenths from the height and thickness. The end result is a camera that feels less like a HumVee, built for war, and more like an SUV, built for the road. Put another way, it's less bulky than the 10D and fits more comfortably like the Digital Rebel. Unlike the Rebel, the inside grip area has a sharper contour for a firm hold; a hold reinforced by rubberized grip areas around the front for the four fingers and on the back for the thumb and heel of the hand. Elsewhere the magnesium alloy outer skin has a new finish, one that actually makes it look more like a very strong polymer instead of solid metal. Beneath is a stainless steel frame that gives the 20D that same uncompromised stiffness that made the 10D's body inspire such confidence.
On the back we see three more minor differences from the 10D. The five-button array that lined the left side of the LCD has been reduced by one, largely thanks to the addition of the aforementioned Multi-Controller that obviated the need for the "change direction" button. The Quick Dial On/Off switch has been integrated into the power switch, and the read/write LCD has been moved from the right grip, where it was too often hidden by the right hand, to a slightly better position lower right of the Quick Dial, where it also resides on the EOS Digital Rebel.
Given all that I've said about the EOS 20D's rigid construction, there is one surprising exception: that of the CF card door. It works like the others, but just doesn't feel that strong; certainly not as strong as the door on the 10D. In a camera that shuts off when this door is open, one would think that making sure it doesn't break off would be a priority. Naturally, I haven't tested its limits, but I can't say it'll be as sturdy five years from now.
The guts for speed
Where the 20D gets more exciting than its practical, tuned EOS exterior is when you go inside its magnesium alloy and stainless steel construct. There you'll find a new processor, Canon's own DIGIC II, designed to enable more than half of the 20D's speed improvements. Bits can be read off the card and processed while AF, exposure, and image analysis are simultaneously evaluated for the next shot. The EOS 20D starts up in 0.3 seconds according to Canon (confirmed by our own timing), a major improvement over the EOS 10D's 2.2 second startup time. Shutter lag time has also been improved, taking only 65 milliseconds from when you press the shutter to when an image is captured, according to Canon (our tests show the prefocused shutter lag to be an average of 77 milliseconds, but note that this is a pre-release camera). The DIGIC II processor also enables faster PictBridge printing and USB 2.0 connection to a computer, for significantly faster image transfer--up to 11 times the speed of Canon's USB 1.1 cameras.
All that horsepower begs for more information to process, and the new CMOS imager and advanced shutter are designed to deliver. The 8.2 megapixel imager in the 20D is just a hair smaller than the imager in the Digital Rebel and 10D, measuring 22.5 x 15mm, while the older 6.3 megapixel sensor is 22.7 x 15.1mm. You still use a 1.6x multiplier). The new sensor is made with Canon's latest CMOS design, which includes a high speed 4-channel data readout. Put simply, this means more bits are being moved more quickly from the imager to the processor to make room for the next image. This technology was first seen in the 11 megapixel EOS 1Ds, which has a 2 channel readout. The speedy 8.5 fps, 8.2 megapixel EOS 1D Mark II has the fastest of them all, with 8 channel readout. Canon calls the size of this 8.2 megapixel imager APS-C, because it is the same aspect ratio as the Advanced Photo System Classic frame, only a little smaller overall.
Canon did a complete redesign of the light box, mirror, and shutter on the 20D, bringing everything in tighter for greater efficiency (see photos in Design section). As a result, they were able to speed both frame rate and shutter speeds. The 20D can capture up to five frames per second, at up to 1/8,000 second, with a flash sync speed of 1/250 second. Our tests show the 5 fps to be about right, as we measured about .205 seconds between each shot. The mirror is shorter and smaller than even the Digital Rebel's mirror, and the shutter has been beefed up with stronger magnets and smaller blades. The opening surrounding the imager is cut more closely than in the 10D and Digital Rebel, which means the smaller metal-coated mylar shutter blades have a shorter distance to travel with each shot. Canon says that these and other improvements will make for a more rugged and reliable shutter. While it's not a compelling as the Mark II's remarkably fast shutter sound and mirror retraction, the 20D's mechanism is fast and the mirror gets out of the way in a hurry.
The result of all this technological improvement is that you can hold the shutter down on the EOS 20D and catch between 19 and 32 8.2 megapixel JPEG shots at five frames per second. The extreme variability in this statistic is mostly due to subject variability. More detailed images will compress less and each file will fill the buffer more quickly; our worst case scenario included detailed images with more image noise, taken at 1600 ISO (image noise--while low in the 20D--is still enough to make the image more difficult to compress) and resulted in the 19 frame figure. Our best case scenario included some black objects and was shot at ISO 100 and captured 32 frames. Canon's own figures are 23 frames before the buffer is full. Depending on the card you use, that buffer can empty quickly, in only 12 seconds with the SanDisk Extreme 1GB CF card Canon provided for the review. The Lexar 1GB 80x cards we have here took slightly longer to clear, but were still fast.
Another area where the EOS 20D excels is AF performance. A new AF array is employed, offering nine focus points in a diamond shape. As mentioned earlier, selecting a focus point manually has been made easier with the nine-way Multi-Controller. Surrounding the center are six horizontally-oriented sensors, with two vertically oriented sensors far left and right of the frame. In the center are two cross-type sensors intertwined with one-another, which Canon calls a Hybrid Cross-type sensor. One is the standard F5.6 sensor, designed to work with lenses with maximum apertures of up to F5.6. The second cross-type sensor is bigger, tuned for F2.8 or larger lenses. The camera switches between the two sensors based on the lens's reported maximum aperture when it is mounted on the camera. Because a lens with a larger opening produces a bigger light cone when out of focus, a larger sensor can more quickly make sense of the blur and bring it to focus; it should also offer greater focus refinement, because the sensor covers a larger area. Low light performance is one full stop better, according to Canon.
The final major speed enhancement takes us back outside the camera to the menu interface. Instead of the multi-tabbed menu of the 10D, Digital Rebel, and most Canon PowerShot cameras, the 20D has returned to one big color-coded menu, as we saw on the D30 and D60. The Jump button moves from color to color on the scrollbar, but you can also just keep on turning the Quick Dial and you'll find your item in short order. The tabbed menu is preferable for Five-way navigator-style controls, as seen on the Digital Rebel and PowerShots, but can be painful and problematic when using the Quick Dial, introducing interruptions to an otherwise speedy interface. We're glad to see this one big scrolling menu make a comeback.
Amazingly clean images
Canon employs a number of strategies to eliminate noise, both through processing and through channelling more light to the imager. As we discussed in the 10D review, one disadvantage to the design of a CMOS imager is that each pixel shares its space on the grid with a noise-reduction circuit. Naturally, left to fall freely, some light would miss the active pixel sensor completely, falling on the noise-reduction circuitry instead, leaving critical photons out of the equation. The solution is to use an array of microlenses to direct light away from the inactive portions of the sensor, and onto the active ones. These lenses are literally microscopic. I would love to have been in the room to see the faces of the optical engineers as this solution was put forth to make CMOS technology truly efficient. Nevertheless, the strategy seems to work very well, and Canon's improvement of this technology may be largely responsible for the remarkably smooth images we're seeing. The microlenses on the 20D's imager apparently cover more of the surface area of the chip, thereby channeling more light into each pixel's active area. More light to each pixel means less guessing and error, which amounts to less noise overall.
In addition to the improved microlens structure, Canon has apparently also dramatically beefed-up the on-chip noise-reduction processing. They've so far been very shy about sharing specific details of what processing is actually done on the sensor, but have indicated that there are now three separate noise-reduction processing steps that are performed on-chip, before the data ever gets to the camera's processor. Whatever the case, the 20D's images are remarkably clean, even at ISO 1600.
The 20D has not only benefited from Canon's professional SLR technology and experience with professional photographers using cameras like the 1Ds and 10D, but a few lessons from the extremely successful Digital Rebel show themselves as well. Not only is the camera lighter and smaller like the Rebel, it accepts EF-S lenses, Canon's "short back-focus" lens design. Indeed, just like the Digital Rebel, the 20D will be available with or without the original 18-55mm lens bundled with the camera. Prices are expected to be US$1,499 body only, US$1,599 with the non-USM 18-55mm lens, and US$1,999 with the new EF-S 17-85mm IS USM lens, an image-stabilized 27-136mm equivalent wide/tele zoom.
Canon has also announced three new EF-S lenses, tuned specifically to their APS-C-sized digital cameras. First is a USM (ultrasonic motor) version of the 18-55mm original. This first appeared on the Japanese version of the Digital Rebel, but was unavailable to US or International customers. Now it's available for US$169. More exciting are the 10-22mm USM wide angle lens (US$799) and 17-85mm USM IS lens (US$599), finally making ultra wide angle and short image-stabilized zoom available to these more affordable SLRs. The 17-85mm lens is designed to provide similar coverage to what the extremely popular Canon EF 28-135mm IS USM lens offers on a 35mm camera. This new lens should be very popular for consumers and event photographers, because this lens offers great handheld performance, with the image stabilization enabling shutter speeds of around two to three stops slower for better indoor and low light photography.
Another Digital Rebel feature that made it in as an option is Parameter 1, something set by default on the Digital Rebel, but only made available as an option on the 20D. By default, the 20D is set to Parameter 2, which mostly matches the 10D for contrast, sharpness, and saturation. Users wanting to tweak their images later, either with Canon's latest PC-based RAW format interpreter, or in Adobe Photoshop, will likely want to stay with Parameter 2. Users wanting more saturated and sharper images out of their camera, and those printing directly to a PictBridge printer--which is most consumers--will want to switch to Parameter 1 for sharper, more contrasty, and vibrant images with minimal computer-side touch up. Users can also save their own parameters by modifying the three user-definable "sets."
One of the only disadvantages to the EOS 20D is the lack of an AF assist lamp. AF assist is only possible when the built-in flash is deployed. The camera uses a rapid set of flash pulses to momentarily illuminate the scene. While we're talking about the onboard flash, it's noteable that it pops up a little higher than the 10D, more like the Digital Rebel, but it pops up more quietly than the Digital Rebel. Both the pop-up and hotshoe-mounted flashes use Canon's new E-TTL II for better flash performance, using lens focus data to determine distances of objects in the frame.
The EOS 20D is an impressive offering. We'd call it a carefully planned amalgam of speedy components, refined imaging, tuned design, and the best Canon can offer for the price of a mid-range digital SLR (it's actually the entry-level Pro SLR). While the ever-escalating war of digital SLRs will doubtless continue, for the moment at least, the 20D really stands alone in the market, not only in its price class, but even when compared with cameras costing considerably more.
Design
 With
a control layout and body design similar to the earlier EOS-10D, Canon's latest
in the "Compact" EOS line of digital cameras, the EOS 20D, will be
familiar to photographers already accustomed to other EOS cameras, film or digital.
At 1.71 pounds (27.38 ounces; 776.3 grams) with battery and card, the weight
has gone down quite a bit from the EOS 10D's 2.05 pounds (932.6 grams) with
battery and card. With the
18-55mm lens included in the bundle added, it's 2.14 pounds (34.86 ounces;
974.2 grams). The 20D is well-balanced, and certainly a
lot lighter than the "industrial strength" Canon EOS-1Ds and 1D Mark
II. The EOS 20D is just slightly smaller than its predecessor in all
directions, being about five millimeters less in width, two millimeters less
in height, and just over three millimeters less in depth than the EOS 10D. Body
dimensions of the 20D are 5.7 x 4.2 x 2.8 inches (144 x 105.5 x 71.5 millimeters).
With
a control layout and body design similar to the earlier EOS-10D, Canon's latest
in the "Compact" EOS line of digital cameras, the EOS 20D, will be
familiar to photographers already accustomed to other EOS cameras, film or digital.
At 1.71 pounds (27.38 ounces; 776.3 grams) with battery and card, the weight
has gone down quite a bit from the EOS 10D's 2.05 pounds (932.6 grams) with
battery and card. With the
18-55mm lens included in the bundle added, it's 2.14 pounds (34.86 ounces;
974.2 grams). The 20D is well-balanced, and certainly a
lot lighter than the "industrial strength" Canon EOS-1Ds and 1D Mark
II. The EOS 20D is just slightly smaller than its predecessor in all
directions, being about five millimeters less in width, two millimeters less
in height, and just over three millimeters less in depth than the EOS 10D. Body
dimensions of the 20D are 5.7 x 4.2 x 2.8 inches (144 x 105.5 x 71.5 millimeters).

The front of the camera features a Canon EF/EF-S lens mount, indicated by the presence of both red dot (standard EF) and white square (EF-S) alignment marks for the two different styles of lens. There's also the lens release button, a depth of field preview button (on the lower left of the lens mount as viewed from the rear), a flash head pop-up button (on the upper left of the lens mount) and the redeye reduction lamp/self timer lamp (the frosted window at upper left in the view above). Nestled in the inside bottom of the handgrip, but just about visible in this picture, is the hole through which the DC coupler cord hole emerges, when using the dummy battery of the AC adapter.
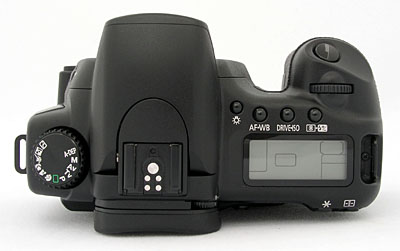
The top of the camera features the Shutter button, Mode dial and a small status display panel that reports most of the camera's settings. An LCD Illuminator button next to the redesigned status display panel backlights the display with an orange glow for better viewing in dark shooting conditions. Also on top are the Main dial and several control buttons (AF Mode / White Balance, Drive Mode / ISO Speed, and Metering Mode / Flash Exposure Compensation). The top of the camera also contains a hot shoe for mounting an external flash unit. The hot shoe has the usual trigger terminal in the center, as well as four other contacts for interfacing to Canon EX Speedlight flash units, and a hole for a locking pin to prevent rotation of the speedlight. Fixed neck strap eyelets are located on both sides of the top panel as well.
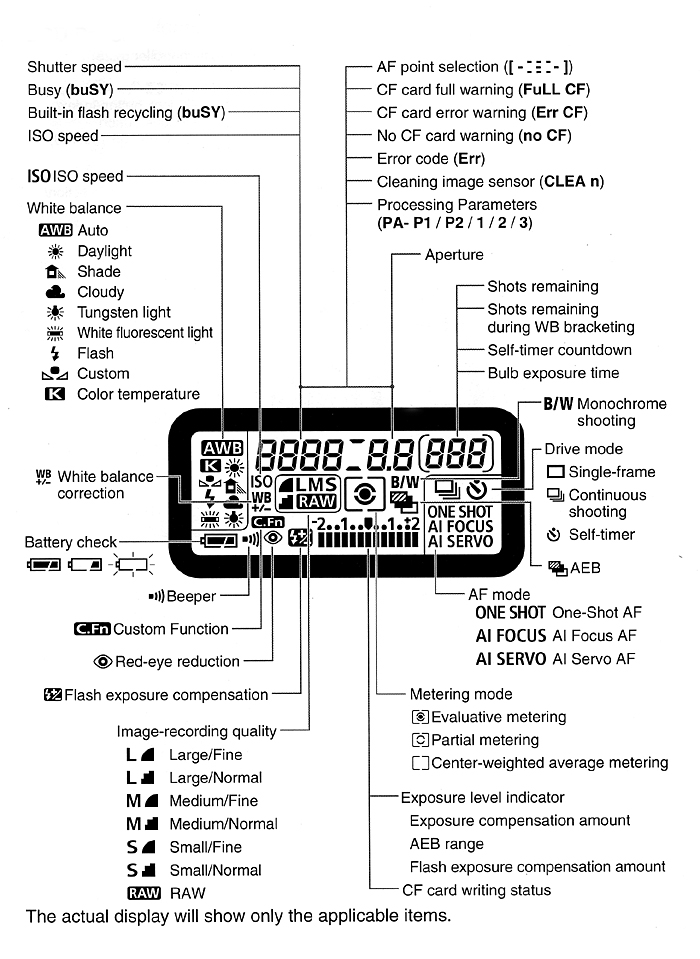
The top-panel data readout conveys a wealth of information about the current status of the camera and its settings, and has been redesigned somewhat since the EOS-10D. Two new indications have been added (white balance compensation, and black & white color mode), and a number of items have been rearranged to more logical positions, or to help fit the new icons on the display. Here's an illustration showing all possible segments and icons and their interpretation:
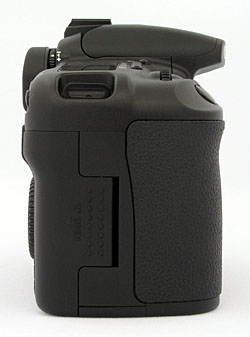
On the right side of the camera, toward the rear of the handgrip, is a large door which slides back and out to reveal the CompactFlash slot (which supports Type-I and Type-II cards, including the Hitachi MicroDrive). Inside the compartment, underneath the CompactFlash slot is a small gray eject button for removing the card. Gone is the small access hole from the 10D that showed the access lamp inside the CompactFlash door; this lamp is now on the back of the camera.
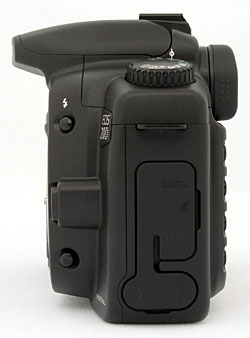
The opposite side of the camera features a hinged rubber flap covering the digital (USB) and Video Out sockets. Below this are two more sockets, likewise protected by a rubber flap. Forward of these sockets is a standard PC flash sync terminal, while the rear socket is for an N3 remote control. This picture also shows the Depth of Field Preview button (bottom) and Flash Pop-up button (top) on the side of the lens mount a little more clearly.
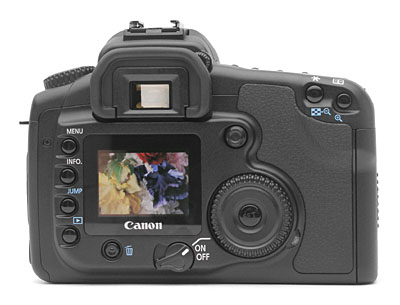
The rear panel of the EOS 20D is home to the bulk of the camera's controls, as well as the large, bright LCD screen. It is also the one part of the camera's body with the most visible changes since the EOS-10D. Beneath the LCD monitor's lower right corner is the main power on/off switch, with an additional setting that turns on the Quick Control dial. Lining the left side of the LCD monitor are four buttons: Menu, Info, Jump, and Playback. Underneath the LCD screen is the Delete button, and to the right of the screen is the Quick Control dial, in the center of which is the Set button. The Set button in the center of the Quick Control Dial acts as a menu selection button. At the lower right of the Quick Control Dial is the Access lamp, which indicates when the memory card is being written to. It has been moved from its location inside the battery chamber in the EOS-10D. Gone is the EOS-10D's Quick Control Dial switch that was used to disable the Quick Control Dial to prevent accidental use, being now integrated into the power switch. Also gone are the Direction and Assist buttons, whose functions when combined have been replaced by the Multi-Controller, an 8-way "joystick"-style controller located at the top right corner of the LCD display that also functions as a button when pressed directly inward. On the top right corner of the optical viewfinder is the diopter adjustment knob, recessed slightly to prevent accidental changes, and featuring a ridged surface to give grip. Finally, the top right corner of the rear panel features the AE/FE Lock / Index / Reduce and AF Point / Enlarge buttons.
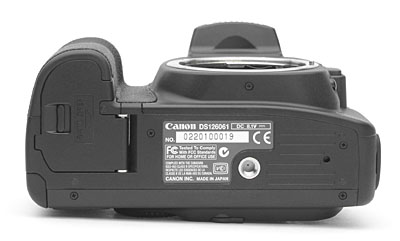
The very flat bottom of the camera reveals the metal tripod mount, as well as the cover for the BP-511 Lithium Ion and CR2016 button battery chamber. Unlike the EOS-10D, the 20D places both batteries (the latter of which is used for keeping the date / time) in the same chamber, the button battery being held in a little tray that slots in next to the main Lithium Ion battery. No coin is needed to open the battery compartment for the button battery, although that wasn't a task that needed to be performed very often anyway. The main battery compartment cover is removable, necessary when installing the optional vertical battery grip (BG-ED2) on the camera (interesting note: the BG-E1 for the Digital Rebel almost fits the 20D, except that it's keyed differently around the camera's battery opening; there's no telling whether the pinout is the same up inside, however, so trying a hack-fit is not recommended). A small latch lever at the outside edge of the battery chamber cover unlocks it so that it may be opened. The battery compartment cover is far enough from the tripod socket that you should be able to swap batteries without removing the camera from your tripod mount. The large surface area of the camera's bottom provides a stable mounting surface for use with a tripod, even with fairly large lenses attached.
Viewfinder
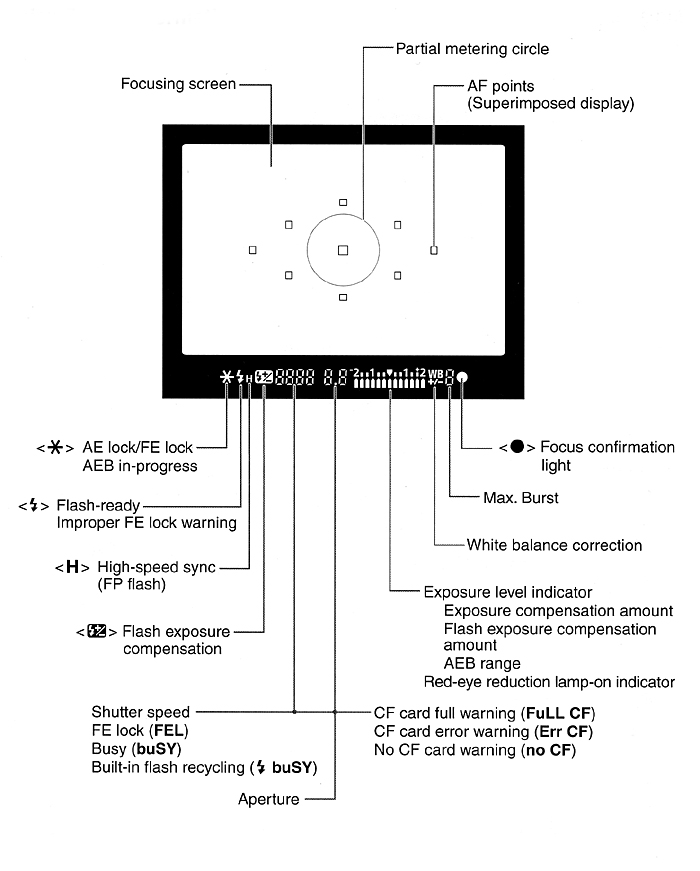
 Nearly
identical to the 10Ds viewfinder along the bottom, the 20D's optical viewfinder
is excellent, providing a wealth of information and great accuracy. Because
the 20D now features nine AF points, the viewfinder shows nine focus point boxes
arrayed in a diamond pattern. Lining the bottom of the display is a strip of
information reporting everything from aperture and shutter speed to flash status
and the maximum number of burst shots available, with the addition of the new
White Balance Correction indicator. While I don't have a formal test for it,
the "eyepoint" of the viewfinder seemed fairly high, making it usable
with eyeglasses, although I had to press the lenses of my glasses up against
the eyecup to see the full viewfinder area. (Courtesy Canon USA, Inc.)
Nearly
identical to the 10Ds viewfinder along the bottom, the 20D's optical viewfinder
is excellent, providing a wealth of information and great accuracy. Because
the 20D now features nine AF points, the viewfinder shows nine focus point boxes
arrayed in a diamond pattern. Lining the bottom of the display is a strip of
information reporting everything from aperture and shutter speed to flash status
and the maximum number of burst shots available, with the addition of the new
White Balance Correction indicator. While I don't have a formal test for it,
the "eyepoint" of the viewfinder seemed fairly high, making it usable
with eyeglasses, although I had to press the lenses of my glasses up against
the eyecup to see the full viewfinder area. (Courtesy Canon USA, Inc.)
It's important to note in discussing the 20D's viewfinder system is that the
rear-panel LCD display is not usable as a viewfinder. Instead, the optical
viewfinder uses a mirror to intercept the image on the way to the shutter and
the sensor. Thus, when the camera isn't actively taking a picture, the light
from the lens is directed only to the optical viewfinder, and so isn't available
to the sensor to drive a live viewfinder display on the LCD. With the exception
of the Olympus E-10 and E-20 (which used a beam-splitter prism instead of a
mirror, at some cost in light sensitivity), all digital SLRs operate in this
fashion.
While not strictly a viewfinder function, the capture-mode Info display shown
on the rear-panel LCD screen deserves mention here. The optical viewfinder carries
quite a bit of information about camera status as shown above, but there's even
more available on the rear panel, just by pressing the Info button. Rather than
the exposure settings shown in the optical viewfinder, this display shows date/time,
autoexposure bracketing amount, white balance bracketing amount, processing
parameter setting, image review status, image review time, color temperature
setting (if selected), ISO speed, auto rotate status, auto power off time, flash
exposure compensation amount, and megabytes of remaining memory card capacity.
Between this screen, the optical viewfinder display, and the LCD data readout
on the camera's top, the 20D offers no shortage of information.
| Free Photo Lessons | |
|
Like most digital SLRs, the sensor in the EOS 20D is smaller than a 35mm film frame. This means that the "effective" focal length of your lenses will be 1.6x their normal values on 35mm cameras. Just to be clear, nothing's changed about the lenses or their behavior, it's just that the CMOS sensor is effectively cropping a smaller area out of the lens' coverage circle. The net result is that shooting really wide angle photography is tough with digital SLRs using regular EF lenses. This has all changed, now that the new wide angle 10-22mm USM lens is available. At the other end of the scale though, it's like having a 1.6x teleconverter on your lenses with no cost in light loss or sharpness. Thus, a 300mm telephoto has the same "reach" as a 480mm on your 35mm film camera. And of course, a f/2.8 300mm is a lot cheaper than a f/2.8 500mm! The net of it is that a 31mm focal length has the same angular coverage as a 50mm lens on a 35mm SLR, the common 16-35mm zoom lenses have a range equivalent to 25.6-56mm on film cameras; and the new 10-22mm will be equivalent to a 16-35mm.
Sensor Cleaning!
Everyone understands that lenses sometimes get dust on them and need to be cleaned, and there are a lot of lens-cleaning cloths, solutions and other accessories on the market that work well. BUT, what do you do when your sensor gets dusty? Dust specks on the sensor tend to show up when shooting at very small apertures, appearing as dark blobs on your images. They're distracting at best, a terrible nuisance at worst, if you end up having to retouch every image to rid of them.
Most of us are naturally leery about the idea of poking around inside the delicate innards of our d-SLRs to wrestle with recalcitrant dust specks. Gently blowing the sensor surface (actually, the surface of the anti-aliasing filter) with compressed air gets rid of some dust, but there's invariably a lot that just stays stuck, no matter what. So what do you do?
If you've got dust specks on your sensor (and sooner or later you will), you're going to need to clean it. There are a lot of products out there intended to address this need, but a distressing number of them work poorly (if at all), and many are grossly overpriced. Advertising hype is rampant, with bogus pseudo-scientific jargon and absurd product claims run rampant. And prices - Did I mention prices? How about $100 for a simple synthetic-bristle brush?
So how do you know what product to use?
We don't pretend to have used everything currently on the market, but can tell you about one solution that worked very well for us. The "Copper Hill" cleaning method is straightforward and safe, and in our routine usage here at Imaging Resource, highly effective. Better yet, the products sold by Copper Hill Imaging are very reasonably priced. Best of all, Nicholas R (proprietor of Copper Hill) has put together an amazingly detailed tutorial on sensor cleaning, free for all.
Sensor cleaning is one of the last things people think about when buying a d-SLR, but it's vital to capturing the best possible images. Take our advice and order a cleaning kit from Copper Hill right along with your d-SLR, so you'll have it close at hand when you need it: You'll be glad you did!
(Other than a few backlinks on their site, we receive no promotional consideration from Copper Hill. We just think their sensor cleaning products are among the best on the market, and like their way of doing business. - We think you will too. Check them out.)
Exposure
| Free Photo Lessons | |
|
The Aperture Priority and Shutter Priority modes work much the same as on any other camera, allowing you to adjust one exposure variable while the camera selects the other for the best exposure. A Custom menu setting enables a "safety shift" option, which automatically adjusts the primary variable (aperture or shutter speed) in Av or Tv modes, if the setting you've selected won't permit a good exposure under the current lighting conditions. This could come into play if you were shooting in shutter-priority mode to achieve a motion-blur effect, but the light suddenly got brighter, pushing the required aperture value beyond what the lens could provide. In this situation, the camera would automatically boost the shutter speed the minimum amount needed to achieve a good exposure. Program mode keeps both variables under automatic control, while Manual mode gives you control over everything.
The Automatic Depth-of-Field mode (A-DEP) uses all nine autofocus zones to
determine the depth of field in the active subject area. Once it has determined
the range of focusing distances present across the nine zones, it automatically
computes the combination of aperture and shutter speed needed to render the
nearest and furthest points in sharp focus. This is a remarkably useful feature,
even for professional photographers. In many situations, you want to keep several
subjects in focus, while at the same time trying for the highest shutter speed
(largest aperture) that will permit that. In practice, faced with such situations,
I've usually resorted to just picking the smallest aperture feasible and hoping
for the best. With the 20D's A-DEP mode, the camera takes the guesswork out
of this process and gives you the fastest shutter speed it can manage while
still keeping things in focus. (In playing with this, I was often surprised
by how large an aperture in fact would work. I frequently would have chosen
a much smaller aperture to stay on the safe side.)
Introduced on the 10D and continued here is an ISO speed extension, which increases
the 20D's maximum ISO speed to 3,200. (Default ISO is 100, other normal options
are 200, 400, 800, and 1,600.) For adjusting the exposure, the 20D's Exposure
Compensation setting increases or decreases overall exposure from +/-2 EV in
either one-half or one-third EV increments. The default step size is 1/2 EV,
but you can set an increment of 1/3 EV via the camera's Custom menu. (Frankly,
I've always found that one-third EV compensation is just about ideal for digicams.
One-half EV steps are just too broad to set critical highlight exposures accurately.)
Automatic exposure bracketing on the EOS 20D lets you set the total exposure
variation (across three shots) at anywhere from +/- 1/2 or 1/3 EV all the way
up to +/- 2 EV. The nice part is that the automatic variation is centered around
whatever level of manual exposure compensation you have dialed in. Thus, you
could set positive compensation of 0.7EV, and then have the camera give you
a variation of +/- 2/3 EV around that point. Whatever EV step size is set through
Custom menu also sets the bracketing step size.
I really like the amount of information the 20D gives you about its exposure,
not only in terms of the settings it's using, but in the form of feedback on
how pictures you've captured turned out. You can select an "Info"
display mode when viewing captured images on the rear-panel LCD screen, which
produces the display shown at right. Notable here is that you not only can see
all the exposure parameters, but you get excellent feedback on the tonal range
of the image itself. One form of feedback is the histogram display at upper
right, which shows how the tonal values are distributed within the image. Histogram
displays are useful for directly seeing how the overall exposure turned out
in an image, but I've found them to be of limited usefulness for making critical
judgments about highlight exposure.
Digital cameras need to be exposed more or less like slide film, in that you
need to zealously protect your highlight detail. Once you've hit the limit of
what the sensor can handle, the image "clips" and all detail is lost
in the highlight areas. The problem is that it's quite common for critical highlights
to occupy only a very small percentage of the overall image area. Because they
correspond to such a small percentage of the total image pixels, the peak at
100 percent brightness can be very hard to distinguish in the histogram display.
To handle such situations, the 10D blinks any pixels that are 100 percent white
on its screen, alternating them between black and white. This makes localized
overexposure problems leap out at you, making it very easy to control the critical
highlight exposure precisely. (The sample image shown in the display above is
a pathological example, chosen to show how the feature works. In practice, you'd
probably never overexpose an image that badly.)
 Besides
the abovementioned exposure information and feedback, the 20D's playback options
include a thumbnail index display, normal full-frame viewing of captured images,
and a zoomed view, as shown at right. There's also a "jump" mode,
activated via the Jump button on the rear panel of the camera. Jump mode lets
you very quickly move through images stored on the memory card, jumping 10 shots
at a time. The EOS 20D's image playback can be zoomed in very small steps anywhere
from 2-10x. Once you've zoomed in at any level, you can scroll the zoomed window
all around the image area, using the large rear-panel control dial and one of
the rear-panel buttons to control direction and movement.
Besides
the abovementioned exposure information and feedback, the 20D's playback options
include a thumbnail index display, normal full-frame viewing of captured images,
and a zoomed view, as shown at right. There's also a "jump" mode,
activated via the Jump button on the rear panel of the camera. Jump mode lets
you very quickly move through images stored on the memory card, jumping 10 shots
at a time. The EOS 20D's image playback can be zoomed in very small steps anywhere
from 2-10x. Once you've zoomed in at any level, you can scroll the zoomed window
all around the image area, using the large rear-panel control dial and one of
the rear-panel buttons to control direction and movement.
Another feature deserving comment is the 20D's separation of the autoexposure
and autofocus lock functions. In consumer-level digicams, half-pressing the
Shutter button locks exposure and focus simultaneously. You can use this to
deal with an off-center subject by pointing the camera at the subject, locking
exposure and focus, and then reframing the picture before finally snapping the
shutter. The only problem is that you sometimes need to perform a more radical
recomposition of the subject in order to determine the proper exposure. For
instance, you may want to zoom in on the subject, grab an exposure setting,
and then zoom back out before taking the picture. Situations like that require
locking the exposure independently of the focusing, and the 20D provides for
just such eventualities by way of a separate AE lock button on the back of the
camera, right under your right thumb. (The "*" button.) A very handy
feature indeed, for those times you need it.
The EOS 20D offers a full range of White Balance settings, including six presets, an Auto setting, Custom setting, and Kelvin temperature setting. The six presets include Daylight, Shade, Cloudy, Tungsten, Fluorescent, and Flash. The Custom setting bases color balance on a previous exposure, meaning you can snap an image of a gray card and base the color temperature on that image. The Kelvin temperature setting lets you get even more specific, and offers a range of temperatures from 2,800 to 10,000 degrees Kelvin.
The EOS 20D also offers a Parameters option through the LCD menu, which lets you select Adobe RGB color space, or set up as many as three Parameters setups. Each setup lets you adjust Contrast, Sharpness, Saturation, and Color Tone, but the custom setups are all based on the sRGB color space.
 One
of the 20D's more unique features is its two-dimensional White Balance Shift/Bracket
control. Conventional white balance "tweak" adjustments are generally
limited to adding blue or red, or perhaps just shifting a color temperature
setting that's calibrated in units of degrees Kelvin. The problem is that controls
of this sort treat color as if were a one-dimensional entity, when it's really
three-dimensional in nature. I've often been frustrated when trying to adjust
a camera's color balance, for instance wanting to shift it toward green, when
the camera offers options of only blue or red.
One
of the 20D's more unique features is its two-dimensional White Balance Shift/Bracket
control. Conventional white balance "tweak" adjustments are generally
limited to adding blue or red, or perhaps just shifting a color temperature
setting that's calibrated in units of degrees Kelvin. The problem is that controls
of this sort treat color as if were a one-dimensional entity, when it's really
three-dimensional in nature. I've often been frustrated when trying to adjust
a camera's color balance, for instance wanting to shift it toward green, when
the camera offers options of only blue or red.
On the 20D, Canon offers a two dimensional adjustment for tweaking white balance, as shown above right. The current color balance is represented by a white cursor floating in a rectangular window representing color space. Moving the cursor up or down results in a shift toward green or magenta respectively, while moving it left or right produces a shift toward red or blue. Each adjustment step in the yellow/blue direction corresponds to 5 mireds worth of color conversion filter, and green/magenta steps are of a similar magnitude, although the green/magenta axis doesn't translate to the color-temperature shift units of mireds.
At first glance, you'd think that a two-dimensional color adjustment tool still wouldn't cover a three-dimensional color space, Canon's approach actually does just that. That's not to say that it is entirely straightforward though. To understand the control, it's important to remember that color (hue and saturation, as opposed to brightness) in an RGB image is determined by the relative amounts of red, green, and blue present, not necessarily by the absolute values of each color channel. The 20D's color shift display lets you control the green channel with either positive (green) or negative (magenta) adjustments, and the red and blue channels with positive-only tweaks.
The positive-only adjustments for the blue and green channels are where it's easy to get confused, but keeping in mind the relative nature of color balance, it's easy to see that you can effectively cut the red in an image by boosting the relative levels of green and blue together. This would correspond to a cursor position somewhere in the upper left quadrant of the Color Shift display's color space. Likewise, you can compensate for a blue cast in an image by boosting green and red together, placing the cursor in the upper right quadrant. Canon's color adjustment tool thus lets you dial in any white balance shift you'd like to make, even though it's only a two-axis control.
"But wait, there's more!" (To steal a line from TV infomercials.) The Bracketing aspect of the White Balance/Bracketing control comes into play when you turn the Quick Control Dial right. This expands the single cursor dot into a horizontal row of three dots, with slightly variable spacing. These represent the successive color values that will be used for a set of three shots that bracket the white balance. You can thus set whatever basic color balance you want, and then bracket with more or less red, or more or less blue, depending on where you are in the color space. Not enough? Turning the quick dial back left switches the set of three dots from a horizontal to a vertical array, letting you bracket with more or less green/magenta, rather than red or blue.
About the only possible remaining option would be the ability to rotate the set of three dots to arbitrary angles, but I guess the Canon engineers had to stop somewhere. Regardless, the EOS 20D's white balance adjustment control goes far beyond anything we've previously seen on a digital camera, regardless of price point.
Low Light Capability & Image Noise Performance
When operating the camera in full-manual exposure mode, the EOS 20D offers
a Bulb exposure setting for very long exposures. Normally, exposure times are
limited to a maximum of 30 seconds in Aperture- or Shutter-Priority modes, but
in Manual mode, you can expose for as long as 999 seconds by selecting Bulb
mode and holding down the Shutter button for as long as you want the shutter
to remain open. Obviously, 999-second exposures aren't a practical reality,
as sensor noise will totally swamp the signal long before that point is reached,
but the 20D does seem quite able to take very long exposures with very
little image noise resulting.
A full discussion of image sensor noise is beyond the scope of this review,
but the simple story is that the most obvious and objectionable noise you'll
see in long digicam exposures is so-called "fixed pattern" noise,
caused by variations in "dark current" between sensor pixels. "Dark
current" is just what it sounds like. Current (a signal) appears even when
the sensor isn't being exposed to light. When you look at a long time exposure
shot with a digital camera, you'll often see very bright pixels, where minor
manufacturing defects have resulted in unusually high "dark current"
levels. Often called "hot pixels," these flecks of color are very
distracting visually.
The normal way to deal with hot pixels is to take an exposure with the camera's
shutter closed, immediately after shooting the subject. If this "dark frame"
is exposed for the same time as the subject was, you can largely eliminate the
hot pixel problem by subtracting the dark frame information from the actual
exposure. In practice, this works fairly well, but has the disadvantage that
you have to wait for the dark frame exposure to be taken, requiring an appreciable
amount of time in the case of long time exposures. (If you shot a one-minute
exposure for the photo itself, you'll have to wait another minute for the dark
frame exposure to be made.)
While most other high-end digicams on the market use a dark frame subtraction
method to deal with image noise, previous d-SLRs using Canon's CMOS sensor technology
apparently did something quite different, as there was very little delay between
the end of the primary exposure and the writing of the image file to the memory
card. There was clearly no "dark frame" exposure involved. I suspect
that this advanced noise reduction processing was another consequence of the
"active pixel" CMOS technology Canon developed internally. Having
active circuitry associated with each pixel in the sensor array allows lots
of fancy processing that would be impossible otherwise, and it looks like Canon's
noise reduction system takes advantage of this.
In the EOS-20D though, while apparently still using the sophisticated on-chip
noise reduction processing we saw in the 10D, Canon has also added an option
for conventional dark-frame subtraction as well. Accessed via Custom Function
02, the "Long exposure noise reduction" seems to operate just the
same as dark-frame subtraction on other cameras we've seen it on. The difference
with the 20D though, is that there's precious little image noise to be subtracted
out, at least at exposure times of 30 seconds or less, where I did essentially
all my shooting. I can imagine the dark-frame subtraction option being useful
for astronomers doing 5-minute exposures with the 20D, but it will add little
to most users' image quality.
Flash
 The
EOS 20D's built-in flash has a guide number rating of 43 feet (13 meters) at
ISO 100, translating to a range of about 15 feet at ISO 100 with an f/2.8 lens.
(Reasonably powerful, but not dramatically so.) The new flash pops up higher
than the flash on the 10D, offering greater clearance over lenses and also somewhat
reducing the likelihood of red-eye at closer ranges. Unlike the Digital Rebel,
which has a similar pop-up mechanism, the new mechanism doesn't rattle noticeably
when the camera is moved, and it pops up more quietly as well. The 20D gives
you a great deal of control over flash exposure, allowing you to adjust flash
and ambient exposure independently of each other, in one-half or one-third EV
increments. This makes it very easy to balance flash and ambient lighting for
more natural-looking pictures. The 20D also uses E-TTL II control for both the
built-in and compatible external flashes (according to Canon this includes the
current 550EX flash, as well as the new 580EX), a new standard that promises
better, more balanced exposures. Custom Function 14 turns this mode off and
returns to an average metering system. E-TTL II is only available with the built-in
flash or when the camera is paired with either the 550EX or the new 580EX flash.
The
EOS 20D's built-in flash has a guide number rating of 43 feet (13 meters) at
ISO 100, translating to a range of about 15 feet at ISO 100 with an f/2.8 lens.
(Reasonably powerful, but not dramatically so.) The new flash pops up higher
than the flash on the 10D, offering greater clearance over lenses and also somewhat
reducing the likelihood of red-eye at closer ranges. Unlike the Digital Rebel,
which has a similar pop-up mechanism, the new mechanism doesn't rattle noticeably
when the camera is moved, and it pops up more quietly as well. The 20D gives
you a great deal of control over flash exposure, allowing you to adjust flash
and ambient exposure independently of each other, in one-half or one-third EV
increments. This makes it very easy to balance flash and ambient lighting for
more natural-looking pictures. The 20D also uses E-TTL II control for both the
built-in and compatible external flashes (according to Canon this includes the
current 550EX flash, as well as the new 580EX), a new standard that promises
better, more balanced exposures. Custom Function 14 turns this mode off and
returns to an average metering system. E-TTL II is only available with the built-in
flash or when the camera is paired with either the 550EX or the new 580EX flash.
Another nice touch is the Flash Exposure Lock button, which fires the flash
under manual control before the actual exposure, to determine the proper exposure
setting. This struck me as very handy, akin to the more conventional autoexposure
lock function for handling difficult ambient lighting conditions. A Flash Exposure
Compensation feature controls the flash exposure +/- 2 stops in 1/2 or 1/3-stop
increments.
Several of the more impressive features of the Canon flash
system depend on the dedicated 550EX or 580EX speedlight. Among these are true
FP (focal plane) flash sync, flash exposure bracketing with external flash units,
flash modeling, and E-TTL II exposure control. FP sync requires a flash unit
to provide uniform light output for a relatively long period of time, long enough
for the focal plane shutter curtain to fully traverse the "film" plane
(sensor plane in the case of the 10D). On the 20D, this requires a flash duration
of 1/250-second. Uniform, long-duration flash pulses like this permit use of
shutter speeds as high as the 1/8,000-second maximum that the 20D is capable
of. This can be invaluable when you want to exclude ambient light from the exposure.
(FP sync mode is referred to as "high speed" mode on the Canon 550
and 580 flash units.)
Here's the rundown on Canon Speedlights and their compatibility with the 20D:
| Speedlight Model | On-Camera Capability | E-TTL Wireless Compatibility |
| 580EX | All | Master or Slave |
| 550EX | All | Master or Slave |
| 480EG | External auto plus manual operation | None |
| 540EZ | Manual operation only | None |
| 430EZ | Manual operation only | None |
| 420EX | All | Slave Only |
| 420EZ | Manual operation only | None |
| 380EX | All | None |
| 220EX | All | None |
| 200E | Not Compatible | None |
| 160E | Not Compatible | None |
| MR-14EX Macro Ring | All | Master Only |
| MT-24EX | All | Master Only |
| ST-E2 transmitter | E-TTL, attach to camera | Master Only |
| Non-dedicated shoe-mount units | Manual operation only | n/a |
| Studio strobe packs | Manual operation only, connect via threaded PC sync socket on camera body | n/a |
You'll note the references to "E-TTL remote"
capabilities in the table above. Canon's Speedlight system permits TTL flash
metering with multiple remote units, and even allows you to set differential
power ratios between the slaved units, over a six-stop flash exposure range.
The "Flash Modeling" feature of the 550/580EX speedlights is quite
useful. With a F550/580EX connected to the 20D, pressing the camera's Depth
of Field Preview button causes the speedlight to fire at 70 flashes per second
for about one second. This creates the illusion of a constant light source for
your eyes, letting you preview the lighting on your subject when the flash fires.
VERY handy, and likely to save lots of shoot/check/reshoot time!
As alluded to above, the "X-sync" speed
of the 20D is 1/250-second. (This is the maximum shutter speed that can be used
on the 20D when working with a non-dedicated, FP-capable speedlight. It has
been increased from the 10D's 1/200 sec.) When used with higher-powered studio
strobe systems, Canon recommends a maximum shutter speed of 1/125-second or
slower, to accommodate the variable time/intensity profile of such units. Finally,
via a Custom menu setting, you can program the 20D to use a shutter speed of
1/250-second in Aperture-Priority exposure mode regardless of ambient light
levels. (I guess this is useful, if you know you're going to be hopping in and
out of flash mode, but other than a convenient preset for the shutter speed,
it's little different from simply using Manual mode to set both shutter speed
and aperture simultaneously.)
Another benefit of the dedicated Canon speedlights is that they carry powerful
autofocus assist illuminators that can extend the range of the built-in AF assist
light of the 20D significantly. As an example, the AF assist beam on the 550EX
is rated as good to about 50 feet, versus the roughly 13 feet of the
lamp on the 20D itself. (Note that the ST-E2 wireless sync transmitter can also
be used for AF assist during non-flash photography, a handy trick.)
 |
20D with E-TTL II |
 |
Digital Rebel without E-TTL II |
Continuous Shooting Mode and Self-Timer
Among digital SLRs currently on the market, the 20D is above average in terms
of shooting speed, very competitive with units it'll be stacked up against in
the marketplace. The Continuous Shooting mode is rated by Canon at five frames
per second, a number that matched almost exactly the 4.8 frames/second that
I measured in my own tests. This actually exceeds the ability of most d-SLRs,
which typically come in at about 3.0 frames per second, but it's nonetheless
slower than the blazing 8.5 frames per second of Canon's own EOS-1D Mark II.
Professional sports shooters will doubtless want more (they being a primary
target of the 1D Mark II), but for most situations, I expect that the five frames
per second of the 20D will be plenty fast enough. The 20D also has an unusually
"deep" buffer, as it's able to capture up to 31 large/fine JPEG images
or 6 RAW or RAW+JPEG ones before having to pause for the memory card to catch
up. The 20D also seems well-able to take advantage of fast memory cards, as
its buffer-clear time is only 19 seconds with a Lexar 80x CF card.
The camera's Drive setting also accesses a Self-Timer mode, which opens the
shutter 10 seconds after the Shutter button is pressed, giving you time to dash
around in front of the camera.
Shutter Lag & Cycle Time Tests
When you press the shutter release on a camera, there's usually a lag time or delay before the shutter actually fires. This corresponds to the time required for the autofocus and autoexposure mechanisms time to do their work, and can amount to a fairly long delay in some situations. Since this number is rarely reported on (and even more rarely reported accurately), and can significantly affect the picture taking experience, I routinely measure both shutter delay and shot to shot cycle times for all cameras I test, using a test system I designed and built for the purpose. (Crystal-controlled, with a resolution of 0.001 second.) Here are the numbers I collected for the Canon EOS 20D. (These were initially collected with a prototype sample, and subsequently verified with a production model. The only change I found was in buffer depth, the production unit can grab up to 31 large/fine JPEGs without pausing, whereas the prototype I tested was limited to 23. All other performance numbers were right in line with what I found on the prototype sample.):
|
|
||
| |
(secs) |
|
| Power On -> First shot | |
So fast
it's hard to measure accurately. Your reflexes will be the reason you
miss any shots, not the camera's startup speed. |
| Shutdown | |
First
time is simple shutdown, second time is worst-case buffer-clearing time.
(After a sequence of 6 RAW+JPEG images in continuous mode.) |
| Play to Record, first shot | |
So fast
it's difficult to measure. |
| Record to play | |
First
time is that required to display a large/fine file immediately after
capture, second time is that needed to display a large/fine file that
has already been processed and stored on the memory card. First time
is fast, but not astonishingly so, second time is so fast that you really
won't notice any delay. |
| Shutter lag, full autofocus | |
Times with the kit lens. (18-55mm) First time is at full wide-angle, second is full telephoto. Very fast. |
| Shutter lag, prefocus | |
Time to
capture, after half-pressing shutter button. Very fast, if not quite
the 65 milliseconds of the Canon spec. |
| Shutter lag, manual focus | |
Fast but
not amazingly so. Still, 0.1 second is faster than most photographer's
reaction time. |
| Cycle Time, Single frame mode LF JPG Lexar 1GB 80x CF card |
0.48 / 1.27 (2.1 / 0.79 fps) |
First number is cycle time before buffer fills, second number is after buffer fills. Times are averages. Buffer filled after 21 shots of a target designed to be difficult to compress, and takes 19 seconds to empty completely with a Lexar 80x CF card. Very fast, the post-buffer-fill cycle time is quite impressive as well. |
| Cycle Time Single frame mode RAW + LF JPG Lexar 1GB 80x CF card |
0.43 / 3.8 (2.3 / 0.26 fps) |
First number is cycle time before buffer fills, second number is after buffer fills. Times are averages. Buffer fills after 6 shots and takes 24 seconds to empty with an 80x Lexar CF card. (After the 6th shot, the cycle time degrades gradually, with roughly 1.1 seconds till the 7th shot, then 2.5 seconds to the 8th, before finally settling into 3.8 seconds/shot for the long haul.) |
| Cycle Time Continuous mode LF JPG Lexar 1GB 80x CF card |
0.21 / 1.13 (4.8 / 0.89 fps) |
First number is cycle time before buffer fills, second number is after buffer fills. Times are averages. Buffer fills after 31 shots of a low-compressibility target and takes 19 seconds to empty with the Lexar 80x CF card. |
| Cycle Time Continuous mode LF JPG SanDisk Extreme 1GB CF card |
0.21 / 0.81 (4.8 / 1.24 fps) |
First number is cycle time before buffer fills, second number is after buffer fills. Times are averages. Buffer fills after 21 shots of a low-compressibility target and takes 12 seconds to empty. While both the Lexar 80x and SanDisk Extreme cards are very fast in the camera, the SanDisk Extreme has a slight edge in throughput. |
| Cycle Time Continuous mode RAW + LF JPG Lexar 1GB 80x CF card |
0.21 / 3.35 (4.8 / 0.30 fps) |
First number is cycle time before buffer fills, second number is after buffer fills. Times are averages. Buffer fills after 6 shots and takes 24 seconds to empty. Image compressibility doesn't affect timing significantly, and buffer capacity is always 6 shots in RAW+JPEG mode. (The 20D shows a similar "gradual fill" timing characteristic in RAW+JPEG mode when shooting continuously as was mentioned in the single-shot commentary above.) |
| Cycle Time Continuous mode RAW + LF JPG SanDisk Extreme 1GB CF card |
0.21 / 2.35 (4.8 / 0.43 fps) |
First number is cycle time before buffer fills, second number is after buffer fills. Times are averages. Buffer fills after 6 shots and takes 16 seconds to empty. Again, the SanDisk Extreme has an edge in buffer-clear times. |
Without a doubt, the EOS 20D is an impressively fast camera, all the more
so given its 8.2 megapixel imager. (That's a lot of data to sling around
that quickly.) Shutter lag is better than that of the earlier 10D, the Digital
Rebel, or the Nikon D70, in many cases significantly so. Cycle times are also
very impressive, whether in single-shot or continuous mode. Buffer capacity
for JPEG images is excellent: Using a low-compressibility color-noise image
as the subject, we consistently shot 31 large/fine JPEGs (depending on subject
detail) before having to wait for the card to catch up; and at about a second
per image, post-buffer-fill cycle time was excellent as well. Shooting in
RAW+JPEG mode cuts buffer capacity to 6 frames, regardless of the subject
matter or JPEG quality setting, and slows both the post-buffer-fill cycle
time and buffer recovery rate as well. - But the cycle time for those first
6 frames is still very good, and you don't have to wait for the buffer to
clear entirely before shooting another series.
From a practical standpoint, while the 20D doesn't approach the speed of the 1D Mark II, the combination of 5 frames/second and a JPEG buffer depth of 31 frames (or 6 frames for RAW+JPEG shooters) makes a huge impact on the sense of speed and responsiveness we felt with the camera, compared to the lower-end Rebel or the earlier 10D. I'm sure that sports shooters and some fashion photographers will still lust for the speed and buffer depth of the Mark II, but for the vast majority of photographers, the performance of the 20D will more than suffice. Big kudos to Canon, on the performance score!
Operation & User Interface
The 20D's user interface is very similar to that of a traditional 35mm SLR
film camera, and very similar to that on the EOS-10D (with just a few changes
that enhance operation somewhat). Current users of Canon EOS SLRs should immediately
feel at home. I generally comment on whether or not a camera's controls permit
single-handed operation, but in the case of pro-level cameras like the 20D,
this is much less of a consideration, since the cameras' bulk and typical
shooting scenarios generally demand the use of two hands anyway. I really
appreciated the fact that the basic exposure controls are adjustable through
the external camera control buttons and dials, greatly reducing your dependence
on the rear-panel LCD menu system. The ability to program the Set button for
quick changes of menu items such as image review, image quality, and parameters
even further reduces reliance on the LCD menu. When you
do venture into the menu system, all of the camera's playback and setup options
are available in all shooting modes, now in a scrolling mode that is almost
identical to the "single menu" design of the original D30.
I found the 20D's user interface straightforward and efficient.

Power Switch: Located below the lower right corner of the LCD
monitor, this switch turns the camera on or off; switching it to its third
position activates the Quick Dial for more functions than just navigating
the menu.
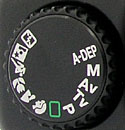
Mode Dial: Positioned on the left side of the camera's top panel,
this dial sets the exposure mode. Exposure modes are divided into three zones
(of which two overlap), the Image, Basic, and Creative zones. The Image Zone
encompasses the Flash Off, Night Portrait, Sports, Close-Up (Macro), Landscape,
and Portrait exposure modes. The Basic Zone includes all of the previously
mentioned exposure modes, plus the Full Automatic exposure mode. Finally,
the Creative Zone refers to the Program AE, Shutter Speed Priority AE, Aperture
Priority AE, Manual, and Auto Depth of Field Priority AE exposure modes.

Shutter Button: Located on top of the right hand grip, this
button fires the shutter when fully pressed, and sets focus and exposure when
halfway pressed in Automatic exposure mode. Halfway pressing this button also
puts the camera into an "active" mode, which allows the rear-panel
quick control dial to adjust exposure compensation. (You don't need to keep
the shutter button half-pressed while working the quick control dial, but
you do need to have pressed it within the preceding six seconds.) Pressing
the shutter button in any state other than direct printing (for example, when
in a menu or reviewing an image) will return the camera almost immediately
to readiness for image capture.

Lens Release Button: Located on the front of the camera this
rectangular button located just to the left of the lens mount (as viewed from
the back) unlocks the lens from the mount when pressed. The lens can then
be removed by rotating it about 45 degrees right to disengage the bayonet
mounting flanges.

Flash Button: Located on the left side of the prism housing,
above the lens release button and just below the popup flash compartment,
this button releases the popup flash into its operating position when the
camera is on. (The popup flash cannot be raised when the camera is turned
off.) With the exception of the landscape, sports and no flash modes, the
flash will also pop itself up automatically if the camera determines it is
needed in any of the Basic Zone modes.

Depth of Field Preview Button: Positioned on the side of the
lens mount housing, just beneath the lens release button, this button lets
you preview the depth of field by stopping down the lens aperture to the current
setting in any of the Creative Zone exposure modes. (Like most modern SLRs,
the 20D normally focuses and meters with the lens wide open, stopping down
to the selected aperture just as the picture is being taken.) When an external
flash is connected, this button also fires a rapid series of flashes for one
second, so that you can check shadows, light balance, and other effects, allowing
the flash to be used as a modeling light. (This feature requires use of a
Canon dedicated speedlight that supports this capability, such as the model
550EX, or the new 580EX.)
![]()
Main Dial: Resting on top of the camera on the right side (as
viewed from the back), this ridged wheel adjusts some of the camera's basic
settings in any of the Creative Zone exposure modes. (That is, in non-programmed
exposure modes such as Aperture- or Shutter-Priority and full Manual mode.)
When used in conjunction with the appropriate control buttons on the camera's
top, the Main dial also controls the autofocus mode, metering mode or drive
mode. In Aperture-Priority and Shutter-Priority modes, this dial sets the
lens aperture or shutter speed. In Manual mode, the dial sets the shutter
speed.

Metering Mode / Flash Exposure Compensation Button: Just off
from the top right corner of the small LCD display panel on top of the camera
is the shiny black Metering Mode / Flash Exposure
Compensation Button. Pressing this button while rotating the Quick Control
Dial sets the flash exposure compensation from -2 to +2 in one-third EV increments,
for both the built-in flash and any Speedlight EX external flash unit. (Flash
exposure compensation cannot be used in any of the "Easy Shooting"
modes.) Through the Custom Function menu, you can change the flash exposure
compensation adjustment step size to one-half EV increments. Pressing this
button while turning the Main dial cycles between the three metering modes:
Evaluative, Partial, and Center-Weighted Averaging.

Drive / ISO Speed Button: Located to the left of the Metering
Mode / Flash Exposure Compensation button, this button controls the camera's
drive mode when pressed while turning the Main dial, cycling through Single
Shooting, Continuous Shooting, and Self-Timer drive modes. When pressed while
turning the Quick Control dial, this adjusts the ISO setting to 100, 200,
400, 800, 1,600, or H (3,200) equivalents. The H option is only available
when Custom Function 08 is set to On.

AF Mode / White Balance Button: To the left of the Drive / ISO
button, this button controls the autofocus and white balance modes. Pressing
the button while turning the Main dial sets the autofocus mode to One Shot,
AI Focus, or AI Servo. (One Shot is for still subjects, while AI Servo is
better for moving subjects, since it causes the camera to focus continuously.
AI Focus automatically switches between the two modes.) Pressing this button
while turning the Quick Control dial sets the white balance to Auto, Daylight,
Shade, Cloudy / Twilight / Sunset, Tungsten, White Fluorescent, Flash, Custom
(manual), or Kelvin mode, to match a variety of light sources. The Kelvin
temperature setting is adjusted through the settings menu, with values from
2,800 to 10,000 Kelvin in 100K increments. Both functions are only available
in the Creative Shooting Zone.

LCD Illuminator Button: Diagonally up and to the left of
the AF Mode / White Balance button, this button illuminates the status display
window with an orange backlight
for six seconds.

Diopter Adjustment Dial: Located outside the top right corner
of the viewfinder eyepiece, this dial adjusts the optical viewfinder's focus
to accommodate eyeglass wearers, across an unusually wide range of -3 to +1
diopter. If this much adjustment isn't enough, one of Canon's ten different
optional dioptric adjustment lenses can be purchased

Menu Button: Topping a column of buttons along the left side
of the LCD monitor, this button accesses the 20D's LCD-based operating menu
in all modes. Pressing the Menu button a second time cancels the menu display.

Info Button: Just below the Menu button, this button displays
the current exposure settings on the LCD screen when pressed. In Playback
mode, pressing this button switches between three different formats for the
playback display. The options are Single Image Display (with Basic Info),
which shows the image number, shutter speed and aperture; Shooting Information,
which brings up an information screen that reports the detailed exposure settings
that the picture was taken with, and also displays a small histogram which
shows the number of pixels having each possible brightness value; and Single
Image Display (no Shooting Info) which shows just the image with no overlay.
The Info button works regardless of whether you are viewing a single image,
multi-image index display, or are using the playback zoom.

Jump Button: Directly below the Info button, this button allows
you to jump 10 frames forward or backward when viewing images in Playback
mode. Once pressed, a jump bar appears in the LCD screen, and jumping is controlled
by turning the Quick Control Dial forwards or backwards. The Jump button also
jumps to the next group in the menu, indicated by color codes on the right
side of the display.

Play Button: The final button on the left side of the back panel,
this button puts the camera into Playback mode, regardless of the Mode dial
setting. (Turning the Quick Control dial in this mode scrolls rapidly through
captured images.) Playback mode can be canceled by hitting the Play button
again, or by touching the Shutter button. (The 20D is a "shooting priority"
camera. It's always ready to shoot a picture, regardless of its current mode.
Simply pressing the Shutter button returns it immediately to capture mode.)

Erase Button: Resting beneath the lower right corner of the
LCD monitor, this button accesses the Erase menu, which allows you to erase
the current image or all images on the card (except for protected ones). There
is also an option to cancel. The Erase function works in Playback mode and
the quick review mode only.
Quick Control Dial: To the right of the LCD monitor on the camera's
back panel, this dial selects various camera settings and menu options when
turned while pressing a control button or while in an LCD menu screen. When
shooting in the Creative Zone (except for Manual exposure mode), turning the
dial while halfway pressing the Shutter button sets the exposure compensation
(from -2 to +2 in one-third or one-half EV increments). In Playback mode,
this dial scrolls through captured images on the CompactFlash card. It also
navigates the index display and scrolls around within an enlarged image. In
Manual mode, the dial sets the aperture.
Set Button: Located in the center of the Quick Control dial,
this button confirms menu selections and camera settings when using the LCD
menu system. Through the Custom Function menu, this button can be programmed
to control the image quality, parameters, or image playback in conjunction
with the Quick Control dial. (The default is for it to have no function in
record mode.)
![]()
Multi-Controller: Located directly above the Quick Control Dial,
this new addition to the EOS-20D makes for a more intuitive way to select
items like, for example, the autofocus point to use, than the EOS-10D's combination
of the Main and Command dials did. The joystick can be moved eight ways, or
pressed in centrally, and is used to control AF Point selection and white
balance correction, as well as to pan around images when the playback zoom
is in use, and to select the area to be trimmed when printing directly from
the camera. It also comes into play when using the new White Balance Compensation
feature.
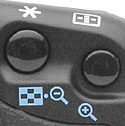
AE / FE Button: In the top right corner of the rear panel and
marked with an asterisk, this button locks the exposure until the Shutter
button is pressed. When pressed while the flash is activated, this button
locks the flash exposure, which signals the camera to fire a small pre-flash
to measure the exposure before locking it. (This decoupling of exposure lock
from autofocusing is a very useful "pro" feature seldom seen on
lower-end cameras.) Through the Custom menu, you can program this button to
lock exposure and focus together, or only one of the variables.
AF Point Selector Button: Just beside the AE / FE button, this
button allows you to choose the focus area manually or automatically in Program
AE, Shutter-Priority AE, Aperture-Priority AE, or Manual Exposure modes. Pressing
the button and using the Multi-Controller allows you to select either an automatic
setting (by moving the Multi-Controller to the position of the currently selected
AF point), or your choice of nine manually-selected focus areas (up, up/left,
left, down/left, down, down/right, right, up/right, or the center point -
which is selected by pushing inwards on the Multi-Controller). The automatic
setting selects the active focus point(s) based on the position of the subject
within the frame, and its proximity to the nine focusing points (shown as
nine small boxes arranged in a diamond pattern in the viewfinder). Whenever
you press this button, your current choice of focusing area is reflected in
the top-panel LCD data readout by the position of a dash (or series of dashes)
in the LCD data readout.
Camera Modes and Menus
![]()
Flash Off Mode: The first mode in the Easy Shooting Zone, Flash Off
mode disables both the internal flash unit and any external flash unit connected.
Focus is set to AI Focus mode, drive mode is set to Single, and metering is
set to Evaluative. The camera controls ISO and Auto white balance as well.
![]()
Night Scene Mode: This mode is for taking pictures of people at sunset
or at night. The autofocus mode is automatically set to One Shot. Drive mode
is set to Single Shot, and metering mode is set to Evaluative. Since slower
shutter speeds will be used, a tripod is recommended to prevent movement from
the camera. The built-in flash is automatically enabled and synched with the
slower shutter speed, so subjects need to remain still after the flash fires
to avoid ghostlike afterimages. ISO is automatically adjusted by the camera.
(For night exposures without the flash, Canon recommends shooting in Landscape
mode.)
![]()
Sports Mode: This mode uses a faster shutter speed to capture fast-moving
subjects. The autofocus mode is automatically set to AI Servo. Drive mode
is set to Continuous Shooting, ISO is set to Auto, and metering mode is set
to Evaluative. The onboard flash isn't available in this mode (since it can't
cycle fast enough to keep up with the continuous exposure mode).
![]()
Close-up Mode (Macro Mode): Turning the Mode dial to the macro flower
symbol sets the camera for capturing smaller subjects such as flowers, jewelry,
and other small details. The autofocus mode is automatically adjusted to One
Shot, the drive mode is set to Single Shot, and the metering mode is set to
Evaluative. ISO is set to Auto. Close-up mode takes advantage of the current
lens' minimum focal distance. However, an EOS dedicated macro lens and the
Macro Ring Lite MR-14EX are recommended for better close-up photography. (Unlike
the macro mode on most consumer digicams, Macro mode on the 20D has no effect
on lens focusing range, as that parameter is entirely determined by the lens
being used.)
![]()
Landscape Mode: Landscape mode combines slower shutter speeds with
smaller aperture settings to increase the depth of field when shooting broad
vistas and sweeping landscapes. This mode is also good for night scenes without
people in them. The built-in flash is automatically disabled, even if it's
already raised. Because this mode uses slower shutter speeds, a tripod may
be needed. Metering is again set to Evaluative and ISO to Auto.
![]()
Portrait Mode: This mode uses a large aperture setting to decrease
the depth of field, which blurs the background to emphasize the subject. ISO
is set to Auto, metering to Evaluative, and AF mode to One Shot.
![]()
Full Automatic Mode: The final mode in the Easy Shooting Zone, Full
Automatic is indicated on the Mode dial by a green rectangular outline. In
this mode, the camera makes all exposure decisions with the exception of image
quality. Autofocus mode is set to AI Focus. (AI Focus evaluates subject movement,
automatically sets either one-shot AF or AI Servo AF automatically.) Drive
mode is set to Single Shot, and the metering mode is set to Evaluative.
![]()
Program AE: This is the first mode in the Creative Zone of the Mode
Dial. Program AE works similarly to the Full Automatic exposure mode, but
allows more control over the exposure variables. Aperture and shutter speed
are automatically selected by the camera, but you can bias the exposure to
larger or smaller apertures by turning the Main control dial, which will change
the combination of aperture and shutter speed so as to maintain the same exposure
value, but with a different choice of aperture/shutter speed. Turning the
Quick Control dial in this mode adjusts the exposure compensation setting,
to increase or decrease overall exposure.
![]()
Shutter-Priority AE: This mode allows you to manually set the shutter
speed anywhere from 1/8,000 to 30 seconds, while the camera chooses the best
corresponding aperture setting. You have control over all other exposure variables,
including exposure compensation.
![]()
Aperture-Priority AE: The opposite of Shutter-Priority mode, Aperture-Priority
AE allows you to set the lens aperture (with available ranges depending on
the lens in use), while the camera selects the most appropriate shutter speed.
Again, you have control over all other exposure variables, including exposure
compensation.
![]()
Manual Exposure: This mode provides the same range of exposure control
as the other Creative Zone exposure modes (except for exposure compensation),
but lets you control both shutter speed and lens aperture independently. The
shutter speed range is extended to include a Bulb setting. A display in the
top LCD panel reports whether the camera thinks your settings will result
in under, over, or correctly exposed photos.
![]()
Automatic Depth of Field AE: This is the final mode in the Creative
Zone, and is meant for taking pictures of large groups of people, landscapes
with foreground detail, or any subject with elements of interest at varying
distances from the camera. This mode puts the camera in control of both the
shutter speed and aperture values, but you can adjust the other exposure variables.
(This mode cannot be used if the lens focus mode is set to manual.) When shooting
in Automatic Depth of Field AE, the camera sets both the exposure and focus
distance to achieve a sharp focus over a wide depth of field. It uses the
autofocus system to measure the distance to the subjects covered by each of
the three autofocus zones, and then attempts to set the focusing distance
and lens aperture so as to render all three subject areas in sharp focus.
Playback Mode: This mode is entered by pressing the Play button on
the back panel. Playback mode lets you erase images, protect them, or set
them up for printing on DPOF/PictBridge compatible devices. You can also view
images in an index display, enlarge images to 10x, view a slide show of all
captured images, or rotate an image. The Info button activates an information
display, which reports the exposure settings for the image and graphs the
exposure values on a small histogram.
Operating Menu: This menu is available in all of
the camera modes, though a few of the capture-related options are only available
in the Creative Zone. Pressing the Menu button calls up the Operating menu.
 Quality:
Sets the image size and the compression ratio. Options are Large/Fine (3,504
x 2,336 pixels), Large/Normal (3,504 x 2,336 pixels), Medium/Fine (2,544
x 1,696 pixels), Medium/Normal (2,544 x 1,696 pixels), Small/Fine (1,728
x 1,152 pixels), Small/Normal (1,728 x 1,152 pixels), and RAW (3,504 x 2,336
pixels, with lossless compression).
Quality:
Sets the image size and the compression ratio. Options are Large/Fine (3,504
x 2,336 pixels), Large/Normal (3,504 x 2,336 pixels), Medium/Fine (2,544
x 1,696 pixels), Medium/Normal (2,544 x 1,696 pixels), Small/Fine (1,728
x 1,152 pixels), Small/Normal (1,728 x 1,152 pixels), and RAW (3,504 x 2,336
pixels, with lossless compression).
 Protect:
Protects the currently displayed image against accidental deletion, apart
from card formatting.
Protect:
Protects the currently displayed image against accidental deletion, apart
from card formatting.
 Auto
Power Off: Sets power down time to between 1 and 30 minutes or to Off
for no automatic shutoff.
Auto
Power Off: Sets power down time to between 1 and 30 minutes or to Off
for no automatic shutoff.
 The
EOS 20D utilizes CompactFlash (Type I and II) memory cards as its image storage
medium, which should never be removed from the camera while in use. (Removing
a card while the camera is still writing to it could cause permanent damage
to the card.) The EOS 20D does not ship with a memory card, so you'll want
to purchase a large capacity card right away. I'd recommend picking up at
least a 512MB card for starters, given the EOS 20D's large, 3,504 x 2,336-pixel
maximum resolution. The table below shows card capacities and approximate
compression ratios for the various file sizes and types, based on a 1GB memory
card. Like the 10D before it, the 20D is fully compatible with IBM MicroDrives
and other Type II CompactFlash devices.
The
EOS 20D utilizes CompactFlash (Type I and II) memory cards as its image storage
medium, which should never be removed from the camera while in use. (Removing
a card while the camera is still writing to it could cause permanent damage
to the card.) The EOS 20D does not ship with a memory card, so you'll want
to purchase a large capacity card right away. I'd recommend picking up at
least a 512MB card for starters, given the EOS 20D's large, 3,504 x 2,336-pixel
maximum resolution. The table below shows card capacities and approximate
compression ratios for the various file sizes and types, based on a 1GB memory
card. Like the 10D before it, the 20D is fully compatible with IBM MicroDrives
and other Type II CompactFlash devices.
The EOS-20D supports the FAT32 directory structure. (FAT stands for File Allocation
Table, and FAT32 indicates that these newer cards use a 32-bit File Allocation
Table. In general, digicams made before 2003 supported only FAT 16.) The larger
address space provided by FAT32 is necessary for managing high-capacity memory
cards of 2GB or greater capacity. This hasn't been an issue until now, but
current CF cards with capacities as high as 8 GB require FAT32 support to
use them.
| Resolution/Quality 1GB Memory Card |
Fine | Normal | |
| 3504 x 2336 | Images (Avg size) |
188 5.4 MB |
376 2.7 MB |
| Approx. Compression |
5:1 | 9:1 | |
| 2544 x 1696 | Images (Avg size) |
340 3.0 MB |
682 1.5 MB |
| Approx. Compression |
4:1 | 9:1 | |
| 1728 x 1152 | Images (Avg size) |
609 1.6 MB |
999+ (1520) |
| Approx. Compression |
4:1 | 6:1 | |
| |
Images (Avg size) |
91 5.0 - 13.5 MB |
- |
| Approx. Compression |
1.8:1 to 5:1 |
- | |
The RAW mode listed above deserves some explanation. This is a format that records all the data from the sensor, exactly as it comes from the A/D conversion process. It is lossless compression, meaning that the file is reduced to a smaller size, but without losing any data in the process. It thus preserves all the original data from the sensor, but is nevertheless much more compact than an equivalent TIFF file. Depending on the subject content, RAW files will compress more or less. In our use of the camera, we saw compression ratios ranging from 1.8:1 to 5:1. Most images will likely come out around 2:1, for a file size of a bit more than 12 MB.
Download Speed
The 20D has a USB 2.0 port for rapid file transfers to the host computer. Note that the 20D won't auto-mount on your computer's desktop, but rather needs to be accessed either by the Canon EOS Viewer Utility (Windows and Mac), or by the Windows Image Assistant (drivers for which are included on the solutions disc that accompanies the camera.) I tested download times on my Sony VAIO desktop machine, running Windows XP. Downloads via Windows Image Assistant (WIA) were fairly fast, at 1208 KB/second, but it's important to note that WIA only recognizes JPEG files, and so can't be used for transferring RAW images. As fast as WIA seemed to be, transfers through Canon's own Image Viewer utility were much faster, at 2,190 KB/second. This is very fast, even among cameras with USB v2.0 interfaces.
Video Out
 A
video cable comes packaged with the 20D, allowing you to connect the camera
to your television set for image playback. The video signal can be switched
between NTSC and PAL via a menu preference. All menus, etc. appear on the
external video monitor, but do note that it won't work as a viewfinder for
the same reason that the rear-panel LCD won't. (The SLR optics mean that the
sensor is only exposed to light when the shutter is open.)
A
video cable comes packaged with the 20D, allowing you to connect the camera
to your television set for image playback. The video signal can be switched
between NTSC and PAL via a menu preference. All menus, etc. appear on the
external video monitor, but do note that it won't work as a viewfinder for
the same reason that the rear-panel LCD won't. (The SLR optics mean that the
sensor is only exposed to light when the shutter is open.)
Power
 The
EOS 20D uses the same BP-511A battery introduced with the Canon PowerShot
Pro1, and now appearing as standard in many of Canon's cameras. These are
compatible with older chargers and cameras, they're just of higher capacity.
The BP-511A battery pack provides 1390 mAh at 7.4 volts. A separate charger
comes in the box with the 20D. It works much like many of the recent ELPH
chargers, with two flip-out prongs that plug directly into the wall. You'll
need to purchase the AC adapter kit ACK-E2 if you need to run the camera from
AC power.
The
EOS 20D uses the same BP-511A battery introduced with the Canon PowerShot
Pro1, and now appearing as standard in many of Canon's cameras. These are
compatible with older chargers and cameras, they're just of higher capacity.
The BP-511A battery pack provides 1390 mAh at 7.4 volts. A separate charger
comes in the box with the 20D. It works much like many of the recent ELPH
chargers, with two flip-out prongs that plug directly into the wall. You'll
need to purchase the AC adapter kit ACK-E2 if you need to run the camera from
AC power.
Because it lacks an external power terminal, I couldn't perform my usual direct
measurements of power consumption on the EOS-20D. I can attest to its excellent
battery life though, as I should shoot literally for days without exhausting
a fully-charged battery. Canon rates battery life at 1000 shots without the
flash, or about 700 with 50% flash use, at 20 degrees C / 68 degrees F, which
certainly seem like reasonable ratings given my personal experience with the
camera.
Of course, regardless of how good a camera's battery life is, there's rarely
an excuse to not purchase at least one extra battery to bring along as a hot
spare. Plan on buying a second battery along with your 20D, it'll save you
a world of grief later on when the battery that you were sure was full of
juice runs out of gas in the middle of an important shoot.
Included Software
The 20D ships with a pretty complete complement of software on both Mac and Windows platforms, including Canon's EOS DIGITAL Solution Disk, and a copy of Adobe Photoshop Elements(tm). The EOS DIGITAL Solution Disk enables image downloading and management, as well as the necessary tools to process the camera's RAW files. Adobe Photoshop Elements is a streamlined version of the larger Photoshop application, and offers creative editing tools.
In the Box
The EOS 20D comes with the following items in the box:
- Neck strap.
- Eye cup.
- BP-511A battery pack and charger.
- CR2025 lithium battery.
- Video cable.
- USB cable.
- Two software CDs.
- Instruction manuals and registration information.
Test Results
In keeping with my standard test policy, the comments given here
summarize only my key findings. For a full
commentary on each of the test images, see the EOS 20D's "pictures"
page.
Not sure which camera to buy? Let your eyes be the ultimate judge! Visit our Comparometer(tm) to compare images from the EOS 20D with those from other cameras you may be considering. The proof is in the pictures, so let your own eyes decide which you like best!
As with all Imaging Resource product tests, I encourage you to let your own eyes be the judge of how well the camera performed. Explore the images on the pictures page, to see how the EOS 20D's images compare to other cameras you may be considering.

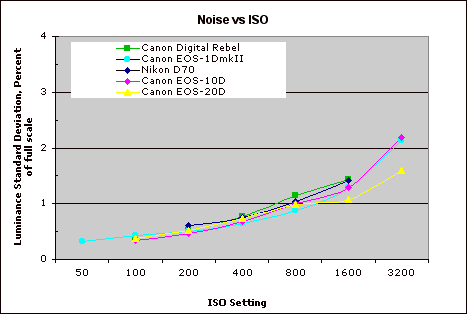
Conclusion
| Free Photo Lessons | |
|
<<EOS 20D Sample Images | Additional Resources and Other Links>>
Reader Comments!
Questions, comments or controversy on this product? Click
this link to see what other Imaging Resource readers have had to say about
the Canon EOS 20D, or add comments of your own!

