Olympus E-520 Operation
Olympus used the small amount of body space on the E-520 wisely, covering just about every available surface within a finger's reach with controls and dials. The Olympus E-520's external dials and buttons access essentially all of the main camera settings, reserving the LCD menu system for less commonly used functions. Turning the Control dial in combination with a number of other external buttons adjusts many common camera settings, including aperture and shutter speed in the manual and partial-manual modes. Most of the camera adjustments are made by rotating a dial, pressing a button, and turning one of the control dials. With a little practice, it shouldn't take long to develop an intuitive feel for the camera.
When the LCD monitor isn't in Live View mode, it offers a very detailed information display (labeled by Olympus as the "Super Control Panel") of the main camera settings, which you can cancel by pressing the Info button. When shooting in Live View mode, the Info button controls the display and information overlays, offering exposure and camera information, a small histogram, an AF area target mark, or an indexed display showing the effects of varying exposure compensation settings. Or, you can cancel all information overlays entirely, for an unobstructed image view. You can also see the main exposure settings and AF area marks through the optical viewfinder.
While you can quickly feel comfortable using the camera, getting to know everything it can do can take a little time, given the large number of custom settings and setup options. However, once you get the hang of it, the control layout and overall feel of the camera should become natural. Right out of the box, you could probably snap a few images with just a cursory look at the manual, but plan on investing more time to get better acquainted with all of the camera's controls and settings.
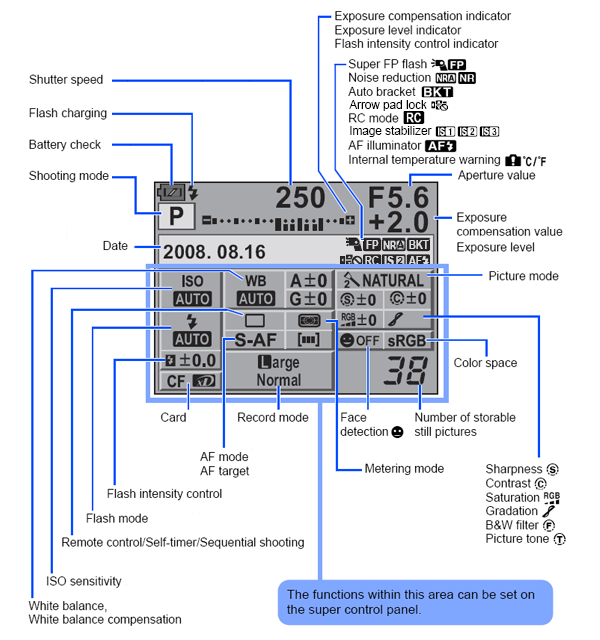
Record Mode Display In record mode, the LCD monitor displays the "Super Control Panel" that you can navigate around in and make changes to a number of menu options (ISO, White Balance, etc.). See the illustration below (courtesy of Olympus America) for callouts of the various settings that are shown and adjustable from this screen. If you're in optical viewfinder mode, pressing the Info button cycles through a basic and an enlarged control panel display, then turns the LCD monitor off entirely.
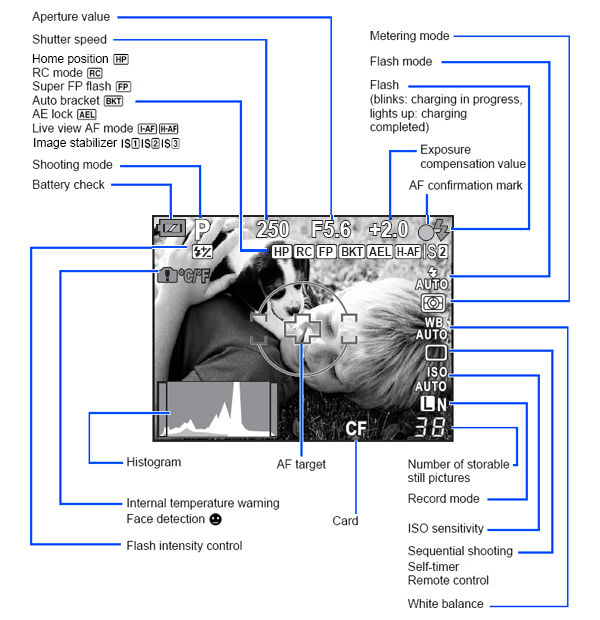
Live View Mode Display Controlled by the Live View button, Live View mode shows you exactly what the sensor sees; however, to focus, you must press the AEL/AFL button on the back, or just press the shutter button and the camera will autofocus right before it takes the shot. While in Live View mode, pressing the Info button a few times brings up a small green box. You can use the arrows to move the box around the screen and press the OK button to enlarge the center of the frame 7x or 10x for more precise focusing or focus verification (manual focus must be enabled in advance). The information display in Live View mode includes exposure mode, AF mode, Live View mode setting, resolution, memory card selection, number of available images, flash mode, any currently-selected exposure compensation setting, ISO setting, and any Picture Mode setting. You can also enable a live histogram. A half-press of the Shutter button displays the shutter speed and aperture settings. You can bring up a Status display by pressing the OK button and make settings changes there as well. Through the Record menu, you can also enable one of a range of grid settings, which display alignment outlines for a range of conditions, including "Golden Section," which gives you lines for the Golden Ratio. Operating the display modes is a bit of a trick, given the combination of buttons involved, but is much less daunting once you get the hang of things. See the illustration below (courtesy of Olympus America) for information callouts in Live View mode.
An interesting side-note is that in Live View mode, the LCD display switches to black and white in low light to avoid colored speckles as it gains up. The result is a slightly improved ability to see detail onscreen in low light. Images are captured in color.
Playback Mode Display In Playback mode, the default image display shows the most recently captured image, with a modest information overlay present. Pressing the Info button cycles through the main display (with no information), a basic information overlay, more detailed information overlay, a thumbnail display with main and RGB histograms, a main histogram overlay, a blinking highlight display, and a blinking shadow display. Pressing the Display button returns you to the status display or Live View mode, depending on the last setting.
 Turning the Control dial to the left cycles through a four, nine, 16, 25, 49, and 100-image index display, and finally a Calendar display. Turning the dial to the right enlarges the captured image as much as 14x. You use the four arrow keys to move around the zoomed image.
 Fujifilm GFX 50S Review
 Fujifilm X-T3 Review
 Olympus E-M5 III Review

Follow Imaging Resource