Olympus E-520 Modes and Menus
Olympus E-520 Capture Mode
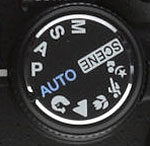 When powered on, the camera is automatically placed into Record mode. The Exposure Mode dial on top of the camera sets the main shooting mode, with the following options:
 Manual: Provides complete user control over the exposure,
including both aperture and shutter speed settings. A Bulb shutter setting
also becomes available in this mode, allowing variable length exposures for
as long as you hold down the shutter button.
Manual: Provides complete user control over the exposure,
including both aperture and shutter speed settings. A Bulb shutter setting
also becomes available in this mode, allowing variable length exposures for
as long as you hold down the shutter button. Shutter Priority: Allows the user to set the shutter speed,
from 1/4,000 to 60 seconds, while the camera selects the most appropriate
aperture setting.
Shutter Priority: Allows the user to set the shutter speed,
from 1/4,000 to 60 seconds, while the camera selects the most appropriate
aperture setting. Aperture Priority: The opposite of Shutter Priority, this
mode puts the user in control of the aperture setting while the camera selects
the best shutter speed. (The aperture range varies with the lens in use.)
Aperture Priority: The opposite of Shutter Priority, this
mode puts the user in control of the aperture setting while the camera selects
the best shutter speed. (The aperture range varies with the lens in use.) Program AE (Program Shift): This mode places the camera
in control over both aperture and shutter speed, while the user has access
to all other menu functions. Turning the Control dial cycles through a range
of equivalent exposure settings, enabling the Program Shift mode.
Program AE (Program Shift): This mode places the camera
in control over both aperture and shutter speed, while the user has access
to all other menu functions. Turning the Control dial cycles through a range
of equivalent exposure settings, enabling the Program Shift mode. Full Auto: This mode places the camera entirely in control
of the exposure, though the user can adjust the exposure compensation and
determine the flash mode.
Full Auto: This mode places the camera entirely in control
of the exposure, though the user can adjust the exposure compensation and
determine the flash mode. Portrait: Optimizes camera settings to reproduce warm,
soft skin tones against a slightly blurred background.
Portrait: Optimizes camera settings to reproduce warm,
soft skin tones against a slightly blurred background. Landscape: Optimizes settings to produce sharp, colorful
landscapes.
Landscape: Optimizes settings to produce sharp, colorful
landscapes. Macro: This mode is for close-up pictures of small objects,
enhancing color in flowers, etc.
Macro: This mode is for close-up pictures of small objects,
enhancing color in flowers, etc. Sports: Favors faster shutter speeds to capture moving
subjects.
Sports: Favors faster shutter speeds to capture moving
subjects. Night + Portrait: Balances the foreground subject illuminate
by flash with the ambient light of the background.
Night + Portrait: Balances the foreground subject illuminate
by flash with the ambient light of the background.  Scene Mode: Accesses the 20 available preset shooting modes:
Portrait, Landscape, Landscape + Portrait, Night Scene, Night + Portrait,
Children, Sport, High Key, Low Key, DIS Mode, Macro, Nature Macro, Candle,
Sunset, Fireworks, Documents, Panorama, Beach & Snow, Underwater Wide
and Underwater Macro.
Scene Mode: Accesses the 20 available preset shooting modes:
Portrait, Landscape, Landscape + Portrait, Night Scene, Night + Portrait,
Children, Sport, High Key, Low Key, DIS Mode, Macro, Nature Macro, Candle,
Sunset, Fireworks, Documents, Panorama, Beach & Snow, Underwater Wide
and Underwater Macro.
![]() Playback Mode: The Playback button on the rear panel accesses
Playback mode, where you can review captured images. The left and right arrow
keys, as well as the up and down keys, scroll through the images on the card.
You can enlarge captured images or display them in an index format for quick
viewing.
Playback Mode: The Playback button on the rear panel accesses
Playback mode, where you can review captured images. The left and right arrow
keys, as well as the up and down keys, scroll through the images on the card.
You can enlarge captured images or display them in an index format for quick
viewing.
Olympus E-520 Menus
Pressing the Menu button provides access to the camera's full menu system. The following options are available in most camera modes as menu tabs at the left of the display:
Record Menu 1:
| Record Menu 1 Options: | |||
|
Top-Level
Selection |
Second-Level
|
Third-Level
|
Notes
|
|
Card Setup
|
- All Erase
- Format |
|
Erases images from the memory
card or formats the card.
|
|
Custom Reset
|
- Reset
- Reset 1 - Reset 2 |
|
You can register two sets of custom
settings, ore reset to factory defaults (Reset option).
|
|
Picture Mode
|
- Vivid
- Natural - Muted - Portrait - Monotone - Custom |
- Contrast (Lo to Hi)
- Sharpness (Lo to Hi) - Saturation (Lo to Hi) - BW Filter: Neutral, Yellow, Orange, Red, or Green -Pict. Tone: Neutral, Sepia, Blue, Purple or Green |
Select a preset for specific situations,
or manually adjust each preset.
|
|
Gradation
|
- Auto
- Normal - High Key - Low Key |
|
Adjusts overall brightness for higher or lower
contrast.
|
|
Quality
|
- Large (L)
- Middle (M) - Small (S) |
- RAW
- Fine (F) - Normal (N) |
Select the image size and quality.
|
|
White Balance
|
- Auto
- Daylight (5,300K) - Shade (7,500K) - Cloudy (6,000K) - Tungsten (3,000K) - Fluorescent 1 (4,000K) - Fluorescent 2 (4,500K) - Fluorescent 3 (6,600K) - Flash (5,500K) - One-Touch - Custom |
All settings except Custom:
- Amber +7 to -7 - Green +7 to -7 Custom Setting: - 2,000K to 14,000K |
Select the white balance mode, or choose
One-Touch to register a setting or Custom to select a Kelvin temperature.
|
|
ISO
|
- Auto
- 100 - 200 - 400 - 800 - 1,600 |
|
Select ISO sensitivity.
|
|
Noise Reduction
|
- Off
- On - Auto |
|
Auto option activates NR when using slow
shutter speeds.
On setting always activates NR, regardless of shutter time. |
|
Noise Filter
|
- Off
- Low - Standard - High |
|
Controls the level of noise processing.
|
Record Menu 2:
| Record Menu 2 Options: | |||
|
Top-Level
Selection |
Second-Level
|
Third-Level
|
Notes
|
|
Metering
|
- Digital ESP + AF/ESP
- Center-Weighted - Spot - Spot HI - Spot SH |
|
Spot Hi
is spot metering with highlight control.
Spot SH is spot metering with shadow control. |
|
Flash RC Mode
|
- Off
- On |
|
Enables wireless flash shooting.
|
|
Flash Exposure Compensation
|
- -3 to +3
|
|
Controls the exposure compensation
with flash.
|
|
AF Mode
|
- S-AF
- C-AF - MF - S-AF + MF - C-AF + MF |
|
Select the AF mode. S-AF+MF and C-AF+MF modes
allow manual fine tuning.
|
|
AF Area
|
- Auto
- Left - Center - Right |
|
Set the location of the spot AF point.
|
|
Anti-Shock
|
- Off
- 1 to 30 seconds |
|
Sets the delay after mirror is raised before
shutter is released, to avoid blurring.
|
|
AE Bracket
|
- Off
- 3 Frames, +/-0.3EV - 3 Frames, +/-07 EV - 3 Frames, +/-1.0 EV |
|
Activates bracketing or disables it.
|
|
WB Bracket
|
- Amber-Blue (A-B)
- Green-Magenta (G-M) |
For either color range:
-Off - 3F 2Step - 3F 4Step - 3F 6Step |
Brackets the white balance setting in terms
of color shifts in Amber/Blue and Green/Magenta, with 3 frames at either
2, 4, or 6 step increments.
|
|
Flash Bracket
|
- Off
- 3F 0.3EV - 3F 0.7EV - 3F 1.0EV |
|
Brackets the flash exposure in three frames,
at either 0.3, 0.7 or 1.0 EV increments.
|
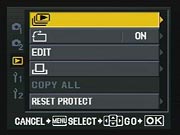
Playback Menu:
| Playback Menu Options: | |||
|
Top-Level
Selection |
Second-Level
|
Third-Level
|
Notes
|
|
Slideshow
|
- Single image display
- 4 image - 9 image - 16 image - 25 image - 49 image - 100 image |
|
Slideshows
can show a single image on-screen at a time, or show up to 100 frames
in an index format.
|
|
Rotate
|
- Off
- On |
|
Rotates images
counter-clockwise 90 degrees.
|
|
Edit
|
- RAW Data Edit
- JPEG Edit |
JPEG:
- Shadow Adjustment - Redeye Fix - Crop - Black & White - Sepia - Saturation - Resize |
RAW Data Edit makes changes based
on current camera settings, while JPEG mode lets you adjust each attribute
independently.
|
|
Print
|
- Single Image
- All |
|
Marks single or all frames for printing.
|
|
Copy All
|
- Yes
- No |
|
Copies images between memory cards.
|
|
Reset Protect
|
- Yes
- No |
|
Cancels all write protection marks.
|
Custom Menu 1:
| Custom Menu 1 Options, Tab A: AF/MF | |||
|
Top-Level
Selection |
Second-Level
|
Third-Level
|
Notes
|
|
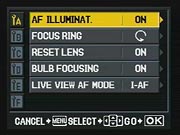
AF Illumination
|
- Off
- On |
|
The built-in flash can serve as an AF illuminator.
|
|
Focus Ring
|
- Counter-clockwise
- Clockwise |
|
Controls the direction of focus ring.
|
|
Reset Lens
|
- Off
- On |
|
Resets focus to infinity.
|
|
Bulb Focusing
|
- Off
- On |
|
Enables focusing during Bulb exposures.
|
|
Live View Mode
|
- AF Sensor
- Hybrid AF - Imager AF |
|
Controls characteristics of Live View AF mode.
|
| Custom Menu 1 Options, Tab B: Button/Dial | |||
|
Top-Level
Selection |
Second-Level
|
Third-Level
|
Notes
|
|
Dial Function
|
- P: PS/EV Comp.
- A: FNo./EV Comp. - S: Shutter/EV Comp. - M: Shutter/FNo. |
|
Controls the function of the
Control dial in each exposure mode.
|
|
Dial Direction
|
- Dial 1
- Dial 2 |
|
Directs the type of
dial control depending on the direction of turning:
- Dial 1 setting enables slower shutter speed, open aperture for clockwise and the opposite for counter-clockwise - Dial 2 is opposite |
|
AEL/AFL
|
- S-AF
- C-AF - MF |
S-AF:
- Modes 1-3 C-AF: - Modes 1-4 MF: - Modes 1-3 |
Controls the
function of the Shutter and AEL/AFL buttons in each AF mode.
|
|
AEL/AFL Memo
|
- Off
- On |
|
Off setting locks exposure only while button
is held down.
|
|
Function Button
|
- Fn Face Detect
- Preview - Live Preview - One-Touch WB - AF Home - MF - RAW - Test Picture - My Mode - Off |
|
Assigns an action to the Fn button.
|
|
Drive Function
|
- Sequential
- Remote - Self-timer - AF Area - AF Mode - WB - Metering - ISO |
|
Assigns other functions to the Remote/ Self-timer/
Sequential button
|
|
My Mode Setup
|
- MyMode 1
- MyMode 2 |
|
Lets you register settings for MyMode
|
|
Button Timer
|
- 3 Sec.
- 5 Sec. - 8 Sec. - Hold |
|
Sets how long a button's function displays after
a quick press
|
|
AEL/Fn Button swap
|
- Off
- On |
|
You can swap the functions of the AE L and Fn
buttons.
|
|
Arrow Key Lock
|
- Off
- On |
|
Locks arrow pad to prevent unwanted
operations.
|
| Custom Menu 1 Options, Tab C: Release/Drive | |||
|
Top-Level
Selection |
Second-Level
|
Third-Level
|
Notes
|
|
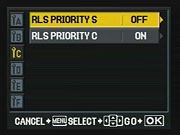
RLS Priority S
|
- Off
- On |
|
If enabled, the camera will
release the shutter before AF function is complete.
|
|
RLS Priority C
|
- Off
- On |
|
If enabled, the camera will release the
shutter before AF function is complete.
|
| Custom Menu 1 Options, Tab D: Disp/Sound/PC | |||
|
Top-Level
Selection |
Second-Level
|
Third-Level
|
Notes
|
|
Sound
|
- Off
- On |
|
Turns the camera's beep sounds
on or off.
|
|
Sleep
|
- Off
- 1 Min. - 3 Min. - 5 Min. - 10 Min. |
|
Sets the camera
to go to sleep after a period of inactivity.
|
|
Backlit LCD
|
- 8 Sec.
- 30 Sec. - 1 Min. - Hold |
|
Turns off the LCD backlight after a period of
inactivity to save battery power.
|
|
4h Timer
|
- Off
- 4 h |
|
Sets the camera to shut off after 4 hours.
|
|
USB Mode
|
- Auto
- Storage - MTP - Control (from PC) - Print Easy - Print Custom |
|
|
|
Live View Boost
|
- Off
- On |
|
If on, boosts the LCD brightness for easier
confirmation.
|
|
Face Detect
|
- Off
- On |
|
If on, detects faces in the frame and sets focus
for those faces.
|
|
Frame Assist
|
- Off
- Grid - Golden Section - Scale |
|
Enables helpful framing assistance
tools.
|
| Custom Menu 1 Options, Tab E: EXP/Point/ISO | |||
|
Top-Level
Selection |
Second-Level
|
Third-Level
|
Notes
|
|
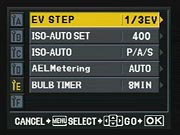
EV Step
|
- 1/3 EV
- 1/2 EV - 1 EV |
|
Sets the increment of EV adjustment.
|
|
ISO-Auto Set
|
- 100
- 200 - 400* - 800 - 1,600 |
|
Sets the upper limit of the
Auto ISO setting. (400 is default)
|
|
ISO-Auto
|
- P
- A - S - All |
|
Sets a shooting
mode that automatically enables Auto ISO.
|
|
AEL Metering
|
- Auto
- Center Weighted - Spot - Spot HI - Spot SH |
|
Controls the type of metering performed via
the AEL/AFL button.
|
|
Bulb Timer
|
|
|
Sets the maximum time for the Bulb exposure.
|
| Custom Menu 1 Options, Tab F: Flash Custom | |||
|
Top-Level
Selection |
Second-Level
|
Third-Level
|
Notes
|
|
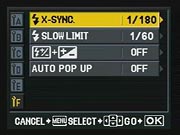
Flash X-Sync
|
- 1/60 to 1/180
|
|
Sets shutter sync speed for external flash
firing.
|
|
Slow Limit
|
- 1/30 to 1/180 (1/60 is default)
|
|
Sets shutter limit for the Slow Sync flash
modes.
|
|
Flash EV Comp. + EV Comp.
|
- Off
- On |
|
If on, flash EV comp. will be
added to overall EV comp. and flash intensity control.
|
|
Auto Pop Up
|
- Off
- On |
|
If on, flash
automatically pops up in Auto or Scene modes.
|
| Custom Menu 1 Options, Tab G: Quality/Color/WB | |||
|
Top-Level
Selection |
Second-Level
|
Third-Level
|
Notes
|
|
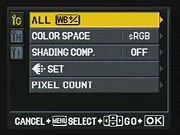
All (WB +/-)
|
- All Set
- All Reset |
All Set:
- Amber -7 to +7 - Green -7 to +7 All Reset: - Yes - No |
In All Set, you can apply the
same WB compensation values to all WB modes at once.
|
|
Color Space
|
- sRGB
- Adobe RGB |
|
|
|
Shading Compensation
|
- Off
- On |
|
Enables a shading compensation that attempts
to eliminate vignetting with certain lenses
|
|
Quality Set
|
- 1
- 2 - 3 - 4 |
L/M/S
SF/F/N/B |
You can combine three image sizes and four compression
ratios and register those settings.
|
|
Pixel Count
|
- Middle
- Small |
Middle:
- 3,200 x 2,400 - 2,560 x 1,920 - 1,600 x 1,200 Small: |
Set the pixel size for the Middle
and Small options.
|
| Custom Menu 1 Options, Tab H: Record/Erase | |||
|
Top-Level
Selection |
Second-Level
|
Third-Level
|
Notes
|
|
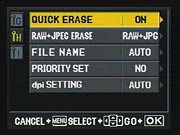
Quick Erase
|
2- Off
- On |
|
If on, allows you to immediately erase an
image during post-capture display.
|
|
RAW + JPEG Erase
|
- JPEG
- RAW - RAW + JPEG |
|
Designates how JPEG+RAW files
are erased.
|
|
File Name
|
- Auto
- Reset |
|
|
|
Priority Set
|
- No
- Yes |
|
Sets the priority of cursor display for Erase
screen to No or Yes.
|
|
dpi Setting
|
- Auto
- Custom |
|
Lets you set the resolution for printing images.
|
| Custom Menu 1 Options, Tab I: Utility | |||
|
Top-Level
Selection |
Second-Level
|
Third-Level
|
Notes
|
|
Cleaning Mode
|
|
|
If enabled, pops up the mirror for sensor
cleaning.
|
|
Sport, Night Portrait, Underwater
Wide, Underwater Macro
|
-Dial Sport/Night Portrait
- Dial UW Wide/UW Macro |
|
Lets you replace the Sport and
Night Portrait positions on the Mode dial with the Underwater modes.
|
Custom Menu 2:
| Custom Menu 2 Options: | |||
|
Top-Level
Selection |
Second-Level
|
Third-Level
|
Notes
|
|
Date and Time
|
|
|
Sets the camera's clock and
calendar.
|
|
CF/xD
|
- CF
- xD |
|
Designates the memory card in use.
|
|
Edit Filename
|
- Adobe RGB
- sRGB |
- Off
- A-Z - 0-8 |
Lets you rename files.
|
|
LCD Brightness
|
- -7 to +7
|
|
Adjusts overall LCD brightness.
|
|
Language
|
English (default)
|
|
Sets the menu language. You can download
additional options with the included software.
|
|
Video Output
|
- NTSC
- PAL |
|
Sets the video output signal.
|
|
Rec. View
|
- 1 to 20 Seconds
- Off - Auto Playback |
|
Controls a post-capture display and the display
time.
Auto setting displays image then switches to Playback mode for quick deletion. |
|
Pixel Mapping
|
|
|
Enables a self-check of the sensor, and remaps bad pixels.
|
|
Firmware
|
|
|
Displays the current firmware version.
|
 Fujifilm GFX 50S Review
 Fujifilm X-T3 Review
 Olympus E-M5 III Review

Follow Imaging Resource