Olympus PEN E-P3 Image Quality
Color
Saturation & Hue Accuracy
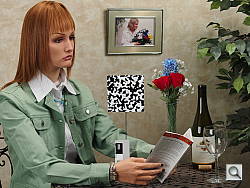
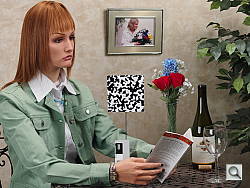
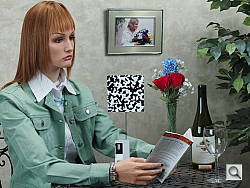
Good color and very good hue accuracy, with pretty good saturation as well.
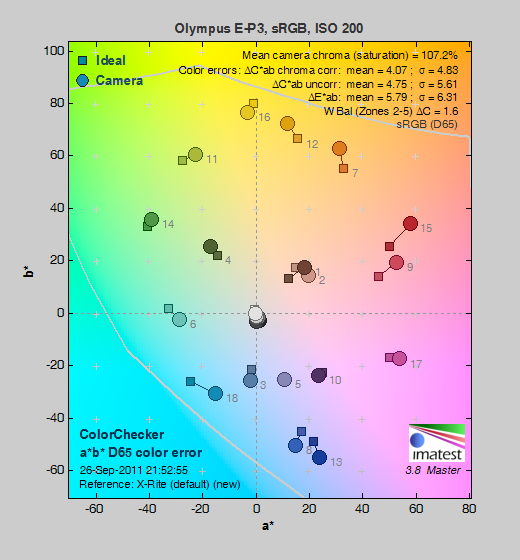 |
| In the diagram above, the squares show the original color, and the circles show the color that the camera captured. More saturated colors are located toward the periphery of the graph. Hue changes as you travel around the center. Thus, hue-accurate, highly saturated colors appear as lines radiating from the center. Click for a larger image. |
Saturation. The Olympus PEN E-P3 pushes reds a fair bit, but most other colors are either about right or only slightly oversaturated. Default saturation is 107.2% (7.2% oversaturated), which is actually slightly lower than average; that is, it's more accurate than most. You can always adjust saturation, or select a different picture mode to adjust color to your tastes. Most consumer digital cameras produce color that's more highly saturated (more intense) than what's found in the original subjects. This is simply because most people like their color a bit brighter than life.
Skin tones. Here, the Olympus PEN E-P3 did well, producing fairly natural-looking skin tones, just slightly on the pinkish side. Darker skin tones show more warmth, but should still be within acceptable limits. Where oversaturation is most problematic is on Caucasian skin tones, as it's very easy for these "memory colors" to be seen as too bright, too pink, too yellow, etc.
Hue. The Olympus PEN E-P3 did push cyan toward blue and oranges slightly toward yellow, but shifts were relatively minor to moderate. (The cyan to blue shift is very common among the digital cameras we test; we think it's a deliberate choice by camera engineers to produce better-looking sky colors.) Overall hue accuracy was very good with a Delta-C color error of only 4.07, which is much better than average. Hue is "what color" the color is.
Color Modes
The Olympus PEN E-P3 offers six preset color modes, as well as ten "Art Filter" modes. You can tweak contrast, saturation, gradation and other parameters (depending on the mode). Changes to each picture mode are saved separately, and you can define your own Custom setting as well. See the E-P3 user manual for details.
| Preset Picture Modes | ||||
 |
||||
Mouse over the links above to see the effect of the presets on our Still Life target. You can click on a link to load the full resolution image.
Saturation Adjustment
The Olympus E-P3 lets you adjust the image saturation, contrast, and sharpness in five steps each. As can be seen below, the saturation adjustment was quite effective, covers a useful range, and does a good job of not impacting contrast.
| Saturation Adjustment Examples | ||
 |
 |
 |
| -2 | 0 | +2 |
The table above shows results with the default as well as the two extreme saturation settings. Click on any thumbnail above, then click again to see the full-sized image.
 |
 |
 |
| See full set of test images with explanations See thumbnails of all test and gallery images |
||
Sensor
Exposure and White Balance
Indoors, incandescent lighting
Cool cast with Auto White Balance, but good color with the Incandescent and Manual settings. Average exposure compensation required.
 |
 |
| Auto White Balance +0.3 EV |
Incandescent White Balance +0.3 EV |
 |
 |
| Manual White Balance +0.3 EV |
2,600 Kelvin +0.3 EV |
Indoors, under normal incandescent lighting, color balance was cool with a bluish cast using the Auto white balance setting. Results with the Incandescent setting were quite good and just a touch warmer than the Manual setting, which was the most accurate. The 2,600 Kelvin setting was quite cool with a blue-green tint. The Olympus E-P3 required an average amount of positive exposure compensation here, at +0.3 EV. (Our test lighting for this shot is a mixture of 60 and 100 watt household incandescent bulbs, a pretty yellow light source, but a very common one in typical home settings here in the U.S.)
Outdoors, daylight
Natural looking colors overall. Good exposure accuracy in our Far-field shot, but our "Sunlit" Portrait shot required slightly higher than average exposure compensation.
 |
 |
| Auto White Balance, +1.0 EV |
Auto White Balance, Auto Exposure |
Outdoors, the Olympus E-P3 performed reasonably well, with good color and good exposure in the outdoor Far-field shot. The Olympus E-P3 required an above average amount of positive exposure compensation (+1.0 EV) to keep facial tones bright on the "Sunlit" Portrait shot, though ideal exposure would likely be something between +0.7 and +1.0 EV. Default contrast was a bit high and dynamic range somewhat below average, so there were quite a few blown highlights in the mannequin's shirt and flower. The Far-field shot had almost no blown highlights at default exposure, though there were some deep shadows that were a bit noisy.
See full set of test images with explanations
See thumbnails of all test and gallery images
Resolution
High resolution, ~1,700 lines of strong detail in JPEGs, up to about 1,900 lines from processed RAW files.
 |
 |
| Strong detail to ~1,700 lines horizontal Camera JPEG |
Strong detail to ~1,700 lines vertical Camera JPEG |
 |
 |
| Strong detail to ~1,900 lines horizontal ACR processed ORF |
Strong detail to ~1,900 lines vertical ACR processed ORF |
In camera JPEGs our laboratory resolution chart revealed sharp, distinct line patterns down to about 1,700 lines per picture height in both the horizontal and vertical direction before aliasing artifacts were interfering with the pattern. Complete extinction of the pattern didn't occur until about 2,700 to 2,800 lines, though. Adobe Camera RAW was able to extract more resolution, to about 1,900 lines in both directions. Use these numbers to compare with other cameras of similar resolution, or use them to see just what higher resolution can mean in terms of potential detail.
See full set of test images with explanations
See thumbnails of all test and gallery images
Sharpness & Detail
Good sharpness overall, though edge-enhancement artifacts on high-contrast subjects are visible. Mild noise suppression visible in the shadows.
 |
 |
| Good definition of high-contrast elements with some visible sharpening artifacts. |
Subtle detail: Hair Noise suppression tends to blur detail in areas of subtle contrast. |
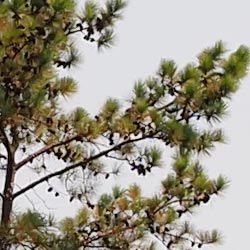
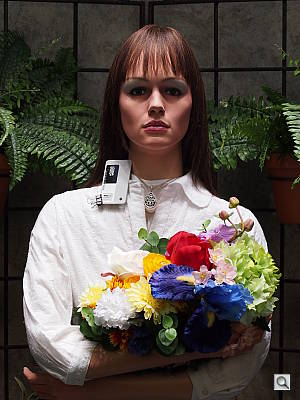
Sharpness. The Olympus PEN E-P3 captures fairly sharp images overall, though edge enhancement artifacts are visible on high-contrast subjects such as halo around the thicker branches and pine cones in the crop above left. Edge enhancement creates the illusion of sharpness by enhancing colors and tones right at the edge of a rapid transition in color or tone.
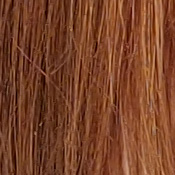
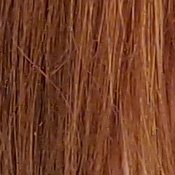
Detail. The crop above right shows some fairly mild noise suppression artifacts in the darkest areas of the model's hair, smudging individual strands together, though quite a few strands remain visible. Overall detail is pretty good for a Four-Thirds model. Noise-suppression systems in digital cameras tend to flatten-out detail in areas of subtle contrast. The effects can often be seen in shots of human hair, where the individual strands are lost and an almost "watercolor" look appears.
RAW vs In-Camera JPEGs
As noted above, the Olympus E-P3 produces fairly sharp, detailed in-camera JPEGs, though with visible sharpening artifacts. As is almost always the case, though, more detail can be obtained from carefully processing RAW files than can be seen in the in-camera JPEGs. Take a look below, to see what we mean:
In the table above, mousing over a link at the bottom will load the corresponding crop in the area above, and clicking on the link will load the full resolution image. The super fine camera JPEG and Olympus [ib] conversion used default settings, while Adobe Camera RAW conversion was sharpened in Photoshop using unsharp mask of 300% with a radius of 0.3.
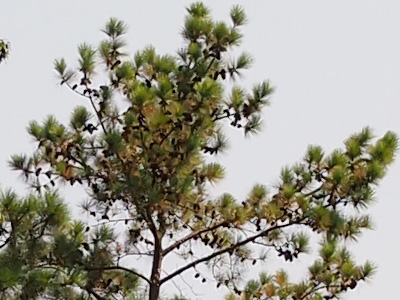
As you can see, the Olympus [ib] conversion resulted in an image very similar to the in-camera JPEG in terms of detail, color and contrast. The Adobe Camera RAW (version 6.5) conversion however contains more fine detail than the camera SuperFine JPEG or Olympus Master conversion at default settings, which is especially noticeable in the pine needles, though it does leave quite a bit more noise. Nevertheless, like previous Olympus PEN cameras, the E-P3 rewards RAW shooters with excellent detail when using a good quality RAW converter.
ISO & Noise Performance
Low noise and good detail up to ISO 800, moderate to high noise at higher ISOs.
|
Default High ISO Noise Reduction
|
 |
 |
 |
| ISO 200 | ISO 400 | ISO 800 |
 |
 |
 |
| ISO 1,600 | ISO 3,200 | ISO 6,400 |
 |
||
| ISO 12,800 | ||
The Olympus PEN E-P3's images are quite clean and detailed at ISO 200, the base ISO. Detail is still very good at ISO 400, with just a bit more blurring and a hint more chroma noise creeping into the shadows. ISO 800 is noticeably softer with more smudging due to stronger noise reduction, but detail is still pretty good for a Four Thirds sensor. At ISO 1,600, we see additional detail loss due to stronger smudging, as well as more obvious purple and yellow blotches in shadow areas. At ISO 3,200, noise grain is stronger, blurring fine detail even further despite the weaker noise reduction. Chroma noise is better controlled at ISO 3,200 though. Noise and the effects of noise reduction are quite obvious ISO 6,400, obscuring almost all fine detail and making shadows quite purplish while lighter tones have yellow blotching. Overall color balance also became cooler with a greenish tint at ISO 6,400 and above. Colors were also darker and less saturated. By ISO 12,800, noise grain is the dominant feature with very little detail left, and a lot of chroma noise was present as well. As always, see the Print Quality section below for maximum recommended print sizes at each ISO.
A note about focus for this shot: We shoot this image at f/4, using one of three very sharp reference lenses (70mm Sigma f/2.8 macro for most cameras, 60mm f/2.8 Nikkor macro for Nikon bodies without a drive motor, and Olympus Zuiko 50mm f/2.0 for Four Thirds and Micro Four Thirds bodies). To insure that the hair detail we use for making critical judgements about camera noise processing and detail rendering is in sharp focus at the relatively wide aperture we're shooting at, the focus target at the center of the scene is on a movable stand. This lets us compensate for front- or back-focus by different camera bodies, even those that lack micro-focus adjustments. This does mean, though, that the focus target itself may appear soft or slightly out of focus for bodies that front- or back-focused with the reference lens. If you click to view the full-size image for one of these shots and notice that the focus target is fuzzy, you don't need to email and tell us about it; we already know it. :-) The focus target position will simply have been adjusted to insure that the rest of the scene is focused properly.
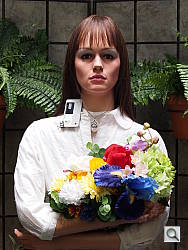
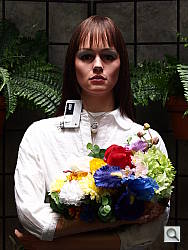
Extremes: Sunlit, dynamic range and low light tests
High resolution with good overall detail, though somewhat limited dynamic range. Good low-light performance, but metering struggled a bit at lower light levels.
 |
 |
|
| +0.3 EV | +0.7 EV | +1.0 EV |
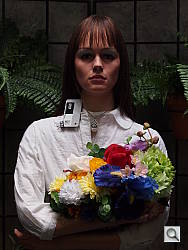
Sunlight. The Olympus PEN E-P3 struggled a little with this difficult shot, requiring more than the average amount of exposure compensation. The E-P3 required +1.0 EV exposure compensation to keep the mannequin's face bright. Most cameras we've tested require about +0.7 EV for this "Sunlit" Portrait shot, so the E-P3 required slightly higher than average positive compensation here. Dynamic range was limited, clipping quite a few highlights in the white shirt and flowers, while shadow noise was slightly high. Compared to compact system cameras using APS-C sensors, the E-P3 performed below average, though performance here was about average compared to most Micro Four Thirds models.
Because digital cameras are more like slide film than negative film (in that they tend to have a more limited tonal range), we test them in the harshest situations to see how they handle scenes with bright highlights and dark shadows, as well as what kind of sensitivity they have in low light. The shot above is designed to mimic the very harsh, contrasty effect of direct noonday sunlight, a very tough challenge for most digital cameras. (You can read details of this test here. In actual shooting conditions, be sure to use fill flash in situations like the one shown here; it's better to shoot in open shade whenever possible.)
Dynamic Range Analysis
A key parameter in a digital camera is its Dynamic Range, the range of brightness that can be faithfully recorded. At the upper end of the tonal scale, dynamic range is dictated by the point at which the RGB data "saturates" at values of 255, 255, 255. At the lower end of the tonal scale, dynamic range is determined by the point at which there ceases to be any useful difference between adjacent tonal steps. Note the use of the qualifier "useful" in there: While it's tempting to evaluate dynamic range as the maximum number of tonal steps that can be discerned at all, that measure of dynamic range has very little relevance to real-world photography. What we care about as photographers is how much detail we can pull out of the shadows before image noise becomes too objectionable. This, of course, is a very subjective matter, and will vary with the application and even the subject matter in question. (Noise will be much more visible in subjects with large areas of flat tints and subtle shading than it would in subjects with strong, highly contrasting surface texture.)
What makes most sense then, is to specify useful dynamic range in terms of the point at which image noise reaches some agreed-upon threshold. To this end, Imatest computes a number of different dynamic range measurements, based on a variety of image noise thresholds. The noise thresholds are specified in terms of f-stops of equivalent luminance variation in the final image file, and dynamic range is computed for noise thresholds of 1.0 (low image quality), 0.5 (medium image quality), 0.25 (medium-high image quality) and 0.1 (high image quality). For most photographers and most applications, the noise thresholds of 0.5 and 0.25 f-stops are probably the most relevant to the production of acceptable-quality finished images, but many noise-sensitive shooters will insist on the 0.1 f-stop limit for their most critical work.
JPEG. The graph at right (click for a larger version) was generated using Imatest's dynamic range analysis for an in-camera Olympus E-P3 JPEG file with a nominally-exposed density step target (Stouffer 4110). At the base ISO of 200 (the optimal ISO) and with default settings, the graph shows 10.4 f-stops of total dynamic range, with 7.12 f-stops at the "High" Quality level. Roll-off at the highlight end of the curve was gradual, but for shadows it wasn't as well behaved. These are are average numerical results for a Micro Four Thirds sensor, though not as good as most APS-C models. Compared to the Sony NEX-5N which uses an APS-C sensor, the E-P3 scored quite a bit lower at the High Quality level (7.12 vs 8.02 f-stops), but actually higher in total dynamic range (10.4 f-stops vs 9.61), though that has more to do with differences in JPEG processing. Note though that this measurement has a margin of error of about 1/3 f-stop, so differences of less than 0.33 can be ignored.
RAW.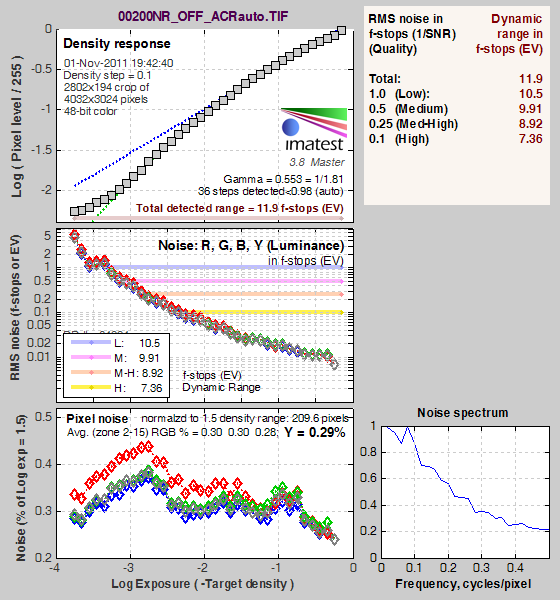 The graph at right is from the same Stouffer 4110 stepchart image captured as a RAW (.ORF) file, processed with Adobe Camera Raw using the Auto setting. (Slightly better results are likely possible with manually tweaking, but we weren't able to do much better.) As can be seen, the score at the highest quality level increased slightly from 7.12 to 7.36 f-stops, which is insignificant, while total dynamic range increased about 1.5 f-stops, from 10.4 to 11.9. Again, these results are about average for a Micro Four Thirds sensor, but not as good as the best APS-C sensors. (The Sony NEX-5N for example managed 9.95 f-stops at the highest quality level, with 12.3 f-stops total dynamic range.) It's also worth noting here is that ACR's default noise reduction settings reduced overall noise somewhat (see the plot in the lower left-hand corner) relative to the levels in the in-camera JPEG, which would tend to boost the dynamic range numbers for the higher quality thresholds.
Contrast Adjustment
The camera's contrast adjustment was some help in handling the harsh lighting in our Sunlit" Portrait and Far-field shots.
|
Minimum Contrast
|
|
 |
 |
| Contrast set to lowest, +0.7 EV |
Contrast set to lowest, Auto Exposure |
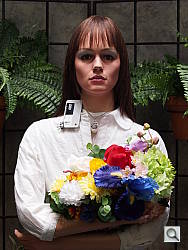
At its lowest contrast setting, the Olympus PEN E-P3 did a better job of revealing shadow detail, while maintaining fairly natural-looking skin tones. There were just a few blown highlights to begin with in both these shots so the decreased contrast setting left most highlights alone, but it did bring out more shadow and darker midtone detail.
| "Sunlit" Portrait Contrast Adjustment Examples | ||
|
 |
 |
| -2 | 0 | +2 |
The shots above show the results of the minimum, default and maximum contrast settings. While you can see the extremes, it's pretty hard to evaluate small differences in contrast on small thumbnails like these, click on any thumbnail to go to the full-size image. As you can see, the E-P3's contrast setting is quite effective and didn't impact saturation much, which is a good thing.
|
Outdoor Portrait Gradation Comparison
|
|
 |
Gradation Normal (Default) Low Key Auto High Key |
 |
|
Gradation
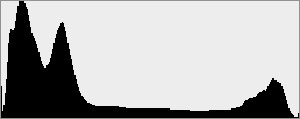
Similar to dynamic range optimization systems from other manufacturers, the Olympus E-P3's Gradation setting applies local contrast adjustments in an attempt to preserve shadow detail and prevent highlight clipping with the Auto setting. Above are examples of the Normal (default), Low Key, Auto and High Key settings applied to our "Sunlit" Portrait shot. Mouse over the links to load the associated thumbnail and histogram, and click on the links to visit the full resolution image. As you can see, the Low Key setting applies Gradation for making subjects darker (in the thumbnail and histogram above, you can see that the camera shifted levels to the left, darkening the image dramatically), while the High Key setting does the opposite for brighter subjects (shifting levels to the right so that lighter tones are blown, but darker ones are opened up). The Auto setting did a good job at toning down highlights and bringing up darker midtones without making the image too flat-looking or washed-out.
| Face Detection | ||
 |
 |
|
| Off at 0 EV | On at 0 EV | |
Face Detection
Like most Point & Shoot cameras these days (and some DSLRs in Live View mode), the Olympus E-P3 has the ability to detect faces, and adjust exposure and focus accordingly. The E-P3 does it automatically in iAuto mode, when a Portrait scene mode is selected, or when Face Detection AF mode is selected. As you can see from the examples above, it works well, as the image with face detection enabled is much better exposed for the face without having to use exposure compensation. An excellent performance under very difficult lighting such as this.
Because digital cameras are more like slide film than negative film (in that they tend to have a more limited tonal range), we test them in the harshest situations to see how they handle scenes with bright highlights and dark shadows, as well as what kind of sensitivity they have in low light. The shot above is designed to mimic the very harsh, contrasty effect of direct noonday sunlight, a very tough challenge for most digital cameras. (You can read details of this test here.)
| 1 fc 11 lux |
1/2 fc 5.5 lux |
1/4 fc 2.7 lux |
1/8 fc 1.3 lux |
1/16 fc 0.67 lux |
1/16fc No NR |
|
|---|---|---|---|---|---|---|
| ISO 200 |
1 s f2.8 |
2 s f2.8 |
4 s f2.8 |
8 s f2.8 |
15 s f2.8 |
15 s f2.8 |
| ISO 400 |
0.5 s f2.8 |
1 s f2.8 |
2 s f2.8 |
4 s f2.8 |
8 s f2.8 |
8 s f2.8 |
| ISO 800 |
1/4 s f2.8 |
0.5 s f2.8 |
1 s f2.8 |
2 s f2.8 |
4 s f2.8 |
4 s f2.8 |
| ISO 1600 |
1/8 s f2.8 |
1/4 s f2.8 |
0.5 s f2.8 |
1 s f2.8 |
2 s f2.8 |
2 s f2.8 |
| ISO 3200 |
1/15 s f2.8 |
1/8 s f2.8 |
1/4 s f2.8 |
0.5 s f2.8 |
1 s f2.8 |
1 s f2.8 |
| ISO 6400 |
1/30 s f2.8 |
1/15 s f2.8 |
1/8 s f2.8 |
1/4 s f2.8 |
0.5 s f2.8 |
0.5 s f2.8 |
| ISO 12800 |
1/60 s f2.8 |
1/30 s f2.8 |
1/15 s f2.8 |
1/8 s f2.8 |
1/4 s f2.8 |
1/4 s f2.8 |
Low Light. The Olympus E-P3 performed fairly well in low lighting, capturing bright exposures at our lowest light level at all ISOs. As is often the case, the EP-3's metering system struggled a bit with getting the exposure right at the lowest levels though, so we used manual exposure for these shots. Noise is well controlled up to ISO 800, though chroma noise is noticeable in dark shadows already at base ISO. There are a few bright pixels visible here and there at lower ISOs. (The E-P3 does offer pixel mapping, so hot/dead pixels can be mapped out without a trip to a service center.) A lot of bright pixels (we wouldn't call them "hot") are however visible when long exposure noise reduction is turned off at lower ISOs, but they blend into the noise "grain" at ISOs above 800, where noise reduction is still active when turned "off". White balance is fairly neutral, with a slightly warm, reddish cast in some exposures (particularly the lower ones). We didn't notice any issues with banding.
The camera's autofocus system was able to focus on our subject down to just above the 1/4 foot-candle light level unassisted with the kit lens, which is good for a camera using contrast-detect autofocus, and in total darkness with the aid of its focus assist lamp.
How bright is this? The one foot-candle light level that this test begins at roughly corresponds to the brightness of typical city street-lighting at night. Cameras performing well at that level should be able to snap good-looking photos of street-lit scenes.
NOTE: This low light test is conducted with a stationary subject, and the camera mounted on a sturdy tripod. Most digital cameras will fail miserably when faced with a moving subject in dim lighting. (For example, a child's ballet recital or a holiday pageant in a gymnasium.) Thanks to their phase-detect AF systems, digital SLRs tend to do much better than point & shoots, but you still shouldn't expect a quick autofocus lock with moving subjects. The E-P3 uses contrast-detect autofocus, as is found in most point & shoot cameras, so its low-light focusing ability is less than that of most SLRs with phase-detect systems. That said, though, the larger, more sensitive pixels of the E-P3's sensor do better under dim lighting than do the tiny pixels of most point & shoots, (A useful trick is to just prop the camera on a convenient surface, and use its self-timer to release the shutter. This avoids any jiggling from your finger pressing the shutter button, and can work quite well when you don't have a tripod handy.)
Output Quality
Print Quality
Great 16x20 inch prints up to ISO 800; ISO 1,600 prints look good at 13x19 inches; ISO 6,400 images print well at 8x10.
 ISO 200 shots look good printed at 20x30 inches.
ISO 400 shots are usable at 20x30, but select elements start to blur, making 16x20-inch prints preferable.
ISO 800 shots look good at 16x20 inches, with only some softening of detail, and low-contrast red areas are often softer than they should be.
ISO 1,600 images are also usable at 16x20 inches. Noise in the shadows is very well controlled, and only reds show a real loss of detail (this is very common). Soft elements do look better, and really become a non-issue when printed at 13x19 inches (except for the red elements, which continue to deteriorate from this setting on up).
ISO 3,200 shots are downright mushy even at 13x19 inches, and reduction to 11x14 inches helps high-contrast areas, but low-contrast areas continue to appear mushy, almost as if they were printed on old newspaper. Printing at 8x10 tightens up this effect.
ISO 6,400 images look good at 8x10.
ISO 12,800 images are too jumbled for printing at any size larger than 4x6. On close inspection, detail in solid colors is obliterated, but that won't matter too much for most subjects at this size.
Overall, the Olympus E-P3 does well from 200 to 1,600, when reds become a problem. Still, you can make a usable print at normal sizes up to ISO 6,400 with good quality, and shots made in darker settings should look fairly natural printed at 4x6. This tracks fairly well when compared to the E-P2's print quality results, though shifted up one stop in ISO settings, and ISO 12,800 is a little rougher than was 6,400 on the E-P2 (its highest setting).
Testing hundreds of digital cameras, we've found that you can only tell just so much about a camera's image quality by viewing its images on-screen. Ultimately, there's no substitute for printing a lot of images and examining them closely. For this reason, we now routinely print sample images from the cameras we test on our Canon Pro9000 Mark II studio printer, and the Canon Pixma MP610 here in the office. (See the Canon Pixma Pro9000 Mark II review for details on that model.)
 Fujifilm GFX 50S Review
 Fujifilm X-T3 Review
 Olympus E-M5 III Review

Follow Imaging Resource