Canon EOS 350D Digital RebelCanon makes an impressive update to their wildly popular "Digital Rebel."!<<User Interface :(Previous) | (Next): Image Storage and Interface>> Page 11:Camera Modes and MenusReview First Posted: 3/23/2003, updated: 6/4/2005 |
Camera Modes and Menus
![]()
Flash Off Mode: The first mode in the Image Zone, Flash Off mode disables both the internal flash head and any external flash unit connected. Focus is set to AI Focus mode, drive mode is set to Single, and metering is set to Evaluative. The camera controls ISO and Auto white balance as well.
![]()
Night Portrait Mode: This mode is for taking pictures of people at sunset or at night. The autofocus mode is automatically set to One Shot. Drive mode is set to Single Shot, and metering mode is set to Evaluative. Since slower shutter speeds will be used, a tripod is recommended to prevent movement from the camera. The built-in flash is automatically enabled and synched with the slower shutter speed, so subjects will need to remain still for a few moments after the flash fires to avoid ghost-like after-images. ISO is automatically adjusted by the camera. (For night exposures without the flash, Canon recommends shooting in Landscape mode.)
![]()
Sports Mode: This mode uses a faster shutter speed to capture fast-moving subjects. The autofocus mode is automatically set to AI Servo. Drive mode is set to Continuous Shooting, ISO is set to Auto, and metering mode is set to Evaluative. The onboard flash isn't available in this mode (since it can't cycle fast enough to keep up with the continuous exposure mode).
![]()
Close-up Mode (Macro Mode): Turning the Mode dial to the macro flower symbol sets the camera for capturing smaller subjects such as flowers, jewelry, and other small details. The autofocus mode is automatically adjusted to One Shot, the drive mode is set to Single Shot, and the metering mode is set to Evaluative. ISO is set to Auto. Close-up mode takes advantage of the current lens' minimum focal distance. However, an EOS dedicated macro lens and the Macro Ring Lite MR-14EX are recommended for better close-up photography. - In our own testing, the Rebel XT's flash throttled down quite well for closeup shots, but the position of the flash head produced somewhat uneven lighting. Also, note that unlike the macro mode on most consumer digital cameras, Macro mode on the 350D has no effect on lens focusing range, as that parameter is entirely determined by the lens being used.
![]()
Landscape Mode: Landscape mode combines slower shutter speeds with smaller aperture settings to increase the depth of field when shooting broad vistas and sweeping landscapes. This mode is also good for night scenes without people in them. The built-in flash is automatically disabled, even if it's already raised. Because this mode uses slower shutter speeds, a tripod may be needed in less-bright lighting conditions. Metering is again set to Evaluative and ISO to Auto.
![]()
Portrait Mode: This mode uses a large aperture setting to decrease the depth of field, which blurs the background to emphasize the subject. ISO is set to Auto, metering to Evaluative, and AF mode to One Shot. Drive mode is set to Continuous Shooting.
![]()
Full Automatic Mode: The final mode in the Basic Zone, Full Automatic is indicated on the Mode dial by a green rectangular outline. In this mode, the camera makes all exposure decisions with the exception of image quality. Autofocus mode is set to AI Focus. (AI Focus evaluates subject movement, automatically sets either one-shot AF or AI Servo AF automatically.) Drive mode is set to Single Shot, and the metering mode is set to Evaluative.
![]()
Program AE: This is the first mode in the Creative Zone of the Mode Dial. Program AE works similarly to the Full Automatic exposure mode, but allows more control over the exposure variables. Aperture and shutter speed are automatically selected by the camera, but you can bias the exposure to larger or smaller apertures by turning the Main dial, which will change the combination of aperture and shutter speed so as to maintain the same exposure value, but with a different combination of aperture/shutter speed. (Personally, I find this sort of vari-program mode more useful than the usual shutter- or aperture-priority modes when I'm wanting to adjust the aperture or shutter speed to control depth of field or subject motion blur. The camera won't let you select a combination of exposure parameters that doesn't work, but you retain all the flexibility of shutter- or aperture-priority exposure modes.)
![]()
Shutter-Priority AE: This mode allows you to manually set the shutter speed anywhere from 1/4,000 to 30 seconds, while the camera chooses the best corresponding aperture setting. You have control over all other exposure variables, including exposure compensation.
![]()
Aperture-Priority AE: The opposite of Shutter-Priority mode, Aperture-Priority AE allows you to set the lens aperture (with available ranges depending on the lens in use), while the camera selects the most appropriate shutter speed. Again, you have control over all other exposure variables, including exposure compensation.
![]()
Manual Exposure: This mode provides the same range of exposure control as the other Creative Zone exposure modes (except for exposure compensation), but lets you control both shutter speed and lens aperture independently. The shutter speed range is extended to include a Bulb setting, allowing long exposures for as long as you hold the Shutter button down. (The rear display reports the elapsed time, from one to 999 seconds.) A display in the viewfinder reports whether the camera thinks your settings will result in under, over, or correctly exposed photos.
![]()
Automatic Depth of Field AE: This is the final mode in the Creative Zone, and is meant for taking pictures of large groups of people, landscapes with foreground detail, or any subject with elements of interest at varying distances from the camera. This mode puts the camera in control of both the shutter speed and aperture values, but you can adjust the other exposure variables. (This mode cannot be used if the lens focus mode is set to manual.) When shooting in Automatic Depth of Field AE, the camera sets both the exposure and focus distance to achieve a sharp focus over a wide depth of field. It uses the autofocus system to measure the distance to the subjects covered by each of the seven autofocus zones, and then attempts to set the focusing distance and lens aperture so as to render all subject areas in sharp focus.
 Playback Mode: This mode is entered by pressing the Play button on the back panel. Playback mode lets you erase images, protect them, or set them up for printing on DPOF compatible devices. You can also view images in an index display, enlarge images to 10x, view a slide show of all captured images, or rotate an image. The Info button activates an information display, which reports the exposure settings for the image and graphs the exposure values on a small histogram.
Operating Menu: This menu is available in all of the camera modes, though a few of the capture-related options are only available in the Creative Zone. Pressing the Menu button calls up the Operating menu, made up of four menu tabs:
Camera 1 Menu
 Quality: Sets the image size and the compression ratio. Options are Large/Fine and Large/Normal (3,456 x 2,304 pixels), Medium/Fine and Medium/Normal (2,496 x 1,664 pixels), Small/Fine and Small/Normal (1,728 x 1,152 pixels), and RAW +Large/Fine JPEG or just RAW (3,456 x 2,304 pixels, with lossless compression).
- Red Eye Reduction: Turns the Red Eye Reduction flash mode on or off (when on, the Red Eye pre-flash fires before every flash exposure).
- Beep: Turns the camera's beep sounds on or off.
- AF Mode: Sets the camera's autofocus system to One Shot, AI Focus, or AI Servo.
- Metering Mode: Sets the metering mode to Evaluative, Center-Weighted, or Partial.
- ISO: Specifies the camera's sensitivity to light. Options are 100, 200, 400, 800, and 1,600 ISO equivalents.
Camera 2 Menu
 Auto Exposure Bracketing (AEB): Sets the bracketing range for Auto Exposure Bracketing in increments of 1/3 EV from -2 to +2 EV (Creative Zone only). Note that the bracketing range is centered around whatever amount of exposure compensation you've dialed-in manually.
- Flash Exposure Compensation: Controls the output of the built-in flash, from -2 to +2 in 1/3 step EV increments. (Custom Function 06 can change this from 1/3 step increments to 1/2 step.)
- White Balance: Sets the white balance to Auto, Daylight, Shade, Cloudy, Incandescent, Fluorescent, Flash, or Custom modes.
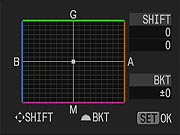 White Balance Shift / Bracket: The "Shift" setting adjusts the white balance by adding or subtracting the amount of blue, magenta, amber, or green. A graph-like display lets you move a selection box anywhere within the grid to adjust the color. The "Bracket" option adjusts the white balance bracketing series in 5-mired steps from -3 to +3 increments. (That is, the total range extends to +/- 15 mireds from the default value of the chosen white balance setting. The shift in degrees Kelvin varies with the starting point, but 15 mireds corresponds to a range of adjustment of roughly +/- 500K around a normal "daylight" center point of 5500K.)
- Custom White Balance: Lets you manually establish the white value by referencing a shot of a white card (Creative Zone only). (This mode on the 350D is a little different from the implementation used by most other camera makers, in that it makes use of a previously-shot image of a white card, allowing you to store several white-point references on the camera's memory card and switch between them relatively rapidly. It also allows a white reference to be shared between multiple photographers shooting the same event, simply by putting the same white reference image on each of their memory cards. Very handy!)
- Color Space: Sets the color space to sRGB or Adobe RGB.
 Parameters: Lets you reference any of up to three sets of manually-set image processing parameters, or three default sets: Parameter 1, Parameter 2, and B/W. These parameters can affect contrast, sharpness, color saturation, and color tone adjustments in a way similar to how Canon's RAW Image Converter software does when processing RAW format images (for finer control, however, you'll still want to shoot RAW and convert on the PC). The Parameter 1 option increases contrast (+1), saturation (+1), and sharpening (+1), while Parameter 2 sets the camera up to record images like the EOS-20D's default settings (all controls set to "zero"). The B/W option is of course for Black and White mode, which includes Contrast, Sharpness, Filter Effects (applying the equivalent of a Yellow, Orange, Red, or Green filter to darken skies), and Toning (which applies Sepia, Blue, Purple, or Green tints to the monochrome images).
Playback Menu
 Protect: Protects the currently displayed image against accidental deletion, apart from card formatting.
- Rotate: Rotates the currently displayed image 90 degrees clockwise or counterclockwise.
- Print Order: Allows you to set up images for printing on any DPOF compatible device. Print options include setting the number of prints, and whether or not the date and/or file number is printed as well.
- Auto Playback: Automatically plays captured images in sequential order as a slide show.
- Review Time: Controls the amount of time that images are displayed in the review, with options of Off, two, four, or eight seconds, or Hold (which displays the image until the Set button is pressed, or the Shutter button is halfway pressed).
Setup 1
 Auto Power Off: Sets the length of inactivity before the camera shuts itself off. Options are 1, 2, 4, 8, 15, or 30 minutes. Alternatively, you can disable the automatic shutoff entirely.
- Auto Rotate: When enabled, records the camera orientation information with the image. This makes portrait-format images appear right-side up on the camera's LCD screen, but doesn't affect the picture data itself in the camera's JPEG or RAW-format files.
- LCD Brightness: Adjusts the LCD brightness.
- Date/Time: Sets the camera's internal date and time.
- File Numbering: Extends consecutive file numbering between media cards (and card-format operations) or resets numbering with each new card.
- Format: Reformats the CompactFlash card, which erases all files (even protected ones).
- Shoot without Card: If set to On, the camera will fire the shutter without a memory card inserted.
Setup 2
 Language: Sets the menu language to one of 15 languages. Options are English, German, French, Dutch, Danish, Finnish, Italian, Norwegian, Swedish, Spanish, Simplified Chinese, Russian, Traditional Chinese, Korean, and Japanese.
- Video System: Selects either NTSC or PAL video timing formats.
- Communication: Sets the USB mode to Print/PTP or PC Connection.
- Custom Functions: Accesses the Custom Functions menu, for customizing the camera.
- C.Fn-1: SET Button/Cross Keys Function: Sets the function of the SET button and arrow keys. Options are:
- 0:Normal
- 1: SET:Quality: The Quality menu appears when this button is pressed.
- 2: SET:Parameter: The SET button accesses the Parameter setting.
- 3: SET:Playback: The SET button accesses Playback mode.
- 4: Cross Keys: AF Frame Selection: Lets you select the AF point using the arrow keys without pressing the Focus Point Selection button. (Pressing the Focus Point Selection button with this option enabled returns to automatic AF point selection.) The SET button then selects the center AF point.
- C.Fn-2: Long Exposure Noise Reduction:
- 0: Off
- 1: On: Automatically reduces noise in bulb exposures 30 seconds or longer at ISO 100 - 800, or one second or longer at ISO 1,600.
- C.Fn-3: Flash Sync. Speed in AV Mode:
- 0: Auto
- 1: 1/200 second (fixed)
- C.Fn-4: Shutter Button / AE Lock Button:
- 0: AF/AE Lock
- 1: AE Lock / AF
- 2: AF/AF Lock, No AE Lock
- 3: AE/AF, No AE Lock
- C.Fn-5: AF Assist Beam:
- 0: Emits
- 1: Does not emit
- 2: Only emits with external flash
- C.Fn-6: Exposure Level Increments:
- 0: 1/3 stop
- 1: 1/2 stop
- C.Fn-7: Mirror Lockup:
- 0: Disable
- 1: Enable
- C.Fn-8: E-TTL II: (Flash metering pattern selection)
- 0: Evaluative
- 1: Average
- C.Fn-9: Shutter Curtain Sync:
- 0: 1st Curtain (Fires as shutter opens)
- 1: 2nd Curtain (Fires as shutter closes - leaves "motion trails" of bright subjects trailing naturally behind the sharp image of the subject that was frozen by the flash.)
- C.Fn-1: SET Button/Cross Keys Function: Sets the function of the SET button and arrow keys. Options are:
- Clear Settings: Resets all camera settings or custom function settings to their defaults.
- Sensor Clean: Locks up the mirror and opens the shutter, allowing you to remove dust from the sensor.
- Firmware Version: Reports the camera's current firmware. You can update the camera's firmware by loading new firmware onto a CF memory card, inserting it into the camera, and pressing the Set button with this menu option selected.

Follow Imaging Resource: