Back
to Full Fuji FinePix 6900 Zoom Review
Back
to Full Fuji FinePix 6900 Zoom ReviewGo to Fuji FinePix 6900 Zoom Data Sheet
Go to Fuji FinePix 6900 Zoom Pictures Page
Up to Imaging Resource Cameras Page
Use your browser's "Back" button to return to the previous page, or the links at the top and bottom of this page to navigate to related information. If you have difficulty fitting the text on this page onto your printer output, simply resize your browser window to a narrower width and print again.
Remember us when it's time to buy!
Dave here: Have our reviews been helpful to you? (Is this article you're reading right now useful?) Preparing this level of information on as many products as we do is incredibly hard work, not to mention expensive. Things on the Internet may look like they're free, but they're not. (As a lot of big dot.com companies are finding out these days.) Somewhere, somebody has to pay to produce worthwhile content. YOU can help us though, by remembering us when it comes time to make your purchase. Would you consider coming back to our site and clicking-through to one of our advertisers to make your purchase? Every dollar you spend with one of our advertisers helps us directly (in affiliate fees) or indirectly (the advertiser will keep renewing their ad contract with us). To make it easy for you to support us, here's a URL you can visit, to see all our current advertisers, with links to click on that will register your visit to them as having come from our site. It's up to you where you buy, but Mike, Mike, Kim, Yazmin, Marti and I would be really grateful if you'd help us out by choosing one of our advertisers to purchase from.
Thank you for your support!
Dave Etchells, Founder & Publisher
Visit our "Buy Now" Page:
https://www.imaging-resource.com/buynow.htm
Back
to Full Fuji FinePix 6900 Zoom Review
Go to Fuji FinePix 6900 Zoom
Data Sheet
Go to Fuji FinePix 6900 Zoom
Pictures Page
Up to Imaging Resource Cameras
Page
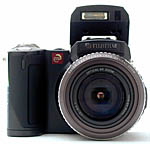
Fuji FinePix 6900 ZoomFuji updates their uniquely-styled "electronic SLR" with a 3.3 megapixel SuperCCD chip and improved color! Review First Posted: 7/19/2001 |
|
 |
|
3.3-megapixel Super CCD sensor delivers up to 6 million pixels |
|
|
6x optical zoom lens |
|
|
|
Extensive exposure control |
|
|
|
Internal and external flash support |
Executive Overview
Compared to the rest of Fujifilm's extensive line of FinePix digicams, the FinePix 6900 Zoom immediately stands out, both for its larger size and for its rich assortment of user controls. Still, the camera is surprisingly compact, given the necessarily large barrel of its 6x, f/2.8 optical zoom lens, and its sophisticated 3.3-million Super CCD, which uses a proprietary interpolation technology to generate image files with more than 6 million pixels. This next generation camera replaces the FinePix 4900 Zoom, introduced last year, with an updated and more refined user interface, as well as some advanced features borrowed from Fujifilm's professional digital camera, the FinePix S1 Pro. The most notable of these features is a histogram display incorporated into the Info readout of the Playback mode, which graphs the number of pixels recorded at each brightness level, so you can immediately determine whether your exposure settings are delivering the optimum range of tonal values. Fujifilm has also improved the camera's image color and detail for an overall better picture quality that will appeal to the serious photo enthusiast.
As with its predecessor, the FinePix 6900 Zoom has managed to make unusually effective use of the camera body's real estate, providing one-button access to most camera functions, somewhat offsetting its heavy reliance on its LCD displays for camera operation. While clearly not a shirt-pocket digicam, the 6900 Zoom is still quite portable, assisted by the neck strap that ships with it. Another departure for Fujifilm is the use of an eye-level LCD viewfinder rather than a purely optical viewfinder. This approach has the strong advantage of providing a lot of exposure and camera-status information in the viewfinder. Since the electronic viewfinder is essentially a miniaturized version of the larger LCD monitor, all menu screens and information displays remain available (although somewhat small when looking through the eyepiece). This isn't an entirely unmixed blessing, in that it limits the camera's usability in low-light shooting conditions, since the 6900 Zoom can capture images in settings a good bit darker than those in which the LCD viewfinder is usable.
A 6x, 7.8 - 46.8mm zoom (equivalent to a 35-210mm lens on a 35mm camera) automatically telescopes outward when the camera is powered on. Focus can be automatically or manually controlled, with an effective range from 1.6 feet (50cm) to infinity in normal mode, and from 0.3 to 2.6 feet (10 to 80cm) in Macro mode. We found the manual focus operation on the 6900 far more usable than similar options on competing cameras, thanks to a unique "Picture-on-Picture" option that doubles the size of the image in the very center of the frame on the LCD display. This is one of the few digicams we've found that you can actually focus accurately using the LCD. A digital telephoto function increases the zoom range by up to 4.45x, depending on the image size setting, but also decreases the image quality proportionately with increased image noise and reduced resolution.
The 6900 Zoom offers a great deal of exposure control, with several exposure modes. The full Automatic exposure mode puts the camera in control of everything except the flash and image size and quality settings. Scene Program mode offers four preset shooting modes for specific situations (Portrait, Landscape, Sports and Night Scene). In Program mode, you can select from a range of equivalent exposure settings, and you also have control over features like white balance, metering, and ISO. In Aperture Priority mode, you can set the lens aperture from f/2.8 to f/11.0 while the camera sets the shutter speed, and in Shutter Priority mode, you set the shutter speed from 1/1,000 to 3 seconds while the camera sets the aperture. (Shutter speeds can go as fast as 1/2,000 second in the Sports Scene Program and Automatic modes.) Finally, a full Manual exposure mode allows you to select the shutter speed and aperture settings independently.
In the Program, Aperture Priority, Shutter Priority, and Manual exposure modes, all of the 6900 Zoom's exposure features are available. In Manual mode though, the exposure compensation control switches the Command dial's control between aperture and shutter settings, instead of its usual function of setting exposure adjustment between -2 and +2 exposure values (EV) in one-third-step increments. White balance can be set to Automatic, Custom (manual), Outdoors-Sunny, Outdoors-Cloudy, Daylight Fluorescent, Warm White Fluorescent, Cool White Fluorescent, and Incandescent light, to match just about any light source you're likely to encounter. An ISO setting option adjusts the camera's sensitivity to 100, 200, or 400 equivalents, increasing the camera's shooting ability in low-light situations, or reducing image noise in bright conditions. An AE Lock button lets you base the exposure reading on a specific area of the subject, and three metering modes (Average, Multi, Spot) let you choose how the camera judges the exposure. There's also a two- or 10-second Self-Timer, and an adjustable image sharpness setting. The built-in, pop-up flash offers Auto, Red-Eye Reduction, Forced Flash, Slow-Synchro, Suppressed Flash, and Red-Eye Reduction with Slow-Synchro modes, with an adjustable Flash Brightness setting from -0.6 to +0.6 EV in one-third-step increments. An external flash hot shoe on top of the camera accommodates a more powerful external flash, but disables the internal flash when in use.
The Auto-Bracketing feature captures a series of images, at three different exposure settings, to find the optimum exposure value for the current subject. The Continuous Shooting mode captures up to five consecutive images at intervals as short as 0.25 seconds, depending on the SmartMedia space and amount of image information to record. Additionally, a Movie mode allows you to capture up to 160 seconds of moving images at approximately 10 frames per second. (The actual amount of recording time depends on the capacity and available space on the SmartMedia card, and can go as high as 774 seconds on a 128MB memory card.)
The 6900 Zoom stores images on a SmartMedia memory card, and a 16MB card comes with the camera. Still images can be saved at 2,832 x 2,128, 2,048 x 1536, 1,280 x 960, or 640 x 480 resolution sizes, with Hi (uncompressed TIFF), Fine, Normal, and Basic quality settings available. TIFF format is only available for the largest image size. (Note that the largest image size is interpolated up from the roughly 3.3-megapixel Super CCD sensor size.) Movies are saved at the 320 x 240-pixel resolution, with no quality choices. A USB cable and software CD also accompany the camera, for downloading images to a Macintosh or PC. US and Japanese versions of the camera include an NTSC video cable, for viewing and capturing images using a television monitor (European models are set up for PAL timing). For power, the 6900 Zoom uses an NP-80 rechargeable, lithium-ion battery, and comes with an AC adapter that doubles as a battery charger.
The 6900 is a significant extension to Fujifilm's FinePix camera lineup, its full exposure control and 6x optical zoom lens appealing to the true "photo enthusiast," with plenty of manual controls with which to experiment. On the other hand, you can put it into full auto or Scene-Program mode and hand it over to a complete novice photographer and still get great results. This is one camera that can span a full range of photographic abilities and produce great photos in the process.
Design
The Fujifilm FinePix 6900 Zoom combines the brand's trademark compact size with a larger lens, achieving a mini-version of a traditional 35mm camera. In fact, the camera appears to mainly be all lens, with the exception of the rather compact hand grip on the side. Measuring 4.3 x 3.1 x 3.7 inches (110 x 78.5 x 93.5mm), and weighing 14.5 ounces (410 grams) without the battery, the 6900 Zoom is a bit of a breakaway from previous FinePix digicam designs (that is, apart from its predecessor, the 4900). While the camera itself is larger than previous versions, it still maintains a pretty compact appearance, especially considering the size of many current digicam models. Fujifilm has used nearly every inch of space on the camera body, with dozens of controls covering the camera's surface. This bounty of controls appears somewhat complicated at first glance, but quickly becomes second nature after a brief read through the manual.

The camera front features mainly the lens barrel and the hand grip. The 6x optical zoom lens is encased in a sturdy metal barrel, and features a ridged focus ring at the very end of the lens for manual focusing. When the camera is turned on, the lens telescopes outward into its operating position, and likewise returns to the lens barrel when the camera is shut off. A plastic lens cap protects the front of the lens, and attaches to the camera with a small strap. The hand grip features a soft, rubber coating on the front that secures your fingers to the camera body, and is echoed on the back panel with a rubber thumb grip.

On the hand grip side of the camera is the SmartMedia slot, with side access. The slot is covered by a hinged, plastic door that snaps securely into place. Another soft, rubber grip area covers the outside of the compartment door, with a small lip that comfortably holds your thumb to the back panel. Also on this side of the camera is an eyelet for attaching the neck strap.

The opposite side of the camera, which is mainly taken up by the side of the lens barrel, features several controls, the connector compartment, and the other eyelet for attaching the neck strap. A Flash pop-up button on the edge of the flash compartment opens and activates the flash. Along the lens barrel is Manual / Auto Focus switch, large Zoom control, Exposure Compensation button, One-Touch Auto Focus / Custom White Balance setting, and Info button, which brings up the current photography settings. Just beyond the control buttons is the connector compartment, covered by another hinged plastic door that opens downward. The USB, A/V out, and DC In connection jacks can all be found in this compartment.

The camera's top panel features the pop-up flash, external flash hot shoe, Shutter button, Mode dial, and Power switch, surrounded by the Photography / Playback switch. Additional controls include the Self-Timer, Continuous Shooting, Macro, and Flash buttons.

A number of control buttons are found on the camera's back panel, including a four-way Arrow Pad button that aids in navigating through settings menus. Above it is a Menu / OK button that brings up the on-screen menu system and verifies selections. Below the Arrow Pad is a Back button, which disengages the on-screen menu. A Display button on the right edge of the LCD monitor adjusts the amount of information shown on the Viewfinder and LCD screens. Next to the viewfinder eyepiece, an EVF / LCD button switches between the electronic viewfinder and LCD screen. At the top right of the back panel are the Focus Lock and Auto Exposure (AE / L) buttons used to set focus and exposure. The LCD display is set in the center of a circular pattern that equates as the back of the lens barrel. The optical viewfinder rests just above, surrounded by a soft, rubber eyepiece. A Shift button, located on the left side of the LCD monitor, allows you to adjust the monitor brightness in both Photography and Playback modes (by holding the Shift button and pressing the Display button simultaneously). In all Photography modes (except Movie), holding this button and pressing the Flash button simultaneously takes you to a screen for adjusting image size and quality settings. (This last is a very handy shortcut, as it prevents having to rotate the Mode dial to the Setup position to make the Size / Quality changes.)

Finally, the camera features a reasonably flat bottom, holding the metal tripod mount and the battery compartment door that slides forward and then opens to reveal the battery. Unfortunately, the two are much too close together to allow quick battery changes while working with a tripod. This is just a minor complaint, but something we always pay attention to with the amount of studio work we do.
 Viewfinder
The 6900 Zoom offers a two-inch LCD monitor and a 0.55-inch electronic optical viewfinder (EVF) for image composition. The LCD monitor features a low-temperature, polysilicon, TFT design with 130,000 pixels. A small EVF / LCD button next to the viewfinder selects between the two. The pixel count is lower in the viewfinder (110,000 pixels), and its small size makes it nearly impossible to visually focus a shot, but the soft, rubber eyepiece surrounding the viewfinder window is helpful when shooting outdoors, as it helps to block out excess light.
 An EVF / LCD button, located on the right of the optical viewfinder eyepiece, selects between the optical viewfinder display and the LCD monitor display, so that either one is in use at all times. The Display button at the top right corner of the LCD monitor controls the information display and framing guidelines that appear over the image. Pressed once, the button pulls up the text information display, which reports the Photography mode setting, file size / image quality, number of images remaining, exposure settings, and a central autofocus target mark. Pressing the Display button a second time activates a framing guideline, which divides the image into thirds horizontally and vertically, to help line up shots. The third press of the Display button cancels both displays. We were glad to see that the camera reports the aperture and shutter speed settings, even in Program mode, since we always like to know what exposure variables are being used. Another helpful feature on the 6900 Zoom is the Info button, which is on the side of the lens. Holding down this button displays a quick reference screen that reports all of the exposure settings, including exposure compensation, white balance, metering mode, ISO, auto bracketing, and sharpness. This is extremely helpful, especially when you can't remember which settings you've already set.
 In Playback mode, the LCD monitor offers a playback zoom, for inspecting captured images up close. The Up and Down Arrow keys are used to zoom in and out of the image. Once the desired magnification is achieved, pressing the Display button enables you to scroll around within the image. Pressing the OK button presents the option of cropping the image at the current magnification and saving it as a separate file. Many cameras these days offer a playback zoom option, but the FinePix 6900 goes way beyond most we've seen: It appears to zoom all the way in to a 1:1 ratio between image pixels and LCD display pixels. Particularly in the highest-resolution capture mode, this is an incredible magnification factor, letting you discern the finest details and subtle nuances of focus. Very handy! At the other end of scale, a Multi-Frame Playback option displays up to nine thumbnail images on the screen at a time, great for selecting images for single-frame erasing, protecting, or resizing.
 In our testing, we found that the EVF provided about 90% frame coverage, while the rear-panel LCD showed 95-96%. The EVF number is better than average for optical viewfinders, and the rear-panel LCD accuracy is about average. (We really like to see LCD viewfinders 100% accurate though, so would prefer to see a bit more of the target area, at least on the rear-panel display.)
 Optics
The 6x, Super Electron Beam Coating (EBC) Fujinon 7.8-46.8mm zoom lens (equivalent to a 35-210mm lens on a 35mm camera) is a professional quality, high-precision lens with two aspherical elements (10 elements in seven groups) and low chromatic aberration. Though it measures only 46mm in depth, and is encased in a strong, lightweight magnesium alloy casing, the lens takes up a large part of the camera body -- much larger than the lenses typically used on FinePix digicams. This is doubtless due to the longer than normal zoom ratio and the lens's fairly large maximum aperture at full telephoto (f/3.1 at 210mm equivalent). The lens telescopes from the barrel when the camera is powered on, and returns when the camera is shut down. Focus ranges from 1.6 feet (50cm) to infinity in Normal mode, and from 3.9 to 32 inches (10 to 80cm) in Macro mode.
Autofocus is determined by a contrast-detection system and gives an audible notification when focusing has been completed. Manual focus is controlled by the notched focus ring at the end of the lens barrel. A switch on the side of the lens controls whether the camera is in Auto or Manual Focus mode. When focusing in Manual mode, a focusing indicator appears at the top of the monitor, next to the MF icon. Two arrows guide you to turn the focusing ring right or left (based on the subject in the very center of the monitor), and once you achieve correct focus, a round dot appears in place of the arrows. If you are in Manual focus mode, but want to speed up the process, you can push the One-Touch AF button on the side of the camera lens and it will quickly switch to Autofocus to complete the focus (the round focus dot will not be displayed).
 We've typically found that digicam manual focus systems operate much better when accompanied by a distance readout scale, primarily because it's so difficult to tell whether the subject is in focus based on the LCD image. Fujifilm has addressed this issue by providing a Focus Check button on the back panel (just below the power button), that uses Super CCD technology to enlarge the center of the image to about twice its normal size. Surprisingly, this seems to be enough to make accurate judgments about image focus, and worked quite well in our own testing. In fact, we felt the magnified LCD view actually worked better than the Manual focus indicator, particularly in the case of low-contrast subjects.
As much as we appreciate the manual focus options this camera provides, we still feel the response time is rather slow and it takes a bit of scrutiny to decide when you've really achieved optimum focus. (The manual focus ring on the 6900 is actually a "fly by wire" control, since its motion doesn't control the lens directly, but instead just instructs the camera's processor to move the lens elements appropriately. This gives very fine control when you're zeroing in on a focus setting, but is rather slow when making major focus changes.) The in-focus indicator in the viewfinder is very useful for telling when you've achieved accurate focus, but users accustomed to manually focusing their 35mm lenses will find the response of the manual focus ring on the 6900 frustrating.
Aperture can be manually or automatically adjusted, depending on the exposure mode, from f/2.8-f/3.1 to f/11.0 with 13 steps in 1/3 "f" increments. The f/2.8-f/3.1 specification refers to the fact that the maximum effective aperture varies as the lens is zoomed from wide-angle to telephoto. This variation is documented in Fujifilm's specs for the lens. It's likely that a similar variation occurs for smaller apertures as well (meaning that the minimum aperture at the telephoto end of the lens's range is likely some number higher than f/11.0, but Fuji doesn't provide this specification, nor does the camera report it in its JPEG file headers.
Zoom is controlled from one of two locations: a large rocker pad on the side of the camera lens or the Up and Down Arrows buttons on the rear-panel four-way arrow pad. The 6900 Zoom also offers a digital telephoto function that works with all file sizes except for the 2,832 x 2,128-pixel setting, and is activated by zooming past the optical zoom range. A zoom status bar appears on the LCD display, showing the amount of digital and optical zoom available with the current camera settings. The amount of digital zoom depends on the actual image size, with the largest amount of digital zoom equaling 4.4x for the 640 x 480-pixel image size. There's no provision to disable the digital telephoto function, but you don't have to worry about inadvertently zooming too far and triggering digital telephoto, because the zoom stops at the end of the optical range, and doesn't proceed into digital telephoto unless you release the zoom button and press it toward the telephoto setting again.
We typically don't recommend using digital telephoto because it only crops the center of the image and enlarges the existing pixels -- compromising image quality by increasing noise levels and / or lowering resolution. However, Fujifilm's system is set up so that it never interpolates the image beyond what the sensor would normally deliver. (That is, it only crops, doesn't interpolate back up to larger pixel dimensions.) No digital telephoto is available at maximum image size, and the amount of digital telephoto available at any given image size always corresponds to a simple cropping of the maximum-resolution file. Therefore, digital telephoto will be slightly less sharp than the optical telephoto image, but it won't degrade to the extent seen in some cameras.
A set of threads on the inside lip of the lens barrel accommodate wide-angle and telephoto lens conversion kits, available as accessories from Fujifilm. As we wrote in our review of the FinePix 4900 last year, we'd like to see the thread adapter part of this kit sold separately from the lens conversion kits, so you could buy it for use with standard 55mm filters or macro lenses, without having to purchase the whole kit.
In our tests, the lens on the 6900 showed rather high barrel distortion in its wide angle position, about 1.2%. Pincushion distortion was about 0.56% at the telephoto setting. Both numbers are higher than average among the high-end consumer digicams we've tested. Chromatic distortion is very low, but there's a fair bit of corner softness evident at all focal lengths.
Exposure
The 6900 Zoom offers a lot of exposure control, with Full Automatic, Program, Scene Program, Shutter Priority, Aperture Priority and Manual exposure modes available. The camera's exposure mode is controlled by a Mode dial on the top panel, and an icon in the top left corner of the LCD display reports the current mode setting.
Auto Exposure mode places the camera in complete control over the exposure, choosing both the shutter speed and lens aperture settings, based on the current light level. No options are provided for exposure compensation, ISO adjustment, metering, or white balance.
Program mode leaves the camera in control of both shutter speed and aperture, but allows you to select from a range of equivalent exposure setting combinations, accessed by rotating the Command dial on top of the camera. Referred to as Program Shift, this function adjusts the aperture up or down and varies the shutter speed to match and maintain the same exposure level. We found this mode very useful when we wanted to gain some control over depth of field or motion blur in the subject, but didn't want to have to deal with the separate aperture or shutter priority options. (Note: Program Shift does not work if the Flash chamber is in the open position.) Program mode also lets you control other camera settings, such as flash, white balance, ISO, photometry (metering), auto bracketing, and exposure compensation.
Shutter Priority mode allows you to control the shutter speed while the camera selects the best corresponding aperture setting. In this mode, you can select fast shutter speeds to freeze action or slow shutter speeds to blur movement. Shutter speeds range from 1/1,000 to 3 seconds, with the slowest available shutter speed determined by the ISO setting. When the ISO is set on 100 or 200, the slowest shutter speed is 3 seconds. At 400 ISO, the slowest shutter speed is 1.6 seconds. As in Program mode, Shutter Priority allows you to control flash, white balance, ISO, photometry (metering), auto bracketing, and exposure compensation.
Aperture Priority works along the same lines as Shutter Priority, except that you control the aperture setting (from f/2.8 to f/11.0) while the camera selects the best corresponding shutter speed. By selecting a large or small aperture setting, you can control how much of your scene is in focus and how much is out of focus. Small apertures (or large f/stop numbers, like f/11) give you the greatest range of focus or depth of field. Large apertures (or small f/stop numbers, like f/2.8) give you the minimum depth of field. Exposure controls in Aperture Priority are the same as in Shutter Priority mode.
Scene Program mode offers five special shooting modes: Portrait, Landscape, Sports, Night Scene, and Black-and-White. Portrait mode uses a large aperture setting, keeping the subject as the primary focus, with background areas out of focus. Landscape mode uses a smaller aperture setting for greater depth of field, perfect for daytime scenic shots where you want both the foreground and background areas to be in focus. Sports mode uses fast shutter speeds (up to 1/2,000 second) to freeze fast-moving action. Night Scene mode does just the opposite of Sports mode, using slower shutter speeds to allow more ambient light into the image (best used with a tripod or other stable surface to prevent camera shake). Night Scene mode can be used in combination with the Red-Eye Reduction & Slow Synchro flash mode for portrait subjects in dark surroundings. Black-and-White mode removes all color from the scene to give you a black-and-white image.
Manual mode provides full control over both aperture and shutter speed settings. To adjust shutter speed, turn the Command wheel under the Exposure Mode dial until you see the desired setting in the lower left corner of the LCD monitor. To adjust the aperture setting, hold down the Exposure Compensation button on the camera's lens barrel as you turn the Command wheel. An exposure indicator on the lower right of the LCD screen can be used as a guide for setting exposure. Moving the indicator toward the plus sign produces an overexposed image (when the plus sign turns yellow) and moving the indicator toward the minus sign results in an underexposed image (when the minus sign turns yellow). If the plus and minus signs remain blue, the image should be within an acceptable range of exposure.
When the on-screen Display mode is activated in any Photography mode, the LCD monitor reports the shutter speed and aperture settings in the lower left corner of LCD screen. In all three of the manually adjustable exposure modes (Manual, Shutter Priority, and Aperture Priority), the value turns red in the display if the setting you select is out of the correct exposure range. (For example, a shutter speed too fast for the available lighting, even with the lens aperture all the way open.)
In all of the exposure modes except Manual, the AE Lock button on the back panel allows you to set the exposure on a specific area of the subject. You do this by framing the area of the subject on which you want to base the exposure in the center of the autofocus target marks, and then pressing and holding the AE Lock button until you snap the picture. Notably, you cannot only reframe the image, but you can also zoom the lens and change the focus, as long as you continue to hold down the AE Lock button. Autofocus lock works along the same lines, by depressing the shutter button halfway to set focus and holding it down while you recompose the shot. Normally, autofocus and autoexposure lock are set simultaneously by half-pressing the shutter button. By separating these two functions, you can move in closely to take an exposure reading off your subject, and back away again to reframe the image, without jeopardizing the autofocus lock.
In any Photography mode, a Preview or Postview option can be enabled through the Setup menu (Image Display submenu), which displays the most recently captured image on-screen. Postview displays the image for two seconds and then automatically records it to the SmartMedia card. Preview provides the option of deleting an image immediately if you don't like it (by pressing the Back button) or saving the image to the card (by pressing the Menu / OK button).
Exposure Compensation can be adjusted in the Program, Aperture Priority, and Shutter Priority exposure modes, from -2 to +2 exposure values (EV) in one-third-step increments. We liked Fujifilm's implementation of the exposure compensation function. When the viewfinder / monitor displays the exposure information overlay, pressing the Exposure Compensation (+/-) button on the side of the lens barrel brings up an exposure indicator bar at the bottom of the screen. Rotating the Command dial while holding down the Exposure Compensation button adjusts the compensation setting, showing the new value on the exposure indicator bar. This function is particularly useful for high-contrast scenes with backlit subjects, very bright or dark scenes, or when copying printed text.
White Balance is adjustable in all exposure modes except Scene Program and Automatic, with eight options available: Automatic, Custom (manual), Outdoors-Sunny, Outdoors-Cloudy, Daylight Fluorescent, Warm White Fluorescent, Cool White Fluorescent, and Incandescent. We like the variety of fluorescent settings available, as well as the manually adjustable Custom mode, which makes the camera extremely flexible with color balance. Under the Custom setting, you simply hold a white card in front of the camera and press the Custom White Balance button on the left side of the camera to set the value. If the white card is too bright or dark, the LCD will indicate "Over" or "Under," prompting you to reset the value again.
The 6900Z offers three Photometry (metering) modes, which are available in all Photography modes except Automatic and Scene Program. The Average setting takes several readings from across the entire image area and averages them to determine the proper exposure. Spot metering mode bases the exposure on the very center of the image. Multi metering independently evaluates multiple points within the image and selects the optimum exposure based on a sophisticated algorithm. (Multi will be the best choice for most shooting conditions.)
ISO can also be manually adjusted, with options for 100, 200, and 400 sensitivity equivalents. The higher ISO settings give increased light sensitivity, but at the cost of higher image noise, visible as "grain" in your images. As with the Photometry option, ISO can be adjusted in all exposure modes except Automatic and Scene Program.
Image Sharpness can also be adjusted in the Photography menu. Options include: Hard, Normal, and Soft settings. Hard emphasizes the edges of objects in the picture, while Soft turns off all in-camera sharpening. The Soft setting is recommended for images you intend to manipulate in retouching programs such as Photoshop.
A Self-Timer button on top of the camera activates either a two- or 10-second self-timer countdown function. When activated, the Self-Timer (clock) icon is displayed in the LCD monitor -- with a "2" next to it to indicate the two-second countdown and the traditional symbol alone to indicate a 10-second countdown. The countdown is triggered by fully pressing the shutter button, and a red LED on the front of the camera blinks during the countdown.
 Flash
Flash
Fujifilm estimates the effective flash range of the 6900Z's pop-up flash to be 1 to 11.8 feet (0.3 to 3.6 meters) at the wide-angle lens setting, and 1 to 10.5 feet (0.3 to 3.2 meters) at telephoto. In our own testing, we found that the flash intensity fell off only slightly all the way out to the 14 foot limit of our test. We'd thus say that Fuji's 11.8 foot rating for wide angle is fairly conservative.
The five Flash operating modes include: Auto, Red-Eye Reduction, Forced Flash, Slow Synchro, and Red-Eye Reduction & Slow Synchro. The Auto flash mode puts the camera in charge of when to fire the flash, based on the exposure information and light level. Red-Eye Reduction also fires automatically, but flashes a quick pre-flash before firing the full flash to reduce the occurrence of red-eye effect. Forced Flash prompts the flash to fire with every exposure, regardless of the light level. Slow-Synchro combines the flash with a slow shutter speed to allow more ambient light into night and twilight images. Red-Eye Reduction & Slow-Synchro combines the two flash modes for night portraits. To completely disable the flash, simply push it back down into its compartment. A small button on the side of the flash compartment serves as the release mechanism. The internal flash is not available in Landscape, Movie, Continuous Shooting, or Auto Bracketing shooting modes. Flash intensity can be adjusted through the record menu, from -2 to +2 exposure values in one-third-step increments.
A standard external flash hot shoe on top of the camera accommodates a more powerful flash unit. In order to use it, the External Flash setting must be enabled in the Photography menu (automatically disabling the internal flash) and the camera must be set in Program, Shutter Priority, Aperture Priority, or Manual exposure mode. The camera can synchronize with the external flash at any shutter speed up to 1/1,000 second. Additionally, The camera manual recommends shooting with either Aperture Priority or Manual exposure modes to keep the lens aperture at the fixed setting required for correct exposure with the flash in use. The 6900's hot shoe is of the "plain vanilla" variety, meaning it will be compatible with the majority of shoe-mount auto flash units on the market.
Movie Mode
Accessed through the Exposure Mode dial (marked by a movie camera symbol), the Movie mode captures up to 160 seconds of video (without sound) per movie, at approximately 10 frames per second. Movies are shot at 320 x 240 pixel resolution and files are saved in Motion JPEG format. Actual recording time varies, depending on the amount of SmartMedia space available and the memory card capacity. (Fujifilm estimates that the included 16MB card can hold approximately 94 seconds, while a 128MB card can hold up to 774 seconds.) Once in Movie mode, the lens is locked at the wide-angle setting, focus is fixed at infinity, and only digital telephoto is available (up to approximately 1.88x). Shooting begins by fully depressing the Shutter button, and continues until the Shutter button is pressed a second time. Movie quality looks pretty good, with good resolution and not too many JPEG artifacts.
Continuous Shooting
A Continuous Shooting mode is available in all exposure modes except for Movie, and captures up to five consecutive frames with intervals as short as 0.2 seconds. We clocked the FinePix 6900 at 4 frames in one second, a frame rate of 4 frames per second, or 0.25 seconds per frame. Shot to shot time in continuous mode seemed not to depend on image content at all (as it does in some cameras). The 6900 consistently captured images at intervals of 0.25 seconds regardless of subject matter. If the Preview display mode is enabled, the series of images is displayed in the LCD monitor, in chronological order (pressing the Menu button records them to the memory card).
Auto Bracketing
In all exposure modes except Automatic and Scene Program, the Auto Bracketing feature allows you to take a series of three exposures of the same image with different exposure settings. You can set the amount of exposure variation in the Photography menu, with options of +/- 1, 2/3, 1/3 EV. Once the exposure variable is set, the auto bracketing feature takes three images -- one at normal exposure, one overexposed, and one underexposed by the designated EV amount. If the Preview function is enabled, all three shots are displayed on the LCD monitor at once for confirmation.
Shutter Lag & Cycle Times
When you press the shutter release on a camera, there's usually a lag time before
the shutter actually fires. This time is to allow the autofocus and autoexposure
mechanisms time to do their work, and can amount to a fairly long delay in some
situations. Since this number is almost never reported on, and can significantly
affect the picture taking experience, we now routinely measure it using an Imaging
Resource proprietary test system.
|
|
||
|
|
|
|
| Power On -> First shot |
|
Time from power-up to first shot. Average to a bit
slower than average.
|
| Shutdown |
|
Time for lens to retract
|
| Play to Record, first shot |
|
Time until first shot is captured
|
| Record to play (max/min res) |
4.8/0.7 |
Top times are for max res JPEGs, bottom times for min
res. First time in each pair is for immediate switch to play mode after
shutter release, second time is for switch after camera has processed
the last frame and saved to memory.
|
| Shutter lag, full autofocus |
|
Longer time is for telephoto, shorter for wide angle. Telephoto is slower than average, wide angle faster than average. |
| Shutter lag, manual focus |
|
Quite a bit faster than average |
| Shutter lag, prefocus |
|
Faster than average.
|
| Cycle Time, max/min resolution |
1.1/3.3 24.1 |
Top numbers for large/fine files, bottom for small/economy. First time in each pair is for first 4 shots, second is for subsequent. Much faster than average for first 4 shots, average to slower than average for subsequent frames. Last time is for full res TIFF files. |
| Cycle time, continuous mode |
|
Very fast: Captures up to 4 shots, then you have to wait for the memory buffer to clear. (25 seconds for buffer to clear for max res files.) |
The FinePix 6900Z starts up surprisingly quickly for a camera with a telescoping lens, and its cycle time is pretty fast as well. Our only complaint about its speed is the somewhat longer than average shutter lag time in full Autofocus mode when the lens is racked out to its telephoto position. In continuous mode, the four-frame-per-second performance is impressive, great for capturing exactly the right moment in fast-paced action photography. Shutter lag in manual and prefocus modes is quite low, too. Particularly with its long zoom lens, if you use the trick of prefocusing on the location where you expect the action to occur, together with the 4 fps continuous mode frame rate, the 6900Z could be a great amateur camera for shooting sports.
Operation and User Interface
Despite a somewhat daunting first appearance, we found the 6900Z's user interface to be quite straightforward after working with it for awhile. The camera body is liberally sprinkled with control buttons, but they are well marked and much easier to access than scrolling through multiple menu screens. A fair number of the exposure variables are controlled through the LCD menu system, but the basic controls, such as shutter speed, aperture, and exposure compensation, are operated via the external controls. The only control we found a little awkward was the mode dial, which was stiff enough that it required two fingers to turn, and because of the wide area over which all the controls are spread, you'll need both hands to operate the 6900Z. Overall, however, the lightweight and custom shape fit our hands nicely, and the finger grips are comfortable to hold.
Control Enumeration

Shutter Button: Located on the very top of the hand grip, this chrome button trips the shutter when fully depressed, and sets focus when halfway depressed in autofocus mode. When the Self-Timer mode is activated, fully depressing the Shutter button triggers the two- or 10-second countdown.
![]()
Macro Button: Also located on the top panel, one of two controls directly behind the Shutter button, this button enables the camera's Macro shooting mode. Once pressed, the traditional flower symbol appears in the LCD monitor and the focus range changes to 3.9 to 32 inches (10 to 80cm). A second press of the button cancels the mode.
![]()
Flash Mode: Directly to the right of the Macro button, this button controls the internal Flash mode and cycles through Auto Flash, Red-Eye Reduction, Forced Flash, Slow-Synchro, and Red-Eye Reduction with Slow-Synchro operating modes.
![]()
Continuous Shooting Button: Marked with the Continuous Shooting symbol, this button also resides on the camera's top panel, to the lower left of the Macro button. Once pressed, this button places the camera in Continuous Shooting mode, allowing you to capture up to five consecutive images with one press of the shutter button, at intervals as short as 0.2 seconds. Pressing the button a second time cancels the mode.
![]()
Self-Timer Button: To the left of the Continuous Shooting button, the Self-Timer button activates the two- or 10-second Self-Timer mode. Pressing the button repeatedly cycles through the two self-timer delay settings and normal shooting mode. Once either Self-Timer mode is enabled, a full press of the shutter button activates the timer countdown.
Power Button: Just below the Self-Timer and Continuous Shooting buttons, the Power button is located in the center of the camera mode switch. Pressing the Power button turns on the camera and triggers the lens to slide outward into its operating position (if the camera is set to Photography mode). Another press of the button shuts the camera down and retracts the lens into the camera body.

Mode Switch: Surrounding the camera's Power button, and positioned on the back left side of the top control panel, this switch places the camera in either Photography or Playback mode.

Exposure Mode Dial: Situated on the very right side of the camera's top panel, and set on top of the Command wheel, this dial puts the camera into one of seven exposure modes, or into the Setup mode. Available mode settings are:
![]()
Command Wheel: Positioned directly beneath the Exposure Mode dial, this notched wheel adjusts shutter speed and aperture settings. In Shutter Priority mode, it controls the shutter speed. In Aperture Priority mode, it controls the aperture. In Manual mode, it (by default) controls the shutter speed, but pressing and holding down the Exposure Compensation Button (+/- button) switches its control to the lens aperture.
Indicator Lamp: A small rectangular LED lamp, set on top of the camera between the Exposure Mode dial and Mode Switch, indicates camera status in various shooting conditions. Messages are tied into different colors as follows:

EVF / LCD Button: Located directly to the right of the optical viewfinder eyepiece on the back panel, this button switches between the eye-level viewfinder display and the rear-panel LCD monitor, alternately enabling one and disabling the other.

Focus Check Button: To the right of the EVF / LCD button, this button allows you to check the focus when shooting in Manual Focus mode. Pressing the button enlarges the very center of the subject by 2x, so that you can check the fine details for focus.

AE Lock Button: Situated to the right of the Focus Check button, this button locks the exposure setting based on whatever is currently centered in the frame. This setting is preserved as long as you hold the button down, letting you recompose (even changing the lens zoom) and refocus before taking the picture. (A very nice feature!)
![]()
Display Button: Also on the back panel, at the top right corner of the LCD monitor, this button cycles between three LCD display modes. The first press shows a camera settings information display, with information about the memory card, exposure settings, and exposure mode. A second press displays a set of framing guidelines, which divide the frame into thirds, horizontally and vertically. The third press of the button cancels both displays, leaving only the picture.

Menu / OK Button: In the center of the back panel, on the right side of the LCD monitor, this button pulls up the settings menu in both Photography and Playback modes. It also serves as the "OK" to confirm menu selections and changes.

Arrow Rocker Pad: Just below the Menu / OK button, this control features four arrows, one in each cardinal direction. In both Photography and Playback menus, these arrow buttons navigate through menu options and selections. In any Photography mode, the Up and Down Arrows control the optical and digital zoom. In Playback mode, the Right and Left Arrows scroll through captured images. Also in Playback mode, when playback zoom is enabled (by pressing the Display button), the four arrow buttons allow you to move around within the enlarged image to check fine details.

Back Button: Positioned below the Arrow Rocker Pad, this button cancels menu options and backs out of menu screens, returning you to the main image display.

Shift Button: Located on the left side of the LCD monitor, holding the Shift button and pressing the Display button simultaneously allows you to adjust the monitor brightness in both Photography and Playback modes. In all Photography modes (except Movie), holding this button and pressing the Flash button simultaneously takes you to a screen for adjusting image size and quality settings.
Flash Pop-up Button: Located on the lens side of the pop-up flash compartment, this button releases the flash head into its operating position.

AF / MF Switch: Also on the lens side of the camera, this sliding switch selects Auto or Manual Focus modes. In Manual mode, focus is controlled by turning the knurled ring on the front of the lens barrel.

Zoom Button: Just beneath the AF / MF switch is the large round Zoom button, which controls the optical and digital zoom settings.

Exposure Compensation Button: To the right of the AF / MF switch, this button calls up the exposure compensation adjustment bar, allowing you to adjust the exposure compensation from -2 to +2 exposure equivalents (EV) in one-third-step increments. This adjustment is available in Programmed, Shutter-Priority, and Aperture-Priority modes only. In Manual exposure mode, pressing this button while turning the Command wheel adjusts the lens aperture.

AF / Custom White Balance Button: Situated to the right of the Exposure Compensation button, this button doubles as a One-touch Autofocus button (when used in Manual Focus mode) and a manual white balance adjustment when working in Custom White Balance mode. Pressing this button in Manual Focus mode immediately sets focus using the camera's AF system. Pressing it in Custom WB mode, with a white card held up in front of the lens, manually adjusts the camera's white balance to match the current light source.

Info Button: Located at the bottom of the lens side of the camera, this button displays a quick reference screen of the currently set exposure variables in all exposure modes except for Auto, Scene Program, and Movie. Likewise, in Playback mode, the Info button displays the exposure information for the currently displayed image, including a histogram chart in the lower right corner of the monitor. The histogram shows distribution of brightness levels from highlight, midtone, and shadow areas.

Focus Ring: Encircling the tip of the lens barrel, this notched ring adjusts the manual focus when working in Manual Focus mode.
Camera Modes and Menus
Photography Mode: Controlled by the camera's Mode Switch on the top panel, Photography mode sets up the camera for recording images in one of the following seven exposure modes:
Photography Menu: Pressing the Menu button while in Photography mode (in Program, Aperture Priority, Shutter Priority, and Manual exposure modes) displays the following on-screen menu options:
 External Flash: Turns the external flash option on or off.
Playback Mode: Also controlled by the camera's Mode Switch, Playback mode allows you to scroll through captured images, as well as delete, protect, resize, and set up images for printing on a DPOF (Digital Print Order Format) compatible device. Movies can also be played back in an index display mode, which allows you to edit out individual frames.
Playback Menu: Pressing the menu button in this mode calls up the Playback menu, with these offerings:
 Erase: Erases a single frame, all frames, or formats the SmartMedia memory card, for both movie and still images.
Setup Mode: The camera's Setup mode is accessed through the Exposure Mode dial, when the camera is in Photography mode only. Activating the mode instantly displays the following settings menu:
 File Size / Quality: Sets the current image size and quality setting. Size options are:
 Image
Storage and Interface
Image
Storage and Interface
The FinePix 6900 Zoom uses SmartMedia (3.3v) for image storage, and
a 16MB card is supplied with the camera. Upgrades are available up to 128MB.
The entire SmartMedia card can be write-protected by placing a small sticker
on the indicated area of the card. Write-protection stickers can only be used
once, and they must be clean to be effective. Individual images can be protected
through the Playback menu, which prevents them from being accidentally deleted
(except through card formatting).
The 6900 Zoom offers four image sizes for still images: 2,832 x 2,128, 2,048
x 1,536, 1,200 x 960, and 640 x 480 pixels. There are also three JPEG compression
ratios to choose from: Fine, Normal, and Basic. An uncompressed TIFF option
is also available (the Hi setting) at the 2,832 x 2,128 image size only. All
still images are saved as JPEG compliant Exif 2.1 or TIFF-RGB files, and movies
are saved as AVI format Motion JPEGs. Movie images are always recorded at 320
x 240 pixels, with no quality settings available. A 16MB card can hold up to
approximately 90 seconds of movies. Interface software and a USB cable come
with the camera for speedy connection to a Macintosh or PC.
|
Resolution/Quality 16MB Card |
|
|
|
|
|
| 6M TIFF-RGB (2832 x 2128) | Images | 0 | 6 | 13 |
|
| Approx. Compression |
1:1 | 7:1 | 15:1 |
|
|
| 3M
JPEG (2048 x 1536) |
Images |
|
|
|
|
| Approx. Compression |
|
|
|
|
|
|
(1280 x 960) |
Images |
|
|
|
|
| Approx. Compression |
|
|
|
|
|
|
(640 x 480) |
Images |
|
|
|
|
| Approx. Compression |
|
|
|
|
|
![]() One
of the first things any new digicam owner will need is a larger memory card
for their camera: The cards shipped with the units by the manufacturers should
really be considered only "starter" cards, you'll definitely want a higher
capacity card immediately. - Probably at least a 32 megabyte card for a 1.3
or 2 megapixel camera, 64 megabytes or more for a 3, 4, or 5 megapixel one.
(The nice thing about memory cards is you'll be able to use whatever you buy
now with your next camera too, whenever you upgrade.) To help you shop for
a good deal on memory cards that fit the FinePix 6900, we've put together
a little memory locater, with links to our price-comparison engine: Just click
on the "Memory Wizard" button above to go to the FujiFilm memory finder, select
your camera model , and click the shopping cart icon next to the card size
you're interested in. You'll see a list of matching entries from the price-comparison
database. Pick a vendor & order away! (Pretty cool, huh?)
One
of the first things any new digicam owner will need is a larger memory card
for their camera: The cards shipped with the units by the manufacturers should
really be considered only "starter" cards, you'll definitely want a higher
capacity card immediately. - Probably at least a 32 megabyte card for a 1.3
or 2 megapixel camera, 64 megabytes or more for a 3, 4, or 5 megapixel one.
(The nice thing about memory cards is you'll be able to use whatever you buy
now with your next camera too, whenever you upgrade.) To help you shop for
a good deal on memory cards that fit the FinePix 6900, we've put together
a little memory locater, with links to our price-comparison engine: Just click
on the "Memory Wizard" button above to go to the FujiFilm memory finder, select
your camera model , and click the shopping cart icon next to the card size
you're interested in. You'll see a list of matching entries from the price-comparison
database. Pick a vendor & order away! (Pretty cool, huh?)
 Video
Out
Video
Out
US and Japanese versions of the 6900 Zoom come with an NTSC video
cable for connection to a television set. (European models come set up for the
PAL video standard.) Images can be reviewed on the television screen or recorded
to video tape. You can also use the television as an enlarged version of the
LCD display for composing and capturing images.
 Power
Power
The 6900 Zoom uses an NP-80 rechargeable (lithium-ion) battery for power,
and comes with an AC adapter that doubles as a battery charger. Fujifilm estimates
that a fully charged battery should provide approximately 100 minutes of recording
or playback time when using the LCD monitor, and approximately 120 minutes of
time when using the LCD viewfinder. Because much of the 6900 Zoom's operation
depends on the LCD display, we suggest purchasing an additional battery and
keeping it charged and on-hand at all times. Through the Setup menu, you can
activate the Auto Power Save option, which sets the camera to turn itself off
after two or five minutes of inactivity.
|
|
(mA @5v) |
|
| Capture Mode, w/LCD |
|
|
| Capture Mode, no LCD |
|
|
| Half-pressed shutter w/LCD |
|
|
| Half-pressed w/o LCD |
|
|
| Memory Write (transient) |
|
|
| Flash Recharge (transient) |
|
|
| Image Playback |
|
|
Overall, power consumption is about typical of the 2- to 3-megapixel digicams we've tested. We were surprised to see the relatively small difference in power consumption between the large rear-panel LCD screen and the tiny eye-level viewfinder (EVF) LCD. There's a savings, but still a significant power drain when the EVF is used. (Another argument in favor of conventional optical viewfinders, in our humble opinion.) Based on the approximately 4.8 watt-hour capacity of the NP-80 battery, we think Fujifilm's run time numbers should be pretty accurate.

Like many cameras today using the same compact LiIon batteries, the 6900 has a 5 volt external-power connection. This means it can't be used with conventional external battery packs to achieve longer run times, because most such packs put out too high a voltage. Maha's NiMH PowerBank (shown above) can be combined with a special "step-down" cable though, which drops the pack's voltage to the level required by the camera. This makes it feasible to use an external power pack with the 6900. (Although, we have to say that the design of the connector-compartment door on the 6900 makes it rather awkward connecting the PowerBank's cable - the door has to hang open, looking like an invitation for it to get knocked loose.) One note - Maha makes both NiMH and LiIon versions of the PowerBank, make sure you get the NiMH model for the 6900. (Model number MH-DPB180M.) And, don't forget the step-down cable! Click here to order, or for more info.
Included Software
A software CD packaged with the FinePix 6900 Zoom contains the Fujifilm Software for FinePix EX Version 1.1 for Windows and Macintosh operating systems. This utility package includes a USB driver, FinePix Viewer, Exif Launcher, and VideoImpression 1.6 (Windows and Macintosh). Windows users have a slightly better deal than Mac users, as additional software is included for PCs: Adobe PhotoDeluxe HE Version 4 and Adobe ActiveShare. Mac users will unfortunately need to purchase these programs separately, or choose a more comprehensive application, such as Adobe Photoshop LE (Limited Edition).
In the Box
Test Results
In keeping with our standard policy, our comments here are rather
condensed, summarizing our key findings. For a full commentary on each of the
test images, see the 6900's "pictures" page.
As with all Imaging Resource camera tests, we encourage you to let your own
eyes be the judge of how well the devices performed. Explore the images on the
pictures page, to see how well the 6900 performed, and
how its images compare to other cameras you may be considering buying.
Overall, the 6900 produced good looking shots, with nice color and saturation on most of our test targets. The camera's White Balance system handled a variety of light sources well throughout our testing, though in some instances we noticed slightly greenish color casts from the Auto and Manual settings. Color balance looked pretty good on our Davebox target, though the 6900 overexposed the shot just a tad, which washed out color and lost some highlight detail. The 6900 handled the difficult blues in the flowers of our Outdoor Portrait well, producing only faint purple tints, though the camera produced slightly magenta skin tones in both Outdoor shots. Apart from a few minor color issues, the 6900 did a great job.
The 6900 also performed well on our "laboratory" resolution test chart. It showed artifacts in the test patterns at resolutions as low as 900 lines per picture height, in both horizontal and vertical directions, but we found "strong detail" out to at least 1,300 lines, and "extinction" of the target patterns didn't occur until about 1,600 lines. A nice job.
Optical distortion from the 6900's lens is higher than average at the wide angle end, where we measured an approximate 1.29 percent barrel distortion. The telephoto end fared a little better, as we measured a 0.56 percent pincushion distortion. Chromatic aberration is quite low, showing only about one or two lightly-colored pixels in the far corners (though the corner softness in the image somewhat masks this phenomenon).
The 6900 low light performance was acceptable rather than remarkable, producing usable images down to about one-half foot-candle (a little darker than a well-lit city street at night) at the 200 and 400 ISO settings. At 100 ISO, the camera captured reasonably bright images as dark as one foot-candle (average night street lighting). Noise remains moderate at the 100 ISO setting, becoming more pronounced with the 400 ISO setting (though overall, the 6900's noise levels are pretty good).
The 6900's "optical" viewfinder (actually an eye-level LCD) is just a little tight, showing approximately 89 percent frame accuracy at wide angle, and about 92 percent at telephoto. The LCD monitor fares slightly better, showing approximately 95 percent of the image area at wide angle setting, and approximately 96 percent at telephoto. We generally prefer LCD monitors to be as close to 100 percent accuracy as possible, so the 6900's LCD monitor could perform a little better in our opinion. Still, overall pretty good viewfinder accuracy.
The 6900 also handles the macro category quite well, capturing a minimum area of just 2.41 x 1.81 inches (61.29 x 45.97 millimeters). Resolution was high, though details were slightly soft. Corner softness was again evident, and overall color was rather warm. We were pleased to see that the 6900's long lens barrel didn't block the flash, which throttled down for the close-in macro shot quite well.
Throughout our testing, the 6900 performed consistently well. We'd like to see a slightly more accurate LCD monitor and better low-light performance, but all things considered, we were pleased with the 6900's performance. Color is good, with accurate saturation in most instances, and resolution is quite high. Good pictures!
Conclusion
Overall, the 6900 Zoom is a fine digicam, combining a great deal of exposure control with an excellent 6x optical zoom lens. It also offers a host of innovative features, ranging from the excellent focus-assist magnifier function to its highly useful autoexposure lock function, new histogram display, and high-magnification playback zoom option. Overall, a very interesting camera for the true "enthusiast," yet one that can also be used in a fully automatic mode for the technology-challenged. A great package of features that significantly extends Fujifilm's consumer digicam line into the higher end of the product spectrum.
<<F6900 Sample Images | Additional Resources and Other Links>>
Reader Comments!
Questions, comments or controversy on this product? Click
this link to see what other Imaging Resource readers have had to say about
the Fuji FinePix 6900 Zoom, or add comments of your own!