Sony Cyber-shot DSC-F828Sony extends their high end to encompass 8(!) megapixels and a sharp 7x Zeiss zoom lens. - And Sony's new RGB+E sensor technology for more accurate color!<<Design :(Previous) | (Next): Optics>> Page 4:ViewfinderReview First Posted: 08/15/2003, Updated: 02/05/04 |
Viewfinder
 The F828
offers both a 1.8-inch, 134,000-pixel, rear panel LCD monitor and a smaller
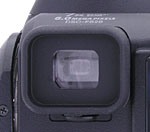
electronic viewfinder (EVF) in place of a true "optical" viewfinder.
The EVF actually uses a tiny (and slightly lower-power) LCD screen
to show the same view you'll see in the camera's monitor display. What makes
the EVF so useful is the information display, identical to that shown on
the LCD monitor (complete with navigable menus). As I noted on earlier Sony
digicams using EVFs, the idea of being able to see the exposure settings
in the eye level viewfinder is a good one, but navigating the menus through
this small viewfinder is pretty tricky. I found it much easier to simply
switch on the LCD monitor when I needed to change menu options. The EVF does
feature a diopter adjustment dial hidden on the bottom of the eyepiece, but
doesn't have quite as high an eyepoint as did the EVF on the F717. It's still
fairly "eyeglass-friendly," but you'll have to press your glasses
more firmly against the rubber eyecup than was required with the 717, and
the eyecup tends to leave smudges on the lenses of your glasses. A slide
switch on the rear panel controls where the view is displayed, either on
the larger LCD monitor or in the smaller eyepiece.
The F828
offers both a 1.8-inch, 134,000-pixel, rear panel LCD monitor and a smaller
electronic viewfinder (EVF) in place of a true "optical" viewfinder.
The EVF actually uses a tiny (and slightly lower-power) LCD screen
to show the same view you'll see in the camera's monitor display. What makes
the EVF so useful is the information display, identical to that shown on
the LCD monitor (complete with navigable menus). As I noted on earlier Sony
digicams using EVFs, the idea of being able to see the exposure settings
in the eye level viewfinder is a good one, but navigating the menus through
this small viewfinder is pretty tricky. I found it much easier to simply
switch on the LCD monitor when I needed to change menu options. The EVF does
feature a diopter adjustment dial hidden on the bottom of the eyepiece, but
doesn't have quite as high an eyepoint as did the EVF on the F717. It's still
fairly "eyeglass-friendly," but you'll have to press your glasses
more firmly against the rubber eyecup than was required with the 717, and
the eyecup tends to leave smudges on the lenses of your glasses. A slide
switch on the rear panel controls where the view is displayed, either on
the larger LCD monitor or in the smaller eyepiece.
The viewfinder LCDs represent an area where Sony has upgraded the F828 relative
to the earlier F717. The F717's rear-panel LCD had 123,000 pixels vs the
134,000 of the one on the 828, a nice, but not very noticeable improvement.
Much more impressive is the upgrade of the EVF though, with the EVF on the
828 sporting 235,000 pixels, to the 717's 180,000. The difference in the
two viewfinders is immediately apparent if you hold each camera up to your
eye. The F828's EVF doesn't so much appear sharper, as larger. When
you look through the 828's EVF, the LCD screen covers a much larger field
of view. (Which probably also explains why it has a lower eyepoint than the
EVF on the F717.)
As I've noted in the past, I'm generally no fan
of EVFs, finding them a poor substitute for true optical viewfinders. On
the F828 though, the EVF seems to have more resolution than I'm accustomed
to seeing (more even than the F707 and F717 models), which helps a great
deal. Plus, the Night Shot and Night Framing modes eliminate one of my biggest
objections to EVFs, which is that they're generally useless in low light
conditions. Overall, even the F828's EVF doesn't take me entirely out of
the anti-EVF camp, but it's definitely a further step in the right direction.
 The Display button on the back panel controls the information display,
with a choice of full or partial exposure information display in Record mode.
The basic information display reports Flash mode, exposure settings (aperture
and shutter speed), and Focus area. The detailed display also shows the remaining
battery power, image quality and resolution, and a handful of other exposure
settings. A histogram display appears in response to a third press of the
Display button. The histogram graphs the tonal distribution of the image,
and is helpful in determining over- or underexposure before snapping the
shot. (Very nice, but I'd really like to see a "blink highlights"
feature as found on some Nikon digicams.) Both the EVF eyepiece and rear
panel LCD monitor have adjustable brightness settings. The LCD Brightness
adjustment is the first option in the camera's "Setup 1" menu,
with Dark, Normal, and Bright settings. When the camera is running on battery
power, the second and third menu items are for LCD and EVF Backlight adjustment
respectively. The backlight settings have Normal and Bright options, the
latter of which is particularly helpful when shooting in bright, sunlit conditions.
When the camera is plugged into the AC adapter, the LCD Backlight option
disappears, because the backlight automatically switches to the "high"
illumination setting by default.
The Display button on the back panel controls the information display,
with a choice of full or partial exposure information display in Record mode.
The basic information display reports Flash mode, exposure settings (aperture
and shutter speed), and Focus area. The detailed display also shows the remaining
battery power, image quality and resolution, and a handful of other exposure
settings. A histogram display appears in response to a third press of the
Display button. The histogram graphs the tonal distribution of the image,
and is helpful in determining over- or underexposure before snapping the
shot. (Very nice, but I'd really like to see a "blink highlights"
feature as found on some Nikon digicams.) Both the EVF eyepiece and rear
panel LCD monitor have adjustable brightness settings. The LCD Brightness
adjustment is the first option in the camera's "Setup 1" menu,
with Dark, Normal, and Bright settings. When the camera is running on battery
power, the second and third menu items are for LCD and EVF Backlight adjustment
respectively. The backlight settings have Normal and Bright options, the
latter of which is particularly helpful when shooting in bright, sunlit conditions.
When the camera is plugged into the AC adapter, the LCD Backlight option
disappears, because the backlight automatically switches to the "high"
illumination setting by default.
 In Playback mode, the Display button also controls
the information display, but in this case, turns it completely on or off.
The histogram is also available in Playback mode. An Index Display mode shows
as many as nine thumbnail images at a time on the LCD monitor with a press
of the Index button. While in Index display mode, pressing the Display button
simply toggles the limited information display on and off. The Magnify button
on the camera's rear panel controls the playback zoom, enlarging captured
images as much as 2x. Turning the Command dial increases the amount of digital
enlargement to 5x.
In Playback mode, the Display button also controls
the information display, but in this case, turns it completely on or off.
The histogram is also available in Playback mode. An Index Display mode shows
as many as nine thumbnail images at a time on the LCD monitor with a press
of the Index button. While in Index display mode, pressing the Display button
simply toggles the limited information display on and off. The Magnify button
on the camera's rear panel controls the playback zoom, enlarging captured
images as much as 2x. Turning the Command dial increases the amount of digital
enlargement to 5x.
One advantage of an eye-level viewfinder, is that
it promotes a more secure camera grip (arms clamped to your sides, camera
body braced against your face), which particularly helps with long telephoto
and low-light shots. It also provides a more natural "look-and-shoot"
operation than when you're forced to rely on a rear-panel LCD display. On
previous Sony digicams, I found the smaller EVF eyepieces difficult to work
with in low-light situations, as the electronic viewfinder system typically
requires more light to operate. As noted though, Sony's Night Framing and
Night Shot modes are very effective in making the EVF usable at low
light levels. (The Night Shot technology was first pioneered by Sony in its
consumer camcorder lines, and made its debut in digital camera form on the
original F707, in 2001.)
Night Shot and Night Framing take advantage of the CCD's sensitivity
to infrared light, which is normally filtered out, because it tends to skew
the camera's color rendering in bright sunlit scenes. Sony's Night Shot technology
uses a movable IR filter that lets the camera take advantage of this IR sensitivity
in low-light situations and block it at other times. The prototype model
of the F828 I tested removed the limitation of Night Shot to Program and
Auto modes that was present in the F707 and F717, allowing its use in any
exposure mode. Unfortunately, it appears that production models of the F828
will once again restrict Night Shot to Programmed and Auto exposure modes
only. The reasons for this are unclear, but are most likely related to issues
of "propriety" - The Night Shot mode was similarly restricted in
Sony's camcorders, because some users found that the IR technology could
"see through" certain fabrics when used under daylight conditions.
I personally never saw this, and think that the validity of the effect was
dubious to begin with, but the furor in the popular press over the issue
was enough to cause Sony to redesign the feature, restricting its use to
dark shooting conditions. This is a real shame, as there are a LOT of IR
photography enthusiasts who have been waiting for a digicam that would permit
full exposure and depth of field control combined with IR-capable operation.
(To date, the original Minolta DiMAGE 7 (not the 7i or 7Hi) remains the best
option for digital IR photographers, as it was made with no IR filter over
it's CCD.) I'd be happy to field any articulate arguments for "uncrippling"
the 828's Night Shot mode that might help persuade Sony to re-enable it in
a future camera or firmware release. - They don't seem to feel that this
is a "make or break" issue for enough photographers to be worth
supporting.
In Night Shot mode, the camera flips the IR filter out of the way for both the framing and exposure. Any natural IR light in the scene is augmented by two infrared LEDs on the front of the camera (just beneath the pop-up flash compartment), which project IR beams onto the subject. These lamps don't completely cover the field of view at wide angle, but they do a pretty good job from about halfway up the zoom range toward telephoto. The built-in illuminator lamps let you shoot in total darkness, but the pictures you capture will be monochromatic, with the majority of light areas of the subject showing a green cast (as is typical with Night Vision goggles). Some colors will render as different shades of gray than they would in a normal black-and-white photo. This is because the reflectance of objects is often different in IR than in visible light, so a "dark" color in daylight may actually appear quite bright in IR. (Note that when shooting reflective surfaces close-up, you'll be able to see the glow of the camera's IR lamps in the center of the image.)
In Night Framing mode, the camera also flips the IR filter out of the way
and turns on the illuminator lamps, but only while you're framing your shots.
As soon as you half-press the Shutter button, the IR filter flips back down,
and the camera takes a normal visible-light photo, using the built-in flash.
This is particularly handy for nighttime flash shooting, when you wouldn't
be able to see (or focus on) the subject otherwise.
Overall, Night Shot and Night Framing are tremendous extensions to digital
photography, clearly taking it into realms that film-based cameras just can't
touch. Sure, you can shoot with IR film in a conventional camera, but the
no-light viewfinder capability of Night Framing simply isn't available in
the film world. Combined with the Hologram AF feature, it makes in-the-dark
digital photography more practical than it's ever been. Big kudos to Sony
for bringing these innovations to digital photography!
Trimming
 This
isn't strictly a "Viewfinder" function, but I didn't know
where else to mention it. Since it at least uses the LCD display,
I figured I'd go ahead and talk about it here.
This
isn't strictly a "Viewfinder" function, but I didn't know
where else to mention it. Since it at least uses the LCD display,
I figured I'd go ahead and talk about it here.
One of the best things most amateur photographers could do to improve
their photos would be to simply crop them a little, cutting out distracting
objects, and filling more of the frame with their primary subject. Virtually
all Sony digicams let you do this right on the camera. Zoom in on an
image in playback mode, and use the Multi-Controller to adjust the framing
to your preference. Then hit the Menu button, and you'll see options
labeled Return and Trimming. Select Trimming, and you'll see further
options to select an image size. (Keep in mind that enlarging the image
back up to full size after cropping it down only softens the detail,
since no new information is added to the image file. The reduced number
of pixels in the cropped image are simply enlarged to fill the full-size
pixel array.) Select a size option, and the camera will save the image
the way you've zoomed and cropped it on the LCD display into a separate
file on the memory card. Very slick! (The animated screenshot at right
was "borrowed" from my review of the F717. The function works
the same way on the F828.)
Reader Comments! --> Visit our discussion forum for the Sony Cyber-shot DSC-F828!

Follow Imaging Resource: