Sony Cyber-shot DSC-F828Sony extends their high end to encompass 8(!) megapixels and a sharp 7x Zeiss zoom lens. - And Sony's new RGB+E sensor technology for more accurate color!<<Shutter Lag & Cycle Time Tests :(Previous) | (Next): Camera Modes & Menus>> Page 8:Operation & User InterfaceReview First Posted: 08/15/2003, Updated: 02/05/04 |
Operation and User Interface
Like the F717, the F828 packs a lot of camera controls into a relatively
small space, making good use of the left side of the lens barrel to spread
the various buttons out a bit. The panoply of external controls may seem
a bit much at first, but I always appreciate having as much external control
as possible, as it saves having to scroll through LCD menu items for common
settings. Given my prior experience with the F707 and F717 models, I quickly
adapted to the F828's control layout, since most of the differences between
the two are fairly subtle. Even novice users should be able to quickly adapt
to the F828's control setup though, as it's very logically laid out. The
Mode dial on top of the camera controls the main exposure mode, while things
like Flash mode, Macro mode, White Balance, Exposure Compensation, etc. are
all controlled via small buttons, either on the rear panel or along the left
side of the lens barrel.
 New
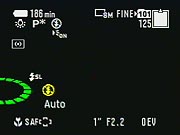
to the F828's interface are a series of animated "virtual dials,"
that appear on the LCD screen whenever a setting is adjusted, such as flash
mode, exposure compensation, etc. (The static shot at right shows the flash-mode
virtual dial.) A virtual dial also appears in the center of the LCD whenever
the Mode dial is turned. The Command dial, located in the top, righthand
corner of the rear panel, lets you quickly adjust aperture and / or shutter
speed without accessing a menu system, a nice touch. I also liked dual rings
on the lens barrel for focus and zoom control. Overall camera operation is
smooth and efficient, with an easy-to-navigate LCD menu system and a user
interface that doesn't require a long learning curve. You may spend a few
minutes reading through the manual, but once you get the hang of things,
the user interface is quite intuitive.
New
to the F828's interface are a series of animated "virtual dials,"
that appear on the LCD screen whenever a setting is adjusted, such as flash
mode, exposure compensation, etc. (The static shot at right shows the flash-mode
virtual dial.) A virtual dial also appears in the center of the LCD whenever
the Mode dial is turned. The Command dial, located in the top, righthand
corner of the rear panel, lets you quickly adjust aperture and / or shutter
speed without accessing a menu system, a nice touch. I also liked dual rings
on the lens barrel for focus and zoom control. Overall camera operation is
smooth and efficient, with an easy-to-navigate LCD menu system and a user
interface that doesn't require a long learning curve. You may spend a few
minutes reading through the manual, but once you get the hang of things,
the user interface is quite intuitive.
Control Enumeration

Shutter Button: Located on the right side of the top panel, on an
angled ridge that slopes down toward the front of the camera, this button
sets focus and exposure when pressed halfway. Fully depressing the button
fires the shutter. When the Self-timer is enabled, fully depressing the Shutter
button begins a 10-second countdown before the shutter fires.

Exposure Compensation Button: Behind the Shutter button to the right,
this button displays the exposure compensation virtual dial on the LCD screen.
Turning the Command dial while holding down the button adjusts the setting.
In Manual exposure mode, this button accesses the aperture adjustment.

White Balance Button: To the left of the Exposure Compensation
button, this button accesses the available White Balance
settings: Auto, Daylight, Cloudy, Fluorescent, Incandescent, Flash, One-Push,
and One Push Set (manual setting). Pressing the button displays the
setting dial on the LCD monitor, and the setting is adjusted via the Command
dial.

Status Display Illuminator Button: Located on the far right of
the top panel, behind the Exposure Compensation button, this button activates
an illuminator for the status display panel.
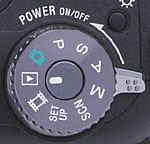
Mode Dial: Sitting atop the Power switch, this knurled dial controls
the camera's operating mode. Choices are Full Auto (green camera icon), Program
AE, Shutter Priority, Aperture Priority, Manual, Scene, Setup, Movie, and
Playback modes.
Power Switch: Located underneath the Mode dial on top of the
camera, pushing this lever forward turns the camera on or off.
Command Dial: Located in the top right corner of the rear panel, this
black, ribbed dial controls various exposure settings in any Record mode,
when turned while pressing a control button. In Aperture Priority and Shutter
Priority exposure modes, it adjusts the available exposure variable when
turned. In Manual mode, turning the dial adjusts the shutter speed. (It adjusts
aperture when turned while pressing the Exposure Compensation button.)
In Playback mode, when image enlargement has been enabled via the Magnify button,
turning this dial enlarges the image as much as 5x, or zooms back out, all
the way to 1x.

AE Lock/Erase Button: To the left of the Command dial, this button
locks the exposure reading until it's pressed again, or until the Shutter
button is pressed. In Playback mode, this button displays the Erase menu
for a single image, or for all images when in Index display mode.
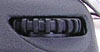
Four Way Multi-Controller: Located between the Menu and AE Lock buttons
on the camera's rear panel, this multi-directional rocker button navigates
through the LCD settings menus. Pressing the button at the center acts as
an OK button, confirming menu selections. In Record mode, pressing the button
in any autofocus mode cycles through the available AF area settings: Multi-Point,
Spot, and Center areas. When in Spot AF area mode, the controller moves the
AF area selection to any of the available AF areas on the screen.
In Playback mode, the Right and Left arrows scroll through captured images. The Up and Down arrows control the playback volume. When an image has been digitally enlarged, pressing the center of this button returns to the normal view.

Menu Button: To the left of the Multi-Controller
is the Menu button, which activates and deactivates the settings menus in
all camera modes (except for Setup mode, which automatically displays the
menu upon entering the mode).

Open CF Latch: Located on the right side of the camera's rear panel,
this sliding latch unlocks the CF compartment door, revealing the CompactFlash
slot.

CF/MS Switch: Just below the Open CF switch, this slide
switch designates which type of memory card is in use, either a Sony Memory
Stick or a CompactFlash card. The camera can have both types of cards loaded,
but will only write to the one that's explicitly selected via this switch.

Quick Review Button: The first button in a series located beneath
the LCD monitor (reading from right to left), this button displays a quick
review of the most recently captured image. (All Playback mode options are
available.)

Magnify Button: To the left of the Quick Review button, this button
is indicated by a magnifying glass icon. In Record mode, if the digital zoom
is enabled, pressing this button activates the digital zoom. In both zoom
modes, the digital zoom kicks in at a fixed ratio, determined by the zoom
mode in use. With Precision Digital Zoom, pressing this button magnifies
the image by 2x, regardless of the current image size. When Smart Zoom is
selected, the camera restricts the digital zoom to the amount that corresponds
to dropping down to a 1:1 crop of the sensor pixels, at whatever image size
is currently selected. Thus, there's no SmartZoom available when the camera
is recording full-sized 8-megapixel images, while at VGA resolution, 5.1x
of digital zoom is available.
In Playback mode, pressing this button enlarges the captured image to 2.0x (after which, turning the Command dial enlarges the image as much as 5.0x).

Self-Timer/Index Button: Adjacent to the Magnify button on the left,
this button turns the Self-Timer mode on or off. In Playback mode, pressing
this button calls up a nine-image index display.

Display Button: Located to the left of the Self-Timer/Index button,
this button controls the on-screen information display in all camera modes
(except Setup mode). It also enables the histogram display.

Finder / LCD Switch: Just below the lower left corner of the LCD monitor,
this switch directs the viewfinder display to either the viewfinder eyepiece
(EVF) or the LCD monitor.
![]()
Diopter Adjustment Dial: Hidden on the underside of the viewfinder
eyepiece, this dial adjusts the viewfinder display for eyeglass wearers.

Open Flash Switch: Located at the top of the camera's left panel
(as viewed from the rear), directly beneath the pop-up flash compartment,
this sliding switch releases the flash from its compartment.

Flash Button: Below the Open Flash switch, this button cycles
through the available main flash modes: Auto, Forced, Slow-Sync, and Suppressed.

Metering Button: To the right of the Flash button, this button cycles
through the Multi-Pattern, Center-Weighted, and Spot metering options.

Macro Button: Below the Flash button on the camera's left panel,
this button turns the macro shooting mode on or off.

Drive Button: Adjacent to the Macro button on the right, this
button accesses the F828's continuous shooting and bracketing modes when
pressed while turning the Command dial. Available modes are Normal, Speed
Priority Burst, Framing Priority Burst, Auto Exposure Bracketing, and Multi-Burst
modes.

Focus Switch: Directly beneath the Macro button, this sliding switch
alternates between Auto and Manual focus modes.

Night Shot / Night Framing Button: To the left of the Focus switch,
this button cycles between Normal, Night Shot, and Night Framing modes when
pressed while turning the Command dial.

Zoom Adjustment Ring: Surrounding the end
of the lens barrel, this collar controls the optical zoom.
Focus Adjustment Ring: Also surrounding the lens barrel, though
further back, this second adjustment ring controls the manual focus.

Follow Imaging Resource: