Back
to Full Panasonic Lumix DMC-FZ20 Review
Back
to Full Panasonic Lumix DMC-FZ20 ReviewGo to Panasonic Lumix DMC-FZ20 Data Sheet
Go to Panasonic Lumix DMC-FZ20 Pictures Page
Up to Imaging Resource Cameras Page
Use your browser's "Back" button to return to the previous page, or the links at the top and bottom of this page to navigate to related information. If you have difficulty fitting the text on this page onto your printer output, simply resize your browser window to a narrower width and print again.
Remember us when it's time to buy!
Dave here: Have our reviews been helpful to you? (Is this article you're reading right now useful?) Preparing this level of information on as many products as we do is incredibly hard work, not to mention expensive. Things on the Internet may look like they're free, but they're not. (As a lot of big dot.com companies are finding out these days.) Somewhere, somebody has to pay to produce worthwhile content. YOU can help us though, by remembering us when it comes time to make your purchase. Would you consider coming back to our site and clicking-through to one of our advertisers to make your purchase? Every dollar you spend with one of our advertisers helps us directly (in affiliate fees) or indirectly (the advertiser will keep renewing their ad contract with us). To make it easy for you to support us, here's a URL you can visit, to see all our current advertisers, with links to click on that will register your visit to them as having come from our site. It's up to you where you buy, but Mike, Mike, Kim, Yazmin, Marti and I would be really grateful if you'd help us out by choosing one of our advertisers to purchase from.
Thank you for your support!
Dave Etchells, Founder & Publisher
Visit our "Buy Now" Page:
https://www.imaging-resource.com/buynow.htm
Back
to Full Panasonic Lumix DMC-FZ20 Review
Go to Panasonic Lumix DMC-FZ20
Data Sheet
Go to Panasonic Lumix DMC-FZ20
Pictures Page
Up to Imaging Resource Cameras
Page
Panasonic Lumix DMC-FZ20Panasonic introduces a five-megapixel digicam with the high quality optics of a 12x Leica lens. Review First Posted: 12/17/2004 |
|
 |
|
5.0-Megapixel CCD delivers 2,560 x 1,920-pixel images |
| |
12x optical zoom lens covers 36-432mm equivalent range while maintaining f/2.8 aperture | |
| |
Full range of manual and automatic exposure options, with nine preset shooting modes | |
| |
Excellent image stabilization system makes long zoom truly useful, even in less bright light. |
Introduction - The Panasonic DMC-FZ20
Panasonic's been a player in the digicam market for the last couple of years, but until now, we've not managed to get hands on any of their cameras to test. Our Panasonic Lumix DMC-FZ20 review has been in much demand, with enthusiastic readers writing in requesting a review quite frequently. After repeated requests for an evaluation unit with no response from the Panasonic PR folks (other editors were apparently not letting go of their test samples once they got hands on them, perhaps a testimony to the appeal of the camera), we finally took the unprecedented step of going out and purchasing a Panasonic FZ20 to test. The Panasonic DMC-FZ20 combines a 12x optically stabilized zoom lens with a 5 megapixel sensor and a host of features designed to entice novice and enthusiast alike. (The Panasonic DMC-FZ20 is very similar to the FZ15 model, the biggest difference being its 5-megapixel CCD vs the 4-megapixel chip on the FZ15.) True to its Leica heritage, the Panasonic FZ20 's long zoom shows very good optical quality, and the rest of the camera happily measures up as well. Read on for all the details, but if you're in the market for a long-zoom digicam with optical image stabilization, the Panasonic FZ20 looks like a good bet.
NOTE: FZ20 vs FZ15. As noted, the Panasonic Lumix DMC-FZ20 is very similar to the 4-megapixel Panasonic DMC-FZ15 model we reviewed previously. If you've read that review, you probably know most of what there is to know about the Panasonic FZ20 already. You can skip to our feature comparison chart to see the differences between the Panasonic FZ20 and other long-zoom Panasonic digital cameras, or jump down to the conclusions page to see what we thought of the FZ20, based on our tests.
High Points
Comparison With Other Panasonic DMC-FZ Models
As of this writing (in early December 2004), Panasonic currently has three long-zoom, optically-stabilized digicams on the market. While there's a steady progression of sensor resolution as you move up the line, other features are not so consistently distributed. Here's a table showing how the features of the different "FZ" models compare:
| DMC-FZ3 | DMC-FZ15 | DMC-FZ20 | |
| List Price (At introduction) |
$399 | $499 | $599 |
| Megapixels (Effective) |
3.2 | 4.0 | 5.0 |
| CCD Size | 1/3.2" | 1/2.5" | 1/2.5" |
| Size | 108 x 68 x 85 mm 4.3 x 2.7 x 3.3 in |
128 x 87 x 106 mm 5.0 x 3.4 x 4.2 in |
128 x 87 x 106 mm 5.0 x 3.4 x 4.2 in |
| Weight (With Batteries) |
323 g (11.4 oz) | 556 g (19.6 oz) | 556 g (19.6 oz) |
| Body Material | Plastic | Metal | Metal |
| Lens Zoom | 12x | 12x | 12x |
| Lens equiv. Focal Lengths |
35-420 mm | 35-420 mm | 36-432 mm |
| Max. Aperture | f/2.8 | f/2.8 | f/2.8 |
| Manual Focus Option |
No | Yes | Yes |
| Supports Conversion Lenses | No | Yes | Yes |
| LCD Size | 1.5" | 2.0" | 2.0" |
| LCD Pixels | 114,000 | 130,000 | 130,000 |
| Stated Flash Range (Auto ISO) | 4.6 meters | 7.0 Meters | 7.0 Meters |
| External Flash Connection | No | No | Hot Shoe |
| ISO Options | Auto, 80, 100, 200, 400 | Auto, 64, 100, 200, 400 | Auto, 80, 100, 200, 400 |
| Image Adjustment Options | Sharpness | Contrast, Saturation, Sharpness | Contrast, Saturation, Sharpness |
| Scene Modes | 9, One "SCN" mode setting |
9, Two "SCN" mode settings |
9, Two "SCN" mode settings |
| Noise Reduction Adjustment | No | Yes | Yes |
| Shot to shot cycle times (Full res JPEGs) | 1.56 sec. | 0.54 sec. | 0.86 |
| Sound Recording | Yes | No (Some question on this, but our eval unit didn't seem to record sound clips) |
Yes |
| Included Memory Card | 8 MB | 8 MB | 16 MB |
User's Report
In most of my reviews, this section is called the "Executive Overview," where I present all the camera's features and functions in a concise fashion. Given that all this info is available elsewhere in the review for those who want to dig for it, I'm moving toward using this space to relate more of my personal impressions of each camera. This approach is frankly more time-consuming, but my hope is that it'll be more useful to readers than the prior format. (Due to time constraints, most of my reviews will continue in the previous format, but I felt that the Panasonic FZ20 deserved the benefit of this new treatment. Here, then, are some of the features and issues that stood out to me as I worked with the FZ20. (As noted earlier, the FZ20 is nearly identical to the FZ20, so most of these comments will mirror what I said about the FZ15.):
Fit, Feel, and Finish
The Panasonic DMC-FZ20, impressed me straight out of the box, as did its
brother the DMC-FZ15. Its solid black body and large lens just says "high
end camera," its fit and finish further contribute to that impression,
and it feels very good in the hand. The large lens makes it a little side-heavy,
but not nearly to the extent that I'd expected it to. The handgrip is relatively
small, but has a fairly tight curve to its front, so it's easy to grasp for
both large and small hands as well. Overall, a very solid "real camera"
feel.
Lens Quality and Focus Operation
The lens is really the standout on this camera, and I'm happy to report
that its optical quality very much lives up to its Leica heritage. In particular,
corner to corner sharpness is very good, and chromatic aberration is very
low, although barrel distortion is somewhat high at maximum wide angle. (Read
my comments in the Test Results section at the end
of this review for more details on this.)
The FZ20 has an unusual "one shot" autofocus option that's kind of neat. This is for times when you want to focus manually, but would like the camera to get you in the ballpark to begin with. Pressing the AF/MF switch on the side of the lens barrel all the way down forces an autofocus operation, but then leaves you in manual focus mode to tweak the focus by hand. I'm sure I've seen a feature like this on one or two other cameras in the past (some Minolta models, for instance), but the implementation on the Panasonic FZ20 is very nice.
On a less positive note, the FZ20's smoothly-operating manual focus ring on the front of the lens is one of the annoying "fly by wire" types. It isn't directly coupled to the lens' optical elements, but rather just tells the camera in which direction to adjust the focus. The result is very "loose" coupling between adjustments of the focus ring and actual changes in the focal point. Given how their lenses and focus systems work, this sort of arrangement seems to be a necessary evil in consumer digicams, but it never fails to annoy me.
Optical Image Stabilization
It's hard to overstate the value of an image-stabilization on a long-zoom
digicam like the Panasonic FZ20. A 12x zoom is all but unusable in anything
other than bright daylight without it. I don't have any way to measure the
effectiveness of anti-shake mechanisms, but the FZ20's seems to be be about
average in its performance. (Based on my purely subjective experience with
various cameras, I'd say that the FZ20's anti-shake system works about as
well as that in the Canon
S1IS, but not quite as well as the one in the Minolta
DiMAGE Z3.) These are pretty fine distinctions though - Any of the named
cameras is a radical improvement over a similar model without an image stabilization
system.
Shutter Response and Shooting Speed
As with the FZ15, you want to studiously avoid the Panasonic FZ20's 9-area
autofocus mode. In that mode, shutter response is leisurely, to put it politely,
with lag times ranging from 1.35 to 1.48 seconds. Switching to any of its
other AF modes cuts lag times to 0.53 - 0.99 second, as the lens is zoomed
from wide angle to telephoto. The long end of this range is still slow, but
isn't out of line with the performance of other long-zoom digicams that I've
tested. If you need to capture fast-moving action, you'll be happiest if you
can use manual focus (a very fast 0.08 second shutter lag) or better
yet prefocus by half-pressing and holding down the shutter button before the
shot itself (a blazing 0.039 second shutter lag).
The FZ20's shot to shot speed was pure pleasure, albeit not quite as fast
as that of the FZ15. This is one camera that makes very good use of fast memory
cards: With a 32x Lexar SD card in it, I could snap an image in single-shot
mode every 0.8 second, and it can shoot continuously at 2.1 frames/second
until the card is filled. For sports use, the FZ20 is hampered a bit by its
0.99 second shutter lag at telephoto focal lengths, but if you can make do
with manual focus or can rely on its continuous shooting speed, the FZ20 could
be an excellent "action" camera.
Viewfinder - Eyeglass Friendly
With 20/180 vision, this is a topic that's near and dear to my heart.
A lot of digicams require you to get your eyeball very close to the viewfinder
in order to see the full frame, and many more offer no dioptric adjustment
to accommodate those of us with failing vision. The FZ20 does well on both
counts, with a moderately high eyepoint, and one of the widest dioptric adjustment
ranges I've yet seen in a digicam.
Control and Menu Ergonomics
Another mixed bag here, I'm afraid. On the one hand, I love the FZ20's menu
system. I actually didn't find it anything special when I first looked at
it, but once I started operating the camera, I found myself just flying
through the menu system. I don't know what makes it so fast, perhaps just
the subtle timing of how the menus respond to the buttons on the multi-controller,
but whatever the cause, I ended up liking the FZ20's menu system better than
those of most digicams I test.
On the downside, I really disliked the action of the Exposure button on the camera's external controls. You use this button to switch the multi-controller from its normal functions to controlling the shutter speed and/or aperture settings, and I found it just terribly awkward to have to press the Exposure button before being able to use the multi-controller to change the exposure variables. What would work a lot better would be a multi-controller with a central button, of the sort used by many digicams these days, letting the central button take the place of the current Exposure button.
Noise Reduction Adjustment
This was a feature I was initially very happy to see, but ended up being
a little disappointed in. The idea is to let the user trade off between higher
image noise but improved subject detail, or lower noise and reduced detail.
The control worked reasonably well, but didn't affect midtones and highlight
areas nearly as much as it did shadows. - I'd like the option to pull back
the noise processing to improve detail in things like hair and foliage at
low ISOs, rather than being mainly restricted to shadow-noise adjustments.
(This control did have a much broader effect at high ISOs, but I'd like to
see it broader at low ISOs as well.)
Bottom Line
I liked the Panasonic FZ20 quite a lot, well enough to make it a "Dave's
Pick," in fact. Its 9-area AF mode is clearly to be avoided if you're
shooting anything other than still lifes, but performance in all other AF
modes is excellent. The camera shoots well, has a good user interface, looks
great, and takes good photos. At the end of the day, this camera (and the
FZ15 before it) convinced me that Panasonic has truly entered the big league
of the digital camera market.
Design
 With
the confident looks of a traditional 35mm SLR, the Panasonic Lumix DMC-FZ20
offers both style and substance, with an impressive Leica 12x optical zoom lens
that lends a professional air. Measuring 5.00 x 3.44 x 2.18 inches (128 x 87
x 106 millimeters), the DMC-FZ20 weighs approximately 19.6 ounces (556 grams)
with the battery and storage card installed. The Panasonic FZ20 's use of lightweight
metal panels helps keep the camera's weight down, somewhat compensating for
the heft of the rather large lens. While it definitely won't fit into your shirt
pocket, an accompanying neck strap makes it easy to tote, but I'd also recommend
picking up at least a small camera bag to protect that Leica lens.
With
the confident looks of a traditional 35mm SLR, the Panasonic Lumix DMC-FZ20
offers both style and substance, with an impressive Leica 12x optical zoom lens
that lends a professional air. Measuring 5.00 x 3.44 x 2.18 inches (128 x 87
x 106 millimeters), the DMC-FZ20 weighs approximately 19.6 ounces (556 grams)
with the battery and storage card installed. The Panasonic FZ20 's use of lightweight
metal panels helps keep the camera's weight down, somewhat compensating for
the heft of the rather large lens. While it definitely won't fit into your shirt
pocket, an accompanying neck strap makes it easy to tote, but I'd also recommend
picking up at least a small camera bag to protect that Leica lens.
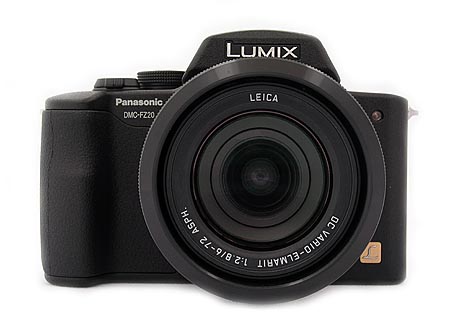
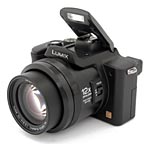
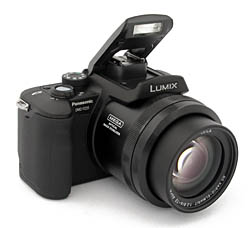
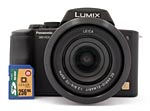
The front of the camera includes a telescoping 12x Leica zoom lens (with a ridged focus ring for manual adjustment), optical viewfinder window, and a bright light emitter that serves double duty as the autofocus assist and the self-timer countdown indicator. There are also two small holes next to the light emitter for the microphone. The built-in, pop-up flash is just above the large lens, and is released by a button on the rear panel. A large handgrip on the right side features an indentation for your right forefinger, and is covered by a leathery, textured wrap that clings to fingers.
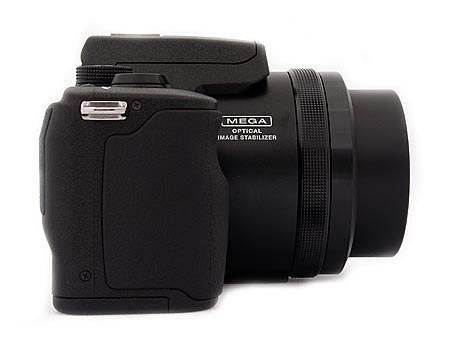
The right side of the camera (as viewed from the back) features only an eyelet for one end of the neck strap.
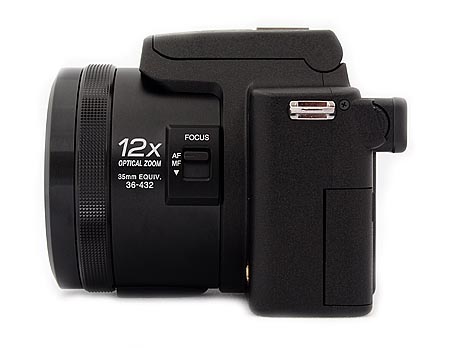
The opposite side of the camera features the other neck strap eyelet, as well as the diopter adjustment dial on the side of the optical viewfinder. A sliding Focus switch on the side of the lens barrel controls the auto and manual focus modes, and accesses a quick-focus adjustment. Also on this side of the camera, beneath a hinged, plastic door, is the connector compartment, which houses the Video Out/Digital and DC In connector terminals. The compartment door opens from the rear panel, and features a pressure hinge that snaps it securely in place when closed.

The Panasonic DMC-FZ20 's top panel features a Mode dial on the right, along with the Shutter button, Zoom lever, and Burst Mode button. The Shutter button is just a little too far back on the panel in my opinion, as I'm accustomed to having the shutter release more forward on the handgrip. Also on the top panel is the pop-up flash (released by a button on the rear panel) and the hot shoe for attaching an external flash unit.
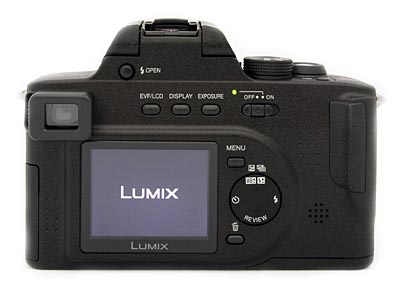
The majority of the exposure controls are located on the camera's rear panel, along with the electronic optical viewfinder (EVF) and LCD monitor. Lining the top of the panel are the EVF / LCD, Display, Exposure, and Power controls, with the Flash Open button just above them. The Menu and Delete buttons line up with the top and bottom right corners of the LCD monitor respectively, with a Four-Way Multicontroller at center. True to its name, the Multicontroller accesses a variety of camera settings and features four arrows for navigating through camera menus and reviewing images. A small speaker rests in the lower right corner of the rear panel, and a textured thumb grip reinforces the large handgrip on the camera's right side.
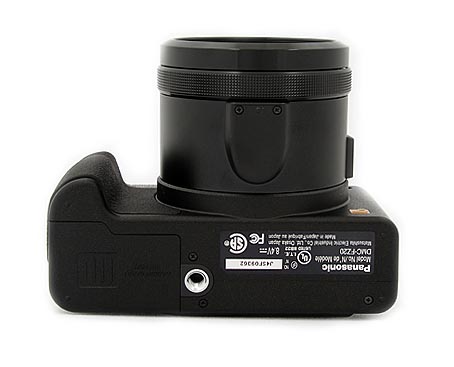
The Panasonic FZ20 's bottom panel is reasonably flat, with a sliding door to access the combined SD/MMC and battery compartment, and a threaded metal tripod mount on its right. The tripod mount is positioned off-center from the lens, and is too close to the compartment for quick battery and memory card changes (something I'm probably more sensitive to than most users, given the amount of on-tripod shooting I do).
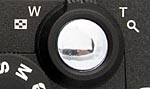
Viewfinder
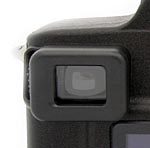 The
Panasonic Lumix DMC-FZ20 features both an eye-level electronic optical viewfinder
(EVF) and a 2.0-inch LCD monitor on the back panel for image composition. The
EVF is essentially a miniaturized version of the larger LCD monitor, complete
with all of the image and information displays. A button on the rear panel switches
the view between the two monitors. A dioptric adjustment tucked on the left
side of the eyepiece adapts the viewfinder optics to your vision, with a diopter
range from -4 to +4 (an unusually wide range). The eyepiece has a high "eyepoint,"
making it well-suited to eyeglass wearers.
The
Panasonic Lumix DMC-FZ20 features both an eye-level electronic optical viewfinder
(EVF) and a 2.0-inch LCD monitor on the back panel for image composition. The
EVF is essentially a miniaturized version of the larger LCD monitor, complete
with all of the image and information displays. A button on the rear panel switches
the view between the two monitors. A dioptric adjustment tucked on the left
side of the eyepiece adapts the viewfinder optics to your vision, with a diopter
range from -4 to +4 (an unusually wide range). The eyepiece has a high "eyepoint,"
making it well-suited to eyeglass wearers.
 The
2.0-inch, low-temperature, polycrystalline, TFT, color LCD monitor has a 130,000-pixel
display that's bright and clear. (LCD brightness can be adjusted in seven steps
via the Setup menu.) The Display button controls the image and information displays,
accessing five display modes in Record mode, and three modes in Review mode.
The main display shows the image area, center AF brackets, camera modes and
settings, battery level, image resolution and quality, and the remaining image
capacity of the memory card. Pressing the Display button enables the same display
but with the addition of a small histogram. A third press enables the "Out
of Frame" display, which puts the image area into the top left corner,
and displays the camera stats in the right and bottom borders (useful if you're
having trouble framing with the information overlay, but still need to refer
to it). The remaining two displays are a framing guideline (which divides the
image area into thirds horizontally and vertically), and the image area only
(with just the central AF brackets). You can also cancel the LCD monitor display
(though the EVF remains active unless switched to the LCD monitor).
The
2.0-inch, low-temperature, polycrystalline, TFT, color LCD monitor has a 130,000-pixel
display that's bright and clear. (LCD brightness can be adjusted in seven steps
via the Setup menu.) The Display button controls the image and information displays,
accessing five display modes in Record mode, and three modes in Review mode.
The main display shows the image area, center AF brackets, camera modes and
settings, battery level, image resolution and quality, and the remaining image
capacity of the memory card. Pressing the Display button enables the same display
but with the addition of a small histogram. A third press enables the "Out
of Frame" display, which puts the image area into the top left corner,
and displays the camera stats in the right and bottom borders (useful if you're
having trouble framing with the information overlay, but still need to refer
to it). The remaining two displays are a framing guideline (which divides the
image area into thirds horizontally and vertically), and the image area only
(with just the central AF brackets). You can also cancel the LCD monitor display
(though the EVF remains active unless switched to the LCD monitor).
 In
Review mode, the LCD monitor provides a full-frame display of captured images,
which you can view individually by scrolling left or right with the arrow buttons
on the Multicontroller. Pressing the Zoom lever toward the wide position brings
up a thumbnail index display of nine images at a time, which you can also scroll
through with the arrow buttons. The telephoto side of the Zoom lever doubles
as a Digital Enlargement button (marked by a magnifying glass), which allows
you to enlarge an image up to 16x its normal size on the screen. This degree
of enlargement is very handy, as it's sufficient to check focus accuracy and
depth of field, something that's difficult to do on cameras with lower playback
magnification. The arrow keys permit you to move around the enlarged image and
check fine details and framing.
In
Review mode, the LCD monitor provides a full-frame display of captured images,
which you can view individually by scrolling left or right with the arrow buttons
on the Multicontroller. Pressing the Zoom lever toward the wide position brings
up a thumbnail index display of nine images at a time, which you can also scroll
through with the arrow buttons. The telephoto side of the Zoom lever doubles
as a Digital Enlargement button (marked by a magnifying glass), which allows
you to enlarge an image up to 16x its normal size on the screen. This degree
of enlargement is very handy, as it's sufficient to check focus accuracy and
depth of field, something that's difficult to do on cameras with lower playback
magnification. The arrow keys permit you to move around the enlarged image and
check fine details and framing.
By default, the LCD screen displays basic information about the captured images, including the file name, date and time it was recorded, compression, resolution, what number it is in the sequence of images stored on the memory card, and the battery level. Depressing the Display button once brings up a more detailed information such as the shooting mode, aperture, f/stop, exposure compensation, and metering mode. In addition, the screen shows a small histogram to indicate the distribution of tonal values. If activated through the Setup menu, the Highlight Display will blink any blown-out highlights in the image from white to black and back again, letting you see exactly where detail has been lost. A third display mode shows only the image, without any information.
Optics
| Free Photo Lessons | |
|
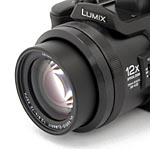 The
Panasonic DMC-FZ20 boasts a high quality 12x, 6-72mm telescoping Leica zoom
lens (equivalent to a 36-432mm lens on a 35mm camera, slightly higher than the
FZ15 due to the slightly smaller footprint of the 5 megapixel CCD chip). A removable,
plastic lens cap protects the lens surface, but doesn't feature any type of
eyelet to tether it to the camera body to prevent it from being lost. Lens caps
are always a nuisance to keep track of, so be sure to stash it securely in a
camera bag or pocket when not in use. When the camera is powered on, the lens
telescopes out from the camera body quietly and majestically (and a little slowly)
into its operating position, projecting an additional three-quarters of an inch
from the camera body. It retracts again when the camera is shut off. Panasonic
included a lens hood with the DMC-FZ20 , and a hood adapter for attaching auxiliary
lenses. Focus can be automatically or manually controlled, with a range of 0.98
feet (30 centimeters) to infinity in normal mode. Macro mode lets you focus
as close as 0.16 feet (5 centimeters) in wide-angle mode and 6.56 feet (200
centimeters) in telephoto mode. A ribbed focus ring around the outside edge
of the lens lets you manually adjust focus much as you would on the lens of
a traditional 35mm SLR. The lens aperture adjusts automatically or manually,
with an f/2.8 to f/8.0 range. What's very unusual about the FZ20 's lens though,
is that it apparently has a constant aperture, with an f/2.8 maximum aperture,
whether at wide angle, telephoto, or anywhere else in between. Along with the
other current Panasonic "FZ" models, I think this is the first time
I've seen this sort of a lens on a digicam, most having variable-aperture lenses,
in which the maximum aperture decreases as the lens is zoomed towards the telephoto
end of its range. (Very impressive indeed, if the FZ20 's aperture readout on
the LCD actually accurately represents what the lens optics themselves are doing.)
The
Panasonic DMC-FZ20 boasts a high quality 12x, 6-72mm telescoping Leica zoom
lens (equivalent to a 36-432mm lens on a 35mm camera, slightly higher than the
FZ15 due to the slightly smaller footprint of the 5 megapixel CCD chip). A removable,
plastic lens cap protects the lens surface, but doesn't feature any type of
eyelet to tether it to the camera body to prevent it from being lost. Lens caps
are always a nuisance to keep track of, so be sure to stash it securely in a
camera bag or pocket when not in use. When the camera is powered on, the lens
telescopes out from the camera body quietly and majestically (and a little slowly)
into its operating position, projecting an additional three-quarters of an inch
from the camera body. It retracts again when the camera is shut off. Panasonic
included a lens hood with the DMC-FZ20 , and a hood adapter for attaching auxiliary
lenses. Focus can be automatically or manually controlled, with a range of 0.98
feet (30 centimeters) to infinity in normal mode. Macro mode lets you focus
as close as 0.16 feet (5 centimeters) in wide-angle mode and 6.56 feet (200
centimeters) in telephoto mode. A ribbed focus ring around the outside edge
of the lens lets you manually adjust focus much as you would on the lens of
a traditional 35mm SLR. The lens aperture adjusts automatically or manually,
with an f/2.8 to f/8.0 range. What's very unusual about the FZ20 's lens though,
is that it apparently has a constant aperture, with an f/2.8 maximum aperture,
whether at wide angle, telephoto, or anywhere else in between. Along with the
other current Panasonic "FZ" models, I think this is the first time
I've seen this sort of a lens on a digicam, most having variable-aperture lenses,
in which the maximum aperture decreases as the lens is zoomed towards the telephoto
end of its range. (Very impressive indeed, if the FZ20 's aperture readout on
the LCD actually accurately represents what the lens optics themselves are doing.)
A Focus switch on the left side of the lens barrel selects the main focus mode, offering Auto, Manual, and One-Shot. When Manual focus is selected, you can also turn on MF Assist through the Setup menu, which enlarges the center portion of the image area to help you fine-tune the manual focus. One-Shot AF is a unique tool that lets you prefocus when in Manual focus mode. For example, if you want the camera to prefocus and then fine-tune the focus yourself, you slide the switch down to the One-Shot position. An indicator in the LCD display lets you know when focus is set, then you're free to fiddle the focus on your own using the focus ring. I've occasionally seen other digicams that let you adjust focus manually after the camera's autofocus is done, but the implementation on the Panasonic FZ20 (and the FZ15 before it) is the best I've seen to date.
The DMC-FZ20 offers nine active autofocus (AF) areas, but you can also limit the active area to three or one AF points through the Record menu. In nine-area mode, the nine AF points are arrayed in a 3x3 pattern in the center of the frame. The camera automatically sets the focus based on the part of the subject closest to one or more of the AF areas, and highlights each area that it's using in the display with a white box. Thus, you can photograph off-center subjects without having to lock the focus and then reposition the camera. (NOTE though, that the 9-area AF option brings with it a heavy penalty in terms of increased shutter lag. - See the test numbers and my comments in the Shutter Lag and Cycle Time Tests section of this review.) In three-area mode, the three AF points stretch across the center of the frame, and the camera again bases focus on the portion of the subject closest to any of the points. One-area mode bases focus on a large area in the center of the frame. There's also a Spot AF mode, which employs a smaller central focus area. A Continuous AF mode is available through the Record menu, which continuously adjusts the focus for moving subjects, but only works with the single area AF modes.
If dim subject lighting requires it, a bright LED autofocus assist light on the front of the camera automatically illuminates whenever autofocus is active. (The AF-assist light can be turned off via a menu option.) The AF assist beam is rated as effective to about 4.92 feet (1.5 meters). Even without the AF assist light in play, the FZ20 focuses better in low light than most cameras, as it can achieve focus down to a light level of roughly 1/6 foot-candle, about one-sixth the brightness of a typical city street scene at night. With the AF assist beam enabled, it can focus in total darkness.
The DMC-FZ20's 4x Digital Zoom can be enabled through the Record menu, and is activated whenever you zoom past the maximum optical telephoto range with the Zoom lever. I always warn readers that digital zoom only enlarges the center portion of the CCD image, and compromises the image quality by reducing resolution and enlarging noise patterns.
True to its Leica heritage, the lens on the FZ20 appears to be of very high quality, offering better corner to corner sharpness at most focal lengths than I'm accustomed to seeing in digicam lenses, particularly those with long zoom ratios. (Its images get a little soft in the corners at the telephoto end of its range, but to a lesser extent than I've seen with many long-zoom lenses.) Barrel distortion is higher than average at maximum wide angle (at 1.1%), but pincushion distortion at telephoto focal lengths is very low. Chromatic aberration is also quite low across the board.
Image Stabilization
Because of the DMC-FZ20's long lens, Panasonic included Image Stabilization
technology (Panasonic Mega OIS) to reduce blurring from camera movement, which
is more noticeable at the full telephoto setting. You can turn Image Stabilization
off through the Record menu, or set it to Mode 1 or 2. In Mode 1, stabilization
operates continuously, while Mode 2 keeps it in standby, activating it only
when the shutter is released. Mode 2 generally gives better stabilization than
Mode 1, although I personally like to be able to watch the stabilized image
in the viewfinder to pick the best moment to trip the shutter. - In the case
of the FZ20, this approach is to be avoided though.
I spent quite a bit of time evaluating the effectiveness of Panasonic's Mega OIS (Optical Image Stabilization) system when I reviewed the DMC-FZ15. I compared the FZ15's performance with that of the Konica Minolta DiMAGE Z3 ("KMZ3" for short from here on), another 4-megapixel long-zoom camera with image stabilization built in. Since the lens and OIS on the FZ20 is identical to that of the FZ15, I didn't see any point in laboriously repeating my earlier experiments and tests. (And I also didn't have a 5-megapixel long-zoom optically stabilized digital camera on hand to compare directly with the FZ20 anyway.)
Since the OIS is such an important feature of the Panasonic FZ20 though, I'm including the comparison between the FZ15 and KMZ3 here in the FZ20 review. While the KMZ3 isn't a direct competitor of the FZ20, the comparison between it and the FZ15 give a good idea of how Panasonic's OIS technology stacks up against the competition, and also reveals the importance of choosing the right operating mode. Here's the scoop on the Panasonic OIS, taken from my Panasonic FZ15 review:
At the prodding of a number of staunch Panasonic fans though, I came up with a direct comparison between the FZ15 and KMZ3, that produced some very interesting results. First and foremost among these was the conclusion that, without absolutely rigorous controls to insure exactly consistent conditions, any sort of with/without sample pictures purporting to show the effects of image stabilization are misleading, to say the very least. (See the photos presented below for evidence of this.) Given the amount of interest that seems to have been raised about image-stabilization effectiveness, I decided to devote a fair bit of attention to the issue here, and will also copy this text into my review of the FZ3 (and eventually the FZ20, whenever Panasonic will condescend to send me a sample of that model), since all three of Panasonic's current FZ-series cameras use the same anti-shake technology.
To test the two cameras against each other, I physically strapped them together (as shown at right - ugly, but effective), and then shot a large number of images of text on a CRT, at the 12x maximum telephoto zoom setting, with a range of very slow shutter speeds (1/10-1/25 second), and in various combinations of the camera's stabilization modes.
With this setup, the amount of shaking the pair of cameras saw varied from shot to shot, but at any given moment, they would see essentially the same motion. Holding the cameras in both hands, it wasn't hard to press the two shutter buttons at nearly the same instant (I estimate that there was a good bit less than 1/10 second separation between the release of the two shutters), so in any pair of shots, the shaking seen by both cameras should have been more or less identical. (It should be noted though, that movement acting to rotate the pair of cameras about the shooting axis could result in one seeing more motion than the other, but inspection of the images that resulted seemed to show little or no rotational movement.)
One of the first things I observed when looking at the resulting images was just how much variation there was in the sharpness of the images from one shot to the next. I was deliberately shooting at very slow shutter speeds, to insure that I was stressing the cameras' stabilization systems enough to see noticeable differences between them, but the variation from shot to shot made it clear just how much the amount of shaking can vary over time with a handheld camera. Given this, it's clear that any A/B comparison showing image sharpness with/without a camera's stabilization system engaged will be completely meaningless unless you're capturing simultaneous frames with two cameras having the same optical characteristics and a common support structure, in the way that I was doing here. That is, you could get a sense of how much difference the FZ15's OIS made if you strapped together two FZ15's and captured simultaneous shots with them, as I did with the FZ15 and the KMZ3. Unless you used a calibrated "shaker table" though, images captured successively with the same camera would convey no meaningful information. - And then, even a calibrated shaker table wouldn't take into account phase and range-of-motion effects between the shaking and the camera's internal mechanics.
Here's an example of what I mean. The crops below are from shots captured at the same shutter speed (1/40 second) within a few seconds of each other, with image stabilization turned off on the FZ15. I tried to hold the camera as steadily as I could for all shots. As these images demonstrate, even though I was trying to be as consistent in my handling of the camera from shot to shot, there was nonetheless an enormous range of variation from image to image. This range of variation makes it clear that any sort of with/without examples of anti-shake effectiveness will be wildly misleading unless done with two identical cameras, being shot at the same moment.
| Camera Shake Variation | |||
 |
 |
 |
 |
| (All shots handheld at 1/40 second, captured a few seconds apart.) | |||
Given the extent to which the camera shake varied between shots, it became clear that I needed to look at a large number of shots for each combination of test anti-shake mode and shutter speed, and evaluate the amount of blurring produced by both cameras statistically. I looked at pairs of images shot with both cameras side by side, scored them based on the amount of blurring I was seeing, and then compared the average scores across a minimum of 10 or more shots for each test condition.
This proved to be a pretty laborious process: In the process of sorting out the performance of the two cameras, I shot, inspected, and scored about 250 images with each model. At the end of the day, the performance of the two image stabilization systems turned out to be surprisingly similar to each other, but a few facts became evident. Here's a digest of what I found:
1) Any with/without stabilization comparison images published by anyone (myself included) are bound to be hugely misleading. Results can vary wildly from one shot to the next, depending on just exactly how the camera is moving at the moment of exposure, and where the mechanical elements of the anti-shake system happen to be in their range of travel. The only way I could come to firm conclusions about how the various IS modes worked relative to each other was by looking at the statistics across a large number of shots. (Since I was comparing the two IS systems to each other, and given the wide variation I was finding between shots, I didn't bother to shoot any non-IS images. Based on what I saw though, I venture to say that I could find "without" shots that looked better than "with" ones, just according to the luck of the draw.) - So anyone who's showing with/without example photos without very rigorous controls on how they're being shot (exactly simultaneous shots from a common platform, or calibrated, mechanical shaker table, for instance) is misleading you at the very best.
1) In Mode 1 operation (anti-shake enabled all the time), the KMZ3 did indeed beat the FZ15 most of the time, especially at slower shutter speeds.
2) In Mode 2 operation however (anti-shake only enabled when the shutter is tripped), the FZ15 beat the KMZ3 quite handily.
3) Running the KMZ3 in its equivalent of Mode 1 and the FZ15 in Mode 2 (that is, running each camera in the mode in which it performed best), the FZ15 generally edged the KMZ3 in image sharpness, albeit not by a huge margin.
Overall, it looks to me like the Panasonic approach to OIS can respond better to higher frequencies of vibration/shake, but it has a smaller range of motion available to its elements. Thus, if you leave it running all the time, the chances are much higher that it'll end up hitting the limits of its travel, and produce a blurry photo as a result. It's quick enough though, that it can respond while you're pressing the shutter down, in which case it's less likely to run up against its mechanical limits, and so is more likely to produce a sharp picture. By contrast, the KMZ3's anti-shake system seems to take longer to get in sync with the camera's motion, but appears to have a greater range of travel within its elements. This is part of why it can handle lower-frequency vibration better, and also why it does better in its equivalent of Mode 1.
Bottom line, I'd give the Panasonic IS system a slight but noticeable edge in performance, but I personally like being able to watch the stabilized LCD display, so I can pick the best moment to fire the shutter. Running in their respective optimum modes though, the differences between the two systems are largely academic: Either does so much better than an unstabilized lens that the differences between the two probably aren't all that important.
So how much of a difference does image stabilization make? As I noted earlier, the only truly valid way to know exactly what sort of vibration a given camera is compensating for would be to strap together two identical models, turn the image stabilization on in one and off in the other, and then capture simultaneous images from both cameras while they're being subjected to the same shaking.
Not having duplicate units of any of the image-stabilized digicams in question available to me, I couldn't perform this sort of a test with the full rigor it deserved. I did feel though, that I could give readers at least a general idea of how well Panasonic's OIS worked, by comparing unstabilized images shot with one camera with stabilized ones shot with another.
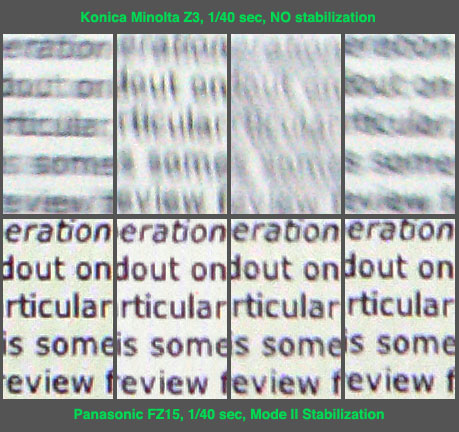
This was the genesis of the image crops you see here: I again used my lashup of the FZ15 and KMZ3, this time with the FZ15 set to Mode II stabilization, and the KMZ3 unstabilized. Both cameras were set to 1/40 second, full 12x zoom, and ISO 200. All images were subjected to an "auto levels" adjustment in Photoshop, so they'd appear with equal brightness. (Hence, don't look at these images to compare image noise, they simply aren't comparable in that respect.) Each pair of shots were captured at as close to the same instant as possible, by my estimate within less than 1/10 second of each other. Hence, both cameras saw more or less identical movement at the moment of exposure. Even though different cameras were used for the with/without comparisons here, the fact that the images were shot at the same focal length, the same shutter speed, and within a fraction of a second of each other makes the comparison entirely valid.
While there's some variation between shots here, the results are pretty dramatic: There's no question that image stabilization is a huge boon for long-zoom digital photography. Even the shots in which the OIS didn't completely eliminate the blur would probably be considered usable, particularly if they were the only shot that you had of some special moment. These shots were captured at 1/40 second, a shutter speed at which the FZ15's OIS system produced usable images about 90% of the time for me. This "usability" threshold will vary from user to user, and even with an individual shooter's physical condition. For instance, I have a much harder time holding the cameras steady when I'm physically tired, or (obviously) if I'm at all winded or my pulse is racing. - All this is to say that you should experiment a bit with you camera, taking a large number of stabilized shots at a range of shutter speeds, to get an idea of just where the exposure-time cutoff is for your particular capabilities and physical condition.
Conversion Lenses
The DMC-FZ20 accepts a range of high-quality Panasonic-branded accessory
lenses and filters. Here's a chart listing a few of them and their list prices
as of late October, 2004. (Be sure you're sitting down before you check the
price of the lenses, particularly the telephoto one: These are high-quality
optics, much more than your typical $40 cheapie front-element adapter lens.)
|
Exposure
| Free Photo Lessons | |
|
Shutter Priority mode puts you in control of the shutter speed setting (from 1/2,000 to eight seconds ), while the camera chooses a corresponding lens aperture. As with the Program AE mode, you maintain control over all other exposure options. Aperture Priority works along similar lines, except that you control the aperture (f/2.8 to f/8.0) and the camera chooses the best corresponding shutter speed. Both the shutter speed and aperture values are displayed on the LCD monitor. If the camera can't find an aperture or shutter speed to produce the correct exposure with the shutter speed or aperture you've selected, the LCD indicators will turn red, letting you know that you need to change the setting you selected.
Full Manual exposure mode lets you control both shutter speed and lens aperture independently. Pressing the Exposure button switches the four-way rocker control arrow keys from their normal functions to control aperture (the up/down arrows) and shutter speed (the left/right arrows). A nice touch is that tapping the shutter button calls up an exposure-meter display on the LCD screen, showing the currently selected exposure level, across a range of +/- 2 EV. The exposure-meter display disappears after a few seconds of inactivity, or you can use the Display button to select a display mode without the on-screen information overlay.
A number of preset "Scene" exposure modes are also available for shooting under special conditions, and include Portrait, Sports, Scenery, Night Scenery, Night Portrait, Panning, Fireworks, Party, and Snow modes. These modes preset a variety of camera options, helping novice photographers capture good-looking pictures in challenging situations without requiring a full knowledge of the camera. Two positions on the Mode dial access the scene modes, "SCN1" and "SCN2." Through the Setup menu, you can set the camera to automatically display the Scene menu in either mode, or set it so that the previously selected scene is enabled whenever switching to the other mode. With the latter option, you can have two different scenes ready to go and accessible at a moment's notice. For example, you can switch from Scenery to Party modes when photographing at a wedding, easily moving indoors and out without a lot of camera setup. Portrait mode uses a large aperture setting to reduce depth of field, resulting in blurred backgrounds and strong focal emphasis on the primary subject. Sports mode instead utilizes fast shutter speeds and wider apertures, in effect "freezing" fast-paced action. Scenery mode is for capturing wide landscapes, and places focus on a distant subject.
Night Scenery mode uses a slow shutter speed to capture the color and detail of evening settings without using the flash. Because of the slow exposure, a tripod is recommended. Night Portrait mode works in the same manner, but utilizes the flash to illuminate the primary subject in the foreground. By using a slow shutter speed and the flash together, the overall scene is more evenly exposed. (The flash mode is fixed at Slow-Sync with Red-Eye Reduction. Portrait subjects should be warned to stay still after the flash, until the shutter is closed.)
Panning mode is useful for following a moving subject, such as a person on a bicycle or in a slow-moving vehicle, so that the subject stays in focus while the background becomes a blur. When shooting in Panning mode, hold down the Shutter button while moving the camera to follow the subject. (Just make sure that the subject is moving at a speed you can easily follow without blurring.) Fireworks mode preserves the color and pattern of fireworks by using a slow shutter speed to capture the full effect (a tripod is recommended). Party mode is best for taking pictures under dim indoor lighting with a flash. You can select between Forced Red-Eye Reduction and Slow-Sync Red-Eye Reduction modes, and a tripod is recommended. Finally, Snow mode captures good exposures in bright, snowy conditions, and adjusts the white balance and exposure to enhance the white color and detail of the snow.
Exposure compensation can be adjusted from –2 to +2 exposure values (EV), in one-third-step increments. The camera's metering system offers three operating modes, which include Multiple, Center-Weighted, and Spot, selectable through the Record menu. Multiple metering measures brightness throughout the entire frame, and determines the best overall exposure. Center-weighted averaging is based on an averaged light reading of the overall scene, but places more emphasis on the center of the viewfinder or LCD monitor. Spot metering reads only a specific point in the viewfinder. You can lock the exposure (and focus) by halfway pressing and holding the Shutter button, and then reframing the subject.
The DMC-FZ20 offers six White Balance modes, including Auto, Daylight, Cloudy, Halogen, Flash, and White Set. The White Set mode allows you to manually set the white balance by holding a white card in front of the camera to set the value in the setup mode. You can fine-tune the white balance by adding more red or blue to the color balance in all of the modes except Auto, using the WB Adjust feature (accessed by pressing the up arrow of the Multicontroller until WB Adjust appears on the LCD monitor).
ISO film speed equivalents on the DMC-FZ20 are set in the Record menu, with choices of Auto, 80, 100, 200, and 400. The higher the ISO setting, the more you can extend the camera's exposure range in low-light situations. Just keep in mind that higher ISO values have progressively lower quality levels, with increased image noise. On that note, the DMC-FZ20 does feature long-exposure Noise Reduction, which uses dark frame subtraction to reduce the amount of image noise in longer exposures. What this means is that after the initial exposure, the camera takes a second exposure with the shutter closed, and compares the two images to subtract the noise pixels from the main image.
In perhaps its most unusual feature, the FZ20 offers a noise-reduction adjustment through its Record menu, with options of High, Normal, or Low Noise Reduction settings. This setting adjusts how aggressive the camera is about trading away subtle subject detail for reduced image noise. Digicam anti-noise systems basically look for regions of the image where there's relatively little local contrast between adjacent pixels, assuming that wherever the local contrast is lower than a certain threshold, whatever's left there must be noise. When that condition occurs, the camera "flattens" the contrast further, suppressing the noise. This is fine if you're dealing with a part of the subject that has little or no detail of its own (a blank wall or the sky for example), but if the detail in the subject has only subtle contrast (hair is an excellent example), the camera can mistakenly flatten-out the subject detail along with the image noise.
On the FZ20, you can control the contrast threshold and amount of detail flattening somewhat via the Noise Reduction menu option, but I found its operation to be pretty subtle. I could see its effects in deep shadows at low ISOs, and more broadly at higher ISOs, but it for the most part had a fairly minor effect. Overall, a good feature that I'd like to see more manufacturers adopt, but it didn't have nearly as much impact as I would have expected or like to have seen.
The DMC-FZ20 also offers a Color Effect setting with Cool, Warm, Black and White, and Sepia color options. A Picture Adjustment menu option features additional adjustment tools, including Contrast, Sharpness, Saturation, and the above-mentioned Noise Reduction options. I found the Contrast, Sharpness, and Saturation controls to all work very well, offering a good range of adjustment, and working as you'd expect them to. In particular, the Contrast adjustment seemed to affect highlight and shadow areas about equally, leaving the overall exposure more or less untouched as the contrast was varied. The Saturation control offered a good range of adjustment, but I really would have liked to have seen more steps (perhaps five?) covering the same range.
Auto Exposure Bracketing
The Auto Exposure Bracketing mode is accessed by pressing the up arrow of the
Multicontroller until "Auto Bracket" appears on the LCD monitor. It
automatically captures a series of three images, each at a different exposure
setting. You can manually set the exposure variation between shots in one-third-step
increments, up to as much as +/- 1 EV. The camera makes all three exposures
in rapid succession with just one press of the Shutter button. Unfortunately,
this function cannot be used with flash photography. If the flash fires, only
one image will be recorded. (The likely reason for this is that the onboard
flash recharges too slowly to be usable in a multiple-exposure application like
this.)
Burst Shooting
The DMC-FZ20 has three Burst shooting modes, which are accessed by pressing
the Burst button on the top panel. Low Speed mode captures a maximum of 10 consecutive
frames at a bit over two frames per second, while High Speed mode captures a
maximum of 10 images at bit under four frames per second, as long as you hold
down the shutter release. (Burst length will depend on the subject you're shooting,
and how well the resulting images compress. In my testing, using a standard
noise pattern for worst-case compressibility, I found a maximum burst length
of five frames.) There's also an Infinity mode, which limits the number of images
only by memory card capacity, and shoots at approximately two frames per second.
(Interestingly, I found that the frame rate in "infinity" mode was
actually a little higher than in "Hi" mode.) The number of images
and actual shot-to-shot speed depend on several factors, including the amount
of memory remaining on the flash card and the size/quality of the images being
acquired. It's also important to note that the FZ20 is a camera that's able
to make good use of fast memory cards. Pauses between bursts were much shorter
using a fast 32x Lexar SD card vs a slower non-speed-rated one, and the "INF"
mode was only truly "Infinite" when shooting with the 32x card.
Movie Mode
The DMC-FZ20 also offers a Movie mode, which is accessed by turning the Mode
dial on top of the camera to the miniature film frame symbol. The Motion JPEG
files are recorded at 320 x 240 pixels, at either 30 or 10 frames per second.
Recording times are limited by frame rate and memory card capacity. Recording
stops and starts with a full press of the shutter button, and the amount of
available recording time appears in the upper right corner of the LCD monitor.
While the lens can be zoomed before and after movie recording, it cannot be
activated during the recording process itself, and the camera's exposure is
also set and fixed at the beginning of the recording interval. Movies are recorded
without sound. Unlike its "INF" continuous shooting mode, the FZ20
's Movie mode appears capable of recording movies continuously to the limit
of card capacity, even on slower memory cards. (At least it worked
fine with a non-speed-rated Lexar SD card.)
Flip Animation Mode
This mode, enabled through the Record menu, lets you connect a string of images
together to make a 20-second movie that resembles a flip animation. You can
record as many as 100 consecutive images to create the animation. To capture
the series, select "Image Capture" under the Flip Animation menu option,
then snap away. Once you've captured all of the files you need, select "Create
Motion Image" and select the frame rate (either five or ten frames per
second) to string the images together into a motion file. Once the animation
has been created, you can opt to delete the still images to save memory space.
(This can be a fun mode. Sony had a Flip Animation option on their cameras a
couple of years back, but that feature was limited to a much shorter sequence
of images.)
Self-Timer Mode
The Self-Timer is set by pressing the left arrow key on the Multicontroller,
and offers a choice between a two- or 10-second countdown. When set to Self-Timer,
the camera displays the standard self-timer icon (a clock counting down) in
the LCD display, and depressing the Shutter button activates the countdown,
during which a lamp on the camera's front panel blinks. The two-second option
is very handy when you're shooting long exposures with the camera on a tripod,
and want to avoid jiggling the camera and blurring the shot when you press the
Shutter button with your finger. The two-second countdown is enough time for
any vibrations to die down before the shutter opens, but not so long as to seriously
slow your shooting. - I also find myself using a short self-timer for shots
in low light or macro situations, where I just prop the camera on a convenient
rock, fence post, or water glass (at a restaurant, for example) to avoid hand-held
jiggles. Very convenient, when you don't happen to have a tripod along.
Flash
 The
DMC-FZ20's built-in, pop-up flash operates in one of six modes: Auto, Red-Eye
Reduction (Auto), Forced, Red-Eye Reduction (Forced), Slow-Sync (with Red-Eye
Reduction), and Flash Off. The Auto mode tells the camera to determine when
flash is necessary, based on existing exposure conditions. Forced means that
the flash fires with every exposure, regardless of lighting conditions, and
Flash Off completely disables the flash. The three Red-Eye Reduction modes fire
a small pre-flash one second before the full flash, to reduce the redeye effect
in portraits. Slow-Sync mode combines the flash with a slower shutter speed,
letting more of the ambient light fall on the camera's sensor, brightening background
objects.
The
DMC-FZ20's built-in, pop-up flash operates in one of six modes: Auto, Red-Eye
Reduction (Auto), Forced, Red-Eye Reduction (Forced), Slow-Sync (with Red-Eye
Reduction), and Flash Off. The Auto mode tells the camera to determine when
flash is necessary, based on existing exposure conditions. Forced means that
the flash fires with every exposure, regardless of lighting conditions, and
Flash Off completely disables the flash. The three Red-Eye Reduction modes fire
a small pre-flash one second before the full flash, to reduce the redeye effect
in portraits. Slow-Sync mode combines the flash with a slower shutter speed,
letting more of the ambient light fall on the camera's sensor, brightening background
objects.
The flash exposure can be adjusted from -2 to +2 EV in one-third-step increments by pressing the up arrow of the Multicontroller until the Flash Exposure Compensation adjustment appears. Panasonic rates the DMC-FZ20's flash as effective from 0.98 to 23 feet (30 centimeters to 7 meters) depending on the zoom setting and ISO. In my own tests, the camera's flash easily reached out to the 14-foot limit of my test setup, even at ISO 64, and with the lens towards the telephoto end of its range. - Very impressive.
Unlike the FZ15, a hot shoe on the top of the Panasonic Lumix DMC-FZ20 allows attachment of an external flash. The company lists the Panasonic DMW-FL28 as the flash of choice, but it looks like any basic thyristor-driven single pole flash will do.
Shutter Lag and Cycle Times
When you press the shutter release on a camera, there's usually a lag time
or delay before the shutter actually fires. This corresponds to the time required
for the autofocus and autoexposure mechanisms time to do their work, and can
amount to a fairly long delay in some situations. Since this number is rarely
reported on (and even more rarely reported accurately), and can significantly
affect the picture taking experience, I routinely measure both shutter delay
and shot to shot cycle times for all cameras I test, using a test system I designed
and built for the purpose. (Crystal-controlled, with a resolution of 0.001 second.)
Here are the numbers I collected for the Panasonic Lumix DMC-FZ20:
| |
||
| |
(secs) |
|
| Power On -> First shot | |
LCD turns
on and lens extends forward. Somewhat slow. |
| Shutdown | |
First time
is time to retract lens, second time is worst-case buffer-clearing time.
Also a bit slow, although it clears its buffer very quickly, even in
continuous-shooting mode. |
| Play to Record, first shot | |
Time until
first shot is captured. Quite fast, at least with the lens set to manual
focus mode. (Autofocus mode would add 0.5 - 1.0 second to this, depending
on the AF mode selected.) |
| Record to play | |
First time
is that required to display a large/fine file immediately after capture,
second time is that needed to display a large/fine file that has already
been processed and stored on the memory card. Fairly fast. |
| Shutter lag, full autofocus, multi-area mode | |
First time is at full wide-angle, second is full telephoto. Quite slow, but these times are with the camera's multi-area Autofocus mode, which is dramatically slower than all the camera's other modes. |
| Shutter lag, full autofocus, all other AF modes | 0.53 / 0.99 | First time is at full wide-angle, second is full telephoto. These times are with all AF modes except multi-area. The camera defaults to the single large-area AF mode when powered on, so these times should represent the typical user's experience. Quite fast at wide angle, average at telephoto, but still better than most long-zoom models. |
| Shutter lag, continuous autofocus | 0.60 | As is often the case, continuous autofocus doesn't help shutter lag with static subjects. |
| Shutter lag, manual focus | 0.080 | Very fast for a manual focus mode. |
| Shutter lag, prefocus | |
Time to capture, after half-pressing
shutter button. Extremely fast. |
| Cycle Time, max/min resolution | 0.86 / |
First number is for large/fine files, second number is time for "TV" mode (640x480) images. Times are averages. Buffer clears after each shot with a 32x Lexar card, slows down to 2.9 seconds/shot after four shots with a non-speed-rated one. (Buy a fast card for use with the FZ20, it can take good advantage of the speed.) NOTE though, that this cycle time depends on using Manual Focus. If you shoot in autofocus mode, the time required for focusing will slow the cycle time to 1.2-1.5 seconds per large/fine shot. |
| Cycle Time, continuous High mode, max/min resolution | 0.33 (3.0 fps) |
Shoots at the same rate for large/fine images or "TV" size images. Times are averages. Takes 4 large/fine shots or 7 TV size shots before stopping to clear buffer. Buffer clears in 1.5 seconds for large/fine images, about 1 second for lowest resolution. Good speed for a 5-megapixel camera. |
| Cycle Time, continuous Low mode, max/min resolution | 0.47 (2.14 fps) |
Shoots at the same rate for large/fine images or "TV" size images. Times are averages. Takes 4 large/fine shots or 7 TV size shots before stopping to clear the buffer. Buffer clears in 1.4 seconds for large/fine images, about 1 second for lowest resolution. Good speed for a 5-megapixel camera. |
| Cycle Time, continuous "infinite" mode, max/min resolution | 0.47 (2.14 fps) |
Shoots at the same rate for large/fine images or "TV" size images. Times are averages. Takes 4 large/fine shots or 7 TV size shots before stopping to clear buffer. After 50 shots, buffer clears in about 2 seconds for large/fine images, about 1 second for lowest resolution. Very fast, considering there's no buffer limitation. (And interesting, that speed in this mode matches that in "Continuous Low.") |
| Cycle Time, TIFF mode | 3.94 | Shoots large/fine TIFF files at this rate, clearing the buffer after each shot. Very fast for a TIFF mode. |
The FZ20 for the most part does pretty well in the speed department, provided
that you avoid its 9-area autofocus mode. When operating in its 9-area
AF mode, the FZ20's shutter lag is positively sluggish, ranging from 1.35
- 1.48 seconds. (Slow even when compared to other long-zoom digicam models.)
In any other AF mode though, the shutter lag ranges from 0.53 - 0.99 second
as the zoom is varied from wide angle to telephoto. The lag for wide angle
focal lengths is quite short, while that for telephoto focal lengths is on
the long side of average, but still not bad for a long-zoom digicam. Manual
focus lag time is really excellent, at 0.08 second, and prefocused, it's positively
blazing, at 0.038 second. Cycle times are very fast. In manual-focus single-shot
mode with a sufficiently fast card (we tested with a Lexar 32x SD card), it
can capture large/fine JPEG files to the memory card nonstop, at about 0.86
second per shot. With slower cards, it'll make you wait a little every 3-4
shots, but it's still very fast. So... If you avoid its 9-area AF mode (which
is really best suited to landscapes or still life shots), the Panasonic FZ20
is a reasonably responsive camera, with excellent cycle times and buffer capacity.
And, if you can live with manual focus or prefocusing prior to your shots,
the FZ20 would be great for fast-paced action.
Operation and User Interface
The Lumix DMC-FZ20's user interface is straightforward and should present a relativelyshort learning curve if you read through the included manual. (Although there are a lot of features here, so I'd imagine that novice users could easily spend a couple of hours learning them all. Experienced digicam users should be able to come up to speed on the major functions in under an hour though.) I generally prefer to see external access to as many exposure controls as possible, and the DMC-FZ20 does provide a fair amount of control without resorting to the LCD menu system. The camera's Multicontroller controls a wide variety of functions independently of the LCD menu, though the menu itself is straightforward. As noted earlier, I also found the FZ20's menu system unusually fast to navigate.
Shutter Button: Located on the right side of the camera's top panel and
surrounded by the Zoom lever, the Shutter button sets focus and exposure when
halfway pressed, and when fully depressed, it trips the shutter release. In
Self-Timer mode, fully depressing the Shutter button triggers a two- or 10-second
countdown before the shutter is released.
Zoom Lever: Surrounding the Shutter button, this lever controls the optical and digital zoom in any Record mode.
In Review mode, pushing the lever toward the "W" end activates a nine-image index display mode. Pushing the lever to the "T" end digitally enlarges a captured image as much as 16x. When playback zoom is enabled, pushing the lever back toward the "W" zooms back out.
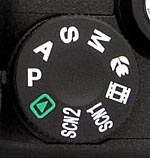
Mode Dial: To the left of the Shutter button, this notched dial is used
to select the camera's shooting modes as follows:

Burst Mode Button: Directly behind the Shutter button / Zoom lever
combo on the top panel, this button accesses the three Burst modes (High, Low,
or Infinity), or returns to the single-shot mode.
![]()
Flash Release Button: Located on the rear panel, just below the pop-up
flash compartment, this button releases the pop-up flash from its closed position.

Diopter Adjustment Dial: Hidden away on the left side of the optical
viewfinder eyepiece, this dial corrects the viewfinder optics for eyeglass wearers,
with a range from +4 to -4.

EVF/LCD Button: The first button in a series lining the top of the
rear panel, this button switches the viewfinder display between the EVF and
LCD monitors.

Display Button: To the right of the EVF/LCD button, this button controls
the image and information displays in Record and Playback modes. In Record mode,
pressing the button cycles between the five display modes, which include the
image with information, image with information and histogram, "Out of Frame"
display, alignment grid, image with no information, and LCD monitor off (you
cannot disable the EVF, however).
In Playback mode, pressing the button cycles between the image with information, expanded information and histogram, and no information displays.

Exposure Button: On the right side of the Display button, this button
lets you shift the exposure in Program AE mode. After the shutter button has
been halfway pressed (displaying the aperture and shutter speed on the LCD screen),
pressing this button enables Program Shift mode. You can then use the right
and left arrow keys to shift the exposure toward a slower or faster shutter
speed, or toward a larger or smaller lens aperture. In Aperture Priority, Shutter
Priority, and Manual exposure modes, pressing this button lets you adjust the
aperture and/or shutter speed by pressing the button and then using the arrow
keys to adjust the selected variable. (As noted in my User Notes above, I felt
that this setup was a little awkward to use.

Power Switch: To the right of the Exposure button, this sliding switch
turns the camera on or off. Powering the camera on with the Mode dial set to
a record mode triggers the lens to extend. (Likewise, turning the camera off
causes the lens to retract.)

Menu Button: Next to the upper right corner of the LCD monitor is the Menu
button, which calls up the settings menus on the LCD display in all camera modes.
A second press of the Menu button cancels the menu display.

Four-Way Multicontroller: Located directly to the right of the LCD, the
Multicontroller is a four way rocker disk that accesses a variety of camera
settings. The arrow keys navigate through menu options and adjust camera settings.
In most record modes, the up arrow accesses the Exposure Compensation, Auto
Exposure Bracketing, Flash Exposure Compensation, and White Balance Adjustment
tools. The right arrow cycles through the available flash modes, while the left
arrow cycles through the Self-Timer modes. The down arrow activates a quick
review of the most recently captured image.
In Playback mode, the right and left arrow keys navigate through captured images and movie files. When an image has been digitally enlarged, the four arrow keys pan around within the image.

Delete Button: Adjacent to the lower right corner of the LCD monitor, this
button pulls up the delete menu in Playback and Review modes.

Focus Switch: Tucked on the left side of the lens barrel (when viewing the
camera from the rear), this switch selects between Auto and Manual focus modes.
A third position lets you quickly set the autofocus in manual focus mode, so
that you can fine tune it with the focus ring.
Focus Ring: Encircling the outer edge of the lens, this ridged ring twists
left and right so you can manually adjust focus.
Camera Modes & Menus
Record Menu: The following options are available by pressing the Menu button in any record mode, though some menu options aren't available in all modes:
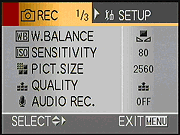 White
Balance: Sets the white balance to Auto, Daylight, Cloudy, Halogen,
Flash, Manual, or White Set modes. (White Set isn't a separate white balance
mode, it's just the option for manually setting the white point that's selected
by the Manual option.)
White
Balance: Sets the white balance to Auto, Daylight, Cloudy, Halogen,
Flash, Manual, or White Set modes. (White Set isn't a separate white balance
mode, it's just the option for manually setting the white point that's selected
by the Manual option.)
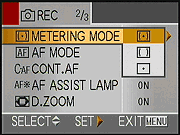 Metering Mode: Designates the camera's metering mode as Multiple,
Center-Weighted, or Spot.
Metering Mode: Designates the camera's metering mode as Multiple,
Center-Weighted, or Spot.
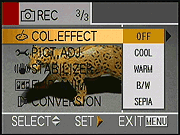 Color Effect: Selects a color effect, with options of Cool, Warm,
Black and White, or Sepia.
Color Effect: Selects a color effect, with options of Cool, Warm,
Black and White, or Sepia.
Scene Menu: If designated through the Setup menu, this menu automatically appears in the SCN1 and SCN2 modes. If turned off, pressing the Menu button calls up this page. (No screenshots here, these screens just have a little icon and text name for each mode.) You can select separate options for SCN1 and SCN2.
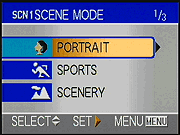 Portrait:
Utilizes a larger aperture to decrease the depth of field, resulting in a
sharply focused subject in front of a slightly blurred background.
Portrait:
Utilizes a larger aperture to decrease the depth of field, resulting in a
sharply focused subject in front of a slightly blurred background. Play Menu: This menu is only available in the Review mode. It lets you scroll through captured images; erase, protect, and rotate them; or set them up in a slide show or for printing on a DPOF compatible device. The Play menu offers the following selections:
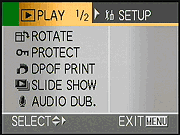 Rotate: Rotates captured images 90 degrees clockwise or counterclockwise.
Setup Menu: The Setup menu provides universal camera control options that remain the same in both Shooting and Review modes. This menu is accessed by depressing the Menu button once and scrolling to the right with the Multicontroller. Following are the available settings:
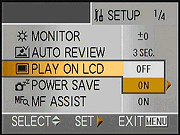 Monitor: Adjusts the brightness level of the LCD monitor in seven
steps.
Monitor: Adjusts the brightness level of the LCD monitor in seven
steps.
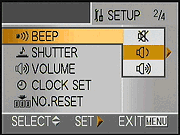 Beep:
Turns the camera's beep sound on or off, with low and high volume settings.
Beep:
Turns the camera's beep sound on or off, with low and high volume settings.
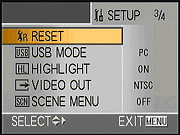 Reset:
Allows user to reset either all settings in the Record menu or all settings
in the Setup menu.
Reset:
Allows user to reset either all settings in the Record menu or all settings
in the Setup menu.
Image Storage and Interface
The DMC-FZ20 uses SD/MMC memory cards for image storage. A 16MB SD memory card is supplied with the camera (far too small for a camera like this), so you'll want to immediately purchase a larger capacity card to accommodate the five-megapixel maximum resolution. Entire SD cards can be write-protected to guard against accidental reformatting, but in this mode you won't be able to save any photos to the card either. The DMC-FZ20's Play menu does allow you to write-protect individual image files though, protecting them from accidental erasure, unless the card is formatted.
Still images can be saved at one of five resolutions (2,560 x 1,920; 2,048 x 1,536; 1,600 x 1,200; 1,280 x 960; 640 x 480 pixels or "HDTV," 1,920 x 1,080 pixels), while movie images are recorded at 320 x 240 pixels. Still images also have two JPEG compression levels available: Fine and Normal, plus an uncompressed TIFF setting that records the RGB image with no compression at all.
A full complement of interface software comes with the DMC-FZ20, as does a USB cable for speedy connection to a PC or Macintosh computer.
Following are the approximate resolution / quality and compression ratios for
the furnished 16MB card. (Compression numbers are based on my own computations.):
| Resolution/Quality 16 MB Memory Card |
TIFF | Fine | Normal | |
| 2560 x 1920 | Images (Avg size) |
0 16.5 MB |
6 2.5 MB |
12 1.3 MB |
| Approx. Compression |
- | 6:1 | 12:1 | |
| 2048 x 1536 | Images (Avg size) |
1 10.5 MB |
9 1.6 MB |
19 835 KB |
| Approx. Compression |
- | 6:1 | 11:1 | |
| 1600 x 1200 | Images (Avg size) |
2 6.3 MB |
16 998 KB |
30 524 KB |
| Approx. Compression |
- | 6:1 | 10:1 | |
| 1280 x 960 | Images (Avg size) |
3 4.1 MB |
24 655 KB |
44 360 KB |
| Approx. Compression |
- | 6:1 | 10:1 | |
| |
Images (Avg size) |
14 1.1 MB |
75 213 KB |
122 131 KB |
| Approx. Compression |
- | 3:1 | 5:1 | |
Video Out
The DMC-FZ20 has a video-out port that supports both PAL and NTSC timing formats.
The video output can be used for reviewing previously recorded images or running
slide shows and videos from the camera. It also carries the viewfinder display,
so you could use a video monitor as a remote viewfinder if you wanted.
Power
The DMC-FZ20 is powered by an internal Panasonic CGA-S002A rechargeable lithium-ion battery pack. The camera ships with one battery pack and a charger. An AC Adapter Kit is sold separately, with a power adapter, DC coupler, and power cord.
Because the DMC-FZ20 relies on its LCD display for viewing and selecting some of its settings, it can be somewhat of a drain on the power supply. Fortunately, the camera has an automatic shutdown mode to help conserve battery power, and you can save power by relying on the electronic optical viewfinder whenever possible.
Here are the power consumption numbers I measured for the FZ20 , along with
the projected run times for various camera operating modes:
| |
(@8.4 volts on the external power terminal) |
Est. Minutes 7.2 v 680 mAh LiIon |
| Capture Mode, w/LCD | |
|
| Capture Mode, no LCD | |
|
| Half-pressed shutter w/LCD | |
|
| Half-pressed w/o LCD | |
|
| Memory Write (transient) | |
|
| Flash Recharge (transient) | |
|
| Image Playback | |
|
With a worst-case run time (capture mode with the rear LCD turned on) of 129 minutes and a run time of three and a half hours in playback mode, the Panasonic FZ20's battery life is better than most. I'd still advise purchasing a second battery to keep as a spare, but for many users, the FZ20's run time will be plenty.
Included Software
The DMC-FZ20 comes with an very nice complement of software on the included CD. Compatible with Windows and Macintosh operating systems, ArcSoft PhotoImpression, Panorama Maker, and PhotoBase applications provide a well-rounded offering of image organization and editing tools. The CD also features USB drivers for both Macintosh and Windows computers.
"Gallery" Photos
For those readers interested in a set of less "standardized" photos from the Panasonic Lumix DMC-FZ20, we've put together a "photo gallery" of more pictorial shots captured with the FZ20.
Test Results
In keeping with my standard test policy, the comments given here summarize only my key findings. For a full commentary on each of the test images, see the Panasonic Lumix DMC-FZ20 sample pictures page.
Not sure which camera to buy? Let your eyes be the ultimate judge! Visit our Comparometer(tm) to compare images from the FZ20 with those from other cameras you may be considering. The proof is in the pictures, so let your own eyes decide which you like best!
As with all Imaging Resource product tests, I encourage you to let your own eyes be the judge of how well the camera performed. Explore the images on the pictures page, to see how the Panasonic DMC-FZ20 's images compare to other cameras you may be considering.
Conclusion
| Free Photo Lessons | |
|
<<DMC-FZ20 Sample Images | Additional Resources and Other Links>>
Reader Comments!
Questions, comments or controversy on this product? Click
this link to see what other Imaging Resource readers have had to say about
the Panasonic Lumix DMC-FZ20, or add comments of your own!