Panasonic Lumix DMC-FZ50 Design
Like the DMC-FZ30 before it, the Panasonic Lumix FZ50 combines the confident looks of a traditional 35mm SLR with an impressive Leica 12x optical zoom lens that lends the camera a professional air. Measuring 5.5 x 3.4 x 5.6 inches (141 x 86 x 142 millimeters) and weighing in at over a pound-and-a-half with the battery and memory card installed, the Lumix FZ50 is built like a tank. But it still has good balance and handles well.
If you're looking for something you can discreetly slide into a coat pocket and sneak into a football game, you might want to look elsewhere. But if you want something that suggests heavy firepower, the Panasonic Lumix FZ50 with its long 12x zoom would be a nice addition to your arsenal. The Panasonic FZ50's use of lightweight metal panels helps keep the camera's weight down somewhat at 1.62 pounds (734 grams), compensating for the heft of the rather large lens. While it definitely won't fit into your shirt pocket, an accompanying neck strap makes the Lumix FZ50 easy to tote. I'd also recommend picking up at least a small camera bag to protect that Leica lens.
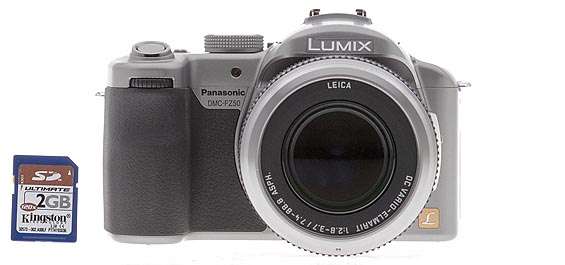
The front of the Panasonic FZ50 includes the 12x Leica zoom lens (with ridged focus and zoom rings for manual adjustment), a front adjustment dial (called the Aperture Command Dial), and a bright light emitter that serves double duty as the autofocus assist and the self-timer countdown indicator. The built-in, pop-up flash is just above the large lens, and is released by a sliding switch on the left side of the Panasonic FZ50's lens barrel (as viewed from the rear). A large handgrip on the right side features an indentation for your right forefinger, and is covered by a rubbery, textured wrap that clings to fingers. The grip is just a tad short to fit most full hands so your pinkie will likely be left dangling at the bottom.
The right side of the Panasonic FZ50 (as viewed from the back) features an eyelet for one end of the neck strap, as well as the SD/MMC memory card compartment. The hinged, plastic door slides toward the rear before opening to reveal the card slot.
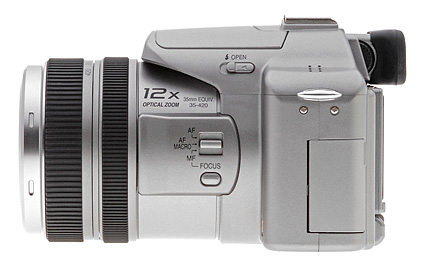
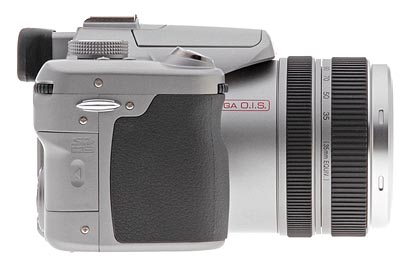
The opposite side of the camera features the other neck strap eyelet, as well as the diopter adjustment dial tucked on the side of the electronic optical viewfinder. A sliding Focus switch on the side of the lens barrel controls the auto and manual focus modes, with a Focus button just below it for quick adjustments in manual mode. The flash release switch is just below the Panasonic FZ50's flash compartment, above the focus switch. Also on this side of the camera, beneath a hinged, plastic door, is the connector compartment, which houses the Remote Control, AV Out/Digital and DC In connector terminals. The compartment door opens from the rear panel, and features a pressure hinge that snaps it both smartly open and securely in place when closed.
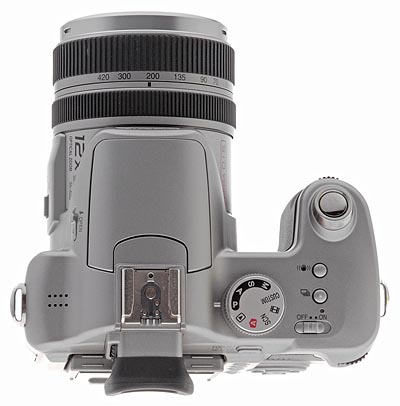
The Panasonic FZ50 's top panel features a Mode dial on the right, along with the Shutter release, Image Stabilizer, and Burst Mode buttons, as well as the sliding Power switch. Also on the top panel is the pop-up flash (released by the sliding latch on its side) and the hot shoe for attaching an external flash unit. On the far left of the top panel is a series of small holes for the microphone.
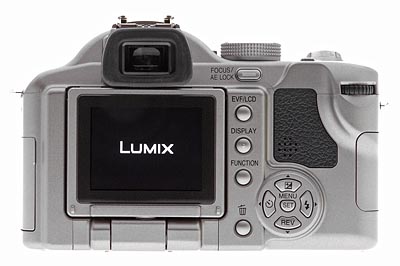
The majority of the exposure controls are located on the camera's rear panel, along with the electronic optical viewfinder (EVF) and swiveling LCD monitor. The LCD monitor lifts out from the rear panel, and can swivel 180 degrees so that you can face it toward the camera and then close it for protection against scratches. You can also angle the monitor up or down, to help frame shots at odd angles. Lining the right side of the panel are the AE/AF Lock, EVF/LCD, Display, Function, and Erase buttons. A secondary control dial (Shutter Command Dial) is at the top of the right side, and a Four-Way Arrow pad is in the lower right. The Panasonic FZ50's arrow pad accesses a variety of camera settings and features four arrows for navigating through camera menus and reviewing images. The Set/Menu button at its center displays menu screens and verifies settings changes. A small speaker rests just above the arrow pad, and a textured thumb grip reinforces the large handgrip on the camera's right side.
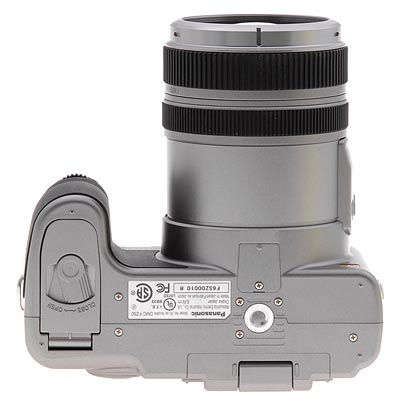
The Panasonic FZ50's bottom panel is flat, with a flip-open door to access the battery compartment, and a threaded metal tripod mount at the center of the lens. The tripod mount is far enough from the battery compartment to allow quick battery changes, and the battery compartment door features a sliding lock to prevent it from accidentally opening.
Panasonic Lumix DMC-FZ50 External Controls
![]()
Aperture Command Dial: At the top of the right hand grip on the front
of the camera, this ridged dial adjusts the aperture setting in Manual and
Aperture Priority modes. In Playback mode, turning the dial to the left enables
the nine, 16, and 25-image index display modes, while turning it to the right
enables playback zoom, up to 8x.

Shutter Button: Located on the right side of the camera's top panel,
the Shutter button sets focus and exposure when halfway pressed, and when
fully depressed, it trips the shutter release. In Self-Timer mode, fully depressing
the Shutter button triggers a two- or 10-second countdown before the shutter
is released.
![]()
Image Stabilization Button: Behind the Shutter button on the top panel,
this button displays the Image Stabilization menu, which lets you shut the
function off entirely, or choose between two operating modes.
![]()
Burst Mode Button: Directly behind the Image Stabilization button,
this button accesses the three Burst modes (High, Low, or Infinity), or returns
to the single-shot mode.

Power Switch: Behind the Burst Mode button, this sliding switch turns
the camera on and off.
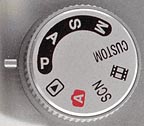
Mode Dial: Sitting just right of the Panasonic FZ30's hot shoe on
the top panel with a notched dial, this control selects the camera's shooting
modes as follows:
 Auto (A): Puts the camera in control of all exposure
decisions, leaving the user in charge of zoom, resolution, and flash.
Auto (A): Puts the camera in control of all exposure
decisions, leaving the user in charge of zoom, resolution, and flash.
 Playback: Lets you review captured images and movie
files.
Playback: Lets you review captured images and movie
files.
 Program AE (P): Places the camera in control of shutter
speed and lens aperture, while you maintain control over everything else
(i.e., white balance, ISO, metering, exposure compensation, flash, etc.).
Program AE (P): Places the camera in control of shutter
speed and lens aperture, while you maintain control over everything else
(i.e., white balance, ISO, metering, exposure compensation, flash, etc.).
 Aperture Priority (A): Allows you to set the lens aperture
from f/2.8 to f/11 (depending on the zoom setting), while the camera controls
the shutter speed. In this mode, you maintain control over all other exposure
variables.
Aperture Priority (A): Allows you to set the lens aperture
from f/2.8 to f/11 (depending on the zoom setting), while the camera controls
the shutter speed. In this mode, you maintain control over all other exposure
variables.
 Shutter Speed Priority (S): Allows you to control the
shutter speed settings from 1/2,000 to eight seconds, while the camera controls
the aperture. All other exposure settings are available.
Shutter Speed Priority (S): Allows you to control the
shutter speed settings from 1/2,000 to eight seconds, while the camera controls
the aperture. All other exposure settings are available.
 Manual (M): Provides complete control over all exposure
settings, including shutter speed and lens aperture. The maximum shutter
time is extended to 60 seconds.
Manual (M): Provides complete control over all exposure
settings, including shutter speed and lens aperture. The maximum shutter
time is extended to 60 seconds.
 Custom: Lets you select your own custom settings to
suit the picture-taking conditions from among the registered patterns you
have saved as custom settings ahead of time.
Custom: Lets you select your own custom settings to
suit the picture-taking conditions from among the registered patterns you
have saved as custom settings ahead of time.
 Movie: Records moving images with sound, at either
30 or 10 frames per second, at 640 x 480 or 320 x 240 pixels. Recording
times are limited by memory card capacity and frame rate.
Movie: Records moving images with sound, at either
30 or 10 frames per second, at 640 x 480 or 320 x 240 pixels. Recording
times are limited by memory card capacity and frame rate.
 SCN: Accesses one of 16 preset scene modes, which include:
Portrait, Soft Skin, Scenery, Sports, Night Portrait, Night Scenery, Panning,
Food, Party, Candle Light, Fireworks, Starry Sky, Baby 1, Baby 2, Snow,
and High Sensitivity.
SCN: Accesses one of 16 preset scene modes, which include:
Portrait, Soft Skin, Scenery, Sports, Night Portrait, Night Scenery, Panning,
Food, Party, Candle Light, Fireworks, Starry Sky, Baby 1, Baby 2, Snow,
and High Sensitivity.
![]()
Flash Release Switch: Located on the left side of the pop-up flash
compartment, this sliding switch releases the pop-up flash from its closed
position.
![]()
Diopter Adjustment Dial: Hidden away on the left side of the electronic
viewfinder eyepiece, this dial corrects the viewfinder optics for eyeglass
wearers.
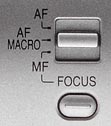
Focus Switch: Tucked on the left side of the lens barrel (when viewing
the camera from the rear), this switch selects between Auto, Macro, and Manual
focus modes.
Focus Button (see image above): Directly below the Focus switch, this button lets you quickly set the autofocus in manual focus mode, so that you can fine tune it with the focus ring.
![]()
Focus/ AE Lock Button: Topping a series of buttons that lines the
right side of the LCD monitor, this button locks the exposure and focus until
the button is pressed again or the Shutter button is pressed. Through the
Record menu, you can set this button to lock focus or exposure only, or both.

EVF/LCD Button: Below the AE Lock button, this button switches the
viewfinder display between the EVF and LCD monitors.

Display Button: Just below the EVF/LCD button, this button controls
the image and information displays in Record and Playback modes. In Record
mode, pressing the button cycles between the display modes, which include
the image with information, image with information and histogram, "Out
of Frame" display, alignment grid, and image with no information.
In Playback mode, pressing the button cycles between the image with information, expanded information and histogram, and no information displays.

Function Button: Next in line below the Display button, this button
displays a quick access menu to commonly-used camera functions, including
AF mode, Metering, White Balance, ISO, Picture Size, and Quality.
![]()
Erase Button: The final button in the series lining the right side
of the LCD monitor, this button pulls up the Erase menu in Playback mode,
allowing you to erase a single image, multiple images, or all images.
![]()
Shutter Command Dial: At the top of the thumb grip on the camera's rear panel, this notched dial adjusts the shutter speed setting in Manual and Shutter Priority exposure modes. In Program AE mode, half-pressing the Shutter button and turning this dial enables Program Shift, which cycles through a range of equivalent exposure settings. In Playback mode, turning this dial left and right scrolls through captured images.
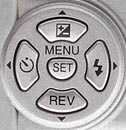
Four-Way Arrow Pad: Located in the lower right portion of the Panasonic
FZ50's rear panel, these four arrow keys are arranged in a circle, with each
arrow facing either up, down, left, or right. The arrow keys navigate through
menu options and adjust camera settings in any settings menu. In most record
modes, the up arrow accesses the Exposure Compensation, Auto Exposure Bracketing,
Flash Exposure Compensation, and White Balance Adjustment tools. The right arrow
cycles through the available flash modes, while the left arrow cycles through
the Self-Timer modes. The down arrow activates a quick review of the most recently
captured image.
In Playback mode, the right and left arrow keys navigate through captured images and movie files. When an image has been digitally enlarged, the four arrow keys pan around within the image.
Menu/Set Button (see image above): This button is in the middle of the Four-Way Arrow pad. It calls up the settings menus on the LCD display in all camera modes and includes a tab for the Recording mode or Display mode options. A further press of the Menu button cancels the menu display. When making camera settings changes, this button also confirms any selections.
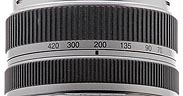
Zoom Ring: The first ridged ring encircling the outer edge of the lens,
this ring controls the optical and digital zoom.
Focus Ring (see above image): Just behind the Zoom ring on the outer edge of the lens, this ridged ring twists left and right so you can manually adjust focus.
 Fujifilm GFX 50S Review
 Fujifilm X-T3 Review
 Olympus E-M5 III Review

Follow Imaging Resource