Back
to Full Canon PowerShot G3 Review
Back
to Full Canon PowerShot G3 ReviewGo to Canon PowerShot G3 Data Sheet
Go to Canon PowerShot G3 Pictures Page
Up to Imaging Resource Cameras Page
Use your browser's "Back" button to return to the previous page, or the links at the top and bottom of this page to navigate to related information. If you have difficulty fitting the text on this page onto your printer output, simply resize your browser window to a narrower width and print again.
Remember us when it's time to buy!
Dave here: Have our reviews been helpful to you? (Is this article you're reading right now useful?) Preparing this level of information on as many products as we do is incredibly hard work, not to mention expensive. Things on the Internet may look like they're free, but they're not. (As a lot of big dot.com companies are finding out these days.) Somewhere, somebody has to pay to produce worthwhile content. YOU can help us though, by remembering us when it comes time to make your purchase. Would you consider coming back to our site and clicking-through to one of our advertisers to make your purchase? Every dollar you spend with one of our advertisers helps us directly (in affiliate fees) or indirectly (the advertiser will keep renewing their ad contract with us). To make it easy for you to support us, here's a URL you can visit, to see all our current advertisers, with links to click on that will register your visit to them as having come from our site. It's up to you where you buy, but Mike, Mike, Kim, Yazmin, Marti and I would be really grateful if you'd help us out by choosing one of our advertisers to purchase from.
Thank you for your support!
Dave Etchells, Founder & Publisher
Visit our "Buy Now" Page:
https://www.imaging-resource.com/buynow.htm
Back
to Full Canon PowerShot G3 Review
Go to Canon PowerShot G3
Data Sheet
Go to Canon PowerShot G3
Pictures Page
Up to Imaging Resource Cameras
Page
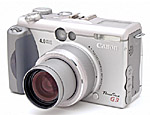
Canon PowerShot G3The third generation of Canon's popular G model retains last year's 4 megapixel CCD, but brings a 4X zoom lens and a host of other improvements. Review First Posted: 9/16/2002 |
 |
|
4 megapixel CCD (3.87 effective) for 2,272 x 1,704 pixel images |
|
|
New 4X optical zoom lens, f/2.0-3.0 | |
|
|
Auto, Scene Program, Program, and Manual exposure modes | |
|
|
Unique tilt/swivel LCD panel | |
|
|
MANY user interface and feature enhancements. |
Manufacturer Overview
Canon U.S.A. has long been a dominant player in the film and digital
camera markets, well-known for their high-quality optics, technical innovations,
and aggressive product development. Over the last few years, they've developed
a powerful lineup of digital cameras, ranging from surprisingly feature-rich
entry-level models, all the way to the extreme high end of professional digital
SLRs. Last year, their PowerShot G2 prosumer model was one of the top two or
three cameras on the entire Imaging Resource site, a fact I attribute to the
superb job Canon did in designing and producing it. - The G2 was one of those
rare cameras that really hit all the right notes with the "enthusiast"
crowd, offering a rich feature set and excellent image quality.
Now, Canon has updated the G2, calling the result the PowerShot G3. To the
surprise of many, they eschewed the five megapixel sensors employed by many
of their competitors in high-end prosumer models, choosing instead to stay with
the proven four megapixel chip first seen in the G2. (I'm told the reason for
this is that Canon was unwilling to accept the image noise tradeoff that the
current crop of 5 megapixel CCDs require.) While the sensor has remained the
same, numerous feature and user interface enhancements (including a new 4x zoom
lens with fast f/2.0 maximum aperture) combine to result in a noticeably different
user experience. Read on below for the full story, but based on my early look
at the new model, I'd say Canon has come up with a very worthy successor to
the wildly popular G2.
High Points
Changes from the Canon PowerShot G2
(And the G1, for historical reference)
As one of the most popular high-end "prosumer" digicams of the past year, many of our readers may already be quite familiar with the Canon PowerShot G2. The G3 is clearly based on the G2's design, with a very similar body design and control layout. There are a number of enhancements (beyond the obvious increase of the zoom range to 4x) that have been added though. I address all of these in the text of the review, but for convenience, have also listed them here, for more convenient, concise reference:
|
|
G3 |
|
|
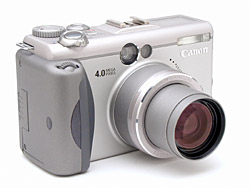
| Body Improvements/Differences | More angular handgrip for better finger-traction, Silver-colored metal body panels. Body is more rectangular, boxy-looking |
|
gray metal cover |
| Startup screen, startup sound | yes/yes (Multiple options via "My Camera" menu) |
|
|
| Maximum Resolution | 3.87 MP (eff) |
|
|
| Resolution Settings |
2272 x 1704, |
1600 x 1200, 1024 x 768 640 x 480 |
1024 x 768 640 x 480 |
| Filtration | RGB |
|
|
| Lens | 4x 35-140mm equiv. F/2.0-3.0 |
3x 32-104mm equiv. F/2.0-2.8 |
3x 32-104mm equiv. F/2.0-2.8 |
| Minimum focusing distance | No spec from Canon yet, but it looks to be about 1.5 inches. | 2.4 inches | 2.4 inches |
| Slow shutter speed range | 15 sec |
|
|
| High shutter speed and aperture combinations | 1/1250 - all apertures
1/2000 - f/4.0 and higher |
1/800 - f/3.5~f/5.0 to f/8 1/1000 - f/8 only |
f/8 only |
| Neutral Density Filter | 3-stop cut (equivalent to ND 0.9), set via record menu. | ---- | --- |
| Flash Operation |
Internal: Total of 9 modes, counting all combinations of on/off/auto and redeye plus slow sync options. Supports EX-mode Speedlites, Ringlight, Macro Twin Flash, and Remote Transmitter |
Internal: 5 modes Supports EX-mode Speedlites and Ringlight, |
Internal: 5 modes Supports EX-mode Speedlites only |
| Signal processing speed | Considerably faster than G2, but don't have a specific spec for this. |
|
|
| Signal processing bit depth | 12 bits/channel, through all image processing operations. | 10 bits/channel | 10 bits/channel |
| Noise reduction | Unknown (Awaiting production model to test) |
|
|
| Battery Life | Excellent: No spec from Canon yet, but my own measurements indicate roughly a 15% improvement in worst-case battery life over the G2. |
1000 images/LCD off 300 minutes/Playback |
800 images/LCD off 160 minutes/Playback |
| Focusing Points | "Infinite"- FlexiZone AF/AE allows positioning of the AF/AE area anywhere within about 60% of the frame area. |
|
|
| Manual Focus | Focusing area magnified on LCD monitor, numerical distance values displayed |
|
|
| Autofocus Bracketing | Focus bracketing option under the FUNC button snaps three shots with minor tweaks in focus setting between them. (First time I've seen this function on a camera.) | --- | --- |
| Metering Modes |
Evaluative, Center-Weighted, Center Spot, Off-Center Spot G3 Incorporates Canon iSAPS scene-analysis technology for more accurate exposures under tricky lighting. |
|
|
| Manual exposure mode improvements | (Same as G2) |
|
|
| Program Shift | (?) (Didn't see this, need to check with Canon to see if it's there or not.) |
|
|
| Intervalometer Option | Shoot 2-100 shots, at intervals of 1 to 60 minutes | --- | --- |
| White Balance Modes | 8, including two separate Custom settings for manual adjustment to standard white card. |
|
|
| Color Effects Mode | Yes (Now expanded to allow application of color effects (including B/W shooting) in any exposures mode. |
|
|
| Movie Mode options and durations | 320 x 240 — 180 sec.
160 x 120 — 180 sec. |
160 x 120 — 120 sec. |
|
| Continuous Shooting Speeds | Continuous High: 2.27 fps
Continuous: 1.46 fps |
Continuous: 1.04 fps |
|
| Startup time, shutter lag, etc. | Much faster (4.2 seconds startup, 0.94 second full AF lag) |
(7.2 seconds startup, 1.3 second full AF lag) |
|
| Interval between frames in Single frame mode | 1.88 (Actual measurement, not Canon specs) |
(Actual measurement, not Canon specs) |
(Actual measurement, not Canon specs) |
| Digital zoom function | True zoom up to 14x combined digital and optical |
|
|
| Histogram display in Playback mode | Yes |
|
|
| Image magnification during playback | Up to 10x, 10 steps |
|
|
| Image erase modes | (Same as G2) |
|
|
| RemoteCapture functions | (Same as G2) |
|
|
| USB Mounter for Mac OS 9.0 ~ 9.1 | Provided. (Also supports PTP mode for Windows XP and Mac OS X conneciton with no driver software needed.) |
|
|
| Direct Print mode | Yes - Also with CP-100, S830D and S530D Bubble Jet printers. |
|
|
| Cropping in Direct Print mode | Yes |
|
|
| Accessory Compatibility |
New bayonet-mount lens adapter, with wider range of wide, tele converters, now covering range of 24.5mm to 245mm equivalents. Support for both Macro Ring Light and Macro Twin Light units, as well as Remote Strobe Transmitter for wireless flash connection. |
Wide, tele converters extend range to ~28 to 150 mm |
|
| Supplied CF Card | 32MB |
|
|
| Control Changes | Top controls mirror EOS layout more closely. Command wheel makes its first appearance in a PowerShot. Mode dial and power switch separated, made easier to operate. Tabbed sub-menus for FUNC button greatly improve efficiency of user interface. | --- | --- |
| Position Sensor | Position sensor automatically tags EXIF header for image rotation on portrait-format shots. | --- | --- |
| Post-Exposure RAW file save | You can choose to save a RAW-mode file on the fly, by hitting the FUNC button during the review period. | --- | --- |