Canon Powershot G6By: Dave EtchellsThe next generation of Canon's popular "G" model updates the line with a larger, 7.1-megapixel CCD and a redesigned camera body. <<Executive Overview :(Previous) | (Next): Viewfinder>> Page 4:DesignReview First Posted: 09/28/2004 |
Design
 With a significantly restyled
body design as compared to the previously-released PowerShot G5, the G6 looks
"squarer", having shaved almost three quarters of an inch off the
width, with only negligible changes to the height and depth. The G6 maintains
a boxy body style with a multitude of external controls, but with a significantly
larger hand-grip that is easier to hold firmly. The body measures 4.1 x 2.9
x 2.9 inches (105 x 73 x 73 millimeters), and is clad mostly in silver plastic
and metal body panels. Weighing in at 16.7 ounces (474 grams) with the battery
pack and CompactFlash card installed, the G6 has a little heft to it. However,
the hand grip is substantial enough to balance out the weight and, with its
increased size and a new rubberized black panel on its inside, provides a secure
hold. The G6 can fit into a very large coat pocket or purse, or it can be carried
with the half-inch neck strap. For extended location shooting, I highly recommend
investing in a small, padded camera case.
With a significantly restyled
body design as compared to the previously-released PowerShot G5, the G6 looks
"squarer", having shaved almost three quarters of an inch off the
width, with only negligible changes to the height and depth. The G6 maintains
a boxy body style with a multitude of external controls, but with a significantly
larger hand-grip that is easier to hold firmly. The body measures 4.1 x 2.9
x 2.9 inches (105 x 73 x 73 millimeters), and is clad mostly in silver plastic
and metal body panels. Weighing in at 16.7 ounces (474 grams) with the battery
pack and CompactFlash card installed, the G6 has a little heft to it. However,
the hand grip is substantial enough to balance out the weight and, with its
increased size and a new rubberized black panel on its inside, provides a secure
hold. The G6 can fit into a very large coat pocket or purse, or it can be carried
with the half-inch neck strap. For extended location shooting, I highly recommend
investing in a small, padded camera case.

The G6's front panel houses the lens, optical viewfinder window, built-in flash, autofocus assist light, microphone, and one of two remote control sensors (on the front of the hand grip). The 4x zoom lens telescopes out about an inch from the camera body when the G6 is powered on, and retracts when the camera is powered off. The lens is protected by a plastic lens cap, tethered to the camera body with an attached cord. The tiny three-hole microphone, which is visible above to the camera lens, records sound to accompany in-camera movies. A thick hand grip on the right side of the camera provides a secure grip and provides good traction on the camera body for your fingers. Also visible on the front panel is a small button below and to the right of the lens. This is a latch for the bayonet-mount for accessory lenses. Pressing this latch lets you twist and remove the cosmetic lens barrel shroud, revealing a set of mounting flanges to which Canon's lens adapter barrel attaches.
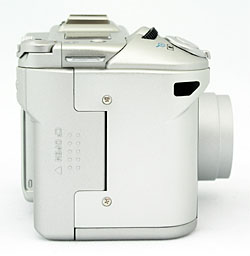
On the right side of the camera is a sliding/hinged door that accesses the CompactFlash slot, accommodating both Type I and II CompactFlash cards. At the top of the right side is an eyelet for attaching one end of the neck strap. A secondary remote control sensor is also on this side of the camera.

The left side of the camera has a speaker for playing back recorded sound, and a set of jacks for the A/V output, USB connection, and DC input for the included AC adapter/battery charger. All the jacks are protected by a hard plastic door that swings open to reveal the connectors. At the top of the left panel is the other neck strap attachment eyelet.

The G6's top panel features a small status display window; an external flash hot shoe; a Power dial with central Off button; a Main dial for controlling various camera settings; a Zoom Lever; a Shutter button; a Backlight button; a Flash button, a Continuous Drive / Self-Timer / Wireless Controller button; and a Metering / Jump button. I always appreciate status display panels like the one on the G6, as they report camera settings and other miscellaneous information without the need for the power-hungry LCD monitor. The Power dial is normally locked to prevent accidental actuation in your camera bag. It's released when you place your finger on it, pressing in the small button at its rear. The Shutter button on the G6 angles toward the front of the camera, to match the angle of your index finger as it wraps over the grip, and a small bump on the front of the Zoom lever makes for quick and easy "tip of the finger" access to the camera's optical and digital zoom functions. The Main dial is handy for quickly changing camera settings such as aperture and shutter speed, and is located just behind the Shutter button on the top of the hand grip.

The majority of the exposure controls are located on the camera's back panel, along with the optical viewfinder and LCD monitor. The G6's eye-level optical viewfinder features a diopter adjustment slider underneath and two LEDs that report camera status on the right. To the right of this is the Mode dial, with shooting and exposure options. The swiveling LCD monitor pops out of the camera back and rotates 270 degrees when fully extended. You can fold it back into its storage compartment with the monitor facing outward or leave it extended and turn the screen to accommodate a variety of shooting angles. Finally, the monitor can be turned around and popped back into the panel face-down, protecting it from accidental scratches and fingerprints. (All in all, a very handy design.) The Four-Way Arrow pad ("omni selector," in Canon parlance) protrudes slightly from the back of the camera, directly below a contoured area that acts as a thumb rest, providing counter support to the large hand grip on the front of the camera. In addition to serving as a navigational tool through settings menus, the Four-Way Arrow pad also controls White Balance and Exposure Compensation settings. On the left side of the viewfinder eyepiece are the MF / Microphone and Macro / Index buttons. An AE Lock / FE Lock button sits on a protruding area directly below the top-mounted Power dial, and a cluster of four buttons - Set / AF Frame Selector; Menu; Display; and Function / Erase, respectively, rounds out the back of the camera below the Four-Way Arrow pad.
The G6's bottom panel is reasonably flat, with a sliding door to the battery compartment and a threaded metal tripod mount. The tripod mount is positioned just slightly off-center (to the right of the lens), most likely to allow clearance for the bottom of the lens mechanism. Because the battery door and tripod mount are so close to one another, it would be difficult to make quick battery changes while working with a tripod. However, if you purchase the optional AC adapter, the side-facing position of the auxiliary power socket should address any power concerns when shooting in the studio.

Accompanying the camera is a small infrared remote control, with a rated working range of up to 16.4 feet (5 meters) from the front sensor, and to about 3.3 feet (1 meter) from the side sensor. By activating the Continuous / Self-Timer / Wireless Controller button in Shooting mode, you can use the Remote to fire the shutter (with a delay of zero, two or ten seconds), adjust the optical zoom, or scroll through the LCD display screens without coming in contact with the camera body. This works well with the rotating LCD monitor, because you can mount the camera on a tripod and compose the shot while standing in front of the camera. The remote also offers several playback functions, which are useful when viewing images on a television screen. The Index display and Replay zoom buttons on the bottom of the remote control enable you to view up to nine thumbnail images at a time, or enlarge one captured image on the LCD monitor. The four arrow buttons on the Remote give you the same capabilities as the Four-Way Arrow pad on the back of the camera, permitting you to scroll through stored images or maneuver within a larger one. Depressing the Remote's Shutter button while in Replay mode lets you play movie files on the camera's monitor or a television. As with the G5 model, I was glad to see the inclusion of this simple gadget as a standard feature on the G6, especially given its video capabilities, which allow the camera to be used as a presentation tool.
Reader Comments! --> Visit our discussion forum for the Canon Powershot G6!

Follow Imaging Resource: