Canon Powershot G6By: Dave EtchellsThe next generation of Canon's popular "G" model updates the line with a larger, 7.1-megapixel CCD and a redesigned camera body. <<Shutter Lag & Cycle Time Tests :(Previous) | (Next): Camera Modes & Menus>> Page 9:Operation & User InterfaceReview First Posted: 09/28/2004 |
Operation and User Interface
Like its predecessors, the G2, G3 and G5 models, the Canon PowerShot G6's combination of control buttons and dials may seem a little complicated at first glance. However, once I became familiar with the features, I actually found the user interface to be very intuitive. I generally prefer to change as many exposure settings as possible through external controls, without resorting to the LCD menu, and the G6 does pretty well in this regard. Better yet, the G6's organization of multiple functions under the FUNC button's menus and the multiple functions of the Main dial make for very fluid camera control. The camera controls are somewhat more spread out than on the earlier models, so you'll probably find yourself using a two-handed grip when shooting - although one hand is sufficient for quick snaps where you don't want to adjust the settings.
I appreciate the small status display panel on top of the camera, which allows you to check current camera settings without having to activate the LCD monitor (a nice battery conservation feature), and found the orange backlight enabled by the Backlight button to be an extra bonus for shooting in dim or dark conditions. I also enjoyed shooting with the rotating LCD screen, which makes composing shots from odd angles a lot easier to manage. The ability to flip the monitor all the way around to face the back panel was great for keeping fingerprints and smudges off of the screen when handling the camera.
Control Enumeration

Shutter Button: Sloping downward to the front on top of the
camera's hand-grip, this button sets focus and exposure when
halfway pressed, and fires the shutter when fully pressed. In
Playback mode, pressing this button will return the camera almost
immediately to readiness to shoot the next image.
Zoom Lever: Surrounding the Shutter button and also sloping slightly, this lever controls the optical and digital zoom in any record mode. In Playback mode, this lever controls the digital enlargement of recorded images, and also serves as a duplicate access to the nine-image thumbnail view.
![]()
Main Dial: Directly behind the Shutter button, on the top of
the handgrip, this dial controls a variety of camera settings. It
adjusts aperture and/or shutter speed depending on the exposure
mode, sets any menu setting in the Function menu, sets White
Balance and Exposure Compensation options, and controls the manual
focus setting. In Playback mode, this dial scrolls back and forth
through captured images.

Power Switch and Button: This lever and button combination
controls both the camera's power and mode. Located at the right
rear corner on top of the camera, the lever portion features a
small button on the front, which allows it to turn when pressed.
Turning the lever to the left activates Record mode and powers on
the camera, while turning it to the right enables Playback mode. In
the center of the lever is the Off button, which powers the camera
off.

Display Backlight Button: Directly to the right of the top-mounted LCD
info display, this button triggers an orange LED backlight that
helps you see the display in dim or dark conditions where it would
otherwise be invisible. On the first press, the panel will light up
for six seconds; if pressed again within that time, the backlight
is disabled.

Flash Button: Positioned in the very left front corner of the
top panel, this button cycles through the three primary flash modes
of off, on (forced or fill-flash) and automatic. (The sub-options
for the flash of red-eye reduction and sync are controlled via the
Record menu.) Although there is no labelling to indicate this, when
reviewing an image after capture in JPEG mode (either courtesy of
the Instant Review function or by holding down the Shutter button),
this button allows you to call up a two-option menu where you can
choose to save a RAW file version of the image just captured
instead of the preset JPEG type.

Drive Mode / Self-Timer / Wireless Remote Button: Directly
behind the Flash button, this button cycles through the camera's
available drive settings. Choices are Single, Continuous, High
Speed Continuous, and Self-Timer / Remote Control modes.
![]()
Metering / Jump Button: Directly behind the Drive Mode /
Self-Timer / Wireless Remote button, this control selects between
Evaluative, Center-Weighted Averaging, or Spot metering modes when
the camera is in Record mode. In Playback mode, it pulls up the
"jump bar." When the jump bar is displayed, the right and left
arrow buttons (or the Main dial) jump ten images forward or ten
images backward, rather than the usual single-image movement.

Lens Ring Release Button: Hidden between the lens and hand-grip
in the lower right of the front panel (as viewed from the rear),
this button releases the lens ring so that it can be removed.
Removing the ring allows you to connect accessory lens adapters to
the G6.

Macro / Index Button: Located to the left of the viewfinder on
the camera's rear panel, this button accesses the Macro function
when the camera is in Record mode. In Playback mode, this button
displays up to nine images at a time, in a thumbnail index format,
on the LCD screen.

MF / Sound Button: Directly below the Macro / Index button,
this button switches the camera between auto and manual focus
control. In Playback mode, this button enables sound recording, for
short sound clips to accompany images.
![]()
Diopter Adjustment Slider : Below the circular viewfinder
eyepiece, this notched slider adjusts the optical viewfinder's
focus to accommodate eyeglass wearers.
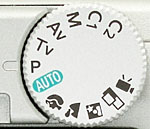
Mode Dial: Moved to the rear panel of the camera next to the
optical viewfinder (unlike the top-mounted position of past
G-series PowerShots), this notched dial controls the camera's
exposure mode. The following options are available:
- Movie: Records short movie clips with sound, with a maximum recording time of three minutes (depending on resolution and the amount of available space on the memory card).
- Stitch-Assist: Captures as many as 26 consecutive images to make up a single panoramic shot. Images are "stitched" together on a computer later, using the software provided by Canon.
- Night Scene: Optimizes the camera for night shots, using a slower shutter speed to allow more ambient light into the image.
- Landscape: This mode is best for wide shots of scenery. Focus is fixed at infinity and the camera uses a smaller lens aperture so more of the scene will be in focus.
- Portrait: Employs a larger aperture setting to decrease the depth of field, leaving the primary subject in sharp focus and the background slightly blurred.
- Auto: Places all exposure variables and choices under automatic control. Only limited controls are available to the user, including file size, compression, flash mode, and zoom.
- Program AE: All exposure options are adjustable by the user, including the ability to indirectly influence the combination of shutter speed and aperture, courtesy of a Program Shift function.
- Tv (Time Value, or Shutter Priority): Allows the user to select the shutter speed setting, while the camera picks the best lens aperture.
- Av (Aperture Value, or Aperture Priority): The opposite of Shutter Priority mode, the user selects the lens aperture, while the camera chooses the shutter speed.
- Manual: All exposure variables are available to the user, including both shutter speed and aperture.
- C1 and C2: These are Custom modes, with multiple exposure settings designated by the user and remembered by the camera. Once set, you can recall the complete camera setup with a twist of the Mode dial. (Very handy when switching back and forth between very different shooting situations. (For instance, outdoors and indoors at a party or reception.)
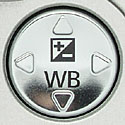
Four-Way Arrow Pad (Omni Selector): Located just to the right
of the LCD display on the camera's back panel, this four-way rocker
button features an arrow in each direction. In any settings menu,
these arrows navigate through menu options. In most Record modes,
the up arrow activates the Exposure Compensation menu, at the
bottom of the LCD display. Pressing the down arrow enables the
White Balance menu. In Playback mode, the right and left arrow keys
scroll through captured images.

Menu Button: Directly below the Four-Way Arrow pad, this button
displays the settings menu in any camera mode. It also dismisses
the menu display.

Set Button: To the left of the Menu button, this button
confirms menu selections. In still-picture Record mode, this button
lets you change the AF area. After pressing the button, the AF
indicator frame turns green, and can be moved throughout the frame
with the arrow keys. Additionally, this button accesses secondary
settings in the Resolution, Effects, and Bracketing menus.

Function / Erase Button: Below the Menu button, this button displays a separate
set of menus on the LCD monitor. Icons for each submenu line the left side of
the display, and item choices appear along the bottom of the LCD display. The
following menu options are available:
 ISO: Sets the camera's sensitivity
to Auto, 50, 100, 200, or 400 ISO equivalents.
ISO: Sets the camera's sensitivity
to Auto, 50, 100, 200, or 400 ISO equivalents.- Effect: Cancels special effects, or enables Vivid Color, Neutral Color, Low Sharpening, Sepia, Black-and-White, or Custom Effect modes. Pressing the Set button with the Custom setting selected lets you adjust Contrast, Saturation, and Sharpness.
- Bracketing: Enables Auto Exposure Bracketing or Auto Focus Bracketing. Pressing the Set button here lets you select the exposure or focus variation for the selected series.
- Flash +/-: Adjusts the overall power of the built-in flash.
- Quality: Sets the JPEG compression level to Superfine, Fine, and Normal.
- Resolution: Sets image resolution to L (3,072 x 2,304 pixels), M1 (2,592 x 1,944 pixels), M2 (2,048 x 1,536 pixels), M3 (1,600 x 1,200 pixels), S (640 x 480 pixels), or RAW.
In Playback mode (and Quick Review mode), this button calls up the single-item erase menu.

Display Button: Directly to the left of the Function button,
this button controls the image and information displays on the LCD
monitor. In Record mode, this button turns on the image display
with the first press, activates the information display with the
second press, and cancels both with the third press. In Playback
mode, the button cycles through the captured image information
displays, including a detailed information display with a
histogram.

AE / FE Lock (*): Located by itself on a protrusion underneath
the Power switch on the camera's rear panel, this button locks the
normal exposure, or the flash exposure (if the flash is enabled) in
any Record mode. It also allows you to access the camera's Program
Shift function in Program mode, metering the scene and then
allowing you to select from a range of shutter speed / aperture
combinations.

Follow Imaging Resource: