Sony DSC-H9 Operation
Operating the Sony DSC-H9 in any of its automatic modes is pretty simple. Working in Aperture, Shutter, or Manual modes requires you to acquaint yourself with the Wheel dial/Set button arrangement.
The Mode dial on top of the camera controls the main Record modes, and a button visible from both the rear and top panel accesses Playback mode. In all image capture modes, the DSC-H9 provides an onscreen LCD menu (activated by the Menu button), with a variety of options for adjusting image quality or capture options.
The four arrows of the arrow pad are used to scroll through menu options, while the button in the center of the pad functions as the OK button to confirm selections. When in Record mode, the arrows adjust Display, Flash, Self-timer, and Macro modes. In Aperture, Shutter, or Manual modes, turning the Wheel dial surrounding the Control dial allows you to select among ISO, shutter, aperture, and EV adjustments, and pressing the center Set button activates the selection so you can adjust it with the dial. When in Manual mode, information on the LCD to the right of these values tells you by how many EV units it thinks your exposure is off, up to plus or minus 2EV.
The Zoom control in the top right corner of the back panel adjusts both optical and digital zoom (when the latter is activated through the Setup menu). The extremely large LCD left little space for extra buttons for oft-changed functions, like ISO and EV, which is a shame. While Sony's menus used to be pretty straightforward, I've found the structure of their recent cameras to be unnecessarily complex. The Home button's value is lost on me. I would prefer all the menus to live under the main Menu button.
Record Mode Display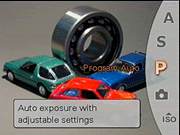 In record mode, the LCD monitor displays the subject with a fair amount of information, indicating approximate battery life remaining (graphically), flash mode, focus mode (macro or normal), autofocus mode setting, any currently-selected exposure compensation setting, ISO setting, the current size/quality setting, folder name, and number of images that can be stored on the remaining Memory Stick space at the current size/quality. It also warns when Super SteadyShot is off. Half-pressing the Shutter button causes the camera to display the shutter speed and aperture setting it has chosen for the current lighting conditions. Pressing the Display button once brightens the display, a second press adds a small live histogram display, pressing it again removes most of the information overlay, and pressing it a third time restores the default display. Pressing the Finder/LCD button right of the EVF switches between the LCD and EVF. A graphical representation of the Mode dial is overlaid briefly when the mode is changed, making it easier to change modes without looking at the dial.
Playback Mode Display In Playback mode, the default image display shows the most recently captured image, with a modest information overlay. Pressing the display button once brightens the display, a second press adds the exposure information and a small histogram to the overlay, pressing it again removes the information overlay entirely, and pressing it a third time returns to the default view. Pressing the wide-angle side of the zoom lever takes you to a display showing images on the Memory Stick in groups of six small thumbnails. You can navigate a yellow outline cursor over these thumbnails by using the four arrow keys. Pressing the telephoto side of the zoom lever will bring the currently-selected image up full-screen. Pressing the telephoto side of the zoom lever when viewing an image full-size on the LCD screen will zoom in on the image in variable-sized increments up to a maximum magnification of 5x.
Sony DSC-H9 Modes and Menus
As mentioned above, the Mode dial on top of the camera controls the main Record modes. Record modes available are:
![]() Automatic Mode: Indicated on the Mode dial with a green camera icon, this mode puts the camera in control over the exposure and everything except Macro, Image Size and Quality, Zoom, Flash, and the Self-Timer.
Automatic Mode: Indicated on the Mode dial with a green camera icon, this mode puts the camera in control over the exposure and everything except Macro, Image Size and Quality, Zoom, Flash, and the Self-Timer.
![]() Program Mode: This mode is marked on the Mode dial with a "P." In this mode, the camera selects shutter speed and aperture, while you control all other exposure variables.
Program Mode: This mode is marked on the Mode dial with a "P." In this mode, the camera selects shutter speed and aperture, while you control all other exposure variables.
![]() Shutter Priority Mode: Marked with an "S," this mode allows the user to control the shutter speed, from 30 seconds to 1/2,000 second.
Shutter Priority Mode: Marked with an "S," this mode allows the user to control the shutter speed, from 30 seconds to 1/2,000 second.
![]() Aperture Priority Mode: Marked with an "A," this mode gives user control of aperture, which varies based on zoom setting.
Aperture Priority Mode: Marked with an "A," this mode gives user control of aperture, which varies based on zoom setting.
![]() Manual Mode: This mode provides total control over the exposure, as you're able to select both aperture and shutter speed independently of each other.
Manual Mode: This mode provides total control over the exposure, as you're able to select both aperture and shutter speed independently of each other.
![]() Movie Mode: A filmstrip icon marks this mode on the Mode dial. In Movie mode, you can record moving images and monaural sound. Movies are recorded in MPEG1 format, up to a maximum clip size of 2GB. Resolution and quality choices are 640 x 480 or 320 x 240 pixels, with Fine (30 frames per second) and Standard (16.6 frames per second) options in 640 x 480 mode. (320 x 230 pixel "Presentation" movies are captured at 8.3 frames per second.) Recording in 640 x 480 Fine mode is only available with a Memory Stick Pro Duo card. Optical zoom is supported while recording movies.
Movie Mode: A filmstrip icon marks this mode on the Mode dial. In Movie mode, you can record moving images and monaural sound. Movies are recorded in MPEG1 format, up to a maximum clip size of 2GB. Resolution and quality choices are 640 x 480 or 320 x 240 pixels, with Fine (30 frames per second) and Standard (16.6 frames per second) options in 640 x 480 mode. (320 x 230 pixel "Presentation" movies are captured at 8.3 frames per second.) Recording in 640 x 480 Fine mode is only available with a Memory Stick Pro Duo card. Optical zoom is supported while recording movies.
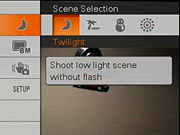
![]() Scene Mode: Indicated on the Mode dial by "SCN" this mode puts the camera in Scene mode, which offers additional selections to the dedicated scene modes listed below, via the menu system. Selections available are Twilight, Beach, Snow and Fireworks.
Scene Mode: Indicated on the Mode dial by "SCN" this mode puts the camera in Scene mode, which offers additional selections to the dedicated scene modes listed below, via the menu system. Selections available are Twilight, Beach, Snow and Fireworks.
![]() Landscape: This scene mode is designed for taking landscapes shots, where the subject is distant. Focus is set at infinity and a smaller lens aperture is used to capture sharp details both near and far away.
Landscape: This scene mode is designed for taking landscapes shots, where the subject is distant. Focus is set at infinity and a smaller lens aperture is used to capture sharp details both near and far away.
![]() Twilight Portrait: This scene mode is designed for taking shots of people at night. Flash is used, but shutter speed is reduced to let ambient lighting brighten the background as well. Use of a tripod is highly recommended to prevent blurring from camera movement.
Twilight Portrait: This scene mode is designed for taking shots of people at night. Flash is used, but shutter speed is reduced to let ambient lighting brighten the background as well. Use of a tripod is highly recommended to prevent blurring from camera movement.
![]() Advanced Sports: This scene mode is designed for taking action shots. The camera attempts to track moving subjects with predictive autofocus while the shutter release is half-pressed.
Advanced Sports: This scene mode is designed for taking action shots. The camera attempts to track moving subjects with predictive autofocus while the shutter release is half-pressed.
![]() Portrait: Designed for taking portrait shots, Portrait mode biases exposure toward wider apertures for sharp subjects isolated against a blurred background.
Portrait: Designed for taking portrait shots, Portrait mode biases exposure toward wider apertures for sharp subjects isolated against a blurred background.
![]() High ISO: This scene mode increases ISO sensitivity so that shots in poor light can be taken without a flash.
High ISO: This scene mode increases ISO sensitivity so that shots in poor light can be taken without a flash.
Record Menu: In Record mode, accessed by pressing the Playback button or changing the mode dial selection, pressing the Menu button allows you to access different controls of the camera.
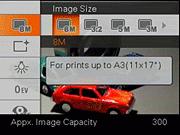 Image Size: Selects the still image resolution. Choices are:
- 8 Megapixels (3,264 x 2,448 pixels)
- 3:2 Aspect Ratio (3,264 x 2,176 pixels)
- 5 Megapixels (2,592 x 1,944 pixels)
- 3 Megapixels (2,048 x 1,536 pixels)
- VGA (640 x 480 pixels)
- 16:9 (1,920 x 1,080 pixels)
- Color Mode: Adjusts the saturation and brightness of color, with a couple of special effects options. Choices include Normal (default), Vivid, Natural, Sepia, and Black & White.
- White Balance: Adjusts the overall color balance of the image to suit the light source, including custom (One Push Set), which lets you take a reading from whatever the camera is viewing when selected and saves it as the setting for "One-Push." (Aim it at a white or neutral gray object to set the white balance for your current light source.) Options are: Auto, Daylight, Cloudy, Fluorescent 1, Fluorescent 2, Fluorescent 3, Incandescent, Flash, One Push (Custom) and One Push Set.
- Flash Level: Sets flash power level. Flash intensity can be adjusted up to +/- 2 EV in 1/3 EV steps for a total of 13 levels.
- Red Eye Reduction: Controls red-eye reduction flash mode. Options are Auto, On and Off. Auto mode uses Face Detection technology, when enabled.
- Contrast: Alters the level of contrast in images with plus, normal, and minus settings. A fourth option called Dynamic Range Optimizer (DRO ) brightens the shadow areas of images while still preserving highlight detail.
- Sharpness: Controls the overall image sharpness or softness with plus, normal, and minus settings.
- Steady Shot: Selects between Shooting and Continuous Steady Shot modes, or turns if off. Shooting mode activates Steady Shot image stabilization only when shutter is half-pressed. Continuous mode leaves the Steady Shot active at all times, which results in increased battery consumption, but may make it easier to see what's going on in the viewfinder at long telephoto settings.
- Setup: Accesses the Shooting Settings menu.
Scene Menu: Five Scene modes are accessed by turning the Mode dial to High ISO, Portrait, Advanced Sports Shooting, Twilight Portrait, and Landscape. Four other Scene modes are available when you set the Mode dial to SCN. The menu looks like this (see above for descriptions):
 Scene Selection: Twilight, Beach, Snow and Fireworks.
- Image Size: 8M, 3:2, 5M, 3M, VGA and 16:9.
- Steady Shot: Shooting, Continuous, Off.
- Setup: Accesses the Shooting Settings menu.
Movie Menu: A filmstrip icon marks this mode on the Mode dial. In Movie mode, you can record moving images with sound. The menu looks like this:
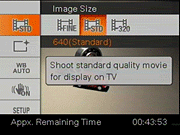 Image Size: Options are Fine (640): 640 x 480 pixels at 30 fps, Standard (640): 640 x 480 pixels at 16.6 fps and 320: 320 x 240 pixels at 8.3 fps.
- Color Mode: Options are Normal, Sepia and Black & White
- White Balance: Options are Automatic, Daylight, Cloudy, Fluorescent Light 1, Fluorescent Light 2, Fluorescent Light 3, Incandescent, One Push, One Push Set.
- Steady Shot: Options are Continuous and Off.
- Setup: Accesses the Shooting Settings menu.
Review Menu: A filmstrip icon marks this mode on the Mode dial. In Movie mode, you can record moving images with sound. The menu looks like this:
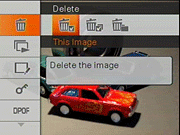 Delete: Options are delete the current image, multiple selected images, or all images contained in the currently selected folder.
- Slide Show: Takes you to the Slide Show menu to play back a series of images with effects and music. See description below in Home menu for more details.
- Retouch: Retouch options are available to add special effects to captured images. Options are available to blur the periphery around a point, surround a chosen point in monochrome, apply a fish-eye lens effect around a chosen point, add a starburst effect to bright points in an image, trim (crop) an image, or remove red-eye. Modified images are saved as a new file, with the original image file intact.
- Protect: Write-protects (or removes protection) from the current image or multiple images, preventing them from being deleted or manipulated in any way except with card formatting.
- DPOF: Marks the current image for printing on a DPOF-compatible printer. Also removes the print mark.
- Print: Takes you to the Print menu (see description in Home menu below).
- Rotate: Rotates images 90 degrees at a time, in either direction.
- Select Folder: Selects the folder on the memory stick to review images from.
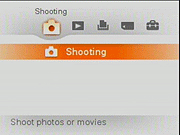 Home Menu: This "über-menu" is displayed whenever the Home button is pressed, and is supposed to give easy access to most camera settings at any time, in any mode. We thought it had too many levels and redundant settings, and thus overly complex.
- Shooting: Selecting Shooting switches back to record mode and displays the record menu for the current shooting mode.
- View Images: Puts the camera into playback mode. Options are:
- Single Image: View a single image.
- Index Display: View an index of thumbnails images.
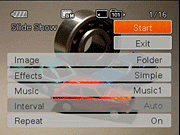 Slide Show: Slide Show has its own menu (shown to the right), allowing the user to generate fairly sophisticated slideshows of captured images, either from all images stored, or a from a specific folder. Options include fade effects, background music and interval. The slideshow can be set to repeat indefinitely as well.
- Printing, Other
 Print: Select single or multiple images for direct printing to a connected PictBridge compatible printer. Options are available for selecting Quantity, Layout, (including border and borderless settings), Size, and Date/Time imprint.
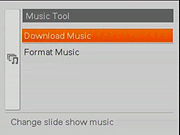 Music Tool: This menu provides a way to change the music files installed from the factory to your favorite music clips, for use a background music for slide shows. Options are:
- Download Music: Transfers MP3 or ripped CD music files via USB from your computer, using the included Music Transfer software utility. You can also restore factory music files.
- Format Music: Prepares the segment of built-in memory used to store music to accept new files.
- Manage Memory
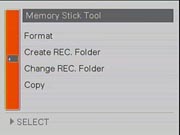 Memory Tool (Memory Stick or Internal)
- Format: Formats the Memory Stick, erasing all files (even protected ones).
- Create REC. Folder: Creates a new folder for recording images.
- Change REC Folder: Changes the folder that images are recorded to.
- Copy: Copies images from the internal memory to a Memory Stick.
- Settings
- Main Settings
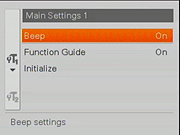 Main Settings 1
- Beep: Controls the camera's beep sounds, turning them on or off. A Shutter option enables only the shutter noise.
- Function Guide: Turns the Function Guide (context sensitive text descriptions of selected menu options) feature on or off.
- Initialize: Resets the camera to its default settings. Any images stored in internal memory will be retained.
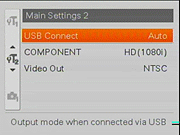 Main Settings 2
- USB Connect: Sets the USB connection type to PictBridge, Mass Storage, or Auto.
- COMPONENT: Sets video output to High Definition (1080i), or Standard Definition. Note: an optional component video cable is required to view in HD.
- Video Out: Sets the timing of the video output signal to either NTSC or PAL.
- Shooting Settings
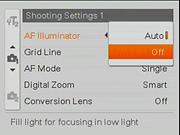 Shooting Settings 1:
- AF Illuminator: Sets the AF Assist light Auto or Off. If set to Auto, the light automatically illuminates in dark shooting conditions to help the camera focus.
- Grid Line: Sets the grid LCD overlay feature to On or Off. The grid is a useful aid in composition.
- AF Mode: Sets the focus mode to Single or Monitor. Monitor continuously adjusts the focus until you half-press the shutter button.
- Digital Zoom: Switches between the Smart Zoom and Precision Zoom, or turns digital enlargement off. Smart Zoom restricts the digital zoom range to that which can be achieved without interpolating the image data (cropping only). No Smart Zoom is available at the full 8M or 3:2 image size settings, progressively more is available as you reduce the image size. Precision Zoom interpolates the image as needed to fill the currently selected pixel dimensions with the subject. Digital zoom is not supported in Advanced Sports or Movie mode, or when Face Detection is enabled.
- Conversion Lens: Must be set according to the accessory lens that is attached to the camera, to permit the camera to focus properly with the conversion lenses in place. Also limits zoom to prevent vignetting. Choices are Tele, Wide, or Off.
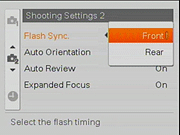 Shooting Settings 2:
- Flash Sync: Sets the flash sync to the front or rear curtain. Front curtain sync fires the flash at the beginning of the exposure, while rear curtain sync fires at the end.
- Auto Orientation: Records the image orientation as it is taken (Portrait or Landscape). The camera or compatible display software will then automatically display images in the correct orientation. Options are On and Off.
- Auto Review: Immediately plays captured image onscreen for approximately two seconds. Options are On and Off.
- Expanded Focus. Zooms the view on the LCD screen by 2x when focusing in Manual Focus mode. Options are On and Off.
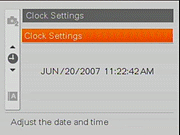 Clock Settings: Sets the camera's internal clock and calendar, as well as the date format.
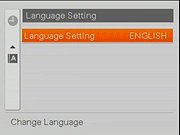 Language Settings: Selects the language for the LCD menu display. Options are: English, French, Spanish, Italian, Chinese and Simplified Chinese.
- Main Settings
 Fujifilm GFX 50S Review
 Fujifilm X-T3 Review
 Olympus E-M5 III Review

Follow Imaging Resource