Konica Minolta DiMAGE A200Konica Minolta trims a little and adds a little relative to their top-end A2 model, delivering a strong contender in the 8-megapixel derby.<<Shutter Lag & Cycle Time Tests :(Previous) | (Next): Camera Modes & Menus>> Page 9:Operation & User InterfaceReview First Posted: 12/22/2004 |
Operation & User Interface
The Konica Minolta DiMAGE A200's user interface is less daunting than that of the A2, though the camera still offers quite a bit of external control. You can control a lot of the essential camera functions without having to resort to the on-screen LCD menu system, although a few are now accessed via the new Function menu (displayed by pressing the Function button). In addition to the Mode switch and Exposure Mode dial, a control dial on top of the camera adjusts settings with just a quick turn. Though you'll likely be able to snap a quick picture or two with the camera right out of the box, plan on spending more time with the manual to get familiar with the settings menus and dual control button functions on this function-rich camera.
Control Enumeration

Shutter Button: Located on the top right-hand side of the camera, this button
sets exposure and focus (in autofocus mode) when half-pressed, and trips the
shutter when fully pressed.
Control Dial: This ridged wheel sits just behind the Shutter button, conveniently
under your index finger. In Aperture Priority and Shutter Priority exposure
modes, this dial controls either the aperture or shutter speed settings. In
Manual mode, the dial controls shutter speed. In any of the Function menu items,
turning this dial sorts through the available options; it also selects the AF
mode in conjunction with the center button on the Four-way controller.
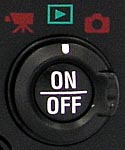
Mode Dial: Directly behind the Control dial on the top panel, this
dial sets the camera's main operating mode to Record, Playback, or Movie.
Power Button: Located in the center of the Mode dial,
this button turns the camera on and off.
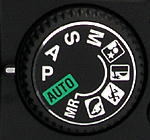
Exposure Mode Dial: Next to the pop-up flash on the camera's top panel,
this dial selects the camera's exposure mode. Options are Manual, Shutter Priority,
Aperture Priority, Program AE, Auto, Memory Recall, Portrait, Sports, Sunset,
and Night Portrait modes.
![]()
Drive Mode Button: Almost hidden between the Exposure Mode and
Mode dials, this small black button accesses the camera's drive mode menu. (The
arrow keys then select the mode setting and any mode options.) Drive modes include
Single, Self-Timer (two or 10 seconds), Remote-Control, Bracketing, and Continuous
Advance.
![]()
Information Button: Angled down from the top panel, closest to the EVF,
this button controls the amount of information displayed on the EVF and LCD
screens while in Record and Playback modes. Holding down
the Shift button while pressing this button accesses the grid and scale LCD
display modes, which help with subject alignment.
![]()
AE Lock Button: To the right of the Information button, this button locks
exposure, and an LCD menu option configures the button
to match your shooting style. The button can be programmed to either toggle
the lock on or off, or only hold the settings while depressed.
![]()
Magnify Rocker Button: Below the Information and AE Lock buttons, this two-way
rocker button controls the digital zoom (either 2x fixed, or 1.1 - 4x interpolated,
depending on the setting in the Record menu). In Playback mode, pressing the
"-" side of the button pulls up an index display of the images on
the memory card, while the "+" side of the button controls playback
enlargement (1.1 to 10x, in fairly small increments).

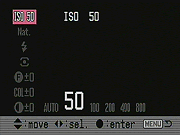 Function Button: Directly beneath the Magnify rocker button, this displays
the following Function menu items:
Function Button: Directly beneath the Magnify rocker button, this displays
the following Function menu items:
- ISO: Set the camera's light sensitivity, in ISO units. Options are Auto, 50, 100, 200, 400, 800.
- Color Mode: Sets the camera's color mode to Vivid, Natural, Portrait, Embedded Adobe RGB, or Black and White.
- Flash Mode: Selects the flash operating mode. Options are Fill-Flash, Fill-Flash with Red-Eye Reduction, Slow-Sync with Red-Eye Reduction, and Rear Sync.
- Metering Mode: Choices are 256-Segment Multi-Segment (default), Center Weighted, and Spot.
- Filter: Adjusts the overall color of a scene, in 11 arbitrary steps from -5 to +5. In all color modes except Black and White, the Filter setting adjusts from a cool to a warm tone. When used with the Black and White color mode, the Filter setting cycles through a range of colors for tinted monochromatic images.
- Color Saturation: Controls the level of color saturation, from -5 to +5 in arbitrary units.
- Contrast Compensation: Like the saturation adjustment, this setting adjusts the overall contrast from -5 to +5 in arbitrary units.
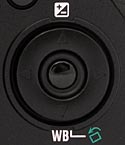
Four-way Controller and OK Button: To the right of the LCD monitor on the
rear panel, this rocker control steps through selections within the LCD menu
system and interacts with various status messages or requests for confirmation
that appear on the LCD screen. You navigate the menus by pressing one of the
four arrows around the control's periphery, and confirm selections by pressing
the OK button in the center of the control. In Record mode, pressing and holding
the center of the control switches the camera between Wide and Spot autofocus
modes. Once in Spot AF, rocking the control moves the Spot crosshair around
the frame, implementing Konica Minolta's Flex Focus Point mode. The up arrow
accesses the Exposure Compensation and Flash Exposure Compensation settings,
which can be adjusted with the left and right arrows. The down arrow enables
the White Balance menu.
In Playback mode, the right and left arrows scroll through captured images on the memory card, while the up arrow activates a histogram display. The down arrow rotates images in the display.
![]()
QV / Delete Button: Below the Four-way Controller, the QuickView button
lets you quickly switch from Record to a Quick View mode to view just-captured
images. When viewing an image, pressing this button prompts the camera to ask
if you want to delete it.

Menu Button: To the right of the QV / Delete Button, this button calls up
the menu system. Pressing it a second time dismisses it. In Playback, Record,
and Movie modes, pressing this button takes you to the first menu screen for
that mode. However, pressing the Shift and Menu buttons together in any mode
takes you straight to the Setup menu.
![]()
Display Button: Just above the top right corner of the LCD monitor, this
button switches the viewfinder display between the EVF and LCD monitor.

Anti-Shake Button: Above the top left corner of the LCD monitor,
this button toggles the camera's Anti-Shake System on and off.
![]()
Diopter Control Dial: Practically hidden on the left side of the optical
viewfinder, this tiny dial adjusts the viewfinder display to accommodate eyeglass
wearers. It varies the eyepiece diopter setting over a broader-than-average
range.

Focus Button: On the left side of the camera body, this button controls
the focus mode, selecting either Single AF, Continuous AF, or Manual modes.

Shift Button: Directly beneath the
Focus button, this button alters the function of other controls when pressed
in conjunction with a control. In Manual exposure mode, pressing this
button while turning the Control dial lets you adjust the aperture setting.
Pressing this button and the Information button together cycles through the
grid and scale LCD display modes. A combination of the Shift and Menu buttons
takes you straight to the Setup menu, instead of the Record or Playback menu
screens.

Macro Focus Switch: Located on the left side of the lens barrel, this control
engages the macro focusing option. Macro focus may be enabled at either the
wide-angle (28mm equiv.) or at a short range of telephoto focal length settings
of the zoom lens (~175 - 200mm equiv.).
![]()
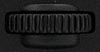
Manual Focus Ring: Surrounding the base of the lens barrel, this ribbed
ring controls focus when the camera is in Manual focus mode. This is a "fly
by wire" control, in that it isn't directly (mechanically) connected to
the optics, but rather commands an internal motor to move the lens elements.
In "Direct Manual Focus" mode, the camera initially focuses automatically,
then turns control over to the Focus Ring so you can fine-tune the focus manually.
Zoom Control Ring: A rubberized ring around the middle of the lens barrel,
this controls the optical zoom, moving the lens from wide angle to telephoto
positions. Unlike the zoom controls on most digicams I've tested, this collar
on the DiMAGE A200 is directly connected to the lens elements, providing very
fast, precise, sure-footed all-mechanical control.
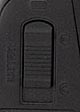
Battery Compartment Latch: Located in the center of the battery compartment
door on the bottom of the camera, this latch unlocks and opens the battery compartment
cover.

Follow Imaging Resource: