Go to MX-1200 Data Sheet
Go to MX-1200 Pictures Page
Up to Imaging Resource Cameras Page
Use your browser's "Back" button to return to the previous page, or the links at the top and bottom of this page to navigate to related information. If you have difficulty fitting the text on this page onto your printer output, simply resize your browser window to a narrower width and print again.
![]() Back to Full MX-1200 Review
Back to Full MX-1200 Review![]()
Go to MX-1200 Data Sheet![]()
Go to MX-1200 Pictures Page![]()
Up to Imaging Resource Cameras Page![]()
![]()
 |
 Fuji MX-1200 digital camera (Review first posted 2 November, 1999) |
![]()
 |
|
1,280 x 960 pixel resolution |
|
|
2x digital zoom | |
|
|
Optical & LCD viewfinder | |
|
|
64-segment metering | |
|
|
+/- EV exposure control | |
|
|
Surprising picture quality! |
![]()
Executive Overview
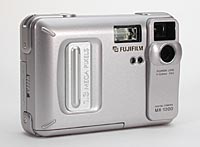
The 1.3 megapixel MX-1200 offers compact, portable design with the ease of a traditional point and shoot camera. Its small, rectangular shape fits easily into pockets and purses and is lightweight too. Finger grips on the front and back of the camera help keep the camera in your hand and feel comfortable. All of the buttons and major controls live on the back panel, except for the Macro control, which is on the side of the camera. The shutter button, digital and AC jacks, SmartMedia slot, battery compartment and tripod mount are all located in their usual places. However, the tripod mount is shifted slightly off center due to the large battery compartment. A static, clear plastic cover protects the lens, eliminating the lens cap and any mechanical lens cover. (We'd still prefer a separate lens cover, as the fixed plastic cover will itself be subject to scratching.)
![]()
Both optical and LCD screen viewfinders assist you in composing subjects. The optical viewfinder features a center autofocus target dot as well as a side LED that lights green, orange or red, depending on the camera's status. The 1.6 inch LCD monitor can be turned off to conserve battery power by hitting the Display button directly adjacent to it. The LCD also displays information about the camera settings, also turned off via the Display button.
![]()
A Fujinon fixed focus lens is built into the camera with a focal length of 5.8mm, equivalent to a 38mm lens on a 35mm camera. Aperture settings are f4.5 and f11, controlled solely by the camera. Macro gets you as close as approximately 3.9 inches and wide angle focuses from about 17.8 inches to infinity. A Digital Telephoto magnifies the image by 2x, but at the expense of resolution and image quality.
![]()
Exposure control is good overall, if fairly basic. Automatic mode controls everything except flash modes, while Manual mode allows you to alter the flash mode, white balance and exposure compensation (EV) settings. A Self-Timer option counts down from 10 seconds once the shutter button is fully pressed. Both the Macro and Digital Telephoto functions are manually controlled in either mode. The flash offers five settings: Auto, Red-Eye Reduction, Forced, Suppressed and Slow Synchro. In turn, white balance offers seven settings to choose from: Automatic adjustment, sunny, cloudy, daylight fluorescent, warm white fluorescent, cool white fluorescent and incandescent. Manual exposure compensation is controlled with nine settings in 0.3 increments from –0.9 to +1.5.
![]()
The MX-1200 utilizes four AA batteries (either alkaline, NiCd or NiMH). As always, we heartily suggest using rechargeables and keeping a spare set of charged batteries around, because battery life is over before you know it.
![]()
Like many digicams on the market, the MX-1200 stores images on SmartMedia cards. A 2MB card comes standard with the camera but is upgradeable, of course. The MX-1200 lacks the video-out capability of other Fuji cameras we've tested, but images can just as easily be viewed on the computer.RS-232C serial cables for both Macs and PCs come with the camera, as does a software CD containing Picture Shuttle, EZtouch, a DS-Serial TWAIN Driver and Adobe PhotoDeluxe. Unfortunately, PhotoDeluxe is only compatible with Windows and not Macintosh. Therefore, Mac users must either purchase the correct version or be content with the offerings of EZtouch.
![]()
The MX-1200 is perfect for consumers wanting relatively hassle-free digital photography in the megapixel-plus range, at a modest price. The Automatic mode lets the camera do all the work while you play, but if you want to make a few decisions or try for some special effects, the Manual mode provides a little control.
![]()
Design
The MX-1200's compact, rectangular design makes it an extremely portable digital camera perfect for active vacations and quick trips to the park. Weighing in at 10.6 ounces including batteries and SmartMedia (300 grams), the MX-1200 measures about 4.3 x 3.0 x 1.3 inches (110 x 77 x 33 mm) without any accessories or attachments. The sturdy case has a silver sheen with a well placed grip on the front an array of bumps to act as a thumb grip on the back. A nylon wrist strap attaches to the top right-hand corner of the camera for easier transportation.
![]()
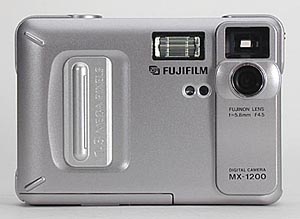
From the front, the camera reveals (clockwise from center top) the onboard flash, viewfinder window, lens, flash sensor, and self-timer alert LED.
![]()
![]()
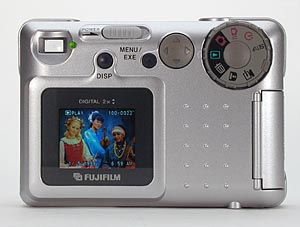
The bulk of the controls are on the back of the camera, including a sideways mode dial and a small rocker toggle button. The only exceptions are the shutter button, which remains on top, and the Macro switch, located on the side of the camera. The absence of a Cancel/Back button makes it a little more time consuming to back out of menu selections and exit menus, but we found we could live without it. The digital and AC jacks (no video output) and the SmartMedia slot are on opposite sides of the camera. Batteries load into a compartment on the bottom of the camera, next to the plastic tripod mount which rests just a little off center.
![]()
![]()
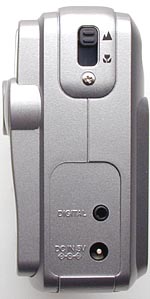
The left-hand side of the camera (viewed from the rear) holds the normal/macro switch and connector jacks for the RS-232 serial connection to a computer, and for external power (5 volts).
![]()
![]()
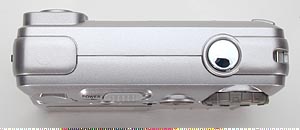
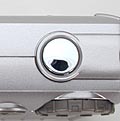
The top of the camera is almost devoid of controls, the sole exception being the shutter button.
![]()
![]()
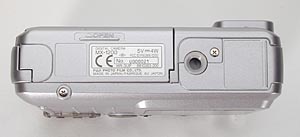
The bottom of the camera contains the tripod socket (structural plastic) and the hatch covering the battery compartment.
![]()
![]()
The notion of a lens cap or retractable cover has been completely done away with on this model. The lens simply has a tough plastic outer cover that doesn't move. On the one hand, this is great because you don't have to worry about keeping up with the lens cap. On the other hand, there's always the possibility that it could itself get dirty, scratched or smudged. If you're pretty careful with your camera, as most people are, there's probably not much to worry about, although we still prefer to see some sort of removable lens protection on cameras.
![]()
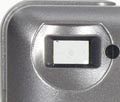
One thing missing on this camera is the small black and white LCD readout that usually serves as a status display when the back LCD monitor is off. Such displays are useful when conserving power and shooting without the LCD monitor. Given the relatively few modes the MX-1200 has though, such a display is less necessary than on more complicated cameras.
![]()
Viewfinder
 The MX-1200 features both an optical viewfinder and color LCD display screen. The optical viewfinder sits right on top of the lens and provides about 87 percent frame coverage. A center dot in the viewfinder helps you with composition and reminds you where the exposure settings are concentrated. An LED sits just beside the optical viewfinder and lights either green, orange or red, depending on the camera's status. The 1.6 inch, 55,000 pixel D-TFT LCD monitor doesn't come alive until the Display button is pressed after the camera is turned on. Information such as the current record mode, frame number, flash setting and the date are displayed on the LCD monitor in addition to the image. A second hit of the Display button turns off this information display, and a third hit turns off the display altogether. The LCD viewfinder is quite accurate, showing 97% of the final image area on its screen.
![]()
The MX-1200's optical viewfinder is one of the camera we liked least: It has rather blurry, poorly defined edges, making it hard to tell exactly where the edges of the frame are. For eyeglass wearers, this fuzziness at the edges is compounded by a rather high "eye point", and no dioptric correction adjustment. In fairness, you wouldn't expect to find dioptric correction on such an inexpensive digicam, but a higher eye point would have been nice. In our testing, we took a "best guess" that we thought would represent the behavior of the average user, and ended up with a fairly accurate result. Overall though, we like viewfinders that provide crisp, well-defined edges to the field of view.
![]()
In the case of the LCD display, we found it tended to be a little misleading on the exposure when operating in viewfinder mode: It doesn't respond very much to changes in scene brightness. On the other hand, while in Manual mode, the "preview" display it provides before storing the picture more accurately represents what the camera actually captured.
![]()
In playback mode, the LCD screen provides reasonably sharp images, but has an added bonus in the form of up to 4x "zoomed" playback. The up/down arrows on the rocker toggle zoom the view in or out on the photo you're viewing. Once you reach the desired zoom level, pressing the Display button changes the operation of the toggle control to let you move your viewing window around the photo. Pressing the Display button again cancels this mode and returns the toggle control to its normal playback operation. This playback zoom function can be very handy for checking your pictures for precise framing, or to make sure you've captured the shot you were looking for.![]()
Optics
The MX-1200 comes equipped with a Fujinon fixed focus lens with available apertures of f/4.5 and f/11. Focal length is 5.8mm, equivalent to 38mm on a 35mm camera. Focal range on the macro end is specified to be as close as 3.9 inches (10 cm) and in normal mode from about 17.8 inches to infinity. There is no optical zoom function with this lens, although a digital zoom goes up to 2x (and reduces the image quality in the process, unlike a true, optical zoom). The camera automatically selects the aperture setting, even when in Manual capture mode. Since the lens is fixed-focus, there's no autofocus function. On the one hand, this could translate into some softness at the extremes of working distances (17.8 inches and infinity), but the positive side is that there's no focusing to worry about when shooting flash pictures in near-darkness. In our tests, the lens displayed barrel distortion of only 0.6%, less than most digicams, and almost no chromatic aberration. (We estimated the latter at roughly a half-pixel, or 0.04%.)
![]()
Exposure
Exposure on the MX-1200 can be controlled either automatically or semi-manually, both are straightforward in operation. ISO remains constant at 125, regardless of the mode setting.
![]()
Automatic
In Automatic capture mode, the camera reads the existing light levels and decides the appropriate exposure settings. To enter Automatic mode, just turn the mode dial to the red camera symbol. While in Automatic mode, you do have the ability to set the flash modes by hitting the menu button. All five flash modes are available to you. You can also control the Digital Zoom in this mode by pressing the up and down arrows on the rocker toggle button. As we said before, like all digital zoom functions, that on the MX-1200 compromises image quality in direct proportion to the magnification it provides. Basic operation of the camera is pretty standard in Automatic mode. Compose the picture, halfway press the shutter button to focus and set exposure (if using the LCD monitor, 'standby' will appear) and then fully press the shutter button to expose. If the LCD monitor is on, the captured image will appear briefly and disappear. You can review the image at more leisure in Playback mode.
![]()
Like most digital cameras, the MX-1200 provides an "exposure lock" function when you half-press the shutter button. This is handy for subjects with odd lighting (people with their sun, etc). You just point the camera at something about the same brightness as the subject you care about, half-press the shutter, then turn and compose your picture, all while holding the shutter button halfway down. When you finally fully-press the shutter release, the picture will be taken with the exposure you "locked in" initially. With the MX-1200, since there's no autofocus that happens along with the exposure determination, you can actually use the exposure lock somewhat like a "spot" meter in a more advanced camera. If the subject is close enough (as in outdoor people-pictures), just walk up to it, take an "exposure reading" by locking the exposure with the desired subject filling the field of view, then back off again to snap the actual picture. (Just don't let up on the shutter button while you get back into position!)
![]()
Manual
Manual mode is denoted on the mode dial with the same red camera symbol with an M next to it. Manual capture mode gives you the same shooting simplicity, but with the option to alter the exposure a little. Hitting the Menu button (or the left or right arrows on the rocker toggle control) allows you to change the flash mode, white balance, or exposure compensation. When you turn to Manual mode, the settings menu is automatically displayed on the LCD monitor, even if it was previously off. Hit the Display button to use the LCD as a viewfinder, and a second time to dismiss the menus and have an unobstructed view of the subject. As in Auto mode, you can independently select Macro and Digital Zoom as well. You do have the option of rejecting a captured image when shooting in Manual mode. Once the image is exposed, you are asked to record or cancel the shot. This can be a help or a hindrance, depending on how fast you're trying to shoot. If you don't tell the camera to save the image, it will be lost when the camera times-out and goes to sleep.
![]()
White Balance
The MX-1200 has seven white balance settings available in Manual capture mode: Automatic, Sunny, Cloudy, Daylight Fluorescent, Warm White Fluorescent, Cool White Fluorescent and Incandescent. The white balance settings are controlled through the settings menu, automatically displayed when entering Manual mode. The white balance setting you choose will automatically be disabled when using the flash. Fuji suggests setting the flash to Suppressed and choosing the desired white balance setting to achieve a particular effect. When using special lighting or shooting closeups, the Auto white balance setting may not be the most accurate. It's best to select the appropriate light source setting, although some experimentation may be required: As with most digicams we've tested, the colors shown on the MX-1200's LCD are only useful for getting a relative idea of which white balance setting produces the most neutral overall coloration.
![]()
Exposure Compensation (EV)
Exposure compensation (EV) is also available while in the settings menu of Manual capture mode. Nine compensation levels from –0.9 to +1.5 are adjustable in approximately 0.3 EV increments. This setting, like white balance, returns to automatic control when using the flash. The manual details what conditions each setting may be good for. (Basically, cameras' exposure systems assume that the light and dark portions of your subject will all average out to a medium gray. This is often the case, but if your subject is much brighter or darker overall, the camera will overcompensate, making for dark-looking snow and beach scenes, and overly bright pictures of dark objects. Likewise, if your subject is backlit, the camera will tend to underexpose it, based on the light it sees coming from the bright background. The exposure compensation function essentially lets you tell the camera "no, I really *do* want it that bright/dark".)
![]()
Flash
In either Automatic or Manual capture modes, the flash setting menu can be accessed by hitting the Menu button. Here, you can choose from Auto, Red-Eye Reduction, Forced, Suppressed and Slow Synchro. Auto lets the camera decide for itself whether or not to fire the flash, but is not available when using the Macro function. Red-Eye Reduction emits a preflash before the real flash fires to minimize the occurrence of the red-eye effect in pictures of people. (The preflash makes the irises in people's eyes close down somewhat, reducing the likelihood of the reflections off the back of their eyeballs that is the cause of red-eye.) Forced means that the flash always fires, regardless of the light conditions. Forced flash is very useful for providing "fill" illumination outdoors when the subjects have their backs to the sun. Alternatively, Suppressed means that the flash never fires. Slow Synchro is good for night and backlit subjects, firing with a slow shutter speed (1/4 seconds). The slower shutter speed allows more of the light from the scene into the camera, in addition to the light from the flash. This can brighten backgrounds and avoid the white-subject-on-a-black-background look that's typical of most nighttime flash shots. A tripod is recommended for both Suppressed and Slow Synchro modes and a shaking camera symbol appears in the LCD monitor as an indication of that. Flash range is specified as approximately 2.3 to 8 feet (0.7 to 2.5m), which agrees fairly well with our own test results.
![]()
Macro
The Macro function is controlled by a sliding switch on the side of the camera, marked with a flower symbol on the macro end and a mountain symbol on the wide angle end. When switched to Macro mode, the flower icon appears in the LCD monitor. Macro allows you to capture subjects as close as 3.9 inches. If the flash is set on Auto or Red-Eye Reduction when switching to Macro mode, the setting will automatically change to Suppressed (it reverts back to the previous setting when Macro mode is cancelled). Forced and Slow Synchro flash modes are available for use. Fuji recommends using the LCD monitor to frame the subject as the optical viewfinder's visible field will not match what the lens is capturing when you're this close to the subject.
![]()
Digital Telephoto
The MX-1200 offers a Digital Telephoto function providing a nominal 2x "magnification" of the image, accessible by pressing the up arrow on the rocker toggle button (the down arrow digitally zooms back out). The image will automatically be recorded at 640 x 480 when using Digital Telephoto, even if the file size had been previously set to 1280 x 960. The LCD monitor must be on to utilize this function and the amount of digital zoom will appear on the upper left corner of the LCD monitor. Like the "digital telephoto" option on most digicams, that on the MX-1200 works by simply cropping-out the central area of pixels from the CCD array. Thus, while the image fills a larger portion of the frame, it's only because the frame itself is smaller. Digital tele might be useful for web applications, where you're likely to be shooting at a smaller image size anyway, but its operation shouldn't be confused with a true optical zoom lens.
![]()
Self-Timer
The Self-Timer is accessed by turning the mode dial to the Self-Timer icon. Once the shot is composed and focused, fully press the shutter button to start the timer. The camera will count down from 10 seconds with the Self-Timer light next to the lens lit solid for the first five seconds, then blinking for the remaining five. A countdown is also displayed on the LCD monitor. The timer can be cancelled after initiation by pressing the down arrow button. Because the Macro function is selected with a separate switch on the side of the camera, you can use the Macro and Self-Timer functions together. This is handy, as camera movement in close-in macro shooting is often a problem. When used with an appropriate tripod or copy stand, the self-timer function allows time for the camera vibrations to die down before opening the shutter.
![]()
Shutter Lag/Cycle Times
"Shutter Lag" refers to the delay between when the shutter release is pressed and when a picture is actually taken. In most cameras, this delay allows time for the autofocus and autoexposure systems to do their work. In the case of the MX-1200, the fixed focus lens means no additional time is needed for the lens to focus, and the result is a somewhat shorter shutter lag than in most cameras. We measured shutter lag from a full press of the shutter button at 0.34 seconds. When you half-press the shutter to lock exposure prior to the shot itself though, the delay is even shorter, since the exposure and white balance have already been determined. Under these conditions, the shutter delay is only 0.22 seconds.
![]()
Cycle time is a measure of how quickly the camera can take a second shot after the shutter is snapped for the first one. We were surprised by how responsive the MX-1200 was in this respect, given its low cost and fairly high resolution: At maximum resolution and image quality, the shot-to-shot cycle time was only 4.3 seconds. This figure dropped to only 2.7 seconds in low resolution and at the lowest image-quality setting.
![]()
Another important time factor with digicams is how quickly they can take a picture after being powered on. The MX-1200 really shines in this area, as we clocked it at 0.8 seconds from power-on to first picture! This is one of the fastest times we've recorded for a digicam in this test.
![]()
User Interface
Overall, the MX-1200's user interface is pretty up front and self explanatory. All the buttons are easily accessible and in very natural positions. The positioning of the buttons allows for one handed operation, with the exception of accessing the Macro function. The Mode Dial is well marked and the buttons are labeled as common sense would dictate. In addition, the Mode Dial and other buttons have bumps and ridges on them, which aids in the one handed operation. The large grip on the front helps this as well.
![]()
The digital and AC jacks and the SmartMedia slot are located on opposite sides of the camera from each other, in their traditional places. A minor mention is that because of the large size of the battery compartment, the tripod mount has moved slightly off center, which may or may not affect user operation. (We found the resulting tripod mount to be quite stable though, as there's enough of the camera bottom left on the left-hand side of the tripod socket to provide a flat mounting surface.)
![]()
Shutter Button
Located on top of the camera, this button sets focus and exposure settings when pressed halfway. It fires the shutter when fully pressed.
![]()
![]()
Power Slide Switch
Above the LCD monitor, this turns the camera on and off.
![]()
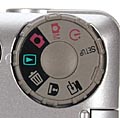
Mode Dial
The Mode Dial is located on the back panel, in the top right corner. It rotates between eight camera modes:
![]()

Rocker Toggle Button
This four way button is located directly to the left of the Mode Dial, and features up, down, left and right arrows that let you to navigate through menus and activate the Digital Telephoto in Automatic or Manual capture modes.
![]()
![]()
![]()
Menu/EXE Button
Located right beside the rocker toggle button. In Self-Timer, Automatic, Manual and Playback modes, accesses the settings menu for each mode. The EXE function of the button serves as an 'OK' when selecting menu items and confirming decisions.
![]()
![]()
Display Button
Located just above the LCD monitor, this button turns the LCD display on and off. One press turns it on, a second press turns off the information display and a third press turns off the image display.
![]()
![]()

Macro Switch
Directly on the side of the camera, this allows you to select between macro and normal lens focusing.
![]()
Camera Modes and Menus
![]()
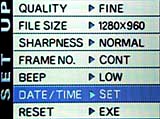 Setup Mode
Marked on the Mode Dial by the word Setup, this mode lets you alter the camera's settings. Choose from:
![]()
Self-Timer Mode
The camera counts down from 10 seconds once the shutter button is fully pressed with a visual countdown on the LCD monitor and with an LED next to the lens. The LED lights solid for the first five seconds then flashes for the remaining five. The down arrow button cancels the countdown.
![]()
Manual Mode
Gives you control over some exposure settings such as flash mode, white balance and exposure compensation (EV). You can also access the Macro and Digital Telephoto functions in this mode. Manual mode is denoted by a red camera icon with an M next to it on the Mode Dial.
![]()
Pressing the Menu/EXE button in this mode brings up the settings menu with the following options:
![]()
Automatic Mode
In this mode, the camera controls all the exposure settings. You have control over flash, Macro and Digital Telephoto functions. Automatic mode is marked by a single red camera symbol on the dial.
![]()
Hitting the Menu/EXE button in this mode brings up the Flash settings menu with the same options as in Manual:
![]()
 Playback Mode
Gives you the option of viewing recorded images frame by frame or multi frame with a playback digital zoom option. The mode is designated by a green arrow surrounded by a green rectangle.
![]()
Hitting the Menu/EXE button in this mode accesses the Playback settings menu with the following options:
![]()
Erase Mode
The Erase Menu automatically appears on the LCD when the Mode Dial is turned to the Erase position (marked by a trash can symbol). Here, you have these options:
![]()
Protect Mode
Automatically displays the Protect Menu on the LCD and is marked on the mode dial by a padlock symbol. Here, you have these options:
Note that protection cannot be cancelled for files with DPOF settings. To cancel their protection, the DPOF settings must first be removed.
![]()
PC Mode
Marked by a computer symbol with an arrow pointing inward, allows the camera to transfer images from camera's memory to your computer. A software CD comes packaged with the camera and offers Picture Shuttle, a DS-Serial TWAIN Driver, EZtouch and Adobe PhotoDeluxe. PhotoDeluxe is only compatible with Windows 95, 98 and NT 4.0 operating systems.
![]()
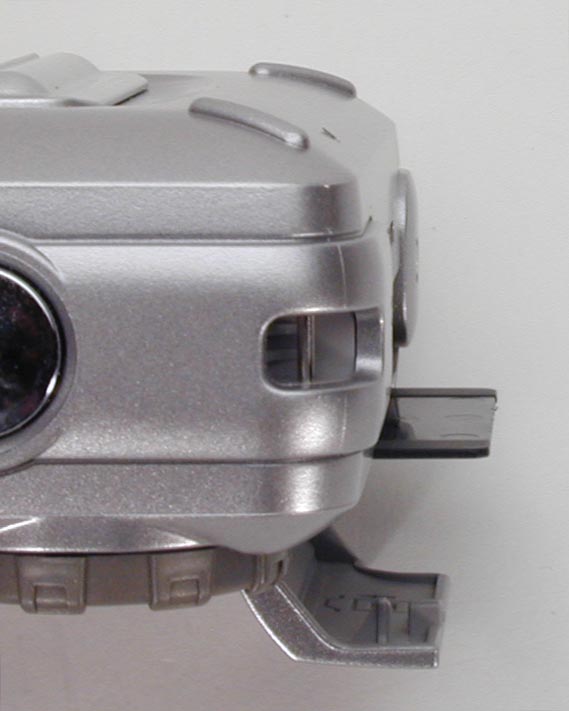 Image Storage and Interface
The MX-1200 utilizes SmartMedia for image capture and storage. A 4MB card comes standard with the camera, but 8MB, 16MB and 32MB sizes are also separately available. Remember to use only 3.3V SmartMedia (sometimes marked simply 3V) and steer clear of the 5V version. The 2MB card can hold approximately two Fine quality images, six Normal images and 11 Basic images (depending on compression ratios and image sizes). The table below shows card capacities, based on the included 4 MB memory card, and approximate JPEG compression ratios for the various size/quality combinations the camera provides.
| Resolution/Quality vs Image Capacity |
|
|
||
| Images |
Compression |
Images |
Compression |
|
| Fine Quality |
|
|
|
|
| Normal Quality |
|
|
|
|
| Basic Quality |
|
|
|
|
![]()
SmartMedia should never be removed while the camera is on and neither should the camera be turned off while performing operations to avoid damaging the media. If the SmartMedia slot cover is opened while the camera is on, the camera will automatically turn off. Always load the SmartMedia with the gold electrodes going into the camera first (the card will not fully slide into the slot if inserted incorrectly).
![]()
You can write protect SmartMedia by placing a write protection sticker in the designated area. Write protection stickers can only be used once and must be clean to be effective. You can protect individual or all images in Protect mode, accessible via the Mode Dial. Protection prevents images from being accidentally erased, resized or manipulated in any other way.
![]()
Frames are stored on SmartMedia and assigned file numbers from 0001 to 9999 with a preceding directory number. Once 9999 is reached, the directory number goes up by one. Setup mode allows you to alter the frame numbering sequence by selecting Renew or Continue. Use Renew to start images at 0001 each time a new SmartMedia card is inserted. Continue stores images beginning from the highest file number recorded on the last SmartMedia used. The Continue option ensures that images are not duplicated when downloaded to a computer. Note that if the SmartMedia already contains image files with higher file numbers than the highest number on the last SmartMedia used, images are stored beginning from the highest file number on the current SmartMedia card.
![]()
Also through the Setup Menu, the Image Resize option allows you to change images from 1280 x 960 pixels to 640 x 480 pixels. Images are saved in DCF compliant (Exif Ver.2.1 JPEG compliant) format with Digital Print Order Format (DPOF) compatibility.
![]()
You can erase images while in Erase mode, accessed by turning the Mode Dial to the trash can symbol. Here, you have the option of erasing a single frame, all frames or to format the card. Formatting erases all images on the card, including protected images, and re-initializes the SmartMedia. You can also erase images while in Manual capture mode when you are asked to delete or record each image as it is exposed.
![]()
Connected to a PC at 115Kbaud (the highest speed the PC supports), download is typically serial-port pokey: A maximum-resolution file 721 Kbytes in size took 148 seconds to download to the host. This translates into a rate of 4.9 Kbytes per second: Slow even by serial-port standards. Users who are the least impatient will want to consider purchasing a parallel-port or USB-based card reader, which typically sell for a bit over $50. Fuji themselves also offer the very convenient FlashPath floppy-disk adapter for $99 list, which is much faster than the serial connection, albeit slower than a parallel-port or USB device. The advantage of the FlashPath is there are no cables to contend with, since it fits into your PC's floppy drive.
![]()
Power
 The MX-1200 utilizes four AA alkaline primary batteries, or NiMH or NiCd rechargeable batteries. Fuji recommends staying away from manganese or lithium batteries because of potential damage from the amount of heat generated. Fuji approximates that alkaline batteries will capture about 190 frames, NiCd about 130 frames and Ni-MH about 190 frames (all estimations were made assuming the LCD monitor is on). We're reluctant to estimate "number of shots" in this fashion, but our tests indicate the camera should run for upwards of an hour and a half of continuous use with high-power NiMH rechargeable cells and the LCD on continuously. With the LCD off, the camera should literally be usable for a couple of days of use on a single charge. (Take our advice, and don't even consider using alkaline batteries with digicams: Buy a couple of sets of good-quality NiMH batteries, and a good recharger. You'll recover the cost of the batteries and charger in just the first week's use, and the combination will probably last as long as you own the camera!)
![]()
|
|
|
| Capture Mode, w/LCD |
|
| Manual Capture, LCD readout only |
|
| Capture Mode, w/o LCD |
|
| Capture, half-pressed shutter w/LCD |
|
| Capture, half-pressed w/o LCD |
|
| Memory Write (transient) |
|
| Flash Recharge (transient) |
|
| Image Playback |
|
| "Sleep" Mode |
|
![]()
An auto power off function will shut down the camera if unattended for two minutes, except in PC mode. You can cancel this function by holding down the Menu/EXE button while turning the camera on. The setting is re-enabled by turning the camera off and back on again.
![]()
Included Software
The MX-1200 comes with a software CD featuring Picture Shuttle, a DS-Serial TWAIN Driver, EZtouch and Adobe PhotoDeluxe. PhotoDeluxe is only compatible with Windows 95, 98 and NT 4.0 operating systems.
![]()
Picture Shuttle is simply the vehicle that transfers images from the camera to the computer. EZtouch allows some minor image manipulations while Adobe PhotoDeluxe provides additional manipulation capabilities with a wide variety of filters and formats for greeting cards, calendars and Internet uses. Unfortunately, Mac users must either rely on the EZtouch software or purchase photo manipulation software separately since the included PhotoDeluxe is only compatible with Windows. Both EZtouch and PhotoDeluxe applications are straightforward and easy to understand, as is the Picture Shuttle. A RS-232C serial cable and Mac compatible cable come standard with the camera. MAC USERS NOTE: The unit we received, in retail packaging did not include a Mac cable adapter, although the Picture Shuttle software supports the Mac platform. We will contact Fuji and ask whether the production units will include Mac cables, or if they're available as an option.
![]()
Once you connect the camera (in PC mode) to your machine and open up Picture Shuttle, images can be transferred. A picture index window is displayed from which you can view images or open them for editing. Opening an image triggers EZtouch, where you can perform some minor image manipulations with filters such as white vignette and emboss. You can also crop, color correct and take out Red-Eye. You can save images in either BMP; high, medium or low quality Exif-JPEG files; or in Exif-TIFF.
![]()
Test Results
Expecting relatively little from a 1.3 megapixel camera with such a low selling price, the MX-1200 surprised us with its image quality. Although it placed lower than many competing units in our laboratory-based resolution test (a maximum of 600 lines per picture height in both horizontal and vertical directions, with significant vertical aliasing), this result wasn't directly reflected in the "real world" pictures we took.
![]()
Color accuracy was overall very good, particularly in sunlit outdoor shots, and the Incandescent white balance setting did a very good job indoors under typical household tungsten lighting. The flash did well in mixed-lighting situations as well, and we felt was actually a bit more powerful than Fuji gives it credit for. (We felt it worked well to a range of 10 feet or so, vs. the 8 foot range that Fuji specifies.)
![]()
The wide-angle, fixed focal length, fixed-focus lens doesn't get terribly close in macro mode, but still captures a respectable minimum area of 2.8 x 3.7 inches (71 x 95 mm).
![]()
Overall, the MX-1200 held up quite well against the rest of the 1.3 megapixel competition, surprisingly so for such an inexpensive model with the range of features it provides.
![]()
Conclusion
The MX-1200 is a strong entry in the low-end market, providing more resolution than most cameras at its price point. Image quality is quite good, operation is point & shoot simple, yet reasonable exposure, white balance, and flash controls are provided for those who want them. The controls are accessible, readily navigable, and easy to understand. Image quality is surprisingly good. This looks like either a great "entry level" camera for someone just getting into digital photography, or perhaps a good "second camera" for the more advanced buff who wants something to just drop in a pocket and bring anywhere. Overall, an excellent buy for the money, particularly once the discount retailers get their hands on it!
![]()
Reader Comments!
See what other Imaging
Resource readers have had to say about the MX-1200, or add comments
of your own. (Read what's here, then add your own!
- If you buy an MX-1200, come back and tell the rest of us what you thought!)
![]()
For More Info:![]()
View the Imaging Resource Data Sheet for the MX-1200![]()
See the MX-1200 Pictures Page![]()
Visit the Fuji home page for the MX-1200
(Sorry,Fuji's site is frames-based and database-driven: We can't give you a direct link to the MX-1200 page.)
(Click here for the main Fuji site, then type "MX-1200" in the Search box.)![]()
Back to the Imaging Resource Digital Cameras Page![]()
Or, Return to the Imaging Resource home page.![]()
Questions? Problems? Email us!
This document copyright (c) 1999, The Imaging Resource, all rights reserved. Visitors to this site may download this document for local, private, non-commercial use. Individuals who have themselves downloaded this page may print a copy on their personal printers for convenience of reading and reference. Other than this explicit usage, it may not be published, reproduced, or distributed in