Olympus Stylus 1000 Design
The Olympus Stylus 1000 is a very attractive slice of camera, seemingly shaved off a hunk of aluminum with a lens pressed into its tapered curl. The design hides the thickness of this compact, but you can easily find a place for it in any pocket. The weatherproof design protects the camera in the rain, at the beach, and on the slopes, so you can take it more places.
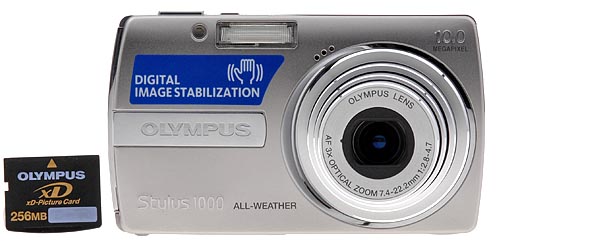
The front panel of the Olympus Stylus 1000 is dominated by the concentric chrome rings of the collapsed lens. A two-piece lens cover protects the glass so you don't have to. At about 11 o'clock on the lens, there's a three-hole grid for the microphone. The Self-Timer lamp sits next to the flash. The left side of the camera is thicker, so it can function as a grip without requiring special finger holds.
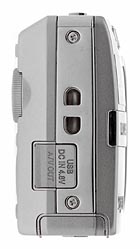
The right side of the Olympus Stylus 1000, as seen from the back, has a wrist strip eyelet in the middle. Below that is the USB/DC In/AV combination port (yes, with an all-weather gasket).
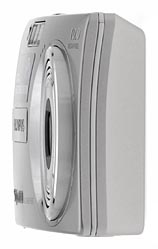
The left side of the Stylus 1000 is featureless.

On the top of the Olympus Stylus 1000, the small Power button sits just left of the larger Shutter button.

The back panel of the Stylus 1000 contains all the other controls. The 2.5 inch LCD takes up the left two-thirds of the bezel. The Zoom lever located top right with a Mode dial just below, extending slightly past the right bevel to make the dial easy to turn. Just to the left of the dial is a small LED that lights when data is being read or written to the xD memory card. Below that is a set of four buttons centered around the four-way navigator. At the center is an OK/Function button. Four buttons surround the four-way navigator: the Image Stabilization/Print button (top right), Erase button (bottom right), Display/Help button (bottom left), and Menu button (top left). In addition, the arrow buttons on the four-way navigator have Record mode functions. The Up arrow controls EV Compensation, and the Down arrow controls the Self-Timer. The Left arrow toggles through the Focus modes, and the Right arrow toggles through the Flash modes.

The bottom of the camera has a round speaker grill just off center, a plastic tripod mount on the far end under the lens, and the Battery/Card Compartment Cover at the opposite end. You can replace both your battery and card with the camera mounted on a tripod. Because the mount is not centered, however, you'll need and adjustable tripod to get the lens at the center for better panorama stitching.
Olympus Stylus 1000 External Controls
![]()
Power Button: Located on the top panel, this small, rectangular button turns the camera on and off. It's easy to find, and its small size makes it easy to tell from its neighbor.
![]()
Shutter Button: The larger, higher, rectangular button adjacent to the Power button sets focus, and exposure when halfway pressed, and fires the shutter when fully pressed.
![]()
Zoom Lever: Positioned in the top right corner of the rear panel, this small lever (marked W and T) controls optical zoom and digital zoom.
In Playback mode, the W button repeatedly cycles through the 4, 9, 16-image, and Calendar index display modes. The T button returns to the normal image display and enlarges the current display for closer viewing of fine details. (Pressing the W button again during enlargement returns to the normal display.)

Mode Dial: Below the Zoom Lever, the Mode dial offers five settings: Playback, Still Photo, Scene Mode, Guide, and Movie.

Four-Way Arrow Pad: Located just below the Mode dial on the rear panel, this four-way rocker button features four arrow buttons, each pointing in a different direction (up, down, left, and right), with an OK/Func button in the middle. In all settings menus, these arrow keys navigate through menu options. Pressing the center button confirms selections.
In any record mode, the Up button displays the Exposure Compensation adjustment, from -2 to +2 EV in 1/3 EV increments. The right button controls the Flash mode, cycling through Auto, Red-Eye Reduction, Forced, and Suppressed modes. The Left arrow turns the Macro (close-up), and Super Macro modes on and off, and the Down arrow accesses the Self-Timer mode.
Also in most record modes, the OK/Func button pulls up the Function menu (see Operation tab, Function menu).
In Playback mode, the Right and Left arrows scroll through captured images. When Playback zoom is enabled, all four arrows scroll around within the enlarged view. The Down arrow calls up the camera's Erase menu, letting you erase the currently displayed image.
![]()
Menu Button: Above, and to the left of the four-way arrow pad, this button activates the settings menu in any camera mode. The Menu button also turns off the menu display.
![]()
Stabilizer/Edit/Print button: In a Record mode, pressing this button activates the digital image stabilization feature. In Playback mode, pressing this button with an image selected allows you to edit it with four options: add digital image stabilization to reduce blur, brighten underexposed areas of an image, fix red-eye, or all of the above. When connected to a printer, this button initiates the printing process.
![]()
Erase Button: In Playback mode, pressing this button with an image selected will erase the image.
![]()
Display/Help Button: In both Record, and Playback modes, pressing this button cycles through the information display options. In Record mode, information display cycles from Normal to a Simple display, then to Frame Assist with a grid, and Normal information, and finally to a Histogram display. In Playback mode, it cycles from Normal to a Detailed display to No Information to a Histogram display with a thumbnail, and file information. When navigating the menu system, pressing, and holding this button will display a brief explanation of the menu item. And if the camera is off, pressing this button will display the time, and any alarm set for three seconds.
 Fujifilm GFX 50S Review
 Fujifilm X-T3 Review
 Olympus E-M5 III Review

Follow Imaging Resource