Pentax Optio W10 Operation
The Pentax Optio W10's user interface is fairly similar to previous Optio models, although it has been restyled somewhat. Colorful cartoon-like icons that represent scene modes were added a couple generations back and they're still effective. For such a compact camera, there's a fairly good selection of external controls and -- for the most part -- a concise LCD menu system. The most basic features such as flash, focus mode, drive mode, and zoom are all adjusted via external controls. Exposure modes are selected from the Capture Mode Palette, called up by pressing the Down arrow on the Four-Way Arrow pad when in record mode.
When delving into the LCD menu system, two menus, each three pages long, are available delineated by subject tabs at the top of the screen. The arrow keys of the Four-Way Arrow pad scroll through each selection, and the OK button in the center of the pad confirms any changes. You can also program the arrow keys of the Four-Way Arrow pad to control 17 specific exposure functions when the Function button is held down, and the User mode setting makes it quick to recall frequently used settings. Overall, menus were clearly labelled, attractively designed, and efficient to use.
 Record Mode Display: By default, the Pentax Optio W10's display shows the central autofocus area along with currently-selected options for shooting mode, flash mode, drive mode, focus mode, shake warning, digital zoom, memory status, storage remaining, battery status, key lock, exposure compensation, date and time, and world time setting. By pressing the central OK button, you can also have it show a more detailed display which adds a live histogram, blinking red/yellow over/underexposure warning, shutter speed, aperture, image size and quality, white balance, and sensitivity. By pressing the OK button again, you can dispense with everything but the focus frame. Another press returns to the normal mode, but with the backlight off, saving battery power but effectively making the LCD impossible to see in all but strong sunlight. Finally, one last press of the OK button returns you to the normal display mode.
 Playback Mode Display: In Playback mode, you can press the wide-angle side of the zoom toggle to show images on the memory card in the form of thumbnails, nine at a time. Pressing it once more takes you to a view of all top-level folders on the flash card. If you press the green button while looking at the folders, it switches to a calendar view, where the first shot from each day takes up position in that date square; handy for vacation photos. Pressing the telephoto side of the zoom toggle zooms in on the image as much as 8x. Pressing the Display button cycles between Normal Display (which displays the folder number, file number, protect icon, voice memo icon, volume icon, memory status, key lock icon, capture date and time, and four-way controller guide), Histogram + Info (which adds a histogram, blinking red/yellow over/underexposure warning, image size and quality, white balance, sensitivity, shutter speed, and aperture), and No Icons (which shows only the four-way controller guide).
Pentax Optio W10 Modes and Menus
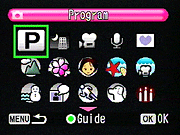 Shooting Modes: In Record mode, the Optio W10 can capture still images, movie files, or audio clips. Available Record modes include Green, Program, Night Scene, Movie, Voice Recording, Panorama Assist, Landscape, Flower, Portrait, Underwater, Surf & Snow, Sport, Synchro Sound Record, Pet, Candlelight, Soft, Fireworks, Self-Portrait, Natural Skin Tone, Food, and Museum, and with the exception of Green mode, are selected from the on-screen Capture Mode Palette menu called up with the Down Arrow portion of the Four-way Arrow Pad. By default, Green mode is selected by pressing the Green button. Playback mode, where you can browse recorded still images, movie files, and audio clips, is activated by pressing the Playback button. The Record menu, which features two tabs each containing three pages of options, is displayed by pressing the Menu button in any operating mode. The following options are available on the two tabs:
Record Mode tab
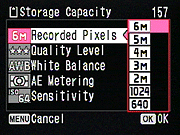 Recorded Pixels: Sets the image resolution to 6M ( 2,816 x 2,112), 5M (2,560 x 1,920); 4M (2,304 x 1,728); 3M (2,048 x 1,536); 2M (1,600 x 1,200); 1280 (1280 x 960); 1024 (1,024 x 768); or 640 (640 x 480) pixels.
- Quality level: Sets the JPEG compression level to Good, Better, or Best (three stars being Best and one star being Good).
- White Balance: Adjusts the overall color balance of the scene. Options include Auto, Daylight, Shade, Tungsten Light, Fluorescent Light, and Manual. (Manual white balance lets you use a white object to set the camera's color balance.)
- AE Metering: Lets you choose between multi-segment, center-weighted, and Spot AE metering.
- Sensitivity: Adjusts the camera's light sensitivity. Options are Auto, or 64, 100, 200, 400, or 800 ISO equivalents.
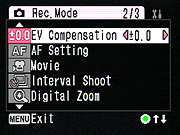 EV Compensation: Adjusts the overall exposure from -2 to +2 exposure equivalents (EV) in one-third-step increments
- AF Setting: Pulls up a sub-menu of AF options:
+ Focusing Area: Designates the area of the frame that the camera determines focus from, either Spot or Multiple. Spot AF uses a small area in the center of the frame to determine focus. Multiple mode bases focus on a larger area in the center of the frame.
+ Focus Limiter: If activated, limits the lens' focusing area. For example, limits the focus to far distances in normal mode, and to closer settings in Macro mode. This enables faster shooting. - Movie: Pulls up the following submenu:
- Recorded Pixels: Sets the movie resolution to either 640 x 480 or 320 x 240.
- Color Mode: Selects Full Color, Black and White, or Sepia color modes.
- Frame Rate: Sets the frame rate to either 30 or 15 frames per second.
- Movie Anti-Shake Function: Turns the movie anti-shake function on or off.
- Interval Shoot: Automatically takes pictures at a set interval between 10 and 99 seconds.
- Digital Zoom: Turns the camera's 4x digital zoom on or off. When enabled, the digital zoom kicks in after you've zoomed the optical lens all the way to its telephoto position.
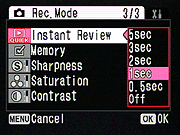 Instant Review: Turns the Instant Review function off, or sets the review time on the LCD screen to 0.5, 1, 2, 3, or 5 seconds.
- Memory: Lets you decide which settings will be remembered when the camera is shut off or the battery is changed. Any setting not selected returns to the default setting whenever the camera is turned off and back on again. Features that can be remembered include Flash Mode, Drive Mode, Focus Mode, Zoom Position, MF Position, White Balance, Sensitivity, EV Compensation, Digital Zoom, Display, and File Numbering.
- Sharpness: Adjusts the overall image sharpness to Normal, Hard, or Soft.
- Saturation: Controls the level of color saturation. Options are Normal, High, or Low
- Contrast: Adjusts overall image contrast to Normal, High, or Low.
Setting tab
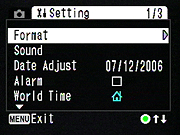 Format: Formats the SD/MMC card, erasing all files (even protected ones)
- Sound: Adjusts the volume of the camera's overall sound, and assigns specific sounds to startup, shutter, operation , and self-timer functions. All except the self-timer sound offer three built-in choices. On top of this, all sounds can be individually disabled or replaced with a user sound recorded on the camera.
- Date Adjust: Sets the camera's internal date and time, and selects the Date Style (choices being mm/dd/yy, yy/mm/dd, or dd/mm/yy with either 12 or 24-hour clock).
- Alarm: Sets the time of the camera's alarm clock function, and allows it to be enabled or disabled. The alarm will only sound if the camera is turned off.
- World Time: Allows you to set the time in another city, so that when traveling you can have the camera show and record in your images the local time without needing to adjust the time of the camera's clock. You select a home city and the city you're currently in from a selection of 70 cities (listed in the manual), and then enable the World Time feature. City names are listed at the bottom of the screen, and to help you in finding the correct city, the current city is indicated on one of six different regional maps. You can also turn daylight savings time on or off.
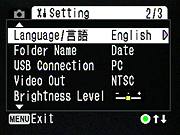 Language: Changes the menu language to English, French, German, Spanish, Portuguese, Italian, Swedish, Dutch, Russian, Korean, Chinese (traditional and simplified), or Japanese.
- Folder Name: Designates the method by which the camera names folders, either Standard or Date. Standard mode names folders XXXPENTX, where "XXX" is a three-digit folder number. Date mode names folders XXX_mmdd, where "XXX" is the same three-digit folder number, but followed by the month and day.
- USB Connection: Sets the USB connection to PC or PictBridge.
- Video Out: Sets the video format to NTSC or PAL.
- Brightness Level: Controls the brightness of the LCD display, with seven steps of adjustment available.
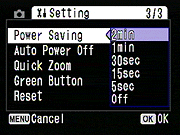 Power Saving: Turns this feature off, or sets the LCD display to shut off after five, 15, or 30 seconds, or after one or two minutes of inactivity. The LCD display will not turn off when the camera is in Playback mode, connected to a PC or printer, running on AC power, or recording a movie.
- Quick Zoom: When turned on, this function enlarges images to eight times zoom with only one press of the zoom toggle button.
- Green Button: Assigns specific exposure functions to the Green button (Green Mode, Recorded Pixels, Quality Level, White Balance, Focus Area, Focus Limiter, Sensitivity, EV Compensation, Sharpness, Saturation, and Contrast). When the Green button is pressed in Record mode, the available exposure functions are shown sequentially at the top of the display with each press, and most value can be changed with the Left and Right Arrow portions of the Four-way Arrow Pad. The change can then be stored by pressing the OK or Green buttons, or waiting approximately one second. Two of the functions above behave differently to the others. The Green Mode isn't a setting that can be changed, but rather sets the camera to automatically control all functions (and actually disables access to the camera's menu system), keeping things simple for the user. Rather than being adjusted with the Left and Right Arrows, the White Balance function calls up the White Balance menu when either button is pressed, and you then select the white balance using the Up and Down Arrows.
- Auto Power Off: Turns this feature off, or sets the camera to shut off after three or five minutes of inactivity.
- Reset: Resets all camera settings to their defaults.
Playback Mode: This mode lets you review captured images / movies and listen to the voice memos on the memory card, as well as edit them, erase them, protect them, set them up for printing, add sound clips, etc. Pressing the Menu button in Playback mode displays the same menu screens described above. Listed below are the options that come up when you press the Mode button in Playback mode.
- Slideshow: Allows you to set up a slideshow with pauses of 3 to 30 seconds; set transition effects; and add a sound effect.
- Resize: Enables creation of smaller images from captured images, suitable for emailing or web posting. Size options include 1024, 640, or 320, at one, two, or three star compression levels.
- Trimming: For cropping captured images. You can choose to overwrite your existing image or save the file as a new image.
- Image/Sound Copy: Moves images and sounds between a card and internal memory in either direction.
- Image Rotation: Rotates captured images.
- Digital Filter: Brings up an array of tint filters, including black and white, multiple color filters, and a soft filter. You can choose to overwrite your existing image or save the file as a new image.
- Brightness Filter: Allows the user to brighten or darken an image after capture.
- Movie Edit: This tool can cut a still image out of a movie, or either divide or splice two movies together.
- Frame Composite: Overlays an array of frames over an image. You can choose to overwrite your existing image or save the file as a new image.
- Red-eye Compensation: Can correct red-eye after capture.
- Voice Memo: Attaches sound to images.
- Protect: Applies deletion protection to individual images.
- DPOF: Allows selection of images before printing.
- Image Recovery: Attempts to recover accidentally deleted images.
- Start-up Screen: Selects an image on the card to appear as the image that displays when the camera starts up.
 Fujifilm GFX 50S Review
 Fujifilm X-T3 Review
 Olympus E-M5 III Review

Follow Imaging Resource