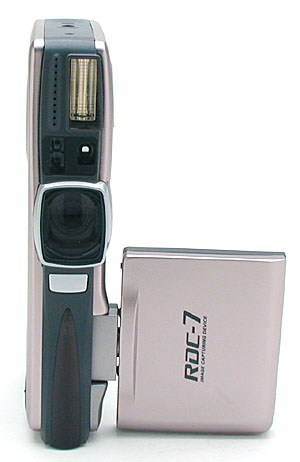
Ricoh RDC-7A 3 megapixel "Image Capturing Device" for mobile professionals with some unusual capabilities!<<Optics :(Previous) | (Next): Shutter Lag & Cycle Time Tests>> Page 6:Exposure & FlashReview First Posted: 8/2/2000 |
Exposure
Exposure control on the RDC-7 is relatively straightforward, with a few exposure
control buttons on the camera's top panel and an LCD menu system that controls
the rest. The mode dial on the back panel of the camera sets the camera's recording
mode (Still, Sound, Text, Continuous Shooting, Motion Picture) as well as controls
the Playback and Setup modes. The camera operates in "Program" exposure
mode only, in that it always controls both the shutter speed and aperture settings
(with the exception of the Time Exposure mode, which allows you to select a
slower shutter speed for low light subjects). As we mentioned earlier, the maximum
aperture setting ranges from f/2.6 to f/3.4, depending on the zoom setting,
and official shutter speeds range from eight to 1/1,000 seconds. (As noted earlier,
although the RDC-7's documentation specified a maximum shutter speed of 1/1,000,
we observed values as high as 1/2,000 in the JPEG header information. We're
don't know why Ricoh wouldn't claim the full shutter speed in their specs, unless
our unit was somehow mis-reporting the speed in its JPEG headers...) Neither
aperture nor shutter speed setting is reported on the LCD monitor. We personally
like to see this, but recognize that the RDC-7's target market of "mobile
professionals" most likely could care less about tweaky details like these.
Although the camera takes charge of the basic exposure settings, you do have
control over flash, exposure compensation and a few other things. Exposure compensation
is adjusted with the right and left arrow buttons on top of the camera, from
-2 to +2 in 1/2 EV increments. White balance can be set to Auto, Daylight, Overcast,
Tungsten or Fluorescent, to match the light source you're shooting under. You
also have control over the ISO setting, which can be set to Auto, 200 or 400.
Under the Auto ISO setting, the lowest ISO sensitivity used is 150. A Soft mode
apparently disables the in-camera sharpening, good for softening portraits.
There's also a Monochrome mode for capturing subjects in black and white or
sepia monotones and a Date Imprint mode that stamps the date and time on each
captured image.
An Image with Sound menu option allows you to record text or standard still
images with a 10 second sound clip attached to each. The Self-Timer mode is
activated by pressing the Self-Timer button on top of the camera. Once the shutter
button is pressed in this mode, the camera counts down from 10 seconds before
firing the shutter. A small, red LED on the front of the camera flashes slowly
for the first eight seconds, then speeds up for the remaining two. You can cancel
the self-timer by pressing the control button a second time. If you're not sure
about your exposure or how the camera will handle your subject, you can activate
the Auto-Bracket feature through the Record menu. Once enabled, the Auto-Bracket
function takes three frames in succession at exposure compensation values of
-0.5, 0.0 and +0.5, centered around whatever exposure compensation you had set
manually before pressing the shutter button. (For instance, you can set the
camera to bracket around a setting of +1.0EV, snapping shots with exposure adjustments
of +0.5, +1.0, and +1.5 EV.)
After capturing each image, a confirmation screen optionally pops up and gives
you the opportunity to review the image before saving it to memory. You can
set the time for which the confirmation screen is displayed through the Setup
menu, which includes a zero second setting that lets you disable the screen
altogether.
Vertical and Horizontal Formats
It took us a while to catch on to this one: If you use the shutter button mounted
on the top of the RDC-7, the camera will assume that it is horizontally oriented,
and capture the image accordingly. On the other hand, if you use the front-mounted
shutter button, the camera will assume that it is being held vertically, and
will save the image file in "portrait" mode (vertical orientation).
It's important to note that the change in orientation is not a function of the
position of the camera, but rather is governed entirely by the choice of shutter
button. This is a clever solution, and works the vast majority of the time,
but there may be situations when you'd be tempted to use the front-mounted shutter
button when you should really use the top-mounted one. (We discovered this when
trying to take a one-handed macro shot, in which our hand was best positioned
to use the front button, which gave us an image stood on its end.)
Flash
The RDC-7's built-in flash operates in four modes: Off, Auto, Forced and Slow
Synchro. Each mode is relatively self-explanatory and controlled through the
Flash button on top of the camera. The Off setting simply means that the flash
never fires, regardless of lighting conditions. Auto lets the camera judge when
to fire the flash, based on the exposure settings and existing light levels.
Forced means that the flash fires with every exposure and Slow Synchro uses
the flash with a slow shutter speed, allowing a little ambient light into the
image. The Slow Synchro setting is good for subjects with dark backgrounds,
such as night scenes. A Redeye Reduction feature can be activated through the
settings menu, and fires a small pre-flash before the full flash to eliminate
the Redeye Effect. Redeye Reduction can be used with all flash modes except
Off. Ricoh estimates the RDC-7's flash as effective from 2.0 to 8.2 inches (0.6
to 2.5 m) in normal mode. In our testing, however, we found the flash still
reasonably effective as far as 14 feet, without getting too dark. An intensity
setting adjusts the flash strength to Strong, Normal or Soft, giving you a little
added flexibility. The flash is unavailable when the camera is in the Macro,
Sound, Continuous or Motion Picture modes. Additionally, the flash will not
fire in any white balance mode other than Auto.
"PRO" Resolution Modes
One of the RDC-7's most interesting features is its "PRO" high-resolution
exposure function. There are actually three different PRO modes, two of them
making use of the same basic innovation: The camera has the ability to take
two full-resolution shots in very rapid succession, displacing the CCD sensor
a half the width of a pixel between each shot.(For the real technoids out there,
we're told this is accomplished with a mounting arrangement involving a piezoelectric
actuator that minutely shifts the CCD during the second exposure of the series.)
The camera then takes the two slightly offset 3.3 megapixel images and combines
them together into nearly 7 megapixels of raw image data.
 It's important
to note several things about the PRO modes: First, this is a genuine increase
in resolution, unlike interpolation schemes that attempt to increase the number
of final image pixels beyond the resolution of the CCD array. Ricoh's PRO modes
actually are working with twice as much original image data, so the increase
in resolution is real. A second point though, is that this increase in resolution
only occurs along the horizontal axis of the picture: Since the CCD is only
shifted in one direction, you'd expect that the resolution is only increased
in the direction of the shift. (No surprise then, that our tests showed pretty
clearly that (a) the resolution did indeed increase in PRO mode, but (b) only
along the long axis of the pictures.)
It's important
to note several things about the PRO modes: First, this is a genuine increase
in resolution, unlike interpolation schemes that attempt to increase the number
of final image pixels beyond the resolution of the CCD array. Ricoh's PRO modes
actually are working with twice as much original image data, so the increase
in resolution is real. A second point though, is that this increase in resolution
only occurs along the horizontal axis of the picture: Since the CCD is only
shifted in one direction, you'd expect that the resolution is only increased
in the direction of the shift. (No surprise then, that our tests showed pretty
clearly that (a) the resolution did indeed increase in PRO mode, but (b) only
along the long axis of the pictures.)
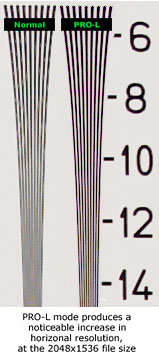
The photos at right below show samples from our resolution test target, shot
in normal and in the PRO-L mode. In this mode, the RDC-7 takes two shots as
described above, then combines them into a single 2048x1536 image, with increased
resolution. As you can see from the image samples here, this works quite well
in the horizontal direction (the direction in which the CCD is actually being
shifted, but less so along the vertical axis, where there's really nothing more
than conventional interpolation being applied.
Two of the PRO resolution modes result in a larger file size, measuring 3072
x 2304 pixels. The standard "PRO" mode simply interpolates the image
up from a single CCD exposure, with fairly predictable results. The image thus
produced is perhaps slightly sharper than one simply resized in Photoshop(tm),
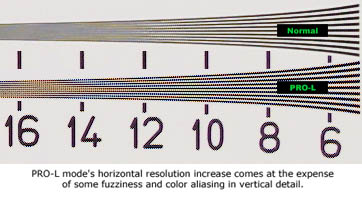
but the differences are pretty slight. PRO-H mode however, again takes two separate,
slightly shifted exposures, and combines them into a single higher-resolution
image. As you can see in the images below, this produces a pretty dramatic increase
in resolution along the horizontal axis, although color artifacts are somewhat
increased at very high spatial frequencies as well. (What we're talking about
here are the faint color tints appearing in the PRO-H sample below, starting
about midway between the "6" and the "8". This laboratory
test target tends to accentuate problems of this sort, due to the regular spacing
of the lines. Natural objects are much less likely to produce this effect, unless
there's something like a picket fence or herringbone cloth pattern.

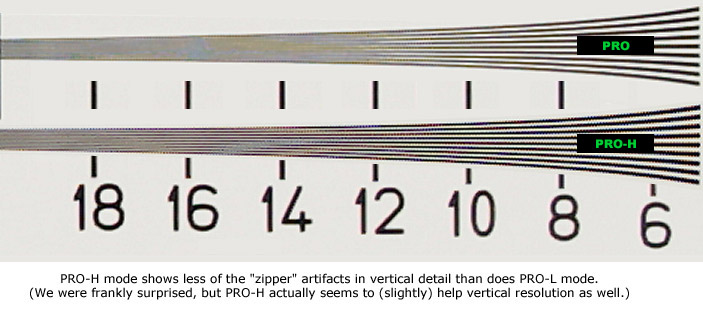
Given what we know about how PRO-H mode works, and the results we saw in PRO-L
mode, we were surprised to see that it looked like PRO-H mode had slightly better
resolution in the vertical direction as well. It's possible though, that all
we're seeing in the samples below is just a slight increase in in-camera sharpening
applied to the PRO-H mode image. (We say this because there really isn't any
additional picture information being added in the vertical direction for PRO-H
mode images.)
 The other important thing to note about the PRO shooting modes is that there are two separate exposures involved, albeit fairly closely spaced in time. This means that the PRO modes will be of little use with rapidly moving objects. While Ricoh says you can shoot PRO mode pictures handheld, it's clear that your results will be much better if you have the camera mounted on a tripod. The picture at right shows what happens when a part of the subject moves during the exposure: This clip is from our outdoor house photo (the one we call the "Far Field test", which was taken on a fairly breezy day across the street from the house in question. The completely stationary parts of the image were rendered quite sharply, but the leaves of the tree shown here were moving in the breeze, and so produced the artifacts shown.
Of course, nothing comes for free, and the PRO modes do have their price. The first is the limitation of only shooting relatively stationary objects, as seen above. A second one though is the significantly longer shot to shot cycle times that result from all the extra processing the camera's CPU has to do. In the highest-resolution PRO mode, it takes upwards of a minute and a half (that's right, 90 seconds) to process one image and be ready to capture the second. This is a pretty heavy performance tradeoff for a noticeable but not necessarily dramatic increase in resolution.
 One more comparison is perhaps in order here: Let's look at an example of a "real life," still-life subject. The image at right is from the same outdoor house shot, but this time contains only static elements. The sample on top is from standard "PRO" mode, which we saw above produced results pretty equivalent to what you'd get if you just resampled the base-resolution image from the CCD in Photoshop. The lower sample is the same subject shot just a minute or so later in PRO-H mode. This is pretty typical of what we found in both our outdoor and studio tests: Even though PRO-H mode really only boosts resolution in the horizontal direction, the overall appearance of the image is quite a bit crisper, and the eye is somewhat tricked into seeing more resolution in all directions (that is, vertical too) than may actually exist. Pretty slick, even though restricted to stationary subjects!
In practice, we felt that the PRO modes indeed produced a useful increase in resolution, albeit at some cost in cycle times. The fact that this was a resolution increase in one direction only wasn't nearly as apparent in our "natural" test subjects as it was in the resolution test target. Not a panacea by any means, but a feature we'd like to see again, in a camera aimed more at the photo enthusiast: We can imagine a PRO mode equipped camera being useful for studio-based product photography, capturing high-resolution images to be used in printed media. In the RDC-7, the technology looks to us like a bit of an odd fit, as we have a hard time imagining the "mobile professional" caring so much about image resolution that he/she would be willing to trade off camera responsiveness to the degree that the current PRO mode technology requires.
Text Mode
The Text mode allows you to capture images of text (such as from white boards or meeting notes) in pure black and white (no grays in the image at all). For any given image size, images captured in Text mode are about a third of the file size of regular images. We've seen similar modes in other digicams we've tested, but they've been almost useless for actual capture of text documents at high resolution due to the exceptionally long processing times they typically require. The RDC-7's text mode is quite different though, requiring only 14 seconds in high resolution mode (2048 pixels wide), and 6.2 seconds in low resolution mode (1024 pixel wide images). This still couldn't be considered "high speed", but is realistically about as fast as a low-end desktop scanner could collect the same data. - And resolution is probably good enough for the resulting images to be used with an OCR (Optical Character Recognition) program too: With 2048 pixels across perhaps 10 inches of active area on a typical typewritten page, you have about 200 ppi (pixels per inch) resolution, about the lower limit for usable OCR. Thus, the RDC-7 is probably the first digicam we've tested that we could actually say would be usable for collecting document images. Very impressive, and a feature we've had multiple email requests for from readers.
Sound Mode
The RDC-7 allows you to record audio files of arbitrary length. The available recording time is governed by the amount of available memory space, and is displayed in the LCD monitor and the small status display panel upon entering the mode. The microphone is located just beneath the flash on the front of the camera. Sound files are saved in the AVI format.
Continuous Shooting Mode
Continuous Shooting allows you to capture a rapid succession of images with one press of the shutter button. You can record up to 164 640 x 480, 70 1024 x 768 or 24 2048 x 1536 images continuously, under the Economy quality setting. As the quality setting increases, the maximum number of sequential images decreases. Shot to shot cycle times vary, depending on the image size, quality and amount of image information for the camera to process. Typical capture rates range from 1.2 to 1.6 seconds between frames. (Interestingly, the larger image size results in faster frame rates, apparently because the camera subsamples the CCD data to obtain the smaller-size image. This results in a higher-quality small image, but at the cost of increased processing time. Continuous mode on the RDC-7 is fairly slow compared to other high-end 3 megapixel digicams we've tested.
Motion Picture Mode
Like the Sound recording mode, the Motion Picture mode allows you capture moving images with sound, of any duration. The available recording time is displayed in the LCD monitor and on the small status display panel, and depends on the amount of free memory space. Note that the optical zoom is disabled in this mode, and the exposure compensation, white balance and focus are locked once the shutter button is pressed. This behavior is not uncommon among digicams we've tested that have movie modes, but we always prefer to see a zoom option during "filming." This is somewhat of a tradeoff for camera designers though, as the small confines of the typical digicam body often mean that allowing zooming would introduce objectionable motor noise into the audio of recorded movies. On the positive side, playback on the camera's screen is very clear, and the sound recording is quite sensitive. (It did seem rather prone to picking up ambient noise, though:We realized that we really need a standardized test for sound recording, as this is becoming a more common feature on digicams.)
Interval Shooting Mode
You can set the camera to automatically take pictures at set intervals, from 30 seconds to three hours in 30 second increments, to achieve the effect of time-lapse photography. The camera will take pictures at the set interval continuously until the mode is canceled or the SmartMedia card or internal memory runs out of room. Even if the camera is powered by the AC adapter, the automatic shutoff feature will turn the camera off after 24 hours. You can take normal images without affecting the Interval mode at any time, by simply pressing the shutter button. We confess to being rather puzzled as to why Ricoh chose to have the camera shut itself off after 24 hours, even when it's plugged into an AC adapter: We're sure that at least some folks will want to capture longer-duration time-lapse sequences with the RDC-7, and there really doesn't seem to be any good reason why the camera should shut off after 24 hours.
Time Exposure Mode
The Time Exposure mode helps you capture subjects in low light settings. Normal (automatic) exposure provides for shutter times down to 1 second. Time exposure mode lets you select the desired shutter speed, with options of one, two, four and eight seconds. The RDC-7 did quite well in the low-light category, producing usable images down to light levels of only 1/4 of a foot-candle, and somewhat usable ones all the way down to 1/16 of a foot-candle, albeit with significant noise. For reference, a typical city night scene under average street lighting is a light level of about 1 foot-candle. Although the RDC-7 has a dual-mode autofocus system (both active and passive), we found that it only worked reliably down to about 1 foot-candle: At lower light levels, we had to use the manual focus option. (For those of you interested in very low light photography with the RDC-7, be sure to check out Mike Chaney's excellent Qimage Pro program, which does an amazing job of removing image noise without disturbing picture detail.)
Reader Comments! --> Visit our discussion forum for the Ricoh RDC-7!

Follow Imaging Resource: