 Back
to Full Ricoh RDC-7 Review
Back
to Full Ricoh RDC-7 ReviewGo to Ricoh RDC-7 Data Sheet
Go to Ricoh RDC-7 Pictures Page
Up to Imaging Resource Cameras Page
Use your browser's "Back" button to return to the previous page, or the links at the top and bottom of this page to navigate to related information. If you have difficulty fitting the text on this page onto your printer output, simply resize your browser window to a narrower width and print again.
Remember us when it's time to buy!
Dave here: Have our reviews been helpful to you? (Is this article you're reading right now useful?) Preparing this level of information on as many products as we do is incredibly hard work, not to mention expensive. Things on the Internet may look like they're free, but they're not. (As a lot of big dot.com companies are finding out these days.) Somewhere, somebody has to pay to produce worthwhile content. YOU can help us though, by remembering us when it comes time to make your purchase. Would you consider coming back to our site and clicking-through to one of our advertisers to make your purchase? Every dollar you spend with one of our advertisers helps us directly (in affiliate fees) or indirectly (the advertiser will keep renewing their ad contract with us). To make it easy for you to support us, here's a URL you can visit, to see all our current advertisers, with links to click on that will register your visit to them as having come from our site. It's up to you where you buy, but Mike, Mike, Kim, Yazmin, Marti and I would be really grateful if you'd help us out by choosing one of our advertisers to purchase from.
Thank you for your support!
Dave Etchells, Founder & Publisher
Visit our "Buy Now" Page:
https://www.imaging-resource.com/buynow.htm
Back
to Full Ricoh RDC-7 Review
Go to Ricoh RDC-7
Data Sheet
Go to Ricoh RDC-7
Pictures Page
Up to Imaging Resource Cameras
Page
Ricoh RDC-7A 3 megapixel "Image Capturing Device" for mobile professionals with some unusual capabilities! Review First Posted: 8/2/2000 |
|
 |
|
3.3 megapixel CCD for sharp 2048x1536 images
|
|
|
Double-exposure "PRO" mode provides ~7 megapixel effective resolution(!)
|
|
|
|
3x optical zoom lens
|
|
|
|
Sound and movie recording
|
|
| * | Very sleek & compact for on-the-go professionals | |
Executive Overview
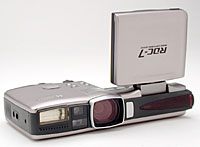
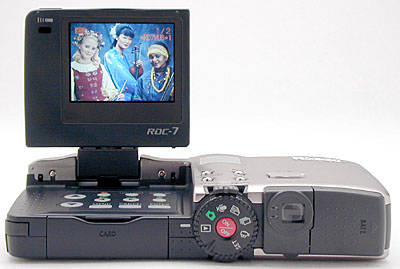
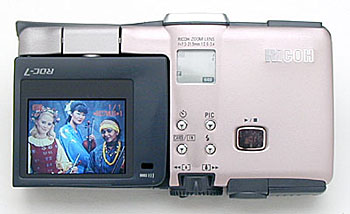
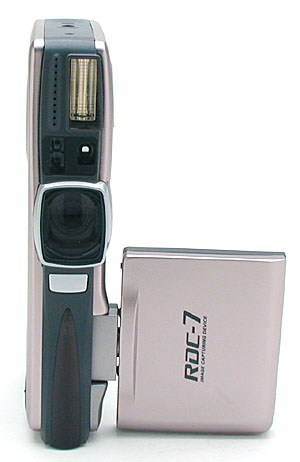
One glance at the RDC-7 and you'll be wondering if it's not some slick device designed for a high-level CIA operative. With a trim size of 5.3 x 2.9 x 1.1 inches (135.4 x 74 x 27.9 mm) and a very light weight of 9.5 ounces (270 g), the RDC-7 is definitely meant to go places. The camera should easily fit into most shirt pockets and includes a wrist strap for added portability. The camera's efficient design maximizes nearly every inch of space, featuring two shutter buttons and a double-sided zoom control, allowing you to hold the camera vertically or horizontally.
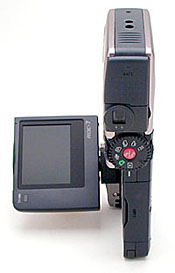
The very utilitarian, two inch LCD monitor flips up and swivels around to face all four sides of the camera, rotating a full 270 degrees. This also means that you can flip the LCD around to face the front and then close it back into its locking position to maintain a very sleek profile. The RDC-7 also features a real image optical viewfinder, complete with a dioptric adjustment dial to accommodate eyeglass wearers. A 3x, 7.3 to 21.9 mm optical zoom lens, equivalent to a 35 to 105 mm lens on a 35mm camera, features a maximum aperture of f/2.6 to f/3.4, depending on the zoom setting, and a normal focal range of 9.4 inches (24 cm) to infinity. A macro mode offers a focal range from an amazing 0.4 to 9.4 inches (1 to 24 cm). Focus can be controlled automatically or manually, with the autofocus system using a hybrid of TTL and CCD focusing mechanisms.
When it comes to exposure, the RDC-7 mainly operates under automatic control, with the camera determining the shutter speed and aperture the majority of the time. Through the Time Exposure mode, however, you can choose from a range of slow shutter speeds, from one to eight seconds. Shutter speeds range from 1 to 1/1,000 seconds in the normal,automatic mode. (This is the official spec, our tests revealed a minimum shutter time of only 1/2,000 second.) Exposure compensation can be manually adjusted from -2 to +2 in 1/2 EV increments, and ISO can be set to Auto, 200 or 400. White balance offers Automatic, Daylight, Overcast, Tungsten and Incandescent options. There's even a Soft mode that disables the in-camera image sharpening, and a Monochrome mode for capturing images in black and white or sepia monotones. An auto bracketing function takes three images consecutively, at -0.5, 0.0 and +0.5 exposure compensation levels, centered around the amount of exposure compensation you've set manually. The self-timer mode counts down from 10 seconds before firing the shutter, with a blinking LED on the front of the camera to indicate the countdown. The camera's built-in flash offers Auto, Off, Forced and Slow -Synchro operating modes, with an option for Red-Eye Reduction available through the Record menu (Redeye Reduction works with the Auto, Forced and Slow-Synchro modes). Also through the Record menu, you can adjust the flash power to Strong, Normal or Soft, depending on the amount of flash you need.
The RDC-7 offers a variety of capture modes, including Text, Sound, Continuous Shooting, Interval Shooting and Motion Picture. In the Text mode, the camera is setup for capturing images of text from documents, signs or white boards. The Sound mode allows you to record sound only, with recording time limited only by memory space. You can also record 10 second sound bytes to accompany an image, through the Image with Sound option under the Record menu. Continuous Shooting lets you capture a rapid succession of images, with just one press of the shutter button. The mode works with any file size and quality setting, so shot to shot cycle times vary. In Motion Picture mode, the camera captures moving images with sound, with the length of recording time depending on the amount of memory space available. Finally, the Interval Shooting mode sets up the camera to automatically fire the shutter at set intervals, varying from once every 30 seconds to once every three hours, for time-lapse photography.
For image storage, the RDC-7 allows you to save captured files to either a SmartMedia card or the camera's internal eight megabytes of memory. A button on top of the camera lets you alternate between file destinations, and a Copy function under the Playback menu lets you copy files back and forth. The RDC-7 offers three main image sizes (640 x 480, 1024 x 768 and 2048 x 1536) and three quality settings (Fine, Normal and Economy). Three "PRO" settings provide higher resolutions or improved sharpness at the camera's normal maximum file size, using a pixel-shifting technique and taking two separate exposures in quick succession. An uncompressed TIFF option is activated through the Record menu, and works with all file sizes.
The RDC-7 is equipped for NTSC and PAL video formats, with an NTSC cable provided with US and Japanese versions and a PAL cable with European ones. The video format is changed through the camera's Setup menu. A USB and PC serial cable also accompany the camera, for connection to a computer. A very nice offering of software is packaged with the RDC-7, compatible with both Windows and Macintosh operating systems. The accompanying CD is loaded with Arcsoft's PhotoStudio, PhotoBase, PanoramaMaker, PhotoFantasy, VideoImpression, PhotoPrinter and PhotoMontage, as well as QuickTime. Through this abundance of software, you can organize images, edit and graphically enhance them, create panoramas, set up images for printing, create unique photo mosaics and edit your digital video files. The furnished software constitutes an unusually complete offering, providing all the basic tools you need for organizing, manipulating, printing, and presenting your images and mini-movies.
For power, the RDC-7 utilizes a rechargeable, Ricoh DB-20 lithium-ion battery pack, and includes one battery pack and a charger in its packaging. An AC adapter also accompanies the camera, good for time consuming tasks like image downloading and playback, as well as shooting in the Interval photography mode.
Overall, the RDC-7 features a very sleek, attractive design with a trim profile that lets it go just about anywhere. While more advanced photo enthusiasts might prefer more manual controls, the nice sprinkling of features and the fully automatic exposure control matches the needs of the "mobile professional" the camera is aimed at. The RDC-7 bundles good looks with good image quality and a very complete bundle of software, perfect for amateurs looking for a portable, uncomplicated digital camera.
Design
At first glance, Ricoh's RDC-7 looks like something that Agent 007 would whip
out of his pocket to photograph secret documents. It's sleek and trim, almost
the exact shape and size of a mini-cassette recorder. At just 5.3 x 2.9 x 1.1
inches (135.4 x 74 x 27.9 mm) and a mere 9.5 ounces (270 g), the RDC-7 glides
easily into most shirt pockets. With two shutter buttons and a double-sided
zoom control lever, the RDC-7 is set up to be easily held either vertically
or horizontally. Because there are so many interesting design features on this
camera, we'll just dive right in to our virtual tour.
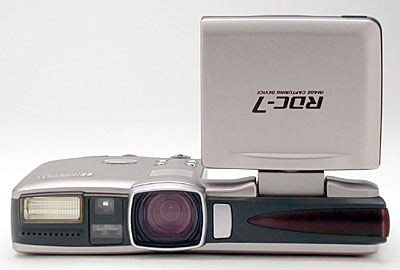
The front of the camera holds the lens, self-timer LED, a secondary shutter
button (for holding the camera vertically), autofocus window, flash and microphone.
The lens front actually has a rectangular shape, with a small lens cap to prevent
any accidental scratches. A tiny strap attaches the lens cap to the camera,
which keeps you from worrying about losing it. While the secondary shutter button
is useful when you want to hold the camera in a vertical position it's so close
to the lens that we found ourselves accidentally placing our fingers over the
lens nearly every time we used it. (Which also entailed us cleaning off our
smudgy fingerprints.) The alternate shutter button is a good idea, we just would
like to see a little more space between the button and the lens. We also often
wanted to hold the camera vertically, with the LCD screen opened, but found
it hard to get a secure grip on the camera body, since the screen prevented
our fingers from completely wrapping around it. Not a huge issue, and we do
appreciate the thought given to both common grips on the camera body: We just
wish the vertical grip were a bit more convenient.
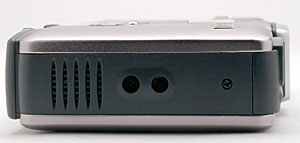
The left side of the camera (when facing the front) features just the speaker
and a small eyelet for attaching the wrist and lens cap straps.
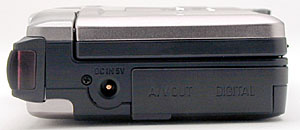
On the opposite side of the camera are the DC in, video out and digital ports. The video out and digital ports are both protected by a small, flexible plastic flap that easily pops in and out of place while remaining attached to the camera body.
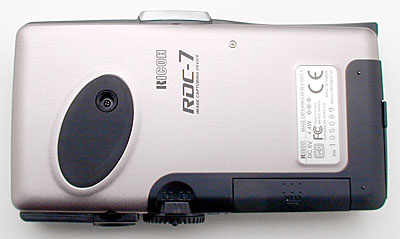
The back panel of the camera is tightly packed with the SmartMedia slot, mode
dial, power switch, optical viewfinder and battery compartment. Ricoh really
makes the most of the camera's small body design, by efficiently putting the
controls and compartments very close together. The battery compartment features
a sliding plastic door that flips open once slid out of place. As always, we
appreciate the ability to access both the SmartMedia card and the battery while
mounted on a tripod, and both are accessible here via the RDC-7's back panel.
The SmartMedia slot is covered by a plastic door that slides forward and then
drops open, which we found a little tricky to operate at times. The mode dial
conveniently encircles the power button, and the optical viewfinder has a tiny
dioptric adjustment dial beneath it, to adjust the focus for eyeglass wearers.
Most of the action takes place on the top panel of the camera, which holds the
majority of the control buttons and the flip up LCD display. The entire left
side of the top panel is taken up by the LCD monitor, which is hinged at the
front of the camera, allowing it to flip up 90 degrees. Once in its upright
position, the LCD panel actually swivels 270 degrees, so that it can face directly
front, as well as the remaining three sides (this also allows you to swivel
the monitor around to the front and then close it back to maintain the camera's
smooth profile and still see the monitor).
A set of controls lives beneath the LCD panel, including the menu button, exposure
compensation controls, macro button, and many others. Also on the top panel
of the camera body is a small status display panel that reports the camera settings,
useful when shooting with the optical viewfinder only. There's also the zoom
control, primary shutter button and a few other exposure controls.
The bottom panel of the camera holds mainly the plastic tripod mount and a secondary zoom control. The tripod mount is located within a small rubber grip, that comfortably holds your thumb when shooting without the tripod. As we mentioned before, the amount of studio work we do necessitates the ability to access both the SmartMedia slot and battery compartment while mounted to the tripod, and the RDC-7's design conveniently accommodates this need.
 Viewfinder
The RDC-7 packs both an optical viewfinder and an LCD monitor into its compact form. The real-image optical viewfinder features a small dioptric adjustment dial (located beneath the eyepiece), to correct the focus for eyeglass wearers. (We don't have any way of quantifying this, but it did seem as though the RDC-7's diopter adjustment had an unusually broad range of control.) Two LEDs beside the viewfinder report when the focus and exposure are set or when the flash is charging.
The 2.0 inch TFT, color LCD monitor features a unique pop-up design that allows it to swivel around 270 degrees, enabling it to face all four directions. When upright and facing the back panel, the LCD monitor can also lean back a little, providing a better view when the camera is held below eyelevel. (Dave had some fun with this on a business trip, taking available-light candid shots in an airport, with the camera braced on the arm of the waiting area chairs.) The LCD Light button adjusts the LCD panel's backlight, brightening it for better visibility under strong daylight, or dimming it to reduce power consumption. (The LCD monitor shuts off completely when it is closed against the camera body.) An onscreen information display is controlled by the Display button, and reports various camera settings, including the memory being used for image capture, exposure options, the number of available images, date, time and image size. In Playback mode, the LCD monitor can display six thumbnail images at a time and also features a magnification option for closer inspection of captured images.
We found the RDC-7's LCD monitor to be a little tight, with varying degrees of accuracy depending on the file size setting. The smaller, 640 x 480 image size usually produced the most accurate results, showing about 92 percent of the final image area at wide angle and 94 percent at telephoto. The remaining image sizes (including the PRO sizes, 3072 x 2304) measured the same, showing 86 percent at wide angle and 88 percent at telephoto.
 Optics
A 3x, 7.3 to 21.9 mm glass lens (equivalent to 35 to 105 mm on a 35mm camera) is built into the RDC-7, with 10 glass elements in seven groups and three aspherical lenses. In normal shooting mode, the focal range extends from 9.4 inches (24 cm) to infinity. A macro mode allows focusing from an amazing 0.4 to 9.4 inches (1 to 24 cm). The camera uses a hybrid autofocus system which works both passively through the lens (TTL) as well as with an auxiliary infrared active autofocus sensor. This combined system seems to give better focus performance than just the passive system (used by most digicams) itself, but still doesn't permit operation in complete darkness. (We speculate that the active autofocus helps achieve "coarse" focus quickly, while the passive, CCD-based system provides the fine focusing.) Aperture is automatically controlled, with a maximum opening of f/2.6 to f/3.4, depending on the zoom setting. The documentation didn't specify the minimum lens opening, but our tests seemed to show that it ranged from f/5.3 to f/7.0, again depending on zoom setting. A manual focus option allows you to control the focus with the up and down arrows on top of the camera.
Distortion on the RDC-7 is moderate to high at the wide angle end, as we measured 0.74 barrel distortion at the widest zoom setting. Alternatively, the telephoto end had practically no distortion at all, we only noticed about a half a pixel of pincushion distortion. Chromatic aberration was also very low, we only noticed about a half to one pixel of coloration on either side of the black target elements in the corners of the resolution target. In total, this is quite a good performance from a digicam lens, relative to others we've tested: Barrel distortion at wide angle is about typical, but pincushion at telephoto and chromatic aberration overall are both better than average.
Exposure
Exposure control on the RDC-7 is relatively straightforward, with a few exposure
control buttons on the camera's top panel and an LCD menu system that controls
the rest. The mode dial on the back panel of the camera sets the camera's recording
mode (Still, Sound, Text, Continuous Shooting, Motion Picture) as well as controls
the Playback and Setup modes. The camera operates in "Program" exposure
mode only, in that it always controls both the shutter speed and aperture settings
(with the exception of the Time Exposure mode, which allows you to select a
slower shutter speed for low light subjects). As we mentioned earlier, the maximum
aperture setting ranges from f/2.6 to f/3.4, depending on the zoom setting,
and official shutter speeds range from eight to 1/1,000 seconds. (As noted earlier,
although the RDC-7's documentation specified a maximum shutter speed of 1/1,000,
we observed values as high as 1/2,000 in the JPEG header information. We're
don't know why Ricoh wouldn't claim the full shutter speed in their specs, unless
our unit was somehow mis-reporting the speed in its JPEG headers...) Neither
aperture nor shutter speed setting is reported on the LCD monitor. We personally
like to see this, but recognize that the RDC-7's target market of "mobile
professionals" most likely could care less about tweaky details like these.
Although the camera takes charge of the basic exposure settings, you do have
control over flash, exposure compensation and a few other things. Exposure compensation
is adjusted with the right and left arrow buttons on top of the camera, from
-2 to +2 in 1/2 EV increments. White balance can be set to Auto, Daylight, Overcast,
Tungsten or Fluorescent, to match the light source you're shooting under. You
also have control over the ISO setting, which can be set to Auto, 200 or 400.
Under the Auto ISO setting, the lowest ISO sensitivity used is 150. A Soft mode
apparently disables the in-camera sharpening, good for softening portraits.
There's also a Monochrome mode for capturing subjects in black and white or
sepia monotones and a Date Imprint mode that stamps the date and time on each
captured image.
An Image with Sound menu option allows you to record text or standard still
images with a 10 second sound clip attached to each. The Self-Timer mode is
activated by pressing the Self-Timer button on top of the camera. Once the shutter
button is pressed in this mode, the camera counts down from 10 seconds before
firing the shutter. A small, red LED on the front of the camera flashes slowly
for the first eight seconds, then speeds up for the remaining two. You can cancel
the self-timer by pressing the control button a second time. If you're not sure
about your exposure or how the camera will handle your subject, you can activate
the Auto-Bracket feature through the Record menu. Once enabled, the Auto-Bracket
function takes three frames in succession at exposure compensation values of
-0.5, 0.0 and +0.5, centered around whatever exposure compensation you had set
manually before pressing the shutter button. (For instance, you can set the
camera to bracket around a setting of +1.0EV, snapping shots with exposure adjustments
of +0.5, +1.0, and +1.5 EV.)
After capturing each image, a confirmation screen optionally pops up and gives
you the opportunity to review the image before saving it to memory. You can
set the time for which the confirmation screen is displayed through the Setup
menu, which includes a zero second setting that lets you disable the screen
altogether.
Vertical and Horizontal Formats
It took us a while to catch on to this one: If you use the shutter button mounted
on the top of the RDC-7, the camera will assume that it is horizontally oriented,
and capture the image accordingly. On the other hand, if you use the front-mounted
shutter button, the camera will assume that it is being held vertically, and
will save the image file in "portrait" mode (vertical orientation).
It's important to note that the change in orientation is not a function of the
position of the camera, but rather is governed entirely by the choice of shutter
button. This is a clever solution, and works the vast majority of the time,
but there may be situations when you'd be tempted to use the front-mounted shutter
button when you should really use the top-mounted one. (We discovered this when
trying to take a one-handed macro shot, in which our hand was best positioned
to use the front button, which gave us an image stood on its end.)
Flash
The RDC-7's built-in flash operates in four modes: Off, Auto, Forced and Slow
Synchro. Each mode is relatively self-explanatory and controlled through the
Flash button on top of the camera. The Off setting simply means that the flash
never fires, regardless of lighting conditions. Auto lets the camera judge when
to fire the flash, based on the exposure settings and existing light levels.
Forced means that the flash fires with every exposure and Slow Synchro uses
the flash with a slow shutter speed, allowing a little ambient light into the
image. The Slow Synchro setting is good for subjects with dark backgrounds,
such as night scenes. A Redeye Reduction feature can be activated through the
settings menu, and fires a small pre-flash before the full flash to eliminate
the Redeye Effect. Redeye Reduction can be used with all flash modes except
Off. Ricoh estimates the RDC-7's flash as effective from 2.0 to 8.2 inches (0.6
to 2.5 m) in normal mode. In our testing, however, we found the flash still
reasonably effective as far as 14 feet, without getting too dark. An intensity
setting adjusts the flash strength to Strong, Normal or Soft, giving you a little
added flexibility. The flash is unavailable when the camera is in the Macro,
Sound, Continuous or Motion Picture modes. Additionally, the flash will not
fire in any white balance mode other than Auto.
"PRO" Resolution Modes
One of the RDC-7's most interesting features is its "PRO" high-resolution
exposure function. There are actually three different PRO modes, two of them
making use of the same basic innovation: The camera has the ability to take
two full-resolution shots in very rapid succession, displacing the CCD sensor
a half the width of a pixel between each shot.(For the real technoids out there,
we're told this is accomplished with a mounting arrangement involving a piezoelectric
actuator that minutely shifts the CCD during the second exposure of the series.)
The camera then takes the two slightly offset 3.3 megapixel images and combines
them together into nearly 7 megapixels of raw image data.
 It's important
to note several things about the PRO modes: First, this is a genuine increase
in resolution, unlike interpolation schemes that attempt to increase the number
of final image pixels beyond the resolution of the CCD array. Ricoh's PRO modes
actually are working with twice as much original image data, so the increase
in resolution is real. A second point though, is that this increase in resolution
only occurs along the horizontal axis of the picture: Since the CCD is only
shifted in one direction, you'd expect that the resolution is only increased
in the direction of the shift. (No surprise then, that our tests showed pretty
clearly that (a) the resolution did indeed increase in PRO mode, but (b) only
along the long axis of the pictures.)
It's important
to note several things about the PRO modes: First, this is a genuine increase
in resolution, unlike interpolation schemes that attempt to increase the number
of final image pixels beyond the resolution of the CCD array. Ricoh's PRO modes
actually are working with twice as much original image data, so the increase
in resolution is real. A second point though, is that this increase in resolution
only occurs along the horizontal axis of the picture: Since the CCD is only
shifted in one direction, you'd expect that the resolution is only increased
in the direction of the shift. (No surprise then, that our tests showed pretty
clearly that (a) the resolution did indeed increase in PRO mode, but (b) only
along the long axis of the pictures.)
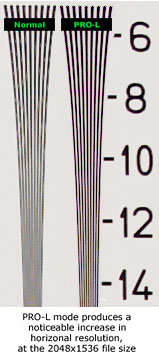
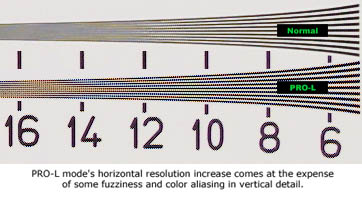
The photos at right below show samples from our resolution test target, shot
in normal and in the PRO-L mode. In this mode, the RDC-7 takes two shots as
described above, then combines them into a single 2048x1536 image, with increased
resolution. As you can see from the image samples here, this works quite well
in the horizontal direction (the direction in which the CCD is actually being
shifted, but less so along the vertical axis, where there's really nothing more
than conventional interpolation being applied.
Two of the PRO resolution modes result in a larger file size, measuring 3072
x 2304 pixels. The standard "PRO" mode simply interpolates the image
up from a single CCD exposure, with fairly predictable results. The image thus
produced is perhaps slightly sharper than one simply resized in Photoshop(tm),
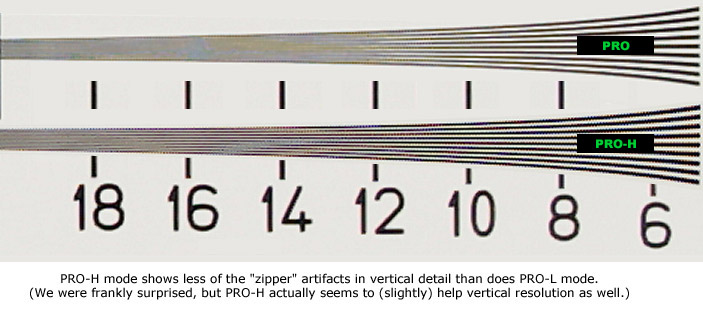
but the differences are pretty slight. PRO-H mode however, again takes two separate,
slightly shifted exposures, and combines them into a single higher-resolution
image. As you can see in the images below, this produces a pretty dramatic increase
in resolution along the horizontal axis, although color artifacts are somewhat
increased at very high spatial frequencies as well. (What we're talking about
here are the faint color tints appearing in the PRO-H sample below, starting
about midway between the "6" and the "8". This laboratory
test target tends to accentuate problems of this sort, due to the regular spacing
of the lines. Natural objects are much less likely to produce this effect, unless
there's something like a picket fence or herringbone cloth pattern.

Given what we know about how PRO-H mode works, and the results we saw in PRO-L
mode, we were surprised to see that it looked like PRO-H mode had slightly better
resolution in the vertical direction as well. It's possible though, that all
we're seeing in the samples below is just a slight increase in in-camera sharpening
applied to the PRO-H mode image. (We say this because there really isn't any
additional picture information being added in the vertical direction for PRO-H
mode images.)
 The other important thing to note about the PRO shooting modes is that there are two separate exposures involved, albeit fairly closely spaced in time. This means that the PRO modes will be of little use with rapidly moving objects. While Ricoh says you can shoot PRO mode pictures handheld, it's clear that your results will be much better if you have the camera mounted on a tripod. The picture at right shows what happens when a part of the subject moves during the exposure: This clip is from our outdoor house photo (the one we call the "Far Field test", which was taken on a fairly breezy day across the street from the house in question. The completely stationary parts of the image were rendered quite sharply, but the leaves of the tree shown here were moving in the breeze, and so produced the artifacts shown.
Of course, nothing comes for free, and the PRO modes do have their price. The first is the limitation of only shooting relatively stationary objects, as seen above. A second one though is the significantly longer shot to shot cycle times that result from all the extra processing the camera's CPU has to do. In the highest-resolution PRO mode, it takes upwards of a minute and a half (that's right, 90 seconds) to process one image and be ready to capture the second. This is a pretty heavy performance tradeoff for a noticeable but not necessarily dramatic increase in resolution.
 One more comparison is perhaps in order here: Let's look at an example of a "real life," still-life subject. The image at right is from the same outdoor house shot, but this time contains only static elements. The sample on top is from standard "PRO" mode, which we saw above produced results pretty equivalent to what you'd get if you just resampled the base-resolution image from the CCD in Photoshop. The lower sample is the same subject shot just a minute or so later in PRO-H mode. This is pretty typical of what we found in both our outdoor and studio tests: Even though PRO-H mode really only boosts resolution in the horizontal direction, the overall appearance of the image is quite a bit crisper, and the eye is somewhat tricked into seeing more resolution in all directions (that is, vertical too) than may actually exist. Pretty slick, even though restricted to stationary subjects!
In practice, we felt that the PRO modes indeed produced a useful increase in resolution, albeit at some cost in cycle times. The fact that this was a resolution increase in one direction only wasn't nearly as apparent in our "natural" test subjects as it was in the resolution test target. Not a panacea by any means, but a feature we'd like to see again, in a camera aimed more at the photo enthusiast: We can imagine a PRO mode equipped camera being useful for studio-based product photography, capturing high-resolution images to be used in printed media. In the RDC-7, the technology looks to us like a bit of an odd fit, as we have a hard time imagining the "mobile professional" caring so much about image resolution that he/she would be willing to trade off camera responsiveness to the degree that the current PRO mode technology requires.
Text Mode
The Text mode allows you to capture images of text (such as from white boards or meeting notes) in pure black and white (no grays in the image at all). For any given image size, images captured in Text mode are about a third of the file size of regular images. We've seen similar modes in other digicams we've tested, but they've been almost useless for actual capture of text documents at high resolution due to the exceptionally long processing times they typically require. The RDC-7's text mode is quite different though, requiring only 14 seconds in high resolution mode (2048 pixels wide), and 6.2 seconds in low resolution mode (1024 pixel wide images). This still couldn't be considered "high speed", but is realistically about as fast as a low-end desktop scanner could collect the same data. - And resolution is probably good enough for the resulting images to be used with an OCR (Optical Character Recognition) program too: With 2048 pixels across perhaps 10 inches of active area on a typical typewritten page, you have about 200 ppi (pixels per inch) resolution, about the lower limit for usable OCR. Thus, the RDC-7 is probably the first digicam we've tested that we could actually say would be usable for collecting document images. Very impressive, and a feature we've had multiple email requests for from readers.
Sound Mode
The RDC-7 allows you to record audio files of arbitrary length. The available recording time is governed by the amount of available memory space, and is displayed in the LCD monitor and the small status display panel upon entering the mode. The microphone is located just beneath the flash on the front of the camera. Sound files are saved in the AVI format.
Continuous Shooting Mode
Continuous Shooting allows you to capture a rapid succession of images with one press of the shutter button. You can record up to 164 640 x 480, 70 1024 x 768 or 24 2048 x 1536 images continuously, under the Economy quality setting. As the quality setting increases, the maximum number of sequential images decreases. Shot to shot cycle times vary, depending on the image size, quality and amount of image information for the camera to process. Typical capture rates range from 1.2 to 1.6 seconds between frames. (Interestingly, the larger image size results in faster frame rates, apparently because the camera subsamples the CCD data to obtain the smaller-size image. This results in a higher-quality small image, but at the cost of increased processing time. Continuous mode on the RDC-7 is fairly slow compared to other high-end 3 megapixel digicams we've tested.
Motion Picture Mode
Like the Sound recording mode, the Motion Picture mode allows you capture moving images with sound, of any duration. The available recording time is displayed in the LCD monitor and on the small status display panel, and depends on the amount of free memory space. Note that the optical zoom is disabled in this mode, and the exposure compensation, white balance and focus are locked once the shutter button is pressed. This behavior is not uncommon among digicams we've tested that have movie modes, but we always prefer to see a zoom option during "filming." This is somewhat of a tradeoff for camera designers though, as the small confines of the typical digicam body often mean that allowing zooming would introduce objectionable motor noise into the audio of recorded movies. On the positive side, playback on the camera's screen is very clear, and the sound recording is quite sensitive. (It did seem rather prone to picking up ambient noise, though:We realized that we really need a standardized test for sound recording, as this is becoming a more common feature on digicams.)
Interval Shooting Mode
You can set the camera to automatically take pictures at set intervals, from 30 seconds to three hours in 30 second increments, to achieve the effect of time-lapse photography. The camera will take pictures at the set interval continuously until the mode is canceled or the SmartMedia card or internal memory runs out of room. Even if the camera is powered by the AC adapter, the automatic shutoff feature will turn the camera off after 24 hours. You can take normal images without affecting the Interval mode at any time, by simply pressing the shutter button. We confess to being rather puzzled as to why Ricoh chose to have the camera shut itself off after 24 hours, even when it's plugged into an AC adapter: We're sure that at least some folks will want to capture longer-duration time-lapse sequences with the RDC-7, and there really doesn't seem to be any good reason why the camera should shut off after 24 hours.
Time Exposure Mode
The Time Exposure mode helps you capture subjects in low light settings. Normal (automatic) exposure provides for shutter times down to 1 second. Time exposure mode lets you select the desired shutter speed, with options of one, two, four and eight seconds. The RDC-7 did quite well in the low-light category, producing usable images down to light levels of only 1/4 of a foot-candle, and somewhat usable ones all the way down to 1/16 of a foot-candle, albeit with significant noise. For reference, a typical city night scene under average street lighting is a light level of about 1 foot-candle. Although the RDC-7 has a dual-mode autofocus system (both active and passive), we found that it only worked reliably down to about 1 foot-candle: At lower light levels, we had to use the manual focus option. (For those of you interested in very low light photography with the RDC-7, be sure to check out Mike Chaney's excellent Qimage Pro program, which does an amazing job of removing image noise without disturbing picture detail.)
Shutter Lag/Cycle Times
When you press the shutter release on a camera, there's usually a lag time before the shutter actually fires. This time allows the autofocus and autoexposure mechanisms time to do their work and can amount to a fairly long delay in some situations. Since this number is almost never reported on, and can significantly affect the picture taking experience, we now routinely measure it using a special electronic test setup.
|
|
||
|
|
|
|
| Power On -> First shot |
|
Start with lens retracted. Time is delay until first shot captured. |
| Shutdown |
|
Since no need to wait for lens to retract, "shutdown" is effectively zero. Times shown are those required to clear the buffer and finish writing to the card so it can be removed, at minimum resolution, and maximum/uncompressed TIFF mode. |
| Play to Record, first shot |
|
Time is delay until first shot captured. (Pretty fast) |
| Record to play (max/min res) |
|
High number is for max normal resolution JPEG, lower is for minimum resolution JPEG. |
| Shutter lag, full autofocus |
|
Slightly slower than average |
| Shutter lag, manual focus |
|
About average |
| Shutter lag, prefocus |
|
About average |
|
|
|||
|
|
(Min:Secs) |
|
|
| Pro Mode |
|
|
Times are for "normal" PRO mode, fine/normal/economy JPEG. (NOTE that times are in Minutes:Seconds) |
| Pro Mode Uncompressed |
|
|
Time is for normal PRO mode, uncompressed. (NOTE that times are in Minutes:Seconds) |
| Pro-L Mode |
|
|
Time is for PRO-L mode, fine/normal/economy JPEG. (NOTE that times are in Minutes:Seconds) |
| Pro-L Mode Uncompressed |
|
|
Time is for PRO-L mode, uncompressed. (NOTE that times are in Minutes:Seconds) |
| Pro-H Economy |
|
|
Time is for PRO-L mode, fine/normal/economy JPEG. (NOTE that times are in Minutes:Seconds) |
| Pro-H Uncompressed |
|
|
Time is for PRO-H mode, uncompressed. (NOTE that times are in Minutes:Seconds) |
| Uncompressed L/M/S |
|
|
Time is for uncompressed file format, large/medium/small file sizes. (NOTE that times are in Minutes:Seconds) |
| L Fine |
|
|
Time is for large image at "Fine" JPEG quality setting. (Somewhat slow) |
| S Economy |
|
|
Time is for small image at "Fine" JPEG quality setting. (Somewhat slow) |
| L Fine Flash |
|
|
Flash recharge time increases cycle time somewhat. |
| S Economy Flash |
|
|
Flash recharge time increases cycle time somewhat. |
| LF Continuous |
|
|
Somewhat slow, apparently no buffer memory. |
| SE Continuous |
|
|
Oddly, is slower than the Large/Fine continuous mode. |
| Text Mode |
|
|
High/low resolution modes (Surprisingly fast for a "text" mode!) |
Operation and User Interface
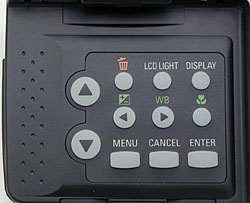
At first glance, the RDC-7's user interface left us wondering how to control it, as there were only 4 buttons in evidence on the outside of the unit. As it turns out, a full control panel is hidden by the flip-up LCD screen, and there are plenty of buttons to make controlling the RDC-7 a simple matter. A quick read of the manual should clear up any questions users might have, as the camera operation is very straightforward. The majority of the camera settings are controlled through the LCD based menu system, but you can change the flash mode, activate the self-timer, enter the macro mode, and change the picture quality, white balance and exposure compensation without entering the menu system. Navigation of the LCD menu is quite uncomplicated as well, featuring a scrollable list of options and clear directions on changing settings. The camera is set up to be held either vertically or horizontally, with two shutter buttons and two zoom control levers. One handed operation is possible (and comfortable) in the vertical position, but a little awkward when shooting horizontally. Overall, we found the RDC-7 to be an easy camera to understand and operate. Following is our standard list of controls and functions.

Primary Shutter Button: Located on the top panel of the camera, this flat, silver button sets exposure and focus when halfway pressed, and fires the shutter when fully pressed. It also serves as the stop and start of recording for sound and movie files. In Playback mode, when the "Copy All Files" option is selected, the shutter button acts as the start button and initiates the copying process once pushed.
![]()
Secondary Shutter Button: Sitting next to the lens on the front of the camera, this button also sets focus and exposure when halfway pressed and fires the shutter when fully pressed. This secondary shutter button is for use when holding the camera in a vertical position.
![]()
Pic Button: Positioned to the left of the primary shutter button, this button cycles through nine image quality and size settings (640 x 480, 1024 x 768 and 2048 x 1536 sizes and Fine, Normal and Economy quality settings). Note that the uncompressed formats and the "PRO" modes are accessed via the LCD menu system, rather than by the Pic button.
![]()
Self-Timer Button: Directly to the left of the Pic button, this button activates the Self-Timer mode. It can also cancel the mode and the self-timer countdown.
![]()
Card / IN Button: Just below the Self-Timer button, this control determines where images are saved by alternating between the (optional) SmartMedia card and the eight megabyte internal memory.
![]()
Flash Button: To the right of the Card / IN button, this button cycles through four flash modes:
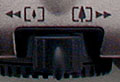
Primary Zoom Lever: Situated directly over the mode dial, this lever rocks back and forth to control the optical zoom.
![]()
Display Button: Located in the far right corner of the Operation Panel (beneath the LCD monitor), this button turns the LCD information display on and off.
![]()
LCD Light Button: Directly to the left of the Display button, this button turns the LCD backlight on and off.
![]()
Erase Button: Sitting to the left of the LCD Light button, this button (marked with an orange trash can) calls up the Erase menu, with the following options (each with an option to cancel):
![]()
Macro Button: Positioned beneath the Display button, this button (marked with a green flower symbol) activates the macro mode, which changes the focal range to 0.4 to 9.4 inches (1 to 24 cm).
![]()
White Balance / Right Arrow Button: Located to the left of the Macro button, this control serves two functions. In standard record mode, pressing it calls up the white balance menu, featuring Auto, Daylight, Overcast, Tungsten and Fluorescent white balance settings. In any settings menu, it serves as the right arrow for making changes in menu options. In Playback mode, it scrolls through images in the thumbnail display, and controls the volume when playing back sound files.
![]()
+/- / Left Arrow Button: As with the White Balance button, this button serves dual functions, and sits to the left of the White Balance button. In standard record mode, this button accesses the range of exposure compensation settings (from -2 to +2 in 1/2 EV increments). In any settings menu, it serves as the left arrow for making changes to menu selections. In Playback mode, it scrolls through images in the thumbnail display, and controls the volume when playing back sound files.
![]()
Enter Button: Residing below the Macro button, this button confirms menu selections.
![]()
Cancel Button: Situated to the left of the Enter button, this button cancels menu selections.

Menu Button: Located to the left of the Cancel button, this button calls up the settings menu for each mode. It also dismisses the menu screen.

Up and Down Arrow Buttons: Positioned on the far left side of the Operation Panel, these buttons navigate through menu options in each of the settings menus. In Playback mode, the buttons scroll through captured images and play back sound and movie files. When shooting in manual focus mode, the up and down arrows adjust the focus.
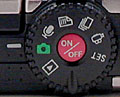
Mode Dial: Located on the back side of the camera, this notched dial sets the camera's operating mode:

On/Off Button: Encircled by the mode dial, this red button turns the camera on and off.
Secondary Zoom Lever: Nestled underneath the mode dial on the bottom of the camera, this secondary zoom lever controls the optical zoom and is convenient when holding the camera vertically.
![]()
Dioptric Adjustment Dial: This small dial is located beneath the optical viewfinder and adjusts the viewfinder's focus to accommodate eyeglass wearers.
Camera Modes and Menus
Setup Mode: The Setup mode is accessed by turning the mode dial to the "Set" position, which automatically displays the Setup menu in the LCD monitor.
 Format: Formats either the internal memory or the SmartMedia card, depending on which has been selected with the Card / IN button.
Motion Picture Mode: Noted on the mode dial with a white movie camera symbol, this mode sets up the camera to record moving images with sound. White balance and exposure compensation are adjustable in this mode, and the flash is automatically disabled. Pressing the Menu button activates the following settings menu:
 Focus: Sets the camera's focus control to either Automatic or Manual.
Continuous Shooting: Accessed by turning the mode dial to the multi-shot symbol, this mode allows you to capture multiple images in rapid succession with just one press of the shutter button. Shot to shot cycle time varies depending on memory space and the image size and quality settings. The flash is automatically disabled in this mode, but white balance and exposure compensation are adjustable. The Menu button calls up the following options:
 Focus: Adjusts the camera's focus control to either Automatic or Manual.
Text Mode: Marked on the mode dial with a white text symbol, this mode allows you to capture images of text, either on papers, white boards or signs. All of the flash modes are available, as is the exposure compensation adjustment. Pressing the Menu button pulls up these options:
 Image With Sound: Records a 10 second sound byte with the image.
Sound Mode: This mode is marked on the mode dial with a white microphone symbol, and allows you to record audio files of any length (depending on available memory space). There is no settings menu for this mode.
Still Mode: This mode, noted by a green camera symbol on the mode dial, sets up the camera to record single, still images. You have control over flash, white balance, exposure compensation, image quality and size, as well as access to the self-timer and macro modes. A push of the Menu button enables the following settings menu:
Playback Mode: Activated when the mode dial is turned to the white playback symbol, this mode lets you scroll through captured images and play back movie and audio files. While in this mode, the Menu button accesses the Play menu:
 Multi Image: Displays as many as six thumbnail images at a time on the LCD screen.
Image Storage and Interface
The RDC-7 stores images either to its internal eight megabytes of memory or to a SmartMedia card. Since the camera has the capability to store images internally, it does not come with a SmartMedia card. However, memory cards may be purchased separately, in sizes up to 64 megabytes. The SmartMedia slot is conveniently tucked beneath the Operation Panel, with a sturdy plastic door that slides open and clicks securely into place. We actually found this compartment a little tricky to open, and decided that the best method is to close the LCD monitor and use the flat panel as a grip to slide the door open. You can select where you would like to save images to by pressing the Card / IN button on top of the camera, which cycles between the SmartMedia card and the internal memory.
SmartMedia is easily write protected by placing a write protection sticker over the designated area on the card. Likewise, removing the sticker disables the protection. Remember that these stickers can only be used once and write protection may fail if the sticker gets dirty. To protect individual images from accidental erasure (except from card or memory formatting), the settings menu in Playback mode gives you an image protect option. Protected images are denoted by a key symbol on the display. Protection can be removed through the same process.
In normal shooting mode, the RDC-7 offers image sizes of 2048 x 1536, 1024 x 768 and 640 x 480, with image quality settings of Fine, Normal and Economy. An uncompressed TIFF option is available for all three image sizes through the Record menu. Also available through the Record menu are the PRO image quality modes. The basic PRO setting changes the image size to 3072 x 2304 (simply using interpolation). PRO-L records 2048 x 1536 images with improved detail (using two separate exposures to increase the amount of image information), and PRO-H also records higher resolution images (again using two separate exposures), but at the 3072 x 2304 image size.
The RDC-7 allows you to copy images from the SmartMedia card to the internal memory and vice versa, through the Copy function in the Playback menu. Also when in Playback mode, the Erase button pulls up the Erase menu, which allows you to delete the currently displayed image, all images, or selected ones. If you choose to delete selected images, the camera activates the six image thumbnail display, from which you can select the images to erase.
The table below shows the image capacity and compression ratios for the eight megabyte internal memory and the three standard resolution sizes for the RDC-7.
| Resolution/Quality vs Image Capacity |
|
|
|
|||
|
|
|
|
|
|
|
|
| Uncompressed |
|
|
|
|
|
|
| Fine Quality |
|
|
|
|
|
|
| Normal Quality |
|
|
|
|
|
|
| Economy Quality |
|
|
|
|
|
|
The RDC-7 connects to the host computer via a fast USB interface. In our tests, we transferred a 13.5 megabyte(!) high-resolution PRO-mode image to the host PC in 2 minutes and 34 seconds, a data-transfer rate of 87.6 Kbytes/second. This is enormously faster than cameras with RS-232 serial connections, but somewhat slower than we're accustomed to seeing for USB interfaces. Still, it's fast enough that you probably don't need an external card reader for routine work, making the RDC-7 a pretty well self-contained imaging solution.
Video Out
The RDC-7 is equipped for both NTSC and PAL video formats, adjustable through
the Video Out option in the Setup menu. US and Japanese models are shipped with
an NTSC cable and European models with the appropriate PAL cable. Once the camera
is connected to a television set, you can review captured images and play back
movie and sound files. You can also record files to video tape by connecting
a VCR.
 Power
Power
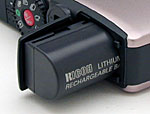
The RDC-7 utilizes a rechargeable Ricoh DB-20 lithium-ion battery pack for power,
and includes one battery pack and a charger in its packaging. An AC adapter
also accompanies the camera, and is highly recommended when performing time
consuming tasks like downloading images, reviewing captured files or shooting
in the Interval photography mode. Ricoh estimates that a fully charged battery
should provide about 50 minutes of recording or playback time. One thing we
noticed is that the camera doesn't report the amount of battery consumption
until the battery gets quite low, at which point you begin to receive battery
warnings. We recommend picking up a spare and keeping it fully charged, especially
on long trips, since you never really know exactly how much battery time you
have left.
To save power, the camera features an auto shutoff option. Through the Setup
menu, you can determine the period of time before the camera automatically shuts
down. There's also a Power Save option, which decreases the brightness of the
LCD. Of course, one of the best ways to conserve battery power is to shoot without
using the LCD monitor, relying on the optical viewfinder. This is especially
convenient on the RDC-7, as it features a small status display panel on top
of the camera that reports the majority of the camera's settings, including
the estimated number of available images.
The table below shows the amount of power consumption for various camera operating
modes.
|
|
|
| Capture Mode, w/LCD |
|
| Capture Mode, no LCD |
|
| Half-pressed shutter w/LCD |
|
| Half-pressed w/o LCD |
|
| Memory Write (transient) |
|
| Flash Recharge (transient) |
|
| Image Playback |
|
Note that the power consumption numbers we've reported above were measured at the external power jack, at a supply voltage of 5.0 volts: Since the battery voltage is only 3.7 volts the actual current drain would be a fair bit higher. As noted, Ricoh rates the RDC-7's battery as providing approximately 50 minutes of run time in either record or playback modes. Based on our tests, we'd say this was about right, perhaps a bit conservative in playback mode, and a bit optimistic in record mode. The RDC-7 is one of several cameras we've tested lately that use this new, small LiIon rechargeable battery. While the smaller battery really helps make the cameras more compact, they just don't pack as much juice as the traditional set of 4 NiMH AA-cell rechargeables. We'd therefore strongly recommend buying a second battery along with your RDC-7: It'll be well worth the added cost when you're out on any sort of extended shooting expedition.
Ricoh ships the RDC-7 with a very nice little quick-charger that also serves as the AC adapter for the camera. This unit recharges the batteries to 90% of full capacity in about 60 minutes, and will top them off after an additional 40 minutes. (A pretty fast charge time overall.) Oddly though, the battery won't recharge in the camera itself: You have to remove it and put it into the charger to get it recharged. Not a problem, just something different than what we're used to seeing. The 1-hour recharge time in the external charger is a definite plus though, since most in-camera charging takes at least several hours in our experience.
Included Software
Two software CDs are packaged with the RDC-7, one for Windows 95 or better and one for Macintosh OS 8.1 to 9, each with a wealth of software. Both CDs contain an entire suite of ArcSoft software packages, including PhotoStudio, PhotoBase, PanoramaMaker, PhotoFantasy, VideoImpression, PhotoPrinter and PhotoMontage. There's also a copy of QuickTime and various drivers and camera utilities. (QuickTime is a software package from Apple Computer that's become an industry standard for displaying video on both Mac and Windows computers. It's required to be able to view the movie files the RDC-7 produces on your computer.) Both a USB and a PC serial cable come with the camera as well. The PhotoBase software organizes your images into "catalogs" and allows you to create entire libraries of images. PhotoStudio gives you a world of creative options and editing tools for enhancing and correcting your images. PanoramaMaker allows you to stitch together several individual images into one large panoramic shot. (Since the RDC-7 doesn't have a panorama utility, you'll have to be precise in lining up shots. You'll also need to watch for variations in exposure or color balance as you pan around to collect the images that will make up your panorama: A good trick to be aware of is to always start at the same position with a half-press of the shutter button, then rotate the tripod head to the position needed for the next frame in the sequence before fully pressing it. This will "lock" the exposure and white balance at the same values for every image in the series: A little tedious, but workable.) PhotoFantasy lets you get even more creative, with a variety of fun and unique templates for greeting cards, calendars, etc., and the ability to graphically enhance your images with drawing tools. VideoImpression provides some minor video editing capabilities, allowing you to add music or text to your movies. PhotoPrinter sets up your images for printing, and the PhotoMontage software gives you the ability to create one large mosaic image out of hundreds of smaller ones. We're really impressed with the amount of software that comes with the RDC-7, as it enables you to be even more creative with your imaging (not to mention getting more bang for your buck). With the ArcSoft packages comes a connection to PhotoIsland.com, which keeps you updated on all of ArcSoft's latest promotions and provides the ability to share photos with friends and family members online.
Test Results
In keeping with our standard policy, our comments here are rather condensed, summarizing our key findings. For a full commentary on each of the test images, see the RDC-7's "pictures" page.
As with all Imaging Resource camera tests, we encourage you to let your own eyes be the judge of how well the devices performed. Explore the images on the pictures page, to see how well the RDC-7 performed, and how its images compare to other cameras you may be considering buying.
The RDC-7 generally produced very good images. Color accuracy was good, although the "subtractive primary" colors (yellow, cyan, and magenta) were a bit muted,, and skin tones were just a bit on the pinkish side. Overall color accuracy was quite good though. Choices for white balance selection were a bit limited, as befits a camera intended more for the point & shoot user than the photo enthusiast. The auto white balance setting worked very well in all but the most extreme lighting conditions (incandescent did better in our indoor portrait shot), and we found the color balance to be unusually neutral across the full tonal range. Tonal range was quite good as well, with the camera doing a good job of holding detail in both highlights and shadows, and what noise was present was fairly minimal in shadow areas. We did find that the RDC-7's flash is unusually well matched to indoor incandescent lighting, and the range of control for flash exposures is actually quite impressive.
The most unique feature of the RDC-7 is it's collection of "PRO" resolution modes, in which two successive, slightly shifted images are captured in rapid succession and then combined to result in a higher-resolution final image. We found that this genuinely increased camera resolution in the horizontal direction on our resolution target, but not in the vertical direction. On "natural" images though, the overall effect was definitely one of improved sharpness and detail. In normal exposure mode, we called the vertical resolution at 750-800 lines per picture height,, but aliasing began to be evident as early as 600 lines. (We did see more color artifacts in fine vertical detail than we're accustomed to on the current crop of 3 megapixel digicams.) Normal-mode horizontal resolution was 750 to 775 but aliasing again was visible as early as 600. As you'd expect, "standard" PRO mode (which just interpolates a large image up from the same basic CCD source data) showed no improvement in resolution over normal exposure mode, and in fact to our eye worsened matters a little bit. PRO-L mode is an interesting one, in that the camera uses two images captured in rapid succession, slightly shifted relative to each other to produce a single image at the normal 2048 x 1536 file size. Confirming the results of our "real world" tests, we found that PRO-L mode vertical resolution was about the same as that in normal exposure mode, but with the introduction of some fuzzy-looking "zipper" artifacts superimposed. By contrast, horizontal resolution is significantly improved in PRO-L mode, looking good to 900 lines or so, but minor color artifacts are visible starting at about 800. PRO-H mode again uses two images captured in rapid succession, with a CCD shift in between, but combines them in such a way as to produce a single image with the significantly larger image size of 3072 x 2304 pixels. Again confirming our "real-world" test results, horizontal resolution in PRO-H mode is significantly boosted, looking good to nearly 1000 lines per picture height, but does show artifacts starting back at about 800 lines. Vertical resolution in PRO-H mode does seem improved relative to that in other modes, showing good detail out to roughly 900 lines, but minor artifacts are again evident as far back as 600 lines. (We did see considerably less of the "zipper" artifacts in PRO-H mode though).
With either of the double-shot PRO resolution modes, it's important to note that they are really only usable with completely stationary objects: Any motion of the camera or subject produces very noticeable artifacts. Still, for stationary subjects, the improved resolution is quite noticeable. Normal-mode resolution is about average among current 3 megapixel digicams, but PRO mode options provide considerably more.
The RDC-7 is primarily a point & shoot camera, and as such, its exposure control is fairly limited. No control is provided over aperture or shutter speed, other than the time-exposure mode for low-light shooting. You do have a +/- 2EV exposure compensation adjustment, and can select increased light sensitivity settings of ISO 200 and 400, but that's about the extent of your exposure options. We did find that the higher ISO settings produced less noise than we've generally seen on current digicams, and the RDC-7's low light shooting was pretty good. We rated it as good to about 1/4 to 1/8 of a foot candle for low-light shooting, although image noise began to be an issue at that level. The autofocus stopped working at about 1 foot candle though, so you'll need to use the manual focus option for anything darker than a typical well-lit city night street scene.
The RDC-7's viewfinders (optical and LCD) weren't as accurate as we normally like to see, the optical covering 82-85% of the final image area, and the LCD 86-88%. We also found about 1 degree of rotation in the optical viewfinder, an annoying trait that you can learn to overcome fairly easily, but that we really feel users shouldn't be forced to. As you'd expect, the LCD viewfinder had no rotation error, so you'll want to use it if you're dealing with more critical framing.
The RDC-7 did very well in the macro category, capturing a minimum area of only 0.94 x 0.70 inches (23.77 x 17.83 mm), much smaller than most digicams can manage. The flash is disabled in macro mode though, which makes sense given how close the camera can focus.
Overall, the RDC-7 has about average image quality among the current crop of 3 megapixel digicams, but stands out in the areas of compact portability, video and sound recording, macro shooting, and its unusual "PRO" resolution modes. Designed for the "mobile professional", we'd judge it to be a good choice for users in that category.
Conclusion
With its sleek shape and very portable dimensions, the RDC-7 is a great choice for users who hold portability as a top priority. Image quality is good, about average for the current 3 megapixel category, but the camera is clearly designed for professionals on the move, rather than the photo enthusiast. Designed for the point & shoot user with portability and video/audio capability as key priorities, it offers only limited exposure controls (no aperture or shutter priority exposure modes, for instance), although flash exposure is surprisingly flexible. The extended-resolution "PRO" exposure modes are probably the most unusual aspect of the camera, and do in fact provide a significant boost in resolution. The downside though, is that these modes are only usable with stationary subjects. Some reviewers of the RDC-7 have reacted to how slow the camera is when shooting in PRO mode, but to focus solely on those modes as a measure of the camera's speed does it a disservice in our opinion: In ordinary shooting modes, it's about average in its shot to shot speed. The term "mobile professional" is already becoming a bit overused, but it does describe a significant group of potential digicam users out there, and we think the RDC-7 is well-suited to them. If you travel a lot & want a 3 megapixel digicam that slides easily into a shirt pocket and has some unique features to boot, the RDC-7 could easily be the camera you've been waiting for!
<<RDC-7 Sample Images | Additional Resources and Other Links>>
Reader Comments!
Questions, comments or controversy on this product? Click
this link to see what other Imaging Resource readers have had to say about
the Ricoh RDC-7, or add comments of your own!
