Back
to Full Fuji FinePix S1 Pro Review
Back
to Full Fuji FinePix S1 Pro ReviewGo to Fuji FinePix S1 Pro Data Sheet
Go to Fuji FinePix S1 Pro Pictures Page
Up to Imaging Resource Cameras Page
Use your browser's "Back" button to return to the previous page, or the links at the top and bottom of this page to navigate to related information. If you have difficulty fitting the text on this page onto your printer output, simply resize your browser window to a narrower width and print again.
Remember us when it's time to buy!
Dave here: Have our reviews been helpful to you? (Is this article you're reading right now useful?) Preparing this level of information on as many products as we do is incredibly hard work, not to mention expensive. Things on the Internet may look like they're free, but they're not. (As a lot of big dot.com companies are finding out these days.) Somewhere, somebody has to pay to produce worthwhile content. YOU can help us though, by remembering us when it comes time to make your purchase. Would you consider coming back to our site and clicking-through to one of our advertisers to make your purchase? Every dollar you spend with one of our advertisers helps us directly (in affiliate fees) or indirectly (the advertiser will keep renewing their ad contract with us). To make it easy for you to support us, here's a URL you can visit, to see all our current advertisers, with links to click on that will register your visit to them as having come from our site. It's up to you where you buy, but Mike, Mike, Kim, Yazmin, Marti and I would be really grateful if you'd help us out by choosing one of our advertisers to purchase from.
Thank you for your support!
Dave Etchells, Founder & Publisher
Visit our "Buy Now" Page:
https://www.imaging-resource.com/buynow.htm
Back
to Full Fuji FinePix S1 Pro Review
Go to Fuji FinePix S1 Pro
Data Sheet
Go to Fuji FinePix S1 Pro
Pictures Page
Up to Imaging Resource Cameras
Page
Fuji FinePix S1 ProA 3.5 megapixel "SuperCCD" gives superb color and amazing low-light capability in an under-$4,000 SLR digicam! Review First Posted: 8/1/2000 |
|
 |
|
3.54 megapixel "SuperCCD makes up to 3024x2016 image files |
|
|
Absolutely beautiful color! | |
|
|
Fantastic low light performance | |
|
|
Uses most Nikon F mount lenses | |
|
|
Exceptional exposure control flexibility | |
Fuji has long been a player in the digicam arena, creating a line of popular consumer-level models over the last couple of years. From the email we receive, it's apparent that they've been very successful in doing so, as we consistently note a "happy" tone from Fuji users that really stands out amid the flood of correspondence we receive. A while back, Fuji teamed with Nikon to create a digital Single Lens Reflex (SLR) camera (the E2S) that used "reflex optics" to match normal Nikkor lenses to the much smaller CCD sizes that were then prevalent. The resulting unit was rather cumbersome due to the additional optics inside the body, and perhaps for that reason never achieved a high market penetration. Recently, Fuji has made waves with their "SuperCCD" technology, which has promised significant improvements in light sensitivity and resolution, but thus far has been packaged in a camera (the FinePix 4700) that offered only a heavily interpolated option as its "full resolution" mode. To our mind, this tended to obscure some of the potential benefits of the SuperCCD technology.
Now, Fuji has entered the interesting ground between upper-echelon amateur and cost-conscious pro photographers, building an all-new digital SLR combining a SuperCCD sensor with a Nikon N60 film-camera body. The resulting FinePix S1 Pro SLR has been both much awaited and much debated on the Internet, not the least of which because of its maximum file size of 6.1 megapixels. Now that the camera is actually shipping in the US and full-production test units are available for evaluation, we're finally able to bring you a full review of this remarkable new camera. We say "remarkable" because of the exceptional image quality it delivered in our tests: The FinePix S1 Pro has the distinction of delivering some of the best color we've yet seen from any digicam at any price point. It also offers exceptionally good low-light shooting capability, and a really excellent user interface that makes using it a pleasure. Given the "consumer" genesis of its body, it wouldn't be your first choice to pack along on a safari with rain, dust, and mud, as it just doesn't have the level of environmental seals found in high-end professional film cameras. By the same token, it wouldn't the first choice for high-speed sports action, due to it's maximum frame rate of 1.5 frames per second. For "the rest of us" though, who shoot under more moderate conditions, it could very well be the camera many have been waiting for, combining Nikon F-mount compatibility, superb color, and excellent ease of use. Compared to consumer-level digicams, its speed and capabilities aren't even in the same league, it's that far superior. Compared to other professional SLRs, it's color handling, low light capability, and ease of use could win it many converts. Overall, a dramatic entry in the SLR digicam arena, and one sure to significantly affect that market.
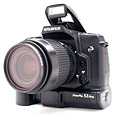
Based on the Nikon N60 film camera body, Fujifilm's new FinePix S1 Pro digital SLR camera is a welcome addition to the prosumer digicam marketplace. Its familiar 35mm styling includes the ability to accept Nikon's F series lenses, which should thrill any Nikon photographer with an extensive lens collection. Compared to the consumer-level digicams we usually test, the S1 is a bit chunky to handle, measuring 5.8 x 4.9 x 3.1 inches (149 x 125 x 80 mm). Weighing in at 28.2 ounces (800 g) without the lens, you'll definitely want to take advantage of the accompanying neck strap. Next to digital SLRs based on pro-model camera bodies though (such as the Nikon D1 and the Kodak SLR series), the S1 Pro is positively svelte by comparison, being more the size of a midrange professional film-based SLR, minus the digital accouterments.
Probably the biggest buzz about the S1 is its CCD. Using the Fuji-developed "SuperCCD" honeycomb sensor pattern, it actually carries 3.4 million active sensor elements, which are used to produce either 3.5 or 6.1 megapixel final file sizes. Fuji's initial presentation of the S1 as a 6.1 megapixel camera caused a lot of controversy, as many felt that the camera should be rated by its sensor resolution, rather than the file size produced. For their part, Fuji claimed that the innovative honeycomb sensor layout allowed greater interpolation than did the normal rectangular pattern used by conventional imagers. (Just for the record, all single-sensor digicams interpolate, it's just a matter of to what degree.) In our full review, we delve into the issues of sensor resolution, comparing the output of the S1 to cameras with more conventional imagers. Bottom line, there may be some merit to Fuji's claims for improved interpolation accuracy, but overall we feel that the S1 is best considered as just a very good 3.4 megapixel camera.
One of the benefits of SLR digicams like the S1 Pro is the TTL (through the lens) optical viewfinder, which gives you a more accurate representation of what the camera is seeing, complete with a small information readout at the bottom of the screen that reports aperture, shutter speed, focus, etc. We found the optical viewfinder of the S1 Pro to be very accurate, showing between 94% and 97% of the final field of view. A 2.0 inch color LCD monitor on the back panel displays an image preview, complete with histogram functions, and also reviews captured images when in Playback mode. The downside of the SLR design though, is that the LCD monitor can't provide a "live" viewfinder display. Optically, the S1 features a lens mount that accommodates most of the Nikon F series lenses, although advanced metering modes only work with the more recent models. A manual/auto focus switch on the front of the camera allows you to change between the two focus modes.
The S1 provides a great deal of exposure control, with a wide variety of exposure modes and adjustments available. The main exposure modes include Full Auto, Programmed, Aperture Priority, Shutter Priority and Manual. There's also a handful of special exposure modes, including Portrait, Landscape, Macro, Sports and Night Scene. The main difference between the Full Auto and Programmed modes is that in Full Auto, the camera controls every aspect of the exposure (except flash). In Programmed mode, the camera still maintains control, only the user can select from a range of equivalent exposure settings as well as adjust the exposure compensation (from -3 to +3 EV in 1/3 EV increments, an unusually broad range). Aperture and Shutter Priority modes allow the user to select the named exposure variable (aperture or shutter) while the camera selects the other one. Aperture settings will vary with each lens used, but shutter speeds range from 30 to 1/2,000 seconds. Of course, Manual exposure mode gives the user control over both exposure variables. The special exposure modes are designed to work in specific shooting situations, and each one is relatively self-explanatory. However, we should mention that the Sports mode also features a Continuous Shooting function, which captures up to five consecutive frames at approximately 1.5 frames per second.
The S1 provides a wide array of other exposure controls through the function buttons and the small black and white LCD data readout on the back panel. White balance can be set to Auto, Sunny, Shade, Fluorescent 1, Fluorescent 2, Fluorescent 3, Incandescent or Custom values. ("Custom" is a manual preset option in which you use a white reference card to set the white balance for the current lighting conditions. The camera's light sensitivity can also be adjusted, with available settings of ISO 320, 400, 800 and 1600 ISO equivalents. Color, tone and sharpness settings can also be adjusted through the Function menus, and exposure metering automatically alternates between three systems (3D 6-zone multi-pattern, standard 6-zone multi-pattern and center-weighted), depending on the exposure mode. The inclusion of the smaller rear LCD data readout for the Function menus and the top LCD panel for exposure settings is very beneficial in saving battery power, as you can change nearly all of the exposure settings without resorting to the larger LCD monitor.
For flash photography, the S1 features a pop-up flash and a hot shoe for connecting a more powerful external flash unit. The built-in flash works in several modes, including Auto, On, Off, Anti Redeye, Anti Redeye with Slow Sync and Slow Sync. In Self-Timer mode, a self-timer counts down from two or 10 seconds before firing the shutter, and flashes the AF assist light on the front of the camera during the countdown.
One of the other really great design elements on the S1 is the memory card slot, which actually accommodates CompactFlash Type I and II as well as SmartMedia cards. This definitely increases your memory card options, and enables you to use the IBM MicroDrive CompactFlash cards, now available in sizes up to 1 gigabyte(!). A USB cable accompanies the camera, as well as a software CD loaded with Adobe Photoshop 5.0 LE, Fujifilm Camera Shooting Software, USB drivers for Windows 2000, 98 and Macintosh, Fujifilm EXIF Viewer, Fujifilm EXIF Launcher and Fujifilm DP Editor (for use with DPOF Digital Print Order Format printing devices). The Fujifilm software basically allows you to connect the camera to the computer and download or browse images, while the Photoshop LE application provides basic image editing and correction tools. An interesting application included with the camera is the Camera Shooting Software, which allows you to remotely operate the camera from your computer, using the USB connection.
US models of the S1 come with an NTSC video output cable for connecting to a television set, and we assume that European models will be equipped for PAL timing. For power, the S1 utilizes four AA batteries(NiMH rechargeble highly recommended) and two CR123A lithium batteries, with an AC adapter and battery charger available as accessories.
Overall, the S1 provides all the manual exposure control you need, with the flexibility of automatic and programmed modes. The incredible range of available lenses, extensive color adjustments and histogram functions, and all-around excellent color make it suitable for both advanced amateurs and professional photographers entertained. Professional action shooters will bemoan the relatively slow 1.5 frame per second continuous-shooting speed, but the camera is dramatically faster than any consumer-level digicam we've tested. Unless you absolutely need a 4 frame per second motor-drive capability, the Fujifilm S1 Pro should more than meet your digital shooting needs.
With a body based on the Nikon N60 film camera, Fujifilm's new FinePix S1 Pro digital SLR looks a lot like a traditional 35mm SLR camera. The camera doesn't ship with any lenses, but features a lens mount that accepts Nikon F-mount compatible lenses, offering arguably the broadest range of lens optics in the world. (The manual provides a very detailed listing of compatible lenses.) Size-wise, the S1 body weighs in at 28.2 ounces (800 g) without a lens or batteries, and measures 5.8 x 4.9 x 3.1 inches (149 x 125 x 80 mm). While compact portability isn't much of a factor with this camera, the S1 does come with a neck strap for added support. We were surprised by how compact the S1 actually was: The specs above will seem bulky to our readers accustomed to seeing numbers for typical consumer digicams, but compared to other "Pro" digital SLRs, it's positively svelte: It really isn't much larger or heavier than many film-based SLRs.

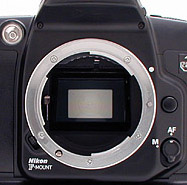
The front of the camera mainly features the lens mount, auto/manual focus switch, the AF assist lamp (amazingly bright for its tiny size) which helps the camera focus in low light situations), the front of the pop-up flash and its release button, and the lens release button. There's also a rather hefty handgrip on the left side, courtesy of the lithium-cell battery compartment, which provides a firm hold on the camera with natural resting places for your fingers. (A very comfortable grip.) The video, DC and mini-USB output jacks are hidden beneath a flexible rubber cover just below the lens mount.
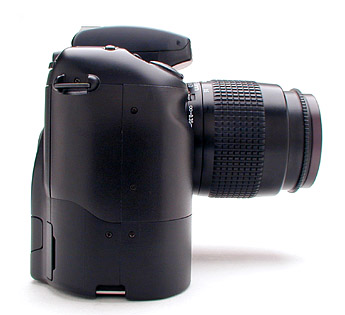
The right side of the camera (when viewed from the rear) consists solely of a beefy handgrip, courtesy of the CR123A battery compartment takes.
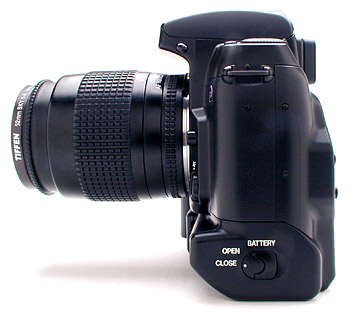
The left side of the camera sports the AA battery compartment, with a secure and easily-operated latching door.
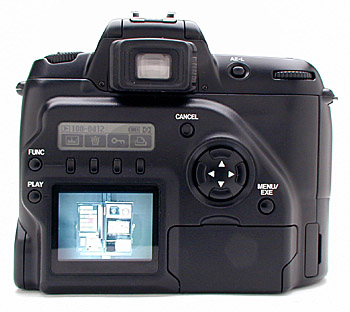
From the back panel of the S1, the majority of the camera's control features are visible. Both the optical viewfinder and the LCD monitor are located in the rear, the former with a dioptric adjustment dial for adjusting the focus of the viewfinder for eyeglass wearers. Aside from the control buttons, there's a small, monochrome LCD data readout (directly over the main LCD monitor) which provides an easily-navigated menu system, allowing you to change some camera settings, great for saving battery power. This smaller LCD display also illuminates during use, good for shooting in dark situations situations. Also present on the rear panel are the media slots, which host CompactFlash Type I or II (including the IBM MicroDrives) and SmartMedia cards. The card bay is protected by a hinged plastic door that snaps firmly into place.
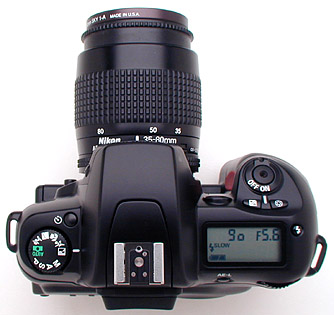
More exposure controls are located on the top panel of the camera. The mode dial and self-timer button are on the left side of the camera, while the power switch, shutter button, exposure compensation button, aperture button, flash button and another black and white data readout lie on the right side. The pop-up flash compartment takes up the center of the panel above the viewfinder prism, as well as the hot shoe for mounting an external flash.
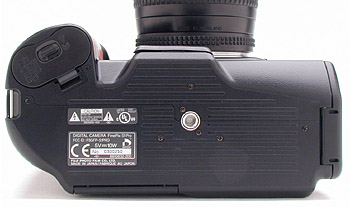
The S1 features a nice, flat bottom, with a metal tripod socket and the lithium battery compartment door sharing the space. The lithium battery compartment door is sufficiently distant from the tripod mount to allow you to change batteries while working with a tripod, although in practice the lithium batteries will very rarely need to be changed.
One point that's come up repeatedly in online discussions of the S1 is the "consumer" heritage of its camera body: The Nikon N60 it's based on is really an entry-level consumer film camera. This means it will lack the cast-metal ruggedness of professional bodies, as well as some of the environmental seals around key controls (to keep out dust and moisture). The consumer-level body also doesn't support the latest "S-series" ("silent wave" focus motor) Nikkor lenses, and will generally operate more slowly, both in terms of autofocus speed and continuous-mode frame rates. These factors will rule out the S1 for professional applications involving extreme environmental conditions (shooting in a driving rain storm, for instance), or situations in which high frame rates are needed (sports and action shooting).
The "consumer" body of the S1 has lead many on the Internet to write it off, calling it a camera without a constituency, too expensive for the amateur, but too limited for the professional. While we wouldn't pretend to being pros ourselves, after working with the camera for a few days we feel that it does indeed have a place in the market, and in fact is a very strong entry in the SLR digicam field. While it may not be your first camera choice for that next jungle expedition you were planning, the build quality of the S1 is excellent, and should prove very reliable in any sort of reasonably careful usage. It has a pleasant heft and conveys a comfortable sense of solidity, with no taint of cheapness anywhere in its construction, that we could see. As for it's shooting speed, its tempting to simply divide the world into two camps, as many pundits have done: "Pros" and "everyone else". This division maintains that anyone shooting pictures professionally absolutely needs a 5 frame per second motor drive, and that anyone else will be perfectly content with a camera that cycles in 5-10 seconds. Examined more closely, this is obviously ludicrous. The fact is that there are a vast number of 35mm photographers who routinely shoot without high-speed motor drives, but for whom the leisurely pace of consumer-level digicams is simply unworkable. There's an enormous amount of commercial photography done every day that fits this range of performance. Categories include product photography, portraiture, general corporate work, and doubtless many others as well. For photographers in these categories, the S1 Pro represents an excellent photographic tool: While slower than some more expensive digital SLRs, the S1 is so much faster than any consumer digicam we've tested that it's really in an entirely separate class. It may not be usable in a hurricane or sandstorm, but for any normal human environment, it should work just fine. Its exposure versatility, range of color and tone controls, and absolutely superlative color (really the best we've found in a digicam to date) make it a powerful photographic tool, at a price thousands less than most competing models.
The "SuperCCD"
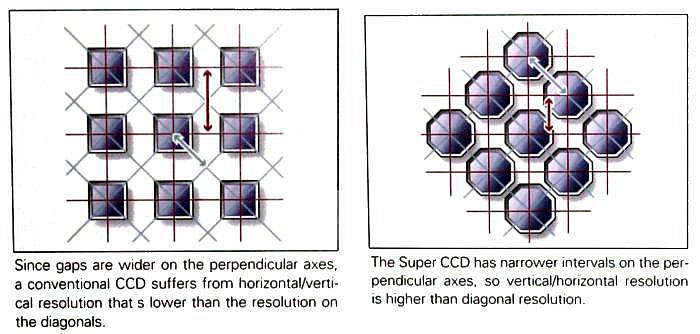
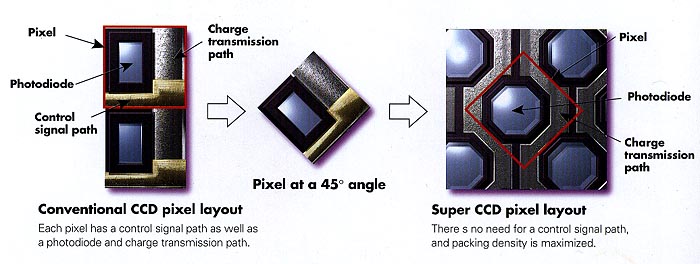
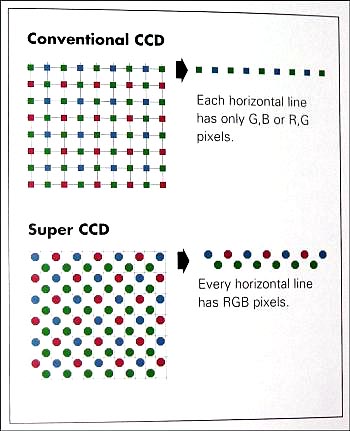
We first reported on Fuji's patented "SuperCCD" technology almost a year ago, when it was announce to the public at Fall Comdex '99. Since then, SuperCCD technology has been the source of some controversy, not the least of which is due to Fuji's claims that it's unique sensor geometry permits more image interpolation than does the rectilinear layout of conventional CCDs. (And, just to be clear, all single-sensor/single-shot color digicams use some degree of interpolation to produce their pictures.) There are two major differences between Fuji's SuperCCD technology and conventional configurations: 1) SuperCCD uses an octagonal cell layout that increases the amount of light-sensitive surface area in every cell, and 2) The SuperCCD rows and columns overlap slightly and are rotated 45 degrees. This theoretically improves resolution (at least somewhat) over a conventional sensor with a rectilinear layout.
For clarification on the Super CCD technology, here's a repeat of the information we published as part of our Fall '99 Comdex coverage (where the Super CCD was first announced).
According to Fuji, the SuperCCD's layout offers an effective resolution some 60% better than a standard CCD, as well as 130% better sensitivity, dynamic range and signal/noise ratio, 50% better color reproduction and significantly better power consumption (assuming that a SuperCCD with 40% fewer pixels can match the resolution of a standard CCD). The logical question is - how can simply changing the shape and orientation of the photodiodes in a SuperCCD produce such a dramatic improvement in image quality? Borrowing heavily from Fuji's own explanation, here's a quick summary of the reasons:
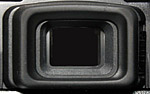
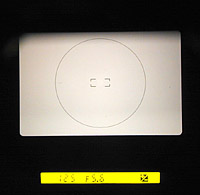
The S1 utilizes a TTL (Through The Lens) optical viewfinder for composing images. A dioptric adjustment dial to the right of the eyepiece accommodates eyeglass wearers. A removable plastic cap slides on and off the eyepiece for protection when not in use, and also to prevent ambient light from entering the rear element of the viewfinder and affecting exposure when used on a tripod. A central autofocus bracket and a circular representation of the metering area make up part of the optical viewfinder display. There's also a small information readout at the bottom of the display that reports the main exposure settings, such as aperture, shutter speed, whether or not exposure compensation is in use, exposure suitability in manual mode, and the status of the flash. Additionally, a focus indicator lets you know when the autofocus is set or guides the manual focus process.
A 2.0 inch color LCD monitor allows you to preview and confirm shots, showing a generous 200,000 pixels. (This is a very sharp LCD, compared to the units we're accustomed to seeing on the backs of digicams.) Because of the SLR design, the CCD only sees the image when the shutter is opened and thus the LCD monitor cannot be used for image composition. However, the manual option on the Preview feature provides extensive feedback on the image's actual exposure (which we'll discuss in more detail in the exposure section). LCD brightness can be adjusted through the menu system and can get bright enough to be useful even in very bright outdoor shooting situations. In Playback mode, the LCD can display either four or nine thumbnail images at a time, and also supports a playback zoom feature for enlarging captured images. The playback zoom on the S1 deserves particular mention: It not only zooms in reasonable increments (ranging from 5 to 50%, depending on its current zoom level), but provides you with smooth scrolling around the image at any zoom setting. What's more, the playback zoom goes all the way to 19x (!) depending on the original image size, providing enough resolution to really make sensible judgments about focus as well as framing and exposure. (Maximum playback zoom is 7x at the 1440 file size, 12x at the 2304 file size, and 19x at the 3040 size.)

Playback mode also provides full exposure information for each image via the monochrome LCD data readout directly above the color LCD monitor, and an optional (and very accurate/detailed) histogram display on the LCD monitor itself. Overall, the S1 Pro sports one of the best image-playback systems we've yet seen on a digicam.
 The
S1 doesn't come with any lenses, but supports most lenses compatible with
the Nikon F-mount system, which includes Nikkor lenses with built-in CPUs,
D-type and other AF Nikkor lenses. The accompanying camera manual provides
a very detailed listing of the compatible lenses, which we've reproduced below.
(One notable exception for professional photographers is that the S1 won't
support Nikon's latest AF-S "silent wave" lenses with the high-speed
built-in autofocus motor system.) Lenses attach to the front lens mount and
can be released by pressing the lens release button to the right of the mount,
and turning the lens (as you would on most film-based SLRs). A small focus
switch on the lower right side of the lens mount switches back and forth between
auto and manual focus. Two types of auto focusing are used by the camera,
Single and Continuous AF. Single autofocus simply means that the focus is
not set until the shutter button is halfway pressed. With Continuous autofocus,
the camera is constantly adjusting the focus as the subject moves. According
to the manual, the camera judges whether or not the subject is in motion and
then determines which autofocus method to use. Since the Single autofocus
method is better for power conservation, we'd like to be able to adjust this
feature ourselves. The S1's autofocus system uses an AF Assist light, located
on the front of the camera, which helps the camera focus in low light situations.
This assist light is disabled when the camera is in manual-focus mode, which
is a nice feature: It's very bright, and would definitely blow your
cover if you're trying for candid shots! When you need it though, the bring
autofocus assist is very handy. We didn't really have the wherewithal to test
it's effective range (which will depend heavily on the subject of course,
as well as lens speed), but in some quick tests with our cheapie 35-80mm Nikkor
f/4-5.6 zoom, it appeared to work well out to at least 15-20 feet. One important
note about the AF assist light though: Because it's located quite close to
the lens barrel, it can be blocked by large lenses or lens hoods: Our Tamron
28-300mm "vacation lens" has both a fairly fat body and a rather
large hood on it, and this interferes with the beam projected by the AF assist
lamp.
The
S1 doesn't come with any lenses, but supports most lenses compatible with
the Nikon F-mount system, which includes Nikkor lenses with built-in CPUs,
D-type and other AF Nikkor lenses. The accompanying camera manual provides
a very detailed listing of the compatible lenses, which we've reproduced below.
(One notable exception for professional photographers is that the S1 won't
support Nikon's latest AF-S "silent wave" lenses with the high-speed
built-in autofocus motor system.) Lenses attach to the front lens mount and
can be released by pressing the lens release button to the right of the mount,
and turning the lens (as you would on most film-based SLRs). A small focus
switch on the lower right side of the lens mount switches back and forth between
auto and manual focus. Two types of auto focusing are used by the camera,
Single and Continuous AF. Single autofocus simply means that the focus is
not set until the shutter button is halfway pressed. With Continuous autofocus,
the camera is constantly adjusting the focus as the subject moves. According
to the manual, the camera judges whether or not the subject is in motion and
then determines which autofocus method to use. Since the Single autofocus
method is better for power conservation, we'd like to be able to adjust this
feature ourselves. The S1's autofocus system uses an AF Assist light, located
on the front of the camera, which helps the camera focus in low light situations.
This assist light is disabled when the camera is in manual-focus mode, which
is a nice feature: It's very bright, and would definitely blow your
cover if you're trying for candid shots! When you need it though, the bring
autofocus assist is very handy. We didn't really have the wherewithal to test
it's effective range (which will depend heavily on the subject of course,
as well as lens speed), but in some quick tests with our cheapie 35-80mm Nikkor
f/4-5.6 zoom, it appeared to work well out to at least 15-20 feet. One important
note about the AF assist light though: Because it's located quite close to
the lens barrel, it can be blocked by large lenses or lens hoods: Our Tamron
28-300mm "vacation lens" has both a fairly fat body and a rather
large hood on it, and this interferes with the beam projected by the AF assist
lamp.
Here's a copy of the table from the S1's manual, showing which Nikkor lenses are compatible with the S1, as well as which exposure modes are supported, and also which are specifically to be avoided:
|
Modes ->
|
Focusing Mode | Exposure Mode | Metering Mode | |||||
|
|
Auto Focus | Focus aids | Manual | Other | M | 3D 6-zone | 6-zone | Center weighted avg. |
|
Nikkor lenses with built-in CPU*2
|
||||||||
| D-type AF lenses | O | O | O | O | O | O | - | O |
| AF-S, AF-I lenses (D-type lenses) | - | O | O | O | O | O | - | O |
| PC micro 85 mm f/2.8D *3 | - | O*4 | O | - | O | O | - | O |
| AF-I Teleconverter | - | O*5 | O | O | O | O | - | O |
| AF Nikkor lenses other than D-type (excluding lenses for F3AF) | O | O | O | O | O | - | O | O |
| Ai-P Nikkor | - | O*6 | O | O | O | - | O | O |
|
Lenses other than Nikkor lenses with a built-in CPU*7
|
||||||||
| Ai-S, Ai Series E lenses, modified AI Nikkor | - | O*6 | O | - | S*8 | - | - | - |
| Medical 120 mm f/4 | - | O | O | - | S*8 | - | - | - |
| Reflex lenses | - | - | O | - | S*8 | - | - | - |
| PC Nikkor | - | O*4 | O | - | S*8 | - | - | - |
| Ai-S, AI Teleconverter | - | O*5 | O | - | S*8 | - | - | - |
| Bellows PB-6 (used with K ring 1, 3, 4 or 5) | - | O*5 | O | - | S*8 | - | - | - |
| Auto close-up rings (PK-11A, 12, 13 and PN-11) | - | O*5 | O | - | S*8 | - | - | - |
|
||||||||||||||||||||||||
Lenses that cannot be used: (Caution, do not attempt to forcibly mount or damage to the camera could result!)
| Lenses other than Nikkor lenses with a built-in CPU that cannot be used |
The lenses other than Nikkor lenses with a built-in CPU listed below cannot be used with this camera. Any attempt to forcibly mount one of these lenses on the camera could damage the camera and lens.
|
The S1 gives you a lot of exposure control, with the benefit of a full automatic mode as well as several "Vari Program" presets when you want to take it easy. The camera's exposure mode is controlled by the mode dial on the top of the camera body, which features Full Auto, Programmed Auto, Shutter Priority, Aperture Priority, Manual, Portrait, Landscape, Macro, Sports and Night Scene modes. The Full Auto exposure mode does exactly as it sounds and puts the camera in charge of all the exposure decisions, with the exception of whether or not to use the flash. The Programmed exposure mode works similarly in that the camera judges the appropriate exposure for the situation. However, the user can opt to select from a variety of exposure equivalents as well as adjust the exposure compensation. Aperture Priority and Shutter Priority are also relatively self-explanatory, each allowing the user to control either the aperture (which depends on the lens in use) or the shutter speed (from 30 to 1/2,000 seconds) while the camera selects the most appropriate corresponding value. As you might expect, the Manual exposure mode gives the user total control over the both aperture and shutter speed.
Exposure compensation on the S1 can be adjusted from -3.0 to +3.0 EV (an unusually wide range) in 1/3 EV increments by pressing the +/- button on the camera's back panel. This adjustment is only available with the Programmed, Shutter Priority, Aperture Priority and Manual exposure modes. (Wait a minute, you say, what does "exposure compensation" mean if you're in manual exposure mode? You're controlling all the exposure parameters, so what's to compensate? It turns out that the S1 gives you an exposure readout when in manual mode, showing whether the camera thinks you're exposing correctly or not. The exposure compensation setting in manual mode affects this exposure-feedback display, biasing it to indicate "correct" exposure when the exposure is actually high or low by the amount that you've dialed-in. Slick!)
An Auto-Exposure Lock function button allows you to lock in the camera's exposure settings for a certain area of your subject (as you would use the shutter button to lock focus). You simply point the camera at the part of the subject you want metered, hold down the AE-Lock button and then recompose the shot. Holding down the AE Lock button also sets the camera's metering mode to center-weighted, as opposed to multi-pattern (which we'll discuss in more detail a little later). This decoupling of exposure and focus lock is potentially a very handy feature that consumer-level digicams generally lack. The Self-Timer button on top of the camera activates the self-timer mode, which counts down from two or 10 seconds after the shutter button is pressed before firing the shutter. The AF Assist light on the front of the camera blinks during the countdown.
 Many
of the S1's exposure options are controlled through the series of function buttons
on the camera's back panel, just beneath the small LCD display and above the
larger LCD monitor. We found this to be one of the easiest camera interfaces
we've yet encountered, for setting common camera operating parameters. We really
liked the way the functions were immediately available, without having to delve
deep into layers of menu structure to find the feature we were looking for.
The function buttons are "soft buttons", whose behavior are set by
the contents of the LCD display above them. The Function button on the back
panel controls which function menu is displayed in the LCD. The first press
of the main Function button displays the basic exposure function menu, featuring
white balance, ISO, image quality and size settings.
Many
of the S1's exposure options are controlled through the series of function buttons
on the camera's back panel, just beneath the small LCD display and above the
larger LCD monitor. We found this to be one of the easiest camera interfaces
we've yet encountered, for setting common camera operating parameters. We really
liked the way the functions were immediately available, without having to delve
deep into layers of menu structure to find the feature we were looking for.
The function buttons are "soft buttons", whose behavior are set by
the contents of the LCD display above them. The Function button on the back
panel controls which function menu is displayed in the LCD. The first press
of the main Function button displays the basic exposure function menu, featuring
white balance, ISO, image quality and size settings.
The second press of the Function button displays the next menu, which adjusts color, tone, sharpness and accesses the multiple exposure feature. White balance on the S1 offers eight modes, including Auto, Sunny, Shade, Fluorescent 1, Fluorescent 2, Fluorescent 3, Incandescent and Custom (which is the manual setting). The Custom setting adjusts the white balance to a preset value selected by the user. To balance the color for a new light source, the Custom setting must be changed through the Record settings menu. We'd prefer to change the setting just by selecting the Custom white balance option, instead of having to access the LCD menu, but it's nice that the camera remembers the setting for you, without forcing you to choose a new setting every time you enter Custom white balance mode. The camera's ISO sensitivity can be set to 320, 400, 800 or 1600 equivalents. Again, it would have been nice to include a lower ISO option, for those situations where you want to use a larger lens opening in fairly bright conditions. (The S1's maximum shutter speed is 1/2000, which won't let you use the widest apertures with bright sunlight and light-colored subjects.) We liked the degree of picture control that the second function menu provided over picture characteristics like color, tone, and sharpness (including a black & white option). The tone and color saturation variations were nicely balanced to give a useful range of control. (That is, the "high" color option wasn't overly garish, and the "org" (original) setting gave nicely understated colors that weren't too flat.)
 The
S1 offers both a built-in, pop-up flash and a hot shoe for connecting an external
flash unit when more flash power is needed. (The external flash option seems
to be able to work with a majority of Nikon dedicated flash units (unlike the
D1, which requires a special model of the SB-28), but it isn't clear how well
they'd work in TTL (through the lens) metering mode, given the different reflectance
of the CCD than the conventional films that the N60 body's flash sensor is calibrated
for. The built-in flash works in six operating modes: Auto, On, Off, Anti Red-Eye,
Slow Synchronization with Anti Redeye and Slow Synchronization. All of the flash
modes are controlled by the Flash button on top of the camera, and each is pretty
self-explanatory. The Auto setting lets the camera judge when to use the flash,
while the On setting fires the flash with every exposure and the Off setting
disables the flash entirely (you can also close the flash compartment to disable
the flash). Anti Redeye (equivalent to Redeye Reduction mode on other digicams)
fires a small pre-flash before firing the full flash, to avoid the pesky Redeye
Effect. Slow Synchronization works with a slower shutter speed to illuminate
the subject and also allow more ambient light into the image. Finally, Slow
Synchronization with Anti Redeye just combines the two modes for night portraits.
The top mounted hot shoe should accommodate most Nikon Speedlights, as well
as other off-brand flash units. Check the manual for more specific information.
The
S1 offers both a built-in, pop-up flash and a hot shoe for connecting an external
flash unit when more flash power is needed. (The external flash option seems
to be able to work with a majority of Nikon dedicated flash units (unlike the
D1, which requires a special model of the SB-28), but it isn't clear how well
they'd work in TTL (through the lens) metering mode, given the different reflectance
of the CCD than the conventional films that the N60 body's flash sensor is calibrated
for. The built-in flash works in six operating modes: Auto, On, Off, Anti Red-Eye,
Slow Synchronization with Anti Redeye and Slow Synchronization. All of the flash
modes are controlled by the Flash button on top of the camera, and each is pretty
self-explanatory. The Auto setting lets the camera judge when to use the flash,
while the On setting fires the flash with every exposure and the Off setting
disables the flash entirely (you can also close the flash compartment to disable
the flash). Anti Redeye (equivalent to Redeye Reduction mode on other digicams)
fires a small pre-flash before firing the full flash, to avoid the pesky Redeye
Effect. Slow Synchronization works with a slower shutter speed to illuminate
the subject and also allow more ambient light into the image. Finally, Slow
Synchronization with Anti Redeye just combines the two modes for night portraits.
The top mounted hot shoe should accommodate most Nikon Speedlights, as well
as other off-brand flash units. Check the manual for more specific information.
Effective Flash Range (from S1 Manual):
| ISO |
|
|
| Guide Number |
|
|
| f-stop (aperture) |
|
|
|
|
(7.2 - 33.8 ft.) |
(8.2 - 37.7 ft.) |
|
|
(5.9 - 28.5 ft.) |
(6.6 - 31.8 ft.) |
|
|
(4.3 - 20.7 ft.) |
(4.9 - 22.3 ft.) |
|
|
(2.6 - 14.1 ft.) |
(3.3 - 15.7 ft.) |
|
|
(2.6 - 10.5 ft.) |
(3.3 - 11.8 ft.) |
One thing that caught us a little by surprise is that the S1's internal flash doesn't throttle down too well for close-in subjects. Perhaps due to the higher sensitivity of the sensor in the S1, the flash really needs to work with a lens stopped down to a fair degree, if your subject is closer than 6 feet or so (a couple of meters). Thus, our first round of the "indoor portrait" shots were drastically overexposed, because we were shooting with the lens wide open. Stopping down to f/8, the results were much better. The table above shows working range for the onboard flash at various aperture settings, for ISO settings of 320 and 400.
We were anticipating problems with flash exposure in the S1 though, that really didn't seem to materialize once we got the aperture settings right. Some professional SLRs have shown very poor flash exposure control due to the difference in reflectivity between the CCD sensor and conventional photo film that the SLR body was designed to cope with. Many SLRs offering TTL (through the lens) flash metering rely on the light reflected from the film surface to gauge the flash exposure while the shutter is open. Because CCD sensors have very different reflectance characteristics than photo film, these cameras tend to overexpose flash pictures by 1 to 1.5 f-stops. We were therefore surprised when we discovered that the S1's flash actually did a pretty good job of getting the exposure right, as long as we were within the acceptable working distance. Our results were somewhat variable though, and we didn't do a great deal of flash shooting in the short time we had the S1 to work with. It did seem to slightly overexpose, but in most cases only by a half-stop or so. On the other hand, there were isolated instances where the overexposure was fairly drastic. Unfortunately, we weren't able to nail down just what the circumstances were that resulted in normal or overexposure.
Metering
The S1 offers three separate metering modes, which are automatically selected depending on the exposure mode. The 6-zone multi-pattern metering divides the image into six zones, which are then measured and analyzed to determine the best exposure for the full image. In 3D 6-zone multi-pattern metering, the camera takes the same information from the six zones and also judges information on the maximum brightness, the differences in brightness and the distance from the subject to the lens. Finally, the S1 also employs a center-weighted metering system, which averages values from a broad area in the center of the image to determine the exposure. The only deficiency we noted in this metering system is that you cannot manually select which system you'd like to use. (This is doubtless a result of the "consumer" heritage of the S1's N60 body.) The only way around this is to use the AE Lock function, which automatically sets the metering to center-weighted. All exposure modes except for Manual use the two multi-pattern metering systems, but unfortunately, the camera does not report whether it's using standard multi-pattern or 3D multi-pattern.
Multiple Exposure Mode
Through the second Function menu in Record mode, you can turn the Multiple Exposure mode on. What this does is allow you to make multiple exposures of one frame. It's just like exposing the same frame of 35mm film without advancing the film, either to brighten the exposure or to create the effect of a multiple exposure. This was a surprise to find on a digital camera, and we suspect that any serious work of this sort would be better done in the computer, rather than in the camera itself. It did have a huge advantage over similar modes in film-based cameras, in that you could immediately see the results of your multi-exposure on the LCD screen, rather than waiting for the film to come back from developing. Overall, an entertaining option, but one we don't think will find a lot of application.
Preview Mode
Through the Record settings menu, you can enable a Preview mode which provides a powerful tool for checking your exposure. When set to Auto Record, the image is previewed but automatically recorded. However, under the Manual Record setting, the image is still previewed, but must be confirmed before saving to memory. Once in Preview mode, the function menu (smaller rear LCD display) allows you to save or delete the image, as well as display a histogram or check the color. The histogram function button actually toggles between the Master histogram (showing the distribution of brightness values in the image) and the individual histograms for the red, green, and blue channels. This gives you a good idea of the distribution of tonal values across the image and whether it's under or over exposed. In Preview Mode, the Color function displays two reference bars, one of gray tones and the other of the standard color range, which help you evaluate the color and tonal values of your image for proper exposure.
Vari-Program Modes
The S1 features five special exposure modes, called Vari-Program modes, which are also controlled by the mode dial. These are again reflections of the underlying N60 body's consumer heritage, as they're intended to help relatively unsophisticated users get the best pictures out of the camera under a variety of conditions, without needing to know a lot about f-stops, exposure compensation, or other more-advanced subjects. In a professional device, they have less use, but we suspect that a lot of S1 owners will end up using these regardless.
Portrait Mode
The first of these is Portrait mode, which decreases the depth of field by using a larger aperture setting. This blurs the background slightly and makes the subject the prominent focus.
Landscape Mode
Using nearly the opposite settings of Portrait mode, Landscape mode increases the depth of field with a smaller aperture setting, causing subjects both near and far to be in sharp focus. Because the smaller aperture setting may necessitate a slower shutter speed, we recommend keeping a tripod handy to prevent any camera movement.
Macro Mode
As with Portrait mode, Macro mode uses a larger aperture setting to softly blur the background and place more emphasis on the subject. Remember that the actual macro focus range will vary with the lens being used.
Sports Mode (Continuous Shooting)
Sports mode biases the exposure system to use a faster shutter speed to freeze fast moving action. The focusing mode switches to continuous AF, so that the camera is continually adjusting the focus as the subject moves within the frame. Holding down the shutter button allows you to capture up to five continuous shots at approximately 1.5 frames per second. (Note that Sports Mode is the only mode that enables continuous shooting.) The actual number of consecutive shots and the cycle time will vary depending on the image size and amount of information to be recorded. When shooting continuously, the camera temporarily saves images to a small buffer memory before saving them to the memory card. An aspect of Sports mode that we didn't like was that it seemed to disable many of the camera's features, such as the white balance controls.
Night Scene Mode
The final special exposure mode is Night Scene, which employs a slower shutter speed to allow more ambient light into the image. A tripod is definitely recommended in this mode to avoid any blurring from camera movement. This mode also works well for night portraits, when using the Slow Synchronization and Slow Synchronization with Anti Redeye flash modes.
Shutter Lag / Cycle Times
When you press the shutter release on a camera, there's usually a lag time before the shutter actually fires. This time is to allow the autofocus and autoexposure mechanisms time to do their work, and can amount to a fairly long delay in some situations. Since this number is almost never reported on, and can significantly affect the picture taking experience, we now routinely measure it.
|
|
||
|
|
|
|
| Power On -> First shot |
|
Start with lens retracted. Time is delay until first shot captured. VERY fast.
|
| Shutdown |
|
Time until camera is powered down. (No pending image processing though.)
|
| Play to Record, first shot |
|
Time is delay until first shot captured. EXCELLENT! Camera is *always* ready to shoot, just press the shutter button!
|
| Record to play (max/min res) |
|
Slower for max res images
|
| Shutter lag, full autofocus |
|
Very dependent on lens used. 0.7 seconds is probably about average.
|
| Shutter lag, manual focus |
|
Very fast |
| Shot-to-shot cycle time (any res) |
|
Very fast |
| "Sports" Mode motor drive speed |
|
Burst of 5 frames. Slow by pro SLR standards, faster than most consumer digicams. |
In our testing, the S1 was a good deal faster than the consumer-level cameras we usually have our hands on. With five frames of buffer memory, and a fast memory device in it (an aftermarket IBM MicroDrive), the feeling was very much that we could pretty well take a picture whenever we wanted. Shutter response felt very quick, and we really liked that the camera is a "shooting priority" design, meaning that you can pretty well just press the shutter in any mode (even playback or setup) and it'll take a picture. VERY nice! Professional photojournalists and sports photographers we know tend to pooh-pooh cameras with motor drive speeds much under 5 frames per second, so the 1.7 frames per second we clocked the S1 at won't impress them. From our perspective though, if you're doing much of anything other than professional sports photography, the S1 will feel like a very quick, responsive camera to use. This feeling is also helped by the exceptionally clean, fast user interface. While this doesn't affect shooting speed directly, it sure eliminated a lot of fumbling we've otherwise found ourselves doing with complex digicams.
We found the user interface on the S1 exceptionally uncomplicated and straightforward, once we got used to the Function buttons and their changing uses. As we mentioned earlier, the camera's design is based on the Nikon N60, which will give existing Nikon users immediate familiarity with the control layout and the general feel of the camera. The use of the mode dial to change the exposure mode and the combination of the command wheel and control buttons make the camera very efficient and quick to operate. Plus, with the majority of the exposure options adjustable through the smaller rear panel LCD display and the associated "soft" buttons, you aren't reliant on a cumbersome LCD menu to change settings. On reflection after living with the camera for several days, we decided that the rear-panel data readout and soft buttons really made a huge difference in how easy the camera was to operate. (Other manufacturers take note, IOHO this is a great feature that is going to do a lot to make people comfortable using the S1.) Following is our standard listing of controls and their functions.

Shutter Button: Positioned on the top right side of the camera, this button is encircled by the power dial. Halfway pressing the shutter button sets focus and exposure, and a full press fires the shutter.
Power Dial: Surrounding the shutter button, this dial turns the camera on and off.
![]()
+/- Button: Located just behind the shutter button, this button adjusts the exposure compensation from -3.0 to +3.0 EV in 1/3 EV increments, in the Programmed, Aperture Priority, Shutter Priority and Manual exposure modes. (In manual mode, it biases the in-viewfinder exposure display by the corresponding amount.)
![]()
Aperture Button: Directly to the right of the +/- button, pressing this button and turning the command wheel sets the lens aperture in Aperture Priority and Manual exposure modes.

Flash Button: This button sits to the right of the small LCD status display panel on top of the camera and controls the flash mode, cycling through Auto, On, Off, Anti Redeye, Anti Redeye with Slow Synchronization and Slow Synchronization.

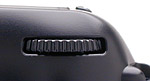
Pop-Up Flash Release Button: Protruding slightly from the side of the pop-up flash compartment, this button releases the pop-up flash into its operating position.

Lens Release Button: Situated to the right of the lens mount (when looking at the front of the camera), this button unlocks the lens so that it can be turned and released from the mount.

Focus Mode Switch: Also located to the right of the lens mount, this switch alternates between auto and manual focus modes.
![]()
Self-Timer Button: Residing on the left side of the camera's top panel, this button activates the self-timer mode, which features a two or 10 second countdown after the shutter button has been fully pressed.

Exposure Mode Dial: Taking up most of the left side of the camera's top panel, this dial sets the camera's exposure mode, with the following choices:

AE Lock Button: Positioned in the top right corner of the back panel, this button allows the user to lock the exposure on a certain area of the subject by centering the part of the subject in question, holding down the AE Lock button, then reframing the subject to the original composition. This button also changes the camera's metering system to center-weighted.
Command Wheel: Located directly to the right of the AE Lock button, this wheel sets the shutter speed when in Shutter Priority mode and Manual mode. In Aperture Priority and Manual exposure modes, turning the wheel while pressing the Aperture button sets the lens aperture.
![]()
Dioptric Adjustment Lever: Nestled on the right side of the optical viewfinder eyepiece, this sliding lever adjusts the optical viewfinder to accommodate eyeglass wearers.

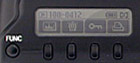
Function Button: Situated on the left side of the back panel, this button cycles between the two function menus and the Preview menu in Record mode. In Playback mode, this button alternates between the Edit and Information menus.
Variable Function Buttons: Arranged horizontally between the small LCD display and the larger LCD monitor on the back panel, these buttons correspond to the function menus displayed above them and allow the user to adjust various camera settings. As noted earlier, these are one of the biggest ease-of-use features of the S1, making it trivially easy to get to a number of camera modes and functions without having to navigate a complex LCD menu system.

Play Button: Located just off the top left corner of the large LCD monitor, this button enters Playback mode and displays the most recently captured image on the LCD. A second press calls up an index thumbnail display and a third press returns the camera to Record mode.

Cancel Button: Directly to the right of the smaller rear LCD display, this button cancels menu selections and backs out of menu screens.
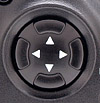
Rocker Toggle Button: This button sits in the center right side of the rear panel and features one arrow in each cardinal direction. In both Record and Playback setup menus, this button navigates through menu options. In Playback mode, the left and right arrow buttons scroll through captured images while the up and down arrows zoom in and out of images (up to 19x, depending on the original image size).

Menu / EXE Button: Just above the memory card slot, this button accesses the setup menu in both Record and Playback modes, and executes selected menu options.
Camera Modes and Menus
Because the Record settings menu remains the same in each of the exposure modes, we'll go through the exposure modes individually and then list the settings menu options. Each of the exposure modes are accessed by turning the mode dial, while the Playback mode is entered by pressing the Play button on the camera's back panel.
![]() Manual: Allows the user to set both the shutter speed and aperture values, as well as control other exposure variables such as ISO and exposure compensation. The camera's metering mode is automatically switched to center-weighted.
Manual: Allows the user to set both the shutter speed and aperture values, as well as control other exposure variables such as ISO and exposure compensation. The camera's metering mode is automatically switched to center-weighted.
![]() Aperture Priority: The user selects the desired lens aperture setting while the camera selects the most appropriate corresponding shutter speed. As with Manual exposure mode, all of the other exposure settings are available.
Aperture Priority: The user selects the desired lens aperture setting while the camera selects the most appropriate corresponding shutter speed. As with Manual exposure mode, all of the other exposure settings are available.
![]() Shutter Speed Priority: As the exact opposite of Aperture Priority mode, this mode lets the user choose the shutter speed while the camera decides which aperture setting to use. All other exposure controls are available.
Shutter Speed Priority: As the exact opposite of Aperture Priority mode, this mode lets the user choose the shutter speed while the camera decides which aperture setting to use. All other exposure controls are available.
![]() Programmed Auto: In this mode, the camera selects both the shutter speed and aperture settings. However, the user may select from a variety of shutter speed and aperture setting combinations that will produce the same exposure, by turning the function wheel. Exposure compensation adjustment is also available.
Programmed Auto: In this mode, the camera selects both the shutter speed and aperture settings. However, the user may select from a variety of shutter speed and aperture setting combinations that will produce the same exposure, by turning the function wheel. Exposure compensation adjustment is also available.
![]() Full Auto: The camera controls all exposure settings with the exception of the flash.
Full Auto: The camera controls all exposure settings with the exception of the flash.
![]() Portrait: Uses a large aperture setting to decrease the depth of field and place all of the emphasis on the subject while slightly blurring the background.
Portrait: Uses a large aperture setting to decrease the depth of field and place all of the emphasis on the subject while slightly blurring the background.
![]() Landscape: Increases the camera's depth of field by selecting a small aperture setting, so that both the foreground and background are in focus.
Landscape: Increases the camera's depth of field by selecting a small aperture setting, so that both the foreground and background are in focus.
![]() Macro: As with Portrait mode, the camera decreases the depth of field by setting a large lens aperture, so that the macro subject is the primary focus.
Macro: As with Portrait mode, the camera decreases the depth of field by setting a large lens aperture, so that the macro subject is the primary focus.
![]() Sports: Utilizes fast shutter speeds and continuous autofocus to freeze fast moving subjects. Also enables the continuous shooting mode, which lets the camera capture up to five frames at approximately 1.5 frames per second with the shutter button held down. Actual cycle times depend on the image size and quality setting as well as the amount of image information to record. NOTE that for some strange reason, this mode disables exposure compensation.
Sports: Utilizes fast shutter speeds and continuous autofocus to freeze fast moving subjects. Also enables the continuous shooting mode, which lets the camera capture up to five frames at approximately 1.5 frames per second with the shutter button held down. Actual cycle times depend on the image size and quality setting as well as the amount of image information to record. NOTE that for some strange reason, this mode disables exposure compensation.
![]() Night Scene: Slows the shutter speed down to allow more ambient light into the image, works well with the Slow Synchronization flash modes.
Night Scene: Slows the shutter speed down to allow more ambient light into the image, works well with the Slow Synchronization flash modes.

Record Mode Function Menu One: Accessed by pressing the Function button once in any record mode, this menu offers the following settings:

Record Mode Function Menu Two: This menu is displayed by pressing the Function button a second time in any record mode.

Record Mode Preview Menu: This menu is accessed by a third press of the Function button in any record mode, if the preview mode has been enabled.
Record Mode Setup Menu: Pressing the Menu button in Record mode pulls up the Setup menu, which allows users to adjust the following camera settings:
Playback Mode: Playback mode is accessed by pressing the Play button on the camera's rear panel. The last image captured is automatically displayed on the LCD monitor upon entering Playback mode. Captured images can be reviewed by pressing the left or right arrows on the rocker toggle button. An index display can be called up by pressing the Play button a second time, and the up and down arrow buttons allow you to digitally enlarge a captured image for closer inspection.
Playback Mode Setup Menu: Pressing the Menu button while in Playback mode brings up the following Setup menu on the large LCD screen:
Playback Mode Function Menu: The Playback Function menu is entered by pressing the Function button while in Playback mode, and the menu is displayed in the small rear LCD panel.
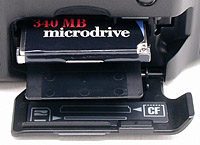 The
S1 can accommodate CompactFlash Type I and II as well as SmartMedia memory cards
for image storage, and includes a 16 megabyte SmartMedia card in its packaging.
We suspect that most users will almost immediately want to purchase a larger
card though, such as the 32 and 64 megabyte cards, and we found IBM's MicroDrive
particularly handy in our testing. (If you're buying one of these cameras, do
yourself a favor and get at least the 340 megabyte MicroDrive to go along with
it: The increased convenience is hard to overstate!) The media card slot location
on the rear panel is extremely convenient for changing memory cards while mounted
to a tripod, and the slot is protected by a hinged, plastic door that flips
easily in and out of place.
The
S1 can accommodate CompactFlash Type I and II as well as SmartMedia memory cards
for image storage, and includes a 16 megabyte SmartMedia card in its packaging.
We suspect that most users will almost immediately want to purchase a larger
card though, such as the 32 and 64 megabyte cards, and we found IBM's MicroDrive
particularly handy in our testing. (If you're buying one of these cameras, do
yourself a favor and get at least the 340 megabyte MicroDrive to go along with
it: The increased convenience is hard to overstate!) The media card slot location
on the rear panel is extremely convenient for changing memory cards while mounted
to a tripod, and the slot is protected by a hinged, plastic door that flips
easily in and out of place.
SmartMedia cards can be write protected by placing a small write protection sticker in the designated area on the card. Stickers must be clean to work and can only be used once. CompactFlash cards cannot be write protected, but images on the card can be individually protected through the Playback menu. Through this same menu, images can also be set up for printing on a DPOF (Digital Print Order Format) device. Three image sizes are available to choose from, 3040 x 2016, 2304 x 1536 or 1440 x 960, with Hi (uncompressed TIFF), Fine, Normal or Basic JPEG compression levels. Under the Record setup menu, you can choose between TIF-RGB or TIFF-YC formats.
The table below shows the approximate number of images, and their compression ratios, for a 16 megabyte card.
|
Resolution/Quality |
|
|
|
|
| Uncompressed TIFF-RGB | Images | 0 | 1 | 3 |
| Approx. Compression |
1:1 | 1:1 | 1:1 | |
| Uncompressed TIFF-YC | Images | 1 | 2 | 5 |
| Approx. Compression |
1:1 | 1:1 | 1:1 | |
| Fine Quality | Images | 6 | 11 | 32 |
| Approx. Compression |
7:1 | 12:1 | 16:1 | |
| Normal Quality | Images | 13 | 23 | 42 |
| Approx. Compression |
9:1 | 15:1 | 28:1 | |
| Economy Quality | Images | 32 | 54 | 82 |
| Approx. Compression |
8:1 | 14:1 | 21:1 | |
Although we suspect that most S1 users will be using external card readers to transfer the S1's images to a host computer, the direct USB connection could potentially be very handy in a studio or event-photography setting. The S1's USB is fairly speedy, albeit not as good as the best external card readers. We clocked it at 48 seconds for 17.5 megabytes of data, a transfer rate of 375 KBytes/second. This is fairly fast as cameras go, but dedicated card readers can be more than twice as fast.
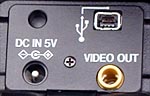 The
US version of the S1 includes a video out jack and connection cable, offering
NTSC-formatted video output. We assume that European models support PAL timing
and is accompanied by the appropriate cable. Connecting the video output provides
a signal to an external device, without disabling the internal LCD display screen.
All images that would normally appear on the LCD are also routed to the external
video display so that the television screen becomes an enlarged version of the
LCD monitor and can be used for image playback and preview.
The
US version of the S1 includes a video out jack and connection cable, offering
NTSC-formatted video output. We assume that European models support PAL timing
and is accompanied by the appropriate cable. Connecting the video output provides
a signal to an external device, without disabling the internal LCD display screen.
All images that would normally appear on the LCD are also routed to the external
video display so that the television screen becomes an enlarged version of the
LCD monitor and can be used for image playback and preview.
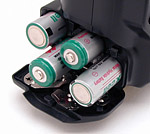 For
power, the S1 utilizes four AA rechargeable NiMH batteries and two CR123A lithium
batteries. The AA cells power the digital parts of the camera, while the lithium
cells run the camera functions such as autofocus, shutter and flash. From our
own experience, we can say that, in addition to the normal extra set of NiMH
AA cells, you'll definitely want to pack along a spare set of CR123A's: After
several days of intense shooting, we were puzzled by the cameras sudden lack
of response, and somewhat confusing error messages in the top LCD readout. It
turned out that LOTS of autofocus operation plus a goodly dose of flash exposures
had drained the lithium cells. (It took us an embarrassingly long time to figure
this out though, after swapping in at least two fresh sets of AA cells, thinking
that was the problem.) An external AC adapter is available as an accessory and
plugs into the DC port on the front of the camera, which is covered by a small,
flexible rubber flap. We should mention that the ability to almost completely
rely on the smaller LCD panels for changing camera settings is a tremendous
power saver. There's also an Auto Off feature with allows you to set the camera
to turn itself off after two or five minutes of inactivity.
For
power, the S1 utilizes four AA rechargeable NiMH batteries and two CR123A lithium
batteries. The AA cells power the digital parts of the camera, while the lithium
cells run the camera functions such as autofocus, shutter and flash. From our
own experience, we can say that, in addition to the normal extra set of NiMH
AA cells, you'll definitely want to pack along a spare set of CR123A's: After
several days of intense shooting, we were puzzled by the cameras sudden lack
of response, and somewhat confusing error messages in the top LCD readout. It
turned out that LOTS of autofocus operation plus a goodly dose of flash exposures
had drained the lithium cells. (It took us an embarrassingly long time to figure
this out though, after swapping in at least two fresh sets of AA cells, thinking
that was the problem.) An external AC adapter is available as an accessory and
plugs into the DC port on the front of the camera, which is covered by a small,
flexible rubber flap. We should mention that the ability to almost completely
rely on the smaller LCD panels for changing camera settings is a tremendous
power saver. There's also an Auto Off feature with allows you to set the camera
to turn itself off after two or five minutes of inactivity.
|
|
|
| Capture Mode, w/LCD |
|
| Capture Mode, no LCD |
|
| Half-pressed shutter w/LCD |
|
| Half-pressed w/o LCD |
|
| Memory Write (transient) |
|
| Flash Recharge (transient) |
|
| Image Playback |
|
These power numbers are quite low for a high-end digicam, largely because there is no mode where both the CCD and LCD are active at the same time. The combination of no LCD viewfinder and accurate optical one means that you should be able to stay away from the power-hungry color LCD screen most of the time. If you're able to do that, the 250 mA operating power is very low, and a good set of high-capacity NiMH AA cells should last for at least 4 hours of nonstop (and non-LCD) operation. Very nice!
| |
|
|
The S1 is accompanied by a USB cable for connection to a PC or Mac. An included software CD offers Adobe Photoshop 5.0 LE, Fujifilm Camera Shooting Software, USB drivers for Windows 2000, 98 and Macintosh, Fujifilm EXIF Viewer, Fujifilm EXIF Launcher and Fujifilm DP Editor (for use with DPOF print devices). The EXIF Viewer software is the mechanism for downloading and browsing saved images. The Camera Shooting Software application allows you to remotely control the camera through your computer, meaning you can shoot images and immediately view them on your computer screen. For image correction and editing, Adobe Photoshop 5.0 LE offers some basic tools for correcting color, removing dust particles, etc. There's also a handful of creative tools for performing slight image manipulations.
In keeping with our standard policy, our comments here are rather condensed, summarizing our key findings. For a full commentary on each of the test images, see the S1's "pictures" page.
As with all Imaging Resource camera tests, we encourage you to let your own eyes be the judge of how well the devices performed. Explore the images on the pictures page, to see how well the S1 performed, and how its images compare to other cameras you may be considering buying.
Throughout our testing, the S1 performed very well and produced exemplary color balance even in our most difficult lighting situations, such as the very high contrast Outdoor Portrait. We mostly shot with the manual white balance setting, opting for the daylight setting in some of our outdoor shots. The manual setting did a nice job of matching a wide range of light sources. During the Indoor Portrait testing we also discovered that the S1's manual white balance option has the uncommon courtesy to let you know when the lighting is outside the range it thinks it can handle. (This is a nice feature, and we wish more digicams would let us know when we're asking too much of them.) Color balance looked very accurate and bright in the large color blocks of our Davebox test target, with just the slightest under-saturation in the subtractive primaries. We also greatly appreciated the camera's ability to adjust the color saturation and tone, with the variations offered representing very useful levels of change. You can also check the color of the image with an RGB histogram or against standard color bars, which we found useful in gauging our exposure. We were surprised that the S1 slightly overexposed the Davebox test target, making the subtle tonal variations of the Q60 target only visible up to the "D" range, but other exposures were excellent. Overall, the S1 did a very nice job with color balance, handling some of our most difficult tests with ease. We concluded that the S1 offers arguably the best overall color handling we've yet seen in a digicam, at any price point. (August, 2000)
Resolution was very good on the S1, and despite Internet arguments against the concept of interpolation in generally, we strongly feel that the in-camera interpolation adds at least a slight amount of resolution over the uninterpolated 2304 x 1536 image size. Nonetheless, the resolution increase is fairly slight, to the point that we shot most of our images in the 2304 x 1536 mode. The S1 showed a resolution that we "called" as 800 - 900 lines per picture height vertically and about 700 - 800 lines per picture height horizontally, a very good performance, albeit one representative of a 3.4 megapixel digital camera, not a 6.1 one.
The S1 gives you excellent exposure control, with a full range of automatic and manual exposure modes, as well as several presets for special shooting situations. You can also control ISO, exposure compensation and white balance in addition to image adjustments such as sharpness, tone and color. The camera performed superbly in our low light tests, easily providing bright, useable images as low as 1/16 of a foot candle (0.67 lux) at all three ISO settings, with very little noise. This is really, really dark! To better appreciate the S1's low light performance, compare it to an average city night scene under modern street lighting, which corresponds to a light level of about one foot candle.
Because we shot our viewfinder accuracy test with a 105 mm lens, instead of a zoom lens, there are no wide angle or telephoto examples. This really reflects the fact that the S1's viewfinder accuracy is much more a function of the camera than any lens that's attached to it. We did find that the framing in the viewfinder was somewhat sensitive to eye position, as we could "peer around" the edges of the framing mask in the viewfinder if we moved our eye back and forth or up and down. We first took a shot of what we called the "viewable area," in that we lined up the shot based on what we could initially see in the viewfinder without any eye movement, which resulted in about 94 percent frame accuracy at all three image sizes. Next, we lined up what we called the "extended viewable area," which means that we utilized all angles of view as a result of moving our eye around to line up the shot, resulting in 97 percent frame accuracy for all three image sizes.
Overall, we found the S1 to be an excellent performer, providing full exposure control and exceptional image quality throughout our testing. The S1 handles low light shooting situations with ease and its white balance system does a great job with a wide range of light sources. Additionally, the S1's color saturation and tone adjustments provide a really useful level of creative control lacking even in many very advanced cameras. Really just an excellent performance: We think the S1 will find many a happy home...
With its Nikon N60 lookalike body, its ability to accept a large range of Nikon F series lenses, and its superb color rendering, we expect the S1 will find a large following. While not as fast as some more expensive SLR digicams, its performance is enormously far ahead of the average consumer digicam, even "high end" models. Likewise, it doesn't have the environmental seals of a "professional" level SLR, but shows excellent build quality throughout, again superior to the "prosumer" cameras we frequently review. Thus, if 1.5 frames per second is fast enough for your applications, and you don't plan on shooting under unusually inclement conditions, the S1 Pro could very well be the camera you've been waiting for. It offers flexibility, good speed, fantastic images, and a wonderful user interface. Very highly recommended!
<<FinePix S1 Pro Sample Images | Additional Resources and Other Links>>
Reader Comments!
Questions, comments or controversy on this product? Click
this link to see what other Imaging Resource readers have had to say about
the Fuji FinePix S1 Pro, or add comments of your own!