Fuji FinePix S2 ProFuji updates their digital SLR with a 6 megapixel CCD, with the same excellent color...<<Shutter Lag & Cycle Time Tests :(Previous) | (Next): Camera Modes & Menus>> Page 8:Operation & User InterfaceReview First Posted: 7/24/2002 |
Operation and User Interface
The S2 Pro's user interface is unusually straightforward, though the Function buttons and their changing uses may take a few moments to get accustomed to. With a camera design familiar to the previous S1 and 35mm SLR Nikon N80, the S2 Pro should make existing Nikon users immediately comfortable with the control layout and the general feel of the camera. The use of the Mode dial to change the exposure mode and the combination of the Command wheel and control buttons make camera operation very quick and efficient. With the majority of the exposure options adjustable through the smaller rear panel LCD display and the associated "soft" buttons, you aren't reliant on a cumbersome LCD menu for common setting changes. The rear-panel data readout and soft buttons really make a noticeable difference in the S2's ease of use - I'd like to see more manufacturers adopt this kind of interface.
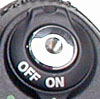
Shutter Button: Positioned on the top right side of the camera, this
button is encircled by the Power dial. Halfway pressing the Shutter button sets
focus and exposure, and a full press fires the shutter.
Power Dial: Surrounding the Shutter button, this rotary control turns the camera on and off.
![]()
+/- Button: Located just behind and to the left of the Shutter button,
this button adjusts the exposure compensation from -3.0 to +3.0 exposure equivalents
(EV) in half-step increments, in the Programmed, Aperture Priority, Shutter
Priority and Manual exposure modes. (In Manual mode, it biases the in-viewfinder
exposure display by the corresponding amount.)
Flash +/- Button: Adjacent to the +/- button behind the Shutter button, this button adjusts the intensity of the built-in flash, from -3.0 to +1.0 EV in half-step increments.

LCD Illuminator Button: This button sits to the right of the small LCD status display panel on top of the camera and illuminates the display panel when pressed. (It controls the backlight for both the top and rear LCD data readouts.)
Sub-Command Dial: Positioned on the front of the camera, at the top of the hand grip, this dial controls a multitude of functions when turned while pressing another control button. In Manual and Aperture Priority exposure modes, this dial adjusts the lens aperture setting.

Main Command Dial: Located directly to the right of the AE Lock button, right under your right thumb as you grip the camera, this dial changes camera settings when turned while holding down a control button.
Depth of Field Check Button: Nestled between the lens and the hand grip on the front panel, this button stops down the lens to the specified aperture setting, so that you can check the approximate depth of field through the viewfinder.

Pop-Up Flash Release Button: Protruding slightly from the side of the pop-up flash compartment, this button releases the pop-up flash into its operating position.

Lens Release Button: Situated to the right of the lens mount (when looking at the front of the camera), this button unlocks the lens so that it can be turned and released from the mount.

Focus Mode Switch: Also located to the right of the lens mount, this switch selects between Single, Continuous, and Manual focus modes.
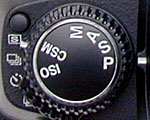
Exposure Mode Dial: Resting on top of the Release Mode dial, on the left side of the camera's top panel, this notched dial sets the camera's exposure mode and accesses two adjustment modes, with the following choices:
 Programmed Auto:
In this mode, the camera selects both the shutter speed and aperture settings.
However, the user may select from a variety of shutter speed and aperture
setting combinations that will produce similar exposures, simply by rotating
the main command dial. Exposure compensation adjustment is also available.
Programmed Auto:
In this mode, the camera selects both the shutter speed and aperture settings.
However, the user may select from a variety of shutter speed and aperture
setting combinations that will produce similar exposures, simply by rotating
the main command dial. Exposure compensation adjustment is also available.
 Shutter Speed
Priority: This mode lets the user choose the shutter speed while the camera
decides which aperture setting to use. All other exposure controls are available.
Shutter Speed
Priority: This mode lets the user choose the shutter speed while the camera
decides which aperture setting to use. All other exposure controls are available.
 Aperture Priority:
The user selects the desired lens aperture setting while the camera selects
the most appropriate corresponding shutter speed. All of the other exposure
settings are available.
Aperture Priority:
The user selects the desired lens aperture setting while the camera selects
the most appropriate corresponding shutter speed. All of the other exposure
settings are available.
 Manual:
Allows the user to set both the shutter speed and aperture values, as well
as control other exposure variables such as ISO and exposure compensation.
Switches the camera's metering method to center-weighted.
Manual:
Allows the user to set both the shutter speed and aperture values, as well
as control other exposure variables such as ISO and exposure compensation.
Switches the camera's metering method to center-weighted.
 CSM: Lets the
user select from a range of custom settings. The following choices are available
by turning the Main Command dial (the Subcommand dial adjusts individual settings):
CSM: Lets the
user select from a range of custom settings. The following choices are available
by turning the Main Command dial (the Subcommand dial adjusts individual settings):
- Bracketing Order: Specifies the order that bracketed images are recorded in. (normal/low/high or low/normal/high)
- On-Demand Grid Lines Display: Turns the alignment grid display in the viewfinder on or off.
- Illumination for Focus Area: Turns on an illuminator in the viewfinder display that indicates which focusing area is active.
- Focus Area Selection: Controls whether user controlled AF area selection stops at the edges of the viewfinder, or "wraps" around to the other side or top/bottom. (For example, if the rightmost focus area is already selected, pressing the right arrow key on the four-way controller will select the leftmost focus area next.)
- AE Lock: If enabled, the exposure can be locked by half pressing the Shutter button.
- Bulb Mode: Enables or disables the Bulb mode option in Manual exposure mode.
- Closest-Subject Priority Dynamic AF at S-AF Mode: Enables Closest-Subject Priority mode for Dynamic AF Area mode, when the camera is operating in Single Autofocus mode.
- Closest-Subject Priority Dynamic AF at C-AF Mode: Enables Closest-Subject Priority mode for Dynamic AF Area mode, when the camera is operating in Continuous Autofocus mode.
- AE / AF Lock Button: Designates whether this button locks focus and exposure independently or simultaneously. Options are AE/AF lock together, only AE locks, only AF locks, AE remains locked after the AE/AF lock button is pressed, until it is pressed again, or the shutter fires. A fifth option disables AF operation when the shutter button is half-pressed.
- Command Dial Functions: Specifies the functions of the Main and Subcommand dials. Main normally controls shutter speed, Sub controls aperture. This option lets you reverse those assignments.
- Multiple Exposure: Allows the multiple exposure option to be used with Continuous Shooting mode.
- Auto Power Off: Turns the camera off after 15 seconds, one, or two minutes of inactivity. Can also be disabled, to keep the camera powered up at all times.
- Self-Timer Duration: Sets the self-timer to 2, 5, 10, or 20 seconds.
- LCD Illumination: Lights the LCD status display for five or 15 seconds whenever any button is pushed. If set to "Off," the LCD only illuminates when the LCD Illuminator button is pressed.
- AF-Assist Illuminator: Turns the AF assist light on or off.
 ISO: Adjusts
the camera's sensitivity to ISO equivalents of 100, 160, 200, 400, 800, or
1,600.
ISO: Adjusts
the camera's sensitivity to ISO equivalents of 100, 160, 200, 400, 800, or
1,600.
Release Mode Dial: Just beneath the Exposure Mode dial, this dial accesses the camera's Single Shot, Continuous Shooting, Self-Timer, and Multiple Exposure modes.
Release Mode Dial Lock Button: This small black button sits beside the Release Mode Dial, and unlocks the dial for turning when held down.

AE/AF Lock Button: Positioned to the right of the viewfinder eyepiece on the back panel, this button lets the user lock the exposure and/or focus on a certain area of the subject by centering the part of the subject in question, holding down the button, then reframing the subject to the original composition. For proper operation, this function should be used with the camera's exposure system set to either center-weighted or spot metering.
Metering Selector Dial: Encircling the AE/AF Lock button on the back panel, this dial sets the camera's metering mode to Center-Weighted, Matrix, or Spot.
![]()
Dioptric Adjustment Lever: Tucked on the right side of the optical viewfinder eyepiece, this sliding lever adjusts the optical viewfinder to accommodate eyeglass wearers.
Synchro Mode Button: To the left of the viewfinder eyepiece, this button cycles through the flash synchro modes, which include Front Curtain Synchro, Red-Eye Reduction, Redeye Reduction with Slow Synchro, Slow Synchro, and Rear Curtain Synchro.
Auto Exposure Bracketing Button: On the left side of the Synchro Mode button, this button activates the Auto Exposure Bracketing mode when pressed while turning the Main Command dial. Pressing this button while turning the Subcommand dial sets the number of exposures in the series.
Back Button: Directly beneath the right corner of the viewfinder eyepiece, this button backs out of menu selections.
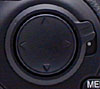
Four-Way Arrow Rocker Button: This button sits in the center right side of the rear panel and features one arrow in each cardinal direction. In both Record and Playback setup menus, this button navigates through menu options. In Playback mode, the left and right arrow buttons scroll through captured images while the up and down arrows zoom in and out of images (up to 19x, depending on the original image size).
Four-Way Arrow Rocker Button Lock Switch: On the right side of the rocker button, a tab projects from a ring that surrounds the rocker. This switch locks the rocker control so that it doesn't make any changes if accidentally pressed.
![]()
Menu / OK Button: Just above the memory card slot, this button accesses the setup menu in both Record and Playback modes, and executes selected menu options.
![]()
Function Button: Located on the far left of the back panel, above and to the left of the LCD monitor, this button changes the function display in the LCD display above the four function buttons, letting the user access a wider range of settings in both Record and Playback modes. (See menu options detailed below.)
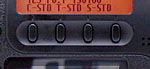
Variable Function Buttons: Arranged horizontally between the small LCD display and the larger LCD monitor on the back panel, these buttons correspond to the functions displayed above them, allowing the user to adjust various camera settings just by pressing a couple of buttons, rather than having to dig through a long series of LCD menu screens. These are one of the biggest ease-of-use features of the S2, making it relatively quick and easy to access a number of camera modes and functions.
![]()
Play Button: Directly beneath the Function button, this button puts the camera in Playback mode and displays the most recently captured image on the LCD. A second press returns the camera to Record mode. (The camera returns to Record mode immediately whenever the shutter release button is half-pressed, so you never really need to hit the Play button a second time.

Follow Imaging Resource: