Fuji FinePix S2 ProFuji updates their digital SLR with a 6 megapixel CCD, with the same excellent color...<<Operation & User Interface :(Previous) | (Next): Image Storage & Interface>> Page 9:Camera Modes & MenusReview First Posted: 7/24/2002 |
Camera Modes and Menus
Because the Record settings menu remains the same in each of the exposure modes, I'll go through the exposure modes individually and then list the settings menu options. Each of the exposure modes are accessed by turning the mode dial, while the Playback mode is entered by pressing the Play button on the camera's back panel.
![]() Manual Exposure
Mode: Lets the user set both the shutter speed and aperture values, as well
as control other exposure variables such as ISO and exposure compensation.
Manual Exposure
Mode: Lets the user set both the shutter speed and aperture values, as well
as control other exposure variables such as ISO and exposure compensation.
![]() Aperture Priority:
The user selects the desired lens aperture setting while the camera selects
the most appropriate corresponding shutter speed. As with Manual exposure mode,
all of the other exposure settings are available.
Aperture Priority:
The user selects the desired lens aperture setting while the camera selects
the most appropriate corresponding shutter speed. As with Manual exposure mode,
all of the other exposure settings are available.
![]() Shutter Speed
Priority: The converse of Aperture Priority mode, this mode lets the user
choose the shutter speed while the camera decides which aperture setting to
use. All other exposure controls are available.
Shutter Speed
Priority: The converse of Aperture Priority mode, this mode lets the user
choose the shutter speed while the camera decides which aperture setting to
use. All other exposure controls are available.
![]() Programmed Auto:
In this mode, the camera selects both the shutter speed and aperture settings.
However, the user may select from a variety of shutter speed and aperture setting
combinations that produce the same exposure, by turning the function wheel.
(I like this mode a lot, it does what you'd normally use Aperture or Shutter
priority for with less hassle.) Exposure compensation adjustment is also available.
Programmed Auto:
In this mode, the camera selects both the shutter speed and aperture settings.
However, the user may select from a variety of shutter speed and aperture setting
combinations that produce the same exposure, by turning the function wheel.
(I like this mode a lot, it does what you'd normally use Aperture or Shutter
priority for with less hassle.) Exposure compensation adjustment is also available.
 Record
Mode Function Menu One: This menu appears on the rear-panel LCD data readout
when the Function button is pressed once in any record mode, this menu offers
the following settings. (Each setting is controlled by the "soft key"
button below the corresponding entry on the LCD data readout as shown at right.)
Record
Mode Function Menu One: This menu appears on the rear-panel LCD data readout
when the Function button is pressed once in any record mode, this menu offers
the following settings. (Each setting is controlled by the "soft key"
button below the corresponding entry on the LCD data readout as shown at right.)
- White Balance: Sets the camera's white balance value to Auto, Custom 1 & 2 (manual settings), Sunny, Shade, Fluorescent 1 (daylight fluorescent), Fluorescent 2 (warm white fluorescent), Fluorescent 3 (cool white fluorescent), or Incandescent.
- AF Area: Sets the AF area to Single or Dynamic Area modes.
- Image Quality: Selects file compression levels and format. Options are Fine or Normal JPEG quality, or Hi (uncompressed TIFF or RAW formats). The choice between TIFF and RAW formats is made via the record menu, as described below.
- Image Size: Selects image size. Options are 1,440 x 960; 2,304 x 1,536; 3,024 x 2,016; and 4,256 x 2,848 pixels. The 3024 size could be thought of as the "native" size of the image, since it produces a 6 megapixel file from a 6 megapixel sensor. Because of the diagonal arrangement of the SuperCCD's pixels though, the 4, 256 interpolated size extracts additional information, resulting in a slight increase in detail.

Record Mode Function Menu Two: This menu is displayed by pressing the Function button a second time in any record mode.
- Color: Adjusts the camera's color saturation, with options of Original (lower saturation), Black and White, Standard, or High.
- Tone: Slightly alters the image tone with settings of Original (slightly lower contrast), Standard, and High.
- Sharpening: Adjusts the in-camera image sharpening. Options are Off, Standard or Hard. (Use Off with strong unsharp masking in Photoshop for maximum detail.)
- Function Lock: Locks the Function keys to prevent accidental changes.
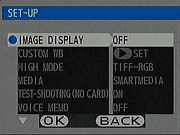 Record
Mode Setup Menu: Pressing the Menu button in Record mode displays the Setup
menu on the large LCD monitor on the camera's rear panel. This menu lets you
adjust the following camera settings:
Record
Mode Setup Menu: Pressing the Menu button in Record mode displays the Setup
menu on the large LCD monitor on the camera's rear panel. This menu lets you
adjust the following camera settings:
- Image Display: Turns the image preview function on or off, with choice of PostView (no record confirmation), Preview, and Histogram Preview. (Both Preview modes require you to confirm the image before the camera will record it to the memory card.)
- Custom White Balance: Sets the custom white balance based on a white card placed in front of the camera.
- Hi MODE: Sets the uncompressed file format to TIFF-RGB or CCD-RAW. (CCD-RAW requires the Fuji software to interpret it.) Both formats are "lossless", but the CCD-RAW format is a good bit more compact.
- Media: Specifies which media slot to use by default: CompactFlash Type I/II or SmartMedia. (If only one card is present, it will be used regardless of this setting.)
- Test Shooting: Lets you trip the shutter without a media card in the camera. The captured image is displayed in preview mode on the LCD monitor, but obviously goes away as soon as you shoot another or turn the camera off.)
- Voice Memo: Turns the voice caption recording option on or off.
- Frame Number: Turns the sequential file numbering on or off. (When on, files are numbered sequentially, even across multiple memory cards. This helps avoid overwriting shots you've previously transferred to your computer.)
- PC Mode: Lets you decide whether the IEEE 1394 or USB interfaces will be used for downloading images, or if the IEEE 1394 interface will be used for shooting.
- Beep: Turns the camera's beep sound on or off, with a High and Low setting.
- Language: Changes the camera's menu language setting. Options are English, French, German, and Japanese.
- Date/Time: Sets the camera's internal date and time.
- Reset: Resets all the menu settings to the factory defaults.
 Playback
Mode: Playback mode is accessed by pressing the Play button on the camera's
rear panel. The last image captured is automatically displayed on the LCD monitor
upon entering Playback mode. Captured images can be reviewed by pressing the
left or right arrows on the Four-Way Arrow Rocker button. The up and down arrow
buttons allow you to digitally enlarge a captured image for closer inspection.
Pressing the FUNC button alternates the data readout display between two screens,
show above right.
Playback
Mode: Playback mode is accessed by pressing the Play button on the camera's
rear panel. The last image captured is automatically displayed on the LCD monitor
upon entering Playback mode. Captured images can be reviewed by pressing the
left or right arrows on the Four-Way Arrow Rocker button. The up and down arrow
buttons allow you to digitally enlarge a captured image for closer inspection.
Pressing the FUNC button alternates the data readout display between two screens,
show above right.
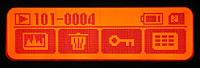 Playback
Mode Function Menu: The Playback Function menu is entered by pressing the
Function button while in Playback mode, and the menu is displayed in the small
rear LCD panel.
Playback
Mode Function Menu: The Playback Function menu is entered by pressing the
Function button while in Playback mode, and the menu is displayed in the small
rear LCD panel.
- Histogram: Cycles between the Master (brightness levels) and red, green, and blue histogram displays. (The histogram overlays the main image.)
- Erase: Deletes the currently displayed image.
- Protect: Protects the currently displayed image from accidental deletion, apart from card formatting.
- Multi-Frame: Displays nine thumbnail images on the LCD monitor, or turns the index display mode off, returning you to single-image viewing. In Multi-Frame mode, the arrow keys on the four-way controller move the cursor corresponding to the currently selected image between the available thumbnails.
 Playback
Mode Setup Menu: Pressing the Menu button while in Playback mode brings
up the following Setup menu on the large LCD screen:
Playback
Mode Setup Menu: Pressing the Menu button while in Playback mode brings
up the following Setup menu on the large LCD screen:
- Erase: Lets you format the memory card or erase all images on the card. (Format will remove all images, even "protected" ones. Erase All leaves protected images undisturbed.)
- Protect: Protects all images currently on the card from accidental erasure (except from formatting) or unprotects them. (Use the "Protect" function key in playback mode to protect or unprotect individual images.)
- DPOF: Sets up images for printing on DPOF compatible devices.
- Voice Memo: Records a short clip of sound to accompany an already-captured image.
- Brightness: Adjusts the LCD brightness.

Follow Imaging Resource: