Back
to Full Fuji FinePix S3 Pro Review
Back
to Full Fuji FinePix S3 Pro ReviewGo to Fuji FinePix S3 Pro Data Sheet
Go to Fuji FinePix S3 Pro Pictures Page
Up to Imaging Resource Cameras Page
Use your browser's "Back" button to return to the previous page, or the links at the top and bottom of this page to navigate to related information. If you have difficulty fitting the text on this page onto your printer output, simply resize your browser window to a narrower width and print again.
Remember us when it's time to buy!
Dave here: Have our reviews been helpful to you? (Is this article you're reading right now useful?) Preparing this level of information on as many products as we do is incredibly hard work, not to mention expensive. Things on the Internet may look like they're free, but they're not. (As a lot of big dot.com companies are finding out these days.) Somewhere, somebody has to pay to produce worthwhile content. YOU can help us though, by remembering us when it comes time to make your purchase. Would you consider coming back to our site and clicking-through to one of our advertisers to make your purchase? Every dollar you spend with one of our advertisers helps us directly (in affiliate fees) or indirectly (the advertiser will keep renewing their ad contract with us). To make it easy for you to support us, here's a URL you can visit, to see all our current advertisers, with links to click on that will register your visit to them as having come from our site. It's up to you where you buy, but Mike, Mike, Kim, Yazmin, Marti and I would be really grateful if you'd help us out by choosing one of our advertisers to purchase from.
Thank you for your support!
Dave Etchells, Founder & Publisher
Visit our "Buy Now" Page:
https://www.imaging-resource.com/buynow.htm
Back
to Full Fuji FinePix S3 Pro Review
Go to Fuji FinePix S3 Pro
Data Sheet
Go to Fuji FinePix S3 Pro
Pictures Page
Up to Imaging Resource Cameras
Page
Fuji FinePix S3 ProFuji updates their digital SLR with a 12.34-megapixel Super CCD SR II, for amazing tonal range. Review First Posted: 9/7/2005 |
|
 |
|
12.34-megapixel SuperCCD SR II makes files as large as 4,256 x 2,848 pixels (6.45 million "S" pixels and 6.45 million "R" pixels) |
| |
New Dynamic Range adjustment for better tonal control in harsh lighting | |
| |
"Live" mode turns LCD monitor into a monochrome viewfinder - a new feature for digital SLRs | |
| |
Superb resolution |
|
| |
Accepts most Nikon F mount lenses |
Manufacturer Overview
Learn how to really use full-functioned cameras like this one - Visit our free Photo Lessons area!
Fuji has long been a player in the digital camera arena, creating a broad line of popular consumer-level models over the last couple of years. From the email I receive, it's apparent that they've been very successful in doing so, as I consistently note a "happy" tone from Fuji users that really stands out amid the flood of correspondence. Fuji has also been a player in the digital SLR market for quite a while now, dating back to their first D-SLR, the E2S several years ago. More recently, they introduced the S1 Pro, a unit based on Nikon's N60 consumer SLR. Using Fuji's SuperCCD sensor technology, the S1 Pro distinguished itself with high resolution and beautiful color, to the extent that it found a strong niche in the commercial portrait business. Its market popularity was further boosted by a selling price that was significantly lower than other D-SLR models available at that time.
Free Photo Lessons
Fuji followed up with the S2 Pro, an upgraded model based on a Nikon N80 body and equipped with the latest-generation 6.1 megapixel SuperCCD. While the S2 Pro was a big hit in the professional arena, Fuji nonetheless decided to continue perfecting their darling digital SLR. FujiFilm is now introducing the S3 Pro, which features a 12.34-megapixel SuperCCD SR II with a dual-pixel layout that attempts to simulate the tonal range and color handling of color film. The S3 Pro offers several digital SLR "firsts," including the ability to adjust the camera's dynamic range, activate a Film Simulation tool that enhances skin tones and color, and the ability to briefly use the LCD monitor as a live viewfinder. I was a big fan of the previous S2, and the S3 boasts all of the same excellent exposure features, plus the bonus of new technology to lure more photographers from the film world. Read on to find out all the details.
High Points
Executive Overview
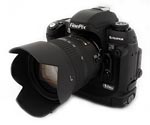
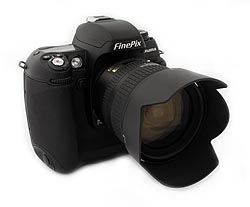
Based on the Nikon N80 film camera body, Fujifilm's new FinePix S3 Pro digital SLR camera is a welcome addition to the prosumer digital camera marketplace, and boasts a few exciting improvements over the well-loved S2 Pro. While the S2 Pro was popular among wedding and portrait photographers, the S3 Pro's new 12.34-megapixel SuperCCD SR II should pique the interest of those who already own an S2 as well as those photographers still considering the digital format. The reason is the S3's dual-pixel CCD design, which features a pixel layout that attempts to simulate the dual-grain makeup of color negative film. With the S3's CCD design, the camera offers two firsts on a digital SLR: adjustable dynamic range and a Film Simulation setting that mimics two different types of color film. But that's not all the S3 has up its sleeve. It's also the first digital SLR to offer a Live LCD mode, which lets you use the LCD monitor (though briefly) for image framing. With its technological innovations and an excellent offering of exposure options, the S3 has a lot going for it. Measuring 5.8 x 5.3 x 3.1 inches (148 x 135 x 79 millimeters), the S3 is just slightly larger than competing models from Nikon and Canon, but roughly the same size as its predecessor. Weighing in at 32.7 ounces (927g) without the lens, but with batteries and media, you'll definitely want to take advantage of the accompanying neck strap, but the heft is not at all excessive for an SLR.
One of the benefits of SLR digital cameras like the S3 Pro is the TTL (through the lens) optical viewfinder, which gives you a more accurate representation of what the camera is seeing than do ordinary viewfinders with separate optics. The S3's viewfinder includes a small information readout at the bottom of the screen that reports aperture, shutter speed, focus, etc. A 2.0-inch color LCD monitor on the back panel displays an image preview, complete with histogram functions, and also reviews captured images when in Playback mode. When the "Live" option is enabled, the S3's shutter opens for about 30 seconds, letting you view the image area on the LCD display. Though it's brief, the Live LCD display is very useful for manual focusing, as you can enlarge the center of the screen. Optically, the S3 features a lens mount that accommodates most of the Nikon F series lenses, although advanced metering modes only work with more recent lenses that are equipped with internal CPUs. A focus switch on the front of the camera allows you to change between continuous autofocus, single-shot autofocus, or manual focusing modes.
The S3 provides a great deal of exposure control, with a wide variety of exposure modes and adjustments available. The main exposure modes include Programmed, Aperture Priority, Shutter Priority and Manual. In Programmed mode, the camera controls the shutter and aperture settings, but the user can select from a range of equivalent exposure settings and also adjust the exposure compensation from -3 to +3 EV in 1/2 EV increments. (One of my few substantive quibbles with the S3's capabilities is that I'd really like to see 1/3 EV steps on the exposure compensation adjustment.) Aperture and Shutter Priority modes allow the user to select the named exposure variable (aperture or shutter) while the camera selects the other one. Aperture settings will vary with each lens used, but shutter speeds range from 30 to 1/4,000 seconds, with a "bulb" mode for even longer exposure times. Of course, Manual exposure mode gives the user control over both exposure variables simultaneously. A continuous shooting mode lets you capture a rapid sequence of shots, at a rate of roughly 2.5 frames/second.
The S3 provides a wide array of other exposure controls through the function buttons and the small monochrome LCD data readout on its rear panel. White balance can be set to Auto, Sunny, Shade, Fluorescent 1, Fluorescent 2, Fluorescent 3, Incandescent, Custom1, or Custom 2 values. ("Custom" is a manual preset option in which you use a white reference card to set the white balance for the current lighting conditions.) The camera's light sensitivity can also be adjusted, with available settings of ISO 100, 160, 200, 400, 800 and 1600 ISO equivalents. Color, tone and sharpness settings can also be adjusted through the Function menus, and exposure metering options include 10-zone matrix, center-weighted, and spot metering. The inclusion of the smaller LCD data readout for the Function menus on the rear panel and the top LCD panel for exposure settings is very helpful for saving battery power, as you can change nearly all of the exposure settings without resorting to the larger LCD monitor. Probably the most interesting exposure tools though are the Dynamic Range and Film Simulation settings. The Dynamic Range option lets you decide how wide you'd like the dynamic range to stretch, from 100 to 400 percent. Film Simulation lets you enhance color and tonal handling, either for skin tones or outdoor shots.
For flash photography, the S3 features a pop-up flash as well as a hot shoe for connecting a more powerful external flash unit. The built-in flash works in several modes, including Auto, On, Off, Anti Redeye, Anti Redeye with Slow Sync, normal Slow Sync, and Rear-Curtain Sync. In Self-Timer mode, a self-timer counts down from two to twenty seconds before firing the shutter, flashing the AF assist light on the front of the camera during the countdown.
Another great design element on the S3 is the memory card slot, which accommodates both CompactFlash Type I and II as well as xD-Picture Cards. This definitely increases your memory card options, and enables you to use the Hitachi MicroDrive CompactFlash drives, now available in sizes as large as 6 gigabytes. The S3 has two interface ports for connecting to a host computer, USB or FireWire (IEEE 1394). Necessary cables accompany the camera, as well as a software CD loaded with Adobe Photoshop Elements, USB drivers for Windows 2000, 98, XP, and Macintosh, Fujifilm FinePix Viewer, a Raw file converter package, and Apple QuickTime 5.0. The Fujifilm software lets you connect the camera to the computer and download or browse images, while the Photoshop Elements application provides basic image editing and correction tools.
US models of the S3 come with an NTSC video output cable for connecting to a television set, and I assume that European models will be equipped for PAL timing. For power, the S3 utilizes four AA batteries (NiMH rechargeable highly recommended) with an AC adapter available as a separate accessory. The camera comes with a set of four rechargeable AA batteries, and a battery charger.
Design
Like the FinePix S2 Pro built before it, the S3 Pro was based on a Nikon N80 camera body, and will thus be a comfortable fit for anyone already familiar with that camera. This is Fuji's third digital SLR, an update of the earlier S2 Pro which proved such a success. Though many of the camera's features are nearly identical to the preceding S2 model, the S3 has a few new tricks up its sleeve. First, the camera boasts Fuji's newest Super CCD SR II, comprised of 6.45 million "S" pixels and 6.45 million "R" pixels, which combine for a total resolution of 12.34 million pixels. The dual pixel configuration of the S3's CCD is intended to mimic the dual grain layer of color film, and thus expand the camera's tonal handling. The new CCD makes it possible to actually adjust the camera's dynamic range, and allows for a Film Simulation adjustment tool as well (exciting news for anyone looking to duplicate the more organic quality of film with a digital camera). In our tests, the Super CCD SR II acquitted itself very nicely, providing really excellent dynamic range, particularly in difficult highlights. Additionally, the S3 Pro's LCD monitor features a Live monochrome viewing mode that lets you use it briefly for framing shots, similar to the LCD monitors on consumer digital cameras. Like the S2, the S3 Pro handles a lot like the Nikon N80 it's built on, the main difference being a bit more heft from the set of four AA cells across the bottom of the camera. The S3 accommodates an array of Nikkor lenses in its Nikon "F" lens mount, a feature that will doubtless attract many current Nikon users. Measuring 5.8 x 5.3 x 3.1 inches (148 x 135 x 79 millimeters), and weighing 32.7 ounces (927 grams) without batteries or lens, the S3's bulk is in line with other digital SLRs, feeling relatively light for a camera of its size.
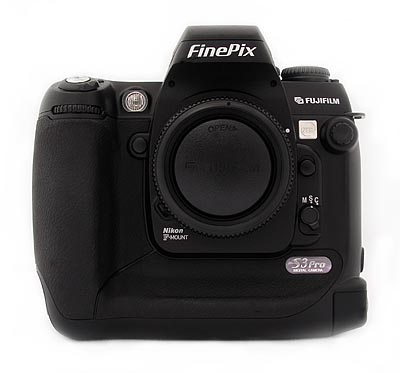
The front of the S3 holds the Nikon F lens mount, the most prominent feature on the front panel. To the right of the lens (as viewed from the front) are the lens release button, Focus Mode switch, and Synchronizing terminal with a screw-on cap (this cap does not stay tethered to the camera body). On the other side of the camera, a sub-command dial projects slightly from the top of the handgrip, and you can also see the Shutter button and Power switch as they angle down from the top of the camera. Nestled between the lens and handgrip are the Depth of Field Preview button and AF assist lamp.
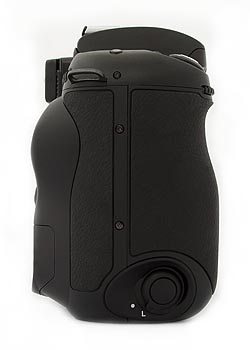
On the left side of the camera (as viewed from the back) are a variety of connection jacks, including the Remote release socket, Video Out, IEEE 1394, USB, and DC In jacks. The DC In and Video Out jacks share a compartment at the bottom of the panel, protected by a flexible plastic flap. Above and to the right of these are the USB and IEEE 1394 jacks, beneath a similar cover. Both flaps remain tethered to the camera when opened. By contrast, Remote release socket and the flash sync socket on the front (a standard PC-contact type) are protected by a tiny plastic cap that screws into place. These little screw-on sync socket covers are found on many cameras, and I dislike all of them. They're too finicky to remove if they were tightened down securely when last used, and are just way too easy to lose. No knocks against Fuji, it's actually a Nikon body, but I do wish the industry could come up with a better solution for protecting sync sockets.
The battery compartment is located at the bottom of the camera, opening from the left side and unlocking with a flip and twist of a latch. Once unlocked, the battery holder slides out from the compartment to reveal four AA-type batteries. Also on this side of the camera is one of the eyelets for attaching the neck strap.
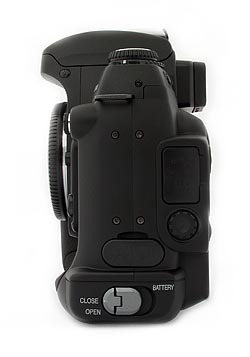
The opposite side of the camera is bare except for the second neck strap eyelet and a secondary Shutter button for holding the camera vertically. A locking dial surrounds the button, so that you can prevent it from accidentally tripping the shutter.

On the S3's top panel are a variety of camera controls, as well as a small status display panel, external flash hot shoe, and the pop-up flash compartment. On the left of the top panel are the Mode dial and the Release Mode Switch (under the Mode Dial, controlling single exposure, motor drive, self-timer, and double-exposure shutter release options; this dial can only be turned when the adjacent button is depressed). Controls on the right side of the top panel include exposure compensation, flash exposure compensation, and LCD illuminator buttons, as well as the Shutter button and Power switch.
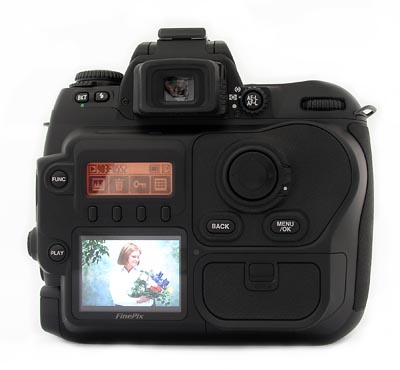
The S3's rear panel holds the remaining camera controls, as well as the optical viewfinder eyepiece and LCD monitor. The optical viewfinder features a diopter adjustment, to adjust the optics for eyeglass wearers. Another small LCD data panel just to the left and below the viewfinder turns the four buttons below it into "soft" buttons, each serving multiple functions as governed by the data panel. A Four-Way Arrow rocker pad with locking dial serves multiple functions, and sits just to the right of the small data panel, with the Back and Menu/OK buttons just below it. The memory card compartment is below the Four-Way Arrow rocker pad, hidden behind a locking cover. Inside the compartment are xD-Picture Card and CompactFlash card slots, the latter of which accommodates Hitachi MicroDrives as well. On the left side of the data display panel and LCD monitor are the Function and Play buttons.
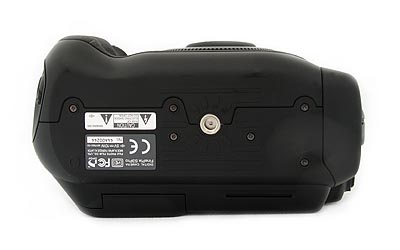
The S3's bottom panel features only the metal tripod mount centered beneath the lens.
Viewfinder
Like other SLRs, the S3 Pro's optical viewfinder looks out through the lens. A sliding diopter adjustment control to the right of the eyepiece adjusts the focusing of the viewfinder optics to accommodate eyeglass wearers, and the viewfinder's "eyepoint" is also high enough that you can see the full viewfinder frame even while wearing fairly thick eyeglass lenses. An illuminated display in the viewfinder gives detailed exposure and camera status information, including focus area indicators, shutter speed, aperture, exposure mode, metering, AE lock, exposure and flash compensation, frame counter, ready light, and five sets of focus brackets. When activated, the view also includes an alignment grid, useful for lining up difficult shots. A large circular outline in the center of the view indicates the Center-Weighted metering area. The optional grid (enabled via Custom Menu setting number 2) and focus area indicators can be set to illuminate briefly when the Shutter button is half-pressed, through Custom Menu setting number 3.
While most digital SLRs offer an LCD panel, the LCD typically isn't available as a viewfinder, due to the digital SLR design. However, the S3 Pro breaks with tradition here, offering a "Live" mode that turns the LCD monitor into a viewfinder. When activated through the camera's main menu, Live Image mode opens the shutter for 30 seconds and displays the image area on the LCD monitor. You can't use the autofocus mechanism, but you can manually adjust focus and frame the shot. There's also an Enlarge option (activated by the up arrow key), which enlarges the center of the image to help you achieve a tight focus. The LCD monitor also provides both normal and zoomed playback of previously captured images, as well as a histogram overlay. (The S3's histogram overlay is unique in my experience in that it shows not only overall brightness values, but separate histograms for the red, green, and blue channels of the image separately.)
The LCD monitor on most digital SLRs also serves to display information about the captured images as well. There's generally an optional information overlay that lists various exposure parameters (shutter speed, aperture, ISO, image size, etc) for the displayed image. On the S3, this function is handled by the monochrome rear-panel LCD data readout just above the main LCD monitor screen. Two screens of information there show image file number, date and time of capture, image compression level and resolution, white balance setting, shutter speed and aperture, ISO, and the settings for color, tone, and sharpening. (You simply hit the Function button to scroll through screens.) I really liked what this data readout panel did for the S3's user interface overall, and particularly enjoyed being able to see the exposure information without it interfering with my viewing of the displayed image.
A new display feature on the S3's image playback is a "blinking highlights" display, which flashes any overexposed highlights. Histogram displays are useful for determining overall exposure, and the S3's addition of RGB histograms is a nice touch. Histogram displays are virtually useless though, if you have relatively small areas of strong highlights that you don't want to blow out. If only a relatively small area is affected, you won't be able to see the tiny peak that corresponds to it on the histogram plot. To address this issue, the S3's playback display shows highlights that are either blowing out or in danger of doing so by letting them "blink" in the display, flipping between white and black. This sort of display makes it immediately obvious anytime you're in danger of losing highlight detail.
The zoomed playback option on the S3 Pro deserves particular mention, given the range of magnification it offers. At maximum magnification, you can easily see down to the pixel level in captured images, allowing pretty precise evaluation of focus and depth of field. (I'd like to see this level of magnification as a standard feature on all digital cameras, but particularly on D-SLRs, whose users are more likely to be interested in precise depth of field evaluation.) The S3 offers a maximum magnification of 26.6x, for maximum resolution images. (The actual level of magnification depends on the image resolution size.)
Optics
| Free Photo Lessons | |
|
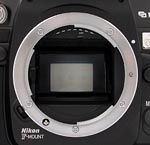 The S3 Pro is equipped with a Nikon "F" type lens mount, which fits a wide range of Nikkor lenses (the user manual has a full list of compatible lens types, reproduced below). The S3's lens mount includes both mechanical AF coupling for older lenses, and AF electrical contacts for the latest AF-IF or AF-S Nikkor lenses with internal focus motors. With very few exceptions, you can use the S3 Pro with any F Mount Nikkor lens ever made. (Actually, I'm not personally aware of any F-mount lenses that flat-out *wouldn't* work, but do know that some of the really unusual Nikkor lenses from the past [full-frame fisheye lenses?] had problems on some camera bodies, requiring mirror lockup to function properly. This is a vanishing percentage of the possible lenses that could be used with the camera though, so you can safely assume that most any F mount lens in your camera bag will work just fine with the S3 Pro.)
As with the Nikon N80 camera body on which it's based, functions and exposure modes available with a given lens will vary greatly with the lens type. More recent Nikkor lenses (the D- or G-type models) include a microchip that communicates focal-distance information to the camera. Lenses without the microchip won't support the 3D Matrix metering mode. Here's a table giving a brief idea of the functionality available with different Nikkor lens types (abstracted from the S3's manual).
| Modes -> |
Focusing Mode | Exposure Mode | Metering Mode | |||||
| |
Auto Focus | Manual with electronic rangefinder | Manual | Any mode Other than M | M | 3D 10-segment | 10-segment | Center weighted, Spot *1 |
| Nikkor lenses with built-in CPU*2 |
||||||||
| D-type, G-type AF lenses, AF-S, AF-I *3 | O | O | O | O | O | O | - | O |
| PC micro 85 mm f/2.8D *4 | - | O*5 | O | - | O | O | - | O |
| AF-I/AF-S Teleconverter | O*7 | O*7 | O | O | O | O | - | O |
| Non-D/G type AF Nikkor (excluding lenses for F3AF) | O | O | O | O | O | - | O | O |
| Ai-P Nikkor | - | O*8 | O | O | O | - | O | O |
| Non-CPU Nikkor*9 |
||||||||
| Ai-S, Ai Series E lenses, modified AI Nikkor | - | O*8 | O | - | O*10 | - | - | - |
| Medical 120 mm f/4 | - | O | O | - | O*11 | - | - | - |
| Reflex lenses | - | - | O | - | O*10 | - | - | - |
| PC Nikkor | - | O*5 | O | - | O*10 | - | - | - |
| Ai-S, AI Teleconverter | - | O*7 | O | - | O*10 | - | - | - |
| Bellows PB-6 (used with K ring 1, 3, 4 or 5) *12 | - | O*7 | O | - | O*10 | - | - | - |
| Auto close-up rings (PK-11A, 12, 13 and PN-11) | - | O*7 | O | - | O*10 | - | - | - |
| Key: |
|
| O : | Usable |
| - : | Not usable |
| *1 | Spot metering area can be shifted with focus area selector |
| *2 | IX Nikkor lenses cannot be attached.. |
| *3 | This camera is compatible with the Vibration Reduction function of the VR Nikkor lens. |
| *4 | The camera's light metering modes and flash control functions do not operate correctly when camera movements are performed (both shift and tilt) or when the aperture is set to any setting other than fully open. |
| *5 | Only possible when camera shift or tilt are not performed. |
| *6 | Compatible with AF-S and AF-I Nikkor except AF-S 17-35mm f/2.8 D I-ED and AF-S 28-70mm f/2.8D IF-ED. |
| *7 | With maximum effective aperture of f/5.6 or faster. |
| *8 | With maximum aperture of f/5.6 or faster. |
| *9 | Some lenses/accessories cannot be mounted on this camera. |
| *10 | With the exposure mode set to M. Note that the exposure meter cannot be used. |
| *11 |
With exposure mode set to Manual and shutter speed set to 1/125 sec. or slower but the meter cannot be used. |
| *12 |
Attach the PB-6 vertically (PB-6 can be set to horizontal position after attaching.) |
| • |
AS-15 must be attached in combination with Medical-Nikkor 200 mm f/5.6 for the lens to fire flash. |
| • |
Reprocopy Outfit PF-4 can be attached in combination with Camera Holder PA-4. |
Lenses that cannot be used: (Caution, do not attempt to forcibly mount or damage to the camera could result!)
| Lenses other than Nikkor lenses with a built-in CPU that cannot be used |
The lenses other than Nikkor lenses with a built-in CPU listed below cannot be used with this camera. Any attempt to forcibly mount one of these lenses on the camera could damage the camera and lens.
|
A release button just to the right of the lens mounting flange unlocks the lens so that it can be rotated and removed from the mount. Below the release button is a Focus Selector switch, which sets focus control to Single Servo, Continuous Servo, or Manual modes. In Single Servo mode, focus is set just once, whenever the Shutter button is halfway pressed. Continuous Servo mode adjusts the focus continuously, as long as the Shutter button is pressed. Manual lets you control focus by turning the focus ring on the lens. In Manual focus mode, a focus indicator appears in the optical viewfinder (a green dot, on the left-hand side of the viewfinder readout), letting you know when the camera thinks the focus is set properly.
One important difference between Single and Continuous Servo modes affects the shutter release: In Single Servo mode, the shutter won't release unless the lens is focused (Focus Priority). In Continuous Servo mode however, the camera will fire regardless of the state of focus (Release Priority). If you want to be sure that the camera is focused when you snap the picture, use Single Servo mode. Use Continuous Servo for moving subjects, and/or times when the instant of shutter release is more important to you than sharp focus.
The AF Area Mode option on the rear-panel data readout/button panel lets you select between Single Area and Dynamic Area by hitting the "FUNC" key until the "AF" option appears, and then pressing the first of the programmable "soft keys" under the data display. The Dynamic Area autofocus mode also offers a closest-subject focus priority option. Both focus modes are capable of responding to any of five individual focus areas, as indicated in the viewfinder by sets of brackets arranged top, bottom, left, right, and center.
Single Area AF simply means that the camera judges focus based on a single, manually-selected focus area. (Focus areas can be selected by pressing the arrow keys on the Four-Way controller on the camera's rear panel.) Dynamic AF employs all five of the autofocus brackets, or areas. Autofocus behavior in Dynamic AF mode is further controlled by CSM menu options 7 and 8, which enable closest-subject AF priority in single and continuous autofocus modes respectively. Normally, Dynamic AF mode begins by focusing on a given AF area, selected by the user from among the five available. If the subject then moves to a different part of the frame, the camera will automatically switch to a new AF point to follow it. In closest-subject priority mode though, the camera itself selects the initial AF point corresponding to the portion of the subject that's closest to the camera. Once the subject is acquired, the camera tracks it as in normal Dynamic AF operation. (Note that no focus area brackets are illuminated in the viewfinder with this mode and on their own cameras, Nikon states that this mode doesn't work well with telephoto lenses or poorly lit subjects. Fuji's manual doesn't caution against telephoto lenses or dim subjects, but it seems safe to assume that the S3 Pro would be subject to the same limitations as the N80 it's based on.)
As noted, in Single Area AF mode, you can change the primary focus area by unlocking the focus area selector (the Four-Way controller on the camera's rear panel) and then shifting the focus area using the up, down, right, or left arrow keys. You can lock the focus area selection by turning the switch back to the lock position. By default, the S3 Pro does not "wrap" the focus area selector as you scroll between focus areas. Through the CSM menu though, you can opt for a "Wrap" function. What this means is that if you press the right arrow key again, after the right focus area is already selected, the selection will immediately jump to the left focus area. The same thing happens when moving the focus area selection vertically as well.
There are two methods by which you can lock focus on the S3. The first is to half-press the Shutter button to lock the focus, placing your subject in the selected focus area, halfway pressing the Shutter button, then realigning the composition and firing the shutter. (By default, this also locks exposure, but you can disable the exposure lock on shutter half-press via CSM option 5.) Alternatively, when using Single Servo AF, you can press the AE-L/AF-L button to lock focus (and exposure too, unless the button is set for focus-only via CSM option 9). Keeping this button pressed will lock focus and/or exposure, even if the Shutter button is released. This lets you recompose the photograph without keeping your finger on the Shutter button, but on the AE-L/AF-L button instead. (Reducing the chance that you'll accidentally trip the shutter when you don't intend to.)
There are several options available for the AE-L/AF-L button, which can be set via CSM option 9. You can program it to lock either focus or exposure separately, or both together (the default). You can also change its operation so a single press locks and holds the exposure setting. (No need to keep the button pressed down.) Finally, you can set the AE/AF lock button so it alone controls the autofocus system, meaning the autofocus won't actuate when the Shutter button is half-pressed, but only when the AE/AF lock button is pressed instead.
Autofocus Speed
I mention AF speed because it's the topic of frequent questions from my readers, although I confess to having no quantitative way to measure it. I also need to point out that AF speed will vary greatly with the lens being used. All that said, the S3 Pro's AF speed seemed "average" to me, overall roughly equivalent to what I experienced with my own Nikon D70. Swapping the D70's "kit" lens (the 18-70mm f/3.5-4.5) back and forth between the S3 Pro and the D70, my subjective sense was that it took about 0.5-0.7 second for either camera to switch focus from a distant subject to one near the closest focusing distance. Traversing smaller distances, the focus lock was much faster.
With a moving subject (Charlotte the Wonder Dog), and the camera set to single-shot focusing mode, I felt that the S3 consistently lagged the subject slightly. This was an entirely unscientific test, but I had the distinct impression that the lens/camera combination could have been faster. (As a rough guess, Charlotte was moving about 10-12 mph towards me, at a distance of around 15 feet when I was snapping the picture. - The most sharply-focused area seemed to be one to two feet behind her under those conditions.) Under similar circumstances, my impression was that the D70 also lagged the subject slightly, but perhaps not quite as much. (Maybe a foot vs two feet?) Neither camera was as fast as I remembered higher-end Nikon models like the D2x being. (Take this with a large grain of salt though, this wasn't any kind of a controlled test, and my memory is far from perfect.)
Low Light Focusing
The S3 sports a bright incandescent autofocus-assist light on its front, between the hand grip and the lens mount. By default, this light will illuminate whenever the ambient light level is too low for the camera to focus well without it. The light is bright enough that the S3 can focus in total darkness out to a good 10 feet (three meters) or so. CSM menu option 15 lets you disable the AF illuminator lamp, for more candid shooting.
Exposure
| Free Photo Lessons | |
|
As noted, shutter times in Manual or Shutter Priority modes extend from 30 to 1/4,000 seconds. In Manual mode, CSM option 6 can be used to enable bulb exposure operation, in which the camera's shutter remains open as long as the shutter button is depressed.
While the S3 permits very long shutter speeds, I was surprised to find that it doesn't appear to incorporate a "dark frame subtraction" noise-reduction system, as found in most D-SLRs and high-end consumer digital cameras. I say this because the camera begins recording the captured image to the memory card the moment the shutter closes. That said, there's evidently some sort of noise reduction processing going on in the SuperCCD sensor, because even very long exposures are amazingly "clean," with virtually no "hot pixels." (I was quite impressed by the S3's low light capabilities.)
Fujifilm's previous S2 model had a disappointing limitation in its metering system, in that it had problems accurately metering exposures longer than two to three seconds. In a very dark room, where a 30 second manually-set exposure at ISO 200 produced a slightly underexposed image, the camera's AE system routinely selected an exposure time of only three seconds in Programmed mode. Happily, the S3 seems to have overcome this limitation, in that its autoexposure system had no trouble metering exposures as long as 30 seconds, the camera's maximum timed exposure duration.
Exposure compensation on the S3 can be adjusted from -3.0 to +3.0 EV (a wider than average range) in 1/2 EV increments by pressing the +/- button on the camera's top panel and rotating the Main Command dial. This adjustment is only available with the Programmed, Shutter Priority, Aperture Priority and Manual exposure modes. Wait a minute, you say, what does "exposure compensation" mean if you're in manual exposure mode? You're controlling all the exposure parameters, so what's to compensate? It turns out that the S3 gives you an analog exposure readout in the viewfinder when in manual mode, showing whether the camera thinks you're exposing correctly or not. The exposure compensation setting in manual mode affects this exposure-feedback display, biasing it to indicate "correct" exposure when the exposure is actually high or low by the amount that you've dialed-in.
For the most part, I really liked the controls on the S3, but one area that I really felt needed improvement was the step size on the exposure compensation adjustment. The S3 has a 1/2 EV unit step size on its exposure compensation control, and there doesn't appear to be any option for switching to the 1/3 EV steps used by most other digital cameras. The 1/2 EV adjustment step is apparently a holdover from the N80 film body, and frankly is too large for exacting work with a digital camera. Film (even transparency film) has a wider exposure latitude than do the sensors on digital cameras. Exposure adjustments of 1/2 EV are thus fine for film work, but can make it difficult to set exposure precisely enough on a digital camera. I'd say if there was a single firmware enhancement I'd like to see Fuji make to the S3, it would be an option for 1/3 EV exposure compensation increments.
ISO sensitivity on the S3 Pro ranges from 100 to 1,600, in steps of 100, 160, 200, 400, 800, and 1600. The user manual cautions about image noise at ISO settings higher than 400, but I thought the images were generally surprisingly clean. Looking at the numbers quantitatively and comparing between the S3 and other cameras currently on the market, the S3's absolute noise levels are lower than most, and the S3 doesn't trade away as much subtle subject detail as some do to achieve its low noise levels. (See the noise graph and further discussion in the Test Results section at the end of this review.)
As mentioned earlier, an Auto-Exposure Lock function button lets you lock the camera's exposure settings for a certain area of your subject (instead of using a half-press of the Shutter button to lock both exposure and focus). You simply point the camera at the part of the subject you want metered, hold down the AE-L/AF-L button and then recompose the shot. For the best/most predictable results, you should set the camera's metering mode to center-weighted or spot when using the AE lock function. (I'll discuss these metering modes in more detail in just a bit.) This decoupling of exposure and focus lock is a handy feature offered by most pro SLRs, but generally lacking in consumer-level digital cameras. By default, the AE-L/AF-L button locks both exposure and focus. CSM menu 9 offers a range of options relating to the AE-L/AF-L button. In addition to the default dual AE/AF lock, you can set it instead to lock just exposure, just focus, or to "latch" the exposure lock when it's pressed. When the AE button is set to latch exposure, you don't have to hold the button down to maintain the exposure setting: Press it once, and the exposure will remain locked until you either trip the shutter, or press the AE-L/AF-L button again. Finally, a fifth option lets you decouple the autofocus system from the Shutter button. The "AF Operation" setting forces the camera's autofocus system to only operate when the AE-L/AF-L button is pressed.
Independent of the AE-L/AF-L button's functioning, you can separately control whether exposure locks when you half-press the Shutter button. CSM menu screen 5 lets you disable the shutter-based AE lock. When this function is disabled, the camera will continue to adjust its exposure settings regardless of whether the Shutter button is half-pressed or not. (The focus will still lock unless it also is decoupled by CSM option 9 as just described, but the exposure will be allowed to change.) With the function enabled, the exposure settings will be set whenever you half-press the Shutter button, and will remain the same until the shutter is fired or the button released. NOTE that the S3's Shutter button AE lock is disabled by default. (Most digital cameras lock exposure when the shutter is half-pressed, so you need to be aware of this when you first start shooting with the S3.)
The Self-Timer button on top of the camera activates the self-timer mode, which counts down from two, five, 10, or 20 seconds after the Shutter button is pressed before firing the shutter. The AF Assist light on the front of the camera blinks during the countdown.
Fujifilm's SuperCCD "SR" Technology
Fujifilm's basic "SuperCCD" technology was first announced back in the fall of 1999, and has been featured in a variety of their digital camera models since then. The basic SuperCCD structure uses diagonally-arrayed hexagonal cells, with the pixel data interpolated 1.4x into the standard rectangular image array. The net result is final images with twice as many pixels as were in the original sensor array, but that have slightly better vertical and horizontal resolution than that of conventional CCDs. Besides the slight but noticeable increase in resolution, Fuji also claims greater light sensitivity, improved signal/noise ratio, and lower power consumption for the technology.
In early 2004, Fujifilm announced a totally new development in the field of CCD sensors, their "SR" sensor technology. An effort to mimic the very broad dynamic range of film, SuperCCD SR chips combine two light-sensitive pixels at each array site. One sensor has normal sensitivity, but the other is only 1/4 as sensitive to light. By cleverly combining the signals from both sensors, Fuji can achieve dynamic range four times as great as that of conventional CCD designs. "SR" technology was first introduced to the market in the consumer-oriented Finepix F700. Now, the technology's true potential becomes more apparent, with its implementation in the S3 Pro.
Here's a little background on how Fujifilm's SR sensor technology works, excerpted from our news coverage of the original announcement:
The root of the dynamic range problem with conventional CCDs is that they're essentially linear devices, with a hard limit on the range of illumination they can accurately respond to. Once a CCD's charge wells are full, it stops responding to incremental exposure. If the subject gets any brighter, there's no change in the amount of charge stored by the CCD.
This is very different than the way film responds to increasing exposure. Even slide film (which digital sensors are often compared to) offers some differential response to increasing illumination beyond that required to fully expose the film.
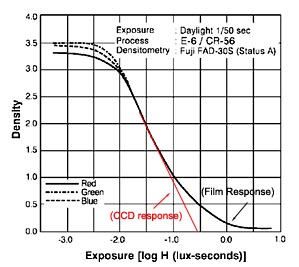
The illustration above shows how typical transparency (slide) film responds to light. (This and all other illustrations here are courtesy of Fujifilm. Modifications made to them are copyright Imaging Resource, and may not be reproduced without the permission of IR.) This is the so-called "DlogE" curve for Fuji's own Sensia 100. The vertical axis shows the density (opacity) of the film, while the horizontal axis shows the exposure level. As you'd expect for slide film, the density is the lowest when the exposure is the highest. Graphs of this sort are referred to as the "Characteristic Curves" of the film involved.
What's interesting about characteristic curves of film emulsions is the way they "tail off" at both high and low exposures. Looking at the highlight (righthand) end of the curve, you can see that it flattens out quite a bit as you get to high exposure levels. This means that the film begins responding more gradually to changes in exposure, and as a result can manage to continue to show at least some response at much higher light levels than it would otherwise.
By comparison, CCDs are "linear" throughout their range, with the result that they respond very predictably up to a certain light level, but then stop responding altogether at levels higher than that point. I've drawn-in an example of what a CCD's response would look like in red on the chart above.
This limitation of CCDs is well-known, but there are things camera designers can do to minimize it. This is why we have that horribly-lit "sunlit portrait" shot in our standard test suite, to evaluate how well cameras handle light overloads in strong highlights. Almost anything you might do to improve a CCD's tolerance for overexposure will have undesirable effects in other areas of its performance, however, so there's no way with conventional CCD technology to match film's tonal response without arriving at a cure that's worse than the problem.
Now comes Fuji though, with a very clever approach to the problem. Rather than try to engineer a single CCD sensor to match the broad dynamic range of film, they've instead added a second, low sensitivity sensor to each pixel of the CCD array. The resulting cells look something like the illustrations below.
| Standard ("HR") SuperCCD pixel layout. | Dual-Element "SR" SuperCCD pixel structure. |
While it sounds counterproductive to add a reduced-sensitivity sensor to the CCD array, it turns out to be just what's needed to mimic the exceptional dynamic range of film. (Fuji's original press release pointed out that this is actually exactly how film emulsions work, using a combination of high- and low-sensitivity layers to respond to varying levels of exposure.) The low-sensitivity sensor is designed to have a light sensitivity only a quarter that of the main element. This means that it can tolerate light overloads 400% higher than can the main sensor element, without saturating (ceasing to respond). Fuji calls the new, lower-sensitivity sensor elements the "R" pixels, and the larger, more sensitive elements the "S" pixels.
With a little clever post-processing, the camera can combine the output signals from the two sensor elements, to mimic the long "tail" on film's DlogE characteristic curve. The illustration below shows how this works.
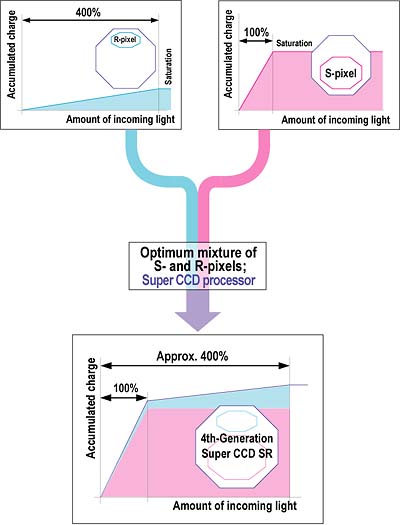
In this schematic depiction of the technique, the resulting curve doesn't look much like a conventional DlogE curve, but the effect is much the same. The sensor can continue to provide a proportional response even in the face of as much as a 400% light overload. The result is that cameras using the new "SR" SuperCCD sensor approach should do a much better job of holding highlight detail under high-contrast lighting conditions. The photos below show what this might look like in an actual image. (Note though, that these images are mockups, and do not represent the actual output from a SR-design SuperCCD. They do serve to convey the general idea though.)
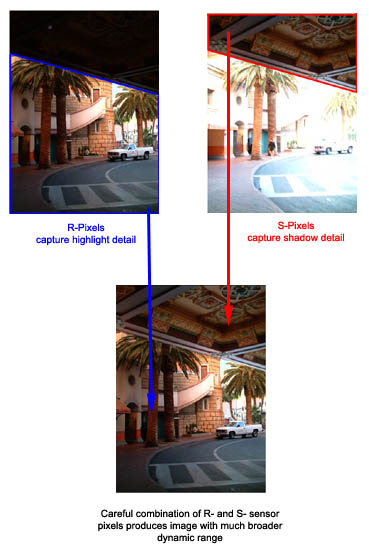
In the shot above, notice how the detail in the overhanging roof is preserved by the "S" pixels, while detail in the brighter portions of the image are recorded by the "R" pixels.
With the SR technology, Fuji has broken away from the blind pursuit of ever-higher pixel counts, and instead trading off some of that resolution to provide better quality photos with more tonal information in them. Early results from the consumer-oriented F700 camera were mixed, part of the problem being that people (including many reviewers) didn't really understand how the SR technology was being applied, and so didn't know how to properly interpret what they were seeing.
With the S3 Pro though, the SR technology comes to its logical market, and the results are absolutely stellar. Based on our detailed tests here, it's hard to imagine any wedding photographer who wouldn't immediately want an S3 Pro for their work: Its handling of difficult highlights under tough lighting conditions simply puts to shame any other camera we've ever tested. - And wedding photographers aren't the only ones who have to deal with difficult highlights either. The S3 Pro could make life considerably easier for studio photographers as well, greatly easing the task of lighting difficult subjects to reduce contrast. With its incredible dynamic range, excellent results can be obtained even with fairly contrasty lighting.
The Function Buttons
Many of the S3's exposure options are controlled through the series of function buttons on the camera's back panel, just beneath the small LCD display and above the larger LCD monitor. This is the same arrangement as appeared on the earlier S2 and S1 models, and I've found it to be one of the best camera interfaces I've yet encountered for setting common camera operating parameters. I really like the way the functions are immediately available, without having to delve into layers of menu structure to find the feature I'm looking for. The function buttons are "soft buttons," whose behavior is set by the contents of the LCD display above them. The FUNC button just to the left of the row of soft buttons controls which function menu is displayed in the LCD. The first press of the FUNC button displays the basic exposure function menu, featuring white balance, image quality and size, and Film Simulation settings. The second press of the Function button displays the next menu, which adjusts dynamic range, color, tone, and sharpness. A third screen offers the AF area option and also lets you lock the function buttons so you won't inadvertently change a setting if you happen to bump the button panel while carrying the camera. There's also a reset option to reset all the settings to their defaults.
White Balance Options
The S3 Pro offers a wider than average range of white balance settings. Options include Auto, two separate Custom ("manual") settings, Sunny, Shade, three Fluorescent settings (Daylight, Warm White, Cool White), and Incandescent. The Incandescent option seems to be adjusted for 3,200K studio lights (as you'd expect on a pro-oriented camera), so it doesn't fully compensate for the very warm cast of typical household incandescent bulbs. The Custom settings adjust the white balance to match specific lighting, based on a reference white card. To balance the color for a new light source, each Custom setting must be changed through the Record settings menu. I'd prefer to change the setting just by selecting the Custom white balance option, instead of having to access the LCD menu, but it's nice that the camera remembers the setting for you, without forcing you to choose a new setting every time you enter Custom white balance mode.
Tone, Color, and Sharpness Options
The S3's tone and color saturation variations are nicely balanced to give a useful range of control. (That is, the "high" color option isn't overly garish, and the "org" (original) setting gives nicely understated colors that aren't too flat. Options for tone (contrast) are STD (standard), HARD (high contrast), or ORG (original - a lower contrast setting). Color options are STD (standard), HIGH (high contrast), ORG (original - a slightly lower saturation), and B/W (black and white). Sharpness options are STD (standard), HARD (higher in-camera sharpening) and OFF (no in-camera sharpening). As with color and tone, the sharpness options seem to cover a good range of variation.
Dynamic Range and Film Simulation
The S3 Pro's Super CCD SR II's dual-pixel configuration was intended to mimic the dual grain configuration of color negative film. What this essentially means is that the S3's CCD is composed of 6.17 million large "S" pixels and 6.17 million small "R" pixels, arrayed in a pattern to mimic the silver-halide grains in film. According to Fuji, this new design broadens the camera's dynamic range by 4x. Thus, built into the S3 is a Dynamic Range adjustment tool, which lets you specify how broad you'd like the range to be, depending on the subject and lighting conditions. Accessed through the Function menu, the Dynamic Range option offers Auto, Wide 1, and Wide 2 settings. The Auto setting varies the range between 100 and 400 percent, depending on the scene. In theory, this mode should automatically suppress any flaring highlights or dark areas in high contrast situations. The Wide 1 option sets the dynamic range to 230 percent, while Wide 2 fixes the setting at 400 percent. Thus, you can leave it up to the camera, or select a smaller or wider dynamic range, depending on the scene at hand. I can immediately see this feature being of interest to wedding photographers (among whom the previous S2 Pro was a big hit), looking to preserve detail in those white wedding dresses.
In order to take advantage of the S3's Dynamic Range setting in the Function menu, the main Dynamic Range option under the Setup menu must be set to Wide. If set to Standard, the dynamic range is fixed at 100 percent (like the previous S2), and the setting is unavailable in the Function menu.
The S3's unique CCD also enables a Film Simulation mode, which enhances tone and color in an effort to simulate the look of color film. Also accessed through the Function menu, the Film Simulation option offers Standard, F1 (Studio Portrait), and F2 (Fujichrome) choices. The Studio Portrait setting enhances skin tones, while the Fujichrome setting boosts saturation for more impressive scenery. This is the first time such a tool has been offered on a digital SLR, and I've no doubt that wedding and portrait photographers alike will be more than a little interested in playing around with it.
Flash
The S3 Pro offers both a built-in, pop-up flash and a hot shoe for connecting an external flash unit when more flash power is needed. The built-in flash has seven operating modes: Auto, On, Off, Anti Red-Eye, Slow Synchronization with Anti Redeye, Slow Synchronization, and Rear-Curtain Sync. All of the flash modes are controlled by the Flash button at the top of the camera's rear panel, and each is pretty self-explanatory. The Auto setting lets the camera judge when to use the flash, while the On setting fires the flash with every exposure and the Off setting disables the flash entirely (you can also close the flash compartment to disable the flash). Anti Redeye (equivalent to Redeye Reduction mode on other digital cameras) fires a small pre-flash before firing the full flash, to avoid the annoying Redeye Effect. Slow Synchronization works with a slower shutter speed to illuminate the subject and also allow more ambient light into the image. Likewise, Slow Synchronization with Anti Redeye just combines the two modes for night portraits. Finally, Rear-Curtain Sync fires the flash at the end of long exposures, so any "motion trails" will appear behind moving subjects, rather than seeming to proceed in front of them.
Effective Flash Range (from S3 Manual):
| ISO | |
|
| Guide Number (feet) | |
|
| f-stop (aperture) | |
|
| |
(3.3 - 13.8 ft.) |
(6.6 - 27.9 ft.) |
| |
(2.3 - 9.8 ft.) |
(4.6 - 19.7 ft.) |
| |
(2.0 - 6.9 ft.) |
(3.3 - 13.8 ft.) |
| |
(2.0 - 4.9 ft.) |
(2.3 - 9.8 ft.) |
| |
(2.0-3.6 ft.) |
(2.0 - 6.9 ft.) |
As noted, the S3 also has an external flash hot shoe, just behind the pop-up flash compartment. The hot shoe accommodates Nikon accessory strobes, as well as a wide range of third party flashes. The range of flash sync modes remains available for compatible flash units. Different Nikon speedlights offer different features when used on the S3 with different lenses. Rather than try to reproduce the large table from the S3's manual here, I'll just note that the S3 doesn't seem to need the special "DX" flash types required by Nikon's own digital SLRs. Chances therefore are good that whatever Nikon speedlight you happen to already own should work on the S3 much as it does on your film-based SLRs.
3D Matrix Flash Metering?
A key feature of Nikon's SLRs (both film and digital) is their "3D Matrix Flash Metering," a uniquely capable system of metering flash exposures that handles difficult subjects with remarkable ease. Given that the S3 Pro is based on a Nikon body, I was curious as to whether that meant that it would also incorporate Nikon's advanced flash exposure algorithms. Unfortunately, a little side by side experimentation with the S3 Pro and my Nikon D70 seems to suggest that this is not the case. Setting up some deliberately difficult subjects (a dark computer screen, surrounded by lighter objects, various light objects against darker backgrounds), the S3 Pro's flash metering system was fairly easy to "trick" into over- or underexposing the images. By contrast, the D70 delivered very accurate flash exposures in almost every instance.
Metering
The S3 offers three separate metering modes, selected via a small ring surrounding the AE-L/AF-L button on the camera's rear panel. The 10-segment multi-pattern metering divides the image into 10 zones, which are then measured and analyzed to determine the best exposure for the full image. Alternatively, the S3's center-weighted metering system averages values from a broad area in the center of the image to determine the exposure. Finally, the Spot Metering option determines the exposure by metering a roughly 4mm diameter area in the viewfinder (approximately two percent of the image area). The spot metering area shifts to follow the selected focus area. (When the camera is in closest-subject priority dynamic autofocus mode though, the spot metering area always remains in the center of the shot.)
Multiple Exposure Mode
You can enable multiple exposures on the S3, through the Release Mode switch on the left side of its top panel. This lets you make multiple exposures on one frame. It's just like exposing the same frame of 35mm film without advancing the film, either to brighten the exposure or to create the effect of a multiple exposure. This is a little surprising to find on a digital camera (although it was also present on the S1 and S2), and I suspect that any serious work of this sort would be better done in the computer, rather than in the camera itself. It does have a huge advantage over similar modes in film-based cameras, in that you can immediately see the results of your multi-exposure on the LCD screen, rather than waiting for the film to come back from developing. Overall, an entertaining option, but one I don't think will find a lot of application.
Preview Mode
Through the Record settings menu, you can enable a Preview mode which provides a powerful tool for checking your exposure. When set to On, the image is previewed two seconds and then automatically recorded. However, under the Preview setting, the image is still previewed and automatically recorded, but the Function keys now offer a few options. Once in Preview mode, the function menu (smaller rear LCD display) allows you to save or delete the image, as well as display a histogram or the brightness warning. The histogram function button actually toggles between the Master histogram (showing the distribution of brightness values in the image) and the individual histograms for the red, green, and blue channels. This gives you a good idea of the distribution of tonal values across the image and whether it's under or over exposed. In Preview mode, the Standard Chart option (fourth Function key) cycles between the brightness warning (which flashes any overexposed areas) and a Color chart. The Color chart displays two reference bars, one of gray tones and the other of the standard color range, which help you evaluate the color and tonal values of your image for proper exposure.
Shutter Lag and Cycle Times
When you press the shutter release on a camera, there's usually a lag time or delay before the shutter actually fires. This time allows the autofocus and autoexposure mechanisms time to do their work and can amount to a fairly long delay in some situations. Since this number is rarely reported on, and can significantly affect the picture taking experience, I now routinely measure it, using a custom test system I built for the purpose, accurate to 0.001 seconds.
| |
||
| |
(secs) |
|
| Power On -> First shot | |
Almost immediate; difficult to measure. - A dramatic improvement over the previous S2. |
| Shutdown | |
First time is simple shutdown (nearly instant), second time is worst-case buffer-clearing time, corresponding to clearing seven low dynamic-range RAW shots from the buffer. (Buffer clearing time measured with a Lexar 80x CF card, slower cards will take longer.) |
| Play to Record, first shot | |
Nearly immediate, typical of most d-SLRs though. |
| Record to play | |
First time is that required to display a large/fine file immediately after capture, second time is that needed to display a large/fine file that has already been processed and stored on the memory card. On the slow side. |
| Shutter lag, full autofocus | |
Will depend somewhat on the lens used, time shown was measured with the Nikkor 105mm f/2.8 macro lens attached, not the fastest-focusing lens out there. Good speed, better than most consumer-grade d-SLRs, not as fast as the best pro models. |
| Shutter lag, continuous autofocus |
|
Shutter lag times improve slightly when operating in continuous-autofocus mode. (On many cameras, continuous AF has no impact on shutter lag with stationary subjects.) |
| Shutter lag, manual focus | 0.143 |
A bit on the slow side, compared to the current crop of d-SLRs. |
| Shutter lag, prefocus | 0.143 |
Time to capture, after half-pressing shutter button. Rather slow by current d-SLR standards. |
| Cycle Time, max/min resolution | 0.94 |
Times are averages. In large/fine mode, shoots 9 frames this fast (14 in "standard" dynamic range mode), then slows to about 2.1 seconds per shot. Buffer clears in 16 seconds. In TV (640x480) mode, shoots 6 frames this fast, then slows to about 1.2 seconds per shot. Buffer clears in 5 seconds. (Buffer clearing time measured with a Lexar 80x CF card, slower cards will take longer.) Slower than average by current standards, and somewhat limited buffer capacity. |
| Cycle Time, RAW mode | 0.69 (1.45 fps) |
Times are averages. Shoots 3 frames this fast, then slows to about 12 seconds per shot. Buffer clears in 35 seconds. (Buffer clearing time measured with a Lexar 80x CF card, slower cards will take longer.) No difference in buffer depth for standard/wide dynamic range modes, but shot to shot speeds and buffer clearing are both a bit faster when the expanded dynamic range option is disabled. |
| Cycle Time, continuous mode, max/min resolution, Wide dynamic range mode | 0.95 (1.06 fps) |
Results are nearly identical to single-shot mode. Times are averages. In large/fine mode, shoots 9 frames this fast (14 frames in "standard" dynamic range mode), then slows to about 2.2 seconds per shot. Buffer clears in 16 seconds. (Buffer clearing time measured with a Lexar 80x CF card, slower cards will take longer.) In TV (640x480) mode, shoots 6 frames this fast, then slows to about 1.2 seconds per shot. Buffer clears in 5 seconds. |
| Cycle Time, continuous mode, max/min resolution, Standard dynamic range mode | 0.50 (2.02 fps) |
Much faster when wide dynamic range option is disabled. In large/fine mode, shoots 14 frames this fast , then slows to about 2.2 seconds per shot. Buffer clears in 30 seconds. In TV (640x480) mode, shoots 13 frames at intervals of 0.44 second, then slows to about 0.8 seconds per shot. Buffer clears in 8 seconds. (Buffer clearing time measured with a Lexar 80x CF card, slower cards will take longer.) |
| Cycle Time, continuous mode, RAW, Wide dynamic range mode | 0.70 (1.43 fps) |
Results are nearly identical to single-shot mode. Times are averages. Shoots 3 frames this fast, then slows to about 12 seconds per shot. Buffer clears in 36 seconds. (Buffer clearing time measured with a Lexar 80x CF card, slower cards will take longer.) |
| Cycle Time, continuous mode, RAW, Standard dynamic range mode | 0.41 (2.45 fps) |
Again, much faster in "Standard" dynamic range mode. (I didn't measure single-shot cycle times in Standard DR mode, so no comparison to discuss here.) Times are averages. Shoots 3 frames this fast, then slows to about 12 seconds per shot. Buffer clears in 36 seconds. (Buffer clearing time measured with a Lexar 80x CF card, slower cards will take longer.) |
Good startup time, but slower than average overall, relative to other d-SLRs, particularly pro-grade ones. The S3 Pro starts up almost instantly, a significant improvement over the previous S2 model. Once running though, its performance is only average. -- In part due to the added data and processing required to capture and merge the extended dynamic-range tonal information. At 0.21 second, shutter lag in full-autofocus mode is better than that of most consumer-grade d-SLRs, if not quite up to the performance levels of competing professional cameras. Shutter lag in manual focus or prefocused mode is 0.143 second, more on a par with consumer SLRs. Shot to shot times are where the S3 Pro pays a price for its sophisticated dynamic-range expansion technology. With the wide dynamic range capability enabled, shot to shot times for large/fine JPEG images are a sluggish 0.94 second in both single-shot and continuous shooting modes. Giving up the expanded dynamic range capability cuts cycle times in half, although 2 frames/second in continuous mode still isn't too impressive by current standards. Buffer depths are also a little limited compared to other d-SLRs on the market, running from as few as 3 RAW format wide dynamic range shots, to 7 RAW "standard" dynamic range ones, to 9 large/fine wide dynamic range JPEGs, or 14 large/fine "standard" dynamic range ones.
Operation and User Interface
The S3 Pro's user interface is straightforward and very similar to the S2 Pro. The Function buttons and their changing uses may take a few moments to get accustomed to, but menu navigation and the external control buttons are all very sensible. With a camera design familiar to the previous S2 and 35mm SLR Nikon N80, the S3 Pro should make existing Nikon users immediately comfortable with the control layout and the general feel of the camera. The use of the Mode dial to change the exposure mode and the combination of the Command wheel and control buttons make camera operation very quick and efficient. With the majority of the exposure options adjustable through the smaller rear panel LCD display and the associated "soft" buttons, you aren't reliant on a cumbersome LCD menu for common setting changes. The rear-panel data readout and soft buttons really make a noticeable difference in the S3's ease of use - I'd like to see more manufacturers adopt this kind of interface.
Shutter Button: Positioned on the top right side of the camera, this button is encircled by the Power dial. Halfway pressing the Shutter button sets focus and exposure, and a full press fires the shutter.
Power Dial (see image above): Surrounding the Shutter button, this rotary control turns the camera on and off.
+/- Button (see image above): Located just behind and to the left of the Shutter button, this button adjusts the exposure compensation from -3.0 to +3.0 exposure equivalents (EV) in half-step increments, in the Programmed, Aperture Priority, Shutter Priority and Manual exposure modes. (In Manual mode, it biases the in-viewfinder exposure display by the corresponding amount.) Holding down this button and the Bracket button simultaneously for two seconds resets the main exposure settings to their defaults.
Flash +/- Button (see image above): Adjacent to the +/- button behind the Shutter button, this button adjusts the intensity of the built-in flash, from -3.0 to +1.0 EV in half-step increments.

LCD Illuminator Button: This button sits to the right of the small LCD status display panel on top of the camera and illuminates the display panel when pressed. (It controls the backlight for both the top and rear LCD data readouts.)
![]()
Sub-Command Dial: Positioned on the front of the camera, at the top of the hand grip, this dial controls a multitude of functions when turned while pressing another control button. In Manual and Aperture Priority exposure modes, this dial adjusts the lens aperture setting.
![]()
Main Command Dial: Located directly to the right of the AE Lock button, right next to your right thumb as you grip the camera, this dial changes camera settings when turned while holding down a control button.

Depth of Field Check Button: Nestled between the lens and the hand grip on the front panel, this button stops down the lens to the specified aperture setting, so that you can check the approximate depth of field through the viewfinder.

Pop-Up Flash Release Button: Protruding slightly from the side of the pop-up flash compartment, this button releases the pop-up flash into its operating position.

Lens Release Button: Situated to the right of the lens mount (when looking at the front of the camera), this button unlocks the lens so that it can be turned and released from the mount.

Focus Mode Switch: Also located to the right of the lens mount, this switch selects between Single, Continuous, and Manual focus modes.

Exposure Mode Dial: Resting on top of the Release Mode dial, on the left side of the camera's top panel, this notched dial sets the camera's exposure mode and accesses two adjustment modes, with the following choices:
Release Mode Dial (see image above): Just beneath the Exposure Mode dial, this dial accesses the camera's Single Shot, Continuous Shooting, Self-Timer, and Multiple Exposure modes.
Release Mode Dial Lock Button (see image above): This small black button sits beside the Release Mode Dial, and unlocks the dial for turning when held down.

AE/AF Lock Button: Positioned to the right of the viewfinder eyepiece on the back panel, this button lets the user lock the exposure and/or focus on a certain area of the subject by centering the part of the subject in question, holding down the button, then reframing the subject to the original composition. For proper operation, this function should be used with the camera's exposure system set to either center-weighted or spot metering.
Metering Selector Dial (see image above): Encircling the AE/AF Lock button on the back panel, this dial sets the camera's metering mode to Center-Weighted, Matrix, or Spot.
![]()
Dioptric Adjustment Slider: Tucked on the right side of the optical viewfinder eyepiece, this indexed slider adjusts the optical viewfinder to accommodate eyeglass wearers.
![]()
Synchro Mode Button: To the left of the viewfinder eyepiece, this button cycles through the flash synchro modes, which include Front Curtain Synchro, Red-Eye Reduction, Redeye Reduction with Slow Synchro, Slow Synchro, and Rear Curtain Synchro.

Auto Exposure Bracketing Button: On the left side of the Synchro Mode button, this button activates the Auto Exposure Bracketing mode when pressed while turning the Main Command dial. Pressing this button while turning the Subcommand dial sets the number of exposures in the series. Holding down this button in conjunction with the +/- button resets the camera to its default exposure settings.

Four-Way Arrow Rocker Button: This button sits in the center right side of the rear panel and features one arrow in each cardinal direction. In both Record and Playback setup menus, this button navigates through menu options. In Playback mode, the left and right arrow buttons scroll through captured images while the up and down arrows zoom in and out of images (up to 26.6x, depending on the original image size).
Four-Way Arrow Rocker Button Lock Switch (see image above): On the right side of the rocker button, a tab projects from a ring that surrounds the rocker. This switch locks the rocker control so that it doesn't make any changes if accidentally pressed.
![]()
Back Button: Below and to the left of the Four-Way Arrow Rocker button, this button backs out of menu selections.
![]()
Menu / OK Button: To the right of the Back button, this button accesses the setup menu in both Record and Playback modes, and executes selected menu options.
Function Button: Located on the far left of the back panel, next to the small display panel, this button changes the function display in the LCD display above the four function buttons, letting the user access a wider range of settings in both Record and Playback modes. (See menu options detailed below.)
Variable Function Buttons (see image above): Arranged horizontally between the small LCD display and the larger LCD monitor on the back panel, these buttons correspond to the functions displayed above them, allowing the user to adjust various camera settings just by pressing a couple of buttons, rather than having to dig through a long series of LCD menu screens. These are one of the biggest ease-of-use features of the S3, making it relatively quick and easy to access a number of camera modes and functions.

Play Button: Directly beneath the Function button, this button puts the camera in Playback mode and displays the most recently captured image on the LCD. A second press returns the camera to Record mode. (The camera returns to Record mode immediately whenever the shutter release button is half-pressed, so you never really need to hit the Play button a second time.
Secondary Shutter Button and Locking Dial: Located at the bottom of the handgrip, this is the secondary Shutter button for shooting vertically-oriented images. The surrounding dial locks the button, so that it won't trip the shutter if pressed accidentally.
Camera Modes and Menus
Because the Record settings menu remains the same in each of the exposure modes, I'll go through the exposure modes individually and then list the settings menu options. Each of the exposure modes are accessed by turning the mode dial, while the Playback mode is entered by pressing the Play button on the camera's back panel.
Manual Exposure Mode: Lets the user set both the shutter speed and aperture values, as well as control other exposure variables such as ISO and exposure compensation.
Aperture Priority: The user selects the desired lens aperture setting while the camera selects the most appropriate corresponding shutter speed. As with Manual exposure mode, all of the other exposure settings are available.
Shutter Speed Priority: The converse of Aperture Priority mode, this mode lets the user choose the shutter speed while the camera decides which aperture setting to use. All other exposure controls are available.
Programmed Auto: In this mode, the camera selects both the shutter speed and aperture settings. However, the user may select from a variety of shutter speed and aperture setting combinations that produce the same exposure, by turning the function wheel. (I like this mode a lot, it does what you'd normally use Aperture or Shutter priority for with less hassle.) Exposure compensation adjustment is also available.
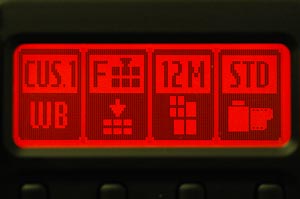
Record Mode Function Menu One: This menu appears on the rear-panel LCD data readout when the Function button is pressed once in any record mode, this menu offers the following settings. (Each setting is controlled by the "soft key" button below the corresponding entry on the LCD data readout as shown below right.)
 White Balance: Sets the camera's white balance value to Auto, Custom 1 & 2 (manual settings), Sunny, Shade, Fluorescent 1 (daylight fluorescent), Fluorescent 2 (warm white fluorescent), Fluorescent 3 (cool white fluorescent), or Incandescent.
Record Mode Function Menu Two: This menu is displayed by pressing the Function button a second time in any record mode.
 Dynamic Range: Allows you to adjust the camera's tonal handling. Options are Standard, Wide 1, and Wide 2. In Standard mode, the camera automatically varies the dynamic range between 100 and 400 percent, according to the circumstances. The Wide 1 setting sets the dynamic range at 230 percent, regardless of the conditions. Wide 2 sets the dynamic range to 400 percent.
Record Mode Function Menu Three: This menu is displayed by pressing the Function button a third time in any record mode.
 AF Area: Sets AF area selection mode to Single-Area (indicated by a cross hairs) or Dynamic-Area.
Record Mode Setup Menu: Pressing the Menu button in Record mode displays the Setup menu on the large LCD monitor on the camera's rear panel. This menu lets you adjust the following camera settings:
 Image Display: Turns the image preview function on or off, or puts it into Preview mode. In Preview mode, the Function menu offers Erase, Histogram, and Standard Chart options. The On setting displays the captured image immediately post-capture for two seconds.
 Auto Rotate: If turned on, this feature automatically rotates vertically-oriented shots in the viewfinder during playback.
 Beep: Turns the camera's beep sound on or off, with a High and Low setting.
 Frame Number: Turns sequential file numbering on or off. (When on, files are numbered sequentially, even across multiple memory cards. This helps avoid overwriting shots you've previously transferred to your computer.)
 Reset: Resets all the menu settings to the factory defaults.
Playback Mode: Playback mode is accessed by pressing the Play button on the camera's rear panel. The last image captured is automatically displayed on the LCD monitor upon entering Playback mode. Captured images can be reviewed by pressing the left or right arrows on the Four-Way Arrow Rocker button. The up and down arrow buttons allow you to digitally enlarge a captured image for closer inspection. Pressing the FUNC button alternates the data readout display between two screens, shown above right.
Playback Mode Function Menu: The Playback Function menu is entered by pressing the Function button while in Playback mode, and the menu is displayed in the small rear LCD panel.
 Histogram: Cycles between the Master (brightness levels) and red, green, and blue histogram displays. (The histogram overlays the main image.)
Playback Mode Setup Menu: Pressing the Menu button while in Playback mode brings up the following Setup menu on the large LCD screen:
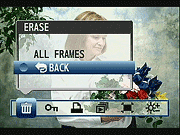 Erase: Lets you erase all images on the selected memory card (except for those with write protection.)
Image Storage and Interface
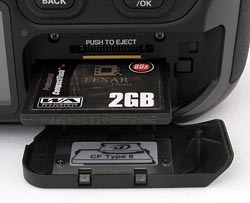 The S3 can accommodate CompactFlash Type I and II as well as xD-Picture Card memory cards for image storage, but ships without any memory card in its packaging. This makes sense, as most users will want to purchase their own memory cards (if they don't already have a few from previous cameras they've owned), and there's no sense in adding the cost of a big memory card onto the cost of the basic camera. Plan on buying a 256 MB card as an absolute minimum, but a 1 GB card would make more sense. The media card slot location on the rear panel is convenient for changing memory cards while mounted to a tripod, and the slot is protected by a hinged, plastic door that flips in and out of place.
xD-Picture Cards and CompactFlash cards cannot be write protected, but images on either card can be individually protected through the Playback menu. Through this same menu, images can also be set up for printing on a DPOF (Digital Print Order Format) device. Four image sizes are available to choose from, 4,256 x 2,848, 3,024 x 2,016, 2,304 x 1,536 or 1,440 x 960, with Hi (RAW), Fine, or Normal JPEG compression levels. The S3 Pro has both USB and FireWire computer interface ports for connection to a host computer. I didn't test download speed over the FireWire interface, but USB downloads were quite speedy, at 1,761 KB/second. While not quite as fast as the fastest USB 2.0-equipped cameras I've tested, this is about three times as fast as cameras with USB 1.1 (or USB 2.0 "full speed") interfaces can manage. With transfers this fast, few users will find any need for FireWire connections or external card readers. (Download speed measurements were made using a Lexar 80x CF card and a Sony VAIO desktop computer, with a 2.4 GHz Pentium IV processor.)
| Resolution/Quality 256 MB Memory Card |
Fine | Normal | |
|
| 4256 x 2848 |
Images (Avg size) |
52 4.9 MB |
104 2.4 MB |
19 / 9 13 / 26 MB |
| Approx. Compression |
8:1 | 15:1 | 1.4:1 / 2.8:1 | |
| 3024 x 2016 |
Images (Avg size) |
83 3.1 MB |
167 1.5 MB |
|
| Approx. Compression |
6:1 | 12:1 | ||
| 2304 x 1536 |
Images (Avg size) |
142 1.8 MB |
280 911 KB |
|
| Approx. Compression |
6:1 | 12:1 | ||
| |
Images (Avg size) |
238 1.1 MB |
462 553 KB |
|
| Approx. Compression |
4:1 | 8:1 | ||
The S3 Pro has both USB and FireWire computer interface ports for connection to a host computer. I didn't test download speed over the FireWire interface, but USB downloads were quite speedy, at 1,761 KB/second. While not quite as fast as the fastest USB 2.0-equipped cameras I've tested, this is about three times as fast as cameras with USB 1.1 (or USB 2.0 "full speed") interfaces can manage. With transfers this fast, few users will find any need for FireWire connections or external card readers. (Download speed measurements were made using a Lexar 80x CF card and a Sony VAIO desktop computer, with a 2.4 GHz Pentium IV processor.)
Video Out

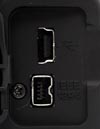 The US version of the S3 includes a video out jack and connection cable, offering NTSC-formatted video output. I assume that European models support PAL timing and are accompanied by the appropriate cable. Connecting the video output provides a signal to an external device, without disabling the internal LCD display screen. All images that would normally appear on the LCD are also routed to the external video display so that the television screen becomes an enlarged version of the LCD monitor and can be used for image playback and preview.
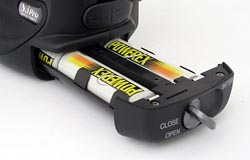 For power, the S3 uses four AA rechargeable NiMH batteries and comes with a set of batteries and a charger. I'd recommend picking up a spare set of batteries and keeping them freshly-charged and on-hand at all times.
An external AC adapter is available as an accessory and plugs into the DC port on the left side of the camera, which is covered by a small, flexible plastic flap. I should mention that the ability to almost completely rely on the smaller LCD panels for changing camera settings is a useful power saver. There's also an Auto Off feature that lets you set the camera to turn itself off after a brief period of inactivity. Here's my usual table with power consumption in various operating modes and projected runtimes for each based on high-capacity NiMH AAs.
| |
(@5 volts on the external power terminal) |
(four 1600 mA cells) |
| Capture Mode | |
|
| Half-pressed shutter | |
|
| Memory Write (transient) | |
|
| Flash Recharge (transient) | |
|
| Image Playback | |
|
Rather limited battery life for a d-SLR. The previous Fujifilm S2 Pro d-SLR used a combination of four AA cells and two CR123A Lithium batteries. The AA cells powered the digital parts of the camera, while the CR123s ran camera functions such as autofocus, shutter and flash. The good part of this arrangement was that the camera would run for quite a long time on a set of AA cells. The downside though, was that it would also chew through a set of expensive CR123s in just a couple of days of moderately heavy shooting. In the S3 Pro, Fuji has addressed complains about the previous multi-battery system by powering the entire camera from the AA cells. This is great news in terms of operating cost, as you can now run everything from relatively inexpensive NiMH rechargeable batteries. The downside of course, is that the AAs no longer last nearly as long, now that they have the entire camera to power. With "standard" 1600 mAh NiMH cells, the S3 Pro should run continuously for a bit over two hours in capture mode. With modern high-capacity NiMH cells having true capacities of 2100 mAh, worst-case run time would stretch to about 2.75 hours. This is still much shorter than most other d-SLRs, but this is of course assuming continuous operation (without letting the auto-shutdown timer put the camera to sleep). Also, the fact that it uses conventional AA cells means it'd be easy and quite inexpensive to keep several sets topped off and on hand at all times. One side note though: While I didn't have any way to test the S3 Pro's cutoff voltage directly (the battery voltage below which it refused to work anymore), my sense was that it was a bit finicky about the NiMH batteries I fed it. - With some brands and models seemed to shut down much earlier than with others, even though the cells involved had roughly similar actual capacities. Bottom line, be sure to buy name-brand, high-capacity NiMH cells for use with the S3 Pro, and be sure to get a good charger as well.
Included Software
The S3 is accompanied by both USB and FireWire cables for connection to a PC or Mac. Included software CDs offer Adobe Photoshop Elements, USB drivers, Fuji's FinePix Viewer, Fuji's Hyper-Utility 2, a fairly capable file browser/manipulator that also incorporates RAW file conversion and manipulation, VideoImpression, and Apple QuickTime 5.0. Fuji's software provides the basics for downloading and browsing images, while Photoshop Elements provides good image-manipulation capability. I applaud Fuji for including software for converting the RAW image files to other formats in the box, at no added charge. In the case of the S3 Pro, the RAW converter is also key for unlocking the full power of its "SR" sensor technology, letting you choose just how much dynamic range expansion you want for each image. Kudos too, for the fairly extensive remote-capture capability that Fuji's Hyper-Utility now offers. Here's a look at some of the software that accompanies the S3 Pro:
Hyper-Utility
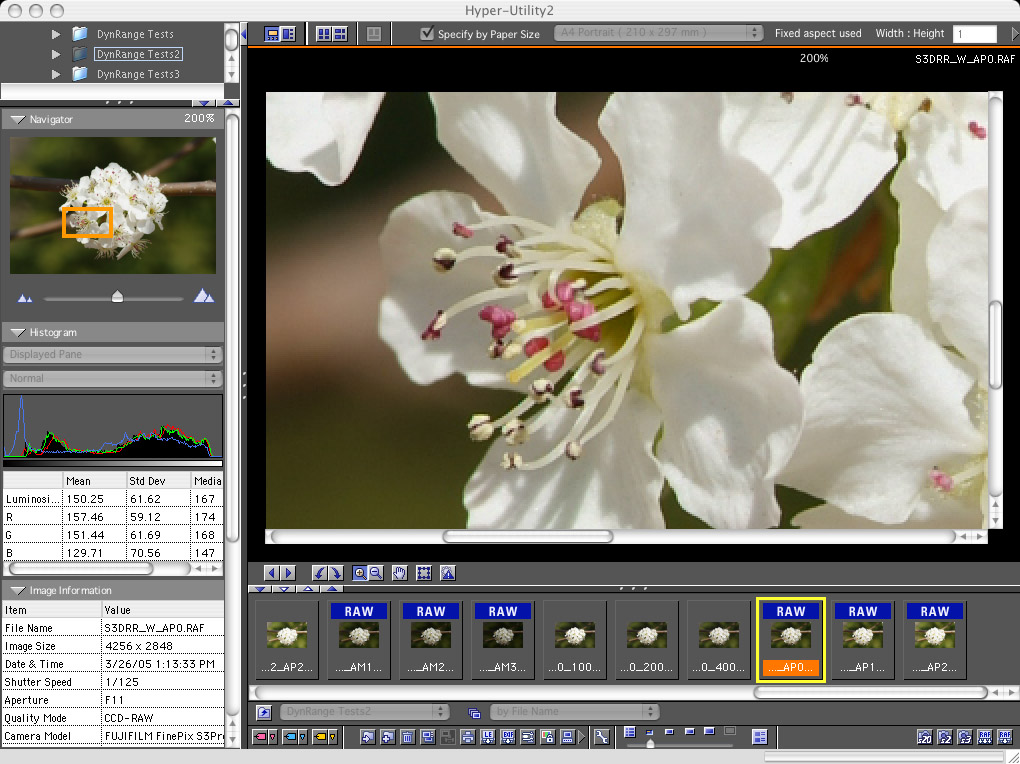
Main Screen
Hyper-Utility's main screen shows a typical "filmstrip" view, popular in many image browsers. At the top left corner is a directory tree that can be expanded or contracted as you'd like (it's somewhat contracted in this view). Below the directory tree is a "navigator" thumbnail showing what part of the larger image is being shown in the main panel on the right. Below that is a very nice 3-color + luminosity histogram display, followed by fairly detailed image information, extracted from the file's EXIF headers. A nice feature of the histogram display is that you can choose to view the histograms of the image as a whole, just the portion that's currently displayed in the preview pane, or a rectangular area that you've selected with a cropping tool. A row of thumbnails run along the bottom of the screen in this view, but they can be moved to the right side of the currently-displayed image by selecting a vertical-format view.
Besides simply browsing through your images, Hyper-Utility lets you do the following (listed in the order they appear in the application's toolbar, with menu options at the bottom):
While I didn't want to take the space or time to show the relevant screens here, Hyper-Utility is an unusually configurable application. Through no fewer than 14 separate preferences screens, you can change options for image display, color matching, highlight/shadow warning points, image types than can be displayed or saved from the program, thumbnail caching, histogram display normalization, button sizes, and even which controls appear on the application's toolbar.
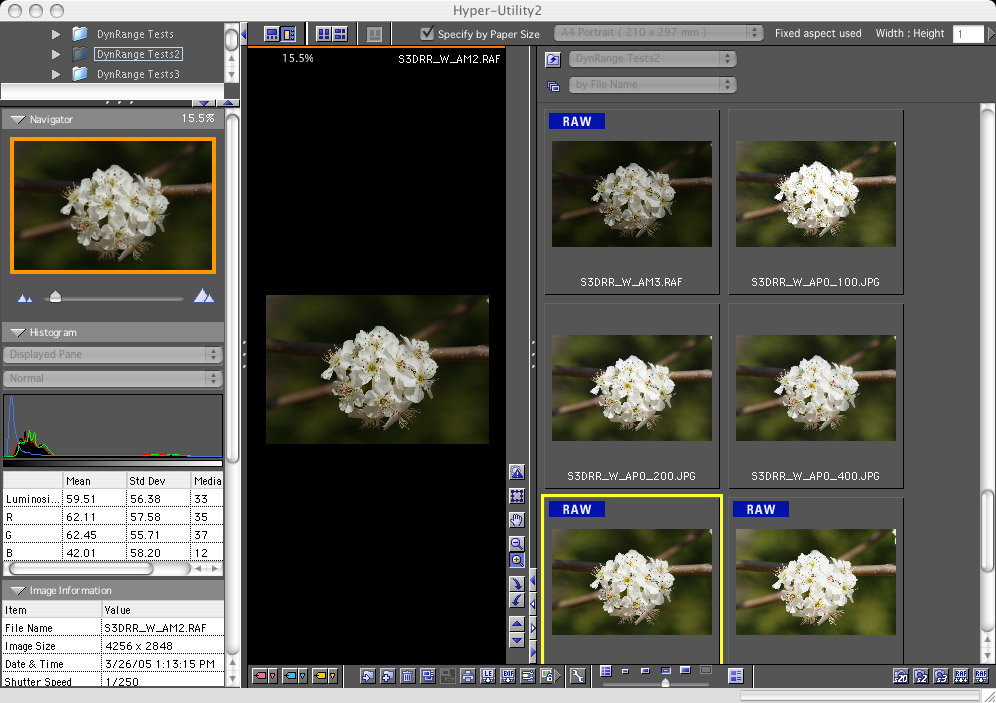
Expanded thumbnail view
You can have as many or as few thumbnails in view as you like, simply by dragging the bar that separates the image preview window and the thumbnail pane. Thumbnails may be any of five different sizes. The screenshot here shows the vertical format mentioned above. (Best-suited for vertical-format images, of course.)

Image Info Option
Clicking the Image Info icon at the bottom of the screen displays all the EXIF information next to each thumbnail, handy if you're needing to quickly sort through a batch of bracketed exposures for particular exposure settings. Dragging the bar between the thumbnail and preview windows all the way over the preview pane lets you see only the thumbnails, as seen here.
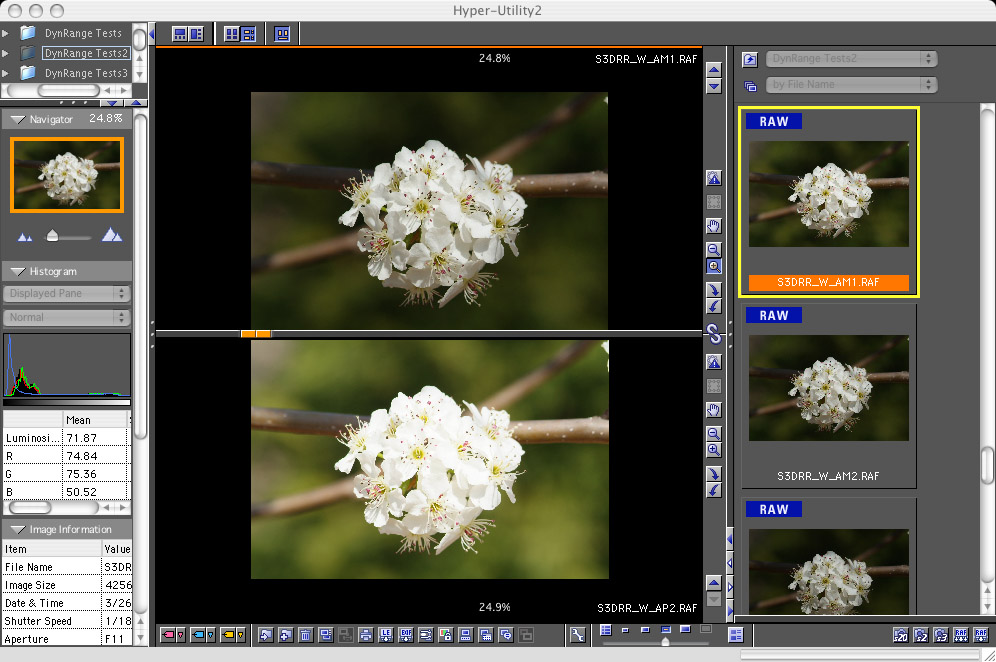
Image Comparison
A nice feature of Hyper-Utility is an image-comparison option. You can not only see two images side by side, but you can zoom in on them as well, with the pan/zoom settings locked between the two windows. This is very handy for checking details in two different shots, to pick the best version.

RAW File Converter Utility
I found the Raw converter function in Hyper-Utility to be more than a little awkward to navigate. You access it by clicking on a thumbnail to select it, then clicking on the tiny "RAF" Raw File Converter icon in the extreme lower right corner of the window. This opens the Raw File Converter pane on the right side of the screen, and the image or images you'd selected now appear(s) in a new thumbnail filmstrip along the bottom of the screen. Bizarrely, if you had only one image selected, you have re-select it once you're in RAF in order to work with it.
Options at the top of the RAW File Converter pane control output parameters, settings saving and restoring, and single or batch conversion. Output options include a choices for color/film simulation including sRGB, Adobe RGB, sRGB/Pro Negative, and sRGB/Fujichrome. File format options include TIFF (8 or 16 bit) and JPEG at any of three compression levels. Settings can be saved to and recalled from disk, and you can also revert any manual settings you've made to the original camera values.
Initially, the image-manipulation controls in the right pane are disabled, since the converter defaults to "Camera Settings" in the "Conversion Conditions" pulldown menu. Selecting "Custom setting" there enables the image-adjustment controls.
By default, all the adjustment control panes are opened, I've collapsed them all down in the shot above, so you can see the list of them all together. Controls include Tone Curve, White balance, Sensitization (think EV adjust), Color, Sharpness, and Dynamic Range. The table below shows each adjustment pane separately in the order they appear in the application (right-left, top to bottom), with pulldown options where appropriate.
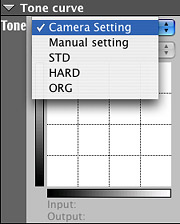 |
 |
| Tone Curve: You can choose either the tone setting in the camera when the image was shot, or one of the three camera settings, or a manual curve, entered by tugging points on a curve up or down. The tone curve only appears when you're in Manual mode, so there's no indication of what sort of tone curves the camera settings correspond to, something that would be nice to be able to see. |
White Balance: Again, the first option is the setting in the camera at the time of capture. Other options are as shown. Some mimic camera options, while the gray picker lets you pick a point that you know to be a neutral tone. Kelvin options range from 2500 - 9500K in 100K increments. All settings here can be "fine tuned" by dragging a cursor point around an RGB color-circle display. (This does indeed seem to provide pretty fine control.) |
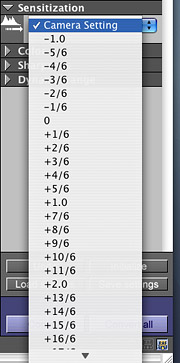 |
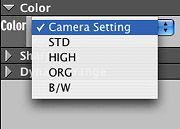 |
| Sensitization: Fuji uses the term "sensitization" where others would say "exposure compensation." This is a typical exposure adjustment, in units of fractions of an EV, ranging from -1.0 to +3.0 |
Color: These are just the four color options from the camera's shooting menu, including black and white. |
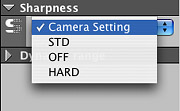 |
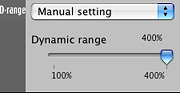 |
| Sharpness: The three options from the camera shooting menu for image sharpening. |
Dynamic Range: This control determines how much of the low-sensitivity pixel data is used in the image. The percentage here refers to exposure headroom above that provided by the "S" pixels. 100% means no dynamic range expansion, 400% means the full range of the low-sensitivity pixels is being used to preserve highlight detail. |
In addition to the controls just covered, a preferences dialog lets you select trimming/resizing and preview display options, as well as parameters affecting the conversion process itself. (Interestingly, the notes here suggest that the "Super High Quality Image Conversion" option applies more sophisticated noise reduction techniques than the default.) The Image Resizing options seem to affect how the software creates 6-megapixel images from the 12 megapixels of raw image data. The "High Quality Image Resizing" option seems to preserve edge detail better and reduce color aliasing somewhat
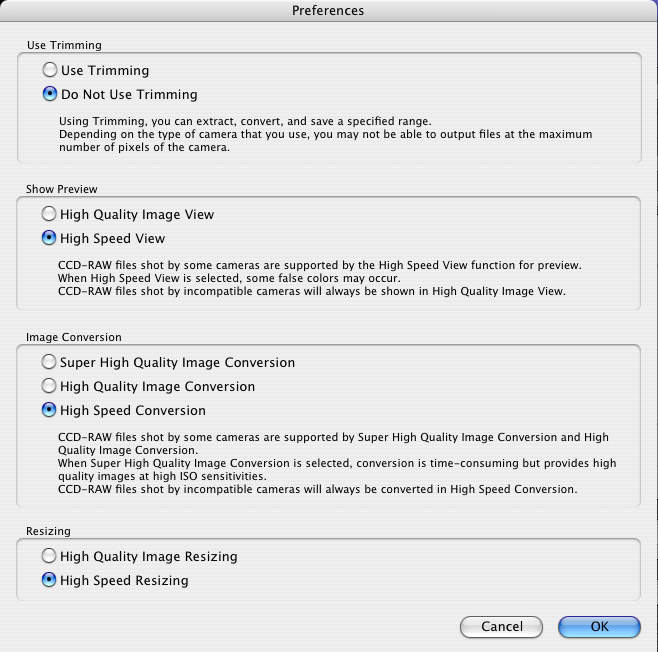
Camera Control and Remote Capture
The latest versions of Hyper-Utility now support fairly complete camera control from a computer, as well as a tethered mode in which the camera is controlled locally, but images are automatically transmitted to the computer for storage. The remote capture mode also includes an intervalometer function, that lets you program the camera/computer combo to snap anywhere from 1 to 1475 images, at intervals ranging from 4 seconds to 120 minutes and 59 seconds.

The screenshot above shows the Hyper-Utility in Camera-Capture mode. As successive images are captured, they're immediately transmitted to the computer and displayed in the preview window. The readouts on the right show the exposure mode, ISO setting, shutter speed and aperture, and exposure compensation used to capture each shot. Previous shots appear in the thumbnail "filmstrip" along the bottom of the window.
In the Box
The Fuji S3 Pro ships to the US market with the following items in the box. (Note that overseas models may have very different complements of software and accessories.)
Test Results
In keeping with my standard test policy, the comments given here summarize only my key findings. For full details on each of the test images, see the S3 Pro's "pictures" page.
For a look at some more pictorial photos from this camera, check out our Fujifilm S3 Pro Photo Gallery.
For the real nitty-gritty image-analysis details, read my S3 Pro Imatest Results page.
Not sure which camera to buy? Let your eyes be the ultimate judge! Visit our Comparometer(tm) to compare images from the Fujifilm S3 Pro with those from other cameras you may be considering. The proof is in the pictures, so let your own eyes decide which you like best!
| Dynamic Range (in f-stops) vs Image Quality (At camera's minimum ISO) |
||||
| Camera Model | Allowed noise, f-stops (Image quality level) |
|||
| 1.0 (Low) |
0.5 (Medium) |
0.25 (Med-High) |
0.1 (High) |
|
| Fujifilm S3 Pro (Via Adobe Camera Raw 2) |
12.1 | 11.7 | 10.7 | 9.0 |
| Fujifilm S3 Pro | -- | 9.9 | 9.4 | 7.94 |
| Nikon D50 | 10.7 | 9.93 | 8.70 | 7.36 |
| Canon EOS 20D | 10.3 | 9.66 | 8.85 | 7.29 |
| Canon Digital Rebel XT | 10.3 | 9.51 | 8.61 | 7.11 |
| Olympus EVOLT | 10.8 | 9.26 | 8.48 | 7.07 |
| Canon Digital Rebel | 10.1 | 9.11 | 8.47 | 6.97 |
| Pentax *istDs | 10.2 | 10 | 8.87 | 6.9 |
| Nikon D2x | -- | 8.93 | 7.75 | 6.43 |
| Nikon D70S | 9.84 | 8.69 | 7.46 | 5.85 |
| Nikon D70 | 9.81 | 8.76 | 7.58 | 5.84 |
| Highlight Recovery from S3 Pro RAF files (All examples from the same RAW file, +2.0 EV exposure compensation) |
||
| Hyper-Utility NO dynamic range expansion |
Hyper-Utility 400% dynamic range expansion (Manually tweaked) |
Adobe Camera Raw 2 (Manually tweaked) |
 |
 |
 |
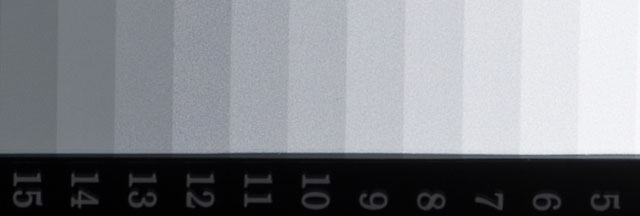
Conclusion
| Pro: | Con: |
|---|---|
|
|
Fuji's original S1 Pro did well partly due to its beautiful color rendering, and partly due to a price that was thousands of dollars less than other D-SLRs at the time of its introduction. The following S2 model genuinely amazed me with its resolution and how delicately it rendered fine detail. I really liked its user interface design, with the small rear-panel data readout and "soft buttons" below it, and was very impressed overall with the camera's capabilities. The S2 offered very nice color rendering as well.
Free Photo Lessons

Learn how to take stunning photos with simple pro lighting tips, in our free Photo School area!
Now comes the S3 Pro, a camera that takes a somewhat different path, trading off image resolution to achieve dramatically greater dynamic range. Its body size and design will prompt many to compare it with lower-end (and much cheaper) "prosumer" d-SLRs, but that's not really a fair comparison, given its amazing imaging capabilities. When it comes to preserving difficult highlights without disturbing the tonality or color rendition of the rest of the image, the Fujifilm S3 Pro is unquestionably without equal anywhere in the digital camera market. If you're a wedding photographer, perpetually challenged by the need to capture white-on-white detail under difficult lighting conditions, you shouldn't even think twice. -- This is the camera you need, it'll save you thousands of dollars in lost shots and missed opportunities, most likely in the first few jobs alone. Portrait and commercial photographers should find a lot of benefit in the S3 Pro's exceptional dynamic range as well, as it could help relax lighting requirements (and therefore setup times) quite a bit. The one minor negative note about the S3 Pro's amazing dynamic range performance is that you really need to work in RAW mode and process its files through Adobe's Camera Raw 2 Photoshop(tm) plugin to get the absolute most out of it. (That said though, JPEGs straight from the camera do noticeably better with difficult highlights than even images processed from RAW files from competing d-SLRs.)
Other camera parameters are fairly middle-of the road, with less than spectacular shot to shot speeds, and mediocre battery life. It's easy to forgive these minor shortcomings though, in exchange for the incredible dynamic range the S3 offers.
Bottom line, Fujifilm appears to have achieved exactly what they set out to do with the S3 Pro, delivering a camera with dynamic range that equals or exceeds that of film, with excellent color and tonal rendition in the bargain. Highly recommended, especially if your work involves a lot of tricky highlight detail. (An easy Dave's Pick.)
<<FinePix S3 Pro Sample Images | Additional Resources and Other Links>>
Reader Comments!
Questions, comments or controversy on this product? Click
this link to see what other Imaging Resource readers have had to say about
the Fuji FinePix S3 Pro, or add comments of your own!