Canon SD700 Operation
The Canon PowerShot SD700 IS' user interface is straightforward and relatively uncomplicated, with a similar menu setup and basic control philosophy as the rest of the current ELPH series. Most of the camera's functions are controlled by buttons on the top and rear panels, while a handful of settings are controlled through the LCD-based Record menu. A Function menu provides faster access to basic settings like image size, quality, and exposure compensation, without the need to sift through menu screens. The LCD menu system itself is quite efficient, as you view menu items organized in tabs instead of through a series of pages. Additionally, the Setup and My Camera menus are always available, regardless of the camera mode. With the instruction manual in-hand, it shouldn't take more than a half an hour to an hour to get comfortable with the camera.
 Record Mode Display: In any record mode, the PowerShot SD700 IS' LCD display shows either the image area with no information, the image with a limited information display, or no display at all. Pressing the Display button cycles through the available display modes. When the information display is active, it reports resolution and image quality settings, the number of available images, Record mode, orientation, and a handful of exposure settings (although not aperture or shutter speed).
 Playback Mode Display: Playback mode also offers three display modes, including the image only, the image with information, and the image with expanded information and a histogram. You can display as many as nine thumbnail images at a time on-screen with the index display mode, or zoom in on captured images to check fine details, focus, or framing. You can also jump through nine images at a time by accessing the JUMP mode. This mode is accessed by hitting the wide angle side of the zoom toggle after entering the nine-frame preview mode.
Canon SD700 Modes and Menus
Still Record Mode: Sets the camera for image capture, with a full range of exposure and shooting options available through the on-screen menus. Exposure modes include Auto and Manual (though no direct exposure control), as well as Portrait, Night Snapshot, Kids & Pets, Scene (Indoor, Foliage, Snow, Beach, Fireworks, and Underwater), My Colors, and Stitch Assist preset shooting modes.
Movie Mode: Records short movie clips with sound in one of four modes. You can zoom while recording. Movie modes include Standard (either 640 x 480 or 320 x 240 pixels at either 30 or 15 fps, up to 1-GB each), Fast Frame Rate (320 x 240 pixels at 60 fps for up to one minute), Compact (160 x 120 pixels at 15 fps for up to three minutes), and My Colors (either 640 x 480 or 320 x 240 pixels at either 30 or 15 fps, up to 1-GB each).
Playback Mode: This mode allows you to scroll through captured images and movies, write-protect images, view a nine-image index display, zoom into a captured image, delete unwanted images, rotate images, set up images for printing on DPOF compatible devices, as well as play and crop movies.
Record Menu System: Accessed by pressing the Menu button in any record mode (some options are not available in all modes). Three menu tabs appear, one each for Record, Setup, and My Camera sub-menus.
Record Menu:
 AiAF: Turns on the AiAF focus system. If switched off, the camera bases autofocus on the center of the frame.
- Self-Timer: Sets the Self-Timer countdown to two or 10 seconds, or lets you specify a custom timer. The custom timer can have a delay of 0-10, 15, 20, or 30 seconds, and allows multiple shots (from one to 10 in total) to be captured. If the camera is set to capture multiple shots, these are captured with an interval of about one second between shots, enough time for the flash to recharge if required. Focus and exposure are locked from the first shot. (A very handy feature for getting good shots of groups, as someone invariably blinks right as the shutter goes off.)
- AF Assist Beam: Turns the AF assist light on or off. If on, the bright orange LED on the camera's front automatically illuminates in low lighting.
- Digital Zoom: Enables the SD700 IS's 4x digital zoom function, which is engaged by zooming past the optical zoom range. Also disables digital zoom.
- Review: Turns the instant review function on or off, sets the amount of time that the captured image is displayed on the screen from two to 10 seconds, or allows a "Hold" mode where the image remains on the screen until the shutter button is half-pressed. The instant review function applies to still images only.
- Save Original: When in My Colors mode, sets the camera to save an unmodified version of each still image captured, as well as the version modified by the My Colors function.
- Grid Lines: Enables or disables display of grid lines to help align shots or compose using the rule of thirds.
 IS Mode: Activates the Image Stabilizer and lets you select between three modes -- Continuous, Shoot Only, and Panning
- Date Stamp: Activates the Date Stamp feature, which imprints the date (and optionally, the time) on the lower right of images captured in "Postcard" mode only.
- Long Shutter: Activates Long Shutter mode, so that it appears in the Function menu.
- Stitch Assist: Enables the Stitch Assist (panoramic) shooting mode, and lets you designate whether the panorama travels left to right or right to left.
Setup Menu:
 Mute: Turns the camera's beep sounds on and off.
- Volume: Individually sets Startup, Operation, Self Timer, Shutter, and Playback volumes. Five steps are available for each item, or the sound for each item can be disabled individually.
- LCD Brightness: Adjust the brightness of the LCD backlight, with 15 steps of control available.
- Power Saving: Toggles the camera's automatic shutoff function, which turns off the camera after a length of inactivity. Also sets display shutdown time to 10, 20, or 30 seconds, or to 1, 2, or 3 minutes.
- Time Zone: Sets both a Home and World (away) time zone, so you can simply select one or the other to record date and time settings for that location. Setting a time zone displays a world map with scrollable time zones and major city names for each zone, making it easy to select a location.
- Date/Time: Sets the camera's internal calendar and clock, as well as the format for dates (mm/dd/yy, dd/mm/yy, or yy/mm/dd).
 Clock Display: Controls the clock display option, which shows the current time (but not the date) for a period of 0-10, 20, or 30 seconds or for 1, 2, or 3 minutes when the Function key is pressed and held for two seconds. (Handy if you forgot your wristwatch, I guess.) If set to zero, the clock is displayed only while the Function button is held in.
- Format: Formats the Secure Digital card, erasing all files (even those marked for write-protection). An optional is available to low-level format the card.
- File Numbering: Resets file numbering with each new Secure Digital card when set to Auto Reset. If set to Continuous, the camera continues numbering in sequence, regardless of memory card.
- Create Folder: Immediately creates a new folder on the memory card to store images or creates the folder at the day and time you specify.
- Auto Rotate: Toggles Auto Rotate feature on and off. The camera can detect when the camera is held approximately level, or when it is rotated left or right beyond approximately 45 degrees. If you aim the camera vertically up or down, it will remember the orientation before you did so -- hence letting you control which orientation an image is tagged with even for shots where the camera is tilted enough vertically to prevent the sensor working.
- Lens Retract: Sets the timing of the lens retraction when you switch from the shooting to the playback mode to either 1 minute or 0 seconds.
- Language: Sets the camera's menu language to one of a whopping 23 choices. English is the default setting.
 Video System: Sets the camera's video-out signal to conform to NTSC or PAL timing.
- Print Method: Lets you change the printer connection method from Auto to 16:9 Widescreen mode.
- Reset All: Resets all non-custom camera settings to their default values.
My Camera Menu
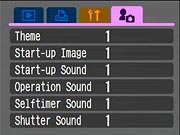 Theme: Selects a common theme for each My Camera menu settings item. Four options are available, the first one being Off. When a theme is selected, all of the following settings automatically adjust to that theme. Users can also select and upload their own sounds to the camera.
- Start-Up Image: Sets the startup image when you turn on the camera to: Black screen, Canon logo, Canon logo with sunset, and nature scene. You can also apply your own image using the Canon software.
- Start-Up Sound: Sets the startup sound when you turn on the camera to: No sound, Musical tone (1), Musical tone (2), or Birds chirping. You can also apply your own sounds using the Canon software.
- Operation Sound: Sets the sound when any control or switch is use (except the Shutter button). Options include no sound, Beep, Musical tone, and Chirp.
- Self-Timer Sound: Sets the sound that signals you when the shutter release is two seconds away. Options include no sound, Fast beeps, Telephone ring, and Howling.
- Shutter Sound: Sets the shutter sound that you hear when you depress the Shutter button (there is no shutter sound in Movie mode). Options include no sound, Shutter sound, Musical Tone, and Bark.
Playback Menu System: Accessed by pressing the Menu button in Playback mode, the Playback menu also has subject tabs for the Setup and My Camera menus. Since these were described above, I won't repeat them here.
Playback Menu:
 Transition: Select a darken and brighten transition between images as they are displayed, a shuffle image transition, or disable both effects.
- Slide Show: Automatically plays all captured images in a slide show.
- My Colors: Adds My Colors effects to your pictures including Vivid, Neutral, Sepia, B/W, Positive Film, Lighter Skin Tone, Darker Skin Tone, Vivid Blue, Vivid Green, or Vivid Red.
- Sound Memo: Records a short sound clip to accompany a captured image.
- Protect: Marks the current image for write-protection, or removes write-protection. Protected images cannot be deleted or manipulated, except through card formatting, which erases all files.
- Rotate: Rotates the current image. The first press gives a 90 degree clockwise rotation; the second press rotates the image 90 degrees counterclockwise from the original position. On the third press, the image returns to its original orientation. The image data is not actually rotated; the camera actually sets a tag in the EXIF header, hence your software must recognize this tag to be able to recognize the orientation set in-camera.
 Erase All: Erases all files on the memory card, except protected ones.
- Transfer Order: Select images for downloading to your computer.
Print Menu: This menu is available in Playback mode, simply by pressing the Menu button and selecting the Print tab. The bottom line of the display shows how many images are selected for printing and the print method that is active.
 Print: Sends images tagged for printing to the printer.
- Select Images & Quantity: Allows you select images for printing and set the number of prints for each image selected.
- Select All Images: Selects all images on the memory card for printing.
- Clear All Selections: Clears all print selections.
- Print Settings: Brings up a menu of these options:
- Print Type: You can specify whether to print one image per page, an index of the images, or both.
- Date: Set printing of the date and time on or off.
- File No.: Set printing of the file number on or off.
- Clear DPOF data: Set the option to clear the DPOF tag on or off.
 Fujifilm GFX 50S Review
 Fujifilm X-T3 Review
 Olympus E-M5 III Review

Follow Imaging Resource